Mobinnova Beam smartbook User manual

1
Mobinnova Beam™ smartbook
User’s Guide
Welcome to the newest revoluon in mobile compung.
Your Mobinnova Beam™ smartbook is designed to go where
you go – runs on fun™. At less than two pounds, it’s easy to
pack in your purse, backpack, or briefcase. With advanced
power management, you can count on it for hours of viewing
photos, watching HD videos, browsing the Internet, and
managing email.
It’s powerful, portable, and perfect for staying connected
anywhere you go.
Thank you for choosing the Mobinnova Beam™ smartbook.
Geng started
This User’s Guide includes informaon about device features,
setup, care, and troubleshoong. It has everything you need
to get the most from your Mobinnova Beam™ smartbook.
To get up and running right out of the box, refer to our
Quick Start Guide.
For addional help and resources,
please visit www.mobinnova.com.
What’s in the box
Mobinnova Beam™
smartbook
SIM (Subscriber Identy
Module) card.
[NOTE: This may already be
installed by dealer.]
AC adapter and
power cord
VGA/RJ-45 Ethernet
adapter
User’s Guide
Quick Start Guide
Warranty Card

32 Front
1 Touchpad
2 AC power indicator
• Flashing – Indicates
baery is charging
• Steady light – Indicates
baery is fully charged
3 Sleep Mode indicator
• Flashing –
Device is in sleep mode
• Light O –
Not in sleep mode
4 Power state indicator
• Light On – Power is on
• Light O – Power is o
5 Caps lock indicator
• Light on –
Caps lock on
• Light o –
Caps lock o
Back
Flip down the baery bar to expose the following
connecon ports:
1 VGA-Ethernet
adapter port
2 HDMI (High Denion
Mulmedia Interface)
for connecon to
external TV
3 USB (Universal Serial
Bus) ports (2)
4 Microphone jack
5 Headset jack
6 External power port
1 2 3 4 5 6
Mobinnova Beam™ smartbook features
12 3 4 5

54
Keyboard Shortcuts
1Bluetooth
2WiFi
3Brightness down
4Brightness up
5LCD/VGA
6Mute/Unmute
7Pause/Resume
8Volume down
9Volume up
10 Browser
11 Music
12 Video
13 Photos
14 Extras
15 Back
16 Home
17 Rotate
Le
1SD memory card slot
Mobinnova Beam™ smartbook features (cont.)
1
1
2
Right
1SIM card slot
2Power buon
Pantone Cool Gray 4U
Pantone 652U 'Blue'
1 2 3 4 5 6 7 8 9 10 11 12 13 14
15 16 17

76
Turning on device
1. Plug the power cord into the AC adapter.
2. Plug the power cord into the electrical outlet.
3. Flip down the baery bar at the back of device.
4. Plug the AC adapter into the device’s external power port
(see photo).
5. The baery fully charges in about 3 hours, but within 15
minutes of connecng it to the power source, the device
is ready to turn on.
6. Open the screen lid (screen must be open to turn
on device).
7. Press the power buon (right side of baery – see photo)
for less than 2 seconds.
8. The Mobinnova logo should appear on screen aer a
few seconds.
NOTE: Aer the baery is charged, device can be used
without power cord unl baery power runs out.
Touchpad
The touchpad enables you to move the cursor pointer
around on the screen by lightly touching the pad and tracing
the direcon you want the pointer to go.
To select an item, lightly tap the touchpad. You can also
press rmly on the le “L” and right “R” sides of the
touchpad itself.
Installing SIM card (if not done at factory or in store)
1. Be sure the device is powered o and the power cord is
not connected to device.
2. Find the SIM card slot on the device’s right side. Open it
by pulling it downwards.
3. Insert the SIM card into the slot with the metal contacts
face up and the notch towards the front of device
(see diagram).
4. Close the SIM card door.

98
Pung device to sleep
There are two ways to put the device in “sleep” mode:
1. Close screen. The device will go to sleep in a second or
two. To wake up the device, open screen.
2. Press power buon for less than 2 seconds. (NOTE:
holding buon down for longer than 2 seconds will
iniate shutdown.) To wake device, press power buon
for less than 2 seconds.
NOTE: If the device ever freezes up or won’t power o, press
the power buon for more than 6 seconds. The device will
shut down.
Turning o device
To turn o the device, press the power buon for over 2
seconds. A “shung down” message will appear on screen.
Navigang your Home screen
The Home Screen automacally launches when you turn on
the device or press [Home key] (see Keyboard
Shortcuts). The Home Screen provides access to status bar,
widgets, and applicaons.
1. Status bar displays date, me, cellular signal strength and
Bluetooth® and connecvity status, Wi-Fi signal strength
and connecvity status, and baery level. You can select
items in the status bar to change sengs or iniate a
connecon.
09/23 10:00AM
Extras
2. Widgets include: Weather, RSS, and Search. RSS (“Really
Simple Syndicaon”) is a family of web feeds that provide
news headlines, blog entries, audio and video, and more.
a) To bring a background widget into the foreground,
select it using touchpad. You can also rotate widgets
using the [Rotate key]
b) To change sengs on a widget, such as RSS feed or
weather locaon, select its .
c) When using the RSS widget, you can cycle from arcle
to arcle using [le/right arrow keys]. You can
scroll up and down within an arcle using [up/
down arrow keys]. Use that appears by the largest
displayed arcle to navigate to that arcle in the
browser.

1110
3. Applicaon choices appear on the boom of the screen
and include: Internet, Music, Video, Photos, Extras, and
Sengs.
a) Select an applicaon with the touchpad or a keyboard
shortcut to open it.
b) Use Sengs to view informaon and change
preferences on hardware, applicaons and sengs.
c) Use Extras to access applicaons, such as games, not
displayed on the Home Screen.
Connecng to the Internet
Using the AT&T 3G network
1. The SIM card must be installed to connect to an AT&T 3G
cellular network. If not installed, see prior instrucons on
“Install SIM card.”
2. Once the card is installed, turn on the device if it is not
already powered on.
3. If your device does not automacally connect to AT&T in
an area served by AT&T 3G, click on on the status
bar to open “3G Watcher”:
a. Click on “Tools” and then “Turn On 3G Cellular.”
b. This will turn on the cellular radio and connect the
device to the network.
c. To turn o the cellular radio, click on , click on
“Tools” and then the “Turn O 3G Cellular.”
4. If you would like your device to connect automacally to
AT&T on power-up, with “3G Watcher” open:
a. If connected to 3G, press the “Disconnect” buon.
b. Click on “Tools” and then “Connecons.”
c. This will bring up the “User Opons” dialog.
d. Select “Connecon Type (Autoconnect, etc.)”
e. Change the connecon type from “Manual Connect”
to “Autoconnect.”
NOTE: The radio must be disconnected to make this change
(see step 4a).
f. Select “OK.”
5. The cellular signal strength meter in the status bar at the
top of screen will indicate the connecvity status.
6. The number of bars displayed on the signal strength
indicator will show the signal strength.
7. The color of the bars displayed on the signal strength
indicator will show the connecvity level:
a. Green: data connecon
b. Red: no data connecon
Using Wi-Fi
1. Turn on device if it is not already powered on.
2. If Wi-Fi is turned o , press the key to turn
on Wi-Fi.
3. Click on the status bar at top of screen.

1312
4. Available Wi-Fi networks and their signal strength will
appear on screen. Select a Wi-Fi network you have access
to by clicking on its name and select “Connect.”
5. If the network is password protected, a screen will
come up asking you to enter the network key. This is
the password used to connect to network. Enter it and
le click OK. In a few moments, connecon should be
completed.
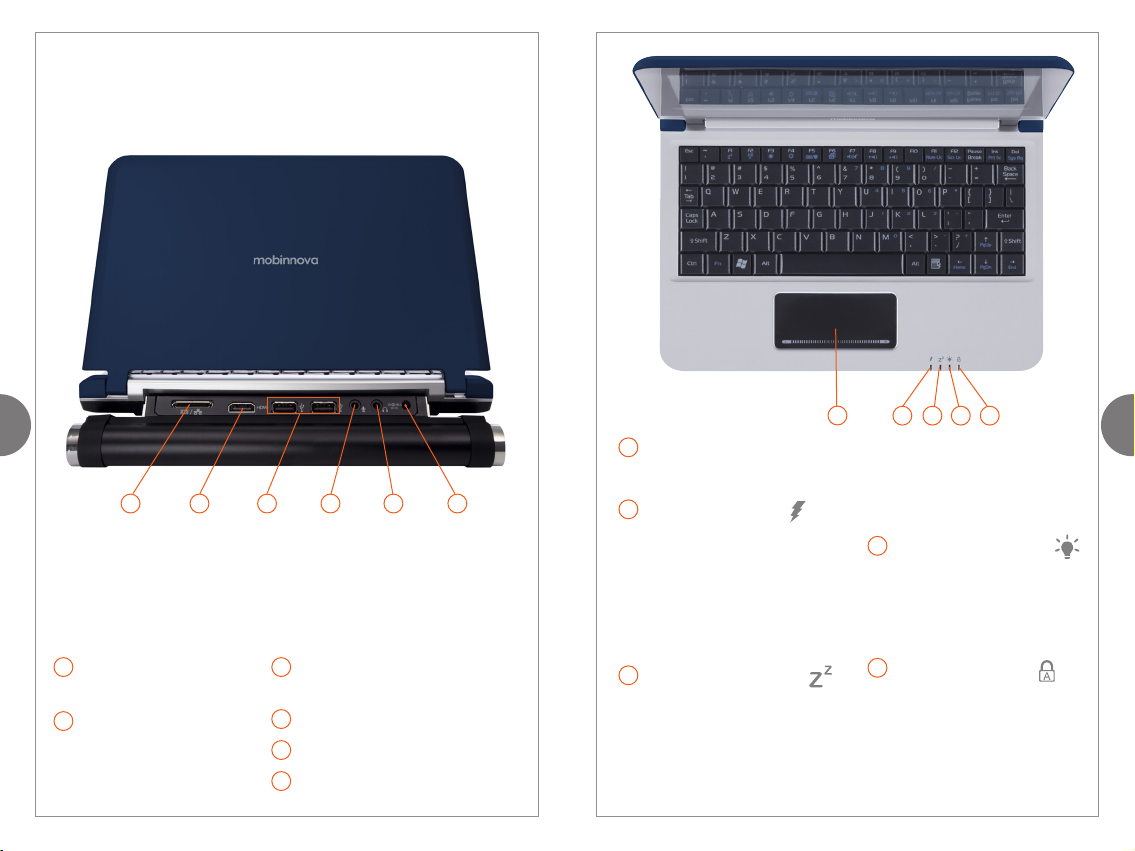
Using the VGA/RJ-45 Ethernet adapter
Your device comes with built-in Ethernet networking
capability, which allows you to connect to a network or a
cable or DSL modem. Flip down the baery on your device
and plug one end of the VGA/RJ-45 Ethernet adapter into
the adapter port. Plug the other end into your networking
device.
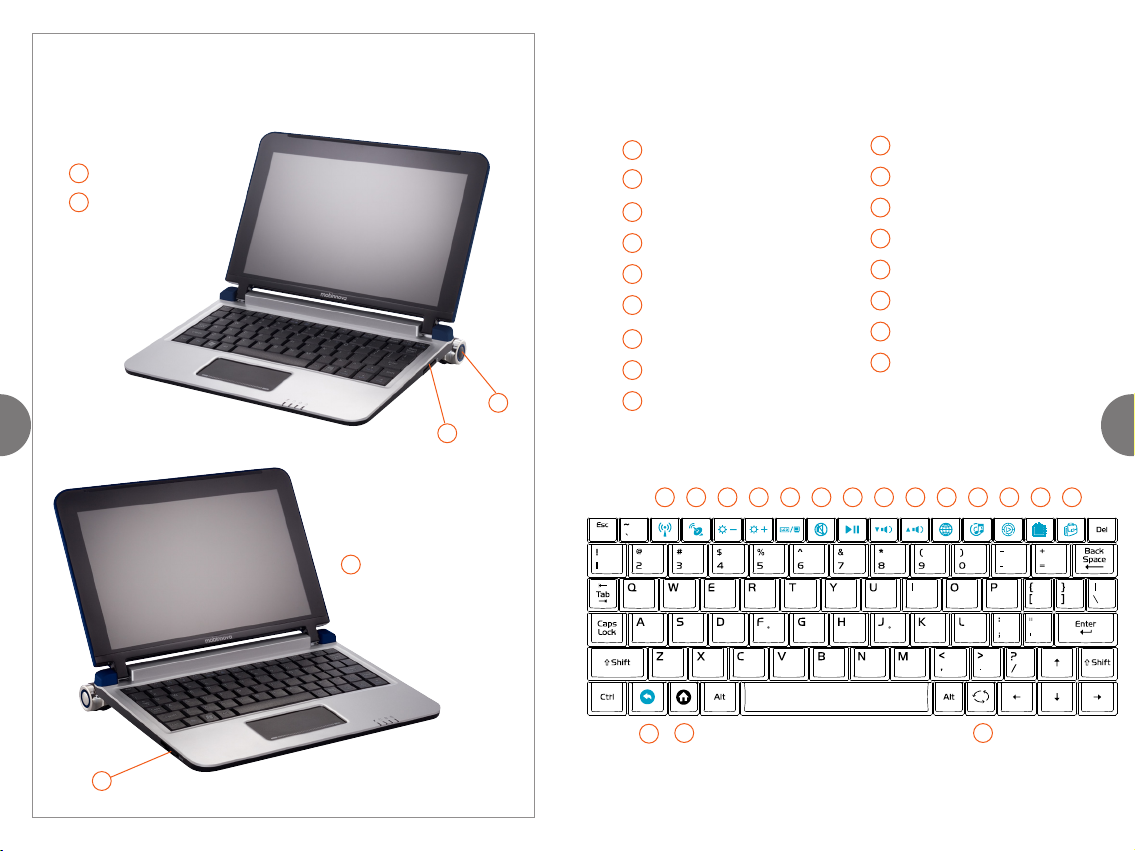
Video, music and photos
The applicaons for Video, Music and Photos are launched
from Home Screen. To get back to the Home Screen any
me you are in another applicaon, simply select in
the tool bar.
To get back to a previous screen, select when available
on the tool bar.
When you select Video, Music or Photos, the available
media will display on the screen. If you have an external
device inserted or aached, such as an SD card or Flash
drive, the media on that device will be displayed as well.
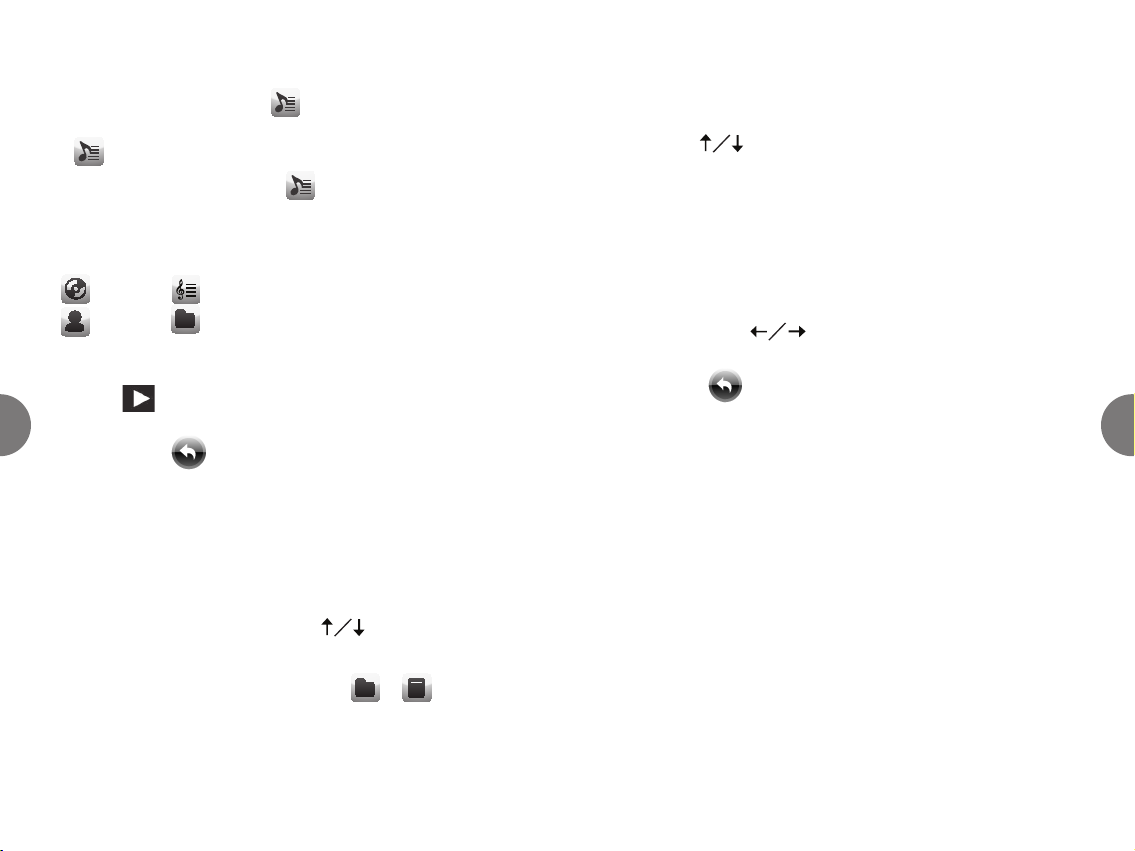
Video
a. To scroll through videos, move pointer to top or boom
of screen and a direconal arrow will appear. List will
automacally scroll in arrow’s direcon. Move pointer
away from screen top or boom and scrolling will stop.
To scroll with keyboard, use [up/down keys].
b. Select a video to play it full screen. Video will begin
playing.
c. To pause, posion pointer anywhere in video and tap
touchpad. To start playing again, posion pointer in video
and tap touchpad.
d. To adjust volume, or move forward or back in video,
access control tool by selecng on video any me during
playback. The video will pause and the control tool will
appear.
e. To stop video and return to thumbnails (video selecon
screen), select in status bar.
Music
a. To scroll through albums, move pointer to the right edge
or le edge of screen. A direconal arrow will appear and
list will automacally scroll in arrow’s direcon. Move
pointer away from right or le edge of screen and the
scrolling will stop. To scroll with keyboard, use
[le/right keys].
b. To select and play an album, if it’s not already in center
of screen, select album with touchpad. This will move the
album to center posion on screen. Select to start music.
For more funconality, select album illustraon and a
controls interface will appear.

1514
c. To choose a specic song on an album before you hit play
or while it is playing, select
31
.
Select desired song and it will play. To close list, select
31
again.
d. Select an icon to the right of
31
to cycle through album
selecon by folder, album tle, arst, and genres. This
icon will change to represent search category you are
using.
d. To scroll through photos, move the pointer to the top or
boom of your the screen just like you did to scroll
through albums. You can also scroll with the keyboard
using [up/down keys].
e. Use touchpad to select and open a photo.
f. Once you have opened a photo, you can move forward or
back through pictures in the album by moving pointer to
right edge or le edge of screen. A direconal arrow will
appear and the list will automacally scroll in arrow’s
direcon. Move pointer away from screen’s right or le
edge and scrolling will stop. You can also navigate through
picture using [le/right keys].
g. To return to album selecon screen from viewing a photo,
select in upper right area of screen.
Installing memory
SD memory card
1. Find SD memory card slot on device’s le side.
2. Insert card with metal contacts facing down and notch
towards front of device (see photo) unl it clicks.
3. Device will recognize most media (video, music or photos)
and enable you to access it when appropriate player is
opened.
Other compable memory formats
Your device is compable with USB ash drives. Use one of
the USB ports to plug in this storage device.
31
Album
31
Arst
e. To pause, select pause buon. To start playing again,
select .
f. To exit out of control screen and return to album selecon
screen, select .
Photos
a. To scroll through photo albums, move pointer to the top
or boom of screen. A direconal arrow will appear and
list will automacally scroll in direcon of arrow. Move
pointer away from screen top or boom and scrolling will
stop. To scroll with keyboard, use [up/down keys].
b. Change how you sort albums by using
31
or 31
(whichever is displaying at the me is your current view)
at the boom right of your screen.
c. To open an album, select it using the touchpad. The
album will open and display thumbnails of each photo.
31
Genres (such as Jazz, Blues, Rock, Classical)
31
Folder

1716
Connecng to external devices
TV
– Your device has an external HDMI port that allows you
to connect it to a TV that supports HDMI input. Once
connected, you can view photos, play videos, listen to
music, and more on your TV. To navigate, you will sll
use the controls that display on your Mobinnova Beam™
smartbook. Simply tap the touchpad to display the control
panel.
– When playing a video, you will only see it on your TV
screen. It will not display on your Mobinnova Beam™’s
screen.
– When playing music, the sound will default to your TV’s
speakers. You can change this in the Sengs/Audio folder.
– The HDMI cable is not included with your device; you will
need to purchase one at your local electronics store.
Monitor
To connect to an external monitor, use the VGA/RJ-45
Ethernet adapter cord that came with your device. Simply
plug one end into the VGA-Ethernet adapter port on your
device and the other end into the corresponding slot on
your monitor.
Bluetooth
To use a Bluetooth® device with your Mobinnova Beam™
smartbook, you must set it up to work with your device.
This is called “pairing.”
1. Follow the instrucons that came with your Bluetooth
device to put it in pairing mode.
2. Using the touchpad, select from the status bar at
the top right of your screen. This opens the Bluetooth
Manager window.
3. Click the “Setup” tab and make sure the “Bluetooth
Power” and “Visibility” radio buons are set to “On” and
“Yes.”
4. Click the “Search” tab to nd your Bluetooth device.
Once it appears in the search window, double click the
associated icon.
5. You will be prompted to enter a Pin Code. Enter any set of
numbers or characters and press “OK.”
6. You will then be prompted to enter this Pin Code on your
Bluetooth device. Once entered, your Bluetooth device
will be paired with your Mobinnova Beam™ smartbook.
Caring for your device
By following some roune care and maintenance
procedures, you can extend the life and performance of
your device.
The device
– Always place your device on an even surface.
– Do not store your device on or near a heat source without
proper venlaon. Do not leave your device in direct
sunlight for prolonged periods. Overheang your device
may damage your device and increase risk of harm.

1918
– Your device includes venlaon openings. Do not block or
cover these openings. These venlaon openings assist in
keeping your device form overheang.
– Do not allow your device to come into contact with
magnec elds.
– Do not allow your device to get wet. This includes
exposing it to rain and moisture, and spilling liquid on it. If
the device comes in contact with water or other liquids it
may not be repairable.
– Prevent your device from heavy shock and vibraon.
– Do not expose your device to dirt or dust.
– Do not slam the device display when closing it.
– Do not force objects into cabinet slots as they may touch
dangerous voltage points or short-out parts that could
result in a re or electric shock.
– Do not store items on top of your device. Your device is
not made to withstand excess weight.
– Do not store or carry ammable liquids, gases, or
explosive materials in the same compartment as the
device, its parts, or enhancements
– Never use any charger or baery that is damaged.
– When carrying the device in a purse, backpack, or
briefcase ensure that there are no loose items that could
get stuck in one of the device’s openings.
– To clean the device, turn o the power and disconnect
the AC adapter. Use a so, moist cloth (e.g., microber)
to clean the display and keyboard. Do not use liquid or
aerosol cleaners. Canned air can be used to clean the
debris from keyboard.
The AC adapter
– Do not connect the adapter to any other device.
– When unplugging the power cord, pull on the plug rather
than the cord.
– Keep the power cord away from foot trac. Do not step
on it or place heavy objects on top of it.
Replacement parts
For informaon about how to replace the AC adapter and
power cord or VGA/RJ-45 Ethernet adapter that came with
your Mobinnova Beam™ smartbook, refer to
www.mobinnova.com.
Safety warnings
Electrical power
– Use the device only with the supplied power supply cord
set. If you need to replace your power supply cord, please
contact Mobinnova for assistance in idenfying the proper
power supply cord.
– Do not overload a power outlet, strip, or receptacle by
plugging in too many devices.
– This device should be operated with the type of power
indicated on the supply cord. If you travel to a foreign
country, your power supply cord may not work. Using an
adaptor may result in damage to your device.

2120
– Take the necessary precauons to ensure that the power
supply cord isn’t a hazard for people walking near the
plugged-in device.
– Do not use a power supply cord that is damaged or frayed.
– Using any cords (including extension cords) not supplied
by Mobinnova may damage your device.
The baery
– This device uses a lithium-ion baery, which should be not
be exposed to humid, wet or corrosive environment.
– Do not expose your device to temperatures over 60°C
(140°F). Failure to follow these guidelines may cause the
baery to leak acid, become hot, explode or ignite and
cause injury and/or damage. Do not aempt to remove
the baery. Seek medical aenon if the baery leaks and
you come into contact with the leaked uids.
Health
– Your device may interfere with the funconality of
inadequately protected medical devices. Consult a
physician or the manufacturer of the medical device to
determine if they are adequately shielded from external
RF energy or if you have any quesons.
– Pacemaker manufacturers recommend that a minimum
separaon of 15.3 cenmeters (6 inches) be maintained
between wireless devices and a pacemaker to avoid
potenal interference with the pacemaker.
– Parts of the device are magnec and may aract metallic
materials. This includes hearing aids, which should be kept
at a distance from the device to prevent interference.
– Prolonged computer use may create a health risk,
including eye strain and other vision disorders or
complicaons, headaches, thigh burn, and hand and
wrist pain. If you have recurring or persistent discomfort
and/or pain related to computer use, consult a physician
immediately and inform your company’s health and safety
department.
Travel
– Do not use your device while operang a vehicle as
such use is extremely dangerous and may be illegal in
some states. Driver inaenon is a leading cause of
accidents. Signals from your device may aect improperly
installed or inadequately shielded electronic systems in
motor vehicles such as electronic fuel injecon systems,
electronic anskid (anlock) braking systems, electronic
speed control systems, and air bag systems.
– When traveling in a vehicle equipped with an airbag, do
not place the device in the area over the airbag or in the
airbag deployment area.
– When carrying your device on an aircra, you must
comply with all federal and airline rules and regulaons
pertaining to the use of your device. In some
circumstances, the use of your device in an aircra may
be dangerous to the operaon of the aircra, disrupt the
wireless telephone network, and may be illegal.
Explosive environments
– Turn o your device when in any area with a potenally
explosive atmosphere and obey all signs and instrucons.
Areas with a potenally explosive atmosphere are oen,

2322
but not always, clearly marked. They include below
deck on boats, chemical transfer or storage facilies,
vehicles using liqueed petroleum gas (such as propane
or butane), near gas pumps at service staons, and in
areas where the air contains chemicals or parcles such as
grain, dust ,or metal powders. Sparks in such areas could
cause an explosion or re resulng in bodily injury or even
death.
Disposal instrucons
Follow your local environmental laws and guidelines to
properly dispose of your device. To minimize polluon and
promote a greener earth, we encourage you to recycle.
Contact your local government oce for informaon on
recycling electronic products.
Frequently asked quesons
Why won’t my device boot up?
– First check to ensure that your AC power adapter is
properly plugged into the device and the power outlet.
– If you are using a baery, it may be low and unable to
power the computer. Plug the AC power adapter into your
device and the power outlet.
Why won’t my device shut down?
– To shut down your device, you need to press the power
buon for more than 2 seconds. The green light should
turn o once it has powered down. If the green light is sll
on, the device is in “sleep” mode.
Why isn’t anything displaying on my screen?
– To conserve power, the device automacally blanks the
screen if you have not used it for a period of me. Press
any key or touch the touchpad to turn on the display
again.
– If the screen is sll blank, the brightness level may be too
low. Use the brightness controls to adjust the display.
Why can’t I hear the audio?
– The volume may be muted or too low. Use the mute
feature and volume controls to adjust the audio level.
What should I do if my device isn’t running properly or my
applicaons stop working?
– Press the power buon for more than 6 seconds to shut
down the device. Wait a few seconds before turning on
the device.
FCC Regulaons:
• This mobile device complies with part 15 of the FCC Rules.
Operaon is subject to the following two condions:
(1) This device may not cause harmful interference, and
(2) this device must accept any interference received,
including interference that may cause undesired
operaon.
• This mobile device has been tested and found to comply
with the limits for a Class B digital device, pursuant to Part
15 of the FCC Rules. These limits are designed to provide
reasonable protecon against harmful interference in a
residenal installaon. This equipment generates, uses
and can radiated radio frequency energy and, if not

2524
installed and used in accordance with the instrucons,
may cause harmful interference to radio communicaons.
However, there is no guarantee that interference will
not occur in a parcular installaon If this equipment
does cause harmful interference to radio or television
recepon, which can be determined by turning the
equipment o and on, the user is encouraged to try to
correct the interference by one or more of the following
measures:
- Reorient or relocate the receiving antenna.
- Increase the separaon between the equipment and
receiver.
- Connect the equipment into an outlet on a circuit dierent
from that to which the receiver is connected.
- Consult the dealer or an experienced radio/TV technician
for help.
Changes or modicaons not expressly approved by the
party responsible for compliance could void the user‘s
authority to operate the equipment.
• The antenna(s) used for this transmier must not be
co-located or operang in conjuncon with any other
antenna or transmier.
RF Exposure Informaon (SAR)
This device meets the government’s requirements for
exposure to radio waves.
This device is designed and manufactured not to exceed the
emission limits for exposure to radio frequency (RF) energy
set by the Federal Communicaons Commission of the U.S.
Government.
The exposure standard for wireless mobile devices employs
a unit of measurement known as the Specic Absorpon
Rate, or SAR. The SAR limit set by the FCC is 1.6W/kg.
*Tests for SAR are conducted using standard operang
posions accepted by the FCC with the device transming
at its highest cered power level in all tested frequency
bands. Although the SAR is determined at the highest
cered power level, the actual SAR level of the device
while operang can be well below the maximum value.
This is because the device is designed to operate at mulple
power levels so as to use only the poser required to reach
the network. In general, the closer you are to a wireless
base staon antenna, the lower the power output.
The highest SAR value for the device as reported to the FCC
when tested for use when worn on the body, as described in
this user guide, is 0.036 W/kg. (Body-worn measurements
dier among device models, depending upon available
enhancements and FCC requirements.)
While there may be dierences between the SAR levels of
various devices and at various posions, they all meet the
government requirement.
The FCC has granted an Equipment Authorizaon for
this device with all reported SAR levels evaluated as in
compliance with the FCC RF exposure guidelines. SAR
informaon on this device is on le with the FCC and can be
found under the Display Grant secon of hp://www.fcc.
gov/oet/fccid aer searching on FCC ID: QDJN910.
This device is compliance with SAR for general populaon
/uncontrolled exposure limits in ANSI/IEEE C95.1-1999
and had been tested in accordance with the measurement
methods and procedures specied in OET Bullen 65
Supplement C.
XTT-BEAMATT

#1
Mobinnova Beam™ smartbook
Manual del usuario
Bienvenido a la úl ma revolución en computación portá l. Su
Mobinnova Beam™ smartbook está diseñado para ir adonde
usted vaya: runs on fun™. Con un peso de menos de un kilo,
es fácil de guardar en su bolsa, mochila o portafolio. Con una
administración avanzada de energía, puede contar con él para
ver fotos durante horas, ver videos de alta de nición, navegar
por Internet y manejar su correo electrónico.
Es poderoso, portá l y perfecto para permanecer conectado
en cualquier lugar al que vaya.
Gracias por haber elegido el Mobinnova Beam™ smartbook.
Para comenzar
El presente Manual del Usuario incluye información acerca de
las caracterís cas del equipo, su con guración, cuidado y la
detección de problemas. Incluye todo lo que usted necesita
para aprovechar al máximo su Mobinnova Beam™ smartbook.
Para comenzar a u lizar su equipo desde el momento en que
lo saque de la caja, consulte nuestra Guía de Inicio Rápido.
Para ayuda y recursos adicionales, visite www.mobinnova.com.
Contenido del paquete
Mobinnova Beam™
smartbook
Tarjeta SIM (Módulo de
Iden dad del Suscriptor)
[NOTA: es posible que el
distribuidor ya la haya
instalado]
Adaptador para CA y cable
de alimentación de energía
Adaptador Ethernet
VGA/RJ-45
Manual del usuario
Guía de inicio rápido
Tarjeta de garan a

# #2
Reverso
Deslice hacia fuera la barra de batería para exponer los
siguientes puertos de conexión:
1 Puerto del adaptador
Ethernet-VGA
2 HDMI (Interfaz
Mul media de Alta
De nición) para conexión
a un televisor externo
3 2 puertos USB (Bus de
Serie Universal)
4 Enchufe para micrófono
5 Enchufe para audífonos
6Puerto externo de energía
1 2 3 4 5 6
Caracterís cas del Mobinnova Beam™ Smartbook
3
Frente
1 Pantalla tác l
2 Indicador de energía para CA
• Intermitente: indica que la
batería está cargando
• Luz ja: indica que la batería
está totalmente cargada
3 Indicador de modo de
hibernación
• Intermitente: el equipo está
en modo de hibernación
• Luz apagada: no está en
modo de hibernación
4 Indicador de estado de
la energía
• Luz encendida: la energía
está encendida
• Luz apagada: el equipo
está apagado
5 Indicador de bloqueo
de mayúsculas
• Luz encendida:
el bloqueo de
mayúsculas está ac vado
• Luz apagada:
el bloqueo de mayúsculas
está desac vado
12 3 4 5

# #4
Izquierda
1Ranura para tarjeta
de memoria SD
Caracterís cas del Mobinnova Beam™ Smartbook
1
1
2
Derecha
1Ranura para
tarjeta SIM
2Power bu on
5
Modos abreviados del teclado
Pantone Cool Gray 4U
Pantone 652U 'Blue'
12345678910 11 12 13 14
15 16 17
1Bluetooth
2WiFi
3Disminuir brillantez
4Aumentar brillantez
5LCD/VGA
6Quitar sonido/Volver a
habilitar el sonido
7Pausa/Reanudar
8Disminuir volumen
9Aumentar volumen
10 Explorador
11 Música
12 Video
13 Fotos
14 Extras
15 Regreso
16 Inicio
17 Rotar

# #6
Pantalla tác l
La pantalla tác l le permite mover el cursor por la pantalla
al tocar ésta ligeramente y marcar la dirección en la que
desea que se desplace el cursor.
Para seleccionar algo, tóquelo con suavidad en la pantalla
tác l. También puede presionar con rmeza en los lados
izquierdo (“L”) y derecho (“R”) de la propia pantalla.
Instalar la tarjeta SIM
(si no se hizo en la fábrica o en la enda)
1. Asegúrese que el equipo está apagado y el cable de
energía no está conectado al equipo.
2. Localice la ranura de la tarjeta SIM en el lado derecho del
equipo. Abra deslizando hacia abajo.
3. Inserte la tarjeta SIM en la ranura, con los
contactos metálicos hacia arriba y la
muesca hacia el frente del equipo (vea
el diagrama).
4. Cierre la tapa de la
tarjeta SIM.
7
Encender el equipo
1. Conectar el cable de alimentación de energía en el
adaptador para CA.
2. Conectar el cable de alimentación de energía al enchufe
eléctrico.
3. Deslice hacia abajo la barra de batería en la parte
posterior del equipo.
4. Conecte el adaptador AC al puerto exterior de
alimentación de energía del equipo (vea la foto).
5. La batería se carga por completo en aproximadamente 3
horas, pero desde los 15 minutos de conexión a la fuente
de energía, el equipo ya está listo para encenderse.
6. Abra la tapa de la pantalla (la pantalla debe estar abierta
para encender el equipo).
7. Oprima el botón de energía (lado derecho de la batería –
vea la foto) durante menos de dos segundos.
8. Luego de algunos segundos, el logo de Mobinnova deberá
aparecer en la pantalla
NOTA: luego que se carga la batería, es posible u lizar el
equipo sin alimentación de energía hasta que ésta se agota.

# #8
Poner el equipo en modo de hibernación
Existen dos formas de poner el equipo a “hibernar”:
1. Cerrar la pantalla El equipo se pondrá en hibernación en
uno o dos segundos. Para ac varlo, abra la pantalla.
2. Oprima el botón de encendido durante menos de dos
segundos (NOTA: mantener el botón oprimido durante
más de dos segundos iniciará el apagado). Para ac varlo,
oprima el botón de encendido durante menos de dos
segundos
NOTA: si el equipo se queda congelado o no se apaga,
oprima el botón de encendido durante más de seis
segundos. El equipo se apagará.
Apagar el equipo
Para apagar el equipo, oprima el botón de encendido
durante más de dos segundos. En la pantalla aparecerá un
mensaje de “apagando”.
9
Navegar la Pantalla Inicial
La Pantalla de Inicio se lanza de manera automá ca cuando
se enciende el equipo o se oprime la tecla [Inicio] (ver
los modos abreviados del teclado). La Pantalla de Inicio
proporciona acceso a la barra de estado, accesorios y
aplicaciones.
1. La Barra de Estado muestra la fecha, la hora, la intensidad
de la señal celular y el estado de conec vidad y de
Bluetooth®, la intensidad y estado de conec vidad de la
señal Wi-Fi, y el nivel de la batería. Es posible seleccionar
ar culos en la barra de estado, para cambiar los ajustes o
iniciar una conexión.
09/23 10:00AM
Extras
2. Los Accesorios incluyen: Clima, RSS y Búsqueda. RSS
(“Really Simple Syndica on”, “Redifusión Realmente
Simple”) es una familia de fuentes web que proporcionan
encabezados, entradas de blog, audio, video y más.
a) Para colocar en el frente un accesorio del fondo,
selecciónelo u lizando la pantalla tác l También es
posible rotar los accesorios con la [tecla Rotar]
b) Para cambiar los ajustes en un accesorio, como una
fuente RSS o una ubicación de clima, seleccione su
icono de símbolo .
c) Al u lizar el accesorio RSS, es posible pasar de un
ar culo a otro u lizando las echas izquierda y
derecha . Es posible avanzar y retroceder en la
página dentro de un ar culo u lizando las echas
arriba y abajo . U lice el icono de página
que aparece más grande, para navegar a ese ar culo
en el explorador.

# #10
3. Las Opciones de Aplicación aparecen en la parte inferior
de la pantalla e incluyen: Internet, Música, Video, Fotos,
Extras y Ajustes.
a) Para abrir una aplicación, selecciónela con la pantalla
tác l o con un modo abreviado del teclado.
b) Use Ajustes para ver la información y cambiar las
preferencias del hardware, las aplicaciones y ajustes.
c) Use Extras para tener acceso a aplicaciones, como
juegos, que no se muestran en la Pantalla de Inicio.
Conectarse a Internet
Por medio de la red AT&T 3G
1. The SIM card must be installed to connect to an AT&T 3G
cellular network. If not installed, see prior instruc ons on
“Install SIM card.”
2. Once the card is installed, turn on the device if it is not
already powered on.
3. Si su equipo no se conecta de manera automá ca a AT&T
en una región servida por AT&T 3G, haga clic en el icono
de estado del celular para abrir “Observador de 3G”.
a. Haga clic en “Herramientas” y después “Encender el
Celular 3G”.
b. Esto encenderá el radio celular y conectará el equipo a
la red.
c. Para apagar el radio celular, haga clic en el icono de
celular , en “Herramientas”, y luego en “Apagar
Celular 3G”.
11
4. Si desea que su equipo se conecte automá camente a
AT&T al encenderlo, con “Observador 3G” abra:
a. Si está conectado a 3G, oprima el botón “Desconectar”.
b. Haga clic en “Herramientas” y después en
“Conexiones”.
c. Esto hará aparecer el diálogo “Opciones del usuario”.
d. Seleccione “Tipo de conexión (automá ca, etc.)”.
e. Cambie el po de conexión de “Manual” a
“Automá co”.
Nota: para realizar este cambio, el radio deberá estar
desconectado (ver el paso 4a).
f. Seleccione “Aceptar”.
5. El medidor de intensidad de la señal celular en la parte
superior de la pantalla indicará el estado de conec vidad.
6. El número de barras que aparece en el indicador de
intensidad de señal mostrará ésta.
7. El color de las barras en el indicador de intensidad de
señal mostrará el nivel de conec vidad:
a. Verde: conexión de datos
b. Rojo: no hay conexión de datos
U lizar Wi-Fi
1. Encienda el equipo si aún no lo ha hecho.
2. Si Wi-Fi está apagado , oprima la tecla para
encenderlo .

# #12
3. Haga clic en en la barra de estado, en la parte
superior de la pantalla.
4. En la pantalla aparecerán las redes Wi-Fi disponibles, así
como la intensidad de sus señales. Seleccione una red
Wi-Fi a la que tenga acceso haciendo clic en su nombre y
seleccione “Conectar”.
5. Si la red está protegida con un código de acceso
(“password”), aparecerá una pantalla solicitándole
ingresar el código de la red. Este es el código u lizado
para conectarse a la red. Ingréselo y haga clic en la parte
izquierda de Aceptar. En algunos momentos, deberá
lograrse la conexión.
U lizar el adaptador Ethernet VGA/RJ-45
Su equipo viene con capacidad integrada para
funcionamiento en las redes Ethernet, lo que le permite
conectarse a una red, a un cable o a un módem DSL. Deslice
la batería de su equipo y conecte un extremo del adaptador
Ethernet VGA/RJ-45 al puerto correspondiente. Conecte el
otro extremo a su disposi vo de red.
Video, música y fotos
Las aplicaciones para Video, Música y Fotos se lanzan desde
la pantalla inicial. Para regresar a la pantalla inicial en
cualquier momento cuando esté en otra aplicación,
simplemente seleccione el icono de Inicio en la barra
de herramientas.
Para regresar a la pantalla anterior, seleccione el botón
“Regresar” si está disponible en la barra de
herramientas.
13
Cuando seleccione Video, Música o Fotos, los medios
disponibles aparecerán en la pantalla. Si ha insertado o
agregado un disposi vo externo, como una tarjeta SD o
un Flash Drive, se mostrarán asimismo los medios en ese
disposi vo.
Video
a. Para recorrer los videos, mueva el cursor a la parte
superior o inferior de la pantalla y aparecerá una echa
de dirección. La lista se desplegará de manera automá ca
en la dirección de la echa. Si aleja el cursor de la parte
superior o inferior de la pantalla, el recorrido se detendrá.
Para recorrer con el teclado, u lice las echas hacia arriba
y hacia abajo .
b. Seleccione un video para reproducirlo en la pantalla
completa. El video comenzará a reproducirse.
c. Para hacer pausa, coloque el cursor en cualquier punto
del video y toque la pantalla tác l. Para reanudar la
reproducción, coloque el cursor en el video y toque la
pantalla tác l.
d. Para ajustar el volumen, avanzar o retroceder en el video,
entre a la herramienta de control al seleccionarla en el
video en cualquier momento de la reproducción. El video
hará una pausa y aparecerá la herramienta de control.
e. Para detener el video y regresar a las miniaturas (pantalla
de selección de videos), seleccione el icono
“Regresar” en la barra de estado.
Table of contents
Languages: