Munchkin MK0038 User manual

Nursery Projector & Sound System
Système de projection audiophonique pour chambre de bébé
Sistema de sonido y proyector para el cuarto del bebé
MK0038
Nursery Projector & Sound System
Système de projection audiophonique pour chambre de bébé
Sistema de sonido y proyector para el cuarto del bebé
PRODUCT AND DESIGN ARE TM & ©2011-2014 MUNCHKIN, INC. MUNCHKIN AND IT’S THE
LITTLE THINGS ARE TRADEMARKS OF MUNCHKIN, INC. 7835 GLORIA AVE.,
VAN NUYS, CA 91406. MUNCHKIN BABY CANADA LTD., 50 PRECIDIO CT.,
UNIT A, BRAMPTON, ON L6S 6E3. AUSTRALIA, CNP BRANDS, 20 CALARCO DR. DERRIMUT
VIC 3030, 1300-667-137. MADE IN CHINA/FABRIQUÉ EN CHINE.
CCD-0039-000 REV 4

IMPORTANT SAFEGUARDS
WARNING: STRANGULATION HAZARD! - KEEP OUT
OF REACH OF CHILDREN. DO NOT USE WITH EXTENSION CORDS.
WARNING: THIS IS AN ELECTRIC LAMP – NOT A
TOY! - TO AVOID RISK OF FIRE, BURNS, PERSONAL INJURY AND ELECTRIC
SHOCK IT SHOULD NOT BE PLAYED WITH OR PLACED WHERE SMALL
CHILDREN CAN REACH IT.
When using electrical appliances, basic safety precautions should always be
followed, including the following:
IMPORTANT SAFETY INSTRUCTIONS
• Readtheseinstructions.
• Keeptheseinstructions.
• Heedallwarnings.
• Followallinstructions.
• Theproductshouldbeplacedroughly4feetawayfromchild’sear(s).
• Donotusesoundprojectorformorethan8hoursofcontinuoususeperday.
• Donotusethisapparatusnearwater.
• Cleanonlywithdrycloth.
• Donotblockanyventilationopenings.Installinaccordancewiththe
manufacturer’sinstructions.
• Donotinstallnearanyheatsourcessuchasradiators,heatregisters,stoves,or
otherapparatus(includingampliers)thatproduceheat.
• Donotdefeatthesafetypurposeofthepolarizedorgrounding-typeplug.A
polarizedplughastwobladeswithonewiderthantheother.Agroundingtype
plug has two blades and a third grounding prong. The wide blade or the third
prongareprovidedforyoursafety.Iftheprovidedplugdoesnottintoyour
outlet,consultanelectricianforreplacementoftheobsoleteoutlet.
• Protectthepowercordfrombeingwalkedonorpinchedparticularlyatplugs,
conveniencereceptacles,andthepointwheretheyexitfromtheapparatus.
• Onlyuseattachments/accessoriesspeciedbythemanufacturer.
• Useonlywiththecart,stand,tripod,bracket,ortablespeciedbythe
manufacturer,orsoldwiththeapparatus.Whenacartisused,usecautionwhen
movingthecart/apparatuscombinationtoavoidinjuryfromtip-over.
• Unplugthisapparatusduringlightningstormsorwhenunusedforlongperiodsoftime.
ENGLISH
2
CCD-0039-000 REV 4

• Referallservicingtoqualiedservicepersonnel.Servicingisrequiredwhenthe
apparatushasbeendamagedinanyway,suchaspower-supplycordorplugis
damaged,liquidhasbeenspilledorobjectshavefallenintotheapparatus,the
apparatushasbeenexposedtorainormoisture,doesnotoperatenormally,or
has been dropped.
• Forusebyadultsforintendedpurposeonly.Anyotheruseisinappropriateand
dangerous. Keep out of the reach of children.
• Forindooruseonly.Donotuseoutdoors.
• Applianceshouldbeplacedonaatandstableareaatleast3feetawayfrom
child.Donotletcordhangoveredgeoftableorcounter.
• DonotoperateanyappliancewithadamagedcordorPowerAdapterafterthe
appliancemalfunctionsorhasbeendamagedinanymanner.Returnappliance
toMunchkin,Inc.forexamination,repair,oradjustment.
• Alwaysmakesureunitis“off”beforeremovingPowerAdapterfromwalloutlet.
• Donotuseapplianceforotherthanintendeduse.
• Donotlookdirectlyatlightedlamp.
Thisdevicecomplieswithpart15oftheFCCRules.Operationissubjecttothe
followingtwoconditions:(1)Thisdevicemaynotcauseharmfulinterference,and
(2)thisdevicemustacceptanyinterferencereceived,includinginterferencethatmay
cause undesired operation.
Warning:Changesormodicationsnotexpresslyapprovedbythepartyresponsible
forcompliancecouldvoidtheuser’sauthoritytooperatetheequipment.
Note:Thisequipmenthasbeentestedandcomplieswiththespecicationsfor
aClassBdigitaldevice,pursuanttoPart15oftheFCCRules.Theselimitsare
designedtoprovidereasonableprotectionagainstharmfulinterferenceina
residentialinstallation.Thisequipmentgenerates,uses,andcanradiateradio
frequencyenergyand,ifnotinstalledandusedaccordingtotheinstructions,may
causeharmfulinterferencetoradiocommunications.However,thereisnoguarantee
thatinterferencewillnotoccurinaparticularinstallation.Ifthisequipmentdoes
causeharmfulinterferencetoradioortelevisionreception,whichisfoundbyturning
theequipmentoffandon,theuserisencouragedtotrytocorrecttheinterference
byoneormoreofthefollowingmeasures:
•Reorientorrelocatethereceivingantenna.
•Increasetheseparationbetweentheequipmentandthereceiver.
•Connecttheequipmentintoanoutletonacircuitdifferentfromthattowhichthe
receiverisconnected.
•ConsultMunchkin,Inc.oraqualiedtechnicianforhelp.
ThisClassBdigitalapparatuscomplieswithCanadianICES-003.
18
CCD-0039-000 REV 4CCD-0039-000 REV 4
3
PARA LIMPIAR:
Siempredesenchufelaunidadyasegúresedequesehayaenfriadoantesde
limpiarla.Limpiesolamenteconunpañoseco.
GARANTÍA LIMITADA DEL PRODUCTO
Sistemadesonidoyproyectorparaelcuartodelbebéincluyeunagarantía
limitadadeunañoquecubredefectosapartirdelafechadecompra.Enelcaso
deunafallaodefectoensufuncionamientoduranteelperíododelagarantía,
Munchkin,Inc.,asuopción,reemplazaráorepararáelproductocubiertoporla
garantía.Alrecibirelproductoyelcomprobantedecompraconunafechade
compraválida,lapiezadefectuosaseráreemplazadaoreparadadeinmediato
yleserádevueltaalusuariosincargoalguno(enEE.UU.solamente).Envíela
unidaddefectuosa,elcomprobantedecompraconelrecibooriginaldelatienda
yunadescripcióndelproblemaquetuvoconelproductoa:Munchkin,Inc.,7835
GloriaAve.,VanNuys,CA91406,USA-Attn:NurseryProjector&SoundSystem
WarrantyNOTA:Estagarantíanocubredefectosquehayansidocausadospor
maluso,negligencia,alteraciones,exposiciónalaintemperie,accidenteouso
inapropiado del producto.

•PowerAdapter
•Adaptateurdecourant
•Adaptadordecorriente
•3ImageCartridges
•3cartouchesd’images
•3cartuchosdeimágenes
•Projector
•Projecteur
•Proyector
•ControlPanel
•Panneaudecommande
•Paneldecontrol
•Nightlight
•Veilleuse
•Luzdenoche
•Speaker
•Haut-parleur
•Altavoz
CCD-0039-000 REV 4CCD-0039-000 REV 4
4 17
Para activar el sonido, el proyector y la luz de noche
simultáneamente:
Lossonidos,lasimágenesylaluzdenochepuedenusarseenformaconjuntaoseparada.
1. PresionelosbotonesSOUND,PROJECTORyNIGHTLIGHTsideseaactivar
lastresfuncionesalmismotiempo.Delocontrario,simplementeseleccione
unaomásfunciones.
Para programar el Minutero
con Apagado Automático:
Tienelaopcióndeusarelminuteroconapagadoautomático
para las funciones de sonido y/o proyector.
1. GirelaperillaTIMERa15,30ó60minutos.
Nota:Sinodeseausarelminutero,girelaperilla
TIMERhastalaposición“OFF”(desactivado).
Para configurar el modo de Activación por Voz:
1. ParacongurarelmododeActivaciónporVoz,mueva
elinterruptorVOICEACTIVATIONqueseencuentraenla
parteposteriordelaunidadalaposición“ON”(activado).
2. CongureelMinuteroconApagadoAutomáticogirandola
perillaalosminutosquedeseeprogramar(15,30ó60minutos).
3. Seleccionelasfuncionesquedesee-Sonidoy/oProyector.
4. ElmododeActivaciónporVozseactivaráúnicamentedespuésde
transcurridoslosminutosprogramadosenelMinuteroconApagadoAutomático.
5. ElmododeActivaciónporVozactivarálamismafunciónqueestabaactivada
cuandoelMinuterollegóalnaldeltiempoprogramado(Sonidoy/oProyector)
ydichafunciónseguiráactivadaporeltiempoprogramadoenelMinuterocon
ApagadoAutomático(15,30,ó60minutos).ElmododeActivaciónporVoz
volveráaactivarsecadavezqueelniñollore.
6. ParadesactivarelmododeActivaciónporVoz,muevaelinterruptorVOICE
ACTIVATIONalaposición“off”(desactivado).
Nota:SielmododeActivaciónporVozestáactivado(ON)yelMinuterocon
ApagadoAutomáticoestádesactivado(OFF)elllantodelniñoactivaráel
sistemaquefuncionaráenformacontinuahastaquesepresionenlosbotones
SOUND y/o PROJECTOR para apagarlo.

INSTRUCTIONS FOR USE
SAVE FOR FUTURE REFERENCE
To Use Nightlight:
To Listen to Sounds:
1. PressthebuttonthatcorrespondstotheSoundEffect,Mozart
Song, or Lullaby that you wish to play.
• ThreedifferentMozartsongs(Eine Kleine Nachtmusik, Mozart Lullaby,
and Twinkle Twinkle) can be accessed by pressing the MOZART
buttonsuccessively.
• ThreedifferentLullabies(Brahms Lullaby, Hush Little Baby, and
Rock-a-bye Baby) can be accessed by pressing the LULLABIES
buttonsuccessively.
• ThefourSoundEffectsaremarkedindividually.
1. Placeunitonaat
surfaceawayfromthe
reach of children.
2. Attach the Power
Adaptertothejack
located on the unit
and insert the cord
into a 120V
household outlet.
3. Press the NIGHTLIGHT
button to turn on
the Nightlight.
4. Press the NIGHTLIGHT
button again to turn
off the Nightlight.
Note: The NIGHTLIGHT
buttonisalwaysbacklitsoitiseasytondinthedark.
CCD-0039-000 REV 4CCD-0039-000 REV 4
16 5
2. Paraaccederalúltimosonidoescuchado,sólotienequepresionarelbotónSOUND.
3. GirelaperillaVOLUMEparaajustarelsonidoalvolumendeseado.
4. PresioneelbotónSOUNDparaapagarelsonido.
Para proyectar imágenes y cargar el cartucho de
imágenes:
Paracargarelcartuchodeimágenes,elProyectordebeestarapagado.Para
apagarelproyector,presioneelbotónPROJECTORunasolavez.
Nota: Sielcartuchoquedeseaveryaestácargadoenlaunidad,simplemente
enciendaelproyectorpresionandoelbotónPROJECTORyajusteelángulo
segúnseanecesario.
1. Seleccioneelcartuchoquedeseaver.
2. Rote el Proyector para acceder a la
ranura de carga del cartucho.
3. Desliceeldispositivodebloqueo
haciaabajoparacargarelcartucho.
4. Asegúresedeinsertarelcartucho
con el lado correcto hacia arriba y
coneltextoinscriptodecara
contrariaaldispositivodebloqueo.
5. Unavezcargadoelcartucho,
asegúresedehaberempujadoel
dispositivodebloqueohaciaarriba
hastalaposicióndebloqueo,delo
contrario,elcartuchonoseactivará.
6. EnciendaelsistemadelProyector
presionandoelbotónPROJECTOR.
7. RoteelángulodelProyectorpara
proyectarlasimágenesenla
pared o el techo.
8. Cuandohayaterminado,apague
elProyectorpresionandoelbotón
PROJECTOR.
9. Parasuconveniencia,guardelos
cartuchosenelcompartimientoquese
encuentra en la parte posterior de la unidad.
Dispositivo
debloqueo

2. Toaccessthesoundthatwaslastplayed,simplypresstheSOUNDbutton.
3. TurntheVOLUMEknobtoadjustthesoundtoyourdesiredvolume.
4. Press the SOUND button to turn off the Sounds.
To Project Images and Load the Image Cartridge:
ToloadtheImageCartridge,theProjectormustbeturnedoff.Toturnthe
Projectoroff,pressthePROJECTORbuttononce.
Note: IftheCartridgeyouwishtoplayisalreadyloaded,simplyturnonthe
ProjectorbypressingthePROJECTORbuttonandadjusttheProjectorangle
as needed.
1. Select the Cartridge you wish to play.
2.RotatetheProjectortoaccessthe
cartridge loading slot.
3. SlidetheLockingSlider
down to load the Cartridge.
4. Makesurethecartridgeis
insertedrightsideupwiththetext
on the cartridge facing away
fromtheLockingSlider.
5. Once the Cartridge is loaded
makesurethattheLockingSlider
ispushedupinalockedposition
or the Cartridge won’t play.
6.TurnontheProjectorsystemby
pressing the PROJECTOR button.
7. Rotate the angle of the
Projectortoprojectonto
the wall or the ceiling.
8.Whennished,turnoff
Projectorbypressingthe
PROJECTOR button.
9.Youcanconvenientlystore
Cartridgesinthecompartment
onthebackoftheunit.
CCD-0039-000 REV 4CCD-0039-000 REV 4
6 15
Locking
Slider
INSTRUCCIONES DE USO
GUARDE PARA FUTURA REFERENCIA
Para usar la luz de noche:
Para escuchar sonidos:
1. Presioneelbotóncorrespondientealefectodesonido,temadeMozart,o
cancióndecunaquedeseeescuchar.
• PuedeaccederatrestemasdiferentesdeMozart(PequeñaSerenata
Nocturna,CancióndeCunadeMozartyCampanitasdelLugar)
presionandoelbotónMOZARTsucesivamente.
• Puedeaccederatrescancionesdecunadiferentes(CancióndeCuna
deBrahms,CállateNiño,yDuérmeteNiño)presionandoelbotón
LULLABIESsucesivamente.
• Losefectosdesonidoestanmarcadosconbotonesindividuales.
1. Coloquelaunidadsobre
unasupercieplanalejos
delalcancedelosniños.
2. Conecte el adaptador
de corriente directa
al enchufe ubicado
en la unidad e
inserte el cable en
untomacorriente
comúnde120V.
3. Presioneelbotón
NIGHTLIGHT para
encenderlaluzdenoche.
4. Presioneelbotón
NIGHTLIGHT
nuevamentepara
apagarlaluzdenoche.
Nota: ElbotónNIGHTLIGHTestásiempreiluminadoparaqueseafácil
encontrarlo en la oscuridad.
VOLUMEN
SONIDO
MINUTERO
PROYECTOR
LUZ DE NOCHE
LLUVIA
LATIDO DEL
CORAZÓN
BLANCOOCÉANO
MOZART
CANCIONES
DE CUNA

To Operate Sounds, Projector, and Nightlight Together:
Sounds,ImagesandtheNightlightcanbeusedtogetherorindependently.
1. Press the SOUND, PROJECTOR, and NIGHTLIGHT buttons if you wish to play
themtogether.Otherwisesimplyselectoneormoreofthefeatures.
To Set the Auto-Off Timer:
YouhavetheoptionofusingtheAuto-OffTimerforthe
Soundand/orProjector.
1.TurntheTIMERknobto15,30or60minutes.
Note:Ifyoudonotwishtouseatimer,setthe
TIMERknobto“OFF”.
To Set the Voice Activation:
1. TosettheVoiceActivation,turntheVOICE
ACTIVATIONswitchonthebackoftheunitto
the“ON”position.
2. SettheAuto-OffTimertothedesiredtimesetting
(15,30or60minutes).
3. Selectyourdesiredfeatures-Soundand/orProjector.
4. TheunitmustrunthroughthetimeselectedwiththeAuto-OffTimerbefore
theVoiceActivationfeaturecanbetriggered.
5. TheVoiceActivationwillactivatewhatwasplayingwhentheTimerexpired
(Soundand/orProjector)foraslongastheTimerisset(15,30,or60
minutes).TheVoiceActivationwillreactivateeachtimethechildcries.
6. ToturnoffVoiceActivation,turntheVOICEACTIVATIONswitchto
the“OFF”position.
Note:IftheVoiceActivationisONandtheAuto-OffTimerisOFF,thechild’s
crywillactivatethesystemtoplaycontinuouslyuntiltheSOUNDand/or
PROJECTOR buttons are pressed to turn OFF.
CCD-0039-000 REV 4CCD-0039-000 REV 4
14 7
• Elproductodebecolocarseaunadistanciadeaproximadamente4piesdelasorejasdelniño.
• Nouseelproyectordesonidopormásde8horasdeusocontinuopordía.
• Noutiliceesteaparatocercadelagua.
• Limpiesolamenteconunpañoseco.
• Nobloqueeningunaaberturadeventilación.Instaledeacuerdoconlasinstrucciones
del fabricante.
• Noinstalecercadefuentesdecalortalescomoradiadores,calentadores,estufasuotros
aparatos(incluyendoamplicadores)quegenerencalor.
• Noanuleelpropósitodeseguridaddelenchufepolarizadooconpuestaatierra.Elenchufe
polarizadotienedosclavijas,unamásanchaquelaotra.Elenchufeconpuestaatierratiene
dosclavijasmásunaterceraclavijadepuestaatierra.Laclavijaanchaolaterceraclavijase
proveenparasuseguridad.Sielenchufeprovistonoencajabienensutomacorriente,
consulteaunelectricistaparaelreemplazodeltomacorrienteobsoleto.
• Protejaelcabledealimentaciónparaquenadielopiseoaprieteparticularmenteenlos
enchufes,tomasdecorriente,yenelpuntodondesalendelaparato.
• Utilicesolamenteaccesoriosespecicadosporelfabricante.
• Utilicesolamenteelcarrito,base,trípode,soporteomesaespecicadosporelfabricante,
ovendidosjuntoconelaparato.Cuandoutiliceuncarrito,tengacuidadodenomover
lacombinacióndecarritoyaparatoparaevitarquesevuelqueyprovoquelesiones.
• Desenchufeesteaparatodurantetormentaseléctricasocuandonoseutilicedurantelargos
períodosdetiempo.
• Todaslasreparacionesdebenserrealizadasportécnicoscalicados.Serequiereuna
reparacióncuandoelaparatosehadañadodealgunamanera,talcomodañosenelcablede
alimentaciónoenchufe,derramedelíquidosocaídadeobjetosdentrodelaparato,
exposicióndelaparatoalluviaohumedadyfuncionamientoanormalocaídadelaparato.
• Paraserusadoporadultosparaelnindicadoúnicamente.Cualquierotrousoesinapropiado
ypeligroso.Mantengafueradelalcancedelosniños.
• Parausoeninterioresúnicamente.Nolousealairelibre.
• Elaparatodebecolocarsesobreunáreaplanayestable,aunadistanciadealmenos3pies
delniño.Nodejequeelcablecuelguedelbordedelamesaomueble.
• Noopereningúnaparatocuyocableoenchufeestédañado,oquehayafuncionadomalo
sehayadañadodealgunaforma.DevuelvaelaparatoaMunchkin,Inc.paraquesea
examinado,reparadooajustado.
• Siempreasegúresedequelaunidadestéapagada(en“off”)antesdedesenchufarladel
tomacorrientedepared.
• Nouseelaparatoparaningúnotrousoquenoseaelindicado.
• Nomiredirectamentealalámparaencendida.

MESURES DE SÉCURITÉ
IMPORTANTES
MISE EN GARDE: RISQUE D’ÉTRANGLEMENT! -
GARDER HORS DE LA PORTÉE DES ENFANTS. NE PAS UTILISER AVEC DES RALLONGES.
MISE EN GARDE : CE PRODUIT EST UNE LAMPE
ÉLECTRIQUE, PAS UN JOUET! POUR ÉVITER TOUT RISQUE
D’INCENDIE, DE BLESSURES CORPORELLES OU DE CHOC ÉLECTRIQUE, NE PAS
LAISSER UN JEUNE ENFANT JOUER AVEC ET NE PAS LE PLACER À SA PORTÉE.
Lorsdel’utilisationd’appareilsélectriques,toujoursobserverlesprécautionsde
sécuritéfondamentales,àsavoir:
CONSIGNES DE SÉCURITÉ IMPORTANTES
• Lirelesdirectives.
• Conserverlemoded’emploi.
• Respectertouteslesmisesengarde.
• Suivretouteslesinstructions.
• L’appareildoitêtreplacéàenviron1,20mdel’oreilledel’enfant.
CCD-0039-000 REV 4CCD-0039-000 REV 4
8 13
FRENCH
NETTOYAGE:
Toujoursdébrancherl’appareilets’assurerqu’ilarefroidiavantdelenettoyer.
Nettoyeruniquementavecunchiffonsec.
GARANTIE LIMITÉE DE PRODUIT
Systèmedeprojectionaudiophoniquepourchambredebébéinclutunegarantie
limitéed’unancontretoutviceàcompterdeladated’achat.Danslecasd’un
mauvaisfonctionnementoud’unvicependantlapériodedegarantie,Munchkin,
Inc.,sursadécision,remplaceraourépareraleproduitsousgarantie.Surréception
duproduitetdelapreuved’achatcomportantunedatevalided’achat,lapièce
défectueuseseraimmédiatementréparéeouremplacéeetvousseraretournée
sansfrais(auxÉtats-Unisuniquement).Envoyerl’appareildéfectueuxaccompagné
d’unepreuved’achatportantunedated’achatvalideetd’unedescriptiondu
problèmeenquestionàl’adressesuivante:Munchkin,Inc.,7835GloriaAve.,
VanNuys,CA91406,USA-Attn:NurseryProjector&SoundSystemWarranty
REMARQUE:Laprésentegarantienecouvrepaslesdéfautsdusàunenégligence,
unaccidentouunemauvaiseutilisationduproduit.
SPANISH
PRECAUCIONES IMPORTANTES
ADVERTENCIA:
¡PELIGRO DE ESTRANGULAMIENTO! -
MANTENGA FUERA DEL ALCANCE DE LOS NIÑOS. NO USE CON CABLES DE EXTENSIÓN.
ADVERTENCIA: ESTE PRODUCTO ES UNA
LÁMPARA ELÉCTRICA – ÉLECTRIQUE, PAS UN JOUET!
¡NO ES UN JUGUETE! - PARA EVITAR EL RIESGO DE INCENDIO, QUEMADURAS,
LESIONES PERSONALES Y DESCARGAS ELÉCTRICAS, COLÓQUELA EN UN
LUGAR DONDE LOS NIÑOS NO PUEDAN ALCANZARLA NI JUGAR CON ELLA.
Alusaraparatoseléctricos,siempredebentomarseprecaucionesdeseguridadbásicas
incluyendo las siguientes:
INSTRUCCIONES DE SEGURIDAD IMPORTANTES
•Leaestasinstrucciones.
•Guardeestasinstrucciones.
•Presteatenciónatodaslasadvertencias.
•Sigatodaslasinstrucciones.
TO CLEAN:
Always unplug the unit and ensure that it is cool before cleaning. Clean only with dry cloth.
LIMITED PRODUCT WARRANTY
NurseryProjector&SoundSystemincludesaone-yearlimitedwarrantyagainst
defectsfromthedateofpurchase.Intheeventofamalfunctionordefectduringthe
in-warrantyperiod,Munchkin,Inc.,atitsoption,willreplaceorrepairtheproduct
underwarranty.Uponreceiptoftheproductandtheproofofpurchasewithavalid
dateofpurchase,thedefectivepartwillbeimmediatelyrepairedorreplacedand
returnedtoyoufreeofcharge(USAonly).Pleasesenddefectiveunit,proofof
purchasewiththeoriginalstorereceipt,andadescriptionoftheproblemyouhave
encounteredto:Munchkin,Inc.,7835GloriaAve.,VanNuys,CA91406,USA-Attn:
NurseryProjector&SoundSystemWarrantyNOTE:Thiswarrantydoesnotcover
adefectthathasbeencausedbyabuse,negligence,alterations,environmental
exposures,accident,ormisuseoftheproduct.

• Nepasutiliserleprojecteursonorependantplusde8heuresd’aflée.
• Nepasutilisercetappareilprèsd’unpointd’eau.
• Nettoyeruniquementavecunchiffonsec.
• Nepasobstruerleséventsd’aération.Installerl’appareilconformémentauxinstructions
du fabricant.
• Nepasinstallerprèsd’unesourcedechaleurtellequ’unradiateur,unegrillede
chauffage,unecuisinièreoutoutautreappareil(amplis,ycompris)calorifère.
• Nepasdéjouerlasécuritéqu’assurentlachepolariséeoulacheàbornedemasse.
Unechepolariséepossèdedeuxlamesdontunepluslargequel’autre.Unecheà
bornedemassepossèdeégalementdeuxlamesetenoutreunebrochepourlamise
àterre.Lalamelapluslarge,etlabrochedansl’autrecas,sontlàpourdesraisonsde
sécurité.Silacheducordond’alimentationfourninepénètrepasdanslaprise
secteur,demanderàunélectricienderemplacerlapriseobsolète.
• Fairecheminerlecordond’alimentationdemanièreàcequ’ilnepuissepasêtrepiétiné
etveilleràcequelecordonnesoitpasécrasé,toutparticulièrementauniveaudesprises
secteur ou de sa sortie de l’appareil.
• N’utiliseraucunaccessoirequinesoitpasconseilléparlefabricant.
• Utiliseruniquementunchariot,unsupport,untrépied,uneconsoleouunetableconseillés
parlefabricantouvendusavecl’appareil.Danslecasd’uneinstallationsurchariot,ne
déplacercedernieretl’appareilqu’ilportequ’aveclesprécautionsquis’imposentpour
éviterderenverserl’appareiletd’êtreblessé.
• Pendantlesoragesousil’appareiln’estpasutilisépendantlongtemps,débrancherla
cheducordond’alimentation.
• Lesréparationsdoiventêtreeffectuéespardupersonnelqualié.Laréparationde
l’appareilestnécessaires’ilaétéendommagé,silecordond’alimentationoulache
sontabîmés,siunliquideouunobjetontpénétrédansl’appareil,ousicederniera
étéexposéàlapluieouàl’humidité,nefonctionnepasnormalementous’ilesttombé.
• Usageréservéàdesadultesauxnsprévuesuniquement.Toutautreusageest
inappropriéetdangereux.Garderhorsdelaportéedesenfants.
• Utiliseràl’intérieuruniquement.Nepasutiliseràl’extérieur.
• Placerl’appareilsurunesurfaceplaneetstable,àunedistanced’aumoins90cmde
l’enfant.Nepaslaisserlecordonpendredudessusd’unetableoud’unesurfacesurélevée.
• Nepasutiliserl’appareilsisoncordonousachesontendommagés,sisonfonctionnement
aétépréalablementdéfectueuxous’ilestendommagéd’unequelconquemanière.
Renvoyerl’appareilàMunchkin,Incpourlefairevérier,réparerourégler.
• Toujourss’assurerquel’appareilestéteintavantdedébrancherlachedelaprisedecourant.
• N’utiliserl’appareilqueselonl’usageprévu.
• Nepasxerdesyeuxlalampeéclairée.
CetappareilnumériquedelaclasseBestconformeàlanormeNMB-003duCanada.
CCD-0039-000 REV 4CCD-0039-000 REV 4
12 9
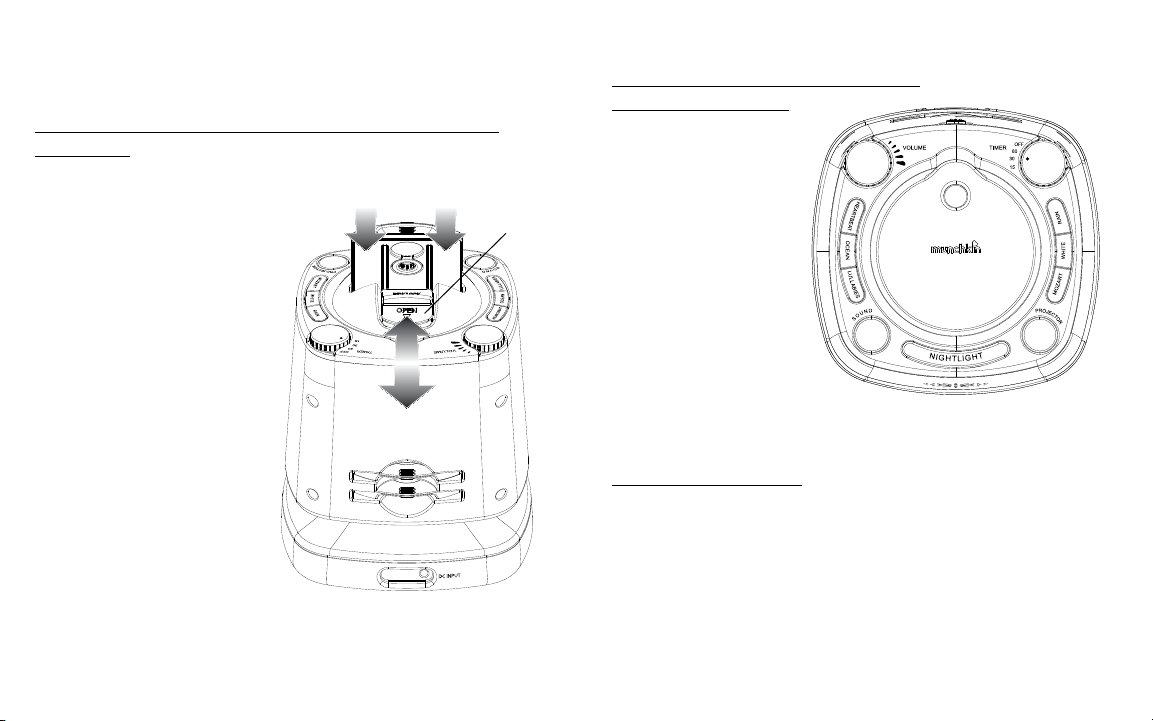
Activation simultanée des sons, du projecteur et de
la veilleuse:
Leson,laprojectionetlaveilleusepeuventêtreactivéssimultanémentou
indépendamment.
1. Appuyer sur les boutons SOUND, PROJECTOR et NIGHTLIGHT pour une
activationsimultanéedecesfonctions.Pourlesactiverindépendamment,
n’appuyerquesurleboutondelafonctiondésirée.
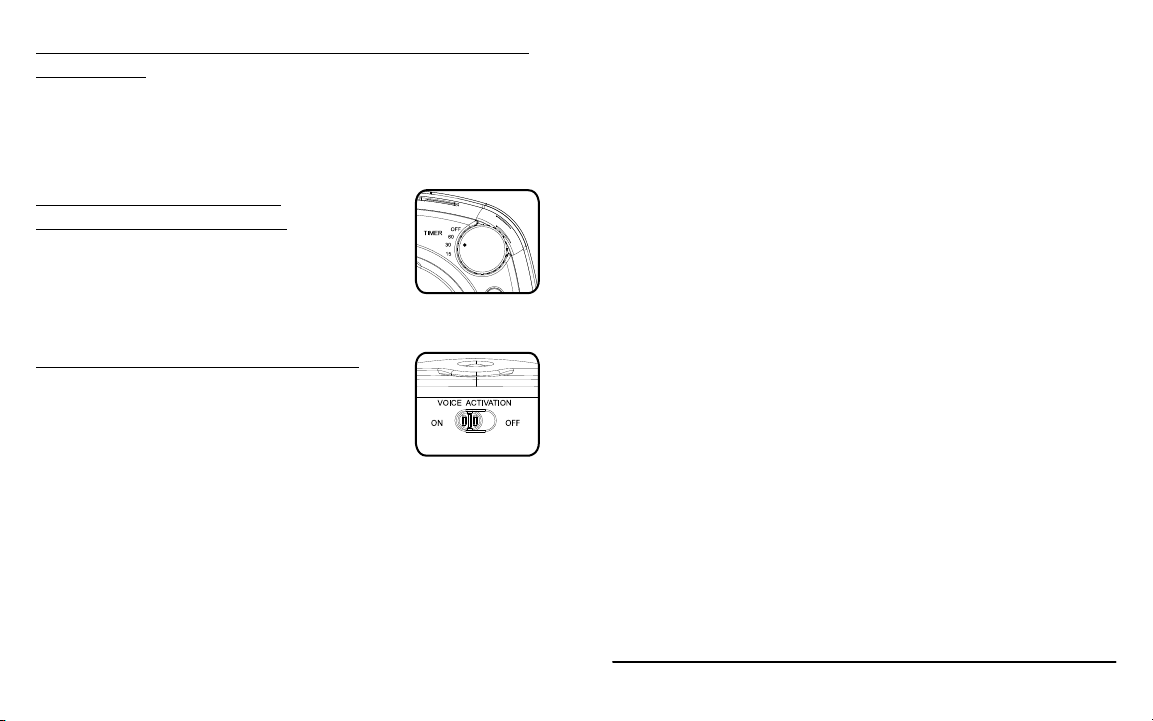
Programmation de l’arrêt
automatique du minuteur:
Leminuteurpeutêtreprogrammésurarrêtautomatique
pourarrêterlafonctionsonoreet/oudeprojection.
1.TournerleboutonTIMERjusqu’à15,30ou60minutes.
Remarque:Leminuteurpeutégalementêtredésactivéen
réglantleboutonTIMERsurlapositionOFF.
Activation de la commande vocale:
1. Pouractiverlacommandevocale,mettrel’interrupteur
VOICE ACTIVATION au dos de l’appareil sur la position ON.
2. Réglerl’arrêtautomatiqueduminuteurauparamètre
désiré(15,30ou60minutes).
3. Sélectionnerlesoptionsdésirées:sonet/ouprojection.
4. Lafonctiondecommandevocaleneseraactivée
qu’aprèsl’arrêtautomatiqueduminuteurtelqu’ilaétéparamétré.
5. Lacommandevocaleréactiveralaoulesfonctionsquiétaientenmarche
avantl’arrêtautomatique(sonet/ouprojection)jusqu’auprochainarrêt
automatiqueparamétré(15,30ou60minutes).Lacommandevocalese
réactiverachaquefoisquel’enfantsemetàpleurer.
6. Pourdésactiverlacommandevocale,mettrel’interrupteurVOICE
ACTIVATION sur la position OFF.
Remarque:Silacommandevocaleestactivéeetleminuteurautomatique
désactivé,l’enfantenpleurantactiveralesystèmequicontinueradejouer
jusqu’àcequelesystèmesoitdésactivéenappuyantsurlesboutonsSOUND
ou PROJECTOR.

CCD-0039-000 REV 4CCD-0039-000 REV 4
MODE D’EMPLOI
À CONSERVER POUR FUTURE CONSULTATION
Utilisation de la veilleuse:
Activation du son:
1. Appuyersurleboutoncorrespondantàl’effetsonore,àl’enregistrementde
Mozartouàlaberceusedésirée.
• Pouractiverl’undestroisenregistrementsdeMozart,appuyersur
leboutonMOZARTsuccessivementjusqu’aumorceaudésiré(EineKleine
Nachtmusik,BerceusedeMozartouAh!vousdirai-je,maman).
• Pouractiverl’unedestroisberceuses(BerceusedeBrahms,HushLittle
BabyouRocka-byeBaby),appuyersurleboutonLULLABIES
successivementjusqu’àlaberceusedésirée.
• Lesquatreeffetssonoressontindiquésindividuellement.
1. Placer l’appareil sur une
surface plane, hors de la
portéedesenfants.
2. Brancher l’adaptateur
de courant dans la
prise de l’appareil et
brancher le cordon
dans une prise de
courant 120 V.
3. Appuyer sur le
bouton NIGHTLIGHT
pourl’allumerla
veilleuse.
4. Ré-appuyersurle
bouton NIGHTLIGHT
pour eteindre la
veilleuse.
Remarque: Le bouton de la
veilleuseestrétroéclairépourpouvoirlerepérerfacilementdansl’obscurité.
VOLUME
SON
MINUTEUR
PROJECTEUR
VEILLEUSE
PLUIE
BATTEMENTS
DE CŒUR
BLANCOCÉAN
MOZARTBERCEUSES
10 11
2. Pouractiverledernierenregistrementjoué,appuyersurleboutonSOUND.
3. TournerlamoletteduVOLUMEpourréglerlesonauvolumedésiré.
4. AppuyersurleboutonSOUNDpouréteindreleson.
Activation des images et chargement de la
cartouche d’images:
Pourchargerlacartouched’images,leprojecteurdoitêtreéteint.Pouréteindre
leprojecteur,appuyersurleboutonPROJECTORunefois.
Remarque: Silacartouchedésiréeestdéjàdanslelecteur,allumersimplement
leprojecteurenappuyantsurleboutonPROJECTORetdirigerleprojecteur
verslasurfacedeprojectiondésirée.
1. Sélectionnerlacartouchedésirée.
2. Tournerleprojecteurpourpouvoir
introduire la cartouche dans la fente.
3. Faire glisser le dispositif de blocage
en y appuyant dessus pour introduire
la cartouche.
4. Vérierquelacartoucheest
correctementinsérée,l’inscription
surlacartouchefaisantfaceducôté
opposéaudispositifdeblocage.
5. Une fois la cartouche introduite,
vérierqueledispositifde
blocagesoitrelevéenposition
bloquéesinonlacartouchene
marcherapas.
6. Allumerleprojecteurenappuyant
surleboutonmarquéPROJECTOR.
7. Dirigerleprojecteurverslemur
ou le plafond.
8. Pouréteindreleprojecteur
appuyerànouveausurle
boutonmarquéPROJECTOR.
9. Ranger les cartouches dans le
compartimentàl’arrièrede
l’appareil.
Dispositif
de blocage
Table of contents
Other Munchkin Projector manuals