New World NW 90EDO MK2 User manual

Instructions for use
-
Installation advice
DOUBLE OVEN
CERAMIC COOKER
NW 90EDO MK2

Read the instructions carefully before installing and using the appliance.
CAUTION: this appliance must only be installed in a permanently ventilated room in
compliance with the applicable regulations.
Dear Customer,
Thank yo for p rchasing a NEW WORLD Do ble Oven Ceramic
Cooker.
The safety preca tions and recommendations in these instr ctions
are for yo r own safety and that of others. They will also provide a
means by which to make f ll se of the feat res offered by yo r
appliance.
Please keep this booklet in a safe place. It may be sef l in the
f t re, either to yo rself or to others in the event that do bts
sho ld arise relating to its operation.
This appliance must be used only for its intended purpose , that
is for the domestic cooking of foodstuffs. Any other form of usage
is to be considered as inappropriate and therefore dangerous.
The manufacturer declines all responsibility in the event of
damage caused by improper, incorrect or illogical use of the
appliance.
2
This cooker has been designed, constructed and marketed in compliance with:
- Safety requirements of EU Directive "Low Voltage" 2006/95/EC;
- Protection requirements of EU Directive “EMC” 2004/108/EC;
- Requirements of EU Directive 93/68/EEC.
Customer Care number: 0844 815 3747

3
Important:
This appliance is designed and manufactured solely for the cooking of domestic
(household) food and is not suitable for any non domestic application and therefore
should not be used in a commercial environment.
The appliance guarantee will be void if the appliance is used within a non domestic
environment i.e. a semi commercial, commercial or communal environment.
IMPOR AN INFORMA ION FOR CORREC DISPOSAL OF HE PRODUC IN
ACCORDANCE WI H EC DIREC IVE 2002/96/EC.
At the end of its working life, the product must not be disposed of as
urban waste. It must be taken to a special local authority differentiated
waste collection centre or to a dealer providing this service.
Disposing of a household appliance separately avoids possible nega-
tive consequences for the environment and health deriving from inap-
propriate disposal and enables the constituent materials to be recov-
ered to obtain significant savings in energy and resources. As a
reminder of the need to dispose of household appliances separately,
the product is marked with a crossed-out wheeled dustbin.
IMPOR AN INS RUC IONS AND ADVICE FOR HE USE OF ELEC RICAL APPLIANCES
The use of any electrical appliance requires the compliance with some basic rules,
namely:
– do not touch the appliance with wet or damp hands (or feet)
– do not use the appliance whilst in bare feet
– do not allow the appliance to be operated by children or unqualified persons without
supervision.
The manufacturer cannot be deemed responsible for damages caused by wrong or
incorrect use.

4
IMPOR AN SAFEGUARDS AND RECOMMENDA IONS
After unpacking the appliance, check to ensure that it is not damaged and that the oven
doors close correctly. If in doubt, do not use and consult your supplier or a professional-
ly qualified technician.
Packing materials (i.e. plastic bags, polystyrene foam, nails, packing straps, etc.) should
not be left around within easy reach of children, as these may cause serious injuries.
●ATTE TIO : please peel plastic cover off both sides and front of the oven
before use.
●Do not attempt to modify the technical characteristics of the appliance as this may
cause danger to users.
●Do not carry out any cleaning or maintenance operations on the appliance without
first disconnecting it from the electric power supply.
●If you should decide not to use this appliance any longer (or decide to substitute an
older model), before disposing of it, it is recommended that it is made inoperative in
an appropriate manner in accordance to health and environmental protection regula-
tions, ensuring in particular that all potentially hazardous parts be made harmless,
especially in relation to children who could play with unused appliances.
●After use, always ensure that the control knobs are in the off position.
●Do not allow young children or infirm persons to use the appliance without your
supervision.
●During and after use of the cooker, certain parts will become very hot. Do not touch
hot parts.
●eep children away from the cooker when it is in use.
●Some appliances are supplied with a protective film on steel and aluminium parts.
This film must be removed before using the appliance.
●WAR I G
When correctly installed, your product meets all safety requirements laid down for this type
of product category. However special care should be taken around the rear or the under-
neath of the appliance as these areas are not designed or intended to be touched and may
contain sharp or rough edges, that may cause injury.
●Fire risk! Do not store flammable material in the ovens and in the storage compartment.
●Make sure that electrical cords connecting other appliances in the proximity of the cooker
cannot come into contact with the hob or become entrapped in the oven doors.
●Do not line the oven walls with aluminium foil. Do not place baking trays or the drip tray on
the base of the oven chamber.
●
The manufacturer declines all liability for injury to persons or damage to property caused by
incorrect or improper use of the appliance.
●The various components of the appliance are recyclable. Dispose of them in accor-
dance with the regulations in force in your country. If the appliance is to be scrapped,
remove the power cord.
●Always use oven gloves when removing the shelves and food trays from the oven
whilst hot.
●Do not hang towels, dishcloths or other items on the cooker or its handle – as this
could be a fire hazard.

5
●Clean the oven regularly and do not allow fat or oils to build up in the oven base or
trays. Remove spillages as soon as they occur.
●Do not stand on the cooker or on the open oven door/s.
●Always stand back from the cooker when opening the oven door/s to allow steam
and hot air to escape before removing the food.
●This appliance is for domestic use only.
●WAR I G: Taking care NOT to lift the cooker by the door handles.
●Safe food handling: leave food in the oven for as short a time as possible before and
after cooking. This is to avoid contamination by organisms which may cause food
poisoning. Take particular care during warmer weather.
●Do not allow heavy or sharp objects to drop on the glass ceramic hob. If the hob is
cracked or otherwise damaged by falling objects etc., disconnect the electrical power
cord and call Customer Service.
●Do not scratch the hob with sharp objects. Don't use the hob as a work surface.
FIRS USE OF HE OVENS
Follow the instructions below:
– Furnish the interior of the ovens by placing the wire racks as described in
“Cleaning and maintenance”.
– Insert shelves and tray.
– Switch the empty ovens on to max to eliminate grease from the heating elements.
– Let the ovens cool down and clean the interior of the ovens with a cloth soaked
in water and neutral detergent, then dry carefully.

6
COOKING HOB
1
1
2
1
3
4
65
Fig. 1.1
VI ROCERAMIC COOKING HOB
1. 3 circuits cooking zone Ø 180 1700 W
2. 3 circuits cooking zone Ø 145 1200 W
3. Oval double cooking zone Ø 145 x 250 1800/1000 W
4. Double cooking zone Ø 210/120 2100/700 W
5. 3 circuits cooking zone Ø 145 1200 W
6. Cooking zone residual heat indicators
OTE
When the hob temperature is above 60 °C, the corresponding indicator light 6 (Fig. 1.1)
will come on to indicate that the hob is hot.
Attention:
Do not use the
ceramic hob
if the glass surface is broken or cracked in any way.
Please disconnect the appliance from the mains and contact the
After-Sales service.

7
CONTROL PANEL
CON ROL PANEL - Controls description
1. Electronic clock
2. Fan main oven temperature knob
3. Fan main oven switch knob
4. Front left
cooking zone
control knob
5. Rear left
cooking zone
control knob
6. Central
cooking zone
control knob
7. Rear right
cooking zone
control knob
8. Front right
cooking zone
control knob
9. Conventional oven control knob
Pilot lamps:
10. Conventional oven ON indicator light
11. Fan main oven temperature indicator light
12. Ceramic hob ON indicator light
2
2
Fig. 2.1
145
789
3
26
Please note: This appliance incorporates a safety cooling fan which you will hear oper-
ating whenever the oven or grill are in use.
This fan may continue to run for several minutes after the appliance has been switched
off.
This fan is to reduce the external temperature of the appliance and cool the internal
components.
11 10 12
8
USE OF COOKING HOB
3
3
Fig. 3.2
The ceramic surface of the hob allows a
fast transmission of heat in the vertical
direction, from the heating elements
underneath the ceramic glass to the
pans set on it.
The heat does not spread in the horizon-
tal direction, so that the glass stays
“cool” at only a few centimeters from the
cooking plate.
The 5 cooking zones are shown by
painted disks on the ceramic surface.
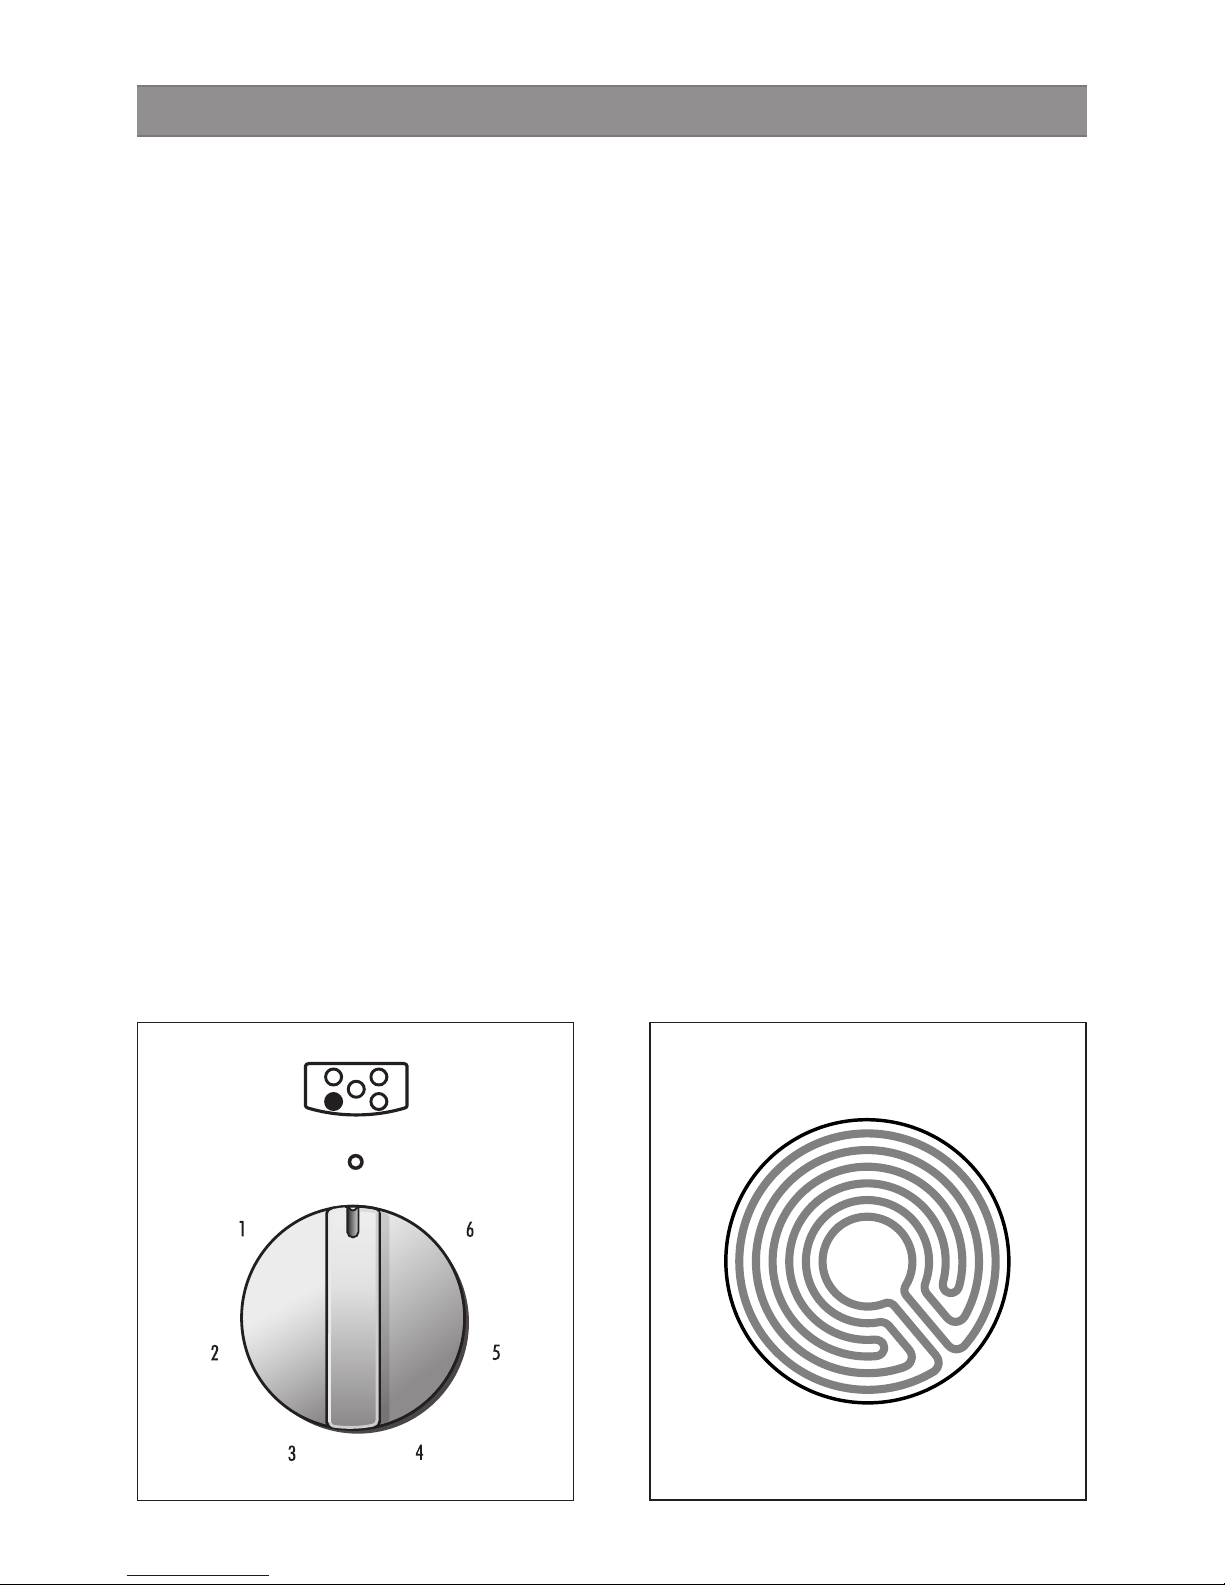
3 CIRCUI S RADIAN ZONES
Incorporating 3 heating elements (fig.
3.2) you can control and light up all
together or separately by a 6 position
switch (fig. 3.1).
Reaches the working temperature in a
very short time.
Fig. 3.1
IMPORTA T OTE:
The heating elements incorporate a
thermolimiter that switches ON/OFF the
element in all settings to protect any
overheating of the ceramic glass.
The use of incorrect pans and/or wrong
pan positioning will cause the tempera-
ture limiter to operate more frequently,
resulting in a reduction of cooking per-
formance.

9
DOUBLE AND OVAL RADIAN ZONES
The heating element is formed of a coil
of resistant material which reaches the
working temperature quickly.
Operation of the cooking zone is con-
trolled by a continuous energy regulator
from 1 to 12 (maximum temperature) (fig.
3.3).
To turn on both zones of the double
element, turn the double element knob
fully clockwise to the position .
To reduce the heat of the full double ele-
ment, turn its knob anticlockwise to set-
ting 12 or lower. Adjust the heat during
cooking as necessary.
ote: if you leave the knob at the
position, the full double element will
remain at the highest heat setting.
To return to using only the inner zone
of the double element, first turn the
knob to the o(off) position (you should
feel a click) and then clockwise to a set-
ting from 1 to 12.
Fig. 3.3
Fig. 3.5
Fig. 3.4
Second element Second element
10
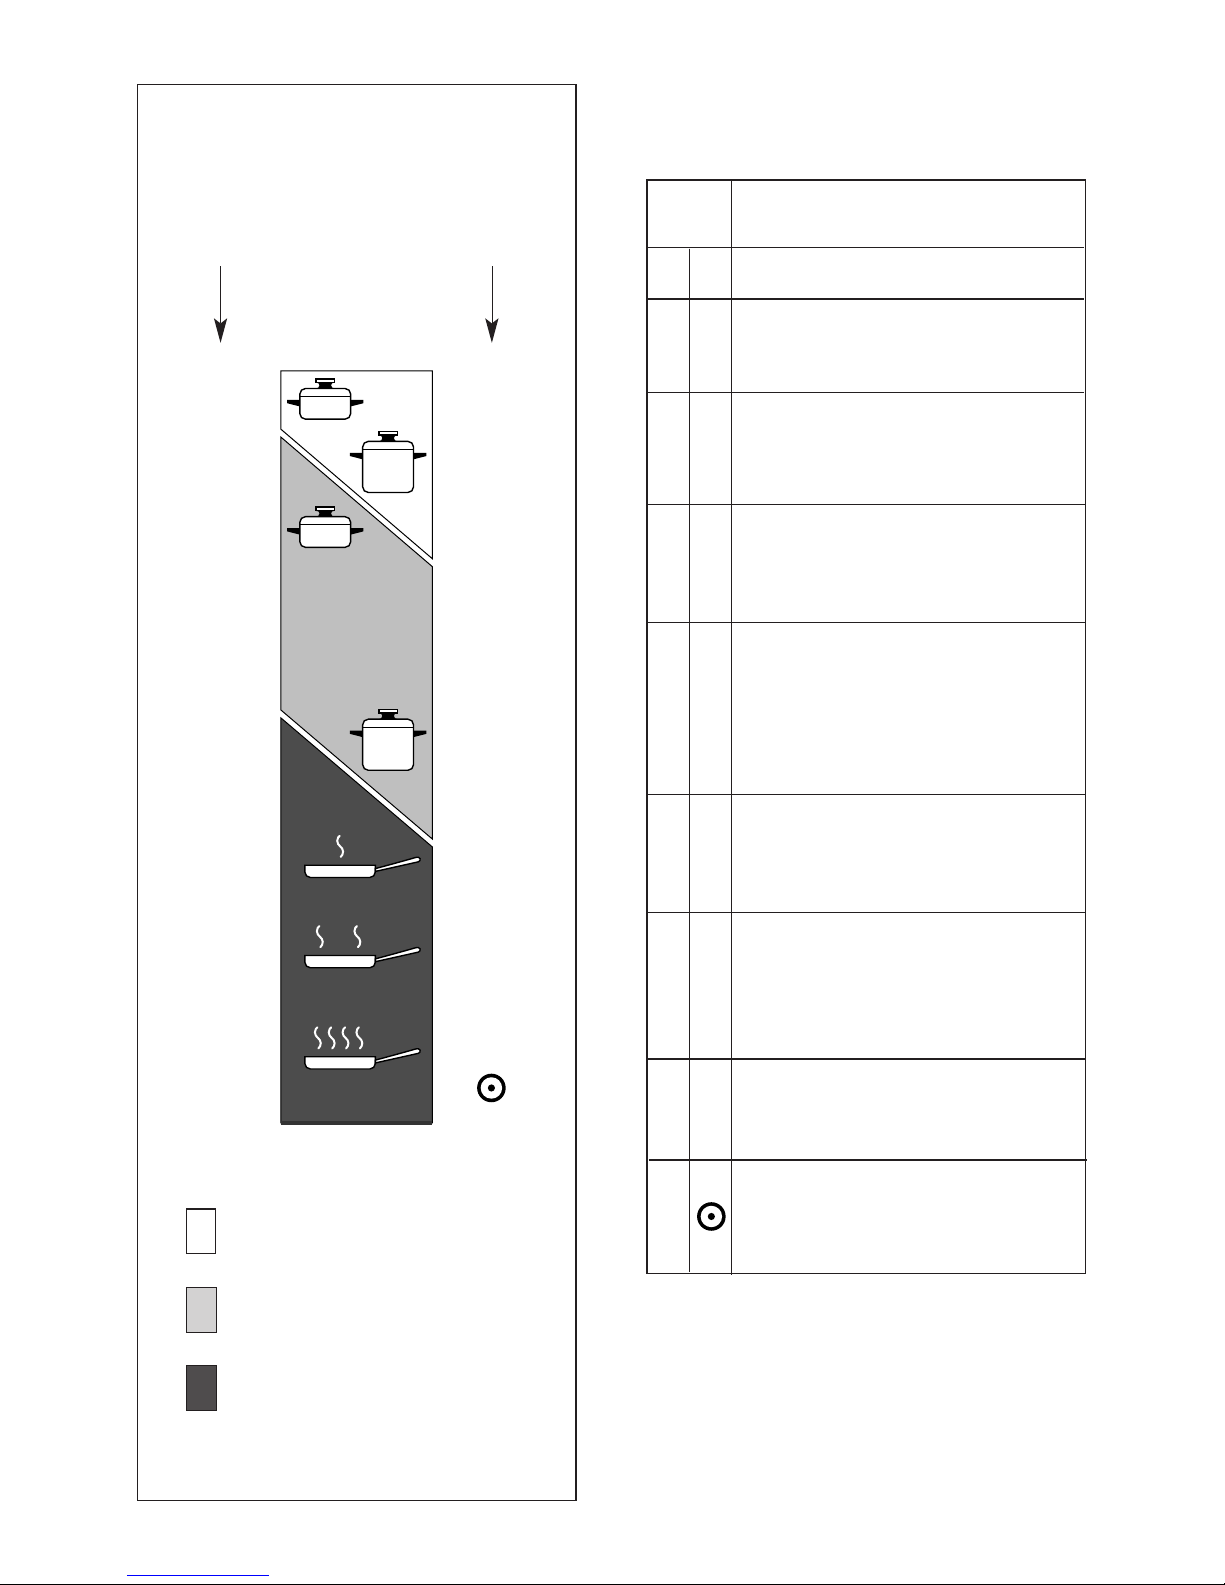
YPE OF COOKING
Switched OFF.
For melting operations
(butter, chocolate).
To maintain food hot and to
heat small quantities of liq-
uid (sauces, eggs).
To heat bigger quantities; to
whip creams and sauces.
(vegetables, fruits, soups).
Slow boiling, i.e.: boiled
meats, spaghetti, soups,
continuations of steam
cooking of roasts, stews,
potatoes.
For every kind of frying, cut-
lets, uncovered cooking,
i.e.: risotto.
Browning of meats, roasted
potatoes, fried fish,
omelettes, and for boiling
large quantities of water.
Fast frying, grilled steaks,
etc.
Switching on the second
element (Double and oval
radiant zones only).
0
Knob
setting
1
2
34
5
6
2
0
1
2
2
3
4
3
4
6
7
47
8
4
5
8
9
10
611
12
After a short period of use, experience
will teach you which setting is the right
one for your needs.
CO0KING HIN S
Cooking zone
controlled by a
7 position
switch
Cooking zone
controlled by a
12 position
energy
regulator
1
2
3
4
5
6
Fig. 3.6
Heating
Cooking
Roasting-frying
1
2
3
4
5
6
7
8
9
10
11
12

11
RESIDUAL HEA INDICA OR
The hob also features 5 warning lamps
which are wired to the corresponding
plate.
When the temperature of a cooking plate
is over 60°C, the relevant warning lamp
is also lit-up to warn of heat on the sur-
face of the hob.
This lamp also stay on after the cooking
plate has been switched off to shown
that the hob surface is still hot.
This residual heat lasts for a rather long
time after the cooking plate has been
switched off.
During this period of time you
should avoid touching the hob
surface over the cooking area.
Please pay special attention to
ensuring children are not allowed
near the hob.
The lamp will switch off automatically as
soon as the surface temperature of the
cooking plate falls below 60°C.
Cooking hints:
– To reduce the cooking time, you can
turn the control knob to the max
when you switch the plate on.
After a short time you will set the
control knob to the required position
for the cooking.
– You should use pots and pans with
flat bases (pans with the test mark for
glass-ceramic hobs are available
from specialist shops).
The diameter of the pan should
match that of the cooking plate (or be
slightly bigger) to make the most of
the energy.
– Since the cooking surface stays hot
for a certain time after the plate has
been switched off, you can switch it
off 5 or 10 minutes before the end of
the cooking.
The residual heat of the hob will com-
plete the cooking.
– To save electricity, use pan lids
whenever possible.
– Never cook the food directly on the
glass ceramic cooktop, but in special
pans or containers.
–Do not scratch the cooktop with cut-
ting or sharp objects.
Do not use the glass ceramic surface
as a work surface.
Caution! the cooking hob becomes
very hot during operation.
Keep children well out of reach.
Fig. 3.7
DO NOT USE GLASSWARE ON CERAMIC HOBS.
DO NOT USE PANS WITH ROUGH CIRCULAR MACHINED BASE.
DEEP FA FRYING
For safety purposes when deep fat fry-
ing, do not fill the pan more than one
third full of oil.
DO OT cover the pan with a lid and
DO OT leave the pan unattended.
In the unfortunate event of a fire, leave
the pan where it is and turn off the con-
trol knobs.
Place a damp cloth or lid over the pan to
smother the flames. Leave the pan to
cool for at least 30minutes before mov-
ing the pan.
DO OT USE WATER ON THE FIRE.

12 Fig. 3.8
CLEANING
Before you begin cleaning make sure
that the appliance is switched off.
Remove any encrustation using the
scraper provided.
Dust or food particles can be removed
with a damp cloth.
If you use a detergent, please make sure
that it is not abrasive or scouring.
Abrasive or scouring powders can dam-
age the glass surface of the hob.
All traces of the cleaner have to be
removed with a damp cloth.
It is highly recommended to keep off the
hob any article which can melt: plastic,
aluminium foil, sugar, sugar syrup mix-
tures etc.
If any of these products has melted on
the ceramic surface, you should remove
it immediately (when the surface is still
hot) by using a scraper to avoid any per-
manent damage to the surface of the
hob (Available under part No. 103138).
Avoid using any knife or sharp utensil
since these can damage the ceramic.
Do not use steel wool or an abrasive
sponge which could scratch the surface
in an irreparable way
ATTE TIO : MOST IMPORTA T!
If cleaning the glass ceramic hob
using a special tool (i.e. scraper) take
extra care to avoid damage to the
seal at the edges of the glass ceram-
ic surface.
ADVICE FOR SAFE USE OF HE
COOK OP
• Before switching on make sure that you
have the correct knob for the hotplate
chosen. It is advisable to put the pan on
the hotplate before switching on and to
take it away after switching off.
• Use cookware with flat and even bot-
toms (be careful when using cast iron
vessels). Uneven bottoms can scratch
the glass ceramic surfaces. Be careful
that the bottom is clean and dry.
• Pots with aluminium bottoms may leave
silver streaks or spots on the bob.
• Do not leave wet or damp lids on the
bob.
• The glass-ceramic surface and pans
must be clean. Carefully eliminate any
food remains (especially containing
sugar), dirt etc. with the aid of a cleans-
ing agent.
• Make sure that the handles of cookware
do not stick out over the edge of the
cooker, to avoid them being knocked
over by accident. This also makes it
more difficult for children to reach the
cooking vessels.
• Do not lean over the cooking zones
when they are switched on.
• Do not drop heavy or sharp objects on
the glass ceramic cooktop. If the sur-
face is broken or damaged unplug the
cooktop and contact the after-sales
service.
• Do not put aluminium foil or plastic
objects on the cooking zones when they
are hot.
• Remember that the cooking zones
remain hot for some time after they are
switched off (about 30 mm.).
• Follow the cleaning instructions careful-
ly.
• If you note a crack in the cooktop,
switch the appliance off immediately
and call the After-Sales Service.
Do not scratch the cooktop with
cutting or sharp objects.
Do not use the glass ceramic sur-
face as a work surface.

13
LEFT MAIN FAN OVEN
4
4
Attention: the oven door becomes
very hot during operation.
Keep children away.
GENERAL FEA URES
With your new Fan oven it is possible to
cook a variety of food using the 2 differ-
ent cooking functions.
The 2 positions, thermostatically con-
trolled, are obtained by 2 heating ele-
ments.
– Grill element 2000 W
– Circular element 2200 W
ote:
Upon first use, it is advisable to operate
the oven at the maximum temperature
(thermostat knob on position 250) for 60
minutes in the position and for
another 15 minutes in the mode in
order to eliminate any traces of grease
from the electrical resistances.
OPERA ING PRINCIPLES
Cooking functions available in this cavity
are:
a. Fanned oven
The element and the fan work together
to produce even results - with no need
to pre-heat.
b. Grill
Food is cooked using the grill element.
c. Fan only
Acts as a defrost function - accelerat-
ing the defrosting of frozen foods.
WAR I G:
The door is hot, use the handle.
During use the appliance becomes hot.
Care should be taken to avoid touching
heating elements inside the oven.
50
225
175
125
75
100
150
200
250
Fig. 4.1 Fig. 4.2

1414
HERMOS A KNOB
(Fig. 4.1)
This only sets the cooking temperature and does not switch the oven on. Rotate clock-
wise until the required temperature is reached (from 50 °C to 250 °C).
The light above the thermostat control knob will illuminate when the oven is switched on
and turns off when the oven reaches the correct temperature.
The light will cycle on and off during cooking.
FUNC ION SELEC OR KNOB (fig. 4.2)
Rotate the knob clockwise to set the oven for one of the following functions:
OVEN LIGH
By turning the knob onto this setting we light the oven cavity.
The oven remains alight while any of the functions is on.
DEFROS ING FROZEN FOODS
Only the oven fan is on. To be used with the thermostat knob on OFF position. The defrost-
ing is done by simple ventilation without heat.
Recommended for:
To rapidly defrost frozen foods; 1 kilogram requires about one hour.
The defrosting times vary according to the quantity and type of foods to be defrosted.
HO AIR COOKING
The circular element and the fan are used. The heat is circulated around the cavity.
Recommended temperatures are between 50 °C - 250 °C.
There is no need to pre-heat the oven.
Recommended for:
For foods that must be well done on the outside and tender or rare on the inside, i.
e. lasagna, lamb, roast beef, whole fish, etc.

15
GRILLING
The infra-red heating element is switched on.
Use with the function selector knob to position and the thermostat knob between 50 °C
and 225 °C for max 15 minutes, then to position 175 °C.
The oven door must be closed.
For correct use see chapter “USE OF THE GRILL”
Before using the grill, preheat for about five minutes.
Always grill with the oven door closed.
ote: It is recommended that you do not grill for longer than 30 minutes at any one
time.
Attention: the oven door becomes very hot during operation. Keep children away.
Recommended for:
Intense grilling action for cooking with a broiler; browning, crisping, “au gratin”, toasting,
etc.
COOKING ADVICE
S ERILIZA ION
Sterilization of foods to be conserved, in full and hermetically sealed jars, is done in the
following way:
a. Set the switch to position .
b. Set the thermostat knob to position 185 °C and preheat the oven.
c. Fill the dripping pan with hot water.
d. Set the jars onto the dripping pan making sure they do not touch each other and the
door and set the thermostat knob to position 135 °C.
When sterilization has begun, that is, when the contents of the jars start to bubble, turn
off the oven and let cool.

16
REGENERA ION
Set the switch to position and the thermostat knob to position 150° C.
Bread becomes fragrant again if wet with a few drops of water and put into the oven for
about 10 minutes at the highest temperature.
ROAS ING
To obtain classical roasting, it is necessary to remember:
– that it is advisable to maintain a temperature between 180 °C and 200 °C.
– that the cooking time depends on the quantity and the type of foods.
OVEN COOKING
Before introducing the food, preheat the oven to the desired temperature.
For a correct preheating operation, it is advisable to remove the tray from the oven and
introduce it together with the food, when the oven has reached the desired temperature.
Check the cooking time and turn off the oven 5 minutes before the theoretical time to
recuperate the stored heat.
SIMUL ANEOUS COOKING OF
DIFFEREN FOODS
The fanned oven, allows you to cook different kinds of food at the same time.
Different foods such as fish, cake and meat can be cooked together without mixing the
smells and flavours together.
This is possible since the fats and vapours are oxidized while passing through the elec-
trical element and therefore are not deposited onto the foods.
The only precaution to follow are:
– The cooking temperatures of the different foods must be as close to as possible, with
a maximum difference of 20 °C - 25 °C.
– The introduction of the different dishes in the oven must be done at different times in
relation to the cooking times of each one.
This is a much more efficient method of cooking - saving both time and energy.
USE OF HE GRILL
Leave to warm up for approximately 5 minutes with the door closed.
Place the food inside positioning the rack as near as possible to the grill.
Insert the drip pan under the rack to collect the cooking juices.
Grill with the oven door closed.
Do not grill for longer than 30 minutes at any one time
(Grilling for longer than the
recommended time may mean the appliance overheats).
Caution: the oven door becomes very hot during operation. Keep children well
out of reach.

17
GRILL PAN AND BAKING RAY
Grilling
In order to get the best results from your grill, please grill in the grill area - as shown in
the illustration 4.3 - this will given the most even results in the shortest time.
Baking
In order to achieve optimum results while baking, we recommend that you place your
baking tin / tray on top of the grill pan and grid inside the oven.
This will ensure that even baking results are achieved.
You can then place the grill pan in the shelf position you require as shown the recipe
you are using.
Please be aware that as with all cooking, results depend on personal taste - always
check your food regularly.
Fig. 4.3

18
RIGHT SMALL CONVENTIONAL OVEN
5
5
Attention: the oven door becomes
very hot during operation.
Keep children away.
GENERAL FEA URES
The convection oven is equipped with 2
electrical heating elements (upper and
lower) for normal oven cooking.
The input of the elements is:
– Upper element 700 W
– Lower element 800 W
WAR I G:
The door is hot, use the handle.
During use the appliance becomes hot.
Care should be taken to avoid touching
heating elements inside the oven.
NO E:
Upon first use, it is advisable to operate
the oven at the maximum temperature
(thermostat knob on position 250 °C) to
eliminate any traces of grease from the
electrical resistances.
50
225
175
125
75
100
150
200
250
Fig. 5.1
ELEC RICAL HERMOS A
Turn on the oven elements by turning the
switch that is also provided with a thermo-
stat to control the oven temperature.
On the control knob (fig. 5.1), other than
the OFF position, are numbers from
50°C to 250 °C which indicate the oven
temperature value.
The switch/thermostat symbols indi-
cate:
– OFF position (as per figure 5.1) =
Oven off
– Positions from “50” to “250”= simul-
taneous operation of the 2 elements.
The elements will turn on and off
automatically depending on the tem-
perature required commanded by the
thermostat.
OVEN COOKING
Before introducing the food, preheat the
oven to the desired temperature.
For a correct preheating operation, it is
advisable to remove the shelf from the
oven and introduce it together with the
food, when the oven has reached the
desired temperature.

19
OTE: Reduce the oven temperature by 10 °C – 20°C for fan assisted ovens.
For dishes that take over an hour to cook, reduce the cooking time by 10 minutes per
hour.
COOKI G CHART
Food Temperature Cooking Time (approx)
°C Gas Mark
CAKES
Victoria Sandwich 180 4 20 – 25 mins
Small cakes/buns 180 4 15 – 20 mins
Rich Fruit Cake 150 2 2 hours
Scones 220 7 – 8 8 – 10 mins
Whisked Sponge 190 5 25 mins
BREAD & PASTRY
Bread Loaf (500g Flour wt) 225 7 – 8 20 – 25 mins
Bread Rolls 225 7 – 8 10 – 15 mins
Pizza Dough 225 8 15 – 20 mins
Shortcrust pastry 200 6 20 – 30 mins
Quiches/Flans 180 - 190 4 - 5 30 – 40mins
ROAST MEATS
Beef – medium joint 190 5 20 – 25 mins/lb + 20mins
Lamb 190 5 25 – 30mins/lb + 25mins
Pork 190 5 30mins/lb + 30mins
Chicken 190 5 20 – 25mins/lb + 30mins
Turkey 180 4 15 – 20mins/lb + 20mins
Stews/Casseroles 170 31
1/2- 2hours
Temperature and times given are approximate, as they will vary depending on the
quality and amount of food being cooked.
Remember to use ovenproof dishes and to adjust the oven temperature during cooking
if necessary.
COOKING GUIDE
6
6

20
ELECTRONIC CLOCK
7
7
Fig. 7.1
ELEC RONIC CLOCK
This appliance comes with an electronic
24 hour clock with minute minder.
SE ING HE IME OF DAY
Once connected to the electricity sup-
ply, the display will show 0.00.
Press the function button, and then use
the plus and minus buttons to set the
correct time of day.
We advise that you do this as soon as
your appliance is operational.
In the event of a power cut, or if the
appliance is unplugged, you will need to
re-set the time of day once power is
restored.
USING HE MINU E MINDER
The minute minder can be set for a
maximum of 99 minutes.
To set the minute minder, press the plus
and minus buttons until the desire
length of time is set. The bell symbol
will illuminate, and the count down will
begin immediately.
At the end of the time period, an alarm
will sound. Press the plus button to
turn the alarm off.
ote: The alarm will sound for a maxi-
mum of 7 minutes.
To cancel the minute minder at any
time, press the plus and minus buttons
together for a few seconds - then
release the plus button first.
Important note: This facility is a minute
minder alarm only. The appliance will
remain operational once the time has
elapsed. You must switch the appli-
ance off manually when cooking has fin-
ished.
O SELEC A ONE
There are three tones to chose from.
To chose a tone which best suits your
needs, press the minus button to listen
to the tone.
When the minus button is released, the
last tone listened to is selected.
Table of contents
Other New World Range manuals


