Nintendo Game Boy Link Cable User manual

[0501/FUG/AGB-HW]
WARNING: PLEASE CAREFULLY READ THE CONSUMER INFORMATION AND PRECAUTIONS BOOKLET INCLUDED
WITH THIS PRODUCT BEFORE USING YOUR NINTENDO®HARDWARE SYSTEM, GAME PAK OR ACCESSORY. THIS
BOOKLET CONTAINS IMPORTANT SAFETY INFORMATION. PLEASE KEEP THIS BOOK FOR FUTURE REFERENCE.
HINWEIS: BITTE LIES DIE VERSCHIEDENEN BEDIENUNGSANLEITUNGEN UND VERBRAUCHERINFORMATIONEN,
DIE SOWOHL DER NINTENDO®HARDWARE WIE AUCH JEDEM MODUL BEIGELEGT SIND, SEHR SORGFÄLTIG
DURCH. DIESE ANLEITUNG ENTHÄLT WICHTIGE SICHERHEITSHINWEISE. HEBE DIR DIESES HEFT FÜR SPÄTERES
NACHSCHLAGEN GUT AUF.
ATTENTION: VEUILLEZ LIRE ATTENTIVEMENT LA NOTICE “INFORMATIONS ET PRECAUTIONS D’EMPLOI” QUI
ACCOMPAGNE LE PRODUIT NINTENDO®, LA CARTOUCHE DE JEU OU LES ACCESSOIRES AVANT DE LES UTILISER.
ELLE CONTIENT DES INFORMATIONS IMPORTANTES SUR LA SECURITE ET LES PRECAUTIONS D’EMPLOI. GARDEZ
ENSUITE LE MANUEL POUR VOUS Y REFERER PLUS TARD.
This seal is your assurance that
Nintendo has reviewed this product
and that it has met our standards
for excellence in workmanship,
reliability and entertainment
value. Always look for this
seal when buying games and
accessories to ensure complete
compatibility with your Nintendo
Product.
Ce sceau est votre assurance que
Nintendo a approuvé ce produit
et qu’il est conforme aux normes
d’excellence en matière de fabri-
cation, de fiabilité et surtout,
de qualité. Recherchez cesceau
lorsque vous achetez une console
de jeu, des cartouches ou des
accessoires pour assurer une totale
compatibilité avecvos produits Nintendo.
TM AND ® ARE TRADEMARKS OF NINTENDO.
TM ET ® SONT DES MARQUES DE NINTENDO.
© 2001NINTENDO.
Thank you for selecting the Nintendo®Game Boy Advance™ system.
Merci d’avoir choisi le Nintendo®Game Boy Advance™.
English . . . . . . . . . . . . . . . . . . . . . . . . . . . . . . . . . 4
Deutsch . . . . . . . . . . . . . . . . . . . . . . . . . . . . . . . 18
Français . . . . . . . . . . . . . . . . . . . . . . . . . . . . . . . 46
CONTENTS / SOMMAIRE
AGB-EUR_A_8 26.09.2007 13:08 Uhr Seite 2
COPY

1Consumer Information and Precautions
1. Consumer Information and Precautions . . . . . . . . . . . . . . . . . . . . . . . . . . . . . . . . . . . . . . . . . . . 5
2. Information . . . . . . . . . . . . . . . . . . . . . . . . . . . . . . . . . . . . . . . . . . . . . . . . . . . . . . . . . . . . . . . . . . . 6
3. List of Components . . . . . . . . . . . . . . . . . . . . . . . . . . . . . . . . . . . . . . . . . . . . . . . . . . . . . . . . . . . . 7
4. Description of Components . . . . . . . . . . . . . . . . . . . . . . . . . . . . . . . . . . . . . . . . . . . . . . . . . . . . . 8
5. Installing Batteries . . . . . . . . . . . . . . . . . . . . . . . . . . . . . . . . . . . . . . . . . . . . . . . . . . . . . . . . . . . . . 8
6. About Game Boy Advance Game Paks . . . . . . . . . . . . . . . . . . . . . . . . . . . . . . . . . . . . . . . . . . . . 9
7. Using the Game Boy Advance Video Game System
Starting a Game . . . . . . . . . . . . . . . . . . . . . . . . . . . . . . . . . . . . . . . . . . . . . . . . . . . . . . . . . . . 10
Removing Game Pak . . . . . . . . . . . . . . . . . . . . . . . . . . . . . . . . . . . . . . . . . . . . . . . . . . . . . . . 10
8. Changing the Screen Colours on Original Game Paks . . . . . . . . . . . . . . . . . . . . . . . . . . . . . . 10
9. Description of Accessories (When using Game Paks for the Game Boy Advance)
About Accessories . . . . . . . . . . . . . . . . . . . . . . . . . . . . . . . . . . . . . . . . . . . . . . . . . . . . . . . . . 11
Connecting a Game Boy Advance Game Link cable (AGB-005)
to your Game Boy Advance . . . . . . . . . . . . . . . . . . . . . . . . . . . . . . . . . . . . . . . . . . . . . . . . . . 11
Playing a Multi-Player Mode Game . . . . . . . . . . . . . . . . . . . . . . . . . . . . . . . . . . . . . . . . . . . 12
10. Description of Accessories
(When using a Game Pak designed for the Game Boy Series)
Supported Accessories . . . . . . . . . . . . . . . . . . . . . . . . . . . . . . . . . . . . . . . . . . . . . . . . . . . . . 13
Connecting an Accessory . . . . . . . . . . . . . . . . . . . . . . . . . . . . . . . . . . . . . . . . . . . . . . . . . . . 13
Playing Two-Player Mode Games . . . . . . . . . . . . . . . . . . . . . . . . . . . . . . . . . . . . . . . . . . . . . 14
11. AC-DC Adapter Set . . . . . . . . . . . . . . . . . . . . . . . . . . . . . . . . . . . . . . . . . . . . . . . . . . . . . . . . . . . . 15
12. Troubleshooting (Before seeking assistance) . . . . . . . . . . . . . . . . . . . . . . . . . . . . . . . . . . . . . . 16
Contents
4
READ THE FOLLOWING WARNINGS BEFORE YOU OR YOUR CHILD PLAY VIDEO GAMES
Some people (about 1 in 4000) may have seizures or blackouts triggered by light flashes, such
as while watching TV or playing video games, even if they have never had a seizure before.
Anyone who has had a seizure, loss of awareness, or other symptom linked to an epileptic con-
dition should consult a doctor before playing a video game.
Parents should watch when their children play video games. STOP PLAYING IMMEDIATELY
and consult a doctor if you or your child have any of the following symptoms: Convulsions,
Eye or muscle twitching, Loss of awareness, Altered vision, Involuntary movements,
Disorientation.
TO REDUCE THE LIKELIHOOD OF A SEIZURE WHEN PLAYING VIDEO GAMES:
1. Sit or stand as far from the screen as possible.
2. Play video games on the smallest available television screen.
3. Do not play if you are tired or need sleep.
4. Play in a well-lit room.
5. Take a 10 to 15 minute break every hour.
Playing video games can make your muscles, joints or skin hurt after a few hours. Follow these
instructions to avoid problems such as Tendonitis, Carpal Tunnel Syndrome or skin irritation:
• Take a10 to15 minute break every hour, even if you don’t think you need it.
• If your hands, wrists or arms become tired or sore while playing,
stop and rest them for several hours before playing again.
• If you continue to have sore hands, wrists or arms during or after play,
stop playing and see a doctor.
FAILURE TO FOLLOW THE FOLLOWING INSTRUCTIONS MAY CAUSE THE BATTERIES TO MAKE
“POPPING” SOUNDS AND LEAK BATTERY ACID RESULTING IN PERSONAL INJURY AND DAMAGE
TO YOUR GAME BOY ADVANCE OR ACCESSORY. IF BATTERY LEAKAGE OCCURS, THOROUGHLY
WASH THE AFFECTED SKIN AND CLOTHES. KEEP BATTERY ACID AWAY FROM YOUR EYES AND
MOUTH. CONTACT THE BATTERY MANUFACTURER FOR FURTHER INFORMATION.
1. For Game Boy Advance use only alkaline batteries. Do not use carbon zinc or any other
non-alkaline batteries.
2. Do not mix used and new batteries (replace all batteries at the same time).
▲
!WARNING – BATTERY PRECAUTIONS
▲
!WARNING – REPETITIVE MOTION INJURIES
▲
!WARNING – SEIZURE
5
AGB-EUR_A_8 26.09.2007 13:08 Uhr Seite 4
COPY

2Information
7
3List of Components
1. External Extension
Connector (EXT.)
3. Game Pak Slot
2. Accessory Fixation Slots
5. START
18. Battery Cover
15. Power Switch 16. Headphone Jack
17. Volume Dial
13. Wrist Strap Attachment
6. SELECT
11. R Button
9. B Button
8. A Button
4. Power Indicator LED
12. Speaker
10. L Button
7. ✚Control Pad
14. Colour LCD Screen
3. Do not put the batteries in backwards (positive [+] and negative [–] ends must face
the proper direction). The supply terminals are not to be short-circuited.
4. Do not leave used batteries in the Game Boy Advance.
5. Do not mix battery types (do not mix alkaline and carbon zinc batteries or mix different
brands of batteries). Use only batteries of the same or equivalent type as recommended.
6. Do not leave batteries in the Game Boy Advance or accessory for long periods of non-use.
7. Do not leave the power switch ON after the batteries have lost their charge.
When you finish using the Game Boy Advance, always slide the power switch OFF.
8. Do not dispose of batteries in a fire.
9. Do not use rechargeable type batteries such as nickel cadmium.
Non rechargeable batteries are not to be recharged.
10. Do not use a battery if the plastic cover has been torn or compromised in anyway.
11. Do not insert or remove batteries while the power is ON.
12. GENERAL NOTE: Rechargeable batteries are to be removed before charging.
Rechargeable batteries are only to be recharged under adult supervision.
GAME BOY ADVANCE INSTRUCTION BOOKLET
In this manual, the previously released software and hardware of the Original Game Boy™,
Game Boy™ pocket and Game Boy™ Color will be referred to as the Game Boy Series. How-
ever, where necessary the specific name may be used depending on the context.
NEW FEATURES OF GAME BOY ADVANCE
– 2.9" TFT reflective screen that can display up to 32,000 colours simultaneously.
– 32-Bit ARM CPU with embedded memory.
– Compatible* with Game Boy and Game Boy Color software.
– Multiplayer mode for up to 4-players when using Game Paks that feature the Game Boy
Advance Game Link™ cable icon and the Game Link cables (sold separately).
*NOTE: A few Game Boy Series Game Paks may not work properly when used with the
Game Boy Advance system.
6
AGB-EUR_A_8 26.09.2007 13:08 Uhr Seite 6
COPY

4Description of Components
9
6About Game Boy Advance Game Paks
5Installing Batteries
1. External Extension Connector (EXT.) – This unit allows connection to any Game Boy and
to Game Boy Series accessories.
2. Accessory Fixation Slots – For connecting Game Boy Advance dedicated accessories.
3. Game Pak Slot – This easily accessible slot is designed for loading a Game Boy Game Pak.
4. Power Indicator LED (POWER) – This tiny bulb lights green when the Game Boy Advance
is ON. For Alkaline batteries, the green light will change to red as the battery power reduces
to 20 or 30% and the LED will begin to fade when it is time to replace the batteries.
5. – 11. Operation Buttons (START, SELECT, ✚Control Pad, A Button, B Button, L Button,
R Button) – Used as the controls for playing games. See individual Game Pak instruction
booklets for specific button functions.
12. Speaker – Outputs mono sound. Will automatically turn off when headphones are plugged
into Headphone Jack.
13. Wrist Strap Attachment – For attachment of a wrist strap.
14. Colour LCD Screen – Highly reflective 2.9 inch Thin-Film Transistor (TFT) Colour Liquid
Crystal Display with up to 32,000 colours.
15. Power Switch (OFF/ON) – Slide the switch to turn the power ON or OFF.
(NOTE: Always insert a Game Pak before turning power ON.)
16. Headphone Jack (PHONES) – For connecting a pair of stereo headphones.
17. Volume Dial (VOLUME) – Adjusts the volume right or left. Rotate to the right to increase
the volume or to the left to decrease.
18. Battery Cover – Remove the cover on the back of the Game Boy Advance and insert two
AA (LR6) batteries. Game Boy Advance AC-DC Adapter Set can also be used.
Remove the cover on the back of the Game Boy Advance and insert two AA (LR6) batteries as
shown. Always use two fresh, high quality alkaline batteries. Do not use rechargeable nickel
cadmium (NiCad), nickel metal hydride (NiMH), carbon zinc or any other type of
non-alkaline batteries.
Caution: When inserting the batteries, make sure that the
positive (+) and negative (–) ends are facing in the correct
directions. (See Illustration 1.) Always insert the negative end
first. When removing batteries, remove the positive end
first.
8
There are four types of Game Boy Game Paks that will work with the Game Boy Advance:
Type 1. Original Game Boy Game Paks, which will work with both the Game Boy Advance
and Game Boy Color units (using 4 –10 colours, see Section 8) and with the original
Game Boy and Game Boy pocket systems (using 4 shades of gray).
Type 2. Dual mode Game Boy Game Paks that will work with both the Game Boy Advance
and Game Boy Color (using up to 56 colours out of a palette of 32,000) and with the
original Game Boy and Game Boy pocket systems (using 4 shades of gray).
Type 3. Full colour games (using up to 56 colors out of a palette of 32,000) that will work
only on Game Boy Color and Game Boy Advance.
Type 4. Special full colour (32,000 colours maximum) wide screen games that will work only
on the Game Boy Advance.
A few older Game Boy games may not function
properly on the Game Boy Advance causing display
or sound problems. Game Boy Color games may
appear darker due to Game Boy Advance screen
specification.
NOTE: You can switch the screen size for Type 1, 2
and 3 games to wide screen mode by pressing the
L and R buttons. (This may make some of the images
distorted or hard to see.)
Game screen size
for Type 1, 2 and 3
games
Game screen size for
Type 4 games only
Illustration 1
NOTE: When the battery life is down to between 20 % and 30 %, the Power Indicator LED
will change colour from green to red. When the LED begins to grow dim, the battery life is
almost gone. If you are playing a game with a battery back-up, you should save your pro-
gress and replace the batteries as soon as possible.
• Non-rechargeable batteries are not to be recharged.
• Different types of batteries or new and used batteries are not to be mixed.
• Exhausted batteries are to be removed from the toy.
AGB-EUR_A_8 26.09.2007 13:08 Uhr Seite 8
COPY

10
9Description of Accessories (When using
Game Paks for the Game Boy Advance)
• You cannot change the screen colour during the game.
• Once you change the screen colour, you cannot change it while the power is turned ON.
If you want to change the screen colour, turn the power OFF and turn it ON again.
• The screen colour can’t be changed when you’re using Game Paks for Game Boy Advance,
Game Boy Color, or dual mode Game Pak for Game Boy & Game Boy Color.
• Some of the selected colour patterns may cause a problem displaying the screen clearly.
ABOUT ACCESSORIES
You will enjoy a wider range of functions while using accessories designed for Game Boy
Advance (each sold separately). You will find icons on the Game Paks and in the Instruction
Booklets indicating which accessories are supported.
NOTE: Please see the Instruction Booklets for how to use each accessory properly.
CONNECTING A GAME BOY ADVANCE
GAME LINK CABLE (AGB-005) TO YOUR GAME BOY ADVANCE
The Game Boy Advance Game Link cable (AGB-005) can only be used with Game Paks designed
for Game Boy Advance when playing a Multi-Player game on the Game Boy Advance hardware.
Connect the Game Boy Advance Game Link cable with the External Extension Connector.
NOTE: Use of this cable with Game Boy Series Game Paks may cause loss of game infor-
mation.
You can also use other accessories licensed by Nintendo that are connected to the Game Pak
Slot. Please see the individual accessory Instruction Booklet for details.
NOTE: When using Game Paks designed for Game Boy Advance, ONLY connect Game Boy
Advance accessories to the External Extension Connector. Otherwise the Game Boy Advance
unit or accessories might not function properly and thus cause a malfunction.
11
7
8Changing Screen Colours on Original Game Paks
STARTING A GAME
1. Insert a Game Pak into the Game Pak Slot in the back of the Game Boy
Advance. The label should face away from the Game Boy Advance when
inserting. (See illustration 2.)
2. Turn the power ON. The Power Indicator LED will light up. (See
illustration 3 and 4.)
3. The screen displays the “GAME BOY” logo. Before starting the
game, always make sure you read the Game Pak Instruction
Booklet for the game you are playing.
NOTE: To get maximum picture brightness on your Game Boy
Advance, be sure to play in a well-lit area. Natural sunlight near
a window works well, as does playing near a lamp, etc. A light source that is above or
behind the player will maximize the brightness of the game. Try holding the Game Boy
Advance at different viewing angles for optimum screen reflection.
REMOVING GAME PAK
1. Turn the power OFF (see illustration 5).
2. Cautiously take the Game Pak out of the Game
Pak Slot (see the illustration 6).
Illustration 2
ON
Illustration 3 Illustration 4
Illustration 6
OFF
Illustration 5
If you use a Game Pak designed for the Game Boy in Game Boy Advance, you can change the
screen colour. There are 12 different colour palettes to choose from.
1. Turn the power ON.
2. While the “GAME BOY” logo is displayed on the screen, enter the command by following the
colour palette list below. The screen colour will then change.
PRESS COLOUR
UP BROWN
UP + A RED
UP + B DARK BROWN
DOWN PALE YELLOW
DOWN + A ORANGE
DOWN + B YELLOW
PRESS COLOUR
LEFT BLUE
LEFT + A DARK BLUE
LEFT + B GRAY
RIGHT GREEN
RIGHT + A DARK GREEN
RIGHT + B REVERSE
Using the Game Boy Advance
Video Game System
AGB-EUR_A_8 26.09.2007 13:08 Uhr Seite 10
COPY

10 Description of Accessories (When using
a Game Pak designed for the Game Boy Series)
Multi-player mode gameplay with 2 to 4 Game Paks (Multi Game Pak play)
How to Connect
1. Make sure that the power switch on every Game Boy Advance hardware is OFF and the
Game Paks are inserted into the Game Pak Slots.
2. Connect the Game Boy Advance Game Link cables together and then plug them into the
External Extension Connectors. The Game Boy Advance that is connected with the 6PIN
plug (small and purple-coloured) should be
the P1 (player one) unit.
3. Flick the power switch for each Game Boy
Advance ON.
4. Check the Game Pak Instruction Booklet
for more details.
Multi-player mode gameplay with 1 Game Pak (1 Game Pak play)
How to Connect
1. Make sure that the power switch of every Game Boy Advance unit is OFF and insert the
Game Pak into the Game Pak Slot of the P 1 Game Boy Advance.
2. Connect the Game Boy Advance Game Link cables together and then plug them into the
External Extension Connectors making sure you connect the 6PIN plug (small and purple-
coloured) into the Game Pak Slot of the P 1 Game Boy Advance.
3. Flick the power switch for each Game Boy Advance ON.
4. Check the Game Pak Instruction Booklet for more details.
When using the Multi-player mode, follow the rules below. Otherwise the game may not func-
tion properly or saved data may be destroyed.
– ONLY use Game Boy Advance Game Link cables.
– Do not perform any connection that is not specified in this Instruction Booklet.
– Do not plug/unplug the Game Boy Advance Game Link cables during the game.
– Do not turn the power OFF while communicating.
3P
4P
2P1P
3P
2P1P
2-Player Game 3-Player Game 4-Player Game
SUPPORTED ACCESSORIES
You will enjoy a wider range of functions when using accessories designed for the Game Boy
Series (each sold separately). You can find icons on the Game Paks and the instruction book-
lets indicating which kind of accessory will be supported.
NOTE: Please see the individual Instruction Booklet to see how to use the accessories in
detail.
Accessories for Game Pak for Game Boy Series
12
CONNECTING AN ACCESSORY
You can use the following accessories (sold separately) when using a Game Pak designed for
the Game Boy Series.
Universal Game Link™ cable (CGB-003)
You can use this cable when you want to play a two-player mode game on the Game Boy
Advance or other hardware in the Game Boy Series.
NOTE: Use of this cable with Game Boy Advance Game Paks may cause loss of game infor-
mation.
Communication
cable – The icon
on the Game Pak
indicates that the
Universal Game Link cable
(CGB-003) is supported.
Game Boy printer –
The icon on the
Game Pak indicates
that the Game Boy printer
(MGB-007) is supported.
PRINTER
Infrared communication – The icon on the
Game Pak indicates that the Game Boy
Color Infrared communication feature is sup-
ported.
• Game Boy Advance doesn’t have an Infrared
communication feature therefore you cannot use
this feature on the Game Boy Advance even if the
Game Pak supports Infrared communication.
13
PLAYING A MULTI-PLAYER MODE GAME
If you use a Game Pak displaying a Game Boy Advance Game Link cable icon (shown
on the right) and the Game Boy Advance Game Link cable (Sold separately), you can
enjoy a multiplayer communication game for up to 4-players.
There are two ways to play a Multi-Player game with the Game Boy Advance Game Link cable:
– Multi-player mode gameplay with 2 to 4 Game Paks (Multi Game Pak play).
– Multi-player mode gameplay with 1 Game Pak (1 Game Pak play).
The Multi-player method may vary depending on the game you play. Please see the Game Pak
Instruction booklet for details.
AGB-EUR_A_8 26.09.2007 13:08 Uhr Seite 12
COPY

11 AC-DC Adapter Set
The Game Boy Advance AC-DC Adapter Set (Model No. AGB-009
and AGB-008) can be used to power your Game Boy Advance
(sold separately).
For the Game Boy Advance, use only an exclusive AC-DC Adap-
ter Set (AGB-009 + AGB-008) or other products officially licensed
by Nintendo.
Do not use Game Boy, Game Boy pocket or Game Boy Color AC
adapters with the Game Boy Advance.
Please see the Game Boy Advance AC-DC Adapter Set Instruction Booklet for details.
• The exclusive AC-DC Adapter conforms to Low Voltage Directive (73/23/EEC) for AC-DC
adapters.
• Transformers used with the Game Boy Advance should be regularly examined for damage
to the cord, plug enclosure and other parts.
• In the event of damage the transformer must not be used until the damage has been repaired.
• The toy is not intended for children under 3 years old.
• The transformer is not a toy.
• For indoor use only.
• If the external flexible cable or cord of the transformer is damaged, it should be replaced by
the manufacturer or his service agent in order to avoid a hazard.
15
How to connect
1. Make sure that the power is OFF on both units and insert the Game Paks.
2. Connect the Game Link cable to each External Extension Connector.
3. Turn the power ON.
4. Please see the Game Pak Instruction Booklet for additional information.
PLAYING TWO-PLAYER MODE GAMES
You can enjoy a two-player mode game, if you are using Game Paks that support the Game
Link cable.
When using Game Boy Advance (AGB-001), Game Boy Color (CGB-001), Game Boy
pocket (MGB-001), or Original Game Boy (DMG-001), you need the Universal Game Link
cable (CGB-003).
Connecting the Game Boy Advance to another Game
Boy Advance, Game Boy Color, Game Boy pocket or
Game Boy printer.
Connecting the Game Boy Advance to the Original
Game Boy.
NOTE: The Game Boy Adapter has been plugged
into one end of the Game Link cable.
Game Boy Adapter
Model
No. AGB-008
Model
No. AGB-009
14
Game Boy printer (MGB-007)
With this accessory you are able to print out pictures or use other special print functions that
various Game Paks support. Connect the Universal Game Link cable to the Game Boy Advance
and Game Boy printer’s External Extension Connector.
You may also use the External Extension Connector for other licensed Nintendo accessories
or Game Boy Series accessories which are designed to be connected to the Game Pak Slot.
Please see individual Accessory Instruction Booklets for details.
NOTE: Some of the accessories may not work properly. Please see the Instruction Booklets
for each accessory.
When you insert a Game Pak designed for the Game Boy Series, please use accessories that
have been designed for the Game Boy Color, Game Boy pocket, and Original Game Boy.
AGB-EUR_A_8 26.09.2007 13:08 Uhr Seite 14
COPY

16
12 Troubleshooting
(Before seeking assistance)
If your Game Boy Advance still does not operate correctly after trying the above reme-
dies, please call the Nintendo Service Center.
Problem
The screen stays blank
even though the power
is ON.
The screen appears faint.
Horizontal lines appear
when the power is ON.
No sound is heard from the
speaker during game play.
Multi-player game modes
don’t work.
Solution
• Turn the power OFF. Wait a few moments, then turn the power ON.
• Turn the power OFF. Remove Game Pak and reinsert it,
then turn the power ON.
• Check the placement of the batteries.
• If using a Game Link cable, check connections with the power OFF,
then try again.
• If using a Game Link cable, check that all Game Paks are the same.
(Review Sections 9 and 10.)
• Replace the batteries with new fresh batteries.
• Turn OFF the power, remove the Game Pak and reinsert it, making sure
it is fully inserted into the Game Pak Slot. Turn the power ON.
• Adjust the volume.
• Make sure there are no headphones plugged into the Headphone Jack.
• Some games may have no sound during parts of the game.
• Turn the power OFF. Check all of the Game Link Cable connections,
then turn the power ON.
• Turn the power OFF. Remove all Game Paks and re-insert,
then turn the power ON.
• Make sure Game Paks include the multi-player feature and that Game Paks
are the same game.
• Make sure you are using the correct Game Link cable.
(Review Sections 9 and 10.)
AGB-EUR_A_8 26.09.2007 13:08 Uhr Seite 16
COPY

1Verbraucherinformationen
und andere wichtige Hinweise
18
Inhalt
1. Verbraucherinformationen und andere wichtige Hinweise . . . . . . . . . . . . . . . . . . . . . . . . . . . 19
2. Information . . . . . . . . . . . . . . . . . . . . . . . . . . . . . . . . . . . . . . . . . . . . . . . . . . . . . . . . . . . . . . . . . . 20
3. Bestandteile des Game Boy Advance . . . . . . . . . . . . . . . . . . . . . . . . . . . . . . . . . . . . . . . . . . . . 21
4. Beschreibung der Bestandteile . . . . . . . . . . . . . . . . . . . . . . . . . . . . . . . . . . . . . . . . . . . . . . . . . 22
5. Einlegen der Batterien . . . . . . . . . . . . . . . . . . . . . . . . . . . . . . . . . . . . . . . . . . . . . . . . . . . . . . . . . 22
6. Unterscheidung von Modulen . . . . . . . . . . . . . . . . . . . . . . . . . . . . . . . . . . . . . . . . . . . . . . . . . . . 23
7. Verwendung des Game Boy Advance
Beginnen eines Spiels. . . . . . . . . . . . . . . . . . . . . . . . . . . . . . . . . . . . . . . . . . . . . . . . . . . . . . . 24
Entfernen des Moduls . . . . . . . . . . . . . . . . . . . . . . . . . . . . . . . . . . . . . . . . . . . . . . . . . . . . . . 24
8. Anpassen der Farbe . . . . . . . . . . . . . . . . . . . . . . . . . . . . . . . . . . . . . . . . . . . . . . . . . . . . . . . . . . . 24
9. Verwendung von Game Boy Advance-Modulen
Erläuterung zum Zubehör . . . . . . . . . . . . . . . . . . . . . . . . . . . . . . . . . . . . . . . . . . . . . . . . . . . . 25
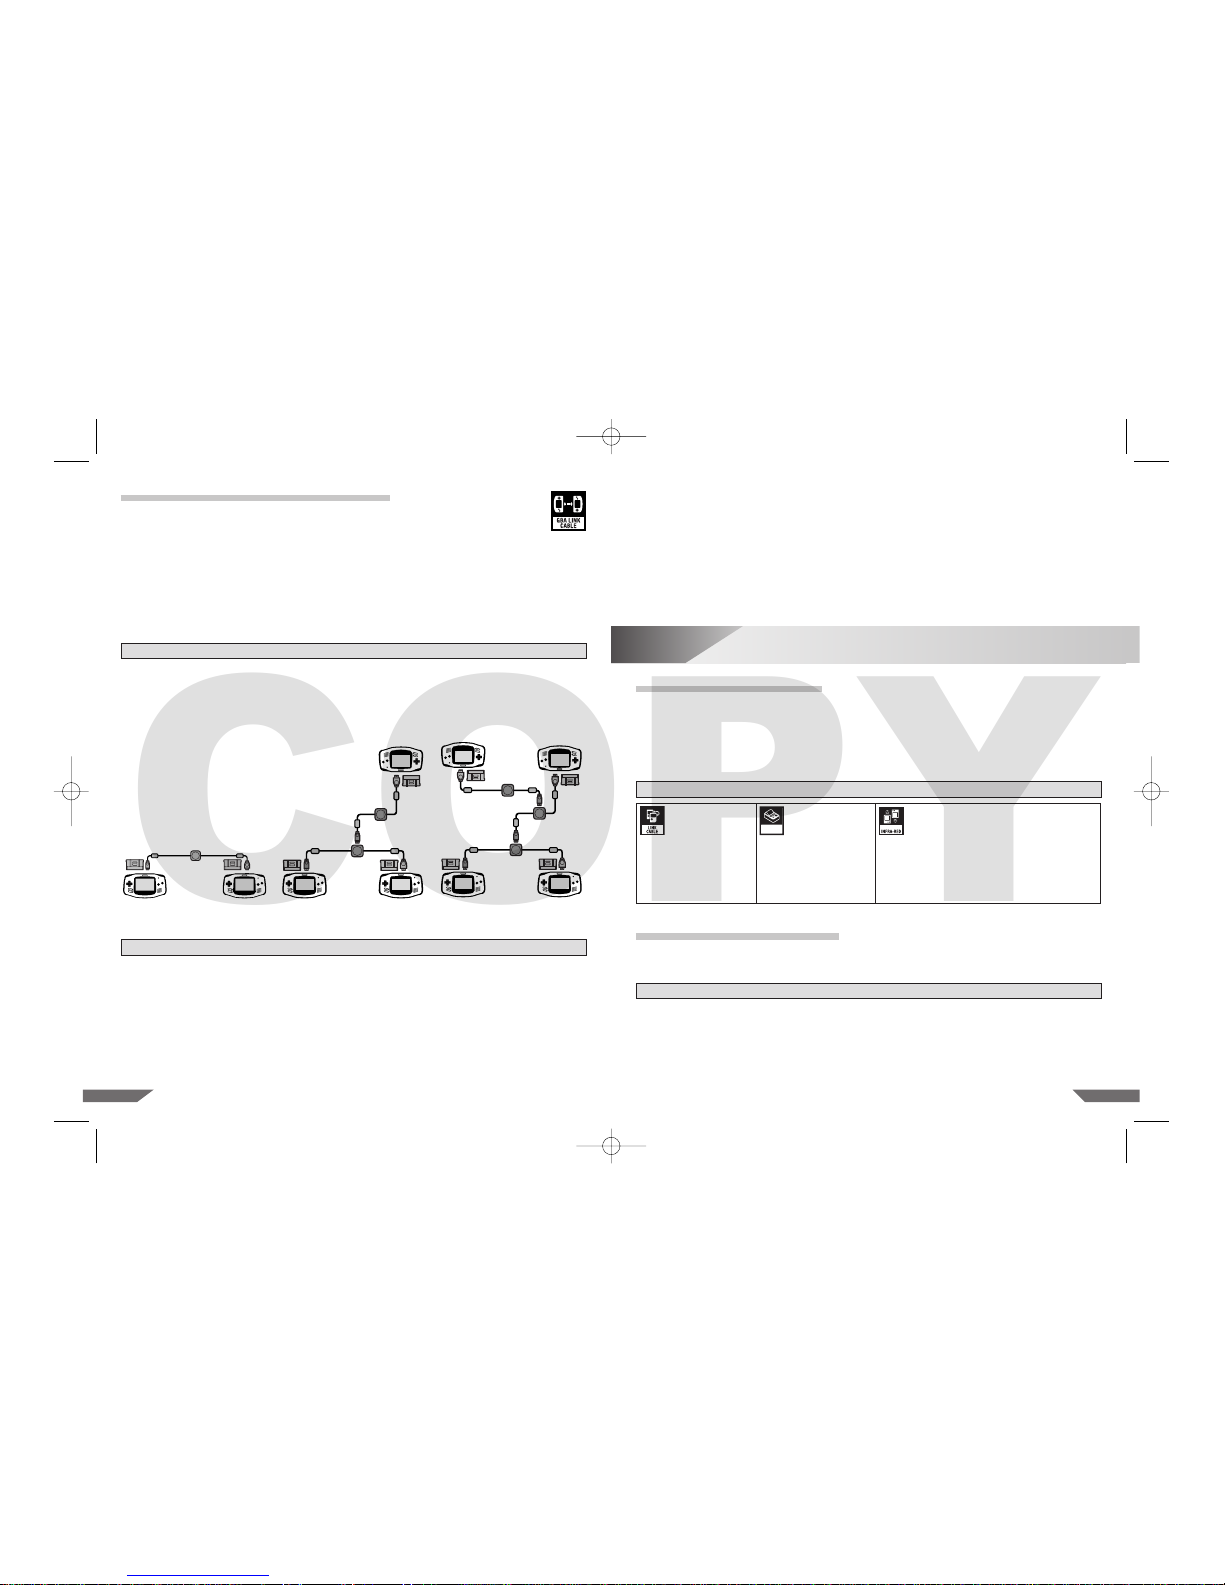
Anschließen des Game Boy Advance Game Link-Kabels . . . . . . . . . . . . . . . . . . . . . . . . . . 25
Die Mehrspieler-Option . . . . . . . . . . . . . . . . . . . . . . . . . . . . . . . . . . . . . . . . . . . . . . . . . . . . . 26
10. Verwendung von Modulen der Game Boy-Serie
Unterstütztes Zubehör . . . . . . . . . . . . . . . . . . . . . . . . . . . . . . . . . . . . . . . . . . . . . . . . . . . . . . 27
Anschließen von Zubehör . . . . . . . . . . . . . . . . . . . . . . . . . . . . . . . . . . . . . . . . . . . . . . . . . . . . 27
2 Spieler-Option . . . . . . . . . . . . . . . . . . . . . . . . . . . . . . . . . . . . . . . . . . . . . . . . . . . . . . . . . . . . 28
11. Hinweise zum AC-DC-Adapterset . . . . . . . . . . . . . . . . . . . . . . . . . . . . . . . . . . . . . . . . . . . . . . . . 29
12. Problemlösungen . . . . . . . . . . . . . . . . . . . . . . . . . . . . . . . . . . . . . . . . . . . . . . . . . . . . . . . . . . . . . 30
HINWEIS AN ALLE ELTERN: BITTE DIESE WARNHINWEISE SORGFÄLTIG LESEN,
BEVOR SIE ODER IHR KIND ZU SPIELEN BEGINNEN!
Bei einem kleinen Prozentsatz (ca. 1 Person von 4000) der Bevölkerung können während des
Betrachtens blinkender Lichter oder Muster, die in unserer Umgebung täglich vorkommen,
epileptische Erscheinungen auftreten. Solche Reaktionen können auch auftreten, wenn diese
Personen bestimmte Fernsehbilder anschauen oder bestimmte Videospiele spielen. Auch bei
Spielern, die bislang nicht mit epileptischen Symptomen auf Lichtreize reagiert haben, ist eine
bisher unentdeckte epileptische Veranlagung nicht ausgeschlossen.
Befrage einen Arzt, bevor du ein Videospiel benutzt, wenn bei dir oder einem Mitglied deiner
Familie Epilepsie vorliegt.
Wir empfehlen allen Eltern, ihre Kinder während des Spielens von Videospielen zu beobachten.
Sollten bei ihrem Kind folgende Symptome auftreten, UNTERBRECHEN SIE AUGENBLICKLICH
das Spiel: verändertes Sehvermögen, Augen- und Muskelzuckungen, unwillkürliche Be-
wegungen, Desorientierung, Wahrnehmungsverlust der Umgebung, geistige Verwirrung,
Schwindelgefühle und/oder Krämpfe. Befragen Sie Ihren Arzt!
BEACHTE BEIM SPIELEN STETS FOLGENDE HINWEISE:
1. Halte den größtmöglichen Abstand zum Bildschirm!
2. Videospiele immer auf einem TV-Gerät mit möglichst kleinem Bildschirm spielen.
3. Verzichte auf das Spielen, wenn du erschöpft bist oder Schlaf benötigst.
4. Spiele stets in einem gut beleuchteten Raum.
5. Achte darauf, pro Stunde etwa 10 bis 15 Minuten Pause zu machen.
Bei einigen Personen kann es nach längerer Spieldauer zu Ermüdungserscheinungen oder Un-
behagen kommen. Beachte folgende Hinweise, um solche Erscheinungen zu vermeiden.
• Unabhängig davon, wie du dich fühlst, solltest du in jedem Fall stündlich eine Pause
von 10 bis 15 Minuten einlegen.
• Sollten deine Hände bzw. deine Arme ermüden oder fühlst du dich unwohl,
lege eine mehrstündige Erholungspause ein, bevor du weiterspielst.
• Sollten die Beschwerden auch dann nicht abklingen, achte auf die Signale deines Körpers
und suche einen Arzt auf. Ansonsten könnten dauerhafte Schädigungen auftreten.
HALTE DICH BITTE AN DIESE ANWEISUNGEN, DA DIE BATTERIEN SONST ZERSTÖRT WERDEN KÖNNTEN,
WAS DEN AUSTRITT VON BATTERIESÄURE ZUR FOLGE HAT. BATTERIESÄURE KANN VERÄTZUNGEN AN
HAUT UND KLEIDUNG VERURSACHEN SOWIE DEN GAME BOY ADVANCE, DIE RUMBLE CARTRIDGE BZW.
DAS ZUBEHÖR BESCHÄDIGEN UND UNBRAUCHBAR MACHEN. SOLLTE BATTERIESÄURE AUSTRETEN,
WASCHE DIE DAMIT IN KONTAKT GEKOMMENEN HAUTPARTIEN UND KLEIDUNGSSTÜCKE GRÜNDLICH
MIT KLAREM WASSER. BRINGE BATTERIESÄURE NIEMALS MIT AUGEN ODER MUND IN KONTAKT. (WEGEN
WEITERER INFORMATIONEN WENDE DICH BITTE AN DEN BATTERIEHERSTELLER!)
▲
!WARNUNG – BATTERIEHINWEIS
▲
!WARNUNG – ÜBERANSTRENGUNGS-HINWEIS
▲
!WARNUNG – EPILEPSIEHINWEIS
19
AGB-EUR_A_8 26.09.2007 13:08 Uhr Seite 18
COPY

2Information
1. Verwende für den Game Boy Advance ausschließlich Alkali-Batterien. Setze keine Zink-
Kohle- oder sonstige, nicht-alkalische Batterien ein.
2. Verwende niemals verbrauchte und frische Batterien zur gleichen Zeit. Tausche immer den
kompletten Satz aus.
3. Lege die Batterien nie entgegengesetzt der Anweisung ein (der Plus- und der Minus-Pol
müssen in die korrekte Richtung zeigen!). Du darfst Batterien nicht kurzschließen.
4. Entferne verbrauchte Batterien aus deinem Game Boy Advance bzw. aus der Rumble Cartridge.
5. Setze niemals verschiedenartige Batterietypen ein, sondern immer nur solche mit gleicher
Zusammensetzung bzw. aus gleicher Herstellung.
6. Wenn du deinen Game Boy Advance, Zubehör oder deine Rumble Cartridge über einen
längeren Zeitraum nicht benutzt, solltest du die Batterien entfernen.
7. Sollten die Batterien leer sein, vergiss nicht, den Game Boy Advance auszuschalten.
Schalte den Game Boy Advance außerdem stets aus, wenn du nicht mehr spielst.
8. Wirf die leeren Batterien niemals ins Feuer oder in den Hausmüll, sondern gib die Batterien
bei einer Sammelstelle ab. (Auskünfte über entsprechende Sammelstellen erteilt deine Stadt
bzw. Gemeinde.)
9. Verwende keine aufladbaren Batterien, wie beispielsweise Nickel-Cadmium-Batterien.
Versuche nicht, herkömmliche Batterien wieder aufzuladen.
10. Batterien, deren äußere Hülle in irgendeiner Weise beschädigt ist, darfst du unter keinen
Umständen benutzen!
11. Lege keine Batterien ein bzw. entferne keine Batterien, während der Game Boy Advance
eingeschaltet ist.
12. ALLGEMEINE INFORMATION: Wiederaufladbare Batterien müssen vor dem Aufladen
aus dem Game Boy Advance entfernt werden. Das Aufladen von Batterien darf nur unter
Aufsicht eines Erwachsenen erfolgen.
In dieser Bedienungsanleitung wird die bisher erschienene Hard- und Software für den Original
Game Boy™, Game Boy™ pocket und Game Boy™ Color, ebenso wie die Geräte selbst,
als der Game Boy-Serie zugehörig beziehungsweise als Game Boy-Serie bezeichnet. Je nach
Zusammenhang finden jedoch auch die jeweiligen Ursprungsbegriffe Verwendung.
HERAUSRAGENDE MERKMALE DES GAME BOY ADVANCE
– Blickwinkel-unabhängiger TFT (Thin-Film Transistor) Farb-Flüssigkristall-Bildschirm
mit einer Darstellung von bis zu 32.000 Farben gleichzeitig und einer Bildschirmdiagonale
von 2,9 Zoll (circa 7,4 cm).
– ARM 32-Bit-RISC-Prozessor mit integriertem Speicher.
– Kompatibel* zum Game Boy und Game Boy Color.
– Bis zu vier Spieler können mit entsprechend gekennzeichneten Game Boy Advance-Spielen
unter Verwendung des Game Boy Advance Game Link™-Kabels (separat erhältlich)
miteinander spielen.
*HINWEIS: Es kann vorkommen, dass einige Spiele der Game Boy-Serie nicht
einwandfrei mit dem Game Boy Advance funktionieren.
20 21
3Bestandteile des Game Boy Advance
1. Anschlussbuchse (EXT.)
3. Modulschacht
2. Befestigungsschlitze für
Game Boy Advance-Zubehör
5. START
18. Batteriefach
15. Ein/Aus-Schalter 16. Kopfhörerbuchse
17. Lautstärkeregler
13. Befestigungsmöglichkeit
für das Trageband
6. SELECT
11. R-Taste
9. B-Knopf
8. A-Knopf
4. Betriebsanzeige
12. Lautsprecher
10. L-Taste
7. ✚Steuerkreuz
14. Farb-LC-Bildschirm
AGB-EUR_A_8 26.09.2007 13:08 Uhr Seite 20
COPY

23
6Unterscheidung von Modulen
Es gibt vier unterschiedliche Module, die in Verbindung mit einem Game Boy Advance verwen-
det werden können:
Typ 1: Original Game Boy-Module unterstützen sowohl den Game Boy Advance und den Game
Boy Color (unter Verwendung von vier bis zehn Farben, siehe dazu auch Kapitel 8) als
auch den herkömmlichen Game Boy und den Game Boy pocket (unter Verwendung von
vier Graustufen).
Typ 2: Duale Game Boy-Module unterstützen sowohl den Game Boy Advance und den Game
Boy Color (unter Verwendung von bis zu 56 Farben aus einer Palette von bis zu 32.000
darstellbaren Farben) sowie den Original Game Boy und den Game Boy pocket (unter
Verwendung von vier Graustufen).
Typ 3: Vollfarb-Module unterstützen ausschließlich den Game Boy Advance und den Game
Boy Color (unter Verwendung von bis zu 56 Farben aus einer Palette von bis zu 32.000
darstellbaren Farben).
Typ 4: Game Boy Advance-Module mit Breitbild-Format unterstützen ausschließlich den Game
Boy Advance (unter Verwendung von bis zu 32.000 Farben).
Aufgrund technischer Unterschiede kann es bei
einigen älteren Game Boy-Modulen zu Problemen
bei der Bild- und Tonwiedergabe kommen. Game
Boy Color-Spiele können aufgrund der Bildschirm-
eigenschaften des Game Boy Advance dunkler
erscheinen.
HINWEIS: Du kannst bei Modulen des Typs 1, 2 und 3
die Bildschirmgröße verändern, indem du entweder
die L- oder die R-Taste drückst. (Durch das veränderte
Bildschirmformat kann es zu Problemen beim Erken-
nen des Bildschirminhaltes kommen.)
Anzeigeformat
bei Spielen des Typs
1, 2 und 3.
Ausschließliches
Anzeigeformat bei
Spielen des Typs 4.
HINWEIS: Die Betriebsanzeige wechselt ihre Farbe von grün zu rot, sobald die verbleibende
Energie der Batterien unter 20 – 30 % fällt. Wenn die Energie der Batterien nahezu erschöpft ist,
wird die Betriebsanzeige schwächer. Wenn du ein Spiel mit Speicherfunktion spielst, solltest
du diese unverzüglich nutzen und danach die Batterien ersetzen.
• Du darfst nicht wiederaufladefähige Batterien nicht aufladen.
• Verschiedene Batterietypen sowie gebrauchte und neue Batterien sollten nicht zusammen
verwendet werden!
• Verbrauchte Batterien sollten unverzüglich aus dem Game Boy Advance entfernt werden.
4Beschreibung der Bestandteile
5Einlegen der Batterien
1. Anschlussbuchse (EXT.) – Sie ermöglicht die Verbindung zu einem weiteren Game Boy-
System oder den Anschluss von Zubehör der Game Boy–Serie.
2. Befestigungsschlitze für Game Boy Advance-Zubehör – Diese Schlitze dienen der
Befestigung von Game Boy Advance-Zubehör.
3. Modulschacht – Zum Einlegen der Spielmodule.
4. Betriebsanzeige (POWER) – Sobald der Game Boy Advance eingeschaltet ist, leuchtet
diese Lampe grün auf. Bei Verwendung von Alkali-Batterien wechselt die Betriebsanzeige
von grün zu rot, sobald die verbleibende Energie der Batterien unter 20–30% fällt. Wenn
die Helligkeit der Betriebsanzeige nachlässt, solltest du umgehend die Batterien wechseln.
5. – 11. Steuerungselemente – Mit diesen Knöpfen bzw. Tasten führst du die Funktionen
des Spiels aus. Lies bitte die entsprechende Spielanleitung, um dich über die jeweilige
Tastenbelegung zu informieren.
12. Lautsprecher – Wiedergabe des Spiel-Sounds in Mono. Schaltet sich automatisch aus,
wenn ein Kopfhörer in die Kopfhörerbuchse gesteckt wird.
13. Befestigungsmöglichkeit für das Trageband – An dieser Stelle kannst du ein Trageband
befestigen.
14. Farb-LC-Bildschirm – Blickwinkel-unabhängiger TFT (Thin-Film Transistor) Farb-Flüssig-
kristall-Bildschirm mit 2,9 Zoll (circa 7,4 cm) Diagonale und einer gleichzeitigen Darstellung
von bis zu 32.000 Farben.
15. Ein/Aus-Schalter – Zum Einschalten des Game Boy Advance nach rechts schieben.
HINWEIS: Schalte den Game Boy Advance nur ein, wenn ein Spielmodul eingelegt ist.
16. Kopfhörerbuchse (PHONES) – Für den Anschluss eines Stereokopfhörers.
17. Lautstärkeregler (VOLUME) – Drehe den Regler nach rechts, um die Lautstärke
zu reduzieren.
18. Batteriefach – Entferne den Batteriefachdeckel und lege zwei AA (LR 6)-Batterien
korrekt in das Batteriefach. Alternativ dazu kannst du auch das Game Boy Advance-
AC-DC-Adapterset verwenden.
Entferne den Batteriefachdeckel auf der Rückseite des Game Boy Advance und lege zwei AA
(LR6)-Batterien korrekt in das Batteriefach. Verwende am besten zwei neue Alkali-Batterien,
um eine einwandfreie Funktion des Game Boy Advance zu garantieren. Du darfst keine wieder-
aufladbaren Nickel-Cadmium-, Nickel-Eisen- oder Zink-Kohle-Batterien sowie
andere nichtalkalische Batterien verwenden.
ACHTUNG: Achte beim Einlegen der Batterien darauf, dass der
positive (+) und der negative (–) Pol in die richtige Richtung
zeigen. Beachte außerdem, dass du die Batterien mit dem
Minuspol (–) zuerst in das Batteriefach einlegst. Beim Ent-
fernen sollte der Pluspol (+) zuerst vom Kontakt genommen
werden. Abbildung 1
22
AGB-EUR_A_8 26.09.2007 13:08 Uhr Seite 22
COPY

25
9Verwendung von Game Boy Advance-Modulen
24
• Während eines Spiels lässt sich die Farbpalette nicht mehr ändern.
• Nachdem eine bestimmte Farbpalette eingestellt worden ist, lässt sie sich nicht mehr wech-
seln. Schalte den Game Boy Advance aus, warte einige Sekunden und schalte ihn wieder ein,
falls du eine andere Farbeinstellung wünschst, um eine andere Palette auswählen zu können.
• Bei Modulen für Game Boy Advance, Game Boy Color und dualen Modulen für Game Boy
Color & Game Boy lässt sich die Farbpalette nicht verändern.
• Bei manchen der gewählten Farbpaletten kann es zu Schwierigkeiten bei der Erkennung der
Bildschirminhalte kommen.
ERLÄUTERUNG ZUM ZUBEHÖR
Mit dem Game Boy Advance-Zubehör (separat erhältlich) erschließt sich eine Vielzahl neuer Mög-
lichkeiten. Eine entsprechende Kennzeichnung auf dem Spielmodul und in der Spielanleitung
zeigt an, welches Zubehör unterstützt wird.
HINWEIS: Lies bitte die jeweilige Bedienungsanleitung genau durch, um das Zubehör ord-
nungsgemäß in Betrieb nehmen zu können.
ANSCHLIESSEN DES
GAME BOY ADVANCE GAME LINK-KABELS (AGB-005)
Das Game Boy Advance Game Link-Kabel (AGB-005) ist ausschließlich zur Verwendung mit
Game Boy Advance-Modulen geeignet. Dieses Kabel wird verwendet, wenn im Mehrspieler-
Modus ausschließlich Game Boy Advance-Systeme zum Einsatz kommen. Verbinde dazu die
Stecker des Kabels mit den Anschlussbuchsen.
HINWEIS: Bei Verwendung dieses Kabels in Verbindung mit Modulen der Game Boy-Serie
kann es zu einem Datenverlust kommen.
Die Anschlussbuchse und der Modulschacht dienen auch der Verwendung von weiterem, von
Nintendo lizenziertem Game Boy Advance-Zubehör. Lies bitte die Bedienungsanleitung des
jeweiligen Zubehörs, um weitere Informationen zur jeweiligen Verwendung zu erhalten.
HINWEIS: Verwende in Verbindung mit einem Game Boy Advance-Modul an der Anschluss-
buchse ausschließlich Game Boy Advance-Zubehör. Andernfalls kann es zu Fehlfunktionen
beim Game Boy Advance-System oder dem jeweiligen Zubehör kommen.
7
8Anpassen der Farbe
BEGINNEN EINES SPIELS
1. Stecke das Spielmodul fest in den Modulschacht auf der Rückseite des
Game Boy Advance. Die Frontseite des Moduls sollte dabei vom Game
Boy Advance wegzeigen. (Siehe Abbildung 2.)
2. Schalte den Game Boy Advance ein. Die Betriebsanzeige leuch-
tet auf. (Siehe Abbildungen 3 und 4.)
3. Auf dem Bildschirm erscheint das GAME BOY-Logo. Bitte lies
vor dem Spiel die entsprechende Spielanleitung gründlich durch.
HINWEIS: Um die größtmögliche Bildbrillanz zu erreichen, solltest
du darauf achten, den Game Boy Advance bei guten Lichtverhält-
nissen zu benutzen. Es empfielt sich beispielsweise, neben einem Fenster bei Tageslicht
oder nahe einer Lampe zu spielen. Befindet sich die Lichtquelle hinter oder oberhalb von dir,
wird die Helligkeit des Bildschirms ebenfalls gesteigert. Versuche den Game Boy Advance in
unterschiedlichen Winkeln zu halten, um den optimalen Blickwinkel zu finden.
ENTFERNEN DES MODULS
1. Schalte zuerst den Game Boy Advance aus, indem
du den Ein/Aus-Schalter nach links schiebst. (Siehe
Abbildung 5.)
2. Ziehe danach das Modul vorsichtig aus dem Modulschacht. (Siehe Abbildung 6.)
Du hast die Möglichkeit, die Farbdarstellung bei einem Original Game Boy-Modul zu verändern.
Dabei kannst du zwischen zwölf verschiedenen Farbpaletten wählen.
1. Schalte zunächst den Game Boy Advance ein.
2. Erscheint das GAME BOY-Logo, drücke das ✚Steuerkreuz in die entsprechende Richtung,
eventuell in Verbindung mit dem Drücken eines Knopfes (siehe Tabelle), um eine Farbpalette
zu wählen.
STEUERKREUZ FARBE
NACH OBEN BRAUN
NACH OBEN + A ROT
NACH OBEN + B DUNKELBRAUN
NACH UNTEN HELLGELB
NACH UNTEN + A ORANGE
NACH UNTEN + B GELB
STEUERKREUZ FARBE
NACH LINKS BLAU
NACH LINKS + A DUNKELBLAU
NACH LINKS + B GRAU
NACH RECHTS GRÜN
NACH RECHTS + A DUNKELGRÜN
NACH RECHTS + B NEGATIV
Verwendung des
Game Boy Advance
Abbildung 2
ON
Abbildung 3 Abbildung 4
Abbildung 6
OFF
Abbildung 5
AGB-EUR_A_8 26.09.2007 13:08 Uhr Seite 24
COPY

27
10 Verwendung von Modulen
der Game Boy-Serie
26
Mehrspieler-Modus mit zwei bis vier Modulen (Multi-Modul-Spiel)
Verbindung der Game Boy Advance-Systeme
1. Vergewissere dich, dass alle Game Boy Advance-Systeme ausgeschaltet sind und stecke die
Spielmodule in die Modulschächte.
2. Verbinde zunächst die Game Boy Advance Game Link-Kabel miteinander und danach mit
den Anschlussbuchsen der Game Boy Advan-
ce-Systeme. Der kleine, lilafarbene Stecker wird
an den Game Boy Advance von Spieler 1 ange-
schlossen.
3. Schalte alle Game Boy Advance-Systeme ein.
4. Lies bitte die entsprechende Spielanleitung
für weitere Informationen.
Mehrspieler-Modus mit einem Modul (Ein-Modul-Spiel)
Verbindung der Game Boy Advance-Systeme
1. Vergewissere dich, dass alle Game Boy Advance-Systeme ausgeschaltet sind und stecke
das Spielmodul in den Modulschacht des Game Boy Advance von Spieler 1.
2. Verbinde zunächst die Game Boy Advance Game Link-Kabel miteinander und danach mit
den Anschlussbuchsen der Game Boy Advance-Systeme. Der kleine, lilafarbene Stecker wird
an den Game Boy Advance von Spieler 1 angeschlossen.
3. Schalte alle Game Boy Advance-Systeme ein.
4. Lies bitte die entsprechende Spielanleitung für weitere Informationen.
Beim Multispieler-Modus solltest du immer folgende Hinweise beachten. Andernfalls könnte
das Spiel in seiner Funktion beeinträchtigt sein oder Spieldaten könnten verloren gehen.
– Benutze ausschließlich Game Boy Advance Game Link-Kabel.
– Versuche nicht, andere Verbindungen herzustellen, als in dieser Bedienungsanleitung abgebildet.
– Verbinde/Löse das Verbindungskabel nicht während eines Spiels.
– Schalte keines der Game Boy Advance-Systeme aus, während ein Datenaustausch stattfindet.
3P
4P
2P1P
3P
2P1P
2 Spieler 3 Spieler 4 Spieler
UNTERSTÜTZTES ZUBEHÖR
Mit dem Zubehör für den Game Boy Advance (separat erhältlich) erschließen sich viele neue
Funktionen und Möglichkeiten. Die jeweilige Kennzeichnung auf dem Spielmodul und in der
Spielanleitung zeigt dir an, welches Zubehör unterstützt wird.
HINWEIS: Lies bitte die jeweilige Bedienungsanleitung für weitere Informationen zur Verwen-
dung und zum Gebrauch des Zubehörs.
Zubehör für die Game Boy-Serie
ANSCHLIESSEN VON ZUBEHÖR
Folgendes Zubehör (separat erhältlich) lässt sich zusammen mit Modulen der Game Boy-Serie
verwenden:
Universal Game Link™-Kabel (CGB-003)
Dieses Kabel kann verwendet werden, um Game Boy Advance-Systeme und Systeme der
Game Boy-Serie miteinander zu verbinden und die 2Spieler-Option zu nutzen.
HINWEIS: Dieses Kabel ist nicht zur Verwendung in Verbindung mit Game Boy Advance-
Modulen geeignet.
Universal Game
Link-Kabel –
Die Kennzeichnung
auf dem Spielmodul be-
deutet, dass das Universal
Game Link-Kabel (CGB-
003) unterstützt wird.
Game Boy printer –
Diese Kennzeich-
nung bedeutet,
dass der Game Boy printer
(MGB-007) unterstützt
wird.
PRINTER
Infrarot-Schnittstelle –
Diese Kennzeichnung bedeutet, dass die
Infrarot-Schnittstelle unterstützt wird.
• Der Game Boy Advance besitzt keine Infrarot-
Schnittstelle. Daher kannst du diese Funktion
nicht nutzen.
DIE MEHRSPIELER-OPTION
Bis zu vier Spieler können gleichzeitig miteinander spielen, wenn du ein Game Boy
Advance-Modul mit einer Game Boy Advance Game Link-Markierung (siehe rechts)
und das entsprechende Game Boy Advance Game Link-Kabel verwendest (separat erhältlich).
Hinsichtlich der Anzahl der benötigten Game Boy Advance-Module gibt es zwei verschiedene
Möglichkeiten, die Mehrspieler-Option zu nutzen:
– Mehrspieler-Modus mit zwei bis vier Modulen (Multi-Modul-Spiel)
– Mehrspieler-Modus mit einem Modul (Ein-Modul-Spiel)
Wie viele Module du für den Mehrspieler-Modus benötigst, hängt vom jeweiligen Spiel ab. Lies
bitte die entsprechende Spielanleitung, um weitere Informationen zu erhalten.
AGB-EUR_A_8 26.09.2007 13:08 Uhr Seite 26
COPY

28
Verbindung der Game Boy-Systeme
1. Vergewissere dich zunächst, dass alle Geräte ausgeschaltet sind und stecke die Spielmodule
in den Modulschacht.
2. Verbinde das Universal Game Link-Kabel mit den beiden Anschlussbuchsen.
3. Schalte danach alle Geräte ein.
4. Lies die jeweiligen Gebrauchsanweisungen für weitere Informationen.
2 SPIELER-OPTION
Du kannst die 2Spieler-Option nutzen, wenn die verwendeten Spielmodule ein Game Link-
Kabel unterstützen.
Bei Verwendung eines Game Boy Advance (AGB-001), Game Boy Color (CGB-001), Game
Boy pocket (MGB-001) oder Original Game Boy (DMG-001) benötigst du ein Universal
Game Link-Kabel (CGB-003).
Verbindung des Game Boy Advance mit einem Game
Boy Advance, Game Boy Color, Game Boy pocket oder
Game Boy printer.
Verbindung des Game Boy Advance mit einem
Original Game Boy.
HINWEIS: Der Game Boy-Adapter wurde zwischen
Link-Kabel und Original Game Boy gesteckt.
Game Boy-Adapter
Game Boy printer (MGB-007)
Mit diesem Gerät kannst du Bilder ausdrucken oder sonstige Druckfunktionen nutzen, die das
jeweilige Spielmodul unterstützt. Verbinde das Universal Game Link-Kabel mit der Anschluss-
buchse des Game Boy Advance und des Game Boy printer.
An der Anschlussbuchse und dem Modulschacht lässt sich weiteres, von Nintendo lizenziertes
Zubehör anschließen. Lies bitte die jeweilige Bedienungsanleitung für weitere Informationen.
HINWEIS: Es kann vorkommen, dass Zubehör nicht einwandfrei funktioniert. Lies bitte die
Bedienungsanleitung des jeweiligen Zubehörs, um weitere Informationen für einen solchen
Fall zu erhalten.
Verwende in Verbindung mit einem Spielmodul der Game Boy-Serie ausschließlich Zubehör,
das Markierungen für Game Boy Color, Game Boy pocket oder Original Game Boy hat.
29
11 Hinweise zum AC-DC-Adapterset
Du kannst das Game Boy Advance AC-DC-Adapterset (AGB-008
+ AGB-009) benutzen, um ohne Batterien zu spielen (separat
erhältlich).
Benutze für den Game Boy Advance nur dieses offizielle Adapter-
set oder andere offiziell von Nintendo lizensierte Produkte.
Die AC-DC-Adapter des Original Game Boy, Game Boy pocket
und Game Boy Color sind nicht kompatibel zum Game Boy
Advance. Diese Geräte darfst du nicht verwenden.
Lies bitte die Bedienungsanleitung des Game Boy Advance AC-DC-Adaptersets für weitere
Informationen.
• Das spezielle Netzgerät entspricht der Niederspannungsrichtlinie (73/23/EEC) für Netzgeräte.
• Der Transformator muss regelmäßig auf Schäden am Kabel, der Ummantelung des Netz-
steckers und an allen anderen Bestandteilen untersucht werden.
• Sollten Beschädigungen vorliegen, darf das Netzgerät auf keinen Fall betrieben werden,
bevor es vollständig repariert wurde.
• Das Spielzeug ist nicht für Kinder unter 3 Jahren geeignet.
• Der Transformator ist kein Spielzeug.
• Ausschließlich zum Gebrauch in Räumen.
• Ist ein Kabel des Netzgerätes beschädigt, muss es ausgetauscht werden. Wende dich dies-
bezüglich bitte telefonisch an die Nintendo Konsumentenberatung unter der Rufnummer
0180/5005806 (0,12 EURO pro Minute) oder lasse es von einem Fachmann reparieren, um eine
Gefährdung zu vermeiden.
Modell
Nr. AGB-008
Modell
Nr. AGB-009
AGB-EUR_A_8 26.09.2007 13:08 Uhr Seite 28
COPY

30
12 Problemlösungen
Funktioniert der Game Boy Advance trotz dieser Lösungshilfen nicht einwandfrei oder
solltest du noch Fragen haben, wende dich telefonisch an die Nintendo Konsumenten-
beratung unter der Rufnummer 0180/50058 06 (DM 0,24/0,13 EURO pro Minute).
Problem
Es ist kein Bild auf dem
Farb-LC-Bildschirm zu sehen,
obwohl der Game Boy
Advance eingeschaltet ist.
Das Bild erscheint blass bzw.
matt.
Bei eingeschaltetem Game
Boy Advance erscheinen
horizontale Linien auf dem
LC-Bildschirm.
Während des Spielens erklingt
kein Ton aus dem Lautsprecher
des Game Boy Advance.
Die Mehrspieler-Option
funktioniert nicht einwandfrei.
Lösung
• Schalte den Game Boy Advance aus, warte einige Sekunden und schalte
ihn danach erneut ein.
• Schalte den Game Boy Advance aus und ziehe das Spielmodul aus dem
Modulschacht. Überprüfe die Kontakte, stecke das Spielmodul wieder
in den Modulschacht und schalte den Game Boy Advance erneut ein.
• Überprüfe, ob die Batterien richtig eingelegt sind.
• Verwendest du ein Game Link-Kabel, überprüfe bei ausgeschaltetem
Game Boy Advance, ob die Stecker des Kabels korrekt in die Buchsen
eingesteckt sind.
• Verwendest du ein Game Link-Kabel, vergewissere dich, dass in allen
Game Boy Advance-Systemen das gleiche Spielmodul eingesteckt ist
(siehe dazu auch Kapitel 9 und 10).
• Tausche die Batterien gegen neue aus.
• Tausche die alten Batterien gegen neue aus.
• Schalte den Game Boy Advance aus und ziehe das Spielmodul aus
dem Spieleschacht. Stecke es erneut hinein und vergewissere dich,
dass es vollständig eingeschoben wurde. Schalte danach den Game Boy
Advance ein.
• Überprüfe die Lautstärkeregelung.
• Vergewissere dich, dass kein Kopfhörer an die Kopfhörerbuchse des
Game Boy Advance angeschlossen ist.
• Es kann durchaus möglich sein, dass das Spiel in einigen Sequenzen
keinen Ton ausgibt.
• Schalte den Game Boy Advance aus. Vergewissere dich, dass sämtliche
Stecker der Kabel korrekt in die Buchsen eingesteckt sind. Schalte die
Game Boy Advance-Systeme danach erneut ein.
• Schalte die Game Boy Advance-Systeme aus und ziehe die Spielmodule
aus dem Modulschacht. Überprüfe die Kontakte, stecke die Spielmodule
wieder in die Modulschächte und schalte die Game Boy Advance-Systeme
erneut ein.
• Vergewissere dich, dass die jeweiligen Spielmodule die Mehrspieler-
Option unterstützen und dass in allen Modulschächten die gleichen
Spielmodule eingesteckt sind.
• Vergewissere dich, dass du ein geeignetes Verbindungskabel verwendest
(siehe dazu auch Kapitel 9 und 10).
24-MONATIGE GEWÄHRLEISTUNG
Für einen Zeitraum von 24 Monaten ab dem Datum des Kaufs innerhalb des Europäischen
Wirtschaftsraums gewährleistet die Nintendo of Europe GmbH wie folgt dem Käufer, dass
dieses Produkt zum Zeitpunkt des Kaufs frei von Mängeln in Material und Verarbeitung ist:
• Nintendo wird andernfalls kostenfrei für den Käufer nach eigener freier Wahl das
mangelhafte Produkt entweder reparieren oder austauschen. Andere Ansprüche
gegen Nintendo bestehen aufgrund dieser Gewährleistung nicht, insbesondere ergibt
sich aus dieser Gewährleistung kein Anspruch auf Schadensersatz.
• Diese Gewährleistung greift nicht ein, wenn der Mangel dadurch entstanden ist, dass
der Käufer und/oder irgendein Dritter nachlässig mit dem Produkt umgegangen sind,
es in unvernünftiger Weise genutzt haben, es verändert oder nicht ordnungsgemäß
repariert oder es anders als in Übereinstimmung mit der von Nintendo herausgegebe-
nen Bedienungsanleitung genutzt haben. Die Gewährleistung greift ferner nicht ein,
wenn der Mangel durch eine zufällige Beschädigung des Produktes entstanden ist.
Es wird ausdrücklich darauf hingewiesen, dass diese Gewährleistung zusätzlich zu etwaigen
gesetzlichen Gewährleistungsansprüchen gewährt wird, die dem Käufer als Verbraucher
gegenüber demjenigen Einzelhändler zustehen können, von dem er das Produkt gekauft hat.
Diese gesetzlichen Ansprüche werden durch die vorliegende Nintendo-Gewährleistung
in keiner Weise eingeschränkt.
Sollte ein Mangel vorliegen, der von dieser Gewährleistung erfasst wird,
wenden Sie sich bitte an:
Nintendo of Europe GmbH
Reparaturabteilung
Nintendo Center • 63760 Großostheim
Wenn Sie das Produkt an die Nintendo of Europe GmbH einschicken, verwenden Sie bitte,
wenn möglich, die Originalverpackung und fügen Sie eine Beschreibung des aufgetretenen
Mangels sowie eine Kopie Ihres Kaufnachweises bei, aus dem das Kaufdatum ersichtlich ist.
Falls die 24-monatige Gewährleistungsfrist bereits abgelaufen ist oder der Mangel nicht
von dieser Gewährleistung erfasst wird, wird die Nintendo of Europe GmbH möglicherweise
dennoch bereit sein, das Produkt zu reparieren oder auszutauschen.
Für weitere Informationen hierzu und insbesondere zu den Einzelheiten etwaiger Kosten
für diesen Service wenden Sie sich bitte an:
Nintendo of Europe GmbH
Konsumentenberatung
Tel.: 0180/5005806 (0,12 EURO pro Minute)
[0102/NOE/AGB-HW]
AGB-EUR_A_8 26.09.2007 13:08 Uhr Seite 30
COPY

[0102/NOE/AGB-HW]
Kompetente Hilfe bei allen Fragen rund um Nintendo –
die Profis von der Nintendo Hotline helfen weiter!
Bei Spielefragen:
0190-000000
(Live-Operator)
(Jeder Anruf kostet nur 1,51 EURO!) Die Spieleberatung erreicht ihr
von Montag bis Freitag jeweils von 13 bis 17 Uhr!
Bei allgemeinen Fragen zum Thema Nintendo:
0180-5005806
(Live-Operator)
(Bundesweit 0,12 EURO pro Minute!) Die Nintendo Konsumentenberatung
erreicht ihr von Montag bis Freitag jeweils von 13 bis 17 Uhr!
Das Magazin!
Bereits seit über zehn Jahren begleitet das CLUB NINTENDO-
Magazin treue Nintendo-Fans ALLE ZWEI MONATE durch das
unendliche Videospiel-Universum! In jeder Ausgabe werden neue
Bereiche der virtuellen Welt erschlossen, neue Spiele vorgestellt
und brandheiße News präsentiert. Zudem erwarten euch Tipps,
Tricks, Verlosungen, Comics, Leserbriefe und vieles mehr!
KOSTENLOS bei eurem Nintendo-Händler!
Das Abo!
Für nur 15,31 EURO kommt das Club Nintendo-Magazin ein Jahr lang
alle zwei Monate direkt zu euch nach Hause. Auf diese Weise entgeht
euch keines der begehrten Hefte! Und das Beste: Der Preis beinhaltet
zusätzlich die POWER PRÄMIE, ein exklusives Nintendo-Gimmick nur für Abonnenten!
MORE THAN WORDS
MORE THAN WORDS
www.nintendo.de
in das Adressfeld des Browsers eingeben und das
Portal zum Newscenter von Nintendo öffnen! Brand-
heiße News, ständig neue Spielevorstellungen und der
kostenlose Newsletter halten euch über alle Entwick-
lungen des Nintendo-Universums auf dem Laufenden!
www.pokemon.de
und ihr betretet den virtuellen Pokémon-Erlebnispark!
Euch erwarten News, Online-Games, Verlosungen, Spiele-
vorstellungen, Sounds, Videos und natürlich jede Menge
Pokémon! Natürlich habt ihr auch hier die Möglichkeit,
einen kostenlosen Newsletter zu abonnieren!
Die Nintendo Spieleberater
Die Ratgeber direkt von den Nintendo-Spieleprofis!
Ob Pokémon, Donkey Kong 64 oder The Legend Of
Zelda – diese Bücher verraten euch wichtige Tipps und
Tricks zum Bestehen großartiger Abenteuer. Inklusive
detaillierter Levelmaps, genauer Lösungsbeschrei-
bungen und jeder Menge original Illustrationen.
Specials
Club Nintendo Specials informieren euch über
jede neue Hardwareentwicklung und bieten euch
einen umfangreichen Einblick in das Software-
angebot von Nintendo. Brandheiße Infos direkt
aus erster Hand!
VIRTUAL VISIONS
VIRTUAL VISIONS HOTLINE
HOTLINE
PLAYER SUPPORT
PLAYER SUPPORT
AGB-EUR_A_8 26.09.2007 13:08 Uhr Seite 32
COPY

C(STD)AGB-FRG-1
NOTIZEN
Leiste einen Beitrag zum Umweltschutz:
Verbrauchte Batterien undAkkumulatoren (Akkus) gehören nicht in den Hausmüll.
Wirf verbrauchte Batterien undAkkus nur in einen Sondermüllbehälter bzw. gib diese bei einer
Sammelstelle ab.
Über Standorte der Sondermüllbehälter bzw. Sammelstellen informiert dich deine Gemeinde.
AGB-EUR_A_8 26.09.2007 13:08 Uhr Seite 34
COPY

hallo freunde!
der offizielle nintendo-club
bietet dir megastarke vorteile!
salut les copains! le magazine
officieldu club nintendot’offre
des mega-avantages!
C(STD)AGB-FRG-1
AGB-EUR_A_8 26.09.2007 13:08 Uhr Seite 36
COPY

NOTIZEN
hallo freunde!
der offizielle nintendo-
club bietet dir mega-
starke vorteile!
AGB-EUR_A_8 26.09.2007 13:08 Uhr Seite 38
COPY

1Informations et precautions d’emploi
A LIRE AVANT TOUTE UTILISATION D’UN JEU VIDEO PAR VOUS MEME OU PAR VOTRE ENFANT.
I – Précautions à prendre dans tous les cas pour l’utilisation d’un jeu vidéo
• Evitez de jouer si vous êtes fatigué ou si vous manquez de sommeil.
• Assurez-vous que vous jouez dans une pièce bien éclairée en modérant la luminosité
de votre écran.
• Lorsque vous utilisez un jeu vidéo suspectible d’être connecté à un écran, jouez à bonne
distance de cet écran de télévision et aussi loin que le permet le cordon de raccordement.
• En cours d’utilisation, faites des pauses de dix à quinze minutes toutes les heures.
II – Avertissement sur l’épilepsie
Certaines personnes sont susceptibles de faire des crises d’épilepsie comportant, le cas échéant,
des pertes de conscience à la vue, notamment, de certains types de stimulations lumineuses
fortes: succession rapide d’images ou répétition de figures géométriques simples, d’éclairs ou
d’explosions. Ces personnes s’exposent à des crises lorsqu’elles jouent à certains jeux vidéo
comportant de telles stimulations, alors même qu’elles n’ont pas d’antécédent médical ou n’ont
jamais été sujettes elles-mêmes à des crises d’épilepsie.
Si vous-même ou un membre de votre famille avez déjà présenté des symptômes liés à l’épilepsie
(crise ou perte de conscience) en présence de stimulations lumineuses, consultez votre médecin
avant toute utilisation.
Les parents se doivent également d’être particulièrement attentifs à leurs enfants lorsqu’ils
jouent avec des jeux vidéo. Si vous-même ou votre enfant présentez un des symptômes
suivants: vertige, trouble de la vision, contraction des yeux ou des muscles, trouble de l’orien-
tation, mouvement involontaire ou convulsion, perte momentanée de conscience, il faut cesser
immediatement de jouer et consulter un médecin.
Jouer aux jeux vidéo pendant plusieurs heures peut fatiguer vos muscles, articulations ou
même votre peau. Suivez les instructions suivantes pour éviter des problèmes de tendinite, le
syndrome Carpal Tunnel ou des irritations de l’épiderme.
• Faites une pause de 10 à 15 minutes toutes les heures de jeu, même si vous sentez bien.
• Si vos mains, poignets ou bras sont fatigués ou douloureux quand vous jouez,
reposez-vous plusieurs heures avant de recommencer à jouer.
• Si la fatigue ou douleur persiste, consultez un médecin.
LE NON-RESPECT DES INSTRUCTIONS SUIVANTES PEUT ENDOMMAGER LES PILES (BRUITS DE “POP”,
FUITE D’ACIDE DE BATTERIE), LA CONSOLE, LES ACCESSOIRES OU VOUS CAUSER DES DOMMAGES
CORPORELS. SI UNE FUITE D’ACIDE SE PRODUIT, LAVEZ A GRANDE EAU LES VETEMENTS ET LA PEAU.
ELOIGNEZ LES PILES DE VOTRE BOUCHE ET DE VOS YEUX. RENSEIGNEZ-VOUS AUPRES DU FABRI-
CANT DES PILES POUR PLUS D’INFORMATIONS.
▲
!AVERTISSEMENT – BATTERIES RECHARGEABLES
▲
!AVERTISSEMENT – TRAUMATISMES DUS A DES MOUVEMENTS REPETES
▲
!AVERTISSEMENT SUR L’EPILEPSIE
4140
Table des Matières
1. Informations et precautions d’emploi . . . . . . . . . . . . . . . . . . . . . . . . . . . . . . . . . . . . . . . . . . . . 41
2. Contenu . . . . . . . . . . . . . . . . . . . . . . . . . . . . . . . . . . . . . . . . . . . . . . . . . . . . . . . . . . . . . . . . . . . . 42
3. Liste des composants . . . . . . . . . . . . . . . . . . . . . . . . . . . . . . . . . . . . . . . . . . . . . . . . . . . . . . . . . 43
4. Description des composants . . . . . . . . . . . . . . . . . . . . . . . . . . . . . . . . . . . . . . . . . . . . . . . . . . . 44
5. Installer les piles . . . . . . . . . . . . . . . . . . . . . . . . . . . . . . . . . . . . . . . . . . . . . . . . . . . . . . . . . . . . . 44
6. A propos des cartouches Game Boy Advance . . . . . . . . . . . . . . . . . . . . . . . . . . . . . . . . . . . . . 45
7. Utilisation du Game Boy Advance
Démarrer une partie . . . . . . . . . . . . . . . . . . . . . . . . . . . . . . . . . . . . . . . . . . . . . . . . . . . . . . . . 46
Retirer une cartouche . . . . . . . . . . . . . . . . . . . . . . . . . . . . . . . . . . . . . . . . . . . . . . . . . . . . . . 46
8. Changer la couleur de l’écran sur les cartouches Game Boy Original . . . . . . . . . . . . . . . . . . 46
9. Description des accessoires (en utilisant une cartouche Game Boy Advance)
A propos des accessoires . . . . . . . . . . . . . . . . . . . . . . . . . . . . . . . . . . . . . . . . . . . . . . . . . . . 47
Connecter un câble Game Boy Advance Game Link (AGB-005)
à votre Game Boy Advance . . . . . . . . . . . . . . . . . . . . . . . . . . . . . . . . . . . . . . . . . . . . . . . . . . 47
Jouer un jeu en mode Multi-joueur . . . . . . . . . . . . . . . . . . . . . . . . . . . . . . . . . . . . . . . . . . . 48
10. Description des accessoires (en utilisant une cartouche de la gamme Game Boy)
Accessoires compatibles . . . . . . . . . . . . . . . . . . . . . . . . . . . . . . . . . . . . . . . . . . . . . . . . . . . 49
Connecter un accessoire . . . . . . . . . . . . . . . . . . . . . . . . . . . . . . . . . . . . . . . . . . . . . . . . . . . 49
Jouer en mode deux joueurs . . . . . . . . . . . . . . . . . . . . . . . . . . . . . . . . . . . . . . . . . . . . . . . . . 50
11. Ensemble transformateur CA-CC . . . . . . . . . . . . . . . . . . . . . . . . . . . . . . . . . . . . . . . . . . . . . . . 51
12. En cas de problèmes (avant d’appeler le service consommateurs) . . . . . . . . . . . . . . . . . . . . 52
AGB-EUR_A_8 26.09.2007 13:08 Uhr Seite 40
COPY
Other manuals for Game Boy Link Cable
2
Table of contents
Languages:
Other Nintendo Toy manuals
Popular Toy manuals by other brands

KidKraft
KidKraft Pink Retro Kitchen Set Assembly instructions

Amewi
Amewi AMXFlight F8F Rare Bear manual

Faller
Faller 130238 manual

The Learning Journey
The Learning Journey Techno Gears Crazy Train instruction manual

Hasbro
Hasbro Cinderella Musical Castle 10119 instruction manual

Fisher-Price
Fisher-Price B1833 instructions