Nishika N8000 User manual

I
10
12
11
Dear
Nishika
Owner,
Since
the
beginning
of
photography,
man
has
sought
to
capture
the
elusive
"third
dimension"
of
life
in
pictures.
yournew
Nishika
N8000
35mm
camera
represents
the
most
revolutionary
breakthrough
in
3-D
photography
todate. You
can
now
enjoy
3-dimensional
photography
without
theneed
for
special
glasses
orviewers.
With
the
Nishika
N8000
camera
and
processing
sys-
tem,
you
get
snapshots
with
remarkably
lifelike
depth
and
realism
you
experience
with
thenaked
eye.
This
owner's
manual
will
show
you
how
simple
3-dimensional
photography
can
be.
Please
take
afew
minutes
toread
thein-
structions
and
suggestions
it
contains,
which
are
designed
tohelp
you
obtain
the
best
pos-
sibleresults
frornyour
revolutionary
new
3-D
camera.
Sincerely,
NISHIKA OPTICAL SYSTEMS
A
DIVISION
OF
NISHIKA
CORPORATION
SECTION
KEY
TO
CAMERA
PARTS
.. Inside
Front
&
HOW
TO
USE
THIS
MANUAL
CAMERA
PARTS
AND
THEIR
FUNCTIONS
INSTALLING
AND
CHECKING
THE
BATTERIES
..
LOADING
AND
ADVANCING
THE
FILM
USING
YOUR
CAMERA
REWINDING
AND
UNLOADING
THE
FILM
CARE
AND
STORAGE
OFYOUR
CAMERA,
PHOTOGRAPHS
AND
NEGATIVES
GUIDELINES
FOR
TAKING
THE
BEST
3-DPHOTOS
TROUBLE.SHOOTI
NG
G
U
IDE
SPECIFICATIONS
WARRANTY
CUSTOMER
SERVICE
TIPS
ONTAKING
THE
BEST
3-DPHOTOS
(SUMMARY)
Outside
Back
Flap
www.orphancameras.com
1. Exclusive
Quadra
Lens
SYstem
The
heartof
the
Nishika
35mm
3-dimen-
sional
camera
is
its
patented
Quadra
Lens
design,
comprised
of
four30mm
two-ele-
ment
lenses
positioned
to
an
accuracy
meas-
ured
in
thousandths
of
aninch.
These
high-index
lensesare
coated
toreduce
flare
and
increase
contrast,
and
haveexceptional
optical
quality
and
resolution.
Prefocused
to
provide
optimal
depth
of
field
fromas
close
as
5 112
feettoas
faraway
asinfinity,
the
four
precision
lenses
eliminate
the
need
for
manual
focusing
and
ensure
maximum
edge-
to-edge
sharpness
of
images.
2. Aperture
Selector
Theaperture
selector
controls
the
size
ofthe
lensdiaphragm
opening,
thereby
de-
termining
the
arnount
of
lightentering
the
camera.
The
range
ofsettings,
also
known
as
f-stops,
enables
you
to
best
utilize
avail-
able
lighting.
Thesize
of
the
lensdiaphragm
opening
iscontrolled
by
moving
the
aperture
selector
up
and
down
to
correspond
withthe
appropriate
brightness
symbol.
Open
the
front
and
back
flapsof
this
booklet
torevealtheKeytoCamera
Parts
pages.Keep
these
pages
opened
outas
you
readthrough
the
manual.
Using
your
manual
in
this
way
will
provide
ahandy
refer-
ence
tothe
parts
of
thecamera
mentioned
in
the
instructions.
3. ShutterReleaseButton
This
convenientlylocated
buttontrig-
gers
theshutter.
4. Cable
Release
Socket
The
cable
release
socket
accepts
stand-
ardcable
releases
as
well
astimedelay
units
for
self-portraits
and
group
shotsthat
include
the
photographer.
5. BatteryIndicator
Light
Thisred
indicator
lights
up
if
your
bat-
teries
have
sufficient
charge
for
the
camera
tooperate.ltis
activated
bythe
battery
tester
switch
(#1
0).
6. Film
Advance
Lever
Thefilm
advancelever
smoothly
advan-
cesthe
film,rolling
theexposedfilm
ontothe
film
take-up
spool
(#1
8).
7. Exposure
Counter
The
exposure
counterindicates
the
number
oftimes
the
filmhas
been
advanced.
8. ldeal
3-D
Distances
Chart
Thishelpful
chart,
convenientlylocated
ontopofthecamerafor
quick
reference,
provides
information
regarding
the
optimum
distances
to
position
the
foreground,
mid-
ground
andbackground
of
your
composition
to
maximize
the3-dimensional
effect
of
your
photographs.
9. Hot
Shoe
The
hot
shoe
acceptselectronicflash
unitssuch
asthe
Nishika
TwinLight
3010,
which
provides
high
performance
lighting
andease
ofoperation
under
low-light
condi-
tions.
10. Battery
Tester
Switch
This
switch
activatesthe
batterytest
cir-
cuit.
The
batteryindicatorlight
(#5)
lights
up
when
the
batteries
have
sufficient
charge
for
thecamera
to
operate.
11. Rewind
Knob
The
rewind
knob
serves
two
purposes:
1)
when
used
in
conjunctionwith
the
rewind
release
button,
torewind
thefilm
smoothly
duringunloading;2)when
pulled
up,toopen
thecamera
back.
12. Rewind
Crank
This
crank
folds
out
for
convenient
turn-
ing
of
the
rewind
knob.
13. Eyelets
forShoulder
Strap
Two
sturdy
metal
eyelets
built
into
the
camera
body
allowtheeasy
attachment
of
theshoulder
strap.
www.orphancameras.com

14. Viewfinder
The
viewfinder
provides
direct
viewing
ofthe
subject
and
facilitates
the
framingand
composition
of
photographs.
15. Rewind
Release
Button
The
rewind
releasebutton
disengages
the
sprocket
wheel
fromthe
filmadvance
mechanism,
thereby
making
it
possible
to
rewindthe
film.
This
button,
located
on
the
underside
of
the
cam
era,
mustbe
pushed
in
before
rewinding
the
film.lt
isimportant
that
this
button
be
used
ONLY
when
rewinding
the
film.Once
pushed,
the
button
remains
locked
in
the
rewind
position
until
the
film
ad-
vance
lever
(#6)
is
operated.
16. Film
Pressure
Plate
The
film
pressure
plate
on
the
insideof
the
camera
back
holdsthe
film
in
precise
alignment.
17. Camera
Back
Thecamera
back,
whenclosed,
Pre-
vents
unwanted
exposure
ofthe
film
tolight.
It
is
opened
bysimply
pulling
up
on
the
re-
wind
knob
(#1
1),
and
closed
by
clicking
the
back
securely
shut.
18. Film
Take-UpSpool
The
film
take-up
spool
receives
the
film
as
itis
being
advanced
from
its
original
car-
tridge.
lthas
fourtoothed
slots
forsecurely
anchoring
the
filmonto
the
sPool.
19. Film
Advance
Sprockets
Thesesprockets
are
tooth-like
projec-
tions
that
engage
the
film
perforations
to
measure
the
amount
of
film
being
advanced
onto
the
take-up
spool.
20. Tripod
Mount
Thisscrew
mount
is
designed
for
mount-
ing
the
camera
onto
atripod
forself-portraits
and
group
shots
that
include
the
photogra-
pher.
21. Battery
Ghamber
The
camera
is
powered
bYtwo
AAbat-
teries.
22. Rewind
Shaft
Theshaft
of
the
rewind
knobextends
intothe
filmchamber
and
securely
engages
the
top
of
the
filmcartridge,
enabling
the
rewind
knoband
shaft
to
function
as
a re-
wind
mechanism.

23. Film
Ghamber
Thefilm
chamber
accepts
anystandard
roll
of35mm
ISO/ASA100
color
print
film.
24, Thumbwheel
The
toothed
thumbwheel
allows
you
to
advancethe
film
take-up
spool
(#1
8)
when
loadingfilminto
thecamera.
The
battery
chamber
(#21
) islocated
on
theunderside
ofthecamera.To
open,
use
1. Opening
theBattery
Chamber
www.orphancameras.com

athumbnail
or
acoin
topush
the
battery
door
in
the
direction
of
the
broad
arrow
until
itswings
open.
NOTE:For
longerbattery
life
and
to mini-
mize
thedanger
of leakage,
we recom-
mendtheuseof high-quality
alkaline
batteries.
3. Ghecking
the Batteries
Check
the
batteries
each
time
before
using
thecamera.
Dothis
bysimply
pressing
the
battery
tester
switch
(#1
0)
forward.
lf
the
red
battery
indicator
light
(#5)
is
illuminated,
the
batteries
haveenough
power
tooperate
your
camera.
lf
this
indicator
does
not
light
up,
thebatteries
are
either
positioned
incor-
rectlyor
have
insufficient
power
and
mustbe
replaced.
2. Battery
Insertion
Procedure
Inserttwo
AAbatteries
side
byside
into
the
chamber
so
that
the
(+)
and
(-)ends
cor-
respond
withthe
symbols
on
the
contact
points
inscribed
onthe
insidesurface
of
the
battery
cover.

NOTE: lftheexposurecounter(#7)
does
not return
to "S" (start)
whenthe door is
opened,
pushthefilm advance
lever
(#6)
totheright
as
farasitwillgo.
3. Insert
the
film into
aslotofthe
film
take-up
spool.
Holding
the
film
cartridge,
insert
theend
ofa new
roll
of
filminto
oneoftheslotsof
the
film
take-upspool
(#1
8). Secure
a
film
perforation
hole
onto
the
hook
atthebaseof
the
slot.
4. Insert
the
filmcartridge
into
the
film
chamber.
Draw
the
film
cartridge
acrosstheback
of
the
cameraanddrop
into
the
film
cham-
ber
(#23),
making
surethatthe
film
cartridge
1. Use35mm
ISO/ASA100
colorprint
film.
NOTE:
Two35mm
frames
produce
one
3-d
i
mensional
photog
raph.
No.
ofexposures No.
of3-D
on
film
cartridge prints
126
24 12
36 18
TheNishika
3-dimensional
process
re-
quires
agroup
of
fourhalf-frame
35mm
negativeimages
(using
two
regular
35mm
frames)
to
produce
each3-dimensional
photograph.
Therefore,
half
the
number
of
pictures
stated
onthe
film
cartridge
will
be
produced
from
any
roll
of
film
used
in
your
Nishika
camera.
2. Openthecamera.
Openthecamera
back
(#1
7)
by
pulling
up
firmly
onthe
rewind
knob
(#1
1) untilthe
backdoorsprings
open.
www.orphancameras.com
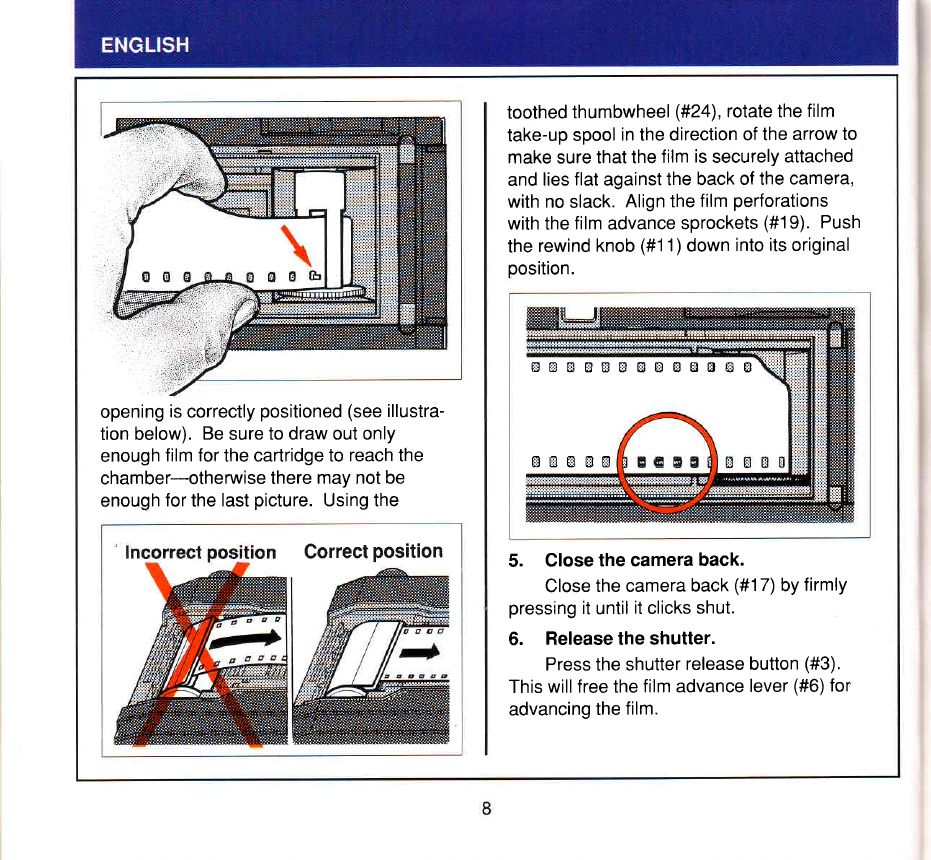
opening
is
correctly
positioned(see
illustra-
tionbelow).
Be
sure
todrawoutonly
enough
filmfor
thecartridgetoreachthe
chamber-otherwise
there
maynot
be
enough
for
the
last
picture.
Usingthe
Correct
position
toothed
thumbwheel
(#24),
rotatethe
film
take-up
spool
inthedirection
ofthe
arrowto
makesurethat
the
film
is
securely
attached
and
lies
flat
against
theback
ofthecamera,
withno
slack.
Alignthe
film
perforations
withthe
film
advance
sprockets
(#19).
Push
the
rewind
knob
(#1
1)
down
intoits
original
position.
gBEtsBtstsEOBEEE
r'::t fil F.1 f.n fit
HUgU@
5. Closethe camera
back.
Close
thecamera
back
(#17)
by
firmly
pressing
it
until
it
clicksshut.
6. Release
theshutter.
Presstheshutter
releasebutton
(#3).
This
willfreethe
film
advance
lever
(#6)
for
advancing
the
film.
7. Advance
the
film.
Operatethe
film
advance
lever
(#6)
by
cushing
it
to
the
right
as
far
as
itwill
go.
When
you
release
it,
the
lever
should
return
to
itsnormal
position.
Anintermediate
dot
will
appear
in
the
exposure
counter
window
(#7).
8. Advance
to number
1foryourfirst
picture.
Repeat
steps6and
7until
the
number
"-1-"
appears
in
the
center
oftheexposure
counter
window
(#7).
Thefilmis
nowin
posi-
tion
for
your
first
picture.
www.orphancameras.com
1. The
Exposure
Counter
Theexposure
counter
(#7)
is
designed
toindicate
the
number
of
3-dimensional
photographs
you
havetaken
once
the
film
has
been
advanced.
Since
your
camera
uses
two
"standard"
exposures
foreach
3-dimensional
photograph,
always
keep
in
mindthat
the
number
of3-dimensional
ex-
posures
equals
halfof
the
exposures
stated
on
the
filmcartridge,
withthe
exposure
counter
automatically
keeping
track.
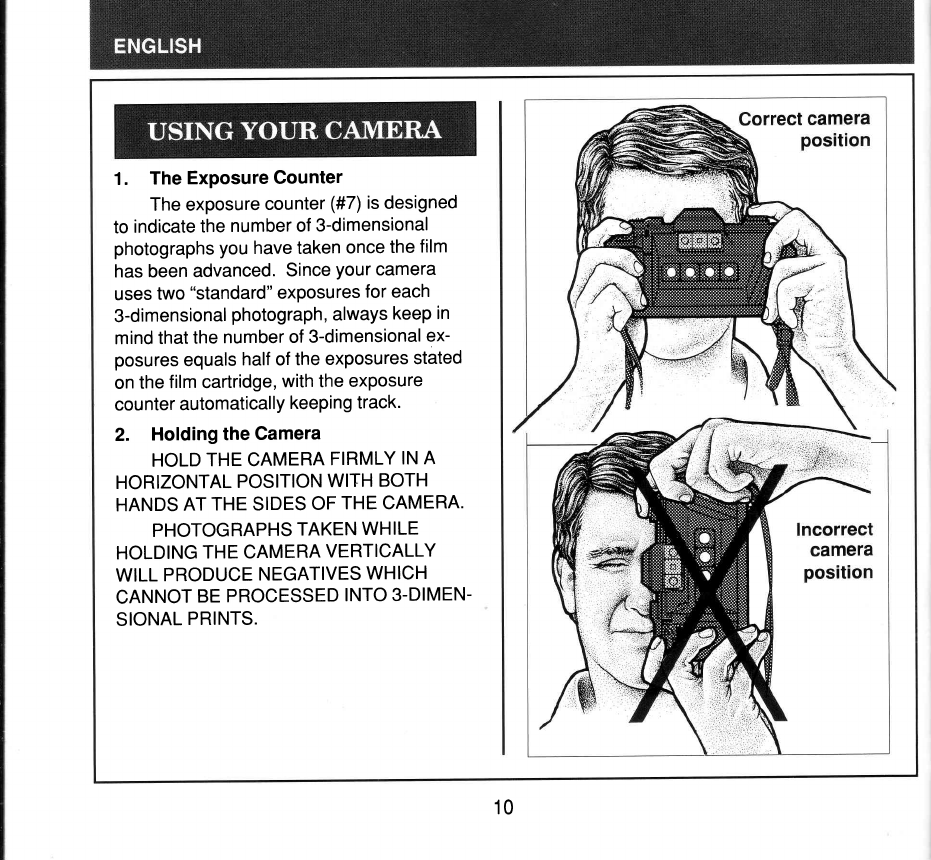
2. Holding
theCamera
HOLD
THECAMERA
FIRMLY
IN
A
HORIZONTAL
POSITION
WITH
BOTH
HANDS
AT
THESIDES
OF
THECAMERA.
PHOTOGRAPHS
TAKEN
WH
ILE
HOLDING
THECAMERA
VERTICALLY
WILL
PRODUCE
NEGATIVES
WHICH
CANNOT
BE
PROCESSED
INTO3-DIMEN-
SIONAL
PRINTS.
10

3. Settingthe Aperture
Select
theaperture
orlens
diaphragm
:oening
thatbest
represents
the
amountof
,ght
on
thesubjectbeing
photographed.
There
arethree
possible
settings,chosenby
rovingthe
aperture
selector
(#2)
upand
iown. Usethetopsetting
(Sunny)
when
the
surbject
of
your
picture
iswellilluminated
by
:night
sunlight.Usethe
middle
setting
(Part-
y
Sunny)
in
partially
sunny/partiallycloudy
situations.
Usethebottomsetting
(Cloudy/
ndoors)when
thesubject
of
your
picture
is
coorly
illuminated,
asonan
overcastor
rainy
day,
or
whenever
you
aretakingapicture
ndoors.
lf
you
arein
doubtastowhere
tosetthe
aperture,
itis
bettertoerr
infavor
ofallowing
'Trore
lightinto
thecamera.
For
example,
if
./ou
are
not
sure
whether
tosettheaperture
selector
toSunnyortoPartly
Sunny,
itis
safer
tochoose
Partly
Sunny.
4. TheLowLightIndicator
Lookinto
the
viewfinder
(#14)
and
push
down
lightly
ontheshutterrelease
button
#3),being
carefulnot
todepress
it
allthe
waydown.
When
thebuttonis
partially
de-
cressed,
a redlightmay
appear
in
the
view-
finder.lf
so,this
indicates
thatthere
isnot
Lowlight
indicator
enoughlightfor
aproper
exposure,and
you
will
need
aflash
unitsuchasthe
Nishika
TwinLight
3010to
produce
correctlyex-
posed
negatives.lfnoredlight
appears,
there
is
enoughilluminationfor
aproper
ex-
posure.
5. Framing
the Picture
Lookinginto
the
viewfinder
eyepiece
(#14),you
will
seeabright
line
frame-an
outlineofthe
image
area
inwhich
you
can
compose
yourphotographquickly
and
www.orphancameras.com
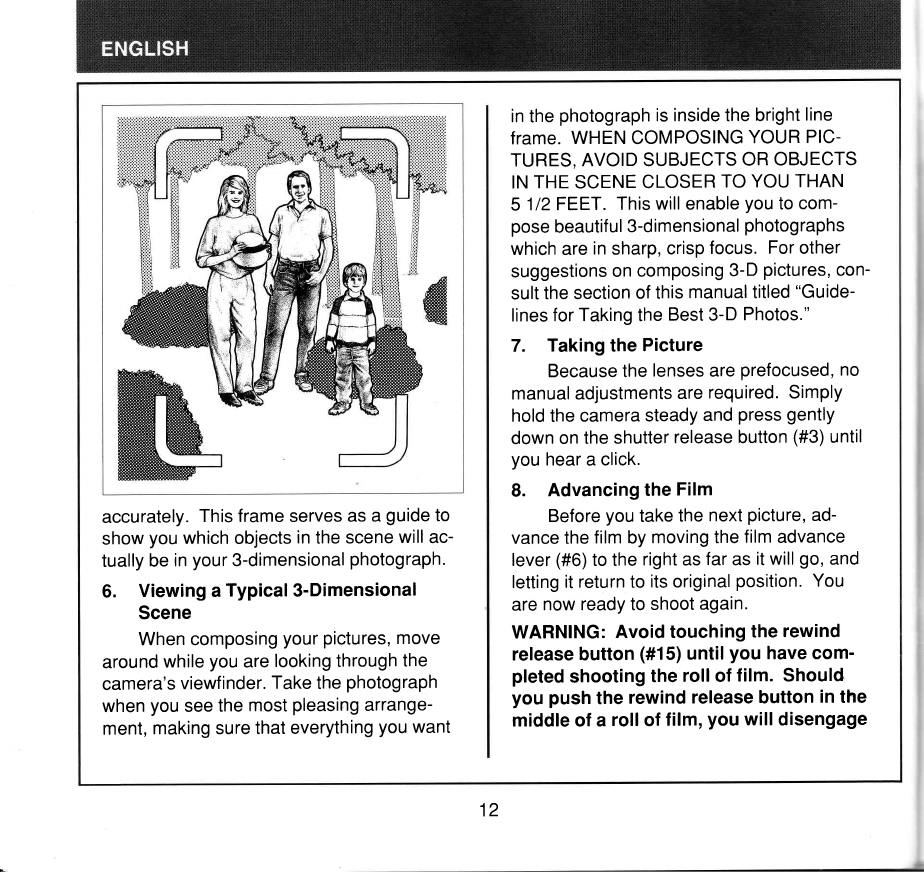
in
the
photograph
isinsidethebright
line
frame.
WHEN
COMPOSING
YOUR
PIC-
TURES,
AVOIDSUBJECTS
OR
OBJECTS
IN
THE
SCENE
CLOSER
TO
YOU
THAN
5 112FEET.
Thiswillenable
you
to
com-
pose
beautiful
3-dimensional
photographs
whichare
in
sharp,
crisp
focus.
For
other
suggestions
on
composing
3-D
pictures,
con-
sult
thesection
ofthis
manualtitled
"Guide-
lines
forTakingthe
Best3-D
Photos."
7. TakingthePicture
Becausethe
lenses
are
prefocused,
no
manualadjustments
are
required.Simply
hold
the
camera
steady
and
press
gently
down
on
theshutter
releasebutton
(#3)
until
you
hear
aclick.
8. Advancing
the
Film
Before
you
take
the
next
picture,
ad-
vancethe
film
by
movingthe
film
advance
lever
(#6)
tothe
rightas
far
as
itwill
go,
and
letting
itreturnto
its
original
position.
You
are
nowreadyto
shoot
again.
WARNING:
Avoidtouching
the
rewind
releasebutton
(#15)
until
you havecom-
pleted
shooting
the
roll
offilm. Should
you push
therewind
releasebutton
in
the
middle
ofa roll
offilm,
you
will
disengage
accurately.
Thisframeserves
as
aguide
to
show
you
which
objects
in
the
scene
will
ac-
tually
be
in
your
3-dimensional
photograph.
6. ViewingaTypical3-Dimensional
Scene
Whencomposing
your
pictures,
move
around
while
you
are
lookingthrough
the
camera's
viewfinder.
Take
the
photograph
when
you
see
the
most
pleasing
arrange-
ment,
making
surethat
everything
you
want
12
thesprocket
wheel
which measures
the
amountof film advanced.
9. End
of Roll
lf
you
have
followed
thefilmloadingin-
structionscorrectly,when
all
theavailable
exposuresareused
you
shouldfeel
a resis-
tance
if
you
trytomove
the
film
advance
lever
(#6).
This
indicates
theend
ofthe
roll.
Donotforcethefilm advancelever
as
youapproach
theendof your rollof film.
Youmayhave
already
shotthe lastpic-
tureon thatroll. lfyou feel
any resis-
tance
inadvancing
the
film,
rewind
the
filmto prevent
tearing.
Forcing
thelever
inorder
to
"squeeze
in" onemorepicture
may
causeexposure
overlap,
spoilinE
both
thepictureyou aretrying to shoot and
theoneyou shotjust before
it.
13
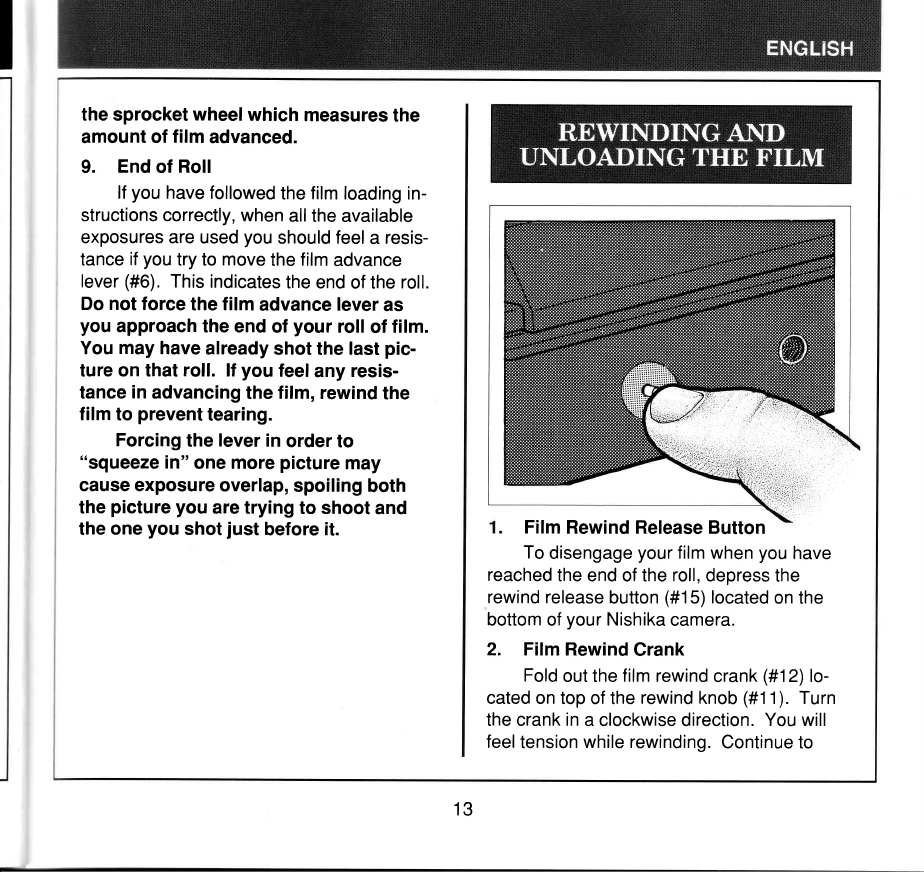
Film
RewindReleaseButton
To
disengage
your
filmwhen
you
have
reached
theendofthe
roll,
depress
the
rewindrelease
button
(#15)
located
onthe
bottomof
your
Nishika
camera.
2. FilmRewind
Grank
Fold
outthe
filmrewind
crank
(#1
2)lo-
catedon
topofthe
rewind
knob
(#1
1).Turn
thecrank
in
aclockwisedirection.
Youwill
feel
tension
whilerewinding.
Continueto
www.orphancameras.com

Camera
1. When
you
are
notusing
your
camera
for
long
periods
of
tiffie,
store
it
withthe
film
advance
lever
uncocked
inacool,
clean,
dry,
well-ventilated
place,
free
fromdust
and
moisture.
2. lf
storing
fora long
period,
remove
the
batteries
from
the
battery
chamber.
3. Do
notdroP
the
cam
era,
knockit
against
anything
solid
or
misuse
it.Acci-
dents
and
rough
handling
can
easily
dam-
age
the
camera's
internal
mechanism.
4. Yourcamera
is
not
waterProof.
Protect
itfrom
watersplashes
and
rain.
5. Do
nottouch
the
surface
of
the
len-
ses.Always
keepthe
viewfinder
and
lenses
as
clean
as
possible.Toremove
loose
dust
and
dirt,
clean
withalensbrush
or
soft,
lint-
freecotton
cloth.Do
nottry
towipeoff
granular
dirt
or
dust
by
any
other
means
or
you
mayscratch
the
lens.
turn
the
crank
until
there
is
notension,
indicating
that
the
film
hasbeen
fully
re-
wound
intothe
film
cartridge.
3. Unloading
the
Film
Pullup
the
rewind
knob
(#1
1)
toopen
the
back
of
the
camera
and
remove
the
film
cartridge.
14
li
6. Smudges
suchasfingerprints
should
becarefully
wiped
awaywith
alens
cleaning
tissue.
For
difficultmarks,
use
aliquid
lens
cleaner
and
lens
tissue.
7. Donot
leave
your
camerain
you
r car
or
in
directsunlightfor
any
length
oftime.
8. Have
all
repairs
performed
by:
NISHIKA
CORPORATION
SERVICE
CENTER
1
Nishika
Drive
Henderson,
NV
89014
Photographs:
Nishika
3-D
photographs
are
printed
on
aspecialhighly
durablematerial.
However,
you
should
treat
these
photographs
tike
any
other
photo-sensitized
product,
andbe
care-
ful
toprotect
the
surfacefrom
scratches
and
liquidswhich
mayleave
amark
or
smudge
onthe
material.
WARNING:
Donotmark
orwrite
onthe
backofyour Nishika
photographs!Due
to thespecial
translucent
material
used
foryourphotographs,
thewriting
or mark-
ing
willshow
through
tothe
front.
Negatives:
Negatives
areextremely
sensitivetooil
and
scratching.
Please
remember
alwaysto
HANDLE
DEVELOPED
NEGATIVE
STRIPS
BY
THE
EDGES.
Oil
from
your
skinand
other
substancesfrom
your
fingers
can
ruin
otherwise
perfect
negatives.
When
you
require
reprinted
copies
of
your
3-dimensional
prints,
you
must
supply
the
original
negative
groups
in
strips
to
Nishika
Corporation.
IMPORTANT:
A copyprint
cannot
be
made
fromyour Nishika
3-dimensional
print. The
laboratory
musthave
theorig-
inalnegative
group.
15
www.orphancameras.com

Your
Nishika
N80003-Dcamera
repre-
sents
the
stateof
theart
inhome3-D
photog-
raphy,
giving
you
photos
thatexhibit
extraor-
dinary
depth
and
realism.
The
suggestions
in
thissection
will
enab,le
you
tomakethe
best
use
of
your
camera,
and
take
the
most
effective
3-D
photographs
possible.
Overview
The3-Deffect
of
Nishika
photographs
occurs
wheneveran
object
atone
distance
fromthe
camera
visuallyoverlaps
another
object
atadifferent
distance.
The
most
ef-
fective3-D
photos
have
overlapping
objects
in
the
foreground,
midgroundand
back-
ground
ofthe
composition.
When
your
Nishika
3-D
photos
are
processed,
a"key
(main)
subject"
must
be
selected
by
the
printing
technician.
This
key
subject
will
bethe
focal
point
of
the
photo-
graph,
and
objects
that
share
its
distance
fromthecamera
will
exhibit
the
mostclarity.
Objects
either
tarin
front
or
far
behind
the
keysubject
may
beslightly
less
sharp.
Several
guidelines
areused
by
Nishika
technicians
to
determine
the
key
subject
of
a
3-D
photo.
lf
there
is
only
one
person
in
the
picture,
that
person
will
bechosen
as
the
key
subject.
lf
there
are
two
people
at
dif-
ferentdistances
fromthe
camera,
the
key
subject
will
bethe
closer
person.
In
photos
wherethereare
more
than
two
people
atdif-
ferent
distances
fromthecamera,
the
key
subject
willbethe
person
mostcentrally
lo-
cated
in
the
midrangeofthe
composition.
Finally,
for
photos
without
people,
the
key
subject
will
bethe
mainsubject
asdeter-
minedbythe
technician,
and
will
usually
be
centrally
located
in
the
midrangeofthe
com-
position.
Thefollowing
guidelines
willhelp
you
take
maximumadvantage
ofthe
3-D
poten-
tial
ofthe
Nishikasystem.
16

IGeneral
3-D
Guidelines
1. Use
your Nishika
3-D
camera
ina
horizontal
position
only.
ln
the
verticalposition,
no
3-D
effect
will
be
achieved,
2, Include
foreground
objects
that
visually
overlap
more
distant
objects
in
the
composition.
The
most
dramatic
3-D
effect
is
achieved
when
objects
in
theforeground
cross
over
orpartially
cover
more
distant
ob-
jects.
Incorrect
17
www.orphancameras.com
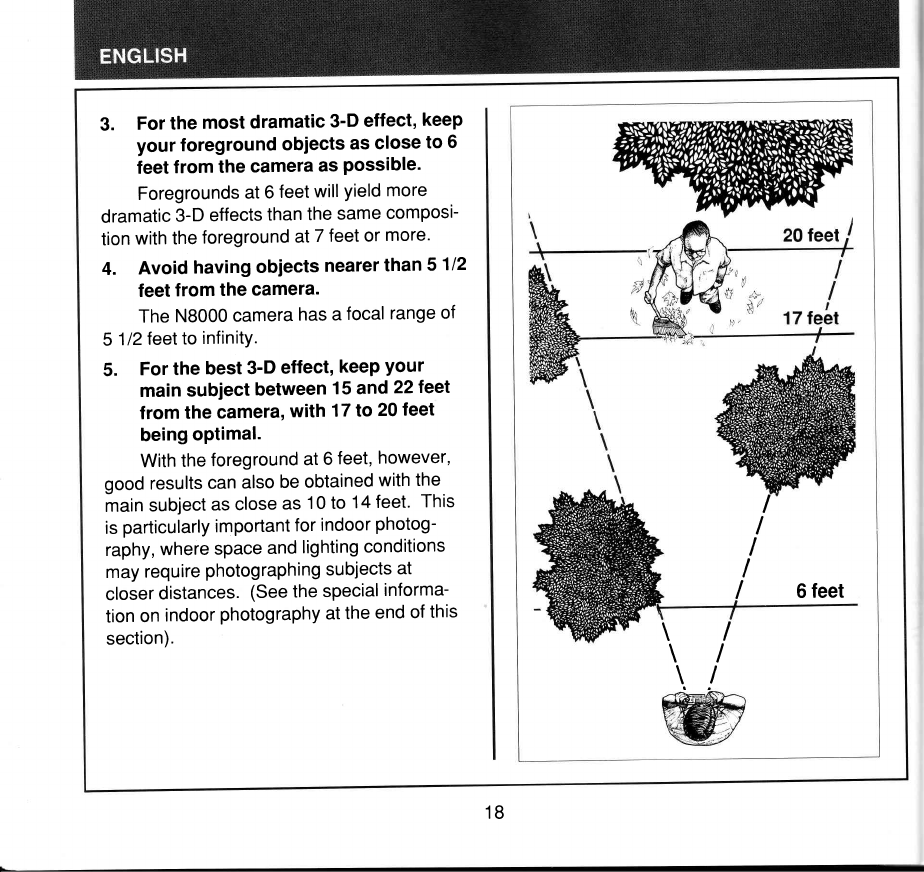
3. Forthe mostdramatic
3'Deffect,
keep
your foregroundobiects
ascloseto 6
feet
from thecamera
asPossible.
Foregrounds
at
6feet
will
yieldmore
dramatic
3-D
effects
than
the
same
composi-
tion
with
the
foreground
at
7feetor
more.
4. Avoidhaving
obiects
nearer
than 5112
feet
fromthecamera.
The
N8000
camera
has
afocal
range
of
5 112
feet
toinfinitY.
5. Forthe best3-D
effect,
keeP
Your
mainsubiect between15and 22teet
from thecamera,
with 17to 20
feet
being
optimal.
With
the
foreground
at
6feet,
however,
good
results
can
also
be
obtained
with
the
main
subject
as
close
as1
0to14
feet.This
is
particularly
important
for
indoor
photog-
raphy,
where
space
and
lighting
conditions
may
require
photographing
subjects
at
closer
distances.
(see
the
special
informa-
tion
on
indoor
photography
at
the
end
of
this
section).
I
I
I
I
I6feet
\l
\l
\t
18

6. Besurethatallobjectsinyour 3-D
pictures
arewell lit,
andwhenever
convenient
include
avariety
of bright
colorsinyourcomposition.
This
will
enhance
the
3-D
effect,
aswell
asbring
addedlife
to
your
pictures.
7. Avoid posingsubjects
against
aflat
background
suchas
awall.
Posing
subjects
against
flat
back-
grounds
will
naturally
result
in
pictures
that
lack
depth.
Special Guidelines for Photograph-
ing PEOPLE
8. Avoidphotographing
people
in
the
foreground
whenthe main
subjectis
atagreater
distance
from thecamera.
People
can
be
photographed
from
as
close
as6feet
when
they
are
in
fact
the
rnain
subject
of
the
composition.
9. Avoidphotographing
people
from
fartherawaythan 25feet.
'l
0. When
photographing
agroupof
people
who are
allatapproximately
thesame
distance
from thecamera,
positionthemso thatthereis some
space
side-to-side
between
them.
Indoor
Photography
As
can
be
seenfrom
the
General
3-D
Guidelines
above,
itis
possible
to
take
effec-
tiveNishika
photographs
with
your
main
sub-
ject
positioned
atawide
range
ofdistances
from
the
camera.
In
well-lit
outdoor
settings,
17
to
20
feet
is
optimal.
For
indoor
photog-
raphy,
however,
space
considerations
may
make
such
distances
impractical.
Further-
more,
themajority
of
flash
units,
including
the
Nishika
Twin
Light
3010,
aremost
effec-
tive
in
lighting
subjects
that
are
14
feet
or
closer
to
the
camera.
For
thesereasons,
it
is
usually
best
tophotograph
subjects
at
dis-
tances
of10
to14
feet
from
the
camera
when
taking
3-D
pictures
indoors.
Tomaximize
the
3-D
effect
of
indoor
photographs
with
themain
subject
atthese
closer
distances,
remember
to
keep
your
foreground
asnear
aspossible
to6feet
from
the
camera.
For
proper
exposure,
make
sure
you
set
thelighting
selector
on
your
camera
to
the
Cloudy/lndoors
position
wheneveryou
are
taking
apicture
indoors.
www.orphancameras.com
Table of contents


