NPG DVD-210HZU User manual

DVD-210HZU
ESPAÑOL
ENGLISH
FRANÇAIS
PORTUGUÊS
Personal Grand Technology S.A. C Ecuador, 14 28850 Torrejón de Ardoz - Madrid - Spain
Tel. 902 501 406 sat@npgtech.com www.npgtech.com

Manual de in truccione
DVD-210HZU
Personal Grand Technolo y S.A. C/ Ecuador, 14 28850 Torrejón de Ardoz - Madrid - Spain
Tel. 902 501 406 sat@np tech.com www.np tech.com
ESPAÑOL

2
Ín ice
1. Precauciones e instrucciones e seguri a 3
1.1 Precauciones 3
1.2 Instrucciones de se uridad 3
2. Elementos el sistema 4
2.1 Mando a distancia 4
3. Conexiones 4
3.1 Conexiones de salida audio y salida de vídeo 4
3.2 Conector SCART de conexión de salida A/V (buena calidad) 4
4. Tipos e repro ucción 5
4.1 Discos DVD 5
4.2 Archivos MP3 y WMA 5
4.3 Discos CD audio 5
4.4 Ima en JPEG 5
5. Configuración e sistema 5
5.1 Confi uración de idioma 5
5.2 Confi uración vídeo 5
6. Solución e problemas 6
ESPAÑOL

3
1. Precauciones e instrucciones e seguri a
Lea atentamente este manual del usuario antes de usar este producto. Conserve
el manual del usuario en un lu ar se uro como referencia en el futuro.
• Existen zonas con alta tensión dentro del equipo que pueden provocar daños
personales. No abra el producto bajo nin ún concepto. En caso de avería,
pón ase en contacto con nuestro servicio técnico.
• Para evitar incendios o electrocuciones accidentales, no pon a el producto
bajo la lluvia ni en lu ares muy húmedos.
• Este disposivo usa un sistema láser. Para evitar una exposición directa al rayo
láser, no abra el producto ni mire al rayo.
• Si es necesario mantenimiento técnico, contacte con nuestro servicio téc-
nico.
• Este producto se ha probado de acuerdo con la clase B de disposivos di itales
y cumple con todas las especificaciones de la CE.
• Si el cable está dañado, debe ser reparado por el fabricante, el a ente de ser-
vicio postventa o una persona con calificación similar para evitar ries os.
1.1 Precauciones
Es muy importante leer atentamente y obedecer las instrucciones de este ma-
nual del usuario. Conserve el manual como referencia en el futuro.
• No pon a el producto sobre superficies inestables, ya que podría caer al suelo y
averiarse o provocar daños a personas o mascotas.
• Desconecte el producto de la toma de corriente antes de limpiarlo. No use lim-
piadores líquidos o en aerosol. Use un trapo humedecido.
• Para evitar posibles daños al equipo, desconéctelo cuando no vaya a usarlo du-
rante un periodo de empo prolon ado o en caso de tormentas.
• No coloque nin ún objeto en el producto mediante las ranuras de venlación,
podría provocar un cortocircuito e iniciar un incendio. No vierta líquidos sobre
el reproductor DVD
• La toma de corriente debe estar cerca del equipo y tener un fácil acceso. No pise
el cable de alimentación ni coloque objetos encima.
• Para evitar interferencias, los disposivos acvos como TV, amplificadores, sis-
temas de cine en casa… deben mantenerse alejados de la unidad.
• La alimentación de este producto es: CA 110-240V~50/60Hz. No use nin una
otra fuente de alimentación.
• No obstruya las ranuras de venlación ni pon a el disposivo cerca de fuentes
de calor.
- Los niños deben ser vi ilados para aranzar que no usen el disposivo
como ju uete.
1.2 Instrucciones e seguri a

4
2. Elementos el sistema
2.1. Man o a istancia
1. DVD/USB
2. PROG
3. TIEMPO
4. TECLAS NUMÉRICAS
5. REPETIR
6. ALEATORIO
7. OSD
8. ZOOM
9. CONFIGURACIÓN
10. ARRIBA/ABAJO/
DERECHA/IZQUIERDA
11. TÍTULO
12. RETROCEDER
13. A-B
14. ANTERIOR
15. DETENER
16. ABRIR/CERRAR
17. REPRODUCIR/PAUSA
18. SILENCIO
19. ÁNGULO
20. SUBTÍTULOS
21. IDIOMA
22. PBC
23. VOLVER
24. N/P
25. REINICIO
26. RALENTIZAR
27. MODO VÍDEO
28. MENÚ
29. ENTER
30. I/D
31. AVANCE
32. VOL+
33. SIGUIENTE
34. VOL -
2.2. Panel elantero
1. BANDEJA DE DISCO
2. ABRIR/CERRAR LA BANDEJA DEL DISCO
3. REPRODUCIR O PAUSA
4 .STOP
5 .ENCENDIDO
6. Receptor IR (Infra Rojos)
7. Puerto USB
2.2. Panel trasero
1. Cable de alimentación de corriente
2. SALIDA HDMI
3. SALIDA Audio Di ital
4. SALIDA SCART / Euroconector
1234567
1 2 3 4
1
2
3
4
5
6
7
8
9
10
11
12
13
14
15
16
17
18
19
20
21
22
23
24
25
26
27
28
29
30
31
32
33
34

5
El DVD comenzará a funcionar automácamente cuando lo introduzca en el repro-
ductor abriendo el menú de inicio del disco. Desde este menú, se ún el disco, puede
ele ir diversas opciones, como iniciar la reproducción de la película DVD, el idioma
de audio, el idioma del menú, etc.
Durante la reproducción de DVD:
- Pulse la tecla “MENÚ” para acceder al menú de inicio del DVD.
- Use la tecla “TÍTULO” para volver al menú de tulo del DVD (si el disco ene un
menú de tulo).
- Puede usar las funciones habituales de reproducción: Reproducir, Pausa, Detener,
Reproducción foto rama a foto rama (FOTOGRAMA), ZOOM, cámara lenta (RALEN-
TIZAR), saltar (>> y <<), reper y reper A-B.
- Use la tecla “SIGUIENTE” para cambiar el capítulo (para acceder al si uiente capítulo)
y “ANTERIOR” (para ir al capítulo anterior).
- Use la tecla “TIEMPO” para reproducir un momento concreto del DVD o acceder a
un tulo y capítulo específicos.
Use las teclas “ARRIBA” y “ABAJO” para seleccionar “Tiempo” y acceder a un mo-
mento concreto del DVD para reproducirlo o seleccione “Título/Capítulo” para ac-
ceder a un capítulo concreto en el tulo.
Use las teclas numéricas para introducir el empo, tulo y capítulo que desee repro-
ducir y pulse “ENTER”.
- Pulse la tecla “IDIOMA” para seleccionar el idioma audio y los sistemas Dolby Di ital
AC3 y DTS Di ital (si el disco se ha codificado con estas funciones).
- Use la tecla “ÁNGULO" para ele ir entre disntos án ulos de cámara en el DVD (si
el disco incluye esta opción).
- Use la tecla “SUBTÍTULOS” para acvar/desacvar los subtulos (si el disco incluye
esta función).
- Use las teclas “VOL+” y “VOL-“ para controlar el volumen del sonido.
3. Conexiones
Use sonido envolvente de 2.1 canales y disfrute de su propio cine en casa.
Puede conectar el vídeo entre el reproductor DVD y la TV usando vídeo com-
puesto o el terminal SCART.
3.1 Conexiones e sali a au io y sali a e ví eo
4. Tipos e repro ucción
3.2. Conector SCART e conexión e sali a A/V (buena cali a )
Puede conectar el DVD a la TV con una salida de audio y vídeo SCART o Euro-
conector, que permite obtener sonido e ima en simultáneamente con el cable
Euroconector.
Debería seleccionar la opción “RGB” para confi urar la salida vídeo.
4.1 Discos DVD

Cuando introduzca un CD en formato MP3 o WMA, el sistema comenzará a re-
producir el primer tulo del primer directorio.
- Use las teclas del cursor para seleccionar la canción que desee y pulse "ENTER"
para iniciar la reproducción.
- Seleccione la úlma canción de la lista y pulse la tecla de cursor “ABAJO” o
“DERECHA” para acceder al directorio si uiente.
- Seleccione la primera canción de la lista y pulse la tecla de cursor “ARRIBA” o
“IZQUIERDA” para acceder al directorio anterior.
- Puede usar las funciones habituales de reproducción
- Puede usar la tecla “PROGRAMA” para acceder al modo pro ramación (des-
crito en la sección 5.2)
Cuando introduzca el CD, el sistema comenzará a reproducir la primera pista
del disco.
- Puede usar las funciones normales de reproducción, como reproducir, pausa,
detener, pista si uiente (SIGUIENTE) y pista anterior (ANTERIOR), saltar y re-
per.
- Puede acceder al modo pro ramación pulsando la tecla “PROGRAMA” como
se ha descrito en las secciones anteriores.
- Pulse la tecla "MOSTRAR" para acceder a información sobre el po de disco,
empo transcurrido y empo restante, número de pista actual y número total
de pistas.
6
4.2 Archivos MP3 y WMA
4.3 Discos CD au io
4. Tipos e repro ucción
Después de introducir un CD con imá enes JPEG, el sistema comenzará a mos-
trar una presentación.
- Use la tecla “ÁNGULO” para rotar las imá enes.
- Use la tecla “ZOOM” para aumentar las imá enes.
- Use la tecla “TÍTULO” para mostrar el álbum de imá enes.
- El reproductor mostrará las imá enes de 9 en 9. Pulse la tecla “SIGUIENTE”
para mostrar el si uiente rupo de 9 imá enes, y la tecla “ANTERIOR” para vol-
ver al rupo de 9 anterior.
- Use las teclas del cursor para seleccionar la ima en que desee y pulse "ENTER"
para verla a mayor tamaño.
- Pulse el botón DETENER para volver al menú de reproducción.
4.4 Imagen JPEG

7
Pulse la tecla “CONFIGURACIÓN” para ir al menú de confi uración del sistema
y cambiar las opciones se ún los submenús si uientes:
- Confi uración de idioma
- Confi uración vídeo
- Confi uración de clasificación
Use las teclas de cursor del mando a distancia para seleccionar una opción con-
creta y pulse “ENTER” para confirmar.
Esta opción le permite seleccionar el idioma preferido para los menús OSD, sub-
tulos, audio y menú de disco DVD. Puede ele ir diversos idiomas, entre ellos
el español.
5.1 Configuración e i ioma
5.2 Configuración ví eo
A. Relación e aspecto: Use esta opción para seleccionar el formato que coin-
cida con la confi uración de pantalla de la TV y el DVD reproducido.
B. Mo o visiona o: Con esta opción puede seleccionar el modo de visionado
de vídeo en pantalla.
5. Configuración e sistema
C. Sistema TV: Use esta opción para seleccionar el formato de vídeo PAL o
NTSC.
D. Sali a ví eo: Con esta opción puede ele ir el po de salida vídeo que use
su instalación: CVBS (señales de vídeo compuesto) o RGB (señales de
vídeo RGB

8
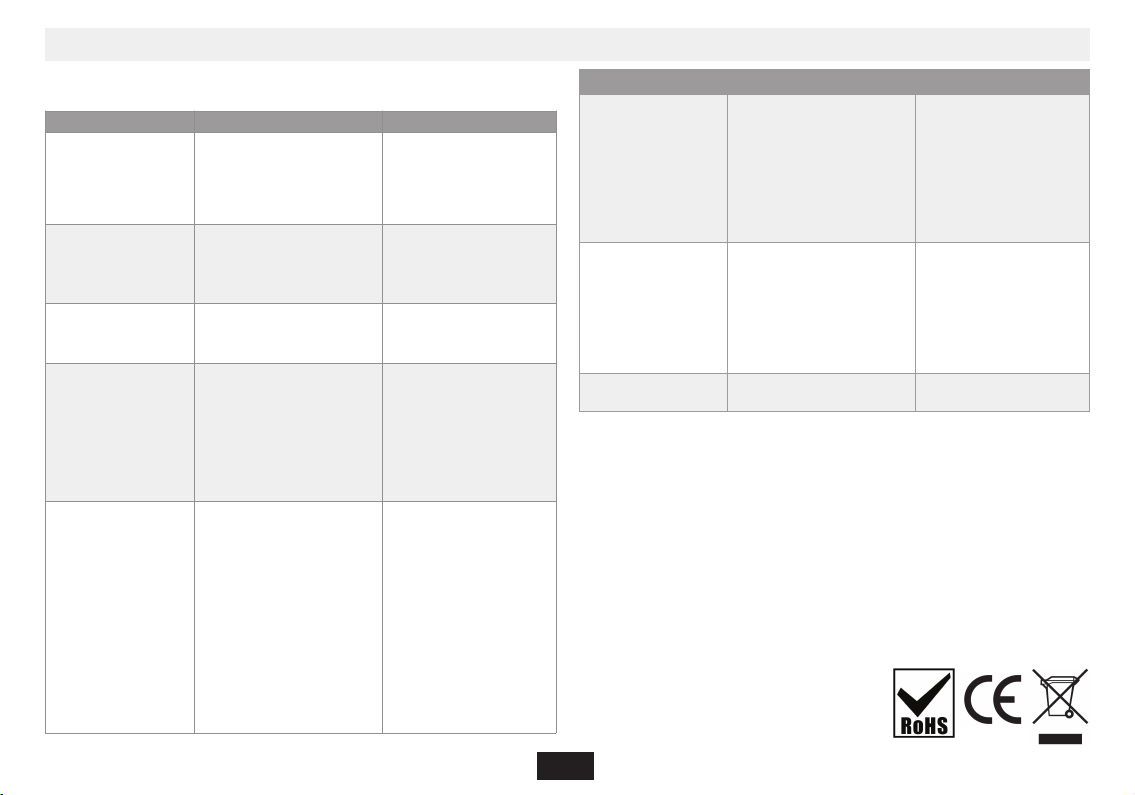
Si se encuentra con un problema, recomendamos comprobar la lista si uiente
antes de solicitar asistencia técnica.
6. Solución e problemas
Síntoma Posible causa Solución
No se enciende 1. Alimentación no conectada.
2. Mal contacto entre el
enchufe y la toma de
corriente.
3. Alimentación de la toma de
corriente desconectada.
1. Conectar a la
alimentación.
2. Enchufe de nuevo o
cambie de toma.
3. Acve la toma de
corriente.
Sin sonido 1. Conexión de señal
incorrecta.
2. Disco deformado o sucio.
3. El sistema está silenciado.
1. Conecte correctamente
las señales.
2. Limpie o arre le el disco.
3. Pulse de nuevo el botón
“Silencio”.
Sin ima en 1. Conexión de señal
incorrecta.
2. Estado de TV incorrecto
1. Conecte correctamente
las señales.
2. Ajuste el estado TV/AV.
Sin color 1. Selección incorrecta de
sistema de TV.
2. Ajuste de color incorrecto.
3. Confi uración de salida
vídeo incorrecta.
1. Confi ure el sistema pul-
sando el botón “Sistema”
en el mando a distancia.
2. Ajuste el color.
3. Compruebe que la
confi uración de salida
vídeo sea correcta.
No se puede
reproducir el disco
1. No hay disco en la unidad.
2. Disco colocado
incorrectamente.
3. Condensación de humedad
en la unidad.
4. No está en estado
reproducción.
5. Formato de disco
incorrecto.
6. Disco sucio.
1. Introduzca un disco.
2. Pon a el disco en la
bandeja con la equeta
hacia arriba.
3. Deje encendida la unidad
durante una hora (sin
disco) y antes de usarlo de
nuevo.
4. Pulse el botón
“Reproducir” para pasar a
estado reproducción.
5. Cámbielo por un disco
soportado.
6. Limpie el disco con una
amuza suave del centro a
los bordes.
Síntoma Posible causa Solución
Mal funcionamiento
del mando a
distancia
1. El mando a distancia no está
orientado al sensor.
2. La distancia es superior a 8
metros.
3. Baja tensión de las baterías
del mando.
4. Obstáculos entre la unidad y
el mando.
1. Oriente el mando a
distancia al sensor.
2. Reduzca la distancia de re-
cepción.
3. Cambie las baterías.
4. Rere los obstáculos.
Avería súbita 1. Mala calidad de disco.
2. Pulsación accidental de otros
botones.
3. Estáca externa.
1. Espere 5.10 se undos y se
restablecerá la
reproducción.
2. Usar de nuevo.
3. Apa ar la unidad durante
1-2 minutos y abrir de
nuevo.
División de ima en 1. El sistema seleccionado es in-
compable con el disco.
1. Confi ure el sistema
correcto.
Eliminacion el electro omesco viejo
En base a la Norma europea 2002/96/CE de Residuos de aparatos Elctricos y Electronicos
(RAEE), los electrodomescos viejos no puenden ser arrojados en los contenedores muni-
cipales habituales ; enen que ser reco idos selecvamente para opmizar la recuperacion
y reciclado de los componentes y materiales que los constuyen, y reducir el impacto en
la salud humana y el medioambiante. El simbolo del cubo de basura tachado se marca
sobre todos los productos para recordar al consumidor la obli acion de separarlos para la
reco ida selecva.
El consumidor debe contactar con la autoridad local con el vendedor para informarse en
relacion a la correcta eliminacion de su electrodomesco viejo.

User manual
DVD-210HZU
Personal Grand Technology S.A. C/ Ecuador, 14 28850 Torrejón de Ardoz - Madrid - Spain
Tel. 902 501 406 sat@npgtech.com www.npgtech.com
ENGLISH

2
Index
1. Cauons and safety instrucons 3
1.1 Cauon 3
1.2 Safety instrucons 3
2. System elements 4
2.1 Remote control unit 4
3. Connecons 4
3.1 Audio and video output connecons 4
3.2 A/V output connecons 4
4. Playback types 5
4.1 DVD discs 5
4.2 MP3 and WMA files 5
4.3 CD audio discs 5
4.4 JPEG pictures 5
5. System sengs 5
5.1 Language setup 5
5.2 Video setup 5
6. Trouble shoong 6
ENGLISH

3
1. Cauon and safety instrucons
Please, read this User Manual carefully before using the product. Keep the user
manual in a safe place to future advice.
• There are high voltage areas inside this equipment that may injury people.
Therefore, please do not open the product on any account. In case of any tech-
nical failure, please get in contact with our technical service.
• In order to avoid either an accidental fire or electric shock, please do not place
the product under the rain or in moist zones.
• This device uses a laser system. To prevent a direct exposure to the laser
beam, please neither open the product nor stare at laser beam.
• In case of being necessary any technical maintenance, please contact with
our technical service.
• This product has been tested according to the B-Class of digital devices and it
meets all the CE specificaons.
• If the cable is damaged, it must be repaired by the manufacturer, the a er
sales service agent or similarly qualified person to avoi danger.
1.1 Cauon
It is very important to read aenvely and follow out the instrucons of this
user manual. Keep the manual for future consultaon.
• Do not place the unit on uneven surfaces because the player may fall to the
ground and suffer a breakdown or damage to people or pets.
• Disconnect the product from the mains before cleaning it. Do not use cleaning
liquid or sprays. Use only a moist cleaning rag.
• To avoid possible damage to equipment, please unplug it, when it is not going
to be used for a long me or in case of storms.
• Do not introduce any object into the product by means of the venlaon slots
since it could cause a short-circuit and start a fire. Do not pour liquids on the
DVD player
• The mains socket must be close to the equipment and be easily accessible.
Do not either step on the powering cable or place objects on it.
• To avoid interferences, the acve devices such as TV amplifiers, Home Theater
Systems, ... must be kept away from the unit.
• The powering supply of this product is, AC 110-240V ~ 50/60Hz. Do not use
any other power source.
• Do not either obstruct the venlaon slots or place the device near heang
sources.
- Children should be monitored to make sure they do not use the device as a
toy.
1.2 Safety instrucons

4
2. System elements
2.1 Remote Control
1. DVD/USB
2. PROG
3. TIME
4. NUMERIC KEYS
5. REPEAT
6. RANDOM
7. OSD
8. ZOOM
9. SETUP
10. UP/DOWN/RIGHT/LEFT
11. TITLE
12. REV
13. A‐B
14. PREV
15. STOP
16. OPEN/CLOSE
17. PLAY/PAUSE
18. MUTE
19. ANGLE
20. SUBT
21. LANGUAGE
22. PBC
23. RETURN
24. N/P
25. RESET
26. SLOW
27. V‐MODE
28. MENU
29. ENTER
30. R/L
31. FWD
32. VOL+
33. NEXT
34. VOL _
2.2 Front Panel
1. DISC TRAY
2. OPEN / CLOSE DISC TRAY
3. Play or Pause
4. STOP
5. ON
6. Receiver IR (Infra Red)
7. USB port
2.3 Rear Panel
1. Power supply cable
2. HDMI OUT
3. Digital Audio Output
4. SCART
1
2
3
4
5
6
7
8
9
10
11
12
13
14
15
16
17
18
19
20
21
22
23
24
25
26
27
28
29
30
31
32
33
34
1234567
1 2 3 4

5
The DVD will start running automacally a er you insert it into the player by openning
the disk’s home menu. From here, depending on the disk, you can select various op-
ons such as starng playback of the DVD film, audio language, etc.
During DVD playback.
(1) Press the “MENU” Key to access the DVD home menu.
(2) Uste the “TITLE” key to go to the DVD´s tle menu (ig the disk in the tray has a
tle menu).
(3) You can use the normal playback funcons: PLAY, PAUSE, STOP, Frame by Frame,
playback (STEP), ZOOM, slow moon (SLOW), SKIP (>> and <<), repeat and A‐B re‐
peat.
(4) Use the NEXT keys to change chapters (to go to the next chapter) and PREV (to go
to the previous chapter).
(5) Use the TIME key to play a certain momento on the DVD or to access a certain
tle and chapter.
Use the UP and DOWN keys to select “Time” to go to a certain moment in the DVD
and play it or select “Title/Chapter” to go to a certain chapter with that tle.
Use the numeric keys to enter the me, tle and chapter that you want to play and
then press “ENTER”.
(6) Press the “LANGUAGE” key to select the audio language Dolby Digital AC3 and
DTS Digital System selecon (if the disk was coded for these funcons).
(7)Use the “ANGLE” key to choose from various camera angles on the DVD (if the disk
includes this opon).
(8) Use the “SUBTITLE” key to acvate/deacvate the subtles (if the disk includes
this funcon).
(9)Use the “Vol +” and “Vol ‐” keys to control the audio volume.
Once you insert a CD in MP3 or WMA format, the system will start to play the
first tle in the first directory.
(1) Use the cursor keys to select the song you want and press "ENTER" to start
playback.
3. Connecons
Use 2.1-channel surround sound and enjoy your own home cinema. You can
connect the video between the DVD player and TV using composite video or
SCART terminal
3.1 Audio and video output connecons
4. Playback types
4.2 MP3 and WMA les
3.2. A/V output connecon SCART connector (Good quality)
You can connect the DVD to the TV with a SCART audoi and video output or EU‐
ROCONNECTOR which allows you to enjoy both sound and picture at the same
me through the Euro-connector cable.
You should select the “RGB” opon to setup the video output.
4.1 DVD discs

Once you insert the CD, the system will begin to play the first track on the disc
.
(1) You can use the normal playback funcons such as play, pause, stop, next
track (NEXT) and previous track (PREV), skip and repeat.
(2) You can enter the programming mode by pressing the “PROGRAM” key as
described in the previous secons.
(3) Press the “DISPLAY” key to access informaon on the type of disk, me lap-
sed and remaining me, currect track number and total number of tracks.
6
4.3 CD audio discs
4. Playback types
A er inserng a CD with JPEG pictures on it, the system will start to display a
slideshow.
(1) Use the “ANGLE” key to rotate the pictures.
(2) Use the “ZOOM” key to zoom the pictures.
(3) Use the “TITLE” key to display the album of pictures.
4.4 JPEG picture
(2) Select the last song on the list and press the “DOWN” or “RIGHT” cursor
key to go to the next directory.
(3) Select the first song on the list and press the “UP” or “LEFT” cursor key to
go to the next directory.
(4) You can use the normal playback funcons.
(5) You can use the “PROGRAM” key to go to programming mode (described
in secon 5.2)
(4) The player will display the pictures 9 at a me. Press the “NEXT” key to dis-
play the next set of 9 pictures, and use the “PREV”key to go back to the previous
set of 9.
(5) Use the cursor keys to select the picture you want and plress “ENTER” to
see it at a larger size.
(6) Press the STOP buon to go to the playback menu.

7
Press the "SETUP" key to go to the system setup menu to change the different
opons in the following submenus:
-.Language setup.
-.Video setup.
-.Rang setup.
Use the cursor keys on the remote control unit to select a specific opon and
press the “ENTER” to confirm.
This opon allows you to select your preferred languages for the OSD menus,
the subtles, the audio and the DVD disk menu. There are various languages
to choose from including english.
5.1 Language setup
5.2 Video setup
A. Aspect Rao: Use this to select the TV Shape that matches the screen seng
of your TV set and the DVD that is playing.
B. View mode: With this opon you can select the video vision mode on the
screen.
5. System sengs
C. TV system: Use this opon to select either PAL or NTSC video for-
mat.
D. Video output: With this opon you should choose the type of
video output that your installaon is using: CVBS (Composite
Video Signal) or RGB (RGB video signal).

8
In the event that you detect a problem, we suggest that you check the following
list before requesng technical service.
6. Trouble shoong
Symptom Possible cause Remedy
No power 1. Power supply not connected.
2. Bad contact between the power
plug and the receptacle.
3. The power of the receptacle is
off.
1. Connect to the power
supply.
2. Plug again or replace a re-
ceptacle.
3. Switch on the receptacle.
No sound 1. Incorrect signal connecon.
2. The disc is deformed or get dirty.
3. The system is in hte mute status.
1. Connect the signals properly.
2. Clean or fix the disc.
3. Press the “MUTE” buon
again.
No picture 1. Incorrect signal connecon.
2. Incorrect TV status.
1. Connect the signals pro-
perly.
2. Adjust the TV/AV status.
No color 1. Wrong selecon of TV
system.
2. Improper color adjustment.
3. Incorrect video output set-
ngs.
1. Setup the system by pres-
sing the “System” buon
of the Remote Controller.
2. Readjust the color
3. Check if the video output
sengs are correct.
Disc cannot be pla‐
yed
1. No disc in the drive.
2. Disc place wrongly.
3. Moisture has condensed in
the unit.
4. Not in a playing status.
5. Wrong disk format.
6. Disk is dirty.
1. Insert a disk.
2. Put the disk on the disk tray
properly with the label side
up.
3. Leave the unit on for about an
hour (without disk) and before
using it again.
4. Press the “Play” buon to switch
to playing status.
5. Repalce it with a supported
disk.
6. Clean the disk with a so cloth
from the centre to the edge.
Symptom Possible cause Remedy
Remote controller
malfuncon
1. The remote controller is not
directed at the sensor.
2. The receiving distance is
more than 8 meters.
3. Low voltage of the RC bae-
ries.
4. There is an obstacle bet-
ween the unit and the RC.
1. Direct the remote contro-
ller at the sensor.
2. Reduce the receiving dis-
tance.
3. Replace all the baeries.
4. Remove the obstacles.
Sudden malfuncon 1. Bad disc quality.
2. Press other buon by mis-
take.
3. Stac from the outside.
1. Wait for 5-10 seconds and
the playing will be resto-
red.
2. Operate again.
3. Shut off the unit for 1-2
minutes and open it again.
Picture dividing 1. The selected system is in-
compable with the disc.
1. Set up the correct system.
Disposal of old appliance.
According to the European standard 2002/96/EC on waste electrical and electronic equip-
ment (WEEE), the old appliance can not be placed in the municipal standard, must be co-
llected separately in order to opmize the recovery and recycling of components and
materials they contain, and reduce the impact on human health and the environment. The
symbol of the trash bin with a cross on top is placed on all products to remind consumers
of the obligaon to separate them for collecon.
Consumers should contact the local authority or retailer for informaon concerning the
disposal of your old appliance.

Mode d´emploi
DVD-210ZU
P rsonal Grand T chnology S.A. C/ Ecuador, 14 28850 Torr jón d Ardoz - Madrid - Spain
T l. 902 501 406 sat@npgt ch.com www.npgt ch.com
FRANÇAIS

2
Table des maères
1. Pr cauons et instrucons de s curit 3
1.1 Précauons 3
1.2 Instrucons d sécurité 3
2. Él ments du système 4
2.1 Pann au avant 4
2.2 Pann au arrièr 4
2.3 Télécommand 4
3. Connexions 5
3.1 Conn xions d sor audio 5
3.2 Conn xions d sor vidéo 5
3.3 Conn ct ur périt l d conn xion d sor A/V (bonn qualité) 5
4. Types de lecture 5
4.1 Disqu s DVD 5
4.2 Fichi rs MP3 t WMA 6
4.3 Disqu s CD audio 6
4.4 Imag JPEG 6
5. Configuraon du système 7
5.1 Configuraon d la langu 7
5.2 Configuraon vidéo 7
6. D pannage 8
FRANÇAIS

3
1. Pr cauons et instrucons de s curit
Lir a nv m nt c manu l d’ulisaon avant d’ulis r c produit. Cons rv r
c manu l d’ulisaon n li u sûr pour tout consultaon ultéri ur .
• C t appar il con nt d s composants sous haut t nsion qui p uv nt provo-
qu r d s bl ssur s. N’ouvrir l produit sous aucun prét xt . En cas d pann ,
contact r notr s rvic t chniqu .
• Afin d’évit r l s risqu s d’inc ndi s ou d’él ctrocuons accid nt ll s, n pas
xpos r l produit à la plui ou à un humidité xc ssiv .
• C t appar il ulis un systèm las r. Pour évit r un xposion dir ct au
rayon las r, n pas ouvrir l produit t n pas r gard r l rayon.
• Si l’appar il doit êtr soumis à un ntr n t chniqu , contact r notr s rvic
t chniqu .
• C t appar il a été t sté t sasfait aux limit s d la class B d s appar ils nu-
mériqu s, conformém nt aux xig nc s d la CE.
• Si l câbl st ndommagé, il doit êtr réparé par l fabricant, l’ag nt d s r-
vic après-v nt ou un p rsonn possédant d s qualificaons similair s afin
d’évit r tout risqu .
1.1 Pr cauons
Il st très important d lir a nv m nt l s instrucons énoncé s dans c ma-
nu l d’ulisaon t d l s r sp ct r. Cons rv r c manu l afin d pouvoir l
consult r dans l futur.
• N pas pos r l produit sur d s surfac s instabl s : il pourrait tomb r au sol t
tomb r n pann ou bl ss r d s p rsonn s ou d s animaux d compagni .
• Débranch r l produit du s ct ur avant d l n oy r. N’ulis r qu d s n t-
toyants liquid s ou n aérosol. Ulis r un chiffon humidifié.
• Afin d’évit r d’ ndommag r l’appar il, l débranch r n cas d non ulisaon
prolongé ou n cas d’orag .
• N pos r aucun obj t sur l s rainur s d v nlaon, c la pourrait provoqu r un
court-circuit t caus r un inc ndi . N pas v rs r d liquid sur l l ct ur DVD.
• La pris d courant doit s trouv r à proximité d l’appar il t êtr facil d’ac-
cès. N pas march r sur l câbl d’alim ntaon t n pas pos r d’obj ts sur
c lui-ci.
• Pour évit r tout int rfér nc , l s disposifs acfs (télévisions, amplificat urs,
Hom cinéma, tc.) doiv nt êtr maint nus éloignés d l’unité.
• L’alim ntaon d c produit st la suivant : CA 110-240V~50/60 Hz. N’ulis r
aucun autr sourc d’alim ntaon.
• N pas obstru r l s rainur s d v nlaon t n pas plac r l disposif à pro-
ximité d sourc s d chal ur.
- V ill r à c qu l s nfants n’ulis nt pas l’appar il comm jou t.
1.2 Instrucons de s curit
Table of contents
Languages:
Other NPG DVD Player manuals