Ordro EP7 Pro User manual

Introduction
Thank you for purchasing ORDRO EP7 Pro. With the first perspective
for photographing, you can 4K UHD videos and photos by using the
buttons and remote control. Besides, you may download the dedicated
App and get connected to hotspots or Wi-Fi to perform remote control
of the product for photographing, settings, and switching to other
channels for one-to-one voice communication……
Safety
Warning
❶Do not use the product in case it
has any damage, fault, or unusual
conditions like smoke, abnormal
sound, peculiar smell.
❷Do not expose it to anywhere
with high or low temperature,
humidity, or strong vibration, for
this may result in any fault or fire.
❸Do not use any corrosive
chemicals or solvent to clean the
product.
➍Do not disassemble, repair, or
transform the product without
authorization.
❺Do not operate it for a long time
while it’s being charged.
❻Do not let magnetic objects such
as magnets Approach the product
to avoid faults and data loss.
❶Prevent dust or dirt from entering
the slot and USB port. Promptly
wipe off or remove them in case of
such condition to avoid conditions
like poor contact.
❷Keep the product, accessories,
and packing materials out of the
reach of children to avoid possible
suffocations.
❸Do not use any USB cable other
than the accessories. Use the
USB cable specified only and pay
attention to the followings:
・Do not damage or process the
USB cable.
・Do not heat, pull, or bend the
USB cable to avoid possible fire
or electric shock.

Table of Contents
●Camcorder and Accessories.................................................................... 1
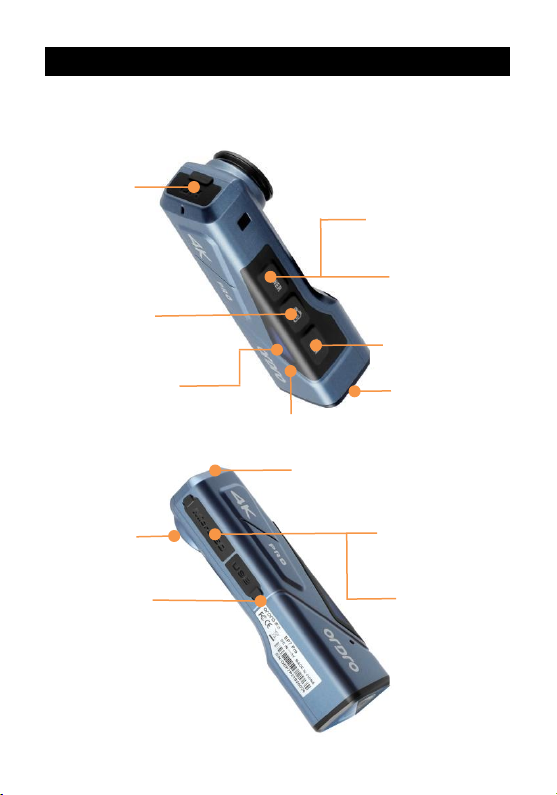
●Components Guide.....................................................................................2
Camcorder components..............................................................................2
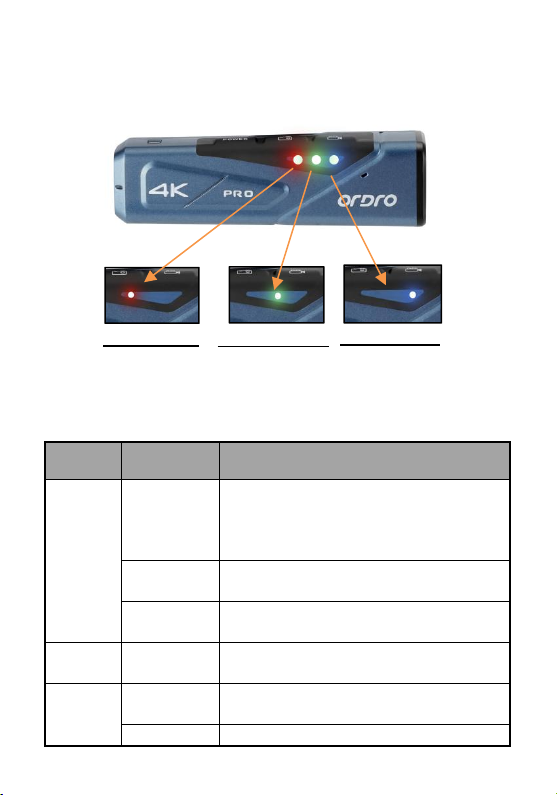
Operating indicators.....................................................................................3
Wireless controller (Optional).................................................................... 4
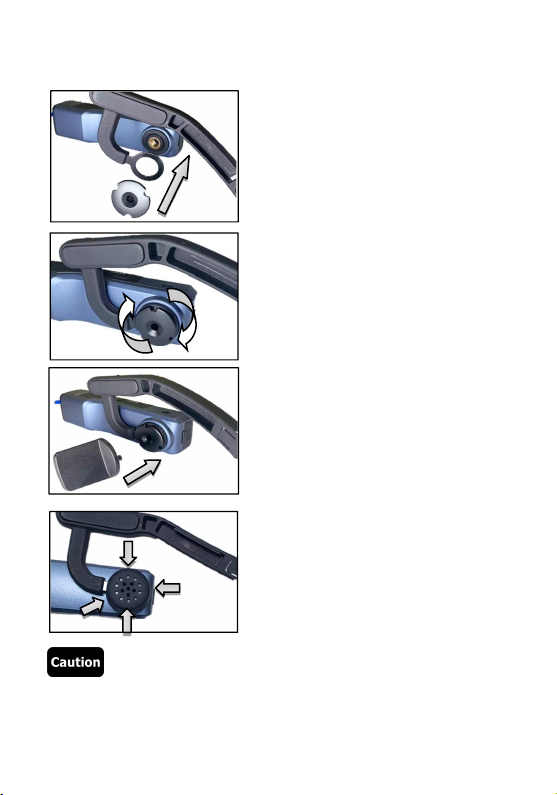
●Assembly/Disassembly of Camcorder................................................... 5
Headband assembly.................................................................................... 5
Headband disassembly...............................................................................5
Camcord assembly.......................................................................................6
●Charging the Camcorder...........................................................................7
●Using a Memory Card................................................................................ 8
Memory card standard................................................................................ 8
Inserting/removing a memory card...........................................................8
Formatting a memory card......................................................................... 8
●Power Operation......................................................................................... 9
Switch on........................................................................................................9
Switch off........................................................................................................9
Reset.............................................................................................................10
●Video Recording and Taking Photos.................................................... 11
Operate by using the camcorder.............................................................11
Operate by using the controller (Optional)........................................... 12
●Connecting to a Computer......................................................................13
Removable disk mode.............................................................................13
PC camera mode......................................................................................13
●Connecting to TV (Optional)...................................................................15
●APP..............................................................................................................16
About the App............................................................................................16

Download and installation.......................................................................16
App networking......................................................................................... 17
App operation............................................................................................ 20
●FAQ..............................................................................................................30
●Faults and Solutions................................................................................ 31
●Technical Specifications..........................................................................32

1
Camcorder and Accessories
Please confirm the accessories as follows before using the product:
◆Camcorder ◆Adjustable headband
◆Micro USB cable
◆Set screw ◆Small spanner
◆USB cable hook ◆Wireless controller (Optional)
◆Rubber cap ◆Manual / Waterproof bag
●The camcorder and the wireless controller are equipped with built-in
rechargeable batteries.
●As a product of IP65, the camcorder is dustproof and waterproof (not
intended for swimming). The wireless controller is not waterproof.
●The camcorder has no internal memory, so you need to insert a
memory card before using it.
Middle
section
Right (R)
Left (L)

2
Components Guide
●Camcorder components
Power button
(On/Off)
Photo button
(Take photos/hold
and press it as
per prompt tone to
format the memory
card)
Microphone 2
(Record sounds)
HDMI port
(D-TYPE HD
cable)
Speaker
(Give out
prompt tone)
USB port
(Plug in a USB
cable)
Video button
(Start,stop recording)
Camera lens
(Find views)
Memory card slot
(Insert a memory
card)
Microphone 1
(Record sounds)
Indicator
(Take photos, record
videos, charging and
Wi-Fi operating status
indication)
Distribution network
mode button
RST hole (Reset
button)
(Gently press it to
restore default
settings)

3
●Operating indicators
Please refer to the table below for the operating indicator statuses of
the camcorder.
Indicator
Color
Status
Indication
Green
Solid
The camcorder is switched on and in standby
status. It will go out after the device is switched
off;
Connect it to a computer by using USB cable.
Constantly
flickering
Video recording/formatting.
Flicker for
one second
General or candid photos are made
Red
Solid
A USB cable is connected for charging, and it
will go out after the USB cable is disconnected.
Blue
Flickering
Wi-Fi is enabled, and it will go out after Wi-Fi is
disabled.
Solid
Wi-Fi connection is successful.
Blue indicator
Using Wi-Fi
Green indicator
Standby Video
recording/photog
raphing
Red indicator
Charging

4
●Wireless controller (Optional)
Name of Part
Functional Description
❶Video button
Press it when the camcorder is in standby status
to start, stop video recording.
❷Operating indicator
It flickers once when the Video/Photo button is
pressed.
❸Charging indicator
It is solid while charging through USB cable and it
will go out after the camcorder is fully recharged.
➍Photo/Candid shot
Press it when standby to take a photo and press it
during recording to take a candid shot.
❺USB port
Connect a USB cable for recharging.
●Please use the USB cable provided by the manufacturer to recharge
the wireless controller, and the charger should be 5V/1A.
●The controller response may slow down in case of low battery.
●The charging time is about 1 hour, and the standby time is about 1
week.
●The effective distance for operating the controller is about 5m for
video recording and about 8m for taking photos.
●The effective distance may vary in different battery statuses and
service conditions.
❶
❸
❺
❸
➍
❷

5
Assembly/Disassembly of Camcorder
●Headband assembly
❶Confirm the left (L) and right (R) sides of the headband, and insert
them into the middle section as shown below until they are
properly installed.
❷Adjust the length by stretching the front and rear parts.
●Headband disassembly
The headband can be removed by pressing the protruding part shown
below and pulling outwards.
★
Middle
section
Right (R)
Left (L)

6
●Camcorder assembly
Step ❶: As shown below, fit the
camcorder with the right side of the
headband and install the set screw.
Step ❷: Screw up the set screw
clockwise as shown in the diagram.
Step ❸: Adjust the correct angle of
the camcorder and use the small
spanner to tighten the set screw.
Step ➍: Correctly insert the rubber
cap into the set screw to finish the
installation.
●Repeat the above steps inversely to disassemble the camcorder.

7
Charging the Camcorder
In case of low battery, the camcorder will give out a prompt tone
『Battery low, please charge timely』. The responses of the controller
buttons may slow down in case of low battery. After the battery is used
up, the indicators will be off after the buttons are pressed.
Charging the camcorder and the controller
❶Take out the Micro USB cable from the package.
❷Insert one end of the USB cable into a 5V/1-2A charger or a
computer, and insert the other end into the Micro USB port at the
bottom of the camcorder.
❸The red indicator is solid while charging, and it will go out after the
battery is fully charged.
★Required charging time:
Camcorder: 2.5 ~ 3 hours Controller: 0.5 ~ 1 hour
●In case of low battery, the speaker will give out a prompt tone “Low
battery! Please recharge it immediately”.
●Don’t use any USB cable other than the accessories to avoid
faults, overheating, or accidents like fire, electric shock.
●If charging is performed by connecting a computer, it cannot be
guaranteed that the product is recharged continuously if the
computer is in standby status.
●If a charger is used, it must be a domestic regular one of 5V/1-2A.
●Do not operate the product for a long time while it’s being char
ged.

8
In case the red indicator is off and charging cannot be
performed, the possible causes are as follows:
●The USB cable is not properly connected or the charger fails to reach
required standards. You may reconnect the cable or replace the
charger.
●The battery is old or abnormal.
Using a Memory Card
●Memory card standard
❶The product is compatible with micro SDXC and micro SDHC
memory cards.
❷The maximum capacity is 256GB.
●Inserting/removing a memory card
❶Confirm the camcorder is switched off.
❷Inserting: According to the Components Guide, open the memory
card slot. Confirm the direction of the memory card and insert it
straightly. It is properly inserted after a『click』sound is heard.
❸Removing: Gently press the memory card edge to automatically
eject and remove it.
●Formatting a memory card
When a memory card is inserted for the first time, the camcorder will
give out a prompt tone『Please hold the photo button to format the
memory card』. Please press and hold the button for about 5 seconds.
The green indicator flickers rapidly. It stops flickering dozens of
seconds later. The camcorder will give out a prompt tone『Formatting
completed』, meaning the formatting is completed.

9
●All the files stored in the memory card will be deleted after it is
formatted to match the usage structure of the camcorder.
●Do not remove the memory card while formatting and operation.
●When a memory card used by any other device is used for the
camcorder for the first time, it must be formatted on the camcorder.
●A U3 256GB memory card is recommended, and any memory card
below U3 may not function properly.
Power Operation
●Switch on
Press the hold the power button for 3 seconds. The green indicator is
on and the device gives out the startup sound, meaning it is switched
on.
●Switch off
Press the hold the power button for 3 seconds. The green indicator is
off and the device gives out the shut-down sound, meaning it is
switched on.
★The camcorder will shut down automatically after being idle for a
certain period to reduce battery consumption.

10
❶The camcorder will shut down automatically if it is idle for 3 minutes
in standby status.
❷The camcorder will shut down automatically after being
disconnected with Wi-Fi for 1 minute.
★In case of system halt, the Reset button can be pressed to perform
forced shutdown.
●Reset
❶Open the memory card slot cover and confirm the Reset button (a
small hole marked with “RST” beside the card slot).
❷Use a toothpick or a needle to accurately and gently press it. The
camcorder shuts down automatically, meaning the resetting is
finished.
●The camcorder will restore factory settings after it is reset.
●Reset the camcorder when it is in standby status.
●After resetting, the data stored in a memory card and the camcorder
version will not be reset.
●Video recording data will not be stored if it is reset during video
recording.
●Resetting can be performed by using the App as well.

11
Video Recording and Taking Photos
●Operate by using the camcorder
Press and hold the Power button for 3 seconds. The green indicator is
on and the camcorder gives out the startup sound and goes to the
standby status.
◆Video recording
Start video recording: Shortly press the Video button once; the
camcorder gives out a prompt tone『Start recording』. The
green indicator starts flickering to start video recording.
Stop video recording: Shortly press the Video button once; the
camcorder gives out a prompt tone『Stop recording』. The
green indicator stops flickering to stop video recording.
◆Taking photos
Shortly press the Photo button once; the camcorder gives out a
prompt tone『Taking picture』. The green indicator flickers for one
second, meaning a photo is taken.

12
◆Taking candid photos
Shortly press the Photo button when recording a video; the camcorder
gives out a prompt tone “crack”, meaning a candid photo is taken.
●Operate by using the controller (Optional)
◆Video recording
Start/stop video recording: Press the Video button; the green indicator
of the controller flickers once, meaning the operation is finished.
◆Taking photos
Press the Photo button; the green indicator of the controller flickers
once, meaning the operation is finished.
●The controller cannot be used when Wi-Fi is enabled.
●After the camcorder is used for recording videos for a certain period,
the video files will be stored automatically in various segments.
When 4K60fps/4K30fps/2.7K30fps is used, they will be
automatically stored in form of 5-minute videos; when
1080P60fps/1080P30fps/720P120fps/720P60fps is used, they will
be automatically stored in form of 20-minute videos.
●Candid photos cannot be made when 4K resolution is used for
recording videos.
●The default resolution for recording videos is 4K 3840x2160 30fps.
●The default pixel for taking photos is 14M.

13
Connecting to a Computer
Use the USB cable provided by the manufacturer to connect the
camcorder to a computer to recharge the product and use it as a
mobile HDD and a network camera.
●Removable disk mode
❶Press and hold the Power button to switch it on.
❷Use the USB cable provided by the manufacturer to connect the
camcorder to a computer. The camcorder gives out a prompt tone
『Please select the USB function and press the video button to
enter the removable disk mode and press the photo button
to enter the PC cam mode』. Shortly press the Video button, and
the device gives out a prompt tone『Enter the removable disk
mode』” and a mobile HDD is displayed on the program
“Computer” in the computer.
●PC camera mode
❶Press and hold the Power button to switch it on.
❷Use the USB cable provided by the manufacturer to connect the
camcorder to a computer. The camcorder gives out a prompt tone
『Please select the USB function and press the video button to
enter the removable disk mode and press the photo button

14
to enter the PC cam mode』. Shortly press the Photo button, and
the device gives out a prompt tone『Enter the PC cam mode』and
a camera is displayed in the program Camera of the computer.
And the camera can be used for any video chat software in the
computer.
●When connecting it to a computer, use the rear USB port of the
computer case to the greatest extent to avoid that the power supply
for the front USB port is insufficient.
●Exit any antivirus programs when connecting it to a computer to
avoid killing the drive program for the camcorder.
●The function is compatible with Windows 10/8.1/8/7/VISTA/XP and
Mac systems.

15
Connecting to TV (Optional)
Use an optional HDMI cable to connect it to a TV set to preview photos
or videos.
❶Press and hold the Power button to switch it on.
❷Use an optional HDMI cable to connect the camcorder to a TV set,
and match the TV channel with that for the HDMI port. The
preview image of the camcorder is displayed on the TV set for
taking photos or recording videos.
●The TV preview image proportion may vary according to the current
resolution ratio changes for the photo/video mode.
●The HDMI cable is not included in the accessories. Please purchase
or prepare one by yourself. The minimum standard is V1.4, and any
HDMI cable below the standard may not be used properly.
●Pay attention to the plug direction and shape of the HDMI cable. Plug
it in straightly, for a forced connection may cause damages.

16
APP
●About the App
Android/iOS users may search「OD Live」in App markets/Appstore to
download and install the App for the following operations:
❶Preview camcorder images in real time.
❷Control the camcorder for taking photos or recording videos by
using the phone as a remote controller.
❸Download the photos or videos in the camcorder via the App and
transfer them into your phone.
➍Edit and share the photos or videos to various social platforms.
❺Switch to other channels for one-to-one communication.
●App download and installation
The steps to install the dedicated App「OD Live」are as follows:
❶Android users may search「OD Live」in Google Play to download
and install it.
❷IOS users may search「OD Live」in App store to download and
install it.
❸You may download the App by scanning the QR code below with
WeChat or any browser.

17
●For Android users, it your phone prompts「Allow the App to have
permission?」, please select「Yes」.
●App networking
◆Registration
❶Go to the first interface after the App is enabled and tap「New user
to go to the registration interface.
❷Input your email and tap「Enter verification code」. After checking
the code in your email, correctly input it in the blank.
❸Input the same user-defined password twice and tap「Sign up
account」to finish the process and log in the App.
Table of contents
Other Ordro Camcorder manuals