Otona no Kagaku (Science for Adults) Product Version
How to Use the 8mm
Film Projector
Frame
border (W8)
Parts in the Kit
8mm lm projector main unit
Guide pin (W8)
Guide pin (W8)
Handle
Axle adapter
Rewind reel
Film editing
tool
Install the handle to the main unit with the washer head screw.
* The projection lens is installed on the lm projector main unit.
* In addition, one washer head screw (for installing the handle) is
also included in the kit.
●How to install the handle
Main unit
Washer head screw
Handle
●Things you will need: three AA alkaline dry cell batteries, a screwdriver,
scissors, utility knife, tape, etc.
CAUTION ★Please read the following instructions before using this kit!
●This kit includes screws and other small parts. Be careful not to swallow
them. There is a risk of suffocation.
Three AA alkaline batteries are used. Incorrect use of the batteries may cause the generation of heat,
explosions or liquid leakage. The following precautions should be taken.
●Do not use oxyride dry-cell batteries. It may cause a malfunction.
●Do not use rechargeable batteries such as NiCd batteries. Film may not be projected properly.
●Ensure that the positive and negative terminals of the batteries are aligned correctly.
●If liquid that leaked from the batteries gets into your eyes, rinse them well with plenty of water and
consult a doctor immediately. If liquid leaks onto your skin or clothes, wash it off immediately with water.
●Remove the batteries when not using for a long time.
★ Please read the instructions and cautions thoroughly before assembling the product. In addition, do not use
any materials that have become damaged or deformed during use.
★Please read the instructions and cautions thoroughly before use.
★For your safety, be sure to follow the instructions in this manual. In addition, do not use any parts that have
become damaged or deformed during use.
★Keep this kit out of the reach of small children when not in use.
[Plastic materials used in this kit]
●Main unit (black)/lm editing tool (black): ABS ●Driving parts (black): POM, LED Base panel: PF ●Lens
(transparent): PMMA ● Reel adapter (gray): PP ● Small bags (clear, colorless): PE
* Please dispose of this product in accordance with local regulations.
NOTE: The actual shapes of some parts may differ from the illustrations above.
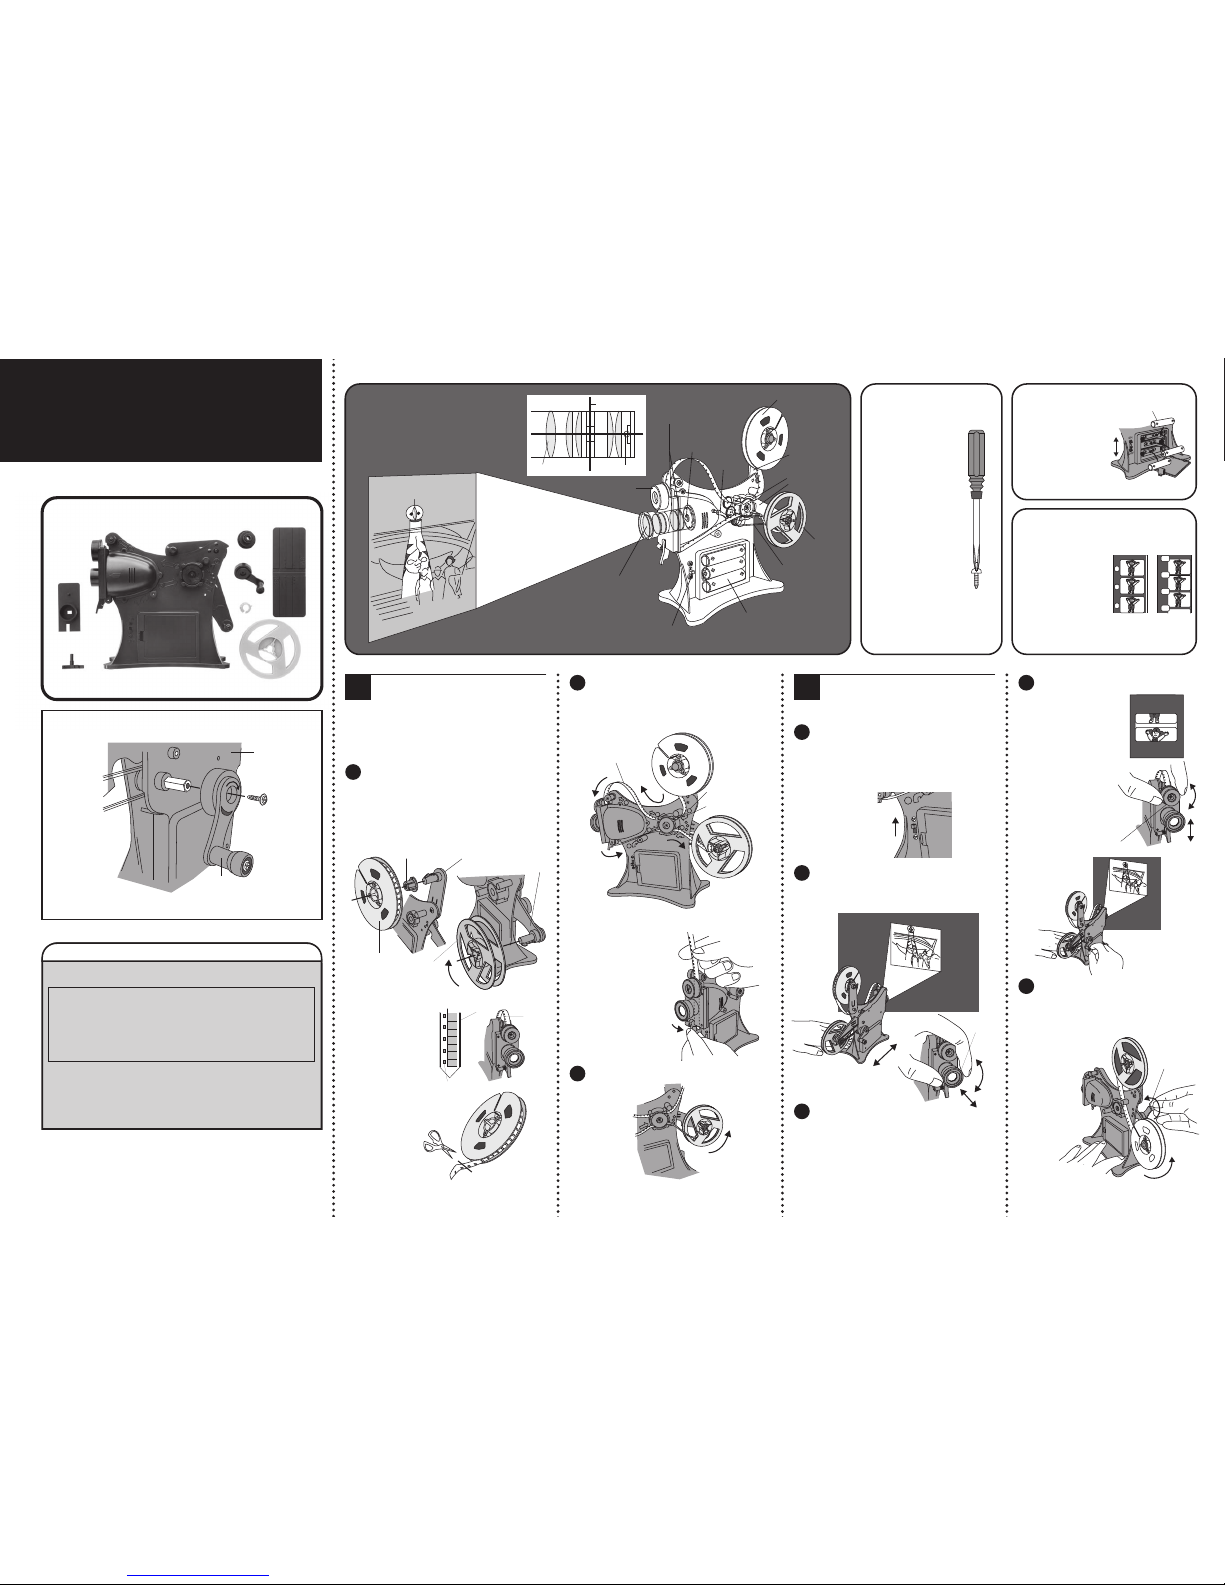
●The structure of the 8mm
lm projector
Projection lenses (3)
Framing knob
Condenser lenses (2)
Light source (ultra-
bright white LED)
Handle
8mm lm (shot and
developed)
Film advance
reel axis
Sprocket (S8)
Rewind reel axis
Rewind reel
Film advance reel axis
AA alkaline batteries (3)
Switch
Lens
Film
Light source
Setting 8mm Film
(Single/Super)
● When using a Phillips
screwdriver...
●Notes for tightening screws
The types of screws used
for the supplement are
those that carve grooves
into the plastic as they are
inserted (self-threading).
When tightening screws,
firmly press the provided
screwdriver straight against
the screws and turn. It is
said that 70 percent of the
force applied is used for
pushing against the screw
and 30 percent for turning it.
If any screws are loose, gaps
may remain or the projector
may operate poorly.
●How to insert the batteries
Insert three AA alkaline
batteries into the battery
box, turn the switch ON,
and confirm that the
light source lights up.
Make sure that the positive and negative
terminals of the batteries are aligned correctly.
AA alkaline battery
●Difference between Single/Super 8,
and Double 8 lms
Single/Super 8
Double 8
There are two types of
8mm films: Single 8 or
Super 8 (1965-1974) and
Double 8 (1955-1964).
The positions of the holes
that are used to advance
the film differ depending on the type of film. For
Double 8 films, the frame border, etc. must be
changed (refer to the back of this sheet for details).
*For how to set Double 8 lm, refer to the back of this
sheet.
Mount the shot and developed 8mm lm
to the lm advance reel axis.
Attach the axle adapter to the lm advance reel axis.
Then, mount the film. At the same time, mount the
rewind reel to the rewind reel axis.
Axle adapter Film advance reel axis
8mm lm
(the shot
and developed)
Rewind reel
Rewind reel axis
●Pay attention to the
position of the holes
on the film (left side
when viewed from the
projection lens side)
when mounting the lm.
Film The
holes
should
be on
the left
side.
Reel
★Pay attention to the position of
the holes.
●It is difficult to
feed lm that is bent
at the tip. In such a
case, cut it straight
using scissors.
Check the arrows engraved on the
main unit of the film projector and
thread the lm in order.
Leave the top section of
film a little loose when
setting the lm in place.
Engraved number
Engraved arrow
●How to thread the film
through the lens portion
Unlock the film holder and
thread the film straight
through the opening.
If the film is curled, try to
straighten it when inserting
the lm.
Unlock the lm holder.
Wind the tip of the film to the rewind
reel.
Wind the lm about
3 revolutions.
Projecting Images on
a Screen
Prepare a dark room.
The darker the room is, the better. A commercially-
available screen or white wall can be used for projecting
the images. (Images cannot be projected on a colored
wall.)
First, turn on the switch.
Turn on the switch.
Project the image from the lm onto the
screen, and bring the image into focus.
Move the projection lens in and out.
Rotate the projection lens to
move the lens in and out.
Projection lens
Set the projection size.
Adjust the distance and height of the lm projector
and screen according to the size and height of the
image being projected.
Bring the image into focus once the position has
been set.
Adjust the frame feed and project
the image.
If the frame shown in the
right figure can be seen,
advance the lm for a few
frames, turn the framing
knob, and adjust the
position of the frame. After
the position is adjusted,
turn the handle to project
the images. (Turn the
handle slowly at rst.)
Framing knob
Turn the handle
clockwise while
rmly holding down
the lm projector.
After projecting the film, rewind
the lm.
Mount the wound lm reel to the lm advance
reel axis making sure that the direction is as
shown in the
gure. Rewind
the film by
turning the
handle (be
sure to turn
the handle
clockwise).
Hold down the film
projector when turning
the handle.
Handle