Panasonic AG-HPX171EJ User manual

ENGLISH
M0211YM0 -PS VQT3N11 (E)
ESPAÑOL ITALIANO
FRANÇAIS
DEUTSCH
Before useDescription of
parts
PreparationShootingPlaybackEditingDisplaysMenuReference
ENGLISH
Before operating this product, please read the instructions carefully and save this manual for future use.
Lesen Sie die Anweisungen vor der Verwendung dieses Produkts sorgfältig durch, und
bewahren Sie das vorliegende Handbuch zur künftigen Referenz auf.
Avant d’utiliser ce produit, veiller à lire attentivement ce manuel et le conserver pour un usage ultérieur.
Prima di utilizzare questo prodotto, leggere queste istruzioni e conservare questo manuale per
consultarlo quando necessario.
Antes de utilizar este producto, lea estas instrucciones de funcionamiento con atención y
guárdelas para poder consultarlas en el futuro.
Operating Instructions/Bedienungsanleitung
Mode d’emploi/Istruzioni per l’uso
Instrucciones de funcionamiento
Memory Card Camera-Recorder/Speicherkarten-Kamerarecorder
Caméscope à carte mémoire/Camcorder a schede di memoria
Camascopio basado en tarjeta de memoria
Model No. AG-HPX171EJ
This product is eligible for the P2HD
5 Year Warranty Repair Program. For
details, see page 7.

E-2
Read this rst! indicates safety information.
Caution for AC Mains Lead
For battery charger
FOR YOUR SAFETY PLEASE READ THE FOLLOWING TEXT CAREFULLY.
This product is equipped with 2 types of AC mains cable. One is for continental Europe, etc.
and the other one is only for U.K.
Appropriate mains cable must be used in each local area, since the other type of mains cable is not
suitable.
FOR CONTINENTAL EUROPE, ETC.
Not to be used in the U.K.
FOR U.K. ONLY
FOR U.K. ONLY
This appliance is supplied with a moulded
three pin mains plug for your safety and
convenience.
A 5 amp fuse is tted in this plug.
Should the fuse need to be replaced please
ensure that the replacement fuse has a rating
of 5 amps and that it is approved by ASTA or
BSI to BS1362.
Check for the ASTA mark or the BSI mark
on the body of the fuse.
If the plug contains a removable fuse cover
you must ensure that it is retted when the
fuse is replaced.
If you lose the fuse cover the plug must
not be used until a replacement cover is
obtained.
A replacement fuse cover can be purchased
from your local Panasonic Dealer.
How to replace the fuse
1. Open the fuse compartment with a
screwdriver.
2. Replace the fuse
Fuse
EEE Yönetmeliğine Uygundur.
EEE Complies with Directive of Turkey.

ENGLISH
E-3
indicates safety information.
Caution for AC Mains Lead
For AC adaptor
FOR YOUR SAFETY PLEASE READ THE FOLLOWING TEXT CAREFULLY.
This product is equipped with 2 types of AC mains cable. One is for continental Europe, etc.
and the other one is only for U.K.
Appropriate mains cable must be used in each local area, since the other type of mains cable is not
suitable.
FOR CONTINENTAL EUROPE, ETC.
Not to be used in the U.K.
FOR U.K. ONLY
FOR U.K. ONLY
This appliance is supplied with a moulded
three pin mains plug for your safety and
convenience.
A 13 amp fuse is tted in this plug.
Should the fuse need to be replaced please
ensure that the replacement fuse has a rating
of 13 amps and that it is approved by ASTA
or BSI to BS1362.
Check for the ASTA mark or the BSI mark
on the body of the fuse.
If the plug contains a removable fuse cover
you must ensure that it is retted when the
fuse is replaced.
If you lose the fuse cover the plug must
not be used until a replacement cover is
obtained.
A replacement fuse cover can be purchased
from your local Panasonic Dealer.
How to replace the fuse
1. Open the fuse compartment with a
screwdriver.
2. Replace the fuse
Fuse

E-4
WARNING:
This equipment must be earthed.
To ensure safe operation, the three-pin plug must
be inserted only into a standard three-pin power
point which is effectively earthed through normal
house-hold wiring.
Extension cords used with the equipment must
have three cores and be correctly wired to provide
connection to the earth. Wrongly wired extension
cords are a major cause of fatalities. The fact that
the equipment operates satisfactorily does not
imply that the power point is earthed or that the
installation is completely safe. For your safety, if
you are in any doubt about the effective earthing
of the power point, please consult a qualied
electrician.
WARNING:
• TO REDUCE THE RISK OF FIRE OR SHOCK
HAZARD, DO NOT EXPOSE THIS EQUIPMENT
TO RAIN OR MOISTURE.
• TO REDUCE THE RISK OF FIRE OR SHOCK
HAZARD, KEEP THIS EQUIPMENT AWAY
FROM ALL LIQUIDS. USE AND STORE ONLY
IN LOCATIONS WHICH ARE NOT EXPOSED
TO THE RISK OF DRIPPING OR SPLASHING
LIQUIDS, AND DO NOT PLACE ANY LIQUID
CONTAINERS ON TOP OF THE EQUIPMENT.
WARNING:
Always keep memory cards or accessories (coin
battery, microphone holder screws, microphone
holder adapter, ferrite cores, INPUT terminal cover)
out of the reach of babies and small children.
CAUTION:
To reduce the risk of electric shock, do not
remove cover. No user serviceable parts inside.
Refer servicing to qualied service personnel.
CAUTION:
TO REDUCE THE RISK OF FIRE OR SHOCK
HAZARD AND ANNOYING INTERFERENCE, USE
THE RECOMMENDED ACCESSORIES ONLY.
CAUTION:
In order to maintain adequate ventilation, do
not install or place this unit in a bookcase,
built-in cabinet or any other conned space. To
prevent risk of electric shock or re hazard due
to overheating, ensure that curtains and any
other materials do not obstruct the ventilation.
CAUTION:
Do not lift the unit by its handle while the
tripod is attached. When the tripod is attached,
its weight will also affect the unit’s handle,
possibly causing the handle to break and
hurting the user. To carry the unit while the
tripod is attached, take hold of the tripod.
CAUTION:
Danger of explosion or re if battery is mistreated.
For Battery Pack
• Replace only with same or specied type.
• Do not disassemble or dispose of in re.
•
Do not store in temperatures over 60°C.
• Do not leave the battery in an automobile
exposed to direct sunlight for a long period of
time with doors and windows closed.
• Use specied charger.
For Battery of Remote Controller
• Replace battery with part No. CR2025 only.
• Do not recharge the battery.
• Do not disassemble or dispose of in re.
•
Do not store in temperatures over 60°C.
Camera-Recorder
The rating plate is on the underside of the
viewnder.
Battery Charger / AC Adaptor
The rating plate is on the underside of the
Battery Charger and AC Adaptor.
Disconnect the AC mains plug from the AC
mains socket when not in use.
CAUTION:
THE MAINS PLUG OF THE POWER SUPPLY
CORD SHALL REMAIN READILY OPERABLE.
THE AC RECEPTACLE (MAINS SOCKET
OUTLET) SHALL BE INSTALLED NEAR
THE EQUIPMENT AND SHALL BE EASILY
ACCESSIBLE.
TO COMPLETELY DISCONNECT THIS
EQUIPMENT FROM THE AC MAINS,
DISCONNECT THE POWER CORD PLUG
FROM THE AC RECEPTACLE.
CAUTION:
Do not jar, swing, or shake the unit by its
handle while the conversion lens or another
accessory is attached.
Due to the added weight of the conversion
lens, any strong jolt to the handle may damage
the unit or result in personal injury.
indicates safety information.

ENGLISH
E-5
CAUTION:
EXCESSIVE SOUND PRESSURE FROM
EARPHONES AND HEADPHONES CAN
CAUSE HEARING LOSS.
CAUTION:
Do not leave the unit in direct contact with the
skin for long periods of time when in use.
Low temperature burn injuries may be suffered
if the high temperature parts of this unit are
in direct contact with the skin for long periods
of time.
When using the equipment for long periods of
time, make use of the tripod.
indicates safety information.
EMC NOTICE FOR THE PURCHASER/USER OF THE APPARATUS
1. Applicable standards and operating environment
The apparatus is compliant with:
standards EN55103-1 and EN55103-2 2009, and
electromagnetic environments E1, E2, E3 and E4.
2. Pre-requisite conditions to achieving compliance with the above standards
<1> Peripheral equipment to be connected to the apparatus and special connecting cables
The purchaser/user is urged to use only equipment which has been recommended by us as
peripheral equipment to be connected to the apparatus.
The purchaser/user is urged to use only the connecting cables described below.
<2>
For the connecting cables, use shielded cables which suit the intended purpose of the apparatus.
Video signal connecting cables
Use double shielded coaxial cables, which are designed for 75-ohm type high-frequency
applications, for SDI (Serial Digital Interface).
Coaxial cables, which are designed for 75-ohm type high-frequency applications, are
recommended for analog video signals.
Audio signal connecting cables
If your apparatus supports AES/EBU serial digital audio signals, use cables designed for AES/EBU.
Use shielded cables, which provide quality performance for high-frequency transmission
applications, for analog audio signals.
Other connecting cables (IEEE1394, USB)
Use double shielded cables, which provide quality performance for high-frequency applications,
as connecting cables.
When connecting to the DVI signal terminal, use a cable with a ferrite core.
If your apparatus is supplied with ferrite core(s), they must be attached on cable(s) following
instructions in this manual.
3. Performance level
The performance level of the apparatus is equivalent to or better than the performance level required
by these standards.
However, the apparatus may be adversely affected by interference if it is being used in an EMC
environment, such as an area where strong electromagnetic fields are generated (by the presence
of signal transmission towers, cellular phones, etc.). In order to minimize the adverse effects of the
interference on the apparatus in cases like this, it is recommended that the following steps be taken
with the apparatus being affected and with its operating environment:
1. Place the apparatus at a distance from the source of the interference.
2. Change the direction of the apparatus.
3. Change the connection method used for the apparatus.
4.
Connect the apparatus to another power outlet where the power is not shared by any other appliances.
�
�
�
�
�
�
�
�
�

E-6
Operating precaution
Operation near any appliance which generates strong magnetic elds may give rise to noise in the video
and audio signals. If this should be the case, deal with the situation by, for instance, moving the source of
the magnetic elds away from the unit before operation.
IMPORTANT
“Unauthorized recording of copyrighted television programs, video tapes and other materials may infringe
the right of copyright owners and be contrary to copyright laws.”
Recommendation for Use of Genuine Panasonic Battery (Rechargeable Battery)
Thank you for using a Panasonic product.
It has been found that counterfeit battery packs which look very similar to the genuine product are
made available to purchase in some markets. Some of these battery packs are not adequately
protected with internal protection to meet the requirements of appropriate safety standards. There is
a possibility that these battery packs may lead to re or explosion. Please be advised that we are not
liable for any accident or failure occurring as a result of use of a counterfeit battery pack. To ensure that
safe products are used we would recommend that a genuine Panasonic battery pack is used.
Be aware that many batteries sold at extremely cheap prices or in situations where it is difcult to
verify the actual products before purchase have proven to be counterfeit.
•
Software information for this product
1. Customer advisory: This product includes software licensed under the GNU General Public License
(GPL) and GNU Lesser General Public License (LGPL); customers have the right to download, modify,
and redistribute source code for this software.
Descriptions of the GPL and LGPL are stored on the installation CD included with this camera-recorder.
See the folder named \LDOC. (The description is the original (written in English).) To download the
relevant source code, visit http://pro-av.panasonic.net/
Please note that we cannot answer any questions you may have about the content, etc. of any source
code you may obtain from the above Web site.
2. This product includes software licensed under the MIT License. A description of the MIT is stored on
the installation CD included with this camera-recorder. See the folder named \LDOC. (The description is
the original (written in English).)
• LEICA is a trademark of Leica Microsystems IRGmbH.
• DICOMAR is a trademark of Leica Camera AG.
• SD logo is a trademark.
All other explanations, company names, and product names are the registered trademarks of the
respective companies.

ENGLISH
E-7
EU
To remove the battery
Main Power Battery
(Refer to page 18 for the detail.)
Press the battery removal button.
Battery removal button
Remote Control Battery
AWhile pressing the stopper , pull out the
battery holder.
BRemove the button-type battery from the battery
holder.
P2HD 5 Year Warranty Repair Program
*1
Thank you for purchasing this Panasonic P2HD device.
Register as a user for this device to receive a special service warranty up to ve years of free warranty
repairs.
Customers who register as users on the website will receive a extended warranty repair
valid for up to ve years.
1st year 2nd year 3rd year 4th year 5th year*5
P2HD device*2 Basic warranty*3 Extended warranty repair*4
*1: Please note that this extended warranty is not available in some countries/regions see web
site below for details. *2: Not all models eligible for extended warranty coverage. *3:The basic
warranty period may vary depending on the country/region see enclosed warranty for warranty
coverage. *4: Not all repair work is covered by this extended warranty see enclosed warranty
card for warranty coverage. *5:The maximum warranty period may be adjusted depending on
the number of hours the device has been used.
Purchase
P2 product
Register online
within 1 month
“Registration Notice”
e-mail sent
Free 5 years of Warranty Repairs
Make sure to save the “Registration Notice”
e-mail during the warranty period.
Details about user registration and the extended warranty:
http://panasonic.biz/sav/pass_e
2
ENGLISH
GERMAN
FRENCH
ITALIAN
SPANISH
Pursuant to at the directive 2004/108/EC, article 9(2)
Panasonic Testing Centre
Panasonic Service Europe, a division of Panasonic Marketing Europe GmbH
Winsbergring 15, 22525 Hamburg, F.R. Germany
Entsprechend der Richtlinie 2004/108/EG, Artikel 9(2)
Panasonic Testing Centre
Panasonic Service Europe, eine Abteilung der Panasonic Marketing Europe GmbH
Winsbergring 15, 22525 Hamburg, Deutschland
En accord avec la directive 2004/108/EC, article 9(2)
Panasonic Testing Centre
Panasonic Service Europe, une division de Panasonic Marketing Europe GmbH
Winsbergring 15, 22525 Hamburg, F.R. Allemagne
In conformità con la direttiva 2004/108/CE, articolo 9(2)
Panasonic Testing Centre
Panasonic Service Europe, un reparto di Panasonic Marketing Europe GmbH
Winsbergring 15, 22525 Hamburg, F.R. Germania
Conforme a la directiva 2004/108/EC, artículo 9(2)
Panasonic Testing Centre
Panasonic Service Europe, una división de Panasonic Marketing Europe GmbH
Winsbergring 15, 22525 Hamburg, F.R. Alemania

E-8
Contents
Read this rst! ..................................................... 2
Operating precaution .......................................... 6
IMPORTANT.......................................................... 6
Recommendation for Use of Genuine
Panasonic Battery (Rechargeable Battery)... 6
Software information for this product ............... 6
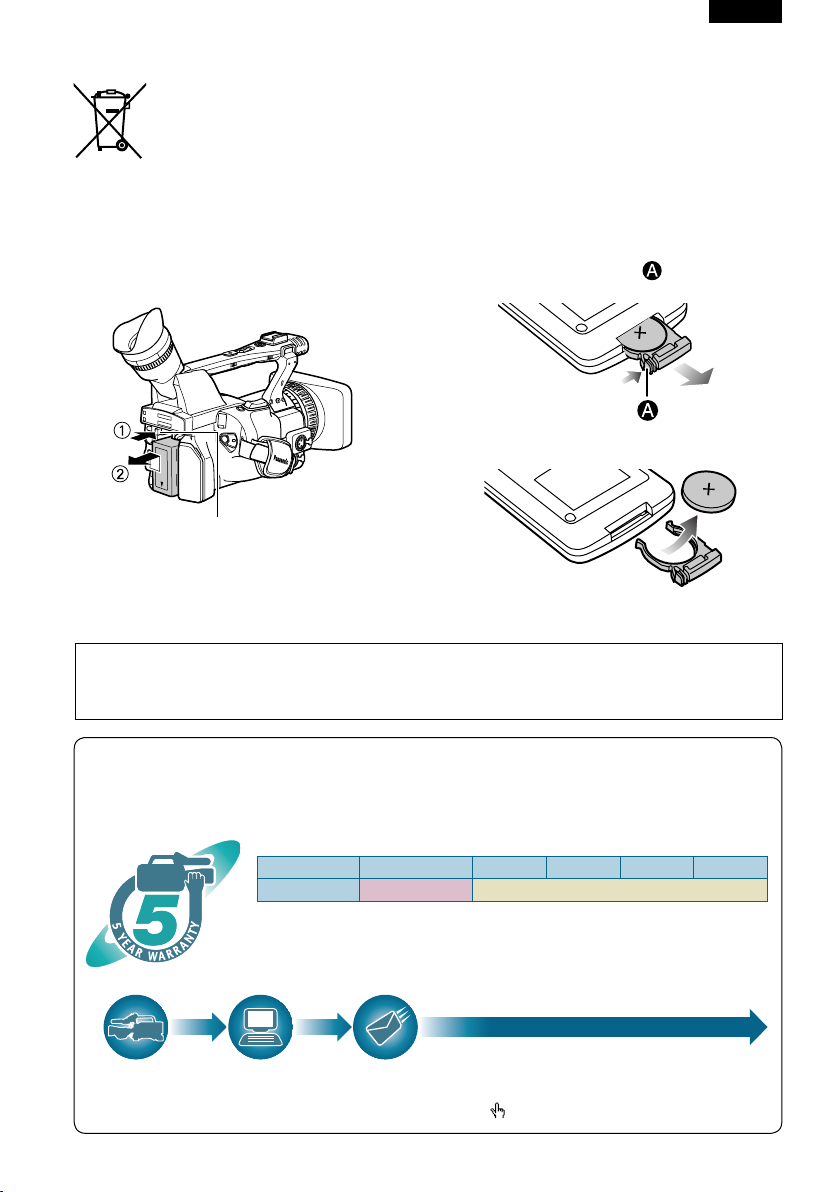
To remove the battery ......................................... 7
Main Power Battery ........................................... 7
Remote Control Battery..................................... 7
Before use
Outline of operations ........................................ 10
Precaution for use............................................. 11
Accessories ....................................................... 12
Optional units .................................................... 12
About this manual ............................................. 12
Description of parts
Description of parts .......................................... 13
Right side and rear side .................................. 13
Left side........................................................... 14
Terminals and mounting parts ......................... 15
Remote control ................................................ 16
Preparation
The battery ......................................................... 17
Charging.......................................................... 17
Installing and removing the power supply...... 18
Installing and removing the battery ................. 18
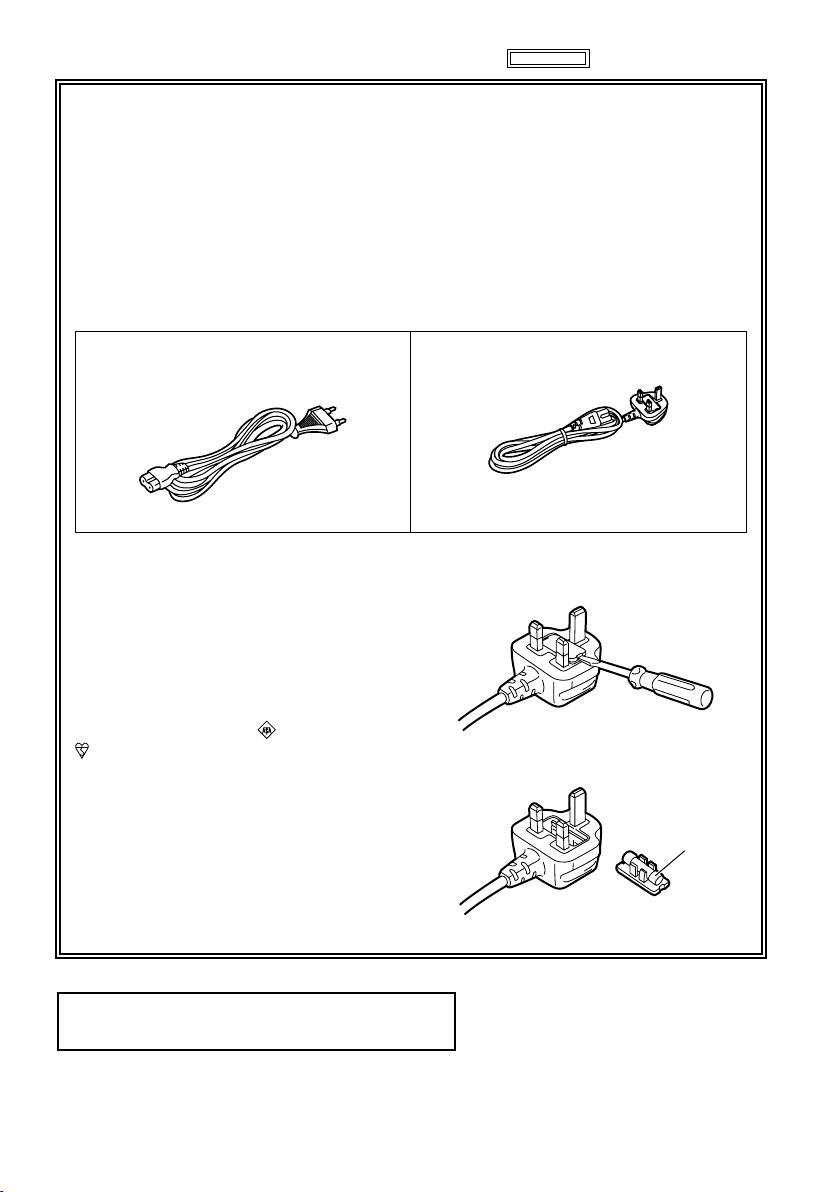
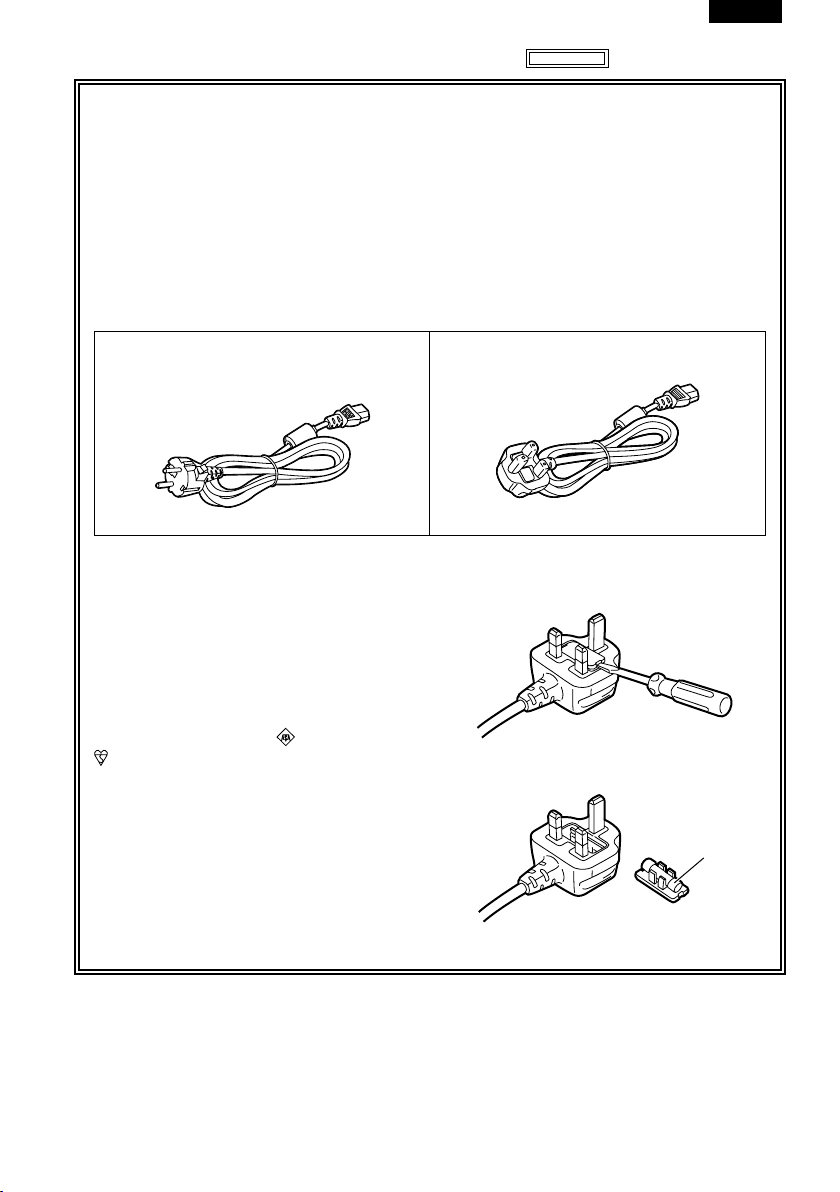
Connecting and disconnecting the power cord .. 18
Adjusting the hand strap .................................. 19
Attaching the shoulder strap............................ 19
Detaching and attaching the lens hood .......... 19
The remote control............................................ 20
Insert the battery ............................................. 20
Remote control setup ...................................... 20
Turn on/off the camera...................................... 21
Tally lamp ........................................................... 21
Viewnder .......................................................... 22
Using the viewnder ........................................ 22
Using the LCD ................................................. 23
Emphasizing outlines ...................................... 23
Adjusting the screen display............................ 24
Adjusting the backlight..................................... 25
Flipping images vertically and horizontally ...... 25
Switching between overscan and underscan .. 25
Setting the calendar .......................................... 26
Shooting
Basic shooting operations ............................... 27
Preparing to shoot ........................................... 27
Shooting in auto mode .................................... 27
Checking photos taken (REC CHECK) ........... 28
P2 card access lamps ..................................... 28
Protecting against a possible erasure ............. 28
Formatting P2 cards ........................................ 28
Recording times .............................................. 29
Remove the P2 card........................................ 30
Using SD/SDHC memory cards........................ 31
Installing and removing the SD memory card .. 31
Formatting SD memory card ........................... 31
Cautions in using SD memory cards ............... 31
Using the zoom function................................... 32
Digital zoom function ....................................... 32
Variable frame rates (VFR)................................ 33
Native recording .............................................. 35
Standard recording.......................................... 35
Using variable frame rates (VFR) .................... 36
Shooting in 1080i/576i (480i) progressive
mode............................................................... 37
Shooting in 1080i/576i progressive mode ....... 37
Shooting in 1080i/480i progressive mode ....... 37
Shooting in manual mode................................. 38
Switching to manual mode .............................. 38
Manual focusing .............................................. 38
Using focus assist............................................ 39
Iris adjustments ............................................... 39
Adjusting the gain............................................ 40
Light intensity adjustments .............................. 40
Adjusting the white balance............................. 41
Black balance adjustments.............................. 42
Auto Tracking White (ATW) .............................. 42
Shooting techniques for different targets....... 43
Low-angle shooting ......................................... 43
Self-portrait shooting ....................................... 43
Zebra pattern................................................... 43
Marker ............................................................. 43
Checking and displaying shooting status ........ 44
Changing the image size................................. 44
Optical Image Stabilizer................................... 45
Adding effects to images ................................. 45
Using the USER buttons.................................. 45
Backlight compensation................................... 45
Color bars........................................................ 45
Waveform monitor function.............................. 46
Adjusting the volume while shooting ............... 46
Backup recording............................................. 46
2-slot continuous recording ............................. 47
Shot mark function .......................................... 47
Text memo recording ....................................... 47
Time stamp function ........................................ 47
LAST CLIP DELETE function.......................... 48
Using the special recording functions ............ 49
Pre-recording (PRE REC) ............................... 49
Interval recording (INTERVAL REC)................ 49
One-shot recording (ONE-SHOT REC)........... 50
Loop recording (LOOP REC) .......................... 50

ENGLISH
E-9
Adjusting the shutter speed............................. 52
Synchro scan................................................... 53
Switching Audio Input....................................... 54
Using the built-in microphone.......................... 54
Using another microphone and audio
equipment.................................................... 54
Adjusting the recording level ........................... 55
Using scene les ............................................... 56
Changing scene le settings ........................... 56
Saving scene les and other settings on SD
memory cards................................................ 58
Clip metadata ..................................................... 60
Using the Counter ............................................. 61
Counter display................................................ 61
1394TC preset mode....................................... 61
Charging the built-in battery/Setting the time
data ................................................................. 62
Recharging the built-in battery ........................ 62
Setting the time code....................................... 62
Specifying the time code (TC PRESET).......... 62
Setting user information................................... 64
Playback
Basic playback operations ............................... 66
Thumbnail screen.............................................. 67
Basic thumbnail screen operations.................. 67
Adding shot marks to clips .............................. 69
Clearing the thumbnail screen......................... 69
Direct shooting functions ................................. 69
Thumbnail operations ....................................... 70
Selecting the thumbnail display method
(THUMBNAIL) ............................................. 70
Deleting clips and formatting cards
(OPERATION) ............................................. 71
Checking the clip or card information
(PROPERTY) .............................................. 72
Editing the recorded clip metadata.................. 74
Uploading the metadata (META DATA)............ 75
Useful playback functions ................................ 77
Variable speed search ..................................... 77
Slow playback.................................................. 77
Fast forward/rewind playback .......................... 77
Frame-by-frame playback ................................ 77
Clip skip........................................................... 78
Adjusting the volume ....................................... 78
Viewing images on a monitor .......................... 78
Checking the date and time............................. 78
Editing
Connecting external units ................................ 79
Headphones .................................................... 79
External microphone ....................................... 79
Computer (non-linear editing/le transfer) ....... 80
Hard disk drive (data copying)......................... 81
Digital video equipment (Dubbing) .................. 82
Video deck (Dubbing)...................................... 83
TV/Monitor (playback/dubbing)........................ 83
Nonlinear editing with P2 card (PC mode)...... 84
Copying from P2 cards to the hard disk drive
(1394 HOST mode) ........................................86
Warnings ......................................................... 88
Dubbing.............................................................. 89
Digital input/output........................................... 89
Analog output .................................................. 89
Displays
Screen displays ................................................. 90
Regular displays .............................................. 90
Main warning displays ..................................... 94
Setting the DISPLAY items.............................. 96
Menu
Using the setup menus..................................... 97
Using the menus.............................................. 97
Initializing the menu settings ........................... 98
Setup menu structure ....................................... 99
CAM (camera) mode menu ............................. 99
MCR (playback) mode menu......................... 100
Setup menu list................................................ 101
SCENE FILE screen...................................... 101
CAMERA SETUP screen .............................. 103
SW MODE screen ......................................... 104
AUTO SW screen .......................................... 106
RECORDING SETUP screen........................ 107
PLAYBACK FUNCTIONS screen .................. 110
AV IN/OUT SETUP screen ............................ 110
DISPLAY SETUP screen............................... 111
CARD FUNCTIONS screen........................... 113
OTHER FUNCTIONS screen ........................ 113
OPTION MENU screen ................................. 116
Reference
Before calling for service................................ 117
Operating precautions .................................... 120
Updating the driver in the camera ................. 122
Cleaning ........................................................... 123
Storage Precautions........................................ 124
How to handle data recorded on P2 cards.... 125
Checkpoints for using memory cards ........... 126
Recording format list....................................... 127
Appendix .......................................................... 128
Specications .................................................. 129

E-10
Outline of operations
This unit is compatible with P2 (Professional Plug-in) cards.
The P2 card has a large capacity with a high transfer rate, and allows you sophisticated movie-making on
this handy camera, including HD (High Denition) recording and smooth editing/dubbing.
BNC cable
(HD-SDI)
Video
equipment/
Monitor
The setting values
such as the user le
are saved to and read
from the SD memory
card.
P2 card
You can use the following features:
HD (High Denition) recording
Multi format recording
Variable frame rates
Slow & quick motion recording
Maximum 4 channel uncompressed
digital audio recording
DV recording (576i (480i))
For details on how to handle recorded
data, see Page 125.
•
•
•
•
•
1
P2 mode shooting and
playback (Pages 27 and 66)
Computer
The data (le) is transferred for nonlinear
editing on your computer or other unit.
2PC mode (Page 84)
External hard disk
The unit directly controls the external hard disk
drive, and transfers the data (le) to it.
31394 host mode (Page 86)
Video equipment/
Television
Computer/
Memory card recorder
The contents can be transferred
as a data stream (digital
dubbing).
AV cable Component
video cable
IEEE1394 (SBP-2*)
USB2.0
(Windows)
IEEE1394
(Macintosh)
P2 card
*Serial Bus Protocol-2
IEEE1394
(Windows/
Macintosh)
Before use

ENGLISH
Before use
E-11
Precaution for use
Always take some trial shots before actual shooting.
When shooting important events (such as weddings), always take some trial shots and check that the
sound and images have been recorded properly before actual shooting.
Be sure to check and set the calendar and time zone.
These settings affect the control and playback sequence of the recorded contents. Before making a
recording, set and check the calendar and time zone. (Page 26)
Panasonic makes no guarantees for your recordings.
Please understand that Panasonic makes no guarantees for your recordings in cases where images
and/or sound were not recorded as you intended due to problems with the camera-recorder.
Respect copyrights
Copyright laws forbid the use of video and audio material you have recorded for any purpose other than
your own personal enjoyment. Remember that restrictions apply to the shooting of certain material even if
it is intended for private use.
Caution regarding laser beams
The CCD may be damaged if it is subjected to light from a laser beam.
When using the camera-recorder in locations where laser irradiation equipment is used, be careful not to
allow the laser beam to shine directly on the lens.
Notes when connecting a 1394 cable
Windows:
Before connecting, turn off the main unit power, and check the shape and orientation of the terminal.
Macintosh:
After turning on the power of the Apple Macintosh computer, check the shape and orientation of the
terminal, and then connect the cable.
(Pages 80, 81)
Media that can be used in this unit
The following media can be used in this unit. For details, refer to the respective pages.
P2 card (Pages 27, 125)
SD/SDHC memory cards (Pages 31, 126)
Mounting the camera-recorder on a tripod
The tripod mounting hole is 5.5 mm deep. Do not force the tripod screw beyond this depth.
You can damage the camera-recorder if you use any screw other than 1/4-20UNC.
Attach the tripod to the tripod hole.
For other usage notes, see Page 120.
•
•
•
•
•
•
•
•
•

E-12
Accessories
Battery *1 Battery charger / AC power supply cords
(For the U.K.) (For areas other than the U.K.)
AC adaptor / AC power supply cords
(For the U.K.) (For areas other than the U.K.)
Eye cup Microphone holder
Screws for microphone holder
6-mm screws (2)
12-mm screws (2)
Microphone holder adapter
Shoulder belt Component video cable PIN-BNC conversion
plugs (3)
30-mm ferrite core (2)*2
35-mm ferrite core (2)*2
CD-ROM Wireless remote control
and battery (CR2025)
The following accessories are attached to the
camera-recorder.
Lens hood INPUT terminal cover (2)
*1 For part numbers for the battery, see “Optional units”. (see below)
*2 When using a 1394 cable (sold separately) or a USB cable (sold separately), attach ferrite cores to the
both ends of the cable. (Page 80)
Optional units
XLR microphone
AG-MC200G
Battery
CGA-D54s (5400 mAh: equivalent to accessory battery)
About this manual
Note concerning illustrations in these instructions
Illustrations (camera-recorder, menu screens, etc.) in these operating instructions differ slightly from the
actual camera-recorder.
References
References are shown as (Page @).
•
•
•
•

ENGLISH
Description of
parts
E-13
Description of parts
Right side and rear side
POWER
ON
OFF
12171615
18 20
21
22
23 25
3 4 5 7 8 9 10 11 12
13
1 2
24
19
6
14
1 POWER switch (Page 21)
2 START/STOP button (Page 27)
3 REC CHECK button (Page 27)
4 Zoom button (Page 32)
5 HANDLE ZOOM switch (Page 32)
6 Recording enable/disable switch (Page 43)
7 Handle zoom button (Page 32)
8 Handle START/STOP button (Page 27)
9 Built-in stereo microphone (Page 54)
10 Tally lamp (Front) (Page 21)
11 Remote control sensor (Front) (Page 20)
12 White balance sensor (Page 42)
13 INPUT 1/2 (audio input) switch (Page 54)
14 Zoom ring pin hole (Page 32)
15 P2 card access lamp (x 2) (Page 28)
16 Viewnder (Page 22)
17 P2 card/SD memory card slot (cover)
(Pages 27 and 31)
18 SCENE FILE dial (Page 56)
19 SLOT SEL button (Page 47)
20 Mode button (Page 27)
21 Remote control sensor (Rear) (Page 20)
22 Tally lamp (Rear) (Page 21)
23 Mode lamp (Page 27)
24 Power terminal (Page 18)
25 Battery release button (Page 18)
Description of parts

E-14
Description of parts (continued)
Left side
BARS
CH1 SELECT
COUNTER RESET/TC SET REC
CH2 SELECT
AUDIO
INT(L)
INPUT1
INPUT2
SHUTTER
SPEES SELECT
INT(R)
INPUT2
INPUT1
MIC POWER+48V
ON
OFF
INPUT2
ON
OFF
LCD
ZEBRA
EVF DTL
OIS
WFM
MENU
PUSH-SET
PAGE/AUDIO MON/VAR
THUMBNAIL
AWB
3 4 652
12
8
11
9
13
14 16
15
17 18 19 2010 21
1
33 34
27
32 353130
26 2928
22 23
24 25
7
36
1 Focus ring (Page 38)
2 Zoom ring (Page 32)
If you don’t need the zoom ring pin, t it
into the provided zoom ring pin hole (14 on
page 13) so that you don’t loose it.
3 FOCUS ASSIST button (Page 39)
4 USER button (Page 45)
5 ZOOM switch (Page 32)
6 Built-in speaker (Page 78)
7 OPEN button (Page 23)
8 Diopter adjustment dial (Page 22)
9 FOCUS switch (Page 38)
10 PUSH AUTO button (Page 38)
11 AWB button (Page 41)
12 IRIS dial (Page 39)
13 ND FILTER switch (Page 40)
14 IRIS button (Page 39)
15 GAIN switch (Page 40)
16 WHITE BAL switch (Page 41)
17 FUCUS RING (FOCUS/IRIS) switch
(Page 38)
18 DISP/MODE CHK button (Page 44)
19 AUTO/MANUAL switch (Page 27)
20 AUDIO LEVEL knobs (CH1, CH2) (Page 55)
21 LCD monitor (Page 23)
22 MENU button (Page 97)
23 THUMBNAIL button (Page 69)
24 Operation lever (Pages 66 and 97)
25 PAGE/AUDIO MON/VAR button (Pages 46
and 77)
26 CH1, CH2 SELECT switch (Page 54)
27 BARS button (Page 45)
28 SHUTTER, SPEED SELLECT +/- button
(Page 52)
29 INPUT1, 2 switch (MIC POWER +48 V)
(Page 54)
30 COUNTER - RESET/TC SET button
(Page 61)
31 LCD button (Page 25)
32 ZEBRA button (Page 43)
33 EVF DTL button (Page 23)
34 WFM button (Page 46)
35 OIS button (Page 45)
36 MCR REC button (Page 89)
Functions when the ZEBRA button (32) and
OIS button (35) are pressed at the same time.

ENGLISH
Description of
parts
E-15
Terminals and mounting parts
SDI
OUT
1394
CAM REMOTE
FOCUS IRIS
ZOOM S/S
COMPONENT
OUT
1 2 3
14
1615
12
54 6
1098 11
7
13
1 USB terminal (Mini-B) (Page 80)
2 Light shoe
3 Microphone shoe (Page 79)
4 P2 card slots (Page 27)
5 SD memory card slot (Page 31)
6 P2 card eject buttons (Page 30)
7 SDI OUT terminal (Page 83)
8 1394 terminal (Pages 80 and 81)
9 COMPONENT OUT terminal (Page 83)
10 CAM REMOTE jack*
FOCUS/IRIS (3.5 mm mini jack)
You can connect a remote control unit to
control the FOCUS and IRIS (aperture).
ZOOM S/S (2.5 mm super mini jack)
You can connect a remote control unit to
control zoom and start/stop of recording.
11 Headphone jack (3.5 mm stereo mini jack)
(Page 79)
12 Tripod hole (Page 11)
13 Security Lock opening
Use this opening to attach a security cable.
For details on how to attach the cable, see the
Operating Instructions supplied with the cable.
The security lock and security cable are
designed to prevent theft, but Panasonic will
not accept any liability for damages resulting
from theft.
14 INPUT 1/2 terminal (XLR, 3 pin) (Page 79)
15 AUDIO OUT CH1/CH2 terminals (Page 83)
16 VIDEO OUT terminal (Page 83)
* Do not connect any equipment except the remote
controller to the CAM REMOTE jack.
Connecting any equipment other than the remote
control may cause the image brightness to
change and/or the images to appear out of focus.

E-16
Description of parts (continued)
Remote control
The following buttons are for functions that
cannot be executed on the camera-recorder.
• PHOTO SHOT • TITLE • A.DUB
• MULTI/P-IN-P • SELECT
• STORE • OFF/ON
• PB.ZOOM • INDEX
OSD
COUNTER
RESET TITLE
STILL ADV
PAUSE
STILL ADV
INDEX
SELECT
STORE
OFF/ON
P.B.DIGITAL
VAR.
SEARCH
VOL +
-
PB.
ZOOM
MENU
SET
ITEM
STOP INDEX
MULTI/
P-IN-P
REC A.DUB
PLAY/REW FF/
ZOOM
DATE/
TIME PHOTO
SHOT
START/
STOP
2
1
3
5
6
7
14
9
10
12
4
13
11
9
15
8
1 DATE/TIME button (Page 78)
2 OSD button (Page 78)
3 COUNTER button (Page 61)
Same function as the COUNTER button on the
main unit.
4 COUNTER RESET button (Page 61)
Same function as the COUNTER RESET
button on the main unit.
5 REC button (Page 89)
Operation buttons
6 PLAY button ( q) (Pages 66 and 89)
7 /REW button (t) (Page 66)
8 PAUSE button ( h) (Page 66)
Like the operation buttons of the camera,
MENU operations are performed using SET
button.
9 STILL ADV button ( ,) (Page 20)
10 STOP button ( g) (Page 66)
11 FF/ button ( y) (Page 66)
Buttons for shooting and volume control
12 START/STOP button (Page 27)
Same function as the START/STOP button on
the main unit.
13 ZOOM/VOL buttons (Page 32)
14 VAR. SEARCH button (Page 77)
15 MENU button (Page 97)
Functions the same as the MENU button on
the camera.
[], [ ], [ ], [ ] buttons
Function the same as the Operation lever on
the camera.

ENGLISH
Preparation
E-17
The battery
Charging
Before using the battery, give it a full charge using
the battery charger.
Keep a spare battery with you.
1Place the battery horizontally while aligning
it with the mark on the battery charger,
and slide it into position.
2Plug the AC cord into the power outlet.
The POWER and CHARGE lamps on the
battery charger light, and charging starts.
If the CHARGE lamp does not light when
attached, detach the battery and then attach
it again.
CHARGE
POWER
When the battery has been charged, the
CHARGE lamp on the battery charger goes
off.
3Slide the battery and remove it.
•
•
•
Recording time of included battery
Capacity Recharging
time
Continuous
recording time
5400 mAh Approx. 330
min.
Approx. 160
min.
The times given above are approximate for when
scenes are shot in the DVCPRO HD mode while
not using the LCD monitor.
The times apply when the ambient operating
temperature is 20°C and humidity is 60%.
Charging may take longer at other temperatures
and humidity levels.
Keep metal objects (such as necklaces
and hairpins) away from the battery.
Shortcircuiting may occur across the
terminals, causing the battery to heat up,
and you may seriously burn yourself if you
touch the battery in this state.
The battery becomes hot while it is being
used or charged. The camera-recorder itself
also becomes hot during use.
The recordable time reduces if you repeatedly
start and stop recording.
Discharge the battery before storing it. When
storing it for an extended time, charge it at
least once a year, use up its charge in the
camerarecorder, and then store it again.
If the battery is extremely hot or cold, the
CHARGE lamp will blink several times before
charging starts.
If the CHARGE lamp continues to blink even
when the battery temperature is normal, there
may be something wrong with the battery or
battery charger. Contact your dealer.
The battery takes longer to charge when it is
warm.
The battery charger can interfere with radio
reception so keep radios at least 1 meter
away from it.
The battery charger may make some noise
when you are using it, but this is normal.
Operation of battery pack CGR-D16 (1600
mAh) (sold separately) is not guaranteed.
•
•
•
•
•
•
•
•
•
•
•
•
Preparation

E-18
Installing and removing the power supply
Installing and removing the battery
Installation
1Insert the battery until it clicks into place.
Removal
1Set the POWER switch to OFF, and check
that the mode lamp is off.
2While pressing the battery release button,
raise up the battery to remove it.
Support the battery with your hand to ensure
that it will not fall.
Battery release button
Mode lamp
•
Connecting and disconnecting the power cord
Installation
1Plug the AC power supply cord into the
power outlet.
2Slide the DC cord’s battery connector to
the direction of the arrow until it clicks into
place.
DC cord’s battery
connector
Removal
1Set the POWER switch to OFF, and check
that the mode lamp is off.
2Slide the DC cord’s battery connector to
the direction of the arrow while pressing
the battery release button.
Battery release button
3Disconnect the AC power supply cord from
the power outlet.
CAUTION:
Disconnect the AC power supply cord from
the power outlet when the unit is not going to
be used.
When the AC power supply cord is
disconnected from the power outlet, the power
lamp on the AC adaptor remains lit for a while
then shuts off. This is not a malfunction.
•
•

ENGLISH
Preparation
E-19
Adjusting the hand strap
Adjust the hand strap to suit your hand.
1Open the cover and adjust the length.
2Close the cover.
Make sure the cover is fully closed.•
Attaching the shoulder strap
Attach the shoulder strap and use it as a precaution against dropping the camera.
20 mm or more
20 mm or more
Detaching and attaching the lens hood
Detaching the lens hood
Turn the lens hood counterclockwise to detach it.
Attaching the lens hood
Turn the lens hood clockwise until it clicks to
secure it in position.
Be sure to attach the lens hood cap to protect the
lens when not in use.
•
•
•

E-20
The remote control
Insert the battery
1Push the catch in the direction shown by
arrow to remove the holder.
2Insert the battery with the “+” marked side
facing up.
3Return the holder to its original position.
When the battery (CR2025) has run out, replace
it with a new one. (The battery lasts about one
year, depending on the frequency of use.)
If the remote control unit fails to work even when
it is operated near the camera-recorder’s remote
control sensor, the battery has run out.
Keep the battery out of the reach of children.
•
•
Remote control setup
When using two camera-recorders simultaneously,
set this camera-recorder and the remote control
to either “operation mode 1” or “operation mode 2”
so the remote control does not operate the wrong
camera-recorder by mistake.
Setting
Wireless remote control
Press the MCR operation buttons STOP ( g)
and STILL ADV ( ) at the same time to set the
remote control unit for use in “operation mode 1”.
Alternatively, press the STOP ( g) and STILL
ADV ( ) buttons at the same time to set the
remote control unit for use in “operation mode 2”.
When the battery in the remote control unit is
replaced, the remote control unit is set for use in
“operation mode 1”.
Camera
In the setup menus, OTHER FUNCTIONS
screen, REMOTE, set to 1 or 2. (Page 113)
If different settings are used for the camera-
recorder and remote control unit, “REMOTE” lights
in red on the viewnder and LCD monitor.
OSD
COUNTER
RESET TITLE
STILL ADV
PAUSE
STILL ADV
INDEX
SELECT
STORE
OFF/ON
P.B.DIGITAL
VAR.
SEARCH
VOL +
-
PB.
ZOOM
MENU
SET
ITEM
STOP INDEX
MULTI/
P-IN-P
REC A.DUB
PLAY/REW FF/
ZOOM
DATE/
TIME PHOTO
SHOT
START/
STOP
Operation
mode 2 Operation
mode 1
•
•
Table of contents
Other Panasonic Camera Recorder manuals