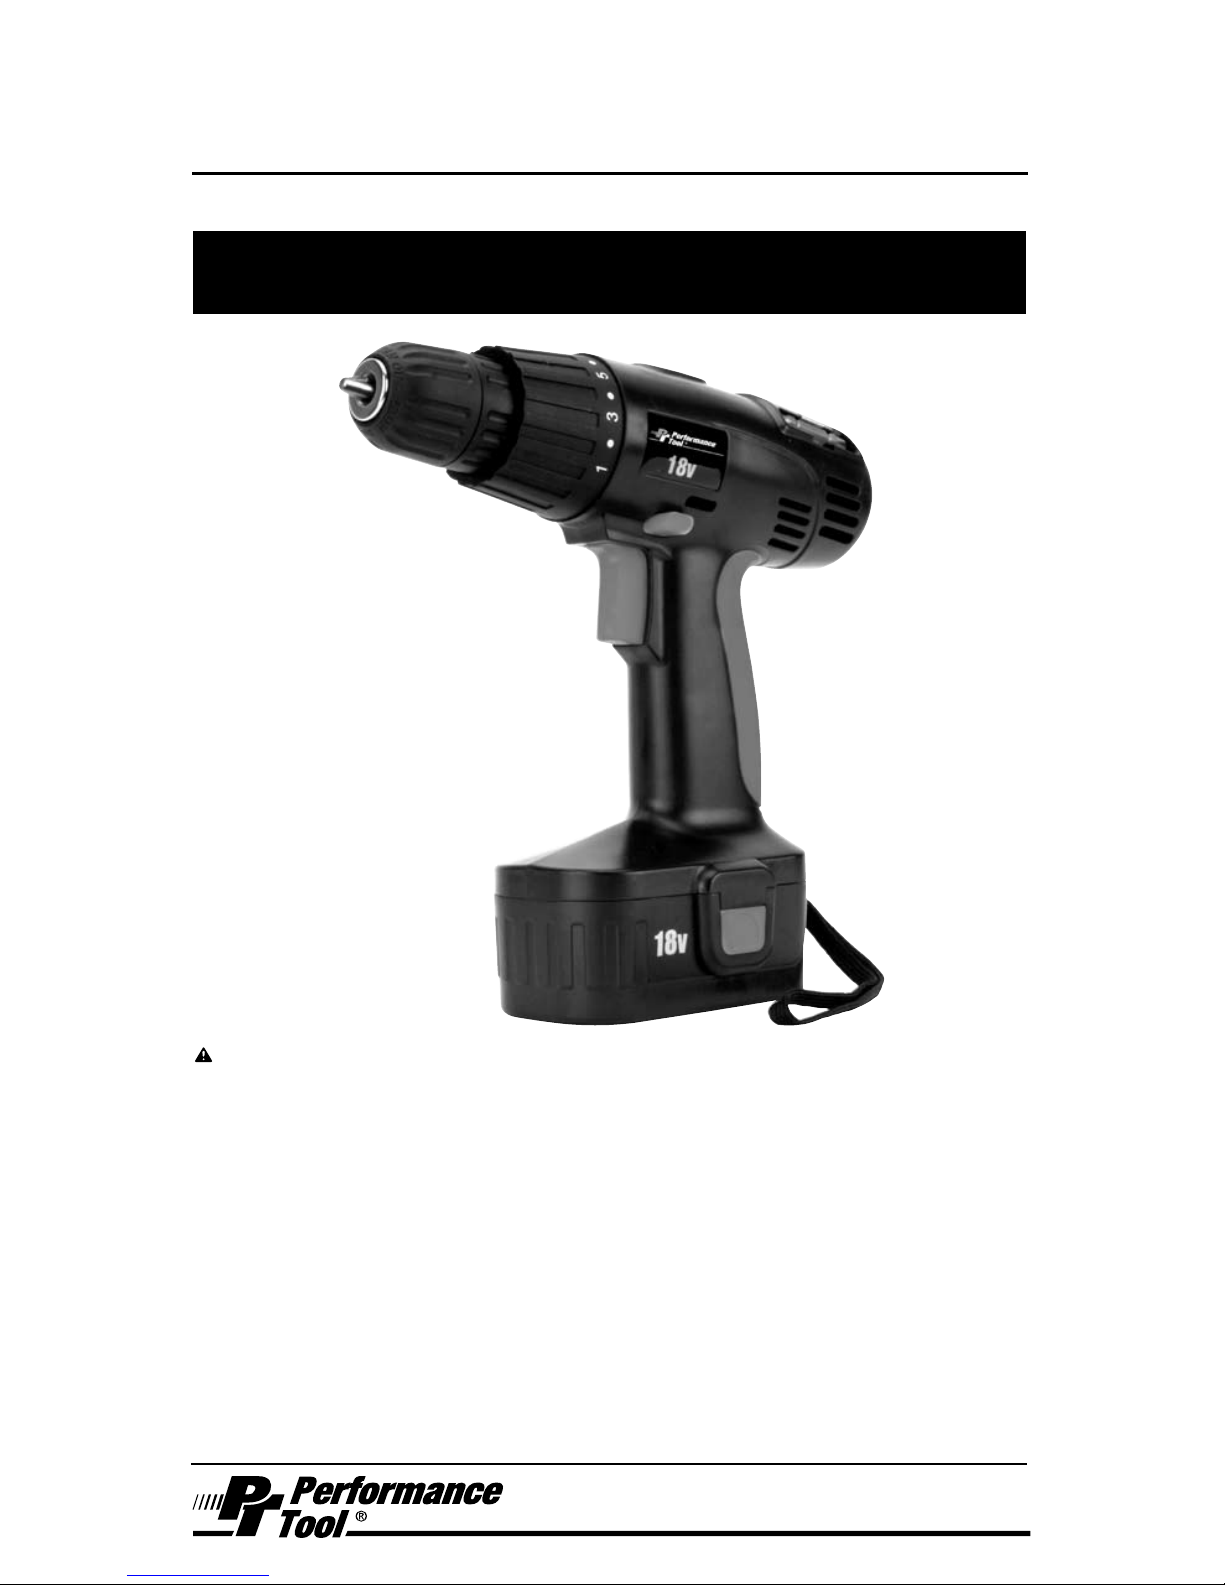
Perfomance Tool W50040 User manual

18 VOLT CORDLESS DRILL
OWNER’S MANUAL
Item Number W50040
WARNING
It is the owner and/or operators’ responsibility to study all WARNINGS, operating, and maintenance
instructions contained on the product label and instruction manual prior to operation of this product. The
owner/operator shall retain product instructions for future reference.
The owner and/or operator are responsible for maintenance, maintaining all decals or warning labels and
while in use, maintaining the unit in good working order. If the owner and/or operator are not fluent in English,
the product warnings and instructions shall be read and discussed with the operators’ native language by the
purchaser/owner or his designee. Make sure that the operator comprehends its contents. Safety information
shall be emphasized and understood prior to usage. The product shall be inspected per the operating
instructions.
Users of this product must fully understand these instructions. Each person operating this product must also
be of sound mind and body and must not be under the influence of any substance that might impair their
vision, dexterity or judgment.
Protect yourself and others by observing all safety information.
Failure to comply with instructions could result in personal injury and/or property damage!
If you encounter any problems or difficulties, please contact our customer service department at:
1-800-426-1262 between 6:30 a.m. and 4:30 p.m. Pacific time.


1
SAFETY GUIDELINES / DEFINITIONS
UNPACKING AND INSPECTION
SPECIFICATIONS
Specifications are
subject to change
without notice.
Voltage ...........................................................................18 Volt
Torque Positions ............................................................. 16+1
RPM (No Load) .............................................................. 0 - 550
Chuck Capacity .............................................................. 3/8 in.
Charger Input ............................................120 Volts AC 60HZ
Charging Time .............................................................3-5 hrs.
Battery Type ................................................. Nickel Cadmium
WARNING: Read and understand this entire instruction manual before attempting to assemble, install, operate or
maintain this product. Failure to comply with the instructions may result in serious personal injury and/or property
damage!
The following signal words are used to emphasize safety warnings that must be followed when using this
product:
This instruction manual is intended for your benefit. Please read and follow the safety, installation, maintenance and
troubleshooting steps described within to ensure your safety and satisfaction. The contents of this instruction manual are
based upon the latest product information available at the time of publication. The manufacturer reserves the right to make
product changes at any time without notice.
DANGER Indicates an imminently hazardous
situation that, if not avoided, WILL result in death or
serious injury.
WARNING Indicates a potentially hazardous
situation that, if not avoided, COULD result in death
or serious injury.
CAUTION Indicates a potentially hazardous situation
that, if not avoided, MAY result in minor or moderate
injury.
NOTICE Indicates important information, which if not
followed, MAY cause damage to equipment.
After opening the carton, unpack your new product and related parts & accessories. Please inspect it carefully for
any damage that may have occurred during transit. Please check it against the photograph on carton. If any parts
are missing, please call customer service at 1-800-426-1262 between 6 a.m. and 5 p.m. Pacific time.
WARNING DO NOT operate this product if damaged during shipment, handling or misuse. Do not operate the
product until the parts have been replaced or the fault rectified. Failure to do so may result in serious personal injury
or property damage. All damaged parts must be repaired or replaced as needed prior to operating this product.
Check to see that all nuts, bolts and fittings are secure before putting this product into service. If you have any
questions, or require assistance with damaged or missing parts, please contact our factory customer service
department at: 1-800-426-1262.
Please have the serial number, model number, and date of purchase available for reference when calling.

2
IMPORTANT SAFETY INFORMATION
WARNING
READ, UNDERSTAND AND FOLLOW ALL INSTRUCTIONS AND WARNINGS BEFORE OPERATING THIS
PRODUCT. FAILURE TO DO SO MAY RESULT IN PERSONAL INJURY AND/OR PROPERTY DAMAGE AND
WILL VOID WARRANTY.
1. Always use common sense and pay particular
attention to all the DANGER, WARNING, CAUTION
and NOTICE statements of this manual. The safety
instructions provided are not intended to cover all
possible conditions and practices that may occur
when operating, maintaining and cleaning power
tools.
2. Observe work area conditions. Do not use machines
or power tools in damp or wet locations. Don’t expose
to rain. Keep work area well lighted. Do not use elec-
trically powered tools in the presence of ammable
gases or liquids. Do not bring combustible materials
near the tools. Power tools create sparks, which may
ignite the dust or fumes. Keep work area clean and
well lit. Cluttered work areas invite accidents.
3. Use personal protective equipment. Wear ANSI
approved safety goggles. Protective equipment such
as dusk mask, non-skid safety shoes, hard hat, heavy
duty work gloves or hearing protection used for ap-
propriate conditions will reduce personal injuries.
4. Keep bystanders, children and visitors away while
operating this product. Distractions can cause you to
lose control.
5. Stay alert. Watch what you are doing, and use
common sense when operating this product. Do not
use this product while tired or under the inuence of
drugs, alcohol, or medication. A moment of inattention
while operating this product may result in serious
personal injury. Keep proper footing and balance at all
times. Do not reach over or across running machines,
hoses, cords, etc.
6. Dress properly. Do not wear loose clothing or jewelry.
Keep your hair, clothing, and gloves away from mov-
ing parts. Loose clothes, jewelry or long hair can be
caught in moving parts.
7. Inspect before every use; do not use if parts are loose
or damaged.
8. Do not alter this product in any way.
9. Use the right tool for the job. Do not attempt to force
a small tool or attachment to do the work of a larger
industrial tool. Don’t use a tool whose performance
is not adequate for your work. Do not modify this tool
and do not use this tool for a purpose for which it was
not intended.
10. Power tool plugs must match the outlet. Never
modify the plug in any way. Do not use any
adapter plugs with earthed (grounded) power tools.
Unmodied plugs and matching outlets will reduce
risk of electric shock.
11. Avoid body contact with earthed or grounded
surfaces such as pipes, radiators, ranges and
refrigerators. There is an increased risk of electric
shock if your body is earthed or grounded.
12. Do not expose power tools to rain or wet conditions.
Water entering a power tool will increase the risk of
electric shock.
13. Do not abuse the cord. Never use the cord for
carrying, pulling or unplugging the power tool. Keep
cord away from heat, oil, sharp edges or moving
parts. Damaged or entangled cords increase the
risk of electric shock.
14. When operating a power tool outdoors, use an
extension cord suitable for outdoor use. Use of a
cord suitable for outdoor use reduces the risk of
electric shock.
15. If operating a power tool in a damp location is
unavoidable, use a ground fault circuit interrupter
(GFCI) protected supply. Use of a GFCI reduces
the risk of electric shock.
16. Before using battery pack, please read carefully
all instructions and cautionary markings on battery
pack, battery charger and product using battery. Do
not incinerate the battery pack even if it is severely
damaged or is completely worn out. The battery
pack can explode.
17. Do not carry battery packs in aprons, pockets, or
tool boxes, product kit boxes, drawers, etc. with
loose metal objects. Battery pack terminals could
be short-circuited causing damage to the battery
pack, severe burns or re.
18. The battery pack is Nickel-Cadmium (Ni-Cad) and
is considered to be a toxic material by the Envi-
ronmental Protection Agency. Before disposing of
damaged or worn out Ni-Cad battery packs, check
with your State Environmental Protection Agency to
nd out about special restrictions on the disposal of
these battery packs.
19. The battery is not fully charged. Before rst use, the
battery pack requires 8-10 hours charge time to be
fully charged. Subsequent recharging needs 3-5
hours for the battery to be fully charged.
20. Always switch to a fresh battery when tool perfor-
mance begins to diminish. Severe heat is most
destructive to a battery; the more heat generated,
the faster the battery loses power. A battery that
gets too hot can have a shortened life.
21. Never over-discharge a battery by using the tool
even after tool performance has decreased. Do not
attempt to discharge a tool’s battery by continuing
to pull on the tool trigger. When tool performance
begins to diminish, stop the tool and recharge the
battery for optimal performance.
22. Charge battery pack at ambient temperatures
between 50° F -104° F. Store tool and battery pack
in locations where temperatures will not exceed
120°F. This is important to prevent serious damage
to the battery cells.

3
IMPORTANT SAFETY INFORMATION
23. A battery operated tool with integral batteries or
a separate battery pack must be recharged only
with the specied charger for the battery. A charger
that may be suitable for one type of battery may
create a risk of re when used with another battery.
Use battery operated tool only with specically
designated battery pack. Use of any other batteries
may create risk of re.
24. When battery pack is not in use, keep it away from
other metal objects, like paper clips, coins, keys,
nails, screws or other small metal objects, that can
make a connection from one terminal to another.
Shorting the battery terminals together may cause
burns or a re.
25. Under abusive conditions, liquid may be ejected
from the battery; avoid contact. If contact acciden-
tally occurs, ush with water. If liquid contacts eyes,
additionally seek medical help. Liquid ejected from
the battery may cause irritation or burns.
26. Prevent accidental starting. Ensure switch is in the
“OFF” position before connecting to power source
and/or battery pack, picking up or carrying the tool.
Carrying power tools with your nger on the switch
or energizing power tools that have the switch “ON”
invites accidents.
27. Do not use the power tool if the switch does not
turn it on and off. Any power tool that cannot be
controlled with the switch is dangerous and must be
repaired.
28. Have your power tool serviced by a qualied repair
person using only identical replacement parts.
This will ensure that the safety of the power tool is
maintained. Follow instructions in the Maintenance
section of this manual. Use of unauthorized parts
or failure to follow Maintenance Instructions may
create a risk of shock or injury.
29. Disconnect the plug from the power source and/or
the battery pack from the power tool before making
any adjustments or changing accessories. Such
preventive safety measures reduce the risk of start-
ing the power tool accidentally.
30. Maintain power tools. Check for misalignment or
binding of moving parts, breakage of parts and any
other condition that may affect the power tool’s op-
eration. If damaged, have the power tool repaired
before use. Many accidents are caused by poorly
maintained power tools.
31. Keep cutting tools sharp and clean. Properly
maintained cutting tools with sharp cutting edges
are less likely to bind and are easier to control.
32. Use the power tool, accessories and tool bits etc.
in accordance with these instructions, taking into
account the working conditions and the work to be
performed. Use of the power tool for operations
different from those intended could result in a
hazardous situation.
33. Store idle equipment. When not in use, tools must
be stored in a dry location to inhibit rust. Always
lock up tools and keep out of reach of children and
other untrained persons. Switch off all unused elec-
trical tools when stored. Disconnect battery from
unit. Tools are dangerous in the hands of untrained
users.
WARNING: Some dust created by power sanding, saw-
ing, grinding, drilling and other construction activities
contains chemicals known to the State of California to
cause cancer, birth defects or other reproductive harm.
WARNING: This product and its packaging contain
a chemical known to the State of California to cause
cancer, birth defects, or other reproductive harm.

4
IMPORTANT:
Some of the following symbols may be used on your tool. Please study them and learn
their meaning. Proper interpretation of these symbols will allow you to operate the tool better and safer.
CONTROLS AND COMPONENTS
SYMBOL DEFINITIONS
1. Battery Pack
2. Release Buttons
on Each Side
3. Charger
4. LED Charging Indicators
5.10 mm (3/8 in.)
Keyless Chuck
6.16 +1 Adjustable Torque
Settings Control Ring
7. Forward/Reversing and
Trigger Lock Lever
8. Variable Speed Controlled
Trigger Switch
9. Comfort Grip
10.120V AC adapter
3
56
7
10
89
1
2
4
V Volts Voltage (Potential)
A Amperes Current
Hz Hertz Frequency (Cycles per Second)
W Watt Power
Kg Kilograms Weight
Alternating Current Type of Current
Direct Current Type of Current
Alternating or Direct Current Type of Current
Earthing Terminal Grounding Terminal
Class II Construction Denotes Double Insulation
min Minutes Time
s Seconds Time
Ø Diameter Size of Drill Bits, Grinding Wheels, etc.
n0No load speed No-load Rotational Speed
.../min Revolutions per Minute Revolutions, Surface Speed,
Strokes, etc. per Minute
1,2,3,... Ring Selector Settings Speed, Torque or Position Settings
Symbol Name Explanation

5
BATTERY PACK INSTALLATION
TO REMOVE BATTERY PACK:
1. Press release button on front side of
the Cordless Drill to release the battery
pack.
2. Pull battery pack free of Cordless Drill.
TO ATTACH BATTERY PACK:
1. Align the raised portion of the battery
pack with the groove in the battery
compartment of the Cordless Drill.
2. Press the battery pack into place. Make
sure the latch is securely fastened. Do
not use the Cordless Drill if the battery
pack is not seated properly.
BATTERY PACK CHARGING OPERATIONS
NOTICE The charger will not
automatically turn “OFF” when the
battery pack is fully charged. The
charging indicator light will remain “ON”
until the charger is disconnected from
the electrical outlet. Remove battery
pack from charger and disconnect
charger from power after 5 hours of
charging operation Overcharging can
overheat battery cells and cause
permanent damage to the battery pack
and charger kit.
1. Make sure the trigger on the Cordless
Drill is in the “OFF” position and remove
the battery pack from the Cordless Drill.
2. Plug 120V AC Adapter into household
outlet and into side of battery charger.
The Red indicator light will come “ON”.
3. Insert battery pack into battery charger.
The Green indicator light will come “ON”
indicating that battery is being charged.
4. After 3 - 5 hours of charging, remove the
battery pack from charger and reattach
battery pack onto Cordless Drill, making
certain latches fasten securely. Cordless
Drill will not operate properly if the bat-
tery pack is not seated properly.
NOTICE Continuous use of your tool
causes the battery pack to become hot.
Let a hot battery pack cool down for ap-
proximately 30 minutes before attempt-
ing to recharge.
BATTERY PACK USAGE AND CHARGING OPERATIONS
Figure 1
Battery Pack
Battery Charger
120V AC Adapter

6
INSTALLING ACCESSORIES
WARNING
Do not attempt to tighten drill
bits (or any other accessory) by gripping
the front of the chuck and turning the tool
on. This may cause personal injury and/or
damage to the chuck. When removing the
bit from the tool, avoid contact with skin
and use proper protective gloves when
grasping the bit or accessory. Accesso-
ries may be hot after prolonged use.
CAUTION Be aware that this tool is
always in an operating condition because
it does not have to be plugged into an
electrical outlet. Always lock the Trigger
Switch and remove the battery pack
before changing accessories.
1. Hold the rear end of the chuck in one
hand and use the other hand to rotate
the front end in a clockwise direction to
open the jaws of the chuck.
2. Insert the shank of the bit (or other
accessory) fully into the keyless chuck,
taking care to keep the bit in the center
of the jaws of the chuck.
3. Turn the front end of the chuck counter-
clockwise to hold the bit in place.
4. Tighten securely by turning the front end
of the chuck counterclockwise while
holding the rear end.
OPERATING THE DRILL
WARNING
Never tape the trigger switch
down to provide continuous high speed.
The tool may fail under such conditions
causing fire or personal injury.
VARIABLE SPEED TRIGGER SWITCH:
• The speed of the Cordless Drill depends
on the amount of pressure you put on the
trigger.
• The more pressure you apply, the faster
the Cordless Drill will go.
• Release the pressure and the Cordless
Drill will slow down.
FORWARD / REVERSE AND TRIGGER
LOCK LEVER:
NOTICE
Be sure the trigger is released
when changing the position of the lever.
Always store the tool in the “LOCKED/
OFF” position. Always check the direction
of the Cordless Drill’s rotation before use.
• To select forward Cordless Drill rotation,
press the trigger lock from left to right at
against the Cordless Drill body.
• To select reverse, press the trigger lock
lever in the opposite direction.
• The center position locks the tool.
OPERATION
Trigger
Switch
Lock
Lever
WARNING Be aware that this tool is always in an operating condition because it does
not have to be plugged into an electrical outlet. Always lock the Trigger Switch and
remove the battery pack before changing accessories.
Figure 2 Hold Here
Rotate Here
Release Grip

7
OPERATION
TORQUE SETTINGS
NOTE
The control ring adjusts the level of
torque
• For light duty work, use lower settings. •
For heavy duty work, use higher settings.
Proper Setting For Driving Screws:
1. Set the ring on the lowest setting to
begin.
2. Try tightening the rst screw. If the drill
drives smoothly, proceed with the next
screw.
3. If the Drill's clutch slips, increase the
torque setting and try again until the Drill
drives the screw without incident.
SCREWDRIVING
• Always start slowly and gradually increase
the speed of the Drill.
• Release the trigger when you feel the
clutch slip.
• Always keep the driver bit straight to
prevent damage to the screw.
• Hold the Drill with both hands to ensure
control if the bit should stick or slip.
• To prevent wood from splitting, drill pilot
holes into the wood before driving in the
screws.
DRILLING METAL
• Apply a lubricant, such as cutting oil, to the
tip of the bit.
• Start with a small hole then enlarge to
the required size. Make sure the bit is
actually cutting and not spinning in the
hole as this will dull the edges of the bit.
• Keep enough pressure on the bit to keep it
drilling through the material.
DRILLING MASONRY
• Masonry can be brittle so be careful not to
apply too much pressure and crack the
material.
• Apply enough pressure to keep the bit
cutting and not spinning in the hole as this
will dull the edges of the bit.
• Bricks and similar soft materials will require
less pressure, concrete will require much
more.
DRILLING WOOD
Use twist bits to drill holes in wood. Make
sure the bits are sharp. Pull the bits out of
the hole frequently to clear chips from the
flutes as an overburdened bit may overheat.
TIPS FOR OPTIMAL USE
• Keep the right amount of pressure in a
straight line with the drill bit. Too little and
the bit will spin without cutting, too much
and the motor may stall.
• Just before the drill tip breaks though the
other side of the work piece drill more
slowly and decrease pressure on the
tool. This will prevent stalling and leave a
cleaner hole.
• Use a block of wood to back up work
pieces that may splinter.
• Use spade bits when drilling large
diameter holes in wood.
• Use HSS drill bits when drilling in metal.
• Use masonry bits when drilling in soft
masonry.
• Use a lubricant when drilling metals other
than cast iron, aluminum, copper, and
brass.
• When drilling, start the hole slowly,
allowing the bit to drill deep enough to
prevent slipping at higher speeds.
• Never try to start a stalled Drill by clicking
the trigger switch "ON" and "OFF". This
may damage your tool.
• To reduce jamming, always keep the Drill
running when pulling the bit out of a
finished hole.

8
CARE & MAINTENANCE
ACCESSORIES
WARNING
Always remove the bat-
tery pack before attempting cleaning or
maintenance.
NOTICE
This Cordless Drill is lubricated
before it leaves the factory. This lubrica-
tion should last for the life of the tool. No
further lubrication is required.
Use only mild soap and a damp cloth to clean
the tool. Never let any liquid get inside the
casing. Never immerse any part of the tool in
a liquid. Always keep the ventilation openings
clear.
Always clean the battery pack using only a dry
cloth. Do not use liquids.
Always unplug the charger before cleaning it.
Regularly clean the ventilation slots in your tool
and charger using only a soft brush or dry cloth.
Never open the Cordless Drill case, battery pack
or charger. Do not attempt to repair the Cordless
Drill, battery pack or charger yourself. Opening
any of these parts will void your warranty.
Use only accessories that are recommended by the manufacturer for your model. Acces-
sories that may be suitable for one tool may become hazardous when used on another
tool.
Always attach grounded (3-prong) extension cords to grounded (3-hole) outlets. If you
must use an extension cord, be sure that the gauge is large enough to carry the amount
of current necessary for your power tool. If not, your tool may experience a loss of power,
excessive voltage drop or overheating. The smaller the gauge number, the heavier the
cord (see table below).

9

1 YEAR LIMITED WARRANTY
PERFORMANCE TOOL® extends only the following warranties, and only to original retail purchasers. These warranties give specific legal
rights. Except where prohibited by local law, the law of the State of Washington governs all warranties and all exclusions and limitations of
warranties and remedies. There may be other rights which vary from state to state.
PERFORMANCE TOOL® warrants the product to be free from defects in materials and workmanship under normal use and service. A
defective product may be returned for a free replacement within 90 days from the date of purchase, provided that product is returned to
place of purchase immediately after discovery of defect. After 90 days and up to one year from date of purchase, PERFORMANCE TOOL®
will replace at no charge any parts which our examination shall disclose to be defective and under warranty. These warranties shall be valid
only when a sales receipt showing the date of purchase accompanies the defective product or defective part(s) being returned. For part(s)
after 90 days, please remit your request, postage prepaid to:
PERFORMANCE TOOL, P.O. Box 88259 Tukwila, WA 98138
These warranties exclude blades, bits, punches, dies, bulbs, fuses, hoses, and other consumables which must be replaced under normal
use and service. These warranties shall not apply to any product or part which is used for a purpose for which it is not designed, or which
has been repaired or altered in any way so as to affect adversely its performance or reliability, nor shall these warranties apply to any
product or part which has been subject to misuse, neglect, accident or wear and tear incident to normal use and service.
PERFORMANCE TOOL® does not authorize any other person to make any warranty or to assume any liability in connection with its
products.
Except for warranties of title and the limited express warranties set forth above, PERFORMANCE TOOL® makes no express or implied
warranties of any kind with respect to its products. In particular, PERFORMANCE TOOL® makes no implied warranty of merchantability
and no implied warranty of fitness for any particular purpose, except that for goods purchased primarily for personal, family or household
use and not for commercial or business use, PERFORMANCE TOOL® makes an implied warranty of merchantability (and, if otherwise
applicable, an implied warranty of fitness for a particular purpose), but only for the particular qualities or characteristics, and for the
duration, expressly warranted above. The laws on limitation of implied warranties may differ from state to state, so the above limitations
may not apply in all cases.
PERFORMANCE TOOL® shall not be liable for consequential, incidental or special damages resulting from or in any manner related to any
product, or to the design, use, or any inability to use the product. The sole and exclusive remedy for a defective product or part shall be the
repair, or replacement thereof as provided above. The laws on limitation of remedies or on consequential, incidental or special damages
may vary from state to state, so the above limitations may not apply in all cases.
© Copyright 2011 WILMAR CORPORATION, P.O. Box 88259 Tukwila, WA 98138
Table of contents
Popular Drill manuals by other brands

Draper
Draper 38255 Instructions for use

U.S.SAWS
U.S.SAWS CORE EZ operating manual

Metabo
Metabo WBE 700 - Original instructions

Parkside
Parkside PSBSA 20-LI B2 Translation of the original instructions

Blohm + Voss Oil Tools
Blohm + Voss Oil Tools GraySpin Mark 40 Technical documentation

Stanley
Stanley FatMax FMEH750 Original instructions