PNI Voyager S1400 User manual

PNI Voyager S1400
User manual / Manual de usuario / Manuel utilisateur /
Használati utasítás / Manuale utente / Instrukcja obsługi / Manual de utilizare

EN
2
KEYBOARD AND FUNCTION DESCRIPTION
1 USB interface 2 Power (On/O) key 3Windscreen mounting support
4 Main lens 5 Menu / Mod key 6Up key
7Down key 8OK key 9Display
10 Secondary lens 11 Microphone 12 micro SD slot
13 Reset
[2] - Power key
Short press - Start device
Long press - Automatically saves the custom settings and the current recording and shuts down the device
In the recording mode, shortly press the Power key while you are in the video interface to enable/disable the
infrared recording function.
[8] - OK key. Video mode / Photo mode / Conrmation
Function 1: Start / Stop Recording
In the Video Interface, shortly press the OK key to start the recording and press the OK key again to stop
recording.
Function 2: Capture the image
In the Video interface, long press OK to take a picture.
Function 3: Playback
In the Playlist interface, long press the OK key to play the recordings or view the photo.
Function 4: Pause
In playback mode, shortly press OK to pause the video le.
Function 5: Conrmation
In any mode, Video, Photo, Playback Photo or Video, briey press the Menu key to access the menu

EN
3
interface for that mode; press the OK key to conrm.
[6] - Up key
Function 1: Page up
In the Menu or Playback interface, scroll the page up.
Function 2: In recording mode, long press the Up key to toggle between the full-screen display of the image
taken from the front camera and the one taken from the rear camera.
[7] - Down key
Function 1: Page down
In the Menu or Playback interface, scroll the page down.
Function 2: Disables the audio recording function
In the recording mode, press the Down key to deactivate the audio recording function. Immediately on the
screen, the Microphone icon is displayed next to the REC icon to indicate that audio will not be recorded.
[5] - Menu/Mode key
Function 1: Menu
In Standby and Photo mode, briey press the Menu key to display the menu with all available settings
(recording, shooting, playback, system, etc.). Short press the Menu key again to access the submenu. Use Up
and Down keys to scroll and OK to conrm a setting. Briey press the menu key to return to the previous menu.
Function 2: Modes
Long press the Menu / Mode key to change between available modes (Video, Photo, Video Playback, Photo
File Playback).
In Playback mode, press the Menu key to stop playback and return to the le list interface.
In the recording mode, briey press the Menu / Mode key to lock or unlock the current recording. The Lock
icon appears on the screen in the bottom right corner. The device will block current registration, the previous
and subsequent registration. These recordings will be saved in the Event directory. The les in this directory
will not be overwritten at the cyclical record.
GPS positioning
information
(this function is
not available)
Recording status indication
Recording resolution
and frame rate
Battery level
SD card status
Infrared light
working status
Video modelogo
Recording time
Date and time

EN
4
OTHER FUNCTIONS
Auto recording:
When the vehicle’s engine is on, the DVR lights up and starts recording automatically. When the vehicle engine
stops, the DVR automatically saves the recording and turns o. The video le will be saved on the micro SD
card. If the card is full, the system will overwrite older les.
Notes:
• The length of the video les can be set in the menu. Options: 1/2/3 minutes.
• The video les are saved in the Normal folder on the SD card as: FILE + Date + Time. MOV
• If Cyclic Registration is disabled, the DVR will not record if the SD card is full.
Manual recording:
By long pressing the Power button, the DVR will turn on and will start recording automatically. Short press OK
to stop recording and OK again to restart it. By pressing the power key, the DVR will save the recording and
close.
Integrated Collision Sensor (G-Sensor)
Go to the System settings menu and scroll to the Protect level menu. Set the collision sensitivity. By default,
this function is active on the sensitivity level 3.
In the event of a serious collision, the DVR will block the current recording, the previous and next one. These
recordings will be saved in the Event directory. The les in this directory will not be overwritten at the cyclical
record.
Set date and time
Go to the System Settings menu until you reach Data Format. In order to ensure the accuracy of recorded les
in case of collision, we recommend that you set the correct date and time.
Connect to PC
Connect the DVR of a computer through a USB data cable. The screen displays 3 options: MSDC, PC camera
and Video mode.
Play video and photo les
Long press the Menu / Mode key until you reach the le playback interface. Select a le, press the OK key to
play it, or press Menu / Mode to access the available options (Volume, Protection, Delete, Video File Type).
Press the Menu / Mode key again to return to the list of les.

EN
5
TECHNICAL SPECIFICATIONS
Video resolution Full HD 1080P (main camera) / HD 720P (rear camera)
Photo resolution 3MB, 2MB, 1.2MB
Video les format MOV
Photo les format JPEG
Memory card capacity max. 128GB (the SD card is not included)
Screen Color 2.7 inch
Field of view 160° (main camera) / 130° (rear camera)
Motion Detection Yes
Microphone Built in
Loudspeaker Built in
Built-in battery 140mAh
Data transfer Yes, through USB
Power voltage 5V / 1A
Cigarette lighter jack voltage Input voltage 12V / Output voltage 5V
Dimensions 122 X 48 X 26.8 mm
Working temperature -20 ~ +60°C

ES
6
DESCRIPCIÓN DE LAS TECLAS Y FUNCIONES
1 Interfaz USB 2 Tecla Power (On/O) 3Carril de montaje soporte parabrisas
4Objetivo principal 5Tecla Menú / Modo 6Tasta Sus
7Tecla Abajo 8Tecla OK 9 Pantalla
10 Objetivo secundario 11 Micrófono 12 Ranura para tarjeta micro SD
13 Reinicio
[2] - Tecla Power
Pulsación corta - Encender dispositivo
Pulsación prolongada – Guarda automáticamente la grabación y las conguraciones personalizadas y
apaga el dispositivo.
En el modo de grabación, pulse brevemente la tecla Power mientras se encuentra en la interfaz video para
abrir/cerrar la función de grabación con infrarrojos.
[8] - Tecla OK. Modo video/Modo foto/Conrmación
Función 1: Iniciar/Detener grabación
En la interfaz Video, pulse brevemente la tecla OK para iniciar la grabación y pulse de nuevo la tecla OK
para detener la grabación.
Función 2: Captura de imagen
En la interfaz Video, mantenga presionada la tecla OK para tomar una foto.
Función 3: Reproducción de las grabaciones
En la interfaz de Archivos, mantenga presionada la tecla OK para reproducir la grabación o para visualizar la
foto.
Función 4: Pausa
En el modo de reproducción, pulse brevemente la tecla OK para interrumpir la reproducción del archivo
video.

ES
7
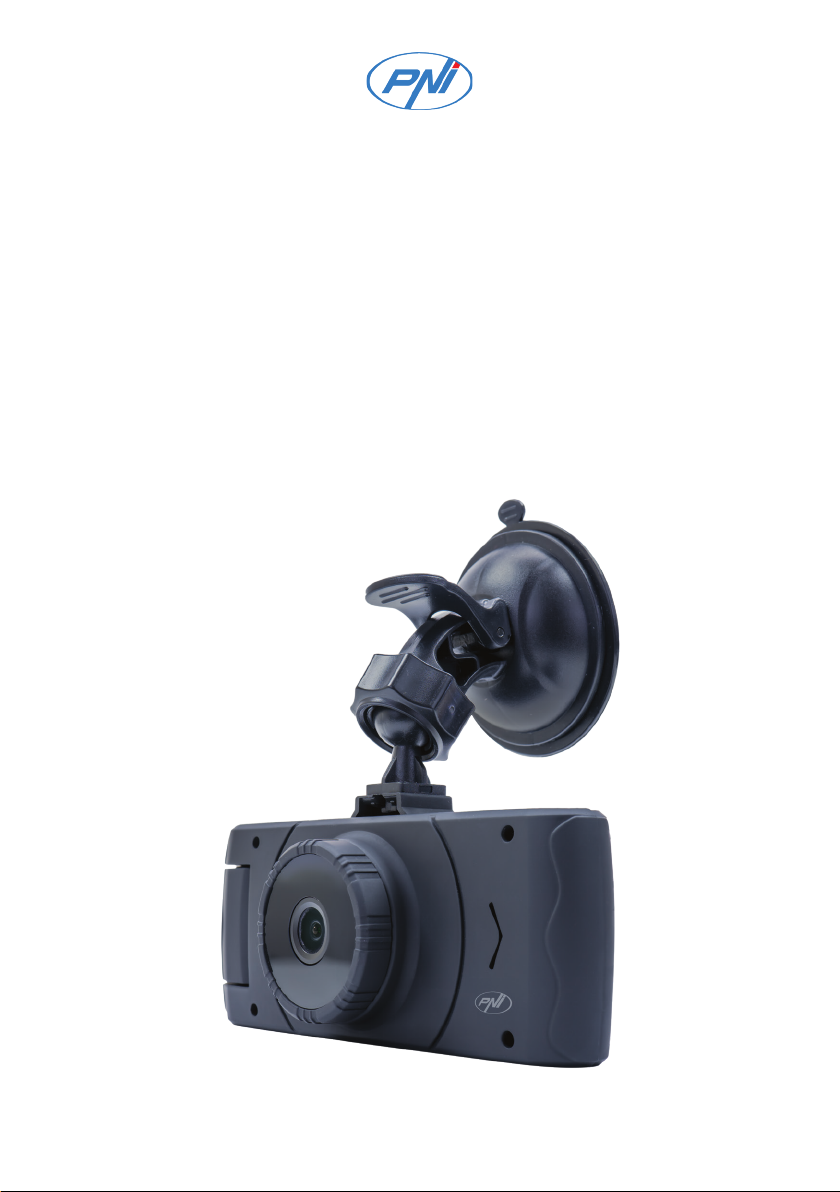
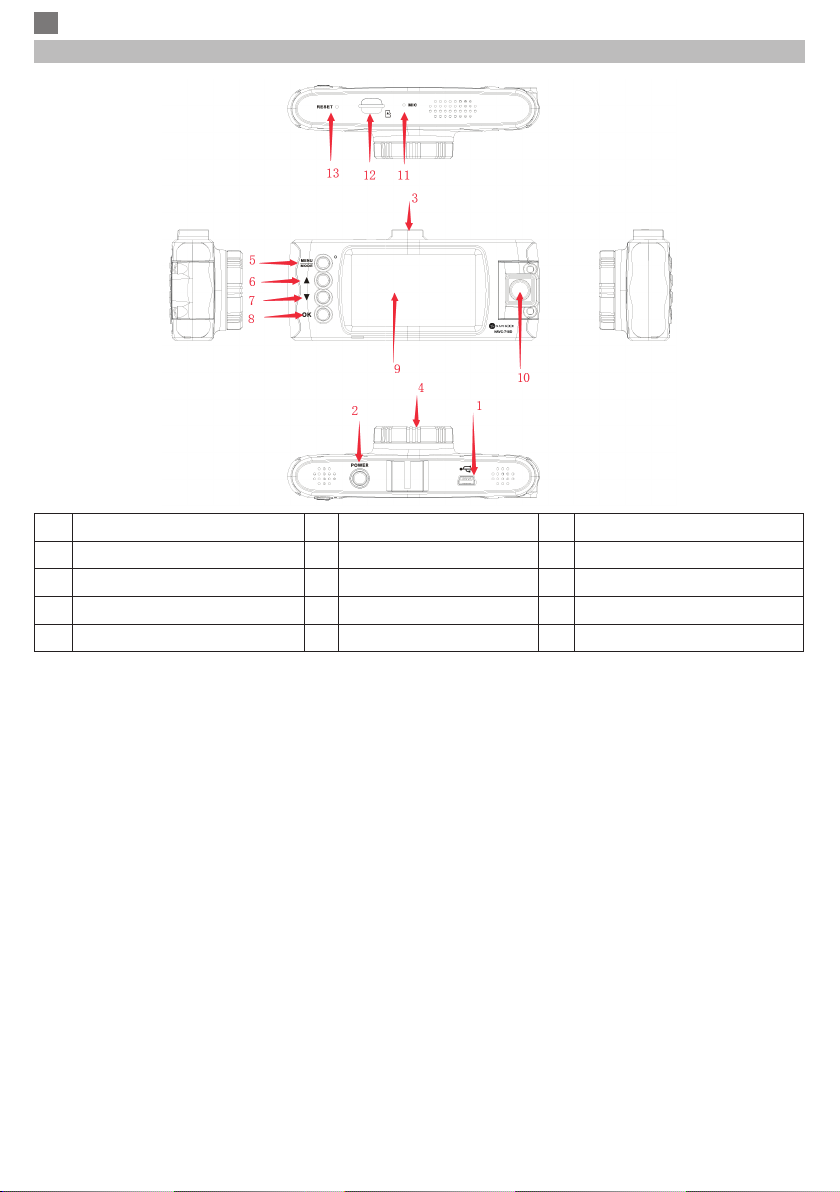
Función 5: Conrmación
En cualquier modo en que se encuentre, Video, Foto, Reproducción foto o Video, pulse brevemente la tecla
Menú para acceder a la interfaz del menú del modo elegido; pulse la tecla OK para conrmar.
[6] - Tecla Arriba (Up)
Función 1: Página arriba
En la interfaz de Menú o en el modo Reproducción desplace la página hacia arriba.
Función 2: En el modo de grabación, mantenga presionada la tecla Arriba (Up) para alternar entre la
visualización a pantalla completa de la imagen tomada desde la cámara frontal con la imagen tomada desde
la cámara trasera.
[7] - Tecla Abajo (Down)
Función 1: Página abajo
En la interfaz Menú o en el modo de reproducción, desplace la página hacia abajo.
Función 2: Desactiva la función de reproducción audio
En el modo de grabación, pulse la tecla Abajo (Down) para desactivar la función de grabación audio.
Inmediatamente en la pantalla, al lado del icono REC se muestra el icono Micrófono desactivado para indicar
que no se graba también en el modo audio.
[5] - Tecla Menú/Modo
Función 1: Menú
En el modo Standby (En espera) y Foto, pulse brevemente la tecla Menú para mostrar el menú con todas
las conguraciones (conguraciones de grabación, toma de fotografía, reproducción, sistema etc.). Pulse de
nuevo brevemente la tecla Menú para acceder al Submenú. Utilice las teclas Arriba y Abajo para desplazarse
y la tecla OK para conrmar o congurar. Pulse brevemente la tecla menú para volver al menú anterior.
Función 2: Modos
Mantenga apretada la tecla Menú/Modo para cambiar entre los modos disponibles (Video, Foto, Reproducción
archivos video, Reproducción archivos foto).
En modo Reproducción, pulse la tecla Menú para detener la reproducción y volver a la interfaz con la lista
de archivos. En el modo de grabación, pulse brevemente la tecla Menú/Modo para bloquear o desbloquear
la grabación actual.
En la pantalla, en la esquina inferior derecha, aparecerá el icono Lock. El dispositivo bloqueara la grabación
actual, anterior y posterior. Estas grabaciones serán guardadas en la carpeta Event. Los archivos de esta
carpeta no se sobrescribirán en el registro cíclico.
Indicador de estado de registro
Resolución grabación
y velocidad de fotogramas
Nivel de batería
Estado de la tarjeta SD
Estado luz
infrarroja
Modo Video logo
Tiempo grabación
Fecha y hora
Posicionamiento
del GPS
La función no está
disponible para
este modelo

ES
8
OTRAS FUNCIONES:
Grabación automática:
Cuando se arranca el motor del vehículo, el DVR se enciende y comienza a grabar automáticamente. Cuando
el motor del vehículo se detiene, el DVR guarda automáticamente la grabación y se apaga. El archivo video
se guardara en la tarjeta micro SD. Si la tarjeta está llena, el sistema sobrescribirá los archivos más antiguos.
Notas:
• La longitud de los archivos video se puede congurar en el menú. Opciones: 1/2/3 minutos.
• Los archivos video se grabaran en la carpeta Normal en la tarjeta SD como: ARCHIVO + Fecha + Hora.
MOV
• Si la función Grabación cíclica esta desactivada, el DVR no grabara si la tarjeta SD esta llena
Grabación manual:
Al mantener presionada la tecla Power, el DVR se encenderá y comenzara automáticamente la grabación.
Presione brevemente la tecla OK para detener la grabación y de nuevo OK para reiniciarla. Al presionar la
tecla Power, el DVR guardara la grabación y se apagara.
El sensor de colisión integrado (G-Sensor)
Acceder al menú Conguración del sistema (System settings) y desplácese hasta llegar al menú Protect
level). Congure la sensibilidad de la colisión. Por defecto, esta función está congurada como activa en el
nivel 3 de sensibilidad.
En el caso de una colisión grave, el DVR bloqueara la grabación actual, la anterior y la siguiente. Estas
grabaciones se guardaran en la carpeta Evento (Event). Los archivos de esta carpeta no se sobrescribirán
en el registro cíclico.
Conguración de fecha y hora
Acceder al menú de Conguraciones del sistema hasta llegar a la Conguración (Date Format). Para asegurar
la precisión de sus archivos grabados en caso de colisión, le recomendamos que congure la fecha y la hora
con la mayor precisión posible.
Conectar a PC
Conecte el DVR a una computadora mediante un cable de datos USB. La pantalla mostrara 3 opciones:
MSDC, Cámara PC y Modo video.
Reproducir archivos video y foto
Mantenga presionada la tecla Menú/Modo hasta llegar a la interfaz de reproducción archivos. Seleccione un
archivo, pulse la tecla OK para reproducirlo o la tecla Menú/Modo para acceder a las opciones disponibles
(Volumen, Protección, Borrar, Tipo archivo video). Pulse de nuevo la tecla Menú/Modo para volver a la lista
de archivos.

ES
9
CARACTERÍSTICAS TÉCNICAS
Resolución de video Full HD 1080P (cámara principal) / HD 720P (cámara secundaria)
Resolución de fotos 3MB, 2MB, 1.2MB
Formato de archivos de video MOV
Formato de archivos de fotos JPEG
Capacidad de la tarjeta de
memoria
máximo 128GB (la tarjeta no esta incluida)
Pantalla Color 2.7 inch
Ángulo de visión 160° (cámara principal) / 130° (cámara secundaria)
Detección de movimiento Sí
Micrófono Integrado
Altoparlante Integrado
Batería incorporada 140mAh
Transferencia de datos Sí, a través de USB
Alimentación 5V / 1A
Voltaje del enchufe del
encendedor de cigarrillos
Voltaje de entrada 12V / Tensión de salida 5V
Dimensiones 122 X 48 X 26.8 mm
Temperatura de trabajo -20 ~ +60°C

FR
10
DESCRIPTION DES TOUCHES ET DES FONCTIONS
1 Interface USB 2 La touche d alimentation
Marche/Arret
3Rail de montage support
pare-brise
4Objectif principal 5La touche Menu / Mode 6La touche haut
7La touche bas 8La touche OK 9Ecran
10 Objectif secondaire 11 Microphone 12 Slot card micro SD
13 Réinitialisation
[2] - Touche d’ alimentation
Appui court – allume le dispositif
Appui long - Sauvegarde automatiquement le vidéo et les réglages personnalisés et ferme le dispositif
En mode enregistrement, appuyez courtement la touche d’ alimentation lorsque vous vous trouvez dans l’
interface vidéo pour ouvrir /fermer la fonction d’ enregistrement infrarouge.
[8] - Touche OK. Mod video / Mod foto / Conrmation
Fonction 1: Marche / Arret d’ enregistrements
Dans l’interface Vidéo, appuyez courtement la touche OK pour démarrer l’enregistrement et appuyez encore
une fois la touche OK pour arreter l’ enregistrement
Fonction 2: Capture d’ image
Dans l’interface Vidéo, appuyez longuement la touche OK pour prendre un photo
Fonction 3: Ecoute d’ enregistrement
Dans l’ interface Fichiers, appuyez longuement sur la touche OK pour écouter l’enregistrement ou pour voir
la photo.
Fonction 4: Pause
Dans le mode Lecture, appuyez courtement OK pour faire une pause dans la lecture du chier vidéo.

FR
11
Fonction 5: Conrmation
Dans n’ importe quel mode vous vous trouvez Vidéo, Photo, Lecture photo ou Vidéo, appuyez courtement
la touche Menu pour accéder a l’ interface.
[6] - Touche Haut (Up)
Fonction 1: Page en haute
Dans l’interface Menu ou dans le mode Lecture, déroulez la page en haut
Fonction 2: Dans le mode d’ enregistrement appuyez longuement la touche Haut (Up) pour changer l’ achage
plein ecran de l’image prise par la caméra frontale avec celle prise par la caméra arrière Lecture.
[7] - Touche Bas (Down)
Fonction 1: Page en bas
Dérolulez la page en bas dans l’ interface Menu ou dans le mode Lecture
Fonction 2: Désactivez la fonction d’ enregistrement audio
Dans le mode Enregistrement appuyez la taste Bas (Down) pour désactiver la fonction d’ enregistrement
audio.Tout de suite, sur l’ ecran, à côté de l’icône REC apparaît l’icône Microphone désactivé pour indiquer
qu’on enregistrera pas le son.
[5] - Touche Menu / Mod
Fonction1:Menu
Dans le mode Standby et Photo, appuyez courtement la touche Menu pour acher le menu avec toutes les
réglages (réglages d’ enregistrement, photographie, lecture, système etc.). Appuyez de nouveau courtement
la touche Menu pour accéder le sous-menu. Utilisez les touches Bas et Haut pour naviguer et la taste OK pour
conrmer un réglage. Appuyez courtement la touche Menu pour retourner au menu précédent.
Fonction 2: Modes
Appuyez longuement la touche Menu / Mode pour échanger les modes disponibles (Video, Photo, Lecture
chiers vidéo, Lecture chiers photo)
Dans le mode Lecture, appuyez la touche Menu pour arreter la lecture et pour retourner a l’ interface avec la
liste de chiers. Dans le mode d’ enregistrement , appuyez courtement la touche Menu / Mode pour verrouiller
ou déverrouiller l’enregistrement en cours.
Sur l’ecran, dans le coin inférieur droit apparaîtra l’icône du verrouiallage(Lock). Le dispositif va bloquer l’
enregistrement en cours,l’enregistrement précédent et la suivante.
Ces enregistrements seront sauvegardes dans le répertoire Evénement. Les chiers de ce répertoire ne
seront pas écrases pendant l’ enregistrement cyclique.
Indicateur du status d’ enregistrement
Resolution de
l’enregistremet et cadence
Niveau de la batterie
Status carte SD
Status lumiere
Infra-rouge
Mode Video logo
Temps d’ enregistrement
Date et heure
Positionemant GPS
La fonction n’est
as disponible
pour ce modele

FR
12
AUTRES FONCTIONS:
Enregistrement automatique:
Lorsque le moteur du véhicule tourne, le DVR-ul se s’allume et l’enregistrement commence automatiquement.
Lorsque le moteur du vehicule s’arrete,le DVRsauvegarde automatiquement l’enregistrement et s’eteint. Le
chier vidéo sera sauvegarde sur la carte micro SD. Au cas ou la carte est pleine, le système va écraser les
chiers plus anciens.
Notes:
•La longueur des chiers vidéo peut etre dénie dans le menu. Options: 1/2/3 minutes.
•Les chiers vidéo sont sauvegardes dans le répertoire Normal sur la carte SD sous la forme:
FICHIER+Date+HEURE. MOV
•Si la fonction d’enregistrement cyclique est désactivée,le DVR ne va pas enregistrer si la carte est pleine
Enregistrement manuel:
En appuyant longuement la touche d’alimentation (Power), le DVR s’allumera et commencera automatiquement
l’enregistrement. Appuyez courtement la touche OK pour arreter l’enregistrement et encore une fois OK pour
redemarrer.En appuyant la touche d’alimentation, le DVR va sauvegarder l’enregistrement et s’arretera.
Capteur de collision intégré (G-Sensor)
Accedez au menu System et deroulez jusqu’au menu Protect level. Reglez la sensibilite a la collision.Par
default cette fonction est active sur le niveau de sensibilite 3.
En cas de collision grave, le DVR-ul va bloquer l’enregistrement en cours, la précedente et la suivante. Ces
enregistrements seront sauvegardes dans le répertoire Evénement. Les chiers de ce répertoire ne seront pas
écrases pendant l’enregistrement cyclique.
Régler la date et l’heure
Accédez le menu de reglages système jusque a ce que vous arrivez a Format de dates.Pour assurer la
precision des chiers enregistres en cas de collision , on vous recomande de xer la date et l’heure le plus
correctement possible.
Connexion PC
Connectez le DVR a un ordinateur par un cable USB. L’ecran ache 3 options: MSDC, PC caméra et Video
mode.
Lecture des fichiers vidéo et photo
Appuyez longuement la touche Menu/Mode jusqu’à ce que vous atteigniez l’interface de lecture des chiers.
. Choisissez un chier, appuyez la touche OK pour le lire ou la touche Menu/Mode pour acceder les options
disponibles (Volume, Protection, Suppression, Type du chier vidéo. Appuyez de nouveau la touche Menu/
Mode pour retourner a la liste des chiers.

FR
13
CARACTÉRISTIQUES TECHNIQUES
Résolution vidéo Full HD 1080P (caméra frontale) / HD 720P (caméra secondaire)
Résolution photo 3 MB, 2 MB MB, 1,2 MB
Formater les chiers vidéo MOV
Formater des chiers photo JPEG
Capacité de la carte
mémoire
128 GB maximum (carte non incluse)
Écran Couleur 2,7 pouces
Angle de vue 160 ° (caméra frontale) / 130 ° (caméra secondaire)
Détection de mouvement Oui
Microphone Incorporé
Haut-parleur Incorporé
Batterie intégrée 140mAh
Transfert de données Oui, via USB
Alimentation 5V / 1A
Prise de briquet de tension Tension d'entrée 12V / Tension de sortie 5V
Dimensions 122 X 48 X 26.8 mm
Température de travail -20 ~ +60°C

HU
14
BILLENTYŰZET ÉS FUNKCIÓK LEÍRÁSA
1USB interfész 2Bekapcsoló gomb (Be / Ki) 3Sina szerelő szélvédő tartó
4Fő cél 5Menü / Mod gomb 6Top gomb
7Le gombot 8OK gombot 9Képernyő
10 Másodlagos cél 11 Mikrofon 12 Micro SD kártyahely
13 Vissza
[2] - Power Gomb
Rövid megnyomás - Indítsa el a készüléket
Hosszú megnyomás - Automatikusan elmenti az egyéni felvételeket és beállításokat, és kikapcsolja a
készüléket
A felvételi módban röviden nyomja meg a Power gombot, miközben a videó felületen van, és nyissa meg.
[8] - OK gomb. Videó mód / Fotó üzemmód / Megerősítés
1. funkció: A felvétel indítása / leállítása
A Videó kezelőfelületen röviden nyomja meg az OK gombot a felvétel elindításához, majd ismét nyomja meg
az OK gombot a felvétel leállításához.
2. funkció: Rögzítse a képet
A Videó kezelőfelületen nyomja meg hosszan az OK gombot a kép készítéséhez.
3. funkció: Lejátszások
A fájlrendszer interfészben hosszú ideig tartsa lenyomva az OK gombot a felvétel lejátszásához vagy a
fénykép megtekintéséhez.
4. funkció: Szünet
Lejátszási módban nyomja meg röviden az OK gombot a videofájl szüneteltetéséhez.
5. funkció: Megerősítés
Bármelyik módban, Video, Fénykép, Lejátszás fénykép vagy videó esetén röviden nyomja meg a Menü

HU
15
gombot, hogy hozzáférjen az adott üzemmód menüihez. nyomja meg az OK gombot a megerősítéshez.
[6] - FEL Gomb(Up)
1. funkció: Oldal felfelé
A Menü vagy a Lejátszás felületen lapozzon az oldalra
2. funkció: Felvételi üzemmódban hosszan nyomja meg a Fel gombot, hogy átváltson az elülső kamera és a
hátsó fényképezőgépből vett kép teljes képernyős kijelzése között.
[7] - LE Gomb (Down)
1. funkció: Oldal lefelé
A Menü vagy a Lejátszás kezelőfelületén lapozzon az oldalra.
2. funkció: Letiltja a hangfelvétel funkciót
felvételi üzemmódban nyomja le a Le (Le) gombot a hangfelvétel funkció kikapcsolásához. Azonnal a
képernyőn megjelenik a mikrofon ikon a REC ikon mellett, jelezve, hogy a hang nem kerül rögzítésre.
[5] - Menü / Üzemmód gomb
1. funkció: Menü
Készenléti és fénykép módban röviden nyomja meg a Menu gombot, hogy megjelenítse a menüt az
összes beállítással (felvétel, felvétel, lejátszás, rendszer stb.). Nyomja meg újra a Menü gombot az
almenü megnyitásához. Használja a Fel és Le gombokat a görgetéshez, majd az OK gombot a beállítás
megerősítéséhez. Nyomja meg röviden a menü gombot, hogy visszatérjen az előző menübe.
2. funkció: Módok
Hosszan nyomja meg a Menu / Mode gombot a rendelkezésre álló módok közötti váltáshoz (videó, fénykép,
videó lejátszás, fényképfájl lejátszása)
Lejátszás módban nyomja meg a Menü gombot a lejátszás leállításához és visszatérés a fájllista felülethez.
A felvételi módban röviden nyomja meg a Menu / Mode gombot az aktuális felvétel rögzítéséhez vagy
feloldásához. A Zár ikon megjelenik a képernyő jobb alsó sarkában. Az eszköz blokkolja az aktuális regisztrációt,
az előző és a későbbi regisztrációt. Ezeket a felvételeket az Esemény könyvtárba menti. A könyvtárban lévő
fájlok nem lesznek felülírva a ciklikus rekordban.
GPS
helymeghatározási
információk
(ez a funkció
nem elérhető)
Felvételi állapotjelzés
Felvételi felbontás és
képsebesség
Az akkumulátor töltöttségi szintje
SD-kártya állapota
Infravörös fény
működési állapotát
Videó mód logó
Felvételi idő
Dátum és idő

HU
16
EGYÉB FUNKCIÓK:
Automatikus regisztráció:
A jármű motorjának indításakor a DVR világít és automatikusan elkezdi a felvételt. Amikor a jármű motorja
leáll, a DVR automatikusan elmenti a felvételt, és kialszik. A videofájl a micro SD kártyára kerül. Ha a kártya
megtelt, a rendszer felülírja a régebbi fájlokat.
Megjegyzés:
- A videofájlok hossza beállítható a menüben. Opciók: 1/2/3 perc.
- A videofájlokat az SD kártya Normál mappájába mentettük: FILE + Date + Time. MOV
- Ha a ciklikus regisztráció le van tiltva, a DVR nem rögzíti, ha az SD kártya megtelt.
Kézi felvétel:
A bekapcsológomb hosszú megnyomásával a DVR bekapcsol, és automatikusan elkezdi a felvételt.
Röviden nyomja meg az OK gombot a felvétel leállításához és az OK újraindításához. A bekapcsológomb
megnyomásával a DVR menteni fogja a felvételt és bezárja.
Integrált ütközésérzékelő (G-érzékelő):
Menjen a Rendszerbeállítások menübe, és lapozzon a Gravitációs érzékelő menühöz. Állítsa be az ütközési
érzékenységet. Alapértelmezés szerint ez a funkció a 3. érzékenységi szinten aktív.
Komoly ütközés esetén a DVR blokkolja az aktuális, az előző és a következő rekordot. Ezeket a felvételeket az
Esemény könyvtárba menti. A könyvtárban lévő fájlok nem lesznek felülírva a ciklikus rekordban.
Állítsa be a dátumot és az időt
Menjen a Rendszerbeállítások menübe, amíg el nem éri az Adatformátumot. A rögzített fájlok pontosságának
biztosítása ütközés esetén javasoljuk, hogy a lehető legpontosabban állítsa be a dátumot és az időt.
Csatlakoztassa a számítógéphez
Csatlakoztassa a számítógép DVR-jét egy USB adatkábelen keresztül. A képernyőn 3 lehetőség található:
MSDC, PC kamera és Video mód.
Videó- és fényképfájlok lejátszása
Hosszú ideig nyomja meg a Menu / Mode gombot, amíg el nem éri a fájl lejátszási felületét. Válasszon ki egy
fájlt, nyomja meg az OK gombot a lejátszáshoz, vagy nyomja meg a Menu / Mode gombot a rendelkezésre
álló opciók eléréséhez (Hangerő, Védelem, Törlés, Videó fájltípus). Nyomja meg ismét a Menu / Mode gombot,
hogy visszatérjen a fájlok listájához.

HU
17
MŰSZAKI JELLEMZŐK
Videó felbontás Full HD 1080P (fő videokamera) / HD 720P (másodlagos videokamera)
Fényképfelbontás 3MB, 2MB, 1.2MB
Videófájlok formázása MOV
Képfájlok formázása JPEG
Memóriakártya-kapacitás maximális 128GB (a kártya nincs benne)
Képernyő Color 2.7 inch
Szög kilátás 160° (fő videokamera) / 130° (másodlagos videokamera)
Mozgásérzékelés Igen
Mikrofon Beépített
Hangszóró Beépített
Beépített akkumulátor 140mAh
Adatátvitel Igen, USB-n keresztül
Tápfeszültség 5V / 1A
Szivargyújtó dugó
feszültsége
Bemeneti feszültség 12V / Kimeneti feszültség 5V
Méretek 122 X 48 X 26.8 mm
Üzemi hőmérséklet -20 ~ +60°C

IT
18
DESCRIZIONE DEI TASTI E FUNZIONI
1 Interfaccia USB 2 Tasto Power (On/O) 3Montaggio supporto per
parabrezza
4Obiettivo principale 5Tasto Menu / Modo 6Tasto Sus
7Tasto giù 8Tasto OK 9Schermo
10 Obiettivo secondario 11 Microfono 12 Slot per scheda Micro SD
13 Reset
[2] - Tasto Power
Pressione breve - Avvia dispositivo
Pressione lunga: salva automaticamente la registrazione corrente e le impostazioni personalizzate e spegne
il dispositivo
Nella modalità di registrazione, premere brevemente il tasto di accensione mentre si è nell’interfaccia video
per attivare/disattivare la funzione di registrazione con infrarosso.
[8] - Tasto OK. Modalità video / Modalità foto / Conferma
Funzione 1: avvio / arresto della registrazione
Nell’interfaccia Video, premere brevemente il tasto OK per avviare la registrazione e premere nuovamente il
tasto OK per interrompere la registrazione.
Funzione 2: Cattura l’immagine
Nell’interfaccia Video, premere a lungo OK per scattare una foto.
Funzione 3: Riproduzioni
Nell’interfaccia Playlist, premere a lungo il tasto OK per riprodurre la registrazione o visualizzare la foto.
Funzione 4: Pausa
In modalità riproduzione, premere brevemente OK per mettere in pausa il le video.

IT
19
Funzione 5: Conferma
In qualsiasi modalità, video, foto, riproduzione foto o video, premere brevemente il tasto Menu per accedere
all’interfaccia menu per quella modalità; premere il tasto OK per confermare.
[6] - Tasto Su (Up)
Funzione 1: Pagina su
Nell’interfaccia Menu o Riproduzione, scorrere la pagina verso l’alto
Funzione 2: in modalità di registrazione, premere a lungo il tasto Su (Up) per alternare tra la visualizzazione a
schermo intero dell’immagine ripresa dalla fotocamera anteriore e quella ripresa dalla fotocamera posteriore.
[7] - Tasto Giù (Down)
Funzione 1: Pagina giù
Nell’interfaccia Menu o Riproduzione, scorrere la pagina verso il basso
Funzione 2: disabilita la funzione di registrazione audio
In modalità di registrazione, premere il tasto Giù (Down) per disattivare la funzione di registrazione audio.
Immediatamente sullo schermo, l’icona Microfono viene visualizzata accanto all’icona REC per indicare che
l’audio non verrà registrato.
[5] - Tasto Menu / Modalità
Funzione 1: Menu
In modalità Standby e Foto, premere brevemente il tasto Menu per visualizzare il menu con tutte le impostazioni
(registrazione, ripresa foto, riproduzione, impostazioni sistema, ecc.). Premere brevemente il tasto Menu per
accedere al sottomenu. Utilizzare i tasti Su e Giù per scorrere e OK per confermare un’impostazione. Premere
brevemente il tasto Menu per tornare al menu precedente.
Funzione 2: Modalità
Premere a lungo il tasto Menu / Modalità per passare da una modalità all’altra (Video, Foto, Riproduzione
video, Riproduzione le foto)
In modalità Riproduzione, premere il tasto Menu per interrompere la riproduzione e tornare all’interfaccia
dell’elenco dei le.
Nella modalità di registrazione, premere brevemente il tasto Menu / Modalità per bloccare o sbloccare la
registrazione corrente. L’icona del lucchetto appare sullo schermo nell’angolo in basso a destra. Il dispositivo
bloccherà la registrazione corrente, la registrazione precedente e la successiva. Queste registrazioni verranno
salvate nella directory degli eventi. I le in questa directory non verranno sovrascritti nella registrazione ciclica.
Indicatore dello stato di registrazione
Risoluzione registrazione
e frame rate
Livello batteria
Stato scheda SD
Stato luce
infrarosso
Logo modalità video
Tempo registrazione
Data e ora
Posizionamento
GPS
Questa funzione
non è disponibile
per questo modello

IT
20
ALTRE FUNZIONI:
Registrazione automatica:
All’avvio del motore del veicolo, il DVR si accende e inizia a registrare automaticamente. Quando il motore
del veicolo si ferma, il DVR salva automaticamente la registrazione e si spegne. Il le video verrà salvato sulla
scheda micro SD. Se la scheda è piena, il sistema sovrascriverà i le più vecchi.
Note:
• La lunghezza dei le video può essere impostata nel menu. Opzioni: 1/2/3 minuti.
• I le video vengono salvati nella cartella Normal sulla scheda SD come: FILE + Date + Time. MOV
• Se la registrazione ciclica è disabilitata, il DVR non registrerà se la scheda SD è piena.
Registrazione manuale:
Premendo a lungo il pulsante di accensione, il DVR si accenderà e inizierà la registrazione automaticamente.
Premere brevemente OK per interrompere la registrazione e OK nuovamente per riavviarlo. Premendo il tasto
di accensione, il DVR salverà la registrazione e si chiuderà.
Sensore di collisione integrato (G-Sensor)
Accedere al menu Impostazioni di sistema e scorrere no al menu Protect level. Impostare la sensibilità di
collisione. Per impostazione predenita, questa funzione è attiva sul livello di sensibilità 3.
In caso di collisione grave, il DVR bloccherà la registrazione corrente, quella precedente e successiva. Queste
registrazioni verranno salvate nella directory degli eventi. I le in questa directory non verranno sovrascritti
nel record ciclico.
Impostazione data e ora
Accedere al menu Impostazioni di sistema no a raggiungere il Date format. Al ne di garantire la precisione
dei le registrati in caso di collisione, si consiglia di impostare la data e l’ora corrette.
Connessione al PC
Collegare il DVR a un computer tramite un cavo dati USB. Lo schermo visualizza 3 opzioni: MSDC, PC cam
e DV.
Riproduzione le video e foto:
Premere a lungo il tasto Menu / Modalità no a raggiungere l’interfaccia di riproduzione del le. Selezionare
un le, premere il tasto OK per riprodurlo o premere Menu / Modalità per accedere alle opzioni disponibili
(Volume, Protezione, Elimina, Tipo le video). Premere di nuovo il tasto Menu / Modalità per tornare all’elenco
dei le.
Table of contents
Languages: