Powerplay KSP1285 User manual

OWNER’S MANUAL
54-Key Electronic
Keyboard
PLEASE READ BEFORE OPERATING THIS EQUIPMENT
Model: KSP1285

1
Caution: Changes or modifications not expressly approved by the party responsible for
compliance could void the user’s authority to operate the equipment.
NOTE: This equipment has been tested and found to comply with the limits for a Class B
digital device, pursuant to Part 15 of the FCC Rules. These limits are designed to provide
reasonable protection against harmful interference in a residential installation. This
equipment generates, uses and can radiate radio frequency energy and, if not installed and
used in accordance with the instructions, may cause harmful interference to radio
communication. However, there is no guarantee that interference will not occur in a particular
installation. If this equipment does cause harmful interference to radio or television
reception, which can be determined by turning the equipment off and on, the user is
encouraged to try to correct the interference by one or more of the following measures:
• Reorient or relocate the receiving antenna.
• Increase the separation between the equipment and receiver.
• Connect the equipment into an outlet on a circuit different from that to which the receiver
is connected.
• Consult the dealer or experienced radio/TV technician for help.
CAN ICES-3 (B)/NMB-3(B). This Class B digital apparatus complies with Canadian ICES-003.
This device complies with Part 15 of the FCC Rules. Operation is
subject to the following two conditions: (1) this device may not cause
harmful interference, and (2) this device must accept any interference
received, including interference that may cause undesired operation.

BATTERY INFORMATION
Adult Installation Required
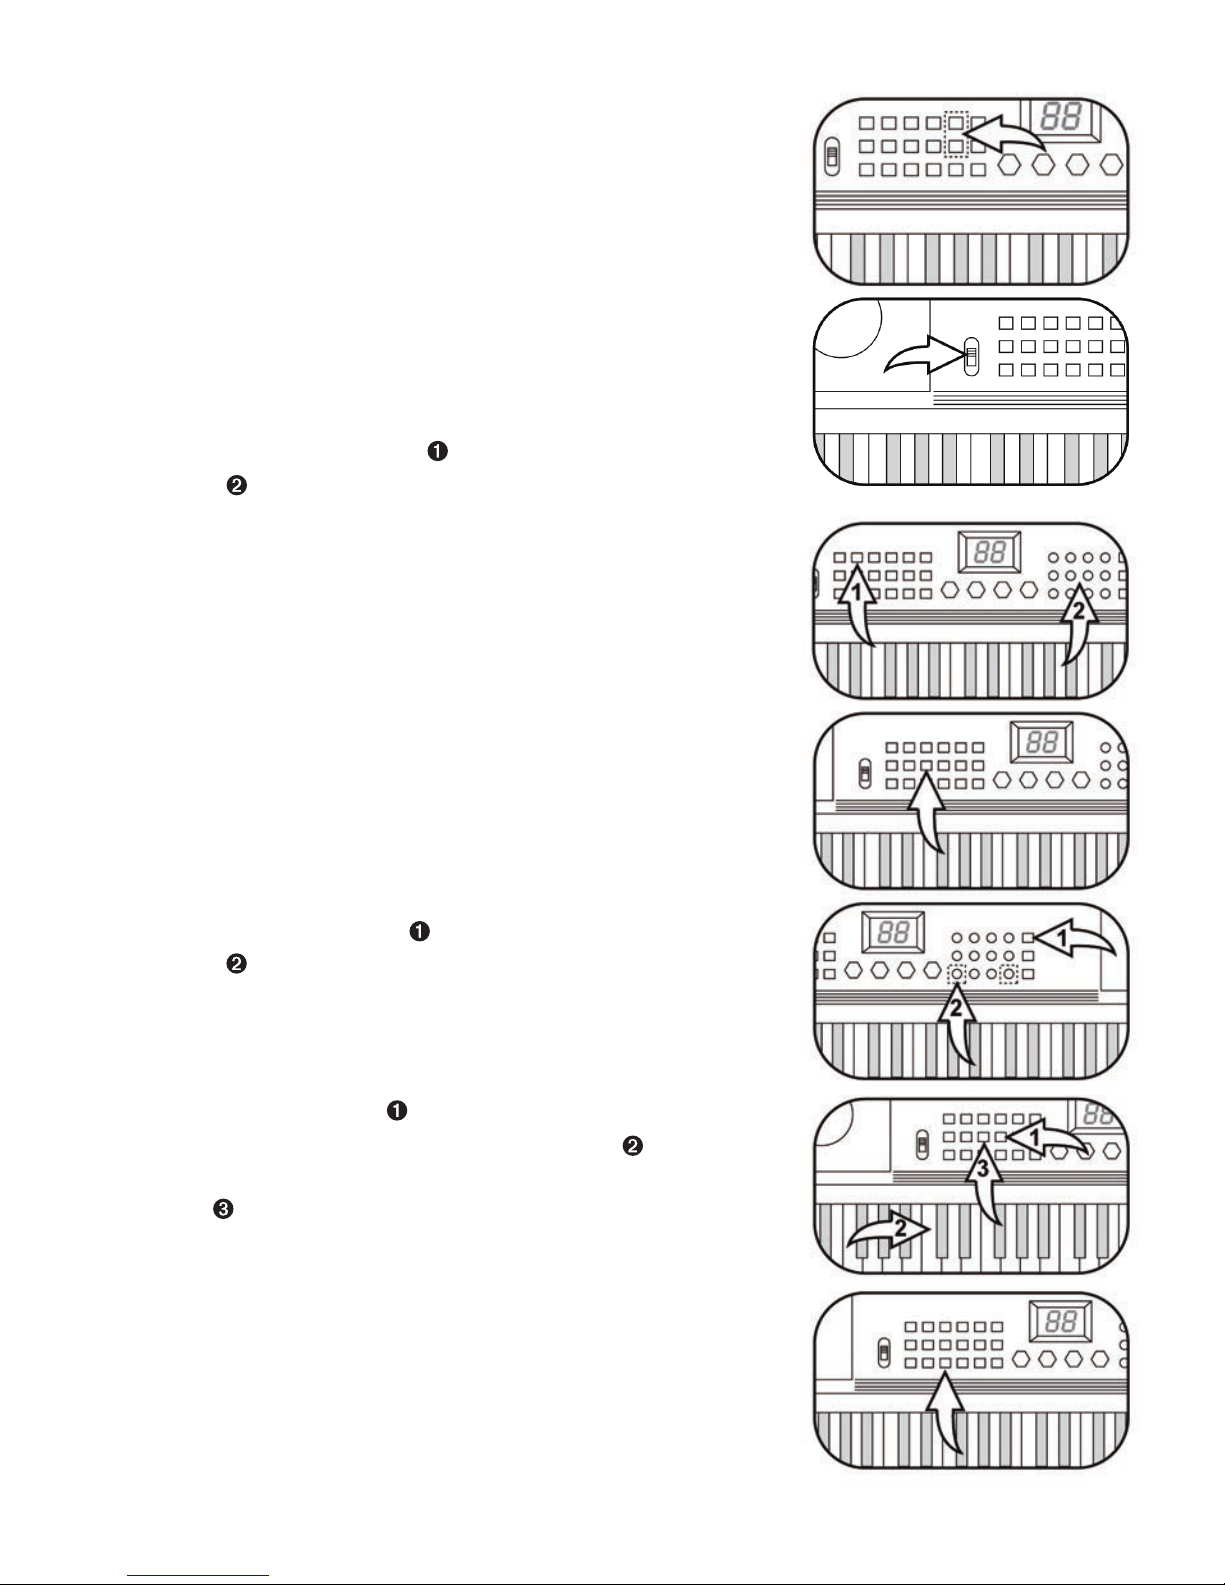
1. Open the battery compartment door
on the bottom of the unit by removing
the screws with a screwdriver (not
included) and lift up.
2. Insert 4 “AA” size batteries (included)
following the polarity marked inside
the battery compartment.
3. Replace the battery compartment door and the screws.
4. Using a screwdriver, close door.
BATTERY PRECAUTIONS:
Follow these precautions when using batteries in this device:
1. Use only the size and type of batteries specified.
2. Be sure to follow the correct polarity when installing the batteries as indicated in the battery
compartment. Reversed batteries may cause damage to the device.
3. Do not mix different types of batteries together (e.g., Alkaline and Carbon-zinc) or old
batteries with fresh ones.
4. If the batteries in the device are weak/dead or the device is not to be used for a long period
of time, remove the batteries to prevent damage or injury from possible battery leakage.
5. Do not try to recharge batteries not intended to be recharged; they can overheat and
rupture. (Follow battery manufacturer’s directions.)
6. Do not dispose of batteries in a fire; batteries may leak or explode.
• Rechargeable batteries are to be removed from the toy before being charged,
• Rechargeable batteries are only to be charged under adult supervision,
• The supply terminals are not to be short-circuited.
AC ADAPTER:
To operate the unit using AC power, connect an AC/DC adapter with DC 6V, 300mA (not
included) to the unit. Plug the small end into the DC 6V ack on the bottom of the unit
and connect the other end into the AC outlet. The batteries are automatically disconnected
when the AC adapter is used.
CAUTION:
Using an AC adapter that does not have the recommended rating may damage the unit. When
not using AC power, disconnect the AC adapter from the wall outlet by pulling the plug (not
the cord).
2

3
LOCATION OF CONTROLS
1. SINGLE Button
2. FINGER Button
3. FILLIN Button
4. PROGRAM Button
5. REC Button
6. PLAY Button
7. DEMO All Button
8. TONE Button
9. START/STOP Button
10. SYNC Button
11. TRANS – Button
12. Power Switch
13. DEMO ONE Button
14. RHYTHM Button
15. SUS (Sustain) Button
16. Guide Button
17. TRANS + Button
18. Volume +/– Buttons
19. Display
20. Number Buttons
21. TEMPO Button
22. ACC Button
23. CHORD Button
24. Drum/Cymbal Buttons
25. Up + Button
26. Down – Button
27. Battery Compartment
28. DC 6V ack
29. Microphone ack
30. MP3 ack
FRONT
REAR

OPERATION
TO PLAY THE KEYBOARD:
1. If desired, plug a Microphone into the Microphone ack
(rear of unit) so you can sing along.
2. Slide the Power switch to the ON position.
3. Press the TONE button 1followed by the Number buttons
2to enter the two-digit code of the tone you would like to
play. The tones are listed above the keyboard buttons.
4. Play the keyboard as desired.
5. To hear the note’s sound a little longer when pressing the
keys, press the SUS (Sustain) button; “Su” will appear briefly
in the display. To disable sustain, press the SUS (Sustain)
button again; “OF”will appear briefly in the display.
6. To hear the drums/cymbals, press one of the four Drum
buttons.
7. Press the Volume +/– buttons to adjust the volume; the
Volume level will appear in the display.
4

5
OPERATION (CONTINUED)
8. Press TRANS “+” or “-“ button, it displays locomotive state,
and adjust the melody. The acquiescent melody is C when
the power is on.
9. See below for more functions. If you are done playing, slide
the Power switch to the OFF position.
RHYTHM:
1. Press the RHYTHM button 1followed by the Number
buttons 2to enter the two-digit code of the rhythm you
would like to play. The Rhythm list is at the top left of the
keyboard (see below).
2. Press the START/STOP button to play the selected rhythm;
press the button again to stop.
3. Press the TEMPO button 1and then the Up+/Down–
buttons 2to adjust the speed; the tempo level will appear
in the display.
4. Press the SYNC button 1; “Sc” will appear in the display.
When ready, press one of the keyboard keys 2and the
rhythm will automatically start. Press the START/STOP
button 3to stop.
5. While the rhythm is playing, you can add variation in the
rhythm by pressing the Fill-In button which is useful to
insert a fill-in patten to smoothly lead into the next section.
This will insert a short drum fill variation and then continue
with the rhythm.
01-07 RUMBA
08-15 POPS
16-23 DISCO
24-31 POLKA
32-39 BOSSA NOVA
40-47 MARCH
48-55 16 BEAT
56-63 COUNTRY
64-71 ROCK & ROLL
72-79 SWING
80-87 LATIN
88-95 WALTZ
96-99 SLOW WALTZ

OPERATION (CONTINUED)
ACC
When playing a rhythm, press the ACC button and then press
the +/– buttons to adjust the volume of the accompanist
(rhythm); the ACC level will appear in the display.
RECORD AND PLAYBACK:
1. Press the REC button to record the notes you play,
up to 64; “E” will appear in the display.
2. Press the PLAY button 1to stop recording and replay these
notes; “Pl” will appear in the display.
3. Press REC button 2to turn off the Record function; “Of” will
briefly appear in the display.
DEMO SONG PLAYBACK:
1. Press the DEMO ONE button to playback a demo song. Press
it again to stop, third press it to play the next demo song. Or
press the DEMO ONE button and then press “+” or “-“ or the
number buttons to select the demo song. The song list is
shown to the right of the display (see beside).
2. Press the Demo All button and all songs will play one
after another.
3. Press the Volume +/– buttons to adjust the volume.
4. Press the TEMPO button 1and then the +/– buttons 2to
adjust the speed.
5. Press the TONE button and then the number buttons to
change the tone of the demo song.
6. Press the START/STOP button 3to stop demo song
playback.
6

7
OPERATION (CONTINUED)
PROGRAM:
1. Press the PROGRAM button.
2. Create a percussion sequence by pressing the four
drumbeat buttons (you have at least 16 percussion sounds).
3. Press the PLAY button 1to playback the program. It will
play continuously until the START/STOP button 2is
pressed.
GUIDE:
1. Press the GUIDE button and then press one of the white
keyboard keys to select the demo song. The leftmost
white keyboard key is for the first demo song and so on.
2. This is a one-key-one note function. Press any keys on the
keyboard to pretend playing the selected demo song.
SINGLE CHORD EFFECT
1. While in the Rhythm mode, press the SINGLE button;“Si” will
appear in the display.
2. Press one of the 19 leftmost keyboard keys to activate the
single chord effect.

OPERATION (CONTINUED)
3. Press the SINGLE button 1again to turn off the Single
effect. Press the START/STOP button 2to turn off the
rhythm.
FINGER CHORD EFFECT
1. While in the rhythm mode, press the FINGER button; “Fi” will
appear in the display.
2. Press a Finger Chord (see below and the following page for
chart) using the 19 leftmost keyboard keys to activate the
Finger Chord effect.
3. Press the FINGER button 1again to turn off the Finger
effect. Press the START/STOP button 2to turn off the
rhythm.
CHORD
Press the CHORD button to stop the function of single chord and finger cord.
8

9
OPERATION (CONTINUED)
MP3 PLAYER:
To listen to your MP3 player while playing the keyboard, simply connect it via a standard audio
cable (not included) to the MP3 ack on the rear of this unit.
PRECAUTIONS
• If using an AC power source, connect keyboard to the power supply before playing, then
turn on the switch. After playing, turn off the switch and then remove the power supply.
• If unit will not be used for a long time, the batteries should be removed from the battery
compartment to avoid battery leakage and keyboard damage.
• Avoid exposure to heat, because extreme heat will cause mechanical and electrical damage
to the keyboard.
• Prevent liquid, dust or small particles from getting inside the keyboard, especially metal
parts. The keyboard should be covered after playing.
• Do not use paint, alcohol thinner, or similar chemicals to clean the keyboard case because
chemicals will damage the finish of the keyboard. Mild cleaning agents can be applied to a
soft cloth to clean the keys.
• Do not drop or apply excessive pressure to the keyboard, because it may damage the inner
parts of the keyboard, causing malfunctions or even breakage of the casing.
• When carrying and transporting, protect the keys and function buttons to avoid damage.
Printed in China KSP1285-IB-E0DM1-B0US
Table of contents