PRECIOUS PLASTIC INJECTION User manual

Machine Manual


3
Contents
1.1 The injection machine
1.2 Components
1.3 Specifications
2.0 Operation &
Maintenance
2.1 How the injection works
2.2 Operating the machine
2.3 Maintenance
2.4 Create
3.0 Safety 3.1 General instructions
3.2 Fumes
3.3 Moulds
3.4 Ancillary equipment
3.5 Workspace hazards
3.6 Personal protective equipment
3.7 Emergency situations
3.8 Safety stickers
4
4
5
6
7
11
13
14
15
16
16
17
18
18
19
20
21
4.0 Installation &
Decommissioning
4.1 Preparation
4.2 Decommissioning
1.0 Introduction
22
24
25
27
28
5.0 More 5.1 Online resources
5.2 Community power
5.3 Be part of it
5.4 Feedback & Support
5.5 Take it to the next level
6.0 Technical
Documents
6.1 List of recommended spares
6.2 Electrical control box
29
30

4
1.2 Components
1.1 The injection machine
1.0 Introduction
Electronics
Box
Hopper
Frame
Barrel with heating
elements and
insulation cover
Plunger
Lever
Nozzle
Base

5
1.3 Specifications
Type Manual lever
Weight 30 kg
Dimensions (l x w x h) 830 x 700 x 1300 mm
Voltage 240 or 110 V
Power consumption 1,2 kW
Barrel volume 150 cm3
Pressure 45 bar
Input: Plastic type HDPE, LDPE, PP, PS
Input: Flake size 2 to 20 mm
Input: Mould dimensions max 330 x 360 mm
Output: Productivity 6 to 7 inj./h
Rate throughput 1 kg/h
Maximum temperature 350ºC
Temperature regulation Yes
Heater type Heat bands (4)
Number of operators 1 to 2

6
Note! Before operating the machine, make sure to read and
understand chapter 3.0 Safety section in this manual!
2.1 How the injection works
2.0 Operation & Maintenance

7
2.2 Operating the machine
Startup
Production

8
9.
14.
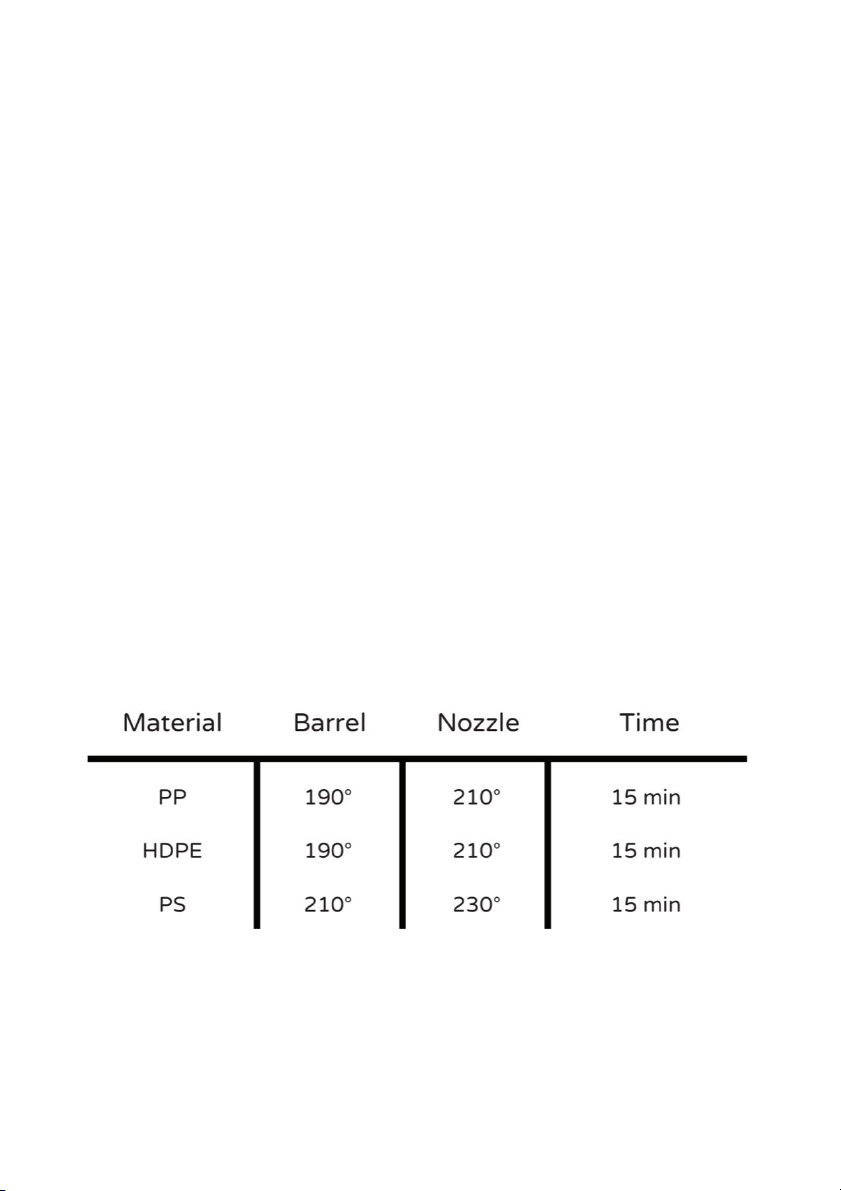
Tip: Depending on the plastic type, you’ll need one or sometimes two
people to pull down the lever. Before injecting into the mould, make sure
the plastic in the barrel is completely melted in order to fill all areas of the
mould. To ensure this you can remove the nozzle cap and gently push the
lever down to let a little bit of plastic come out to check the consistency. If
it's not the desired consistency, increase 5 degrees at the time until you
achieve the desired consistency (*Warning*: Plastic should never be in a
liquid state, this means plastic is burning and can be very dangerous for the
operator and can cause very serious burns).
Cooldown

9
Tips & Tricks while using
Troubleshooting

10
Temperatures

11
2.3 Maintenance
Daily
Monthly
●fasteners
●heating elements

12
2.3 Maintenance
Yearly
●fasteners
●barrel
●nozzle
do not
●electronics box

13
2.4 Create
Note
Have a look at the Precious Plastic Academy and the
How-to’s to learn more about creating with plastic
community.preciousplastic.com/academy

14
3.0 Safety
●
●
●
●
●
●
3.1 General instructions

15
●
●
●
●
●
●
●Processing PET, PVC and other plastics not mentioned in
section 1.3 can be highly hazardous and not advised with
this system.
3.2 Fumes
Have a look at the chapter about safety in the Academy
to read more about fumes and safety gear.
community.preciousplastic.com/academy/plastic/safety

16
3.3 Moulds
●
●
●
●
●
●
3.4 Ancillary equipment
●
●
●

17
3.5 Workspace hazards
●
●
●

18
●Heat proof gloves
●work suit or coverall
●Sealed safety glasses or a face shield
●respirator with ABEK1 filters
●Closed shoes
3.6 Personal protective equipment
3.7 Emergency situations
●
●
●

19
Safety stickers on machine frame - from left to right:
●
●
●
●
Safety stickers on electronics control box - from left to right:
●
●
●
●
●
3.8 Safety stickers

20
4.1 Preparation
4.0 Installation & Decommissioning
●
●
●
●
●
○
○
○
Table of contents
Popular Melting Machine manuals by other brands

Electrothermal
Electrothermal IA 9200 Operating and safety instructions

Buhnen
Buhnen PAM Powerline H206600 operating instructions

Graco
Graco Therm-O-Flow 20 Instructions - parts

Epic
Epic ADVANCED STRIPPING EQUIPMENT FASTMELT 650 quick start guide

CIMLINE
CIMLINE C1 Owner's/operator's manual

Railway Equipment
Railway Equipment 955 operating manual