Purtek PTDVNT User manual

Digital Video Camcorder with Night Vision
PTDVNT
User Manual

2
Table of Contents
Specications• 3
Disconnectingfromyourcomputer• 4
GettingtoKnowYourDigitalVideoCamcorder• 4-5
Loadingthebatteries• 6
Poweron/off• 7
UsingtheFilter• 7-8
Modes• 8
Setup• 8-10
PlaybackModes• 10-12
RecordingVoice(VoiceRecorderMode)• 13
RecordingVideos(CamcorderMode)• 13-14
TakingPictures(CameraMode)• 15-16
ContinuousShooting(BurstMode)• 17
PCCameraMode• 17
MassStorageMode• 17
MemorySpaceIndication• 18
InstallingDigitalCameraDriver• 19
InstallingArcsoftPhotoEditingSoftware• 19-20
OperatingArcsoftPhotoEditingSoftware• 20-21
Copyrightnotice• 22
LimitedWarranty• 22

3
Specications
ImageSensor: VGACMOSSensor
Resolution: VGA(640x480)
13M(1280x960)
3M(2048x1536)
VideoClip: QVGA(320x240)
VGA(640x480)
DigitalZoom: 4X
Display: Color15”TFTLCD
ExternalMemory: MicroSDcard(upto8GB)
InternalMemory: 128MB
FileFormat: JPEG/AVI
Lens: Fixed(2PLens)
FNo: 30
FocusRange: 07m~innity
Interface: USB/AVout
Flashlight: LED/IRLED
ShutterSpeed: 1/8to1/2048second
Power: 2xAAalkalinebatteries
Dimensions: 100x65x34mm
Weight: 110g
SystemRequirements: Pentium166MHzprocessororhigher
MicrosoftWindows2000,XP,VISTA
AvailableUSBport
SuperVGAcardandcolormonitor
CD-ROMorDVD-ROMdrive
64MBRAM(minimumrequired)
200MBavailableHDspace
MassStorage: Windows2000,XP,VISTA
PCCameraDriver: Windows2000,XP,VISTA

4
Getting to Know Your Digital Video Camcorder
Self-timer
Indicator
Flashlight
LED
Night
shoot
LED
Microphone
Lens
FrontView
Disconnecting From Your Computer:
BeforedisconnectingtheDigitalCamerafromthecomputer,besure
tostopthedeviceinWindowsTostoptheDigitalCamera,please
followthestepsbelow:
RemovefromPC:(ForWindowsMe/2000/XP/VISTA)
1 Clickthe“SafelyRemoveHardware”
iconlocatedonthetaskbarSelect
thedeviceyouwanttostop(eg
SafelyremoveUSBMassStorage
DeviceDrive(E:))
2 Followtheon-screeninstructionstoremovetheDigitalVideo
Camcordersafely

5
Getting to Know Your Digital Video Camcorder
Zoom
in(+)
Zoom
out(–)
LCDPanel
Battery
Compartment
AVjack
MicroSD
cardslot
USBjack
Mode
Knob
Status
Indicator
BackView
SideView
Speaker Left Power Shutter
ModeKnob
Menu
Right
DownUp

6
Loading the Batteries
1 Removethebatteryboxcoverbysliding
itoffInserttwo(2)AAbatteries(not
included)intothebatterycompartment,
observingtheproperpolarityas
indicated
2 Pushthebatterycompartmentcover
downandslideforwardtoclose
Battery precautions
Followtheseprecautionswhenusing
batteriesinthisdevice
1 Useonlythesizeandtypeofbatteriesspecied
2 Besuretofollowthecorrectpolarity(+/–)wheninstallingthe
batteriesasindicatedinsidethebatterycompartmentReversed
polaritymaycausedamagetothedevice
3 Donotmixdifferenttypesofbatteriestogether(egAlkalineand
Carbon-zinc)oroldbatterieswithnewones
4 Ifthedevicewillnotbeusedforanextendedperiodoftime,
removethebatteriestopreventdamageorinjuryfrompossible
batteryleakage

7
Power On/Off
PushthePOWERbuttonfor2secondstoactivateyourdigitalcamera
Pushitagaintoturnitoff
Ifthedigitalcameraisleftinactivefor1,3or5minutes,itwill
automaticallyturnoffAuto-Offcanbesetto1minute,3minutes,5
minutes,ordisabled(Formoreinformation,seethe“Setup”section)
Power Low
Ifyourbatteryislow,youwillseeabattery
icon( )and“Lowbattery”willdisplayon
thebottomleftcorneroftheLCDItwillthen
turnitselfoffin3seconds
Using the Filter
Thequalityofimagesorvideoswillbebetterwhenyouinstallthe
lteronthelensbeforetakingpicturesorrecordingvideowhenin
daylight
Note:WhenusingaNightShootLEDtocaptureanightscene,
removethelter(Formoreinformationaboutnightshooting,see
CameraModeonpages13-15)

8
Setup
Language,Date&Times,AutoOff,LightFrequency,Beep,TV
Output,Format,SystemResetandSImagecanbesetinSetup
Mode
1 SwitchMODEknobtoSetupMode
Modes
Setup
Mass Storage
PC Cam
Vo ice Recorder
Camcorder
Camera
Playback
Burst
Attachtheltertothe
camcorder
1 Inordertoavoid
damagingorlosing
thelter,attach
theltertothe
camcorderusingthe
includedconnecting
cordDonotusethecordasahand
straptocarrythecamcorder
2 Attachthestringasindicatedby
loopingtheconnectingcordthrough
thestraplugonthebottomofthe
unit

2 Presseordbuttonstochoosethedesired
itemPressShuttertoentersettingsandthen
presseordtochangesettingPressShutter
againtoconrmorMenutoexitwithoutany
change
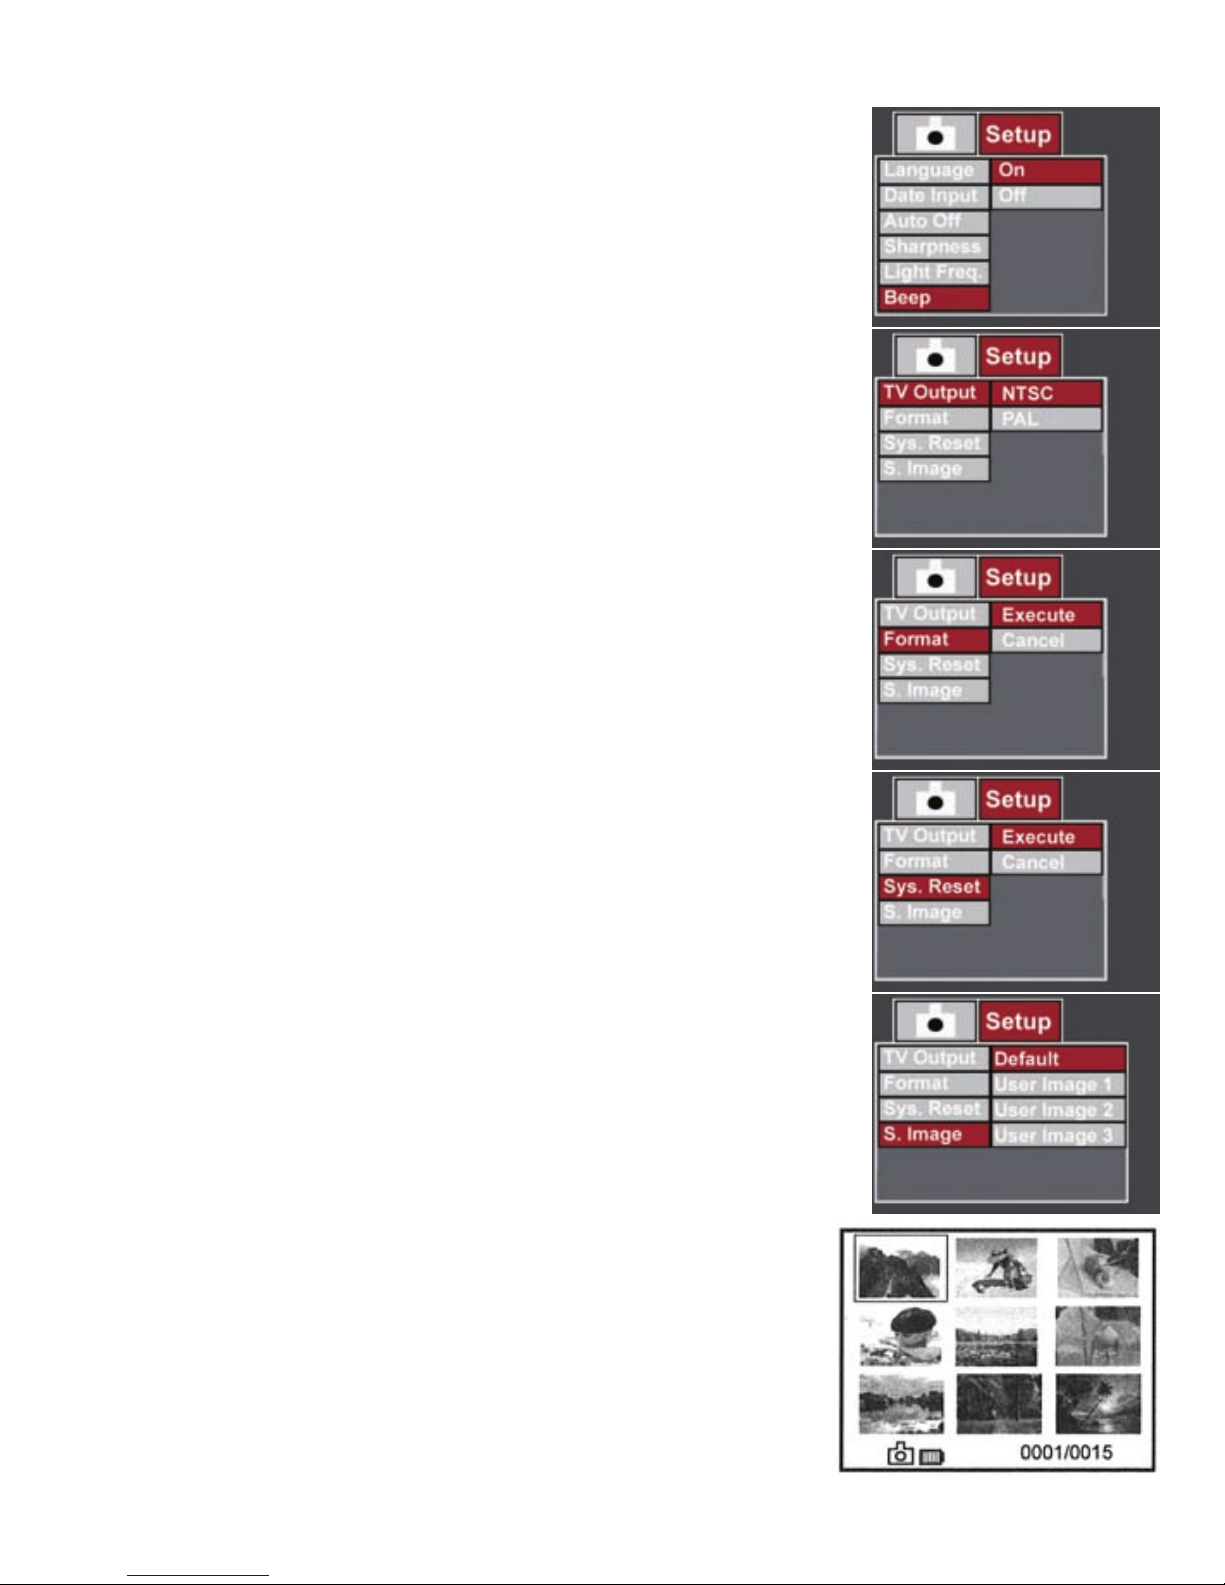
• Language:English,French,German,Italian,
Spanish,Japanese
• Date Input: (Setthedateandtime)
1 PressShuttertoenter
2 PresseordtoselectOfforSetIfyou
selectSet,presseordandforgto
makechanges
TheDatehasthreemodes:
YYYY/MM/DD
DD/MM/YYYY
MM/DD/YYYY
Presseordtoselectthemodedesired
Thenpressforgandeordtosetthe
dateandtimesdesired
3 PressShutteragaintoconrmandreturn
• Auto off:Off,1minute,3minutes,5minutes
(Toconservepower,youcansetAuto-off
function)
• Sharpness:Hard,Normal,Soft
(Selectthesharpnessdesired)
• Light Frequency:50Hz,60Hz
(Matchthefrequencyoftheelectrical
supplyinyourcountryThestandard
frequencyinNorthAmericais60Hz)
9

10
• Beep:On,Off
(TurnthekeytoneONorOFF)
• TV Output:NTSC,PAL
(SelecttheTVoutputformatThestandard
outputinNorthAmericaisNTSC)
• Format:Execute,Cancel
(Formatthememorystorage
Warning:Formattingthememorywill
deleteallimages,videos,voicerecordings
andles)
• Sys. Reset:Execute,Cancel
(Returntothefactorydefaultsettings)
• S. Image (Startup Image):Default,
UserImage1,2or3
(YoucanchoosetheDefaultoruserimage
asstartupimage)
Playback Mode
TurntheModeknobtoPlaybacktoplayvideos,
recordedvoiceandpictures

11
Playback of Videos or Voice Recordings
1 Usethearrowkeysf,g,eordtoscroll
throughthevoicerecordingsorvideoclips
2 PressShutteroncetoselectthedesiredvoice
recordingorvideoclip
3 PressShutteragaintostartthevoice
recordingorvideoclipPressShutteragainto
pausethevoicerecordingorvideoclip
4 Whileplayingback,pressetofastforward
thevideoclip(1x/2x/4x/8xspeed)
5 Pressdtostopthevoicerecordingorvideo
clip
6 Toadjustvolume,pressMenuandselectVolume
7 Toreturntotheselectionpanel,press–
(minus)besidetheLCDPanel
Playback Pictures
1 Presseordtoselectapicturele
2 PressShutter toviewthepictureinfullscreen
asshownbeside,andpress–toreturnto
previewmode
3 Pressforgtoviewpreviousornextpictures
4 Press+/–tozoominorzoomoutthephoto
5 Underthe“zoomin”status,pressShutter, and
navigatethepicturesbypressinge,d,forgPressShutteragain
toescapethismode
6 SomesettingscanbechangedbypressingtheMenubuttonwhen
viewingimagesPresseordtoselectmenuitems,pressShutter
toenter,andpresseordtochangesettingsPressShutteragain
toconrmsetuporMenutoexitwithout
makingchanges
• Slide Show:3Sec,5Sec,10Sec

12
• Delete:Single,All,Select
• DPOF:Single,All
(IfyourprintersupportsDPOF(DigitalPrint
OrderFormat)functionalityandcandirectly
printimagesstoredinaSDcard,thenyou
canprinttheimagesyouneedbyinserting
theSDcardintotheprinter)
• Copy to card:Execute,Cancel
(Whenthere’sinternalmemoryinthedigital
camera,youcancopyalllesincluding
video,recordedvoiceandpicturesfrom
internalmemorytoSDcard)
• Thumbnail:Execute
(Youcanbacktopreviewmode
immediately)
• Volume:1~8
(Youcanadjustthevolumeforvideoor
recordedvoice)
• S. Image (Startup Image):
UserImage1~3,Cancel
(Selectastartupimagefromyourphotos
FormoreinformationaboutSImage,see
page10)

13
Voice Recorder Mode
1 TurnModeknobtoVoice Recorder Mode
2 PressShuttertostartvoicerecording
PressShutter againtostoprecording
Camcorder Mode
1 SwitchModeknobtoCamcorder Mode
2 PressShuttertostartrecordingvideo
PressShutteragaintostoprecording
3 TurnontheFlashlightLEDorNightshootLED
• Pressftoturnon/offtheLEDFlashlight
• Pressgtoturnon/offtheNightVisionLED
• Thefollowingiconwilldisplayonthescreen
FlashlightLED
NightShootLED
Note:
• FlashlightLED:
Ifdaytimelightislow,imagesorvideoswillbebetterwhenthe
LEDFlashlightisused(Theeffectivedistanceoftheashlight
isabout3minadarkenedenvironment)
• NightVisionLED(InfraredLamp):
Tocaptureanightsceneordarkscene,usetheNightVision
LEDImagesandvideoscapturedinthismodewillbein
monochrome(TheeffectivedistanceoftheNightVisionLED
lightisabout6minadarkenedenvironment)
4 PressMenutosettheVideoQualityandothersettings

14
5 PresseordbuttonstochoosethedesiredmenuitemPress
Shuttertoentersettingsandthenpresseordtochangesetting
PressShutteragaintoconrmorMenutoexitwithoutany
change
• Size:VGA(640x480),QVGA(320x240)
• White Balance:Auto,Daylight,Cloudy,
Fluorescent,Tungsten
• EV:+20,+15,+10,+05,+00,-05,-10,
-15,-20
• Color:Off,Monochrome,Sepia,Vivid
• Time stamp:Off,Dateonly,Date&Time

15
Camera Mode
1 TurnModeknobtoCamera mode
2 PressShuttertotakeapicture
3 TurnontheFlashlightLEDorNightshootLED
• Pressftoturnon/offtheLEDFlashlight
• Pressgtoturnon/offtheNightVisionLED
• Thefollowingiconwilldisplayonthescreen
FlashlightLED
NightShootLED
Note:
• FlashlightLED:
Ifdaytimelightislow,imagesorvideoswillbebetterwhenthe
LEDFlashlightisused(TheeffectivedistanceoftheFlashlight
isabout3minadarkenedenvironment)
• NightVisionLED(InfraredLamp):
Tocaptureanightsceneordarkscene,usetheNightVision
LEDImagesandvideoscapturedinthismodewillbein
monochrome(TheeffectivedistanceoftheNightVisionLED
lightisabout6minadarkenedenvironment)
4 PressMENUtosetPictureQuality
5 PresseordbuttonstochoosethedesiredmenuitemPress
Shuttertoentersettingsandthenpresseordtochangesetting
PressShutteragaintoconrmorMenutoexitwithoutany
change
• Size:3M(2048x1536),13M(1280x960),
VGA(640X480)

16
• Quality:Fine,Standard,
Economy
• Preview:On,Off
• White Balance:Auto,
Daylight,Cloudy,
Fluorescent,Tungsten
• EV(ExposureValue):
+20,+15,+10,+05,
+00,-05,-10,-15,-20
• Self timer:Off,5sec,
10sec,15sec
• Scene Mode:Auto,
Portrait,Landscape,
Sport,Night,Backlight
• Color:Off,Monochrome,
Sepia,Vivid
• Time Stamp:Off,Date
Only,Date&Time
• Display:On,Off
• Frame:Off/Select
(Thereare9effectframeforchooseonthismode)
Caution:
Ifthelightingisinsufcient,theicon will
appearinthemiddletopoftheLCDdisplay

17
Burst Mode
ThisDigitalVideocanshootcontinuouslyshoot
upto3pictureswithin05seconds
1 TurnModeknobtoBurst mode
2 Theoperatingmethodisthesameasin
Camera mode
3 PressMenu tosetthepicturequality,thesameasCamera mode
Note:
• Scene ModecannotbeoperatedinBurst mode
• Inthismode,youcanalsoopentheFlashlightLEDandNight
shootLEDtostrengthentheenvironment’slightTheoperating
methodisthesameasinCamera mode
PC Camera Mode
TurntheModeknobtoPCCameraMode
TheDigitalCameracanbeusedasaPCCam
whenitissettoPCCamModeToactivatethe
PCCam,connecttheDigitalCameratoyour
computerwiththesuppliedUSBcable
Note:ToactivatethePCCamfunction,the
DigitalCameradrivermustbeinstalledbeforeconnectingtheDigital
Cameratoacomputer
Mass Storage Mode
TurnModeSwitchKnobtoMassStorageMode
ConnectyourDigitalCameratoyourcomputer
InMassStorageMode,theDigitalCamerawitha
SDcardactsexactlylikeacardreader

18
MassStorageModeiscompatiblewithWindowsandcanbeusedby
connectingtheDigitalCamcordertoacomputerwiththesupplied
USBcableImagesormoviescanbecopied,movedordeletedin
exactlythesamewayasotherlesonyourcomputer
Note:ForWindowsME,2000,XPandVISTAoperatingsystem,itis
notnecessarytoinstalltheDigitalCameradriverDriverinstallationis
onlyneededforWindows98
Memory Space Indication
1 isshowninthelowerleftcornerofdisplay
thatindicatesthemicroSDCardisinserted
inthedevice(seeFIG-1)
2 Whentheinternalmemoryisfull,“Memory
Full”willbedisplayedontheLCD
3 Oncethememoryisfullandthecamera
doesnothaveexternalmemoryinstalled,
thelastimage,audioorvideowillnotbesavedafterthepoweris
turnedoff
Caution:
PleasenotethatthisDigitalCamcorderdoesnotsupporthot
swappingofthememorycard,sobesuretoturnofftheDigital
Camcorderbeforeinsertingorremovingthememorycard

19
Installing Digital Camera Driver
1 InserttheCDintoyourcomputer
2 DoubleClickDRIVERfolderinCD
3 ClickSETUP,thescreenbelowwillappear
4STK02NInstallationProgramwillautorun
untilthefollowingscreenappears
5 ClickFINISHtocompletetheinstallation
6 Restartthecomputeraftercompletingtheinstallation
Installing Arcsoft Photo Editing Software
InstallallsoftwarebeforeconnectingtheDigitalCameratoa
computer
1 InserttheCDintoCD-ROMdriverThe
softwarewillautorun

20
2 Selectthelanguage
3 ClickYESandthedriverwillstartthe
ArcsoftInstallation
4 PressNEXTuntilthefollowingscreen
appearsClickFINISHtonishArcsoft
Installation
Operating Arcsoft Software
CapturedimagescanbeeditedandthePCCammodecanbe
activatedwiththeArcsoftSoftwareToeditimages,settheUSB
ConnectiontoMassStoragemodeTocaptureimagesthroughthe
ArcsoftSoftware,settheUSBConnectiontoPCCammode(See
“PCCameraMode”,page17)
Note:ThissoftwaredoesnotsupporttheMacoperatingsystem
1 TostarttheprogramPhotoImpression5:
Start→Program→ArcsoftSoftwareSuite→PhotoImpression5
Table of contents