Qware FILM & SEE User manual

1
Children
’
s Digital Camcorder
FILM & SEEUser Manual
QW DV-00PK
Please read these instructions before using the product and save them for future reference.The illustrations are for reference only and are subject to change without notice.

2
Contents
Contents
Contents
Contents
I. INTRODUCTION ................................................................................................................................. II. SAFETY INSTRUCTIONS ................................................................................................................. III. IMPORTANT SAFETY PRECAUTIONS ...................................................................................... 4
IV.
CONTENTS ...................................................................................................................................... 4
V.
PRODUCT SPECIFICATIONS ......................................................................................................... 5VI. INSTRUCTIONS .............................................................................................................................. 5
A.
A.
A.
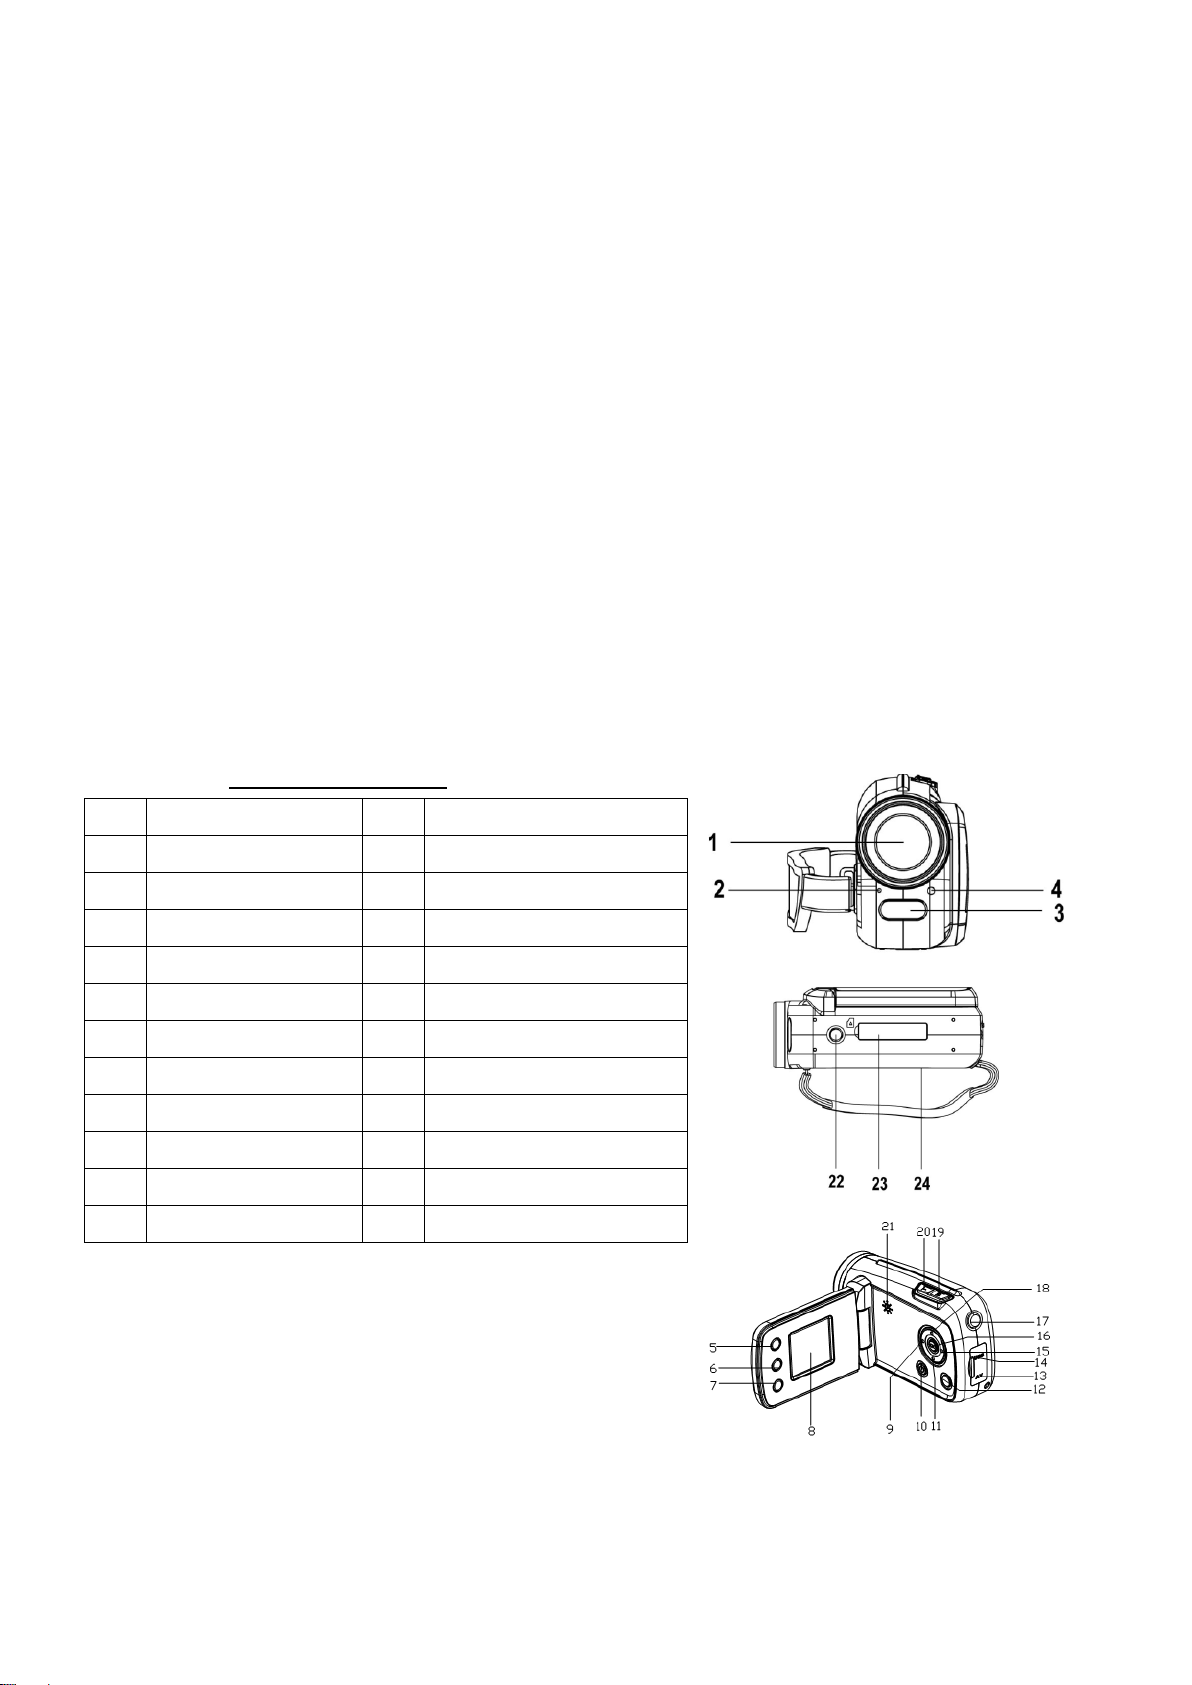
A. Device overview ........................................................................................................................... 5
B.
B.
B.
B. Installing the Battery .................................................................................................................... 6
C.
C.
C.
C. Installing the SD card .................................................................................................................. 6
D.
D.
D.
D. Turning your Camera On ............................................................................................................ 6
E.
E.
E.
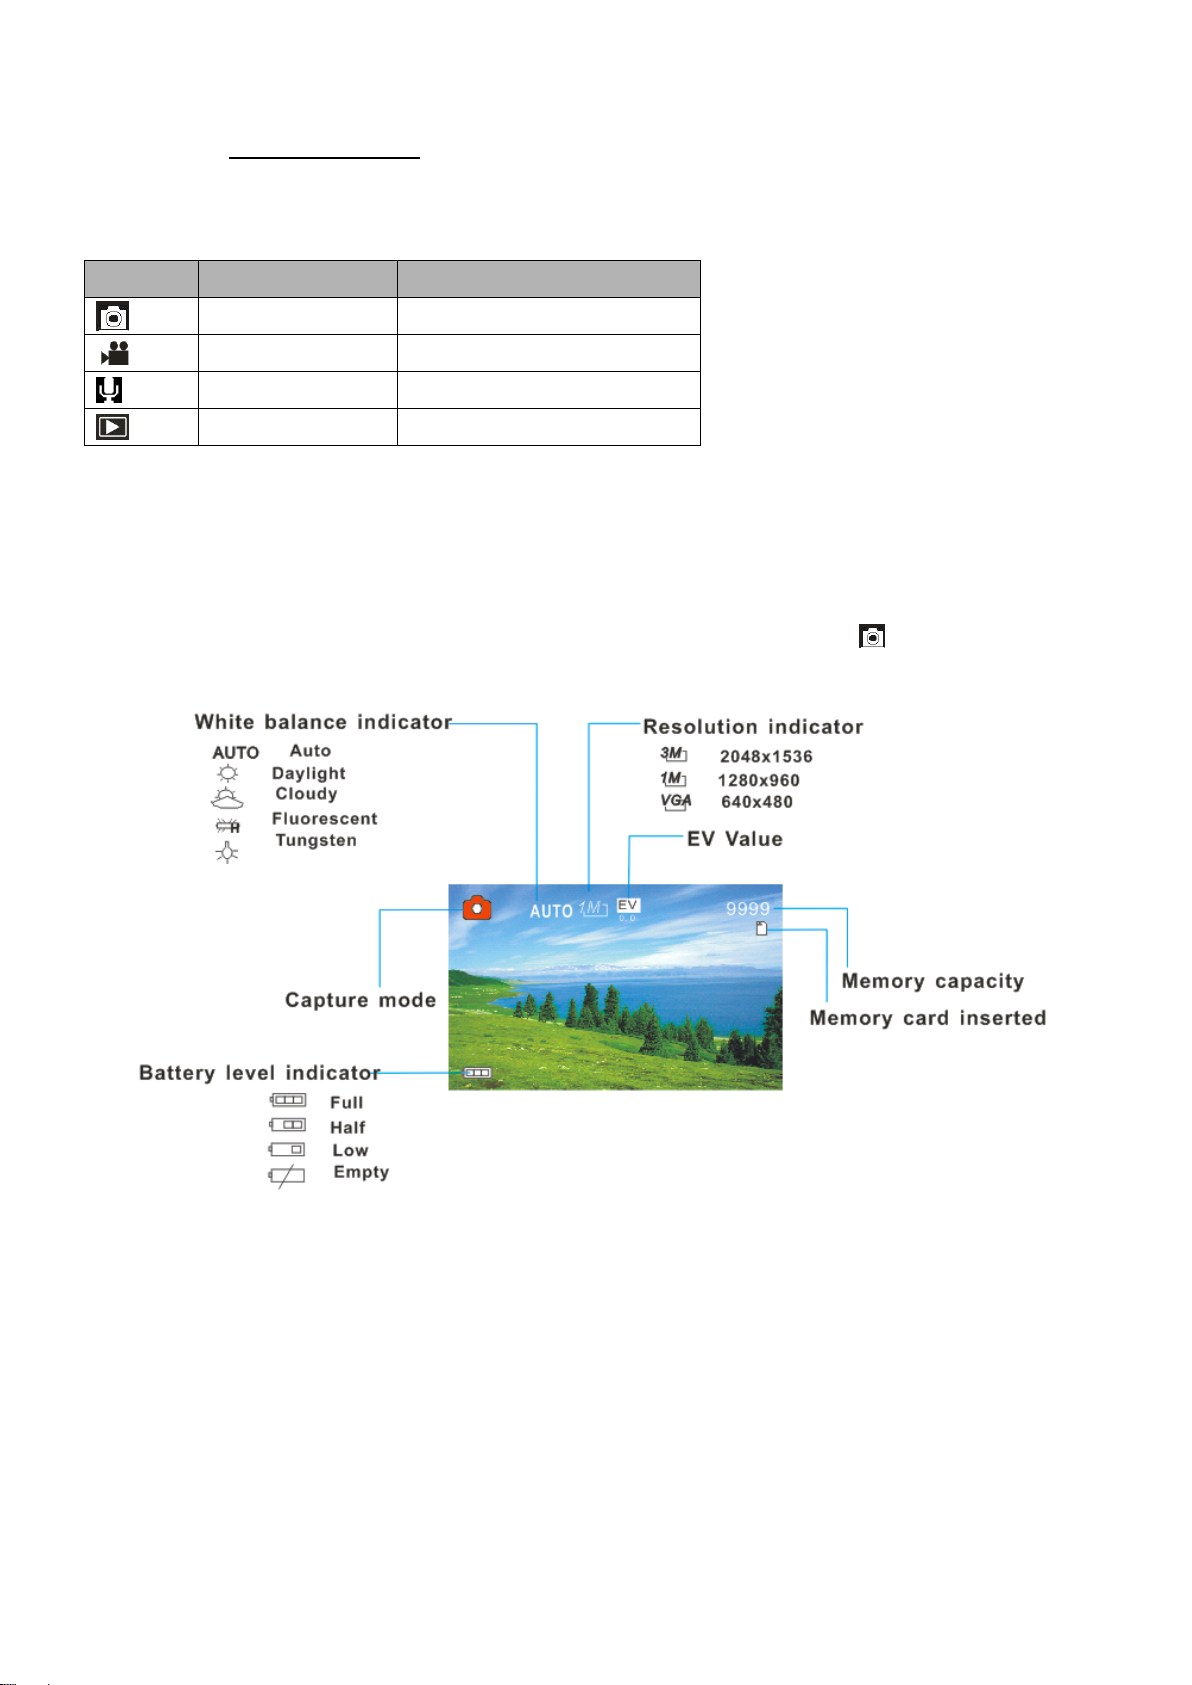
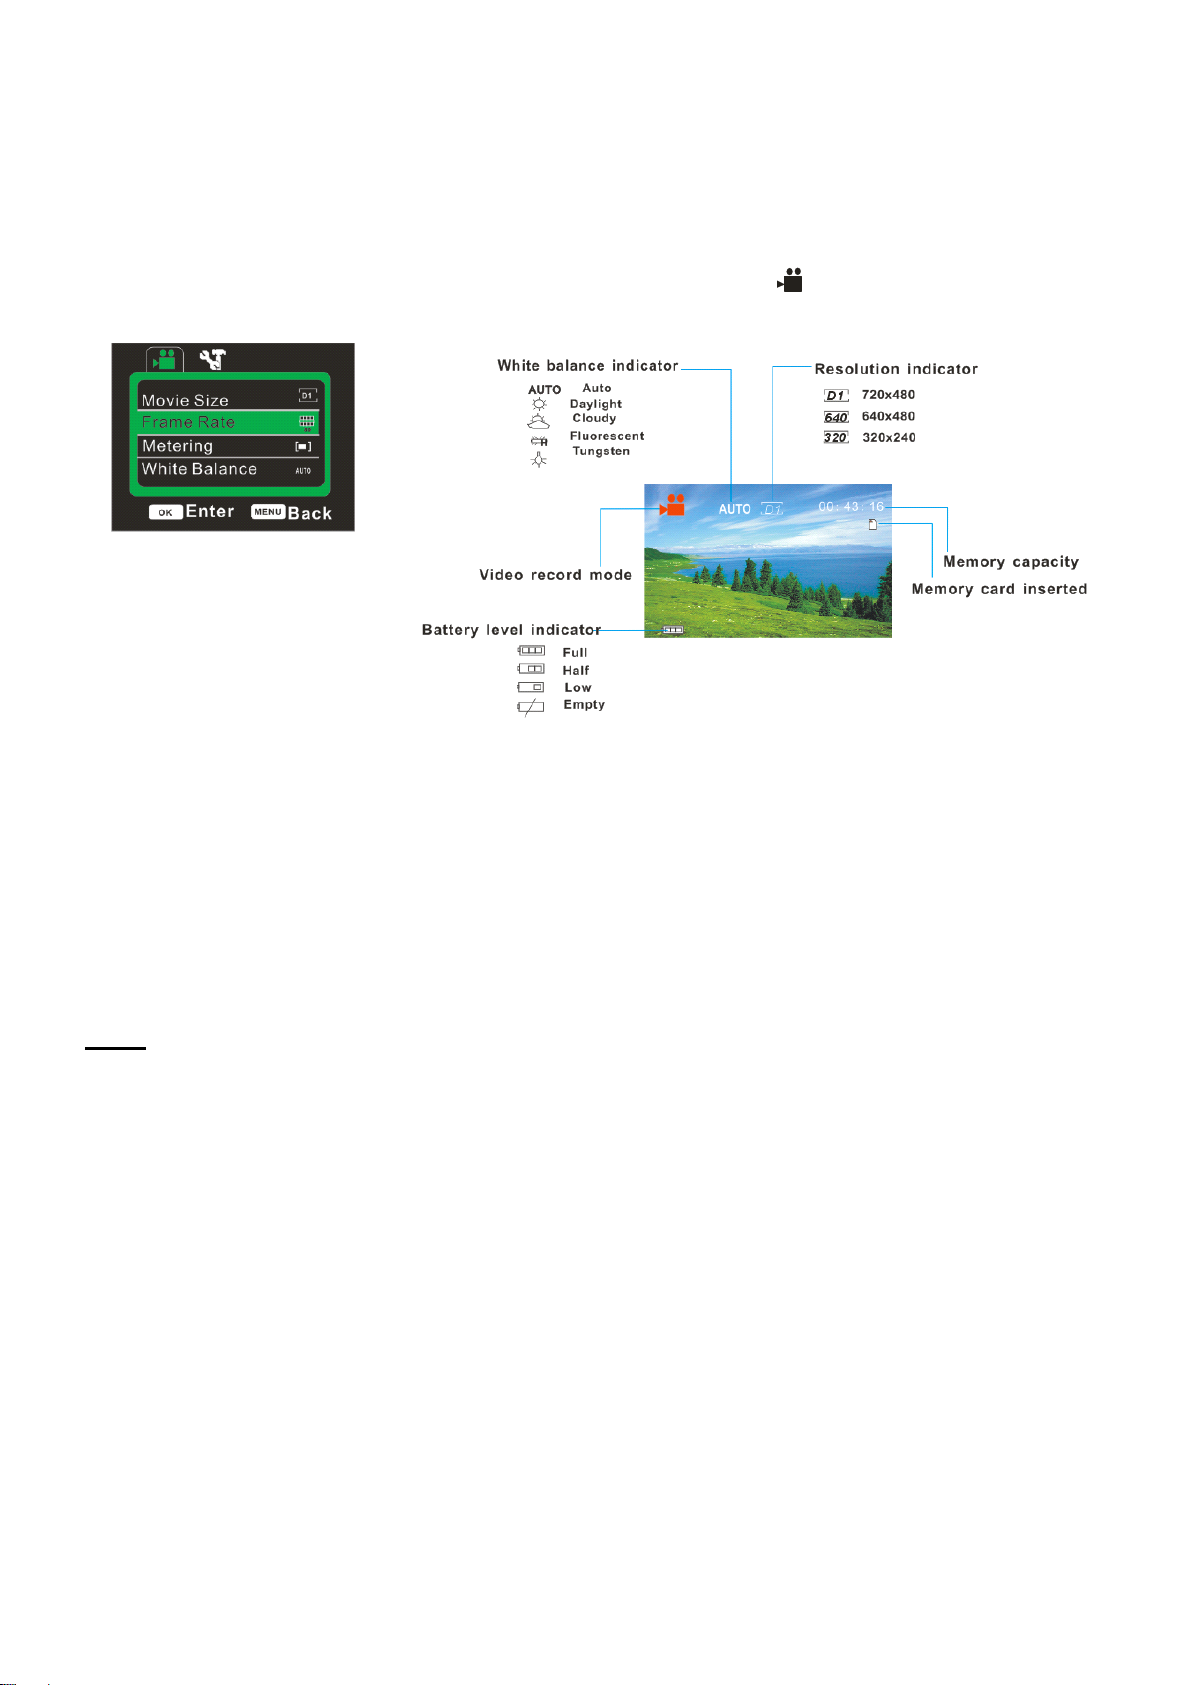
E. Camera Modes ............................................................................................................................. 71. Capture Mode ........................................................................................................................... 72. Video Mode ............................................................................................................................. 10. Audio mode ..............................................................................................................................
11
F.
F.
F.
F.
Recording Audio Files ...................................................................................................................
11
1. Playback mode ....................................................................................................................... 122. Camera Settings ..................................................................................................................... 1
G.
G.
G.
G. AV Output .................................................................................................................................... 15
H.
H.
H.
H. PC Camera Mode ...................................................................................................................... 15VII.
I.
I.
I.
I. Software Installation .................................................................................................................... 15VIII.
J
J
J
J .
.
.
.TROUBLESHOOTING .................................................................................................................. 1 6

I.
I.
I.
I. INTRODUCTION
INTRODUCTION
INTRODUCTION
INTRODUCTION
Thank you for the purchase of the Film & See children
’
s digital camcorder.This manual contains important safety and operating information. Please read all theinformation carefully before you use the device to avoid accidents and keep it for futurereference. Follow these important safety and operation instructions.
II.
II.
II.
II. SAFETY
SAFETY
SAFETY
SAFETY INSTRUCTIONS
INSTRUCTIONS
INSTRUCTIONS
INSTRUCTIONS
•The apparatus shall not be exposed to dripping or splashing and no objects filled with liquids,such as vases, shall be placed near or over the product. Dry location use only.
•Do not attempt to disassemble this unit. When replacements parts are required, be sure theservice technician has used replacements parts specified by the manufacturer that have thesame characteristics as the original parts. Refer servicing to qualified personnel.
•Do not use the product in an extremely dry environment.
•Keep the unit clean. Never store it next to a heat source or in dirty, humid or wet places.Keep it out of direct sunlight.
•Do not put the product in high temperature places (over 40 º
º
º
ºC), especially not in a car withthe windows closed in summer.
•Do not subject the product to harsh impacts. Do not drop the unit to avoid damage.
•Press the buttons gently. Pressing them or the screen too hard can damage the product.
•Disconnect the appliance from the power source before cleaning.
•Use a dry soft cloth to clean this appliance. We strongly suggest using a clean, dry,non-alcohol cotton swab to insert the camera lens and clean the glass surface periodically toproduce a clear image.
•This product is not intended for commercial use. Household Use Only.
•The USB cord for the device should be unplugged from the computer when the unit is leftunused for a long period of time.

4
III.
III.
III.
III. IMPORTANT
IMPORTANT
IMPORTANT
IMPORTANT SAFETY
SAFETY
SAFETY
SAFETY PRECAUTIONS
PRECAUTIONS
PRECAUTIONS
PRECAUTIONS
•In order to prevent program failure, never disconnect the product suddenly from a PC whilefile transferring is in progress.
•Disconnect the appliance from THE PC and remove the battery before cleaning. Use a drysoft cloth to clean this appliance. Do not dismantle the product or use alcohol, thinners orbenzene to clean the surface of the product.
•The supplier or retailer accepts no liability for lost, corrupted or damaged data. It remains theresponsibility of the user to ensure that they perform consistent data backups during the useof this product. Please ensure that you retain the original files you have downloaded to yourdevice.
•We have done our best to produce a complete and accurate manual. However, we cannotensure that there are no errors or omissions during the printing process.
•This device uses batteries. Please observe the local regulations regarding the disposal ofold equipment and battery.
IV.
IV.
IV.
IV. CONTENTS
CONTENTS
CONTENTS
CONTENTS
Please make sure that the items shown below are included in the package. Should an item bemissing, please contact the local retailer from which you purchased this product.
•Digital camcorder
•Camera pouch
•Software/drivers disc
•Hand strap
•User manual (which you ’ re reading right now)
•
AV
cable
•USB cable

5
V.
V.
V.
V. PRODUCT
PRODUCT
PRODUCT
PRODUCT SPECIFICATIONS
SPECIFICATIONS
SPECIFICATIONS
SPECIFICATIONS
�
�
�
�
1.MP Mega Pixels CMOS Sensor
�
�
�
�
Still Image Resolution: (MP (2048x156) / 1.MP (1280x960) / VGA (640x480)
�
�
�
�
Video Clip Resolution: D1 720 x 480 @ 0 fps
�
�
�
�
File Formats: JPEG / AVI / WAV
�
�
�
�
Supports SD/MMC /SDHC Memory Slot up to 2GB
�
�
�
�
4 x Digital Zoom
�
�
�
�
1.44 ” TFT Display Screen
�
�
�
�
Mini USB 5 Pin PC Interface
�
�
�
�
Built in Microphone / Speaker
�
�
�
�
Works with Microsoft Windows
XP,
Vista, Windows 7
�
�
�
�
Power Source: x AAA Batteries
�
�
�
�
Storage/Operation Temperature: 5 ° C to 40 ° C
VI.
VI.
VI.
VI. INSTRUCTIONS
INSTRUCTIONS
INSTRUCTIONS
INSTRUCTIONS
A.
A.
A.
A. Device overview1 Lens 1 AV Out Jack2 Microphone 14 USB JackLED Lamp 15 Right / LED On/Off4 Self timer LED 16 OK5 Delete 17 Shutter6 Playback 18 Up / Display7 Mode 19 Zoom Out8 TFT LCD Screen 20 Zoom In9 Left / Self Timer 21 Speaker10 Power 22 Tripod Hole
11
Down / EV Value 2 SD Card Slot12 Menu 24 Battery Compartment

6
B.
B.
B.
B. Installing the Battery1. Open the camera battery door by pushing theclip to release the cover.2. Insert x AAA batteries as shown, ensuringthe +/- symbols on the batteries are matching+/- symbols on the camera.. Close the battery cover.
C.
C.
C.
C. Installing the SD cardThe camera has no internal memory; to be able to record more images and video clips you willneed to insert a memory card. The camera accepts SD and MMC memory cards up to 2GB.Turn off the camera before inserting or removing the SD/MMC card. Be sure to insert the cardthe correct way. Never try to force the SD/MMC card into the slot. The SD/MMC card has a writeprotect switch, which you can use to protect data from accidental deletion. Therefore, wheneveryou want to record, format or delete files in the SD/MMC card, disable the write protectionbeforehand.
1.
1.
1.
1.
To
insert the memory card:
2.
2.
2.
2.
Turn off the camera.
3.
3.
3.
3.
Find the SD card slot on the bottom of the camera.
4.
4.
4.
4.
Make sure the memory card is inserted as illustrated.
D.
D.
D.
D. Turning your Camera OnTo turn the camera on:1. To turn on the camera, press the Power button, press the power button again to turn the unitoff.
NOTE: The camera will automatically turn itself off after a period of inactivity to save power.

7
E.
E.
E.
E. Camera ModesThe camera has 4 different types of modes Capture mode, Video mode, Audio record mode andPlayback mode. Press the Mode button to select between all the modes.
1.
1.
1.
1. Capture
Capture
Capture
Capture Mode
Mode
Mode
Mode
a)
a)
a)
a) Taking
Taking
Taking
Taking a
a
a
a photo
photo
photo
photo
The Digital Video Camera allows you to take digital still photos. To take digital still photos:1. Press the Mode button to set the camera to capture mode, the icon appears on theLCD screen. The screen will look like below:
2. Use the LCD screen to view your subject.. Use the “ Zoom and Zoom Out ” buttons to zoom in and out on your subject. The value ofmagnification level appears on the screen.4. Press the Shutter button to take a picture. After the picture has been taken the LCD willdisplay image for a brief second. The Memory capacity in the top right of screen will decreaseas each image is taken.
Display Title DescriptionCapture mode For taking still photosVideo mode For recording movie clipsAudio mode For recording audio filesPlayback mode For viewing saved files

8
b)
b)
b)
b) Using
Using
Using
Using SELF
SELF
SELF
SELF TIMER/BURST
TIMER/BURST
TIMER/BURST
TIMER/BURST function
function
function
function
You can use the self-timer function when you wish to take a photograph of yourself or when youwish to photograph an object where the camera must be as still as possible. The burst functionwill allow you take continuous photos .1.
1.
1.
1. Turn the power on, and set the camcorder to the Capture mode.2.
2.
2.
2.
Press the “ Left ” button to change the self-timer Mode: each time the button is pushed left, theicon on screen is changed.
2 seconds - The photo will be taken 2 seconds after the shutter is pressed.
10 Seconds - The photo will be taken 10 seconds after the shutter is pressed.
Burst snapshot: Hold the Shutter button to take pictures continuously. It will automatically
take three pictures continuously in the interval of 1 second.
3.
3.
3.
3. Press the Shutter button to take picture.
c)
c)
c)
c) Photo
Photo
Photo
Photo settings
settings
settings
settings menu
menu
menu
menu
There are various photo settings that can be changed on the camcorder .
4.
4.
4.
4. Turn on the camcorder and set it to capture mode.
5.
5.
5.
5. Press the MENU button to display the menu.
6.
6.
6.
6. Press the “ Up or Down ” buttons to select an item.
7.
7.
7.
7. Push the “ OK ” button to enter the submenu.
8.
8.
8.
8. Press the “ Up or Down ” buttons to select the desired item.
9.
9.
9.
9. Press the OK button to confirm the setting.
10.
10.
10.
10. Press the MENU button to close the menu.

9
Photo settings are as follows:
Menu
Menu
Menu
Menu Function
Function
Function
Function
Resolu
tion
Allows you to change the image resolution for taking still photos. There arefive options for choice:[M] 2048x156 by interpolation /[1.M] 1280x960 / [VGA] 640x480.Quality Selecting lower image quality decreases the image size and allows you tocapture more images. There are three options for choice Super Fine, Fine,Normal.Meteri
ng
Allows you to change the brightness of the picture. There are Settings tochoose from
Center:
Center:
Center:
Center: The exposure will be calculated based on light in the center areaand this is suitable for general use.
Multi:
Multi:
Multi:
Multi: The exposure will be calculated based on the average light.
Spot:
Spot:
Spot:
Spot: Only the spot in the center of the LCD screen will be metered forlight.White
Balanc
e
Allows you to adjust the white balance to suit different light sources. Thereare five options to choose from: Auto/Daylight/Cloudy/Fluorescent
/Tungsten.
Expos
ure
Allows you to set the exposure value manually to compensate for unusuallighting conditions such as indirect indoor lighting, dark backgrounds, andstrong backlighting. The exposure value range is – 2.0 to 2.0.Driver
Mode
Use this item to set the camera to different camera taking modes:Off/Self-timer 2s/ Self-timer 10s/ BurstEffect This function allows you to change the image
’
s color tone for your nextimage you will take. There are several options:Normal/B&W/Sepia/Negative/Red/Green/Blue.
Date
Stamp
This function can be used to add a date to your pictures as you take them.Options include:Off: Doesn ’ t include any information.Date: Shows date to the image.Date and Time: Shows date and time to the image.

10
2.
2.
2.
2. Video
Video
Video
Video Mode
Mode
Mode
Mode
a)
a)
a)
a) Making
Making
Making
Making a
a
a
a video
video
video
video clip
clip
clip
clip
The Digital Camcorder allows you to create video clips. To make a video clip:1. Press the Mode button to set the camera to video mode, the icon appears on the LCDscreen. The screen will look like below:
2. Use the LCD screen to view your subject.. Use the “ Zoom In and Zoom Out ” buttons to zoom in and out on your subject. The value ofmagnification level appears on the screen.4. Press the Shutter button to start recording. While recording the top right of the screen willdisplay how long it has been recording for. You can pause the recording by pressing the Uparrow and press it again to resume recording.5. Press the Shutter button again to stop recording or recording stops when the currentSD/MMC card is full.
Note:
Note:
Note:
Note: When the light is insufficient press the “ Right ” button to turn the LED Light on.
b)
b)
b)
b) Video
Video
Video
Video settings
settings
settings
settings menu
menu
menu
menu
There are various video settings that can be changed on the camcorder.
•Turn on the camcorder and set it to video mode.
•Press the MENU button to display the menu.
•Press the “ Up or Down ” buttons to select an item.
•Push the “ OK ” button to enter the submenu.
•Press the “ Up or Down ” buttons to select the desired item.
•Press the OK button to confirm the setting.
•Press the MENU button to close the menu.

11
Video settings are as follows:
Menu
Menu
Menu
Menu Function
Function
Function
Function
Movie Size Allows you to change the video resolution for for the recording. You canchoose from D1 720 x 480, VGA 640 x 480 and QVGA 20 x 240.Frame Rate Frame rate allows you to set how many frames per second are recorded.There are 2 choices Middle and Low. Middle records at 0fps, low recordsat 15fps. The higher frame rate gives better quality recording but alsotakes up extra memory.Metering Allows you to change the brightness of the picture. There are Settings tochoose from
Center:
Center:
Center:
Center: The exposure will be calculated based on light in the center areaand this is suitable for general use.
Multi:
Multi:
Multi:
Multi: The exposure will be calculated based on the average light.
Spot:
Spot:
Spot:
Spot: Only the spot in the center of the LCD screen will be metered forlight.White Balance Allows you to adjust the white balance to suit different light sources. Thereare five options to choose from: Auto/Daylight/Cloudy/Fluorescent
/Tungsten.Effect This function allows you to change the image
’
s color tone for your nextimage you will take. There are several options:Normal/B&W/Sepia/Negative/Red/Green/Blue.
Date Stamp This function can be used to add a date to your pictures as you take them.Options include:Off: Doesn ’ t include any information.Date: Shows date to the image.Date and Time: Shows date and time to the image.
3.
3.
3.
3. Audio
Audio
Audio
Audio mode
mode
mode
mode
F.
F.
F.
F.
Recording Audio Files
The digital camcorder allows you to record audio clips. Before recording audio clip, make sureyour SD/MMC card has adequate free space.
•Set the camcorder to Audio mode. The icon will appear on the LCD screen with amicrophone.
•Press the Shutter button to start recording. While recording the top right of the screen willdisplay how long left can be recorded. In the middle of the screen will display how longthis clip has been recording for.
You
can pause the recording by pressing the UP button

12
and press it again to resume recording.
•Press the Shutter button again to stop recording or recording stops when the currentSD/MMC card is full.
1.
1.
1.
1. Playback
Playback
Playback
Playback mode
mode
mode
mode
a)
a)
a)
a) Viewing
Viewing
Viewing
Viewing saved
saved
saved
saved files
files
files
files
Playback mode allows you to view all your saved files. To access theplayback menu:1. Press the Playback button to set the camera to playback mode, the icon appears on theLCD screen. The screen will look like below:
The Screen will now display the files that have been saved. Use the Left and Right buttons tobrowse through the files. The bottom left of the screen will display the file type as per abovediagram.
b)
b)
b)
b) Video/audio
Video/audio
Video/audio
Video/audio clips
clips
clips
clips
To
be able to view/listen to the video and audio files you need to:
•
•
•
•Press the left or right to select the movie or audio clip s you want to select.
•
•
•
•Press the SHUTTER (B) button to start playing the file.
•
•
•
•
To
stop playing the file, press the Menu button.
c)
c)
c)
c) Playback
Playback
Playback
Playback settings
settings
settings
settings menu
menu
menu
menu
There are various playback settings that can be changed on the camcorder.
1.
1.
1.
1. Turn on the camcorder and set it to playback mode.
2.
2.
2.
2. Press the MENU button to display the menu.
3.
3.
3.
3. Press the “ Up or Down ” buttons to select an item.
4.
4.
4.
4. Push the “ OK ” button to enter the submenu.
5.
5.
5.
5. Press the “ Up or Down ” buttons to select the desired item.
6.
6.
6.
6. Press the OK button to confirm the setting.
7.
7.
7.
7. Press the MENU button to close the menu.

1
Playback Settings are as follows:
Menu
Menu
Menu
Menu Function
Function
Function
Function
Lock Allows you to Lock and Unlock images from being deleted. There areoptions Lock/Unlock One, Lock All, Unlock All. The icon will appear oneach file that is locked when viewing them in the playback modeDelete Allows you to delete one or all files.Slide
Show
This option allows you to play a slide show of the digital still photos,Choose the Interval time from 1-10secs, Press the OK button on Start andthe slide show will start to play. If you want to repeat the function, changethe Repeat setting to Yes.Effect This function allows you to change the image
’
s color tone for your image.There are eleven options: B&W/Sepia/Negative/Red/ Green/ Blue/Binarize/ Sunset/ Warm/ Cold/ Contrast.Rotate Allows you to rotate the image 90 degrees in the clockwise direction. Theimage will appear in the background on the screen. Once you are happywith the image, Press the Ok button on Save and the image will be savedlike this.Resize Allows you to resize the image to the following 1.MP (1280x960) / VGA(640x480). Note
Note
Note
Note The image can only be resized to a smaller size than theoriginal.Voice
Memo
Allows you to add a voice memo to the saved image file. Press the Okbutton on the Add setting and the audio recording will start. Press the Menuor Shutter buttons to Finish recording.Start-u
p
Image
You
can use your favorite picture as the start-up image.[Set]: Sets your favorite image as the start-up image.[Cancel]:No start-up image.
2.
2.
2.
2. Camera
Camera
Camera
Camera Settings
Settings
Settings
Settings
a)
a)
a)
a) Camera
Camera
Camera
Camera settings
settings
settings
settings menu
menu
menu
menu
The camera settings can be changed from any of the Capture, Videoand Playback mode.1. Set Camera to any of the following modes Capture, Video orPlayback.
2. Press the Menu button to bring up the Settings menu.. Press the “ Right ” button to access the camera settings section.4. Press the Up and Down buttons to select the different settings.5. Press the OK buttons to select the setting then use the UP/Down/OK buttons to select and

14
confirm the setting options. The screen will return back to the setting menu.
Camera Settings are as follows:
Menu
Menu
Menu
Menu Function
Function
Function
Function
Sounds There are four different sound options, each option will play the soundwhen you change the setting:
Shutter:
Shutter:
Shutter:
Shutter: Allows you to set the shutter sound On or Off by pressing theRight button.
Start
Start
Start
Start Up:
Up:
Up:
Up: Allows you to set the start-up sound. Press the Right button tochange the sound. There are four options None, 1, 2, .
Beep:
Beep:
Beep:
Beep: Allows you to set the operation sound when you press any buttonOn or Off by pressing the Right button.
Volume:
Volume:
Volume:
Volume: Adjusts the sound volume.
You
can change it by pressing theRight button. There are four options 0, 1, 2, .Auto Review Adjusts how long the picture will stay on screen after taking a photo. Thereare three options Off, 1 second and seconds.Power Frequency Adjusts the Light Frequency should be set to 50Hz for Australia.Power Save To save power, the camera will automatically turn off after a period of time.There are four options: Off, 1min, min and 5min.Date& Time Allows you to set the date and time for the camera.Language Adjusts the language settings.TV Out TV Out is used for when watching the camera on your TV. Needs to be setto PAL setting.USB Allows you to this camera as a PC camera or removable disk.MSDC: Use as a removable disk.PCCAM: Use as a PC camera.PictBridge: Use as a Printer.Start up image Allows you to set your own start up image when the camera is turned on.Format Will format your SD Card.IMPORTANT: Formatting the SD/MMC card erases all pictures, video andaudio clips, including protected files. Removing the SD/MMC card duringformatting may damage the card.Reset all Restores the camera to default settings.

15
G.
G.
G.
G.
AV
OutputThe video output signal can be switched (NTSC or PAL) to accommodate different signalsystems. For example: NTSC for USA, Canada, Taiwan, Japan, etc. and PAL for Europe, Asia(excluding Taiwan), Australia, New Zealand etc.The Setting can be changed in the camera setting menu.Plug in the AV cable (supplied) to the camera Video output jack the LCD screen turns black,connect the camera to a TV and the TV screen now performs as the camera LCD screen.1. Connect the camera to a TV via the TV-out cable (supplied) as illustrated.2. Set the TV to “ AV ” mode.. When the camera is set to Capture Mode, you can preview the subjects you want to recordon the TV screen.4. When the camera is set to Playback mode, you can review all the pictures, video and audioclips stored in the camera on the TV.
H.
H.
H.
H. PC Camera Mode
IMPORTANT:
IMPORTANT:
IMPORTANT:
IMPORTANT: Install
Install
Install
Install drivers
drivers
drivers
drivers before
before
before
before connecting
connecting
connecting
connecting to
to
to
to a
a
a
a PC
PC
PC
PC
PC Camera mode allows you to use the digital video camera as a webcam. After you havecompleted installing the drivers, plug your device in via the USB cable and switch it on. You needto set the camera to PCCAM mode.
VII.
VII.
VII.
VII. Software
Software
Software
Software Installation
Installation
Installation
Installation
I.
I.
I.
I. Installing the Software
The bundled software CD has the drivers and software that come with video camera. Insert theCD into your CD-ROM drive. The autorun menu appears:
1. Click “ Install Driver - installs driver for using PC camera function.2. User manual. Click “ Install MAGIX Video easy SE ” - Installs software for editing video clips.
Quit

16
4. Click “ Install MAGIX Photo Manager 10 ” - Installs software for editing pictures.Click the items in the autorun menu to install the software. Follow the on-screen instructions tocomplete installation.
Notes:
Notes:
Notes:
Notes:
1.Open MAGIX Video easy SE or MAGIX Photo Manager 10, you have to register the softwareat first, then use program without any time limit.2. Don ’ t forget to install the QuickTime Player during installing the MAGIX video easy SE.. MAGIX Video easy SE and MAGIX Photo Manager 10 only includes Windows XP andWindows Vista, Windows 7 platforms.
VIII.
VIII.
VIII.
VIII. TROUBLESHOOTING
TROUBLESHOOTING
TROUBLESHOOTING
TROUBLESHOOTING
Problem
Problem
Problem
Problem Solution
Solution
Solution
Solution
I cannot upload images tothe PC
Check all cable connections are secured.Set the camera to MSDC mode.I cannot switch on myCamera after inserting aSD/MMC card.
Make sure the SD/MMC card is inserted all the way in and close theslot door properly.
I press the shutter buttonbut no response.
Wait for data process to complete and then take your next image.Or
Delete some images in SD/MMC card, if the memory is full.My images are blurred Hold your camera steadily until you hear a “ beep ” which indicatesthe image has been taken.The battery indicator onthe LCD screen flashes.
You need to change the battery, Or Charge the Battery
My image quality isgrainy.
You may be using the wrong frequency setting. Please refer to“ Setting Frequency ” PAL for 50 Hz NTSC for 60 HzThe LCD on my camerahas frozen whenSD/MMC card inserted.
Ensure you only use a new or formatted SD/MMC card for yourcamera.

17
The contents of this manual may change with no prior notice in order to give you a bettersupport. We reserve the right to make changes to this manual without notice.
You
can help protect the environment.Please remember to comply the local regulations:arrange to dispose non-working electricalequipment to an appropriate waste disposal center.
Other manuals for FILM & SEE
1
This manual suits for next models
1
Table of contents