Rockwell Shopseries RS8065 User manual

RS8065
CORDLESSLAWNMOWER EN


RS8065
1
8
9
5
2
3
4
11 10
7
6

RS8065
12
Front Part
Back Part
1
2
3
AB1
B2 B3
C1 C2
C3 C4

RS8065
12
a
1
1
2
a
b
D1 D2
D3 E1
E2 F1
F2 G

RS8065
1
2
K-1 K-2
K-3
L-1
L-2
L-3
13
14
H I
J K
LM1
M2 N

CORDLESSLAWNMOWER EN
7
COMPONENTLIST
UPPERHANDLE
SWITCHLEVER
CABLECLIP
GRASSBAGFILLINGINDICATOR
GRASSCOLLECTIONBAG
SAFETYKEY
HANDLEKNOBS
LOWERHANDLE
SAFETYFLAP
BATTERYPACK*
MOTORCOVER
CHARGER*(SeeFig.A)
BLADEBOLT(SeeFig.M1)
BLADE(SeeFig.M1)
*Notalltheaccessoriesillustratedordescribedareincludedinstandarddelivery.
1
2
3
4
5
6
7
8
9
12
10
13
11
14
ACCESSORIES
Battery pack 1
Charger 1
Grass collection bag 1
Use good quality accessories marked with a well-
known brand name. Choose the type according to the
work you intend to undertake. Refer to the accessory
packaging for further details. Store personnel can
assist you and offer advice.
GENERALPOWERTOOLSAFETY
WARNINGS
WARNING:Readallsafetywarningsandall
instructions. Failure to follow the warnings
DQGLQVWUXFWLRQVPD\UHVXOWLQHOHFWULFVKRFNÀUHDQG
or serious injury.
Carefullyreadtheinstructionsforthesafe
operationofthemachine.
Saveallwarningsandinstructionsforfuture
reference.
- This appliance is not intended for use by persons
(including children) with reduced physical, sensory
or mental capabilities, or lack of experience and
knowledge, unless they have been given supervision

CORDLESSLAWNMOWER EN
8
or instruction concerning use of the appliance by a
person responsible for their safety.
- Children should be supervised to ensure that they
do not play with the appliance.
Training
a) Readthe instructions carefully. Befamiliar with
the controls and the proper use of the equipment;
b) Never allow children or people unfamiliar with
these instructions to use the lawnmower.Local
regulations can restrict the age of the operator;
c) Never mow while people, especially children, or
pets are nearby;
d) Keep in mind that the operator or user is
responsible for accidents or hazards occurring to
other people or their property.
Preparation
a) While mowing, always wear substantial footwear
and long trousers. Do not operate the equipment
when barefoot or wearing open sandals;
b) Thoroughly inspect the area where the equipment
is to be used and remove all objects which can be
thrown by the machine;
c) Before using, always visually inspect to see that
the blades, blade bolts and cutter assembly are
not worn or damaged. Replace worn or damaged
blades and bolts in sets to preserve balance;
d) On multi-bladed machines, take care as rotating
one blade can cause other blades to rotate.
Operation
D 0RZRQO\LQGD\OLJKWRULQJRRGDUWLÀFLDOOLJKW
b) Avoid operating the equipment in wet grass,
where feasible;
c) Always be sure of your footing on slopes;
d) Walk, never run;
e) For wheeled rotary machines, mow across the
face of slopes, never up and down;
f) Exercise extreme caution when changing
direction on slopes;
g) Do not mow excessively steep slopes;
h) Use extreme caution when reversing or pulling the
lawnmower towards you;
i) Stop the blade(s) if the lawnmower has to be tilted
for transportation when crossing surfaces other
than grass, and when transporting the lawnmower
to and from the area to be mowed;
j) Never operate the lawnmower with defective
guards, or without safety devices, for example
GHÁHFWRUVDQGRUJUDVVFDWFKHUVLQSODFH
k) Switch on the motor carefully according to
instructions and with feet well away from the
blade(s);
l) Do not tilt the lawnmower when switching on the
motor, except if the lawnmower has to be tilted
for starting In this case, do not tilt it more than
absolutely necessary and lift only the part which
is away from the operator;
m) Do not put hands or feet near or under rotating
parts. Keep clear of the discharge opening at all
times;
n) Not to touch the blades before the disabling
device has been removed and the blades have
come to a complete stop;
o) To remove the disabling device
– Whenever leaving the machine unattended,
– Before clearing a blockage,
– Before checking, cleaning or working on the
machine,
– After striking a foreign object,
– Whenever the machine starts vibrating
abnormally.
Maintenanceandstorage
a) Keep all nuts, bolts and screws tight to be sure the
equipment is in safe working condition;
b) Check the grass catcher frequently for wear or
deterioration;
c) Replace worn or damaged parts for safety;
GeneralSafetyWarningsforyourBatteryCharger
WARNING:Readallsafetywarningsandall
instructions. Failure to follow the warnings
DQGLQVWUXFWLRQVPD\UHVXOWLQHOHFWULFVKRFNÀUHDQG
or serious injury.
Saveallwarningsandinstructionsforfuture
reference.
- This appliance is not intended for use by persons
(including children) with reduced physical,
sensory or mental capabilities, or lack of
experience and knowledge, unless they have been
given supervision or instruction concerning use
of the appliance by a person responsible for their
safety.
- Children should be supervised to ensure that they
do not play with the appliance.
If the supply cord is damaged, it must be replaced
by the manufacturer, its service agent or similarly
TXDOLÀHGSHUVRQVLQRUGHUWRDYRLGDKD]DUG

CORDLESSLAWNMOWER EN
9
ADDITIONALSAFETY
INSTRUCTIONSFORYOUR
BATTERYCHARGER
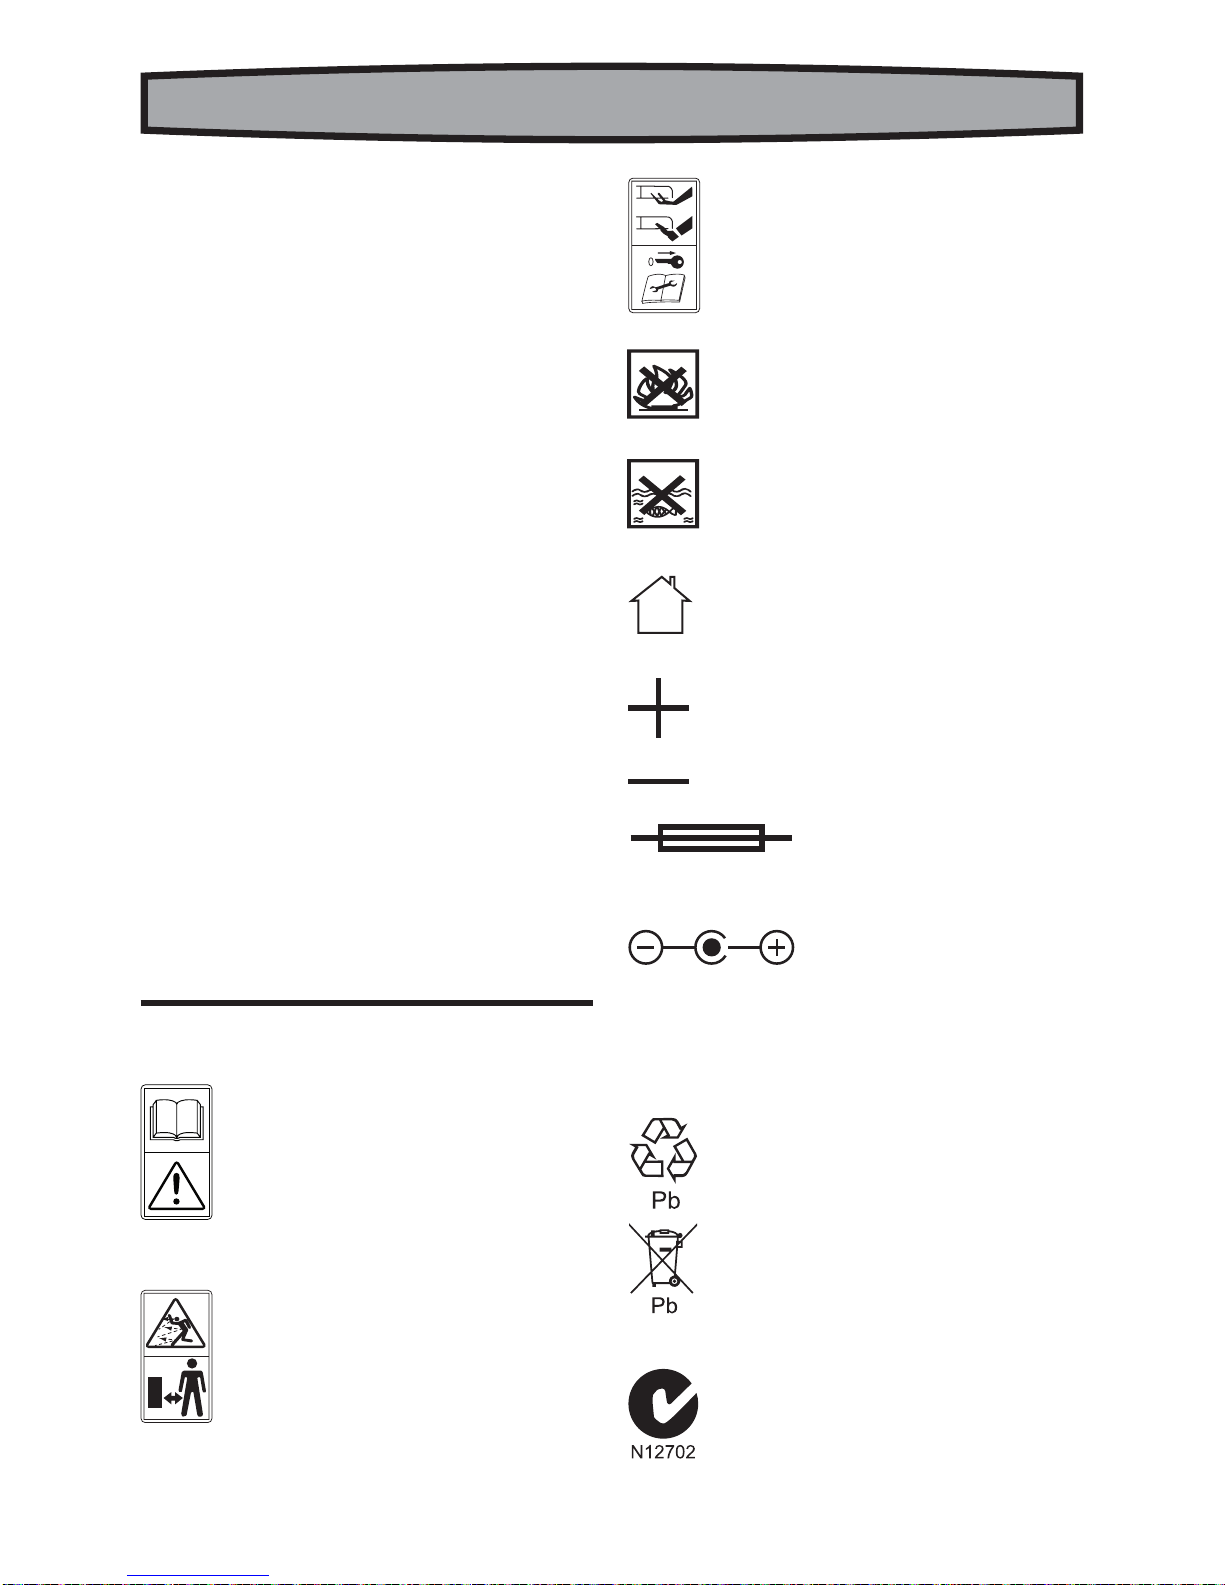
1. Before charging, read the instructions.
2. For charge Lead acid battery pack only.
3. If the supply cord is damaged, it must be replaced
by the manufacturer, its service agent or similarly
TXDOLÀHGSHUVRQVLQRUGHUWRDYRLGDKD]DUG
4. The battery terminal not connected to the chassis
KDVWREHFRQQHFWHGÀUVW7KHRWKHUFRQQHFWLRQLV
to be made to the chassis, remote from the battery
and fuel line. The battery charger is then to be
connected to the supply mains.
5. After charging, disconnect the battery charger
from the supply mains. Then remove the chassis
connection and then the battery connection.
6. Do not charge a leaking battery.
7. Do not use chargers for works other than those for
which they are designed.
8. Before charging, ensure your charger is matching
the local AC supply.
9. The charging device must be protected from
moisture.
10. Do not use the charging device in the open.
11. Do not short out the contacts of battery or
charger.
5HVSHFWWKHSRODULW\´´ZKHQFKDUJLQJ
13. Do not open the unit and keep out of the reach of
children.
14. Do not charge the batteries of other manufactures
or ill-suited models.
15. Ensure that the connection between the battery
charger and battery is correctly positioned and is
not obstructed by foreign bodies.
16. Keep battery charger’s slots are free of foreign
objects and protect against dirt and humidity.
Store in a dry and frost-free place.
17. When charging batteries, ensure that the battery
charger is in a well-ventilated area and away from
LQÁDPPDEOHPDWHULDOV%DWWHULHVFDQJHWKRW
during charging. Do not overcharge any batteries.
Ensure that batteries and chargers are not left
unsupervised during charging.
18. Do not recharge non-rechargeable batteries, as
they can overheat and break.
19. Longer life and better performance can be
obtained if the battery pack is charged when the
air temperature is between 18OC and 24OC. Do not
charge the battery pack in air temperatures below
4.5OC, or above 40.5OC. This is important as it can
prevent serious damage to the battery pack.
20. Charge only battery pack of the same model
provided by manufacturer and of models
recommended by manufacturer.
SafetyWarningsforbatterypack
a) Donotdismantle,openorshredcellsorbattery
pack.
b) Donotshort-circuitabatterypack.Donotstore
batterypackshaphazardlyinaboxordrawer
wheretheymayshort-circuiteachotherorbe
short-circuitedbyconductivematerials.When
battery pack is not in use, keep it away from other
metal objects, like paper clips, coins, keys, nails,
screws or other small metal objects, that can
make a connection from one terminal to another.
Shorting the battery terminals together may cause
EXUQVRUDÀUH
F 'RQRWH[SRVHEDWWHU\SDFNWRKHDWRUÀUH$YRLG
storageindirectsunlight.
d) Donotsubjectbatterypacktomechanical
shock.
e) Intheeventofbatteryleaking,donotallowthe
liquidtocomeintocontactwiththeskinoreyes.
Ifcontacthasbeenmade,washtheaffected
areawithcopiousamountsofwaterandseek
medicaladvice.
f) Seekmedicaladviceimmediatelyifacellor
batterypackhasbeenswallowed.
g) Keepbatterypackcleananddry.
h) Wipethebatterypackterminalswithaclean
dryclothiftheybecomedirty.
i) Batterypackneedstobechargedbeforeuse.
Alwaysrefertothisinstructionandusethe
correctchargingprocedure.
j) Donotmaintainbatterypackonchargewhen
notinuse.
k) Afterextendedperiodsofstorage,itmay
benecessarytochargeanddischargethe
batterypackseveraltimestoobtainmaximum
performance.
l) Batterypackgivesitsbestperformancewhen
itisoperatedatnormalroomtemperature
(20°C±5°C).
m) Whendisposingofbatterypacks,keepbattery
packsofdifferentelectrochemicalsystems
separatefromeachother.
Q 5HFKDUJHRQO\ZLWKWKHFKDUJHUVSHFLÀHGE\
manufacturer.Donotuseanychargerother

CORDLESSLAWNMOWER EN
10
WKDQWKDWVSHFLÀFDOO\SURYLGHGIRUXVHZLWKWKH
equipment.A charger that is suitable for one type
RIEDWWHU\SDFNPD\FUHDWHDULVNRIÀUHZKHQXVHG
with another battery pack.
o) Donotuseanybatterypackwhichisnot
designedforusewiththeequipment.
p) Keepbatterypackoutofthereachofchildren.
q) Retaintheoriginalproductliteratureforfuture
reference.
r) Removethebatteryfromtheequipmentwhen
notinuse.
s) Disposeofproperly.
Additionalsafetyrulesforleadacidbattery:
1. Working in the vicinity of a lead-acid battery is
dangerous. Battery pack generates explosive
gases during normal battery operation. For this
reason it is of the utmost importance that each
time before using your charger, you read and
follow the instructions provided exactly.
1HYHUVPRNHRUDOORZDQRSHQVSDUNRUÁDPHLQ
the vicinity of the battery.
3. Use charger for charging a lead-acid battery pack
only.
4. Never place the charger directly above or below
WKHEDWWHU\SDFNEHLQJFKDUJHGJDVHVRUÁXLGV
from the battery pack will corrode and damage the
charger. Locate thechargeras faraway from the
battery pack as DC cables permit.
5. Do not operate charger in a closed-in area or
restrict ventilation in any way.
SYMBOLS
Beware of sharp blades. Blades
continue to rotate after the motor
is switched off- Remove disabling
device before maintenance.
Do not burn
Batteries may enter water cycle if
disposed improperly, which can
be hazardous for ecosystem. Do
not dispose of waste batteries as
unsorted municipal waste.
For indoor use only
Positive terminal
Negative terminal
FuseT 2 A long time lag fuse with
rated current of 2 A
The output plug is with positive
center pole and negative outer pole
Lead-acid batteryThis product
has been marked with a symbol
relating to ‘separate collection’ for
all battery packs and battery pack. It
will then be recycled or dismantled
in order to reduce the impact on the
environment. Battery packs can be
hazardous for the environment and
for human health since they contain
hazardous substances.
C-Tick approval mark
Read instruction handbook before
operation this machine.
Warning
Keep bystanders away.

CORDLESSLAWNMOWER EN
11
TECHNICALDATA
INTENDEDUSE
This product is intended for domestic lawn mowing.
CHARGERSAFETYRULES
1. Plug charger directly into an electrical outlet.
DO NOT ABUSE THE CORD. Never carry charger
by cord. Do not disconnect the charger from the
outlet or mower by pulling it by the cord.
2. CAUTION:7RUHGXFHWKHULVNRIÀUHHOHFWULFDO
shock, or personal injury do not attempt to
use this charger with any other product.
Likewise, do not attempt to charge the battery
with any other charger.
3. Do not service mower with charger or safety key
installed.
4.
Do not operate a damaged charger. Replace
damaged cordsor charger immediatelyat an
authorized servicecenter.
5. Always charge the mower in a dry area protected
from the weather. Do not expose the mower or
charger to rain. Do not charge in wet locations.
Do not charge mower when temperature is above
104°F (40°C) or below 41°F (5°C).
6. Keep the mower and charger away from water,
heat sources, (Such as radiators, heaters,
VWRYHVHWFÁDPHVRUFKHPLFDOV%HFDUHIXOQRW
to damage the charger cord, by keeping cord away
from sharp edges.
CHARGINGPROCEDURE
1. Charging can be carried out only with the battery
REMOVED from the machine (See Fig. A).
2. Plug the charger connector into the receptacle on
the battery. (See Fig. A)
3. Insert the plugof the charger into the wall
receptacle.
4. Press the button on the charger, the red light
should come on indicating that you have power
and the battery is being charged.
NOTE:If you forget to press the button, the red
light will come on after around 30s and the
charger will start charging automatically.
5. The red light should extinguish and the green
light will come on when charging is complete
(approximately 5-7 hours to charge a fully
discharged battery).
6. After fully charged, the green light will extinguish
after 5 seconds automatically to shut off consume
power from power resource. When the battery
self-discharge to a limit, the charger will restart
charging. the battery again if the cord plug is
connected.
NOTE:If the battery is defective, the red light will
ÁDVKLQJ7KHUHGOLJKWVZLOORQO\IXQFWLRQZKHQWKH
charger is connected to both the battery and wall
receptacle.
7. The charger is a smart charger and can stay
connects to the battery and wall receptacle
for extant periods of time without fear of
damaging the battery or charger. The charger will
automatically turn on to ensure the battery is fully
charged.
BATTERYCARE
The battery in your cordless lawnmower is a 24-volt
sealed lead acid system. The mower can be stored in
any position without fear of leakage.
)RURSWLPDOEDWWHU\OLIHDQGSHUIRUPDQFHWKH
battery should be fully charged every 2 months
during storage
)RURSWLPDOEDWWHU\OLIHDQGSHUIRUPDQFHWKH
battery should be fully charged after each use
6WRUHWKHEDWWHU\LQDFRROGU\ORFDWLRQ
7KHEDWWHU\FDQEHVDIHO\VWRUHGGRZQWR)
(-10°C).
7KHEDWWHU\GRHVQRWQHHGWREHIXOO\GLVFKDUJHG
before recharging.
,QLWLDOO\WRFKDUJLQJF\FOHVPD\EHUHTXLUHG
after purchase to achieve maximum run time
capacity.
Batterycapacity:
Cuttingdiameter:
Cuttingheight:
Cuttingheightpositions
Grasscollectioncapacity:
No-loadspeed:
Batterytype:
Batterymodel:
Chargingtime:
Chargermodel:
Chargerrating:
Protectionclass:
IPnumber:
Machineweight:
24V $K
33cm
PP
3 positions
30L
PLQ
Lead acid
WA3216
5-7hrs
WA3720
,QSXW$&9+]:
Output:29.5V , 1.0A
,,
IPX1
14kg

CORDLESSLAWNMOWER EN
12
ADDITIONAL BATTERIES can be obtained from the
Customer Helpline.
ASSEMBLY
IMPORTANT!Before you assemble the lawn
mower, check the accessories according above
information, make sure the accessories are ompleted.
1.FITTINGTHEHANDLE(seeFig.B1,B2,B3)
1) Remove the screws(x 2) on the both side of deck.
(See Fig.B1)
2) Insert the lower handle (8) into the holes on the
deck provided.
3) Secure with the screws provided.(See Fig. B1)
4) Attachthe upperhandle (1) withthe boltsand
Handle knobs (7) to the lower handle (8). (See Fig.
B2)
5) Screw on the two Handle knobs. Check that the
handle is FULLY secured.
NOTE:Ensure the bolts are fully inserted through the
KDQGOHVEHIRUHÀWWLQJWKHKDQGOHNQREV
6) Attach the cable clips (3) provided, to the upper
and lower handle. Insert the cable into the clips
ensuring there is enough cable slack.(See Fig. B3)
2.GRASSCOLLECTIONBAGASSEMBLY
Connect the grass box handle to the box top as shown
in Fig C1-C4.
6WHS3UHVVWKHIURQWRIWKHKDQGOHEULHÁ\6HH)LJ&
Step 2) Then push it forward. (See Fig. C2)
Step 3) Push down the back of the handle. (See Fig. C2)
Step 4) Clip the plastic clips over the metal frame. (See
Fig. C3)
WARNING:'RQ·WÀWWKHKDQGOHLQUHYHUVHG
direction.FitthehandleasshowninFigC1.
3.GRASSBAGFITTING(SeeFigD1,D2,D3)
1. Turn the mower off, wait until blade stops and
remove safety key (6).
5DLVHWKHVDIHW\ÁDSDQGKROGLWXS
3. Pick up the grass bag by the handle, and position
grass bag on the lower hooks (a) on the mower
deck. (See Fig. D2)
4. Release the safety guard to lock the grass bag
into position. Ensure the grass bag is installed
securely. (See Fig. D3)
NOTE:Depress the grass bag slightly to ensure that it
is completely installed.
4.REMOVING/EMPTYING
+ROGWKHJUDVVEDJOLIWWKHVDIHW\ÁDSDQGKROGXS
Remove grass collection bag (5).
WARNING:$OZD\VFKHFNWKHVDIHW\ÁDSFDQ
close the discharge outlet tightly before using.
1HYHUOLIWWKHVDIHW\ÁDSZKHQWKHODZQPRZHULV
EHLQJXVHGZLWKRXWÀWWHGJUDVVEDJ
5.FITTING/REMOVINGBATTERY(SeeFig.E1,E2)
REMOVINGBATTERY
Pull out the battery with the battery handle directly.
(See Fig. E1)
NOTE:Be careful not to drop the battery onto your foot
or on the ground when removing it.
FITTINGBATTERY
Put the battery into the battery container; make sure
WKHEDWWHU\LVÀWWHGFRUUHFWO\6HH)LJ(
OPERATION
1.STARTINGANDSTOPPING(SeeFig.F1,F2)
WARNING:The blade continues to rotate for a
few seconds after the machine is switched off.
$OORZWKHPRWRUEODGHWRVWRSURWDWLQJEHIRUH
switching “on” again. Do not rapidly switch off and on.
STARTING
1. Insert safety key into the housing of the switch box.
2. Slide the key to the right and hold in position.
3. Pull the lever bar towards the handle and the
mower will start.
4. Release the safety key.
STOPPING
Release the switch lever.
2.GRASSBAGFILLINGINDICATOR(SeeFig.G)
To remind you immediately to empty when the grass
bag is full, the mower provides an indicator on the
top of bag to show the collection status. And you can
follow as below:
(PSW\VWDWXVÁDSÁRDWD
)XOO\VWDWXVÁDSIDOOGRZQE
3.REARDISCHARGE(SeeH)
The mower provides a rear discharge function, so that
you can mower without bag collection. The debris will
be discharged from the rear chute.

CORDLESSLAWNMOWER EN
13
4.BATTERYSTATUSLED’S(SeeFig.I)
NOTE:TheStatusLED’swillindicatethebattery
conditionwhenthebuttononthebatteryis
pressed.
The LED’s constantly senses and displays the battery
condition as follows:
Press the button “POWERTEST”, the light button is
illuminated.
When the three green lights are illuminated, the
battery is in a highly charged condition.
When two lights ( ) are illuminated, the battery is
in a moderately charged condition.
When only one green light ( ) is illuminated, the
battery charge is depleted.
%HIRUHXVLQJ\RXUQHZPRZHUIRUWKHÀUVWWLPHLWLV
recommended that the unit be charged overnight to
ensure that the battery is fully charged.
IMPORTANT:Whenonlyonelightisilluminated,
yourbatteryisoverlydischarged,eventhough
themowermaystillbecapableofcuttinggrass.
Continuingtooperateyourlawnmowerwiththe
batteryinthisdischargedconditionmayreduce
thelifeandperformanceofyourbattery.
6.ADJUSTINGTHECUTTINGHEIGHT(SeeFig.J)
WARNING:Before adjusting the mower height,
wait for the mower to completely stop. Mower
blades continue to rotate after the machine is
switched off and a rotating blade can cause injury.
Wait until all machine components have completely
stopped before touching them and remove safety key
(6).
The lawnmower can be set to 3 cutting heights with
PP
Turn the mower onto its side. Grip one wheel and pull
bar out of the groove and reposition it to the required
KHLJKW)RUÀUVWXVHVHWWKHFXWWLQJKHLJKWDWPP
ALL other wheels should be positioned at the same
height.
7.MOWINGTIPS
NOTE:Alwaysinspectareawheremoweristobe
usedandremoveallstones,sticks,wire,metaland
otherdebriswhichmightbethrownbytherotating
blade.
1. Mow across the face of slopes, never up-and-
down. Exercise extreme caution when changing
direction on slopes. Do not mow excessively steep
slopes. Always maintain good footing.
2. Release switch lever to turn mower “OFF” when
crossing any graveled area (stones can be thrown
by the blade).
3. Set mower at highest cutting height when mowing
in rough ground or in tall weeds. Removing too
much grass at one time can cause circuit breaker
to trip, which stops mower.
4. If a grass bag is used during the fast growing
season, the grass may tend to clog up at the
discharge opening. Release switch lever to turn
mower “OFF” and remove the safety key. Remove
the grass bag and shake the grass down to the
back end of the bag. Also clean out any grass or
debris which may be packed around the discharge
opening. Replace the grass bag.
5. If mower should start to vibrate abnormally,
release switch lever to turn mower “OFF” and
remove safety key. Check immediately for cause.
Vibration is a warning of trouble. Do not operate
mower until a service check has been made.
6. ALWAYSRELEASESWITCHLEVERTOTURNMOWER
“OFF”ANDREMOVESAFETYKEYWHENLEAVINGIT
UNATTENDEDEVENFORASHORTPERIODOFTIME.
MAINTENANCE
WARNING: Stop the mower and remove the
safety key before removing the grass bag.
NOTE:To ensure long and reliable service, perform the
following maintenance procedures regularly. Check
for obvious defects such as a loose, dislodged or a
GDPDJHGEODGHORRVHÀWWLQJVDQGZRUQRUGDPDJHG
components. Check that the covers and guards are
all undamaged and are correctly attached to mower.
Carry out any necessary maintenance or repairs
before operating mower. If the mower should happen
to fail despite regular maintenance, please call our
customer helpline for advice.
BLADESHARPENING
KEEP BLADE SHARP FOR BEST MOWER
PERFORMANCE. A DULL BLADE DOES NOT CUT
GRASS CLEANLY.
WEAR PROPER EYE PROTECTION WHILE
REMOVING, SHARPENING, AND INSTALLING BLADE.
ENSURE THAT SAFETY KEY IS REMOVED.
Sharpening the blade twice during a mowing season
LVXVXDOO\VXIÀFLHQWXQGHUQRUPDOFLUFXPVWDQFHV
Sand causes the blade to dull quickly. If your lawn has
sandy soil, more frequent sharpening may be required.
REPLACE BENT OR DAMAGED BLADE IMMEDIATELY.

CORDLESSLAWNMOWER EN
14
WHENSHARPENINGTHEBLADE:
1. Make sure blade remains balanced.
2. Sharpen blade at the original cutting angle.
3. Sharpen cutting edges on both ends of blade,
removing equal amounts of material from both
ends.
TOSHARPENBLADEINAVISE(SeeFig.K)
1. Be sure the switch lever is released, the blade
has stopped and the safety key removed before
removing the blade.
2. Remove blade from mower. See instructions
for removing and attaching blade (BLADE
MAINTENANCE).
3. Secure blade K-1 in a vise K-2.
4. Wear safety glasses and be careful not to cut
yourself.
&DUHIXOO\ÀOHWKHFXWWLQJHGJHVRIWKHEODGHZLWKD
ÀQHWRRWKÀOH.RUVKDUSHQLQJVWRQH
6. Check balance of blade. See instructions for blade
balancing.
7. Replace blade on mower and tighten securely.
Refer to instructions below.
BLADEBALANCING(SeeFig.L)
Check balance of blade by placing center hole in blade
L-1 over a nail or screwdriver shank L-2, clamped
horizontally in a vise L-3. If either
HQGRIWKHEODGHURWDWHVGRZQZDUGÀOHWKDWHQG%ODGH
is properly balanced when neither end drops.
BLADEMAINTENANCE(SeeFig.M1,M2)
Renew your metal blade after 50 hours mowing
or 2 years, which ever is the sooner-regardless of
condition.
Follow these procedures to remove and replace the
blade. You will need garden gloves (not provided) and
a spanner wrench (not provided) to remove the blade.
Hold the blade (14) and unscrew the blade bolt (13)
counter-clockwise using a spanner wrench, and then
remove blade.
To re-assemble, double check blade washer and blade
À[HGFRUUHFWO\VHH)LJ07KHQSRVLWLRQWKHEODGH
(14) with the cutting edges towards the ground. Then
securely tighten the blade bolt (13).
IMPORTANTBATTERYINSTRUCTIONS
READUSERSMANUALPRIORTOUSE
1. Fully charge battery after each use.
2. Make sure the battery is fully charged before
storage.
3. Charge the battery every two months during
storage.
4. At all times, keep the battery in the upright
positions.
STORAGE:(SeeFig.N)
Stop the mower and always remove the safety key.
Clean the exterior of the machine thoroughly using
a soft brush and cloth. Do not use water, solvents
or polishes. Remove all grass and debris, especially
from the ventilation slots.
Turn the machine on its side and clean the blade area.
If grass cuttings are compacted in the blade area,
remove with a wooden or plastic implement.
Store the machine in a dry place. Do not place other
objects on top of the machine.
To aid storage, release the handle cam lever, and
rotate or fold the upper handle.
Stapleyourpurchase
receipthere
Beforereturningthisproductfor
warrantyoranyotherreason,pleasecall.
POSITECAUSTRALIAPTYLIMITED
ABN14101682357
Unit15,23NarabangWayBelrose2085NSWAustralia
FREECALL1300889028
(0$,/RIÀFHVDOHV#SRVLWHFFRPDX

CORDLESSLAWNMOWER EN
15
TROUBLESHOOTING
Problem Solution
1. Mower doesn’t run
when switch lever is
activated.
A. Check to make sure safety key has been installed and is fully seated and that
button on switch housing is being completely pushed.
B. Release switch lever to turn mower off. Remove safety key, turn mower over and
check that blade is free to turn. If not free, return to an authorized servicer. Blade
should turn freely.
C. Has battery been fully charged? Plug in charger and wait for green light to come on.
2. Motor stops while
mowing.
A. Release switch lever to turn mower off. Remove safety key, turn mower over and
check that blade is free to turn. If not free, return to an authorized servicer. Blade
should turn freely.
B. Raise cutting height of wheels to highest position and start mower.
C. Has battery been fully charged? Plug in charger and wait for green light to come on.
D. Avoid overloading the mower. Slow down the cutting pace by pushing mower
slower or raise the cut height. Or both.
3. Mower runs but
cutting performance
is unsatisfactory, or
does not cut entire
lawn.
A.
Has battery been fully charged? Plug in charger and wait for green light to come on.”
B. Release switch lever to turn mower off. Remove safety key. Turn mower over and
check: Blade for sharpness - Keep blade sharp. Deck and discharge chute for
clogging.
C.
Wheel height adjustment may be set too low for grass condition. Raise cutting height.
4. Mower is too hard
to push. A. Raise cutting height to reduce deck drag on grass. Check each wheel for free
rotation.
5. Mower is
abnormally noisy and
vibrates.
A. Release switch lever to turn mower off. Remove safety key. Turn mower on side
and check blade to ensure it has not been bent or damaged. If blade is damaged,
replace with a replacement blade. If the underside of the deck is damaged return
mower to anAuthorized service center.
B. If there is no visible damage to the blade and the mower still vibrates: Release
switch lever to turn mower off, remove safety key and remove blade. Rotate
blade 180 degrees and retighten. If mower still vibrates, return the mower to an
authorized service center.
6. Battery charger
LED’s not on. A. Check plug connection.
B. Replace charger.
7. Battery charger LED
does not flip to green. A. Battery needs to be diagnosed. Take to authorized service center.
8. Mower not picking
up clippings with the
Grass Collection Bag.
A. Remove mulch plate when bagging.
B. Chute clogged. Release switch lever to turn mower off. Remove safety key. Clear
chute of grass clippings.
C. Too much cut grass. Raise cutting height of wheels to shorten length of the cut.
D. Bag full. Empty bag more often.
9. When mulching
there are clippings
visible.
A. Too much cut grass. Raise cutting height of wheels to shorten length of the cut.
'RQRWFXWRIIPRUHWKDQRIWRWDOOHQJWK
B. Check blade for sharpness. Always keep blade sharp.
10. Low or diminished
run-time after many uses
A. Return to Authorized Service location - may need new battery

MADEINPRC
Copyright © 2013, Positec. All Rights Reserved.
Table of contents
Other Rockwell Lawn Mower manuals