Roma RP36DF-1-SS User manual

Model: RP36DF-1-SS Manual
Use,Care & Installation

CONTENTS
3 - Warnings
8 - Dimensions
9 - Clearance Dimensions 36’’
10 ‑ Specications Technical data
11 - Electrical & Gas Requirements
12 - Gas Requirements
13 - General Information
16 - Leg Installation/Adjustments/Alignment
17 - Anti-tip Device Installation
18 - Connecting Gas & Electric
18 - Before Using
19 ‑ Description of the controls
22 - Oven Features
25 - Baking
26 - Cleaning and Maintenance
27 ‑ Replacing Oven Light
28 - Installation/Door removal
29 - Service Information
30 ‑ Troubleshooting
31 - Electric diagram
WARNING:
If the information in this manual is not followed exactly, a re or
explosion may result causing property damage, personal injury
or death.
•Do not store or use gasoline or other ammable vapors and liquids in
the vicinity of this or any other appliance.
• WHAT TO DO IF YOU SMELL GAS:
– Do not try to light any appliance.
– Do not touch any electrical switch;
– Do not use any phone in your building.
– Immediately call your gas supplier from a neighbor’s phone. Follow
the gas supplier’s instructions.
– If you cannot reach your gas supplier, call the re department.
• Installation and service must be performed by a qualied installer,
service agency or the gas supplier.

3
Warnings
Getting Started Warning and
Important Safety Instructions
appearing in this manual are
not meant to cover all possible
conditions and situations that may
occur. Common sense, caution,
and care must be exercised when
installing, maintaining or operating
the appliance.
ALWAYS contact the manufacturer
about problems or conditions you do not
understand.
Recognize Safety Symbols, Words,
Labels
DANGER
Hazards or unsafe practices which
WILL result in severe personal
injury or death
WARNING
Hazards or unsafe practices which
COULD result in death or severe
personal injury
CAUTION
Hazards or unsafe practices which
COULD result in minor personal
injury.
All safety messages will identify the
hazard, tell you how to reduce the chance
of injury, and tell you what can happen if
the instructions are not followed.
Read and follow all instructions
before using this appliance to
prevent the potential risk of re, electric
shock, personal injury or damage to the
appliance as a result of improper usage
of the appliance. Use appliance only for
its intended purpose as described in this
manual.
To ensure proper and safe operation:
Appliance must be properly installed and
grounded by a qualied technician. DO
NOT attempt to adjust, repair, service,
or replace any part of your appliance
unless it is specically recommended in
this manual. All other servicing should
be referred to a qualied servicer. Have
the installer show you the location of the
gas shuto valve and how to shut it o
in an emergency.
A certied technician is required for any
adjustments or conversions to Natural or
LP gas.
KEEP THESE INSTRUCTIONS FOR
FUTURE REFERENCE
DANGER
If the information in this manual
is not followed exactly, a re or
explosion may result causing
property damage, personal injury or
death.
WHAT TO DO IF YOU SMELL GAS:
• DO NOT try to light any appliance.
• DO NOT touch any electrical switch.
• DO NOT use any phone in your
building.
• Immediately call your gas supplier
from a neighbor’s phone. Follow the
gas supplier’s instructions.
• If you cannot reach your gas supplier,
call the re department.
Installation and service must be
performed by a qualied installer,
service agency or the gas supplier.
WARNING
TIPPING HAZARD
To reduce the risk of the
appliance tipping, it must be
secured by a properly installed
anti-tip bracket(s).To make
sure the bracket has been installed
properly, look behind the range with a
ashlight to verify proper installation
engaged in the rear top left corner of the
range.
• THIS RANGE CAN TIP
• INJURIES TO PERSONS CAN
RESULT
• INSTALL ANTI-TIP DEVICE
PACKED WITH RANGE
• SEE INSTALLATION
INSTRUCTIONS
DANGER
DO NOT use commercial oven cleaners
inside the oven. Use of these cleaners
can produce hazardous fumes or can
damage the porcelain nishes.

4
Warnings
DANGER
To avoid risk of property damage,
personal injury or death; follow
information in this manual exactly
to prevent a re or explosion.
DO NOT store or use gasoline or other
ammable vapors and liquids in the
vicinity of this or any appliance.
To Prevent Fire or Smoke Damage
• Be sure all packing materials are
removed from the appliance before
operating it.
• Keep area around appliance clear
and free from combustible materials,
gasoline, and other ammable vapors
and materials.
• If the appliance is installed near a
window, proper precautions should be
taken to prevent curtains from blowing
over burners.
NEVER leave any items on the top.
The hot air from the vent may ignite
ammable items and may increase
pressure in closed containers which
may cause them to burst.
• Many aerosol-type spray cans are
EXPLOSIVE when exposed to heat and
may be highly ammable. Avoid their
use or storage near an appliance.
• Many plastics are vulnerable to heat.
Keep plastics away from parts of the
appliance that may become warm or
hot. DO NOT leave plastic items on the
rangetop as they may melt or soften
if left too close to the vent or alighted
surface burner.
• Combustible items (paper, plastic, etc.)
may ignite and metallic items may
become hot and cause burns. DO NOT
pour spirits over hot foods.
DO NOT leave oven unsupervised when
drying herbs, breads, mushrooms, etc;
re hazard.
In Case of Fire
Turn o appliance and ventilating hood
to avoid spreading the ame. Extinguish
ame then turn on hood to remove smoke
and odor.
• Worktop: Smother re or ame in a
pan with a lid or cookie sheet.
• NEVER pick up or move a aming pan.
• Oven: Smother re or ame by closing
the oven door. DO NOT use water on
grease res. Use baking soda, a dry
chemical or foam-type extinguisher to
smother re or ame.
• Grease is ammable and should be
handled carefully. DO NOT use water
on grease res. Flaming grease can
be extinguished with baking soda or, if
available, a multipurpose dry chemical
or foam type extinguisher. Let fat cool
before attempting to handle it. DO
NOT allow grease to collect around the
oven or in vents. Wipe up spillovers
immediately.
Child Safety
• NEVER leave children alone or
unsupervised near the appliance when
it is in use or is still hot.
• NEVER allow children to sit or stand on
any part of the appliance as they could
be injured or burned.
• DO NOT store items of interest to
children over the unit. Children climbing
to reach items could be seriously
injured.
• Children must be taught that the
appliance and utensils in it can be hot.
Let hot utensils cool in a safe place,
out of reach of small children. Children
should be taught that an appliance
is not a toy. Children should not be
allowed to play with controls or other
parts of the appliance.
Cooking Safety
• To eliminate the hazard of reaching over
hot surface burners, cabinet storage
should not be provided directly above
a unit. If storage is provided,it should
be limited to items which are used in
frequently and which are safely stored
in an area subjected to heat from an
appliance. Temperatures may be unsafe
for some items, such as volatile liquids,
cleaners or aerosol sprays.
• ALWAYS place a pan on a surface
burner before turning it on. Be sure you
know which knob controls which surface
burner. Make sure the correct burner
is turned on and that the burner has
ignited. When cooking is completed,
turn burner o before removing pan to
prevent exposure to burner ame.
• ALWAYS adjust surface burner ame
so that it does not extend beyond the
bottom edge of the pan. An excessive
ame is hazardous, wastes energy and
may damage the appliance, pan or
cabinets above the appliance. This is
based on safety considerations.

5
Warnings
• NEVER leave a surface cooking
operation unattended especially when
using high heat setting or when deep
fat frying. Boilovers cause smoking and
greasy spillovers may ignite. Clean up
greasy spills as soon as possible.
•DO NOT use high heat for extended
cooking operations.
• DO NOT heat unopened food
containers, build up of pressure may
cause the container to explode and
result in injury.
• Use dry, sturdy pot-holders. Damp pot-
holders may cause burns from steam.
Dishtowels or other substitutes should
NEVER be used as potholders because
they can trail across hot surface burners
and ignite or get caught on appliance
parts.
• ALWAYS let quantities of hot fat
used for deep fat frying cool before
attempting to move or handle.
• DO NOT let cooking grease or other
ammable materials accumulate in
or near the appliance, hood or vent
fan. Clean hood frequently to prevent
grease from accumulating on hood or
lter. When aming foods under the
hood, turn the fan o.
• NEVER wear garments made of
ammable material or loose tting or
long-sleeved apparel while cooking.
Clothing may ignite or catch utensil
handles. DO NOT drape towels or
materials on oven door handles.These
items could ignite and cause burns.
• ALWAY Splace oven racks in the
desired positions while oven is cool.
Slide oven rack out to add or remove
food, using dry, sturdy pot-holders.
ALWAYS avoid reaching into the oven to
add or remove food. If a rack must be
moved while hot, use a dry pot-holder.
• ALWAYS turn the oven o at the end of
cooking.
• Use care when opening the oven door.
Let hot air or steam escape before
moving or replacing food.
• NEVER use aluminum foil to cover
oven racks or oven bottom. This could
result in risk of electric shock, re, or
damage to the appliance. Use foil only
as directed in this guide.
• PREPARED FOOD WARNING: Follow
food manufacturer’s instructions.
If a plastic frozen food container and/or
its cover distorts, warps, or is other wise
damaged during cooking, immediately
discard the food and its container. The
food could be contaminated.
• If you are “aming” liquor or other
spirits under an exhaust, TURN THE
FAN OFF. The draft could cause the
ames to spread out of control.
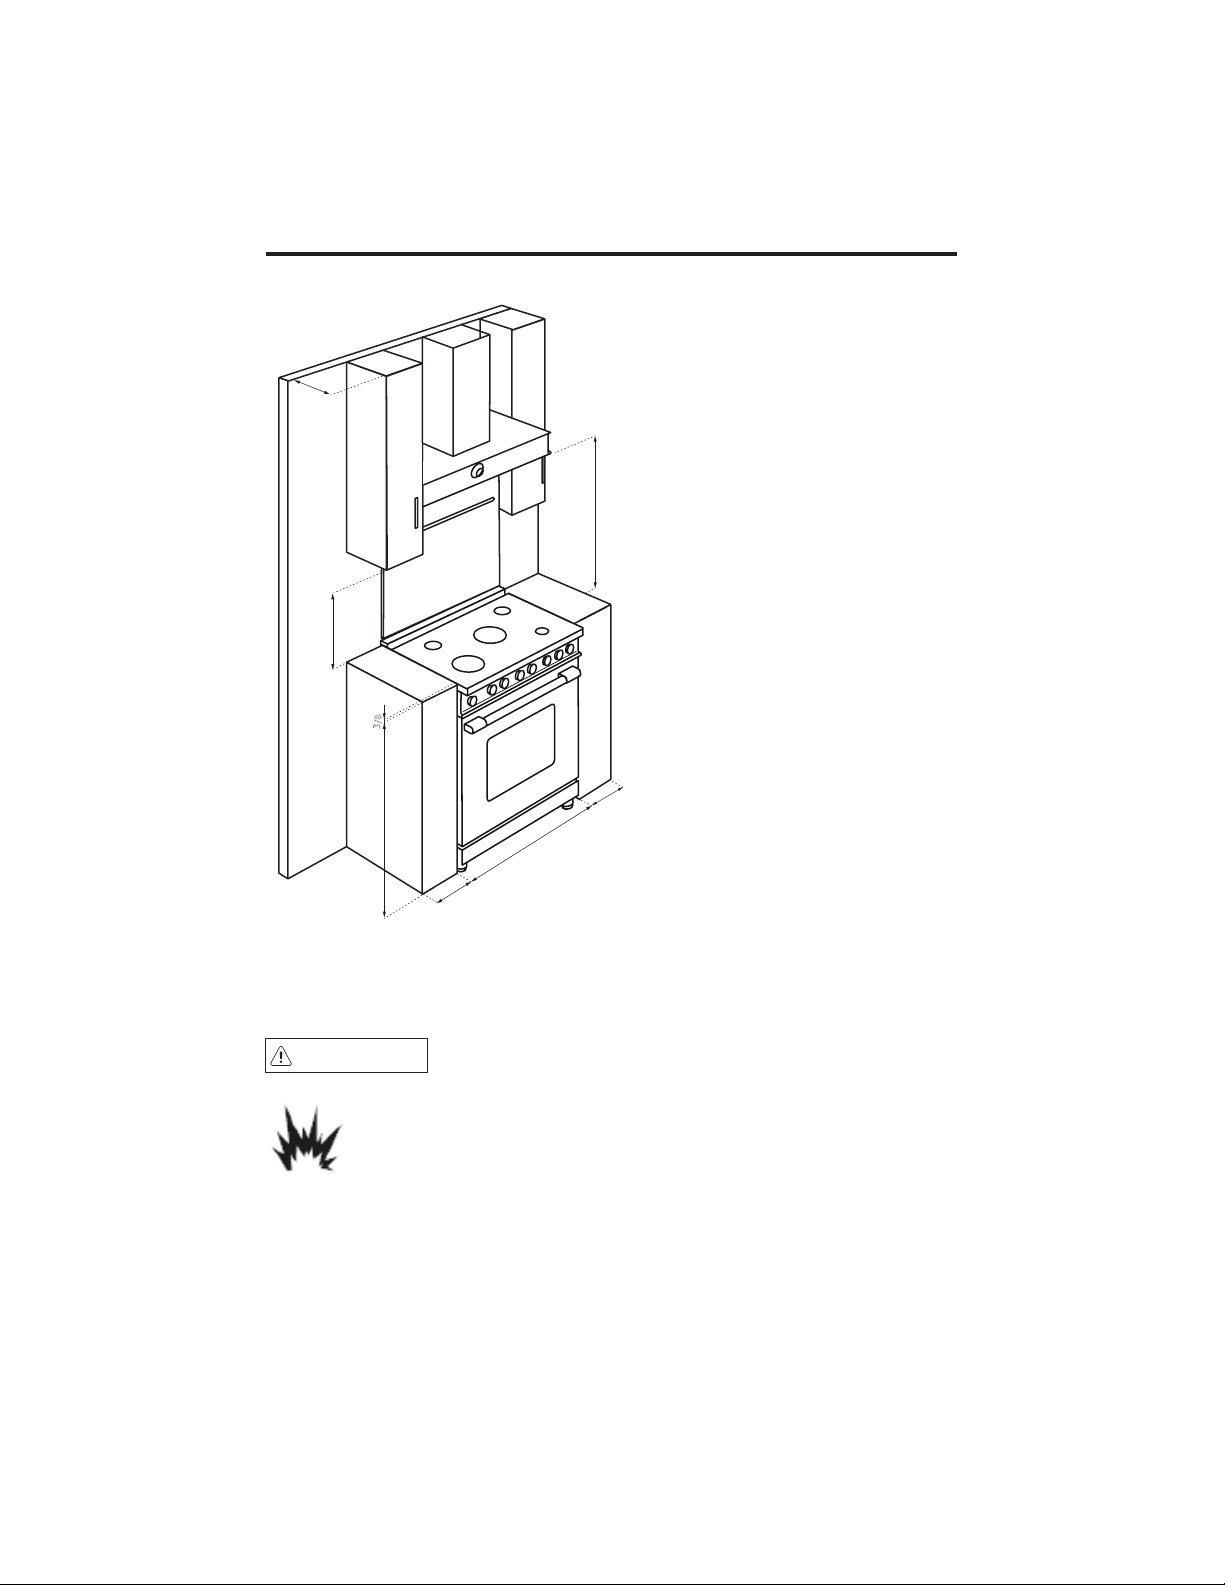
• Once the unit has been installed as
outlined in the Installation Instructions,
it is important that the fresh air
supply is not obstructed.The use of a
gas cooking appliance results in the
production of heat and moisture in the
room in which it is installed. Ensure
that the kitchen is well-ventilated.
Keep natural venting holes open or
install a mechanical ventilation device.
Prolonged or intensive use of the
appliance may call for additional (such
as opening a window) or more eective
ventilation (such as increasing the level
of a mechanical ventilation if present).
Utensil Safety
• Use pans with at bottoms and handles
that are easily grasped and stay cool.
Avoid using unstable, warped, easily
tipped or loose-handled pans. Also
avoid using pans, especially small pans,
with heavy handles as they could be
unstable and easily tip. Pans that are
heavy to move when lled with food
may also be hazardous.
• Be sure utensil is large enough to
properly contain food and avoid
boilovers. Pan size is particularly
important in deep fat frying. Be sure
pan will accommodate the volume of
food that is to be added as well as the
bubble action of fat.
• To minimize burns, ignition of
ammable materials and spillage due to
unintentional contact with the utensil,
DO NOT extend handles over adjacent
surface burners. ALWAY Sturn pan
handles toward the side or back of the
appliance, not out into the room where
they are easily hit or reached by small
children.
• NEVER let a pan boil dry as this could
damage the utensil and the appliance.
• Follow the manufacturer’s directions
when using oven cooking bags.
• Only certain types of glass, glass/
ceramic, ceramic or glazed utensils are
suitable for rangetop surface or oven
usage without breaking due to the
sudden change in temperature. Follow
manufacturer’s instructions when using

6
Warnings
glass.
• This appliance has been tested for
safe performance using conventional
cookware. DO NOT use any devices
or accessories that are not specically
recommended in this guide. DO NOT
use eyelid covers for the surface
units, stovetop grills, or add-on oven
convection systems. The use of devices
or accessories that are not expressly
recommended in this manual can
create serious safety hazards, result in
performance problems, and reduce the
life of the components of the appliance.
• The ame of the burner should be
adjusted to just cover the bottom
of the pan or pot. Excessive burner
setting may cause scorching of adjacent
counter-top surfaces, as well as the
outside of the utensil. This is based on
safety considerations.
Heating Elements
• NEVER touch oven bake and broil
burner areas or interior surfaces of
oven.
• Bake and broil burners may be hot even
though they are dark in color. Areas
near burners and interior surfaces of an
oven may become hot enough to cause
burns.
• During and after use, DO NOT touch or
let clothing or other ammable materials
contact heating elements, areas near
elements, or interior surfaces of oven
until they have had sucient time to
cool. Other surfaces of the oven may
become hot enough to cause burns,
such as the oven vent opening, the
surface near the vent opening, and the
oven door window.
Cleaning Safety
• Turn o all controls and wait for
appliance parts to cool before touching
or cleaning them. DO NOT touch the
burner grates or surrounding areas until
they have had sucient time to cool.
• Clean appliance with caution. Use care
to avoid steam burns if a wet sponge
or cloth is used to wipe spills on a hot
surface. Some cleaners can produce
noxious fumes if applied to a hot
surface.
• No commercial oven cleaner or oven
liner protective coating such as
aluminum foil should be used in or
around any part of the oven. Improper
oven liners may result in a risk of
electric shock or re. Keep oven free
from grease buildup.
WARNING
NEVER use appliance as a space heater to
heat or warm a room to prevent potential
hazard to the user and damage to the
appliance. Also, DO NOT use the range
top or oven as a storage area for food or
cooking utensils.
About Your Appliance
• For proper oven performance and
operation, DO NOT block or obstruct
the oven vent duct located in the
backguard/island trim.
• Avoid touching oven vent area while
oven is on and for several minutes after
oven is turned o. When the oven is
in use, the vent and surrounding area
become hot enough to cause burns.
After oven is turned o, DO NOT touch
the oven vent or surrounding areas until
they have had sucient time to cool.
• Other potentially hot surfaces include
rangetop, areas facing the rangetop,
oven vent, surfaces near the vent
opening, oven door, areas around the
oven door and oven window.
• The misuse of oven doors (e.g. stepping,
sitting, or leaning on them) can result
in potential hazards and/or injuries.
Power Failure
If power failure occurs, the electric igniters
will not work. No attempt should be made
to operate the appliance during a power
failure. Make sure the ovencontrol is in
the “OFF” position.
Momentary power failure can occur
unnoticed. The range is aected only
when the power is interrupted. When it
comes back on, the range will function
properly without any adjustments. A
“brown-out” may or may not aect range
operation, depending on how severe the
power loss is.
WARNING
ELECTRICAL SHOCK
HAZARD
DO NOT touch a hot oven
light bulb with a damp cloth as
the bulb could break. Should
the bulb break, disconnect power to the

7
appliance before removing bulb to avoid
electrical shock.
WARNING
NEVER cover any slots, holes or passages
in the oven bottom or cover an entire
rack with materials such as aluminum
foil. Doing so blocks air ow through the
oven and may cause carbon monoxide
poisoning. Aluminum foil linings may also
trap heat, causing a re hazard.
WARNING
ELECTRICAL SHOCK HAZARD
Disconnect the electric power at
the main fuse or circuit breaker
before replacing bulb.
WARNING
BURN OR ELECTRICAL
SHOCK HAZARD
Make sure all controls are
OFF and oven is COOL before
cleaning. Failure to do so can
result in burns or electrical
shock.
CAUTION
To avoid sickness and food waste, DO
NOT allow defrosted food to remain in the
oven for more than two hours.
NOTICE
DO NOT turn the Temperature Control on
during defrosting. Turning the convection
fan on will accelerate the natural
defrosting of the food without the heat.
CAUTION
BURN HAZARD
The oven door, especially the
glass, can get hot. Danger of
burning: DO NOT touch the
glass!
CAUTION
You must carefully check the food during
the dehydration process to ensure that it
does not catch re.
CAUTION
DO NOT store items of interest to children
over the unit. Children climbing to reach
items could be seriously injured.
NOTICE
The range is provided with an automatic
cooling system, designed to start
operating only when the range becomes
hot during use, whether using the worktop
or the oven or both simultaneously. The
cooling system can also switch on and o
more times during a single cooking cycle
and continue operating for few minutes
after the end of the same coocking cycle.
In the event of air blowing out of the
backguard/island trim holes, this is a
normal operating function and does not
require any action from the user.
Warnings

8
36” RP36DF-1-SS Ranges
Dimensions
min 34”27/32 /max 37”
25”19/32
2”
35”7/8

9
• This range may be installed directly
adjacent to existing 36” (91.4 cm)
high base cabinets.
IMPORTANT: The side trim MUST be
3/8” (0.95 cm) above the adjacent
base cabinet countertop. This can
be accomplished by raising the unit
adjusting the legs.
• The range CANNOT be installed
directly adjacent to sidewalls,
tall cabinets, tall appliances, or
other side vertical surfaces above
36”(91.4 cm) high. There must be
a minimum of 6” (15.2 cm) side
clearance from the range to such
combustible surfaces above the 36”
(91.4 cm) counter height.
• Within the 6” (15.2 cm) side clearance
to combustible vertical surfaces
above 36” (91.4 cm), the maximum
wall cabinet depth must be 13” (33.0
cm) and wall cabinets within this 6”
(15.2 cm) side clearance must be
18” (45.7 cm) above the 36” (91.4
cm) high countertop.
• Wall cabinets above the range must
be a minimum of 42” (106.7 cm)
above the range cooking surface
for the full width of the range. This
minimum height requirement does
not apply if a range hood is installed
over the cooking surface.
Note: If a range hood is installed, wall cabinets above the range have a dierent
minimum clearance height.
CAUTION
Burn hazard
To avoid risk of personal injury; the use of cabinets for storage above the
appliance may resultin a potential burn hazard. Combustible items may
ignite, metallic items may become hot and cause burns. If a cabinet storage
is to be provided the risk can be reduced by installing a range hood that
projects horizontally a minimum 5” (12.7 cm) beyond the bottom of cabinets.
Important: There must be a minimum of 6” (15.2 cm) clearance from rear of range
to a combustible wall. Clearances from non-combustible materials are not part of
the ANSI Z21. 1 scope and are not certied by CSA. Clearances to non-combustible
materials must be approved by the authority having jurisdiction.
Clearance Dimensions 36’’
36’’
min 6"
min 6"
36"
13"
min 18"
3/8"
min 30"

10
Specications Technical data
Burners - injectors and volume
Natural 4’’ LP/Propane 11’’ By‑pass
Inj. WBTU/h Inj. WBTU/h
Ø
WBTU/h
Small burner
90 -3400 56 - 3600 28 -1100
Medium burner (*)
120 -6100 70 -6200 34 - 1300
Large burner
142 -8300 93 - 8800 44 - 2700
Power burner
175 -12100 82 -12400 60 -4700
(*) 2 burners
Electrical components description
Feeding 240 V 60 Hz
Lower heating element of the oven 1700 W
Top heating element of the oven-grill 1400+2000 W
Circular rear heating element of the oven 3000 W
Oven lamp 15 W - E 14 - T 300
Fan of the rear heating element 25..29 W

11
Electrical Requirements
Check your national and local codes regarding this unit. This range comes equipped
with 4 ft. (121.9 cm), 4-wire range power cord with grounded 4-prong NEMA
14-50 plug attached to unit. See “Electrical Connection” section for grounding
instructions. Must be fused seperately from any other circuit.
WARNING
ELECTRICAL SHOCK HAZARD
To avoid the risk of electrical shock, personal injury or death; verify
electrical power is turned o at the breaker box and gas supply is turned
o until the range is installed and ready to operate, installation by an
authorized installer only.
Gas Connection
The appliance must be disconnected from the gas supply piping system during any
pressure testing of that system.
The gas supply (service) line must be the same size or greater than the inlet line of
the appliance. This range uses a 1/2” (1.3 cm) IDNPT (Sch40) inlet. Sealant on all pipe
joints must be resistive to LP gas.
The range is designed specically for natural gas or liquid propane (LP) gas. Before
beginning installation verify that the model is compatible with the intended gas supply.
Manual shut‑o valve:
This installer-supplied valve must be installed in the gas service line before the appliance
in the gas stream and in a location where it can be reached quickly in the event of an
emergency. Any opeing behind the range shall be sealed.
In Massachusetts: A “T” handle type manual valve must be installed in the gas supply
line to the appliance.
IMPORTANT: Any conversion required must be performed by your dealer or a qualied
licensed plumber or gas service company. Please provide the service person with this
manual before work begins.
Pressure Regulator
• All ranges have a pressure regulator on the incoming service line for safe and ecient
operation, since service pressure may uctuate with local demand.
External regulators are not required on this range since a regulator is supplied with
each unit. Under no condition by-pass this regulator.
• Manifold pressure should be checked with a manometer, natural gas requires
4.0”W.C.P. and LP gas requires 11.0” W.C.P. Incoming line pressure upstream from
the regulator must be 1” W.C.P. higher than the manifold pressure in order to check
the regulator. The regulator used on this range can withstand a maximum input
pressure of 1/2” PSI (14.0” W.C.P.). If the line pressure is in excess of that amount,
a step down regulator will be required.
Electrical & Gas Requirements

12
Gas Requirements
TO INSTALL PRESSURE REGULATOR
1 - Assemble the pressure regulator, mount the 1/2” NPT (conical) male connector and
elbow. connector
2 - Screw the pressure regulator group on the range interposing the gasket supplied.
Pay attention to the vertical alignement (45°) of the same pressure regulator.
GAS CONVERSION WARNING!
Before carrying out this operation, disconnect the appliance from gas and electricity.
Gas conversion shall be conducted by a factory-trained professional. Call the customer
service hotline to identify a factory-trained professional near your home. The gas
conversion procedure for this range includes 3 steps:
1. Pressure regulator
2. Surface burners
3. Adjustment of minimum setting.
The conversion is not completed if all 3 steps have not been concluded properly. Before
performing the gas conversion, locate the package containing the replacement nozzle
shipped with every range.
IMPORTANT: each nozzle has a number indicating its ow diameter printed on the
body. Consult the table on “Specications Technical data “paragraph for matching
nozzles to burners. Save the nozzles removed from the range for future use.
Flexible Connections: if the unit is to be installed with exible couplings and/or quick-
disconnect ttings, the installer must use a heavy-duty AGA design-certied exible
connector or at least1/2” (1.3 cm) ID NPT (with suitable strainreliefs) in compliance
with ANSI Z21.41and Z21.69.
G - area for gas connection
E - area for electric connection
In Canada: CAN 1-6, 10-88 metal
connectors for gas appliances and CAN
1-6.9 M79 quick disconnect devices for
use with gas fuel.
In Massachusetts:This appliance must
be installed with a 36” (3-foot) long
exible gas connector.
12

13
STEP1:PRESSURE REGULATOR
The pressure regulator supplied with the appliance is a convertible type pressure
regulator for use with Natural Gas at a nominal outlet pressure of 4” w.c. or LP gas at
a nominal outlet pressure of 11” w.c. and it is pre arranged from the factory to operate
with one of these gas/pressure as indicated in the labels axed on the appliance,
package and Instruction booklet.
To convert the regulator for use with other liquid propane LP gas:
1. Unscrew by hand the upper cap of the regulator (Fig. 3).
2. Remove the white plastic attachment from the cap (Fig. 4).
3. Reverse its direction and screw it again rmly against the cap. The white plastic
attachment must be turned as follow for NATURAL GAS and as reversed for LP/
PROPANE GAS (Figs. 5A and 5B)
4. Screw by hand the metal cap in the original position on the regulator
NATURAL GAS LP/PROPANE GAS
Gas Requirements
3 4
5B
5A

14
STEP 2: SURFACE BURNERS
To replace the nozzles of the surface burners, lift up the burners (Fig. 6) and unscrew
the nozzles shipped with the range using a 7 mm sochet wrench (Fig. 7). Replace
nozzles using the conversion set supplied with the range or by a authorized parts
warehouse. Each nozzle has a number indicating its ow diameter printed on the body.
Consult the table on “Specications Technical data” paragraph for matching nozzles to
burners.
SURFACE BURNERS
1. Light one burner at a time and set the
knob to the MINIMUM position (small
ame).
2. Remove the knob.
3. The range is equipped with a safety
valve. Using a small size slotted
screwdriver, locate the By-pass screw
valve on the valve body and turn it to
the right or left until the burner ame
is adjusted to desired minimum (Fig.8).
4. Make sure that the ame does not go
out when switching quickly from the
MAXIMUM to the MINIMUM position.
For surface hob burners
For simmer burners, on the tap in the
right
STEP 3: MINIMUM FLAME ADJUSTMENT
WARNING! These adjustments should be made only for use of the appliance with
natural gas. For use with liquid propane gas, the By-pass screw must be fully turned
in a clockwise direction.
Gas Requirements
6 7
8

15
General Information
READ AND FOLLOW ALL WARNING AND CAUTION INFORMATION WHEN
INSTALLING THIS APPLIANCE.
• All openings in the wall behind the appliance and in the oor under the appliance
must be sealed.
• Do not obstruct the ow of combustion and air ventilation.
CAUTION
Avoid any damage to oven vents.
The vents need to be un obstructed and open to provide proper airow for optimal oven
performance.
CAUTION
The cooling fan should be working when the unit is in operation, until the appliance has
reduced its external temperatures. If you notice the cooling fan are not operating or
you observe unusual or excessive noise coming from the cooling fan, contact a service
Center before continuing operation.
Failure to do so can result in damage to the oven or surrounding cabinets.
Moving, Handling and Unpacking
Remove and discard all packing materials, including cardboard and tape on the outside
and inside of the range. Remove the burner grates and styrofoam o the top cooking
surface. Be sure to remove the burner caps packaged in styrofoam below the burner
grates.
Do not discard the anti-tip metal bracket supplied with the range.This is the anti-tip
device and must be installed with the unit. Refer to“Anti-tip Device Installation” section.
Some stainless steel parts may have a plastic protective wrap which must be peeled
o. The interior should be washed thoroughly with hot, soapy water to remove lm
residues and any dust or debris before being used, then rinsed and wiped dry.
Solutions stronger than soap and water are rarely needed.

16
Leg Installation/Adjustments/Alignment
The range must be used only with the
legs properly installed.
Four height adjustable legs,
assembled under the bottom of the
range
Four height adjustable legs are delivered
with the range in the polysterene
container situated over the appliance.
Before installing the legs, position the
appliance near its nal location as the legs
are not suitable for moving the appliance
over long distances.
After unpacking the range, raise it enough
to insert the legs in the appropriate
receptacles situated on the lower part
of the appliance. Lower the range gently
to keep any undue strain from legs and
mounting hardware. If possible use a
pallet or lift jack instead of tilting the unit.
NOTE: please install the front legs
rst, and then the back legs, to avoid
any damage to the unit.
Adjust leg height to the desired level
by twisting the inside portion of the
leg assembly until the proper height
is reached. Check with a level that the
worktop allignement is perfectly level.
Insert the legs in the appropriate
receptacles
Remember that is indicated to set the high
corner of range so that the top of side
trim is 3/8” (0.95 cm) above countertop.
(see paragraph “Dimension”)

17
Anti-tip Device Installation
WARNING
TIPPING HAZARD:
To reduce the risk of property damage or personal injury; install
anti‑tipping device provided in accordance with the installation
instructions in this document.
Device must be engaged properly to prevent product from tipping over.
WALL FIXING BRACKETS
Adjust the range height by regulating the feet , until you reach the desired cooktop
height.
Fix the components A to the cooker.
Fix the components B to the wall, according to width the range.
Repeat the same sequence on the other side of the product.
Slide the range towards the wall until the brackets A are well into the holes in the
brackets B
GROUND FIXING BRACKETS
Adjust the range height by regulating the feet , until you reach the desired cooktop
height.
Fix the components A to the cooker.
Fix the components C to the ground , according to width width the range.
Fix C to B with the screws , keeping the distance of the components A.
Repeat the same sequence on the other side of the product.
Slide the range towards the wall until the brackets A are well into the holes in the
brackets B
A
B
A
C
B
WALL FIXINGGROUND FIXING

18
Connecting Gas & Electric
DANGER
GAS LEAK HAZARD
To avoid risk of personal injury or death; leak testing of the
appliance must be conducted according to the manufacturer’s
instructions. Before placing appliance in operation, always
check for gas leaks with soapy water solution.
• DO NOT USE AN OPEN FLAME TO CHECK FOR GAS LEAKS.
Connect gas and electrical.
Before placing appliance in operation,
always check for gas leaks. This must
be performed by your dealer, a qualied
licensed plumber, or gas service company.
Before Using
All products are wiped clean with solvents at the factory to remove any visible signs of
dirt, oil, and grease which may have remained from the manufacturing process. Before
starting to cook, clean the range thoroughly with hot, soapy water. There may be some
burn o and odors on rst use of the appliance this is normal.
Oven
Important! Before rst use, wipe interior with soapy water and dry
thoroughly. Then set the oven selector to bake, the thermostat to 450°F or
500 °F, and operate for an hour.
This appliance is certied by Star-K to meet strict regulations in conjunction with
specic instructions found
on www.star-k.org
Connecting the power cord
IMPORTANT: The wires in
the mains lead are colored and
correspond to the following
prescription
L1 (phase 1) = BLACK
L2 (phase 2) = RED
N(neutral) = WHITE
(Ground) = GREEN

19
Description of the controls
HOB GAS BURNER KNOB (FIG. 9)
By rotating the knob in an anticlockwise
direction, the following symbols appear:
0= Closed position
= “Full on” position
= “Reduced rate” position
TIMER (FIG 12)
To set cooking time, rst wind the timer up by
turning it completely once from left to right and
then back to the number of minutes you want. The
timer will ring when the set time has elapsed.
OVEN FUNCTION SELECTOR KNOB (FIG 10)
By turning the knob to the right or to the left we
will nd the following symbols:
= OVEN LIGHT ON, FOR ALL FUNCTIONS
= DEFROST
= BAKE
= CONVECTION BAKE
= CONVECTION BOTTOM
= CONVECTION
= BROIL
= CONVECTION BROIL
THERMOSTAT KNOB FOR THE FAN OVEN
(FIG 11)
By turning the oven knob clockwise we will nd the
dierent oven temperature values (from 50°C to
Maxi).
9
10
11
12

20
HOB GAS BURNER KNOB (FIG. 9)
Lighting Burners
All burners are ignited by electric ignition.
There are no open-ame, “standing” pilots.
Work-top Burners
To light the surface burners, push and turn the appropriate control knob anticlockwise
to maximum ow position . This control is both a gas valve and an electric switch.
When gas is permitted to ow to the burners, the electric igniters start sparking.
On all surface igniters you should hear a “clicking” sound. If you do not, turn o the
control and check that the unit is plugged in and that the fuse or circuit breaker is not
blown or tripped.
Within a few moments, enough gas will have traveled to the burner to light. When the
burner lights, turn the burner control to any position from maximum to minimum
ow position to adjust the ame size. Setting the proper ame height for the
desired cooking process and selecting the correct cooking vessel will result in superior
cooking performance, while also saving time and energy.
SURFACE COOKING TIPS
Use low or medium ame heights when cooking in vessels that are poor conductors
of heat, such as glass, ceramic, and cast-iron. Reduce the ame height until it covers
approximately 1/3 of the cooking vessel diameter. This will ensure more even heating
within the cooking vessel and reduce the likelihood of burning or scorching the food.
• Reduce the ame if it is extending beyond the bottom of the cooking vessel. A ame
that extends along the sides of the vessel is potentially dangerous, heats the utensil
handle and kitchen instead of the food, and wastes energy.
• The minimum pot or pan (vessel) diameter recommended is 6” (15 cm) on the larger
burners. Pots or pans as small as 4” (10 cm) should be used on the smaller burners.
Description of the controls
Table of contents
Other Roma Range manuals
Popular Range manuals by other brands

Maytag
Maytag W10258096A installation instructions

Waldorf
Waldorf Waldorf RN8610GEC Technical data sheet

Whirlpool
Whirlpool Super Capacity 465 user manual

Samsung
Samsung NX58M5600S Series installation manual

Stanley
Stanley DONARD 60K Installation and operating instructions

Roper
Roper REP34800 Use & care guide