Rover Mowers Limited MULCH ’N CATCH Rover Mowers Limited MULCH ’N CATCH
Congratulations on your purchase of Rover Mowers’ latest addition to its lawn
care range, the Rover Mulch ’N Catch Mower.
The Rover Mulch ’N Catch is a convertible mower. This allows you to use the mower
with the grass catcher fitted to the mower, (to pick up the grass cuttings) or remove the
grass catcher and fit with the mulching plug to mulch the grass. The advantage of this
design is that it allows you to gain the benefits of mulch mowing, but at times of rapid
growth, or when the mulched grass clippings are tending to build up, the grass catcher
can be fitted and the grass clippings removed.
1. INTRODUCTION
1.1 Mulching
The Rover Mulch ’N Catch mower
set up as a mulching mower (grass
catcher removed and mulch plug fit-
ted) reduces the grass clippings into
very fine particles. The design
allows for the even distribution of
the grass particles at the base of the
lawn.
The mulched clippings can then:
•Breakdown quickly, releasing
nutrients into the soil, saving on
fertiliser costs
•Reduce evaporation of moisture
from the soil which reduces water-
ing costs and effort
•Help to control temperature
extremes protecting the roots of
the grass
•Assist in controlling soil erosion
1.2 Benefits for your lawn
Research has shown that lawns are
usually cut too short. Grass, like any
other plant life, relies on photosyn-
thesis to regenerate and survive.
Reduced leaf size (from cutting too
low) can seriously affect a lawn by:
•Making it easy prey for disease
•Encouraging weeds to take hold
•Exposing the soil to:
–greater evaporation
–temperature extremes; and
–erosion
Raising the cut heigh and using
mulch mowing follows the best
practice for nurturing a healthier
more attractive lawn.
1.3 Benefits for you
Because you mulch as you mow the
time and cost savings are also sig-
nificant:
•Eliminates raking of leaves before
mowing (the Mulch ’N Catch
mower picks up and converts fall-
en leaves into mulch)
•Eliminates raking of cut grass
•Saves the time spent emptying the
catcher
•Automaticaly disposes of grass
clippings
•Eliminates the need to dispose of
clippings at the refuse tip
2. SETTING UP
2.1 Multi-purpose
Your Mulch ’N Catch mower is set
up for mulching as delivered from
the factory:
•Multi-purpose mulch blade fitted
•Mulch plug fitted
To convert to a grass catching
mower simply remove the mulch
plug and fit the grass catcher sup-
plied. (Refer to the section on mulch
plug removal for detailed instruc-
tions)
2.2 Installing the Mulch Plug
1. Lift the rear flap
2. Remove the grass catcher
(if fitted)
3. Insert the long right hand side
of the mulch plug first.
4. Guide the mulch plug, until the
spring tab rests against the top
edge of the mower base and the
lower “ramped” edge rests on the
front top edge of the axle retain-
ing bracket.
5. Give the mulch plug a firm jolt
forward and down into place.
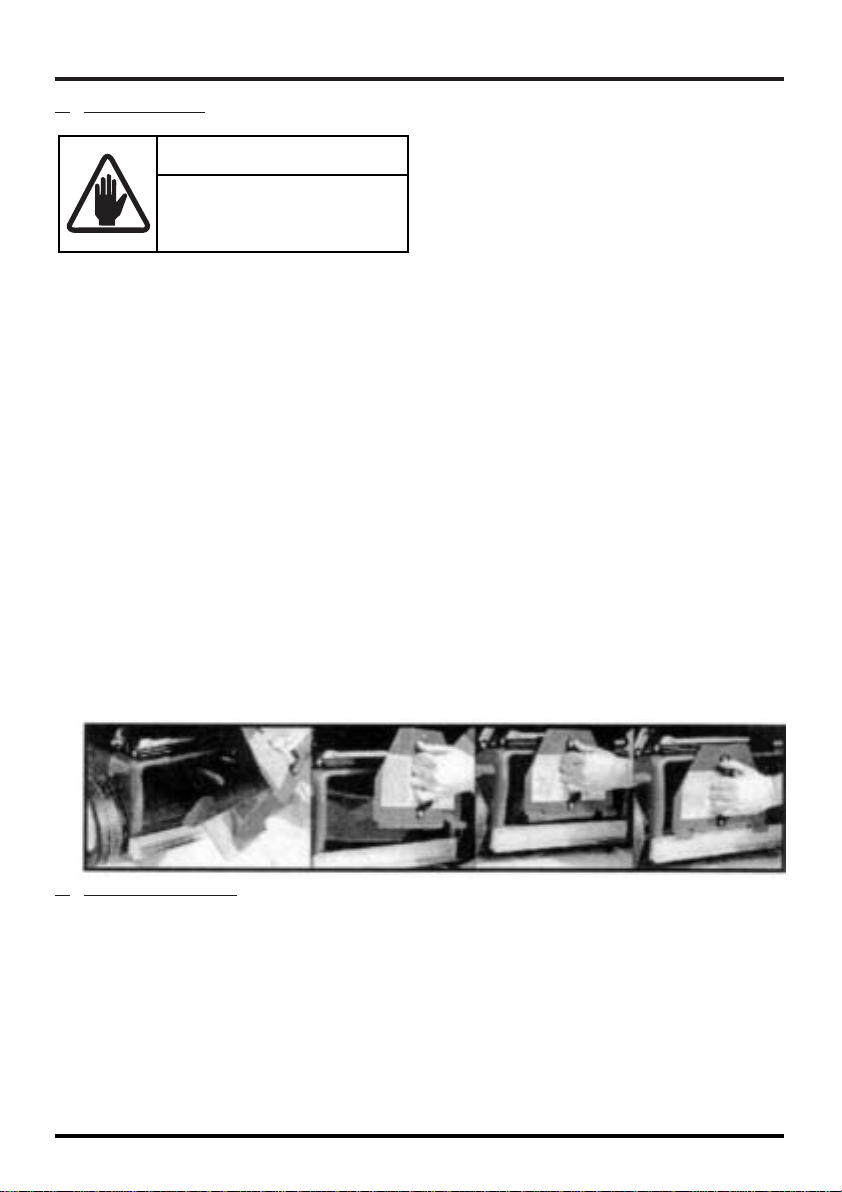
2.3 Removing the Mulch Plug
1. Lift the rear flap.
2. Grasp the handle and, with a firm
jolt, lift the mulch plug up and
away from the mower.
3. Guide the mulch plug out by
rotating the shorter left hand side
to the right and then guiding the
longer right hand section until
clear of the mower. (Refer to the
diagram on the mulch plug itself)
3. MAINTENANCE
3.1 General Mower Maintenance
Refer to your Rotary Lawnmower
Owner’s Manual, Section 3,
Maintenance.
3.2 Mulching Equipment
For optimum mulching performance:
•The mulching blades are to be
kept sharp
•Maintain the blade sharpening
angle when sharpening
•Keep the cutting edge feather free
when sharpening
•Keep the underside of the mower
deck and the mulch plug free of
grass build-up
WARNING
Before removing or installing the
Mulch plug or Grasscatcher the
Engine must be stopped.
3.3 Cutting Assembly
1. Disconnect the spark plug wire.
2. Move the Cut Height Lever to the
high cut position and fold the handle
bars down.
3. Tilt the mower so that the spark plug
is up.
4. Inspect the cutting assembly for
damage and wear.
5. Check the disc retaining bolts.
Tighten the centre bolt to 65-70 Nm
and the three concentric bolts to
8-11 Nm.
3.4 Blade Change
Refer to your Mower Owner’s Manual.
1. Disconnect the spark plug wire.
2. Set the mower to the high cut
position.
3. Lift the rear flap and prop open to
give access to the blades.
4. Remove the blade retaining bolts,
nuts and washers and discard.
5. Fit new blades, blade bolts, washers
and nuts in sets to maintain balance.
Useful Mulching Hints
Mulch mowing is an acquired art form,
and to produce the best results consis-
tently, follow these useful hints:
•Do not attempt to mulch if the grass is
too wet. Wet grass tends to clump
together and does not evenly spread out.
It also clogs up the underside of the base.
•Do not mulch on too low a cutting
height. Remember the maximum cut
should be 25mm off the top of the grass,
or 1/3 the grass blade height, whichever
is the lesser amount. Refer to diagram.
•Do not push the mulch mower too
fast. To obtain the best finish it may be
necessary to regulate the ground speed.
•Run the engine at full throttle.
Running the engine at low speed does
not allow the blades to mulch the grass
efficiently.
•Keep the mulch blades sharp. The
mulch blades are designed to cut and
recut the blades of grass. If the mulch
blades are not kept sharp mulching per-
formance will be reduced.
•Keep the underside of the base clean.
Build-up of grass under the base blocks
the air flow created by the mulch blade
and reduces mulching performance.
WARNING
Before working on the mower:
•Stop the engine
•Remove the spark plug wire
If clumping of grass is visible, raise
the cutting height of the mower.
ROVER
Mowers Limited
ABN 11 000 257 303
04003993
Rev. B
NEW ZEALAND
Rover Mowers
East Tamaki,
Auckland
New Zealand.
Rover Mowers Limited MULCH ’N CATCH
Mulch ’N Catch
Convertible Rotary Lawnmower
Model 30
PRINTED IN
AUSTRALIA
AUSTRALIA
Rover Mowers
PO Box 1235
Eagle Farm, 4009
Australia.
©Copyright
10-2004
TM
TM
TMTM
TM
3993 Mulch & Catch Brochure 23/9/04 2:51 PM Page 1


 User manual")