Silicon Image SI-2K Manual

© 2008 Silicon Imaging, Inc Page 1
SI-2K Image &
Software Install Manual
SiliconDVR
Version 1.1
December 2008
Part #25436

© 2008 Silicon Imaging, Inc Page 2
Table of Contents
Section Page
1.0 - Introduction 3
1.1 Release Notes for SiliconDVR Version 1.1 3
2.0 SI-2K Maintenance Tool (SI-2K Recorder Use) 6
2.1 Download and Pre-installation 6
2.11 Downloading 4
2.12 Prepare the USB Drive 5
2.2 Before You Boot 9
2.3 Using the Maintenance Tool 10
2.4 Troubleshooting 12
2.5 Touchscreen Calibration & Drivers 13
3.0 SiliconDVR Installer (PC/Laptop Use) 14
3.1 - Minimum System Requirements 14
3.2 - Installing SiliconDVR for Intel Pro1000 NIC’s 15
3.3 - Installing SiliconDVR for Generic NIC’s 20
3.4 - Uninstalling SiliconDVR 29
4.0 Troubleshooting FAQ 33
5.0 End User License Agreement 36

© 2008 Silicon Imaging, Inc Page 3
1.0 Introduction
This manual covers the installation and update procedure for the following:
• SI-2K Recorders using Maintenance Tool (Section 2)
• PC/Laptop Systems with Software Installer (Section 3)
The SI-2K Image installation uses a new SI-2K Maintenance Tool to update both SiliconDVR and the full
operating system which resides on the internal Compact Flash. Once updated, no additional software or driver
installation is required. This update procedure overwrites the entire internal flash image and any user files or
custom looks which may have been created, should be backed-up prior to the update procedure.
The SiliconDVR Installer is designed to run on an XP or Vista computers that will be used as the recorder for
SI-2K Mini cameras. The install instructions include those for systems with the following configurations
• Intel High-Performance Pro/1000 NIC
• Generic Gigabit Ethernet NIC systems (eg. Marvell Yukon)
The installer includes all of the licensed software and drivers necessary for operation of the camera. No
additional licenses are required to operate the system. A complete list of new features and enhancements can
be found in Section 1.1.
Check for the most current information on the SI-2K Image and SiliconDVR on our website under ‘Support’.
The address is:
http://www.siliconimaging.com//DigitalCinema/SiliconImaging_support.html
There is an End User License Agreement (EULA) at the end of this document (Section 5). By installing the
software, you have agreed with the terms of this document. Please read it before proceeding.

© 2008 Silicon Imaging, Inc Page
1.1 Release Notes for SiliconDVR Version 1.1
Image Quality
-Improved reliability in black calibration
-Enhanced deviant pixel detection processes
-Increased total count of Deviant pixels detected and corrected
-Reduced column FPN in high-temp
-Higher Quality Cineform Encoder Modes (3.5:1)
Operational Reliability
- Feedback system during camera connection or loading new mode
- Greater stability when recording .SIV files to slow drives
- Fix for short file Time-lapse shooting and playback
- Improved reload of preferences after hard shut-down
- Fix for fan-mode switching bug which was locked into mode
- Ability to playback large QuickTime movie files (over 3GB)
- Deleting AVI/QT files recovers hard-drive space on indicators
- Auto licensing system for Iridas and CineForm
- QuickTime repair to recover files damaged during recording
Time Code Integration
- QuickTime encoder now supports timecode for 25P in Final Cut Pro.
- New support for the Ambient ALL-601 USB timecode reader
- Increased reliability and frame accuracy when in LTC Slave Mode
Stereo-3D Support
- Added support and improved reliability for 2K resolution modes
- Improved reliability for cameras configured as the 3D-slave
3rd Party Integration Support
- CineForm MAC/Final Cut Support for CineformRAW
- New Active Metadata Controls (.look, WB, Log) for MAC & PC
- Iridas support of .SIV and Cineform file formats
Laptop/PC System & OS Support
- Windows XP SP3 and Vista 32-bit Support
- MacBook Pro display performance Improvement
- Shutdown/Hibernate now initiate a Stop Recording

© 2008 Silicon Imaging, Inc Page 5
SI- K & Windows-XP Embedded Support tools
- USB thumb-drive SI-2K Image Installer (Maintenance Tool)
- New XP-e Write Filter (FBFW) used to prevent data writing to the compact flash card which
contains the OS Image. Only the SiliconDVR data folder is accessible for storing .looks and
preference settings.
SI- K Recorder: Known Issues & Limitations
- SIV Playback on slow drives can hang: Use higher speed drives, Raid or SSD
- High Speed CineForm modes (72/85/150P) will only do burst record on SI2K before RAM
overflow. For continuous high-speed shooting you can use PC/Laptop.
- QuickTime .MOV requires more CPU overhead than AVI and will RAM buffer overflow at the
highest quality settings. Use Adaptive encoding or .AVI format.
- Touchscreen calibration settings are not preserved if the write-filter is enabled. The work-
around is to disable the FBWF write filter before performing calibration process. Then re-enable
FBFW and reboot to maintain protection of the system OS. The shortcut for disabling and
enabling the FWBF write-filter is inside the “/SI” directory on the SI-2K desktop.

© 2008 Silicon Imaging, Inc Page 6
2.0 SI-2K Maintenance Tool (For SI-2K Recorders Only)
The SI-2K contains a compact flash memory card that appears as the “C:” drive when the
system is operating. The system boots and runs the SiliconDVR application from this drive.
The SI-2K Maintenance Tool is provided to quickly upgrade or restore the system’s flash drive
to a previous state, called a “snapshot”. This is an exact image of the full camera system –
SiliconDVR application, drivers and operating system. As such, any additions such as
touchscreen calibration or custom looks are overwritten by the process.
The SI-2K Maintenance Tool uses a USB Flash Drive (a “thumbdrive” or “pen drive”) which
has been loaded with a special version of the Linux operating system that allows the system to
boot independently of the internal flash drive and an application that allows snapshots to be
written.
The Snapshot files are included with the Maintenance Tool in order to restore or upgrade the SI-
2K.

© 2008 Silicon Imaging, Inc Page 7
2.1 Download and Pre-installation
If you have received the SI-2K Maintenance Tool already installed on a USB drive, you
may skip to the section “2.2 Before You Boot”
2.1.1 Downloading
The SI-2K Maintenance Tool is distributed in a single ZIP file that may be more than 1GB in size.
Download this file and save it to a computer running Windows. The application used to prepare
the drive for booting is not available for Mac OS at this time. Please contact
support@siliconimaging.com for ftp and password instructions.
2.1.2 Prepare the USB Drive
To create the Maintenance Tool, you will need a USB flash drive, at least 2GB and preferably
GB. The drive should be empty and preferably freshly formatted with a “FAT32” file system.
Unzip the contents of the downloaded Maintenance Tool to the flash drive, making sure that the
files are placed at the top level, not in a subdirectory. Once unzipped, the files should appear
similar to Figure 1.
Figure 1
To make the flash drive bootable, double-click on the batch file “makeboot.bat”. (Note: You
must be logged in to your PC with Administrator rights).
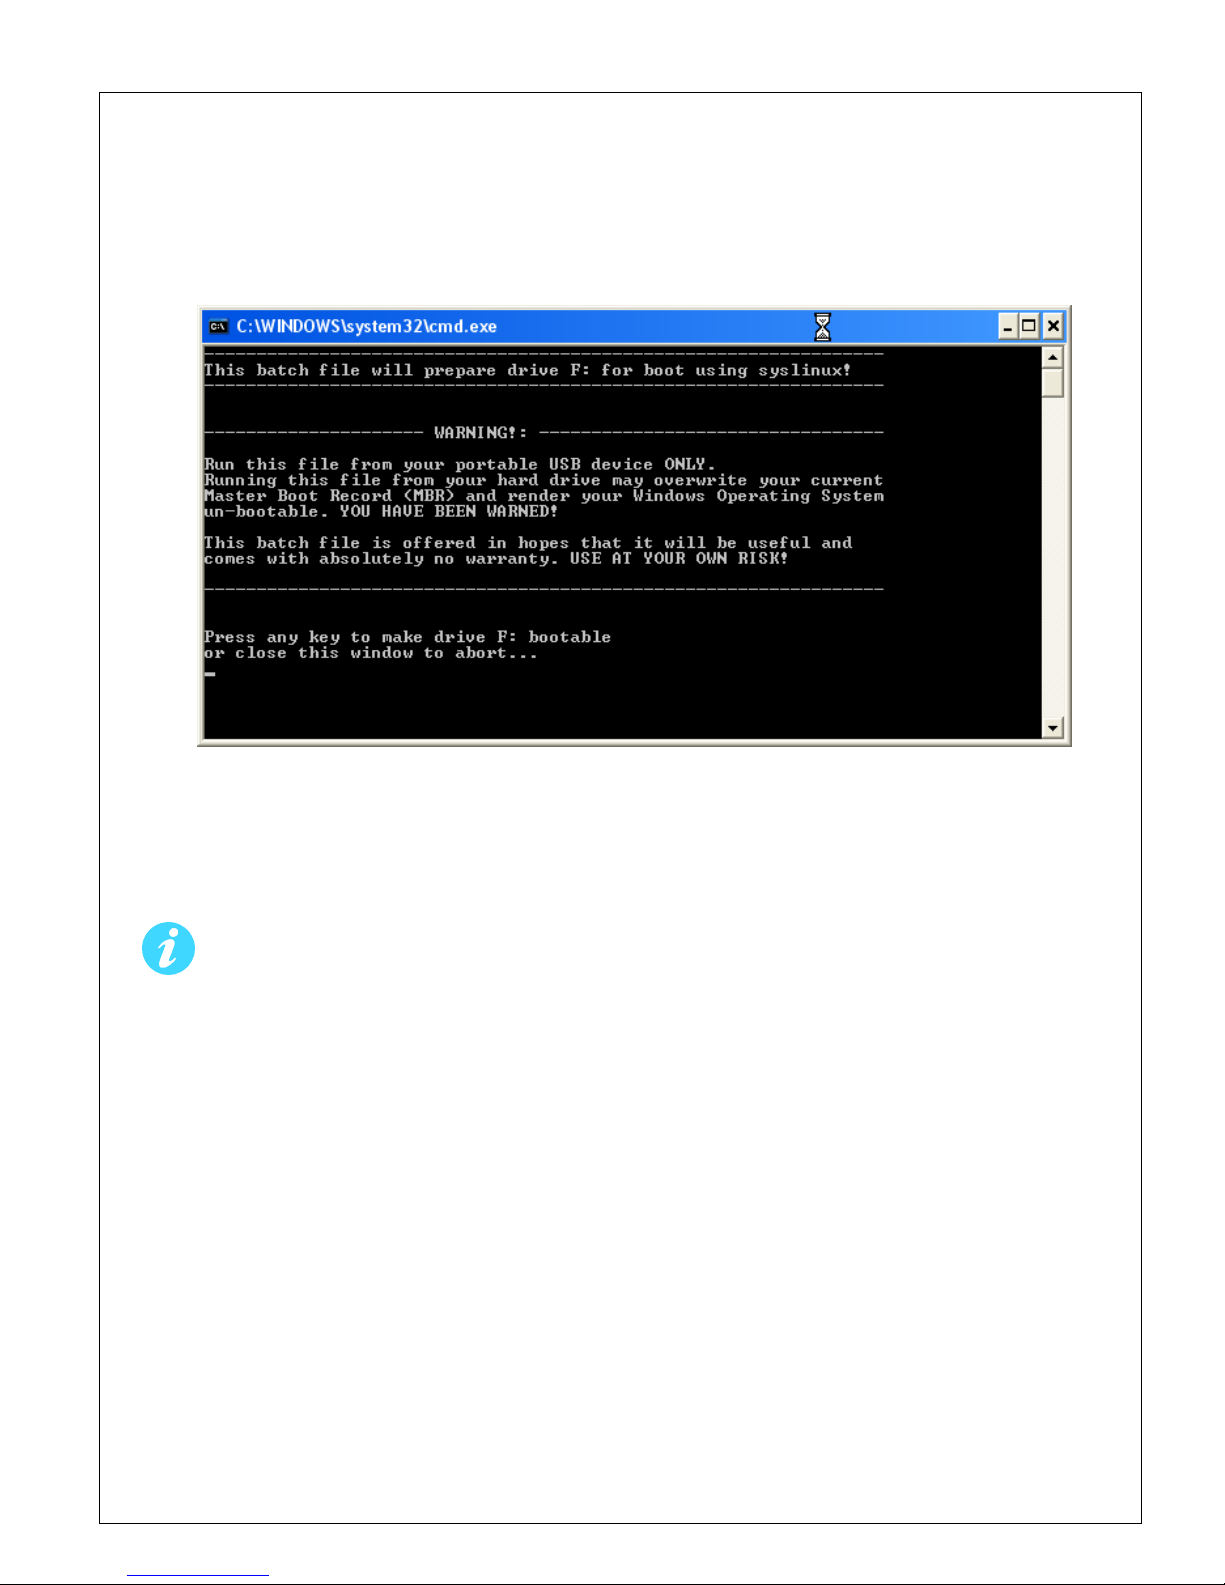
© 2008 Silicon Imaging, Inc Page 8
A warning message will appear as shown in Figure 2. Verify that the flash drive has been
correctly identified, in this example it’s drive “F:”, and press ENTER to make the drive bootable.
Figure 2
Use the “Safely Remove Hardware” function on the Windows Taskbar to insure that the drive is
properly written prior to unplugging it.
Please note that almost all recently manufactured flash drives from reputable
manufacturers are compatible with the SI-2K’s booting process, but there are a few that
may not work. If you encounter problems in the following steps, you may need to try a
different kind of flash drive. For maximum compatibility, use the drive provided by
Silicon Imaging.

© 2008 Silicon Imaging, Inc Page 9
2.2 Before You Boot
The Maintenance Tool is designed to modify only the internal flash drive, but it’s always
prudent to make sure that any work you have on the SI-2K has been copied off the
system prior to using the tool. You may also choose to remove the hard drive carrier
from the SI-2K prior to booting with the Maintenance Tool.
Customized “.LOOK” files are stored on the internal flash drive and will be overwritten
during a snapshot restore. These must be copied off the system prior to restoring a
snapshot.
After restoring a snapshot, touchscreen calibrations will need to be refreshed. Any third-
party hardware that requires drivers will also need to be re-installed.
Beginning with the SI-2K powered off and a display device (external monitor, touchscreen or
electronic viewfinder), plug the Maintenance Tool into either USB port on the rear panel of the
SI-2K. If possible, it’s preferable to power the SI-2K from it’s external power supply rather than
a battery to help insure that nothing interrupts the maintenance processes.
Switch the power on. The SI-2K will begin the first part of its normal boot process, then control
will switch over to the Maintenance Tool. The booting process will take about a minute and
during this, you’ll see a variety of informational and warning messages appear on the screen.
This is a normal part of the Linux operating system’s boot process and error messages during
this phase may be ignored.
If the camera does not boot to the USB drive, the boot order is incorrect in the BIOS.
Attach a USB keyboard to the camera, reboot and hold the ‘Delete’ key. Under ‘Advanced
BIOS Features’, the first boot device should be USB-ZIP. If this is not the case, use the
arrow keys to select the first boot device, use ‘ENTER’ to modify this and use the arrow keys to
select the USB-ZIP drive. The 2nd or 3rd boot device must be “hard disc”.
When the boot process is complete, you will see the Maintenance Tool interface as shown below.

© 2008 Silicon Imaging, Inc Page 10
2.3 Using the Maintenance Tool
The Maintenance Tool interface is operated using the mouse on the side of the SI-2K (not via
touchscreen). There are two types of flash media used in the SI-2K, Transcend and X .
Snapshot Images for both media types are provided in the Maintenance Tool and the appropriate
image will be automatically selected. A brief description of the snapshot along with the date of
its creation is shown.
Press Restore Snapshot to begin. Then click the large button now labeled “START”.
If you decide not to restore the snapshot prior to starting the process, you may safety select
“CANCEL” to abort the process and the system will perform a shutdown.
You should always use the “CANCEL” button and wait for the system to shut down prior
to switching the power off and removing the USB flash drive.

© 2008 Silicon Imaging, Inc Page 11
Once the restore operation has completed, which typically takes five to ten minutes, you
will see a message reporting OPERATION IS FINISHED.
Click the large button at the bottom “CLICK HERE TO COMPLETE” to begin the system
shutdown and insure that data written to the internal flash drive is safely stored.
Note: The option to cancel the process once a restore has started is not available. If the
restore process is interrupted, the internal flash drive will be in a corrupted state. Always
wait for the Maintenance Tool to report that the process has completed and allow it to
shut down the system before switching off the power.
Although there are additional capabilities available via the Linux operating system that
underlies the Maintenance Tool, you should only use the options available via the
Maintenance Interface unless directed otherwise by Silicon Imaging.
About 30 seconds after the shutdown process is initiated, after a series of text messages from
the operating system shutting down, you will see a single line indicating “System Halted” and
the stream of text will stop.
At this point, you may switch off power to the SI-2K and remove the Maintenance Tool USB
drive. The snapshot is now restored and you may switch on the power to the SI-2K and verify
that the restoration or upgrade has succeeded.
The SI-2K will power on and go thru one automatic reboot cycle. Upon reboot, the camera will
startup SiliconDVR and ready to shoot.

© 2008 Silicon Imaging, Inc Page 12
2.4 Troubleshooting
2.4.1 BIOS SETTINGS IF BOOT FAILS
If the SI-2K does not boot into the Maintenance tool, the BIOS boot settings may need to be
adjusted.
1. Connect a USB Keyboard and a monitor to the VGA port (do not use the SI-2K Electronic
Viewfinder) to the switched off camera.
2. Switch on the camera and press the "DEL" Button in order to enter the BIOS as soon as the
camera gives you that option (during start up the first time you see information on your
monitor)
3. Within the BIOS, go into the Advanced BIOS features --> HDD boot priority and set the USB-
ZIP as the first boot disk, and the removable SATA as the second boot disk (it's not a boot disk,
but just set it in the second position)
. Set the Boot Disk Priority from "Fixed" to "Dynamic" then return to the Main BIOS Menu by
pressing "ESC" two times.
5. Go into the Integrated Peripherals->On-Chip IDE Devices and then set the On-chip Serial ATA
to "Enhanced", set the SATA mode to "IDE", and then set the SATA port speed to "FORCE GEN
I". Then return to the Main BIOS Menu by pressing two times "ESC".
6. Select "Save and Exit"
2.4.2 CAMERA CONNECTION ERROR
If the SI-2K system performs its reboot operation and enters SiliconDVR, after a 2minute delay,
but has an error connecting to the camera, you may need to change the settings of your driver.
due to minor difference in Gigabit Ethernet Hardware.
1. QUIT SiliconDVR Disable Write Filter by selecting "Disable FBWF and Reboot" shortcut in the
SI folder on the desktop. System will reboot.
2. QUIT SiliconDVR and follow steps on Page 17 (step 12~18), Run EbdriverTool and assign
Port 1 (Intel Pro1000) with High Performance Driver.
3. While the WriteFilter is disabled, you should also set your Audio Input levels and Calibrate
your touchscreen (as stated in 2.5).
3. Enbale WriteFilter, using shortcut is Desktop /SI folder.

© 2008 Silicon Imaging, Inc Page 13
2.5 Touchscreen Calibration & Drivers
The flash drive of the SI-2K is protected from inadvertent writing by the File Based Write Filter
(FBWF). This protection keeps the file system from being corrupted during unexpected
shutdowns, such as when the battery runs down. In order to make changes to the system files,
it is necessary to turn off this protection, make the changes and then re-enable the protection.
While the FBWF is off, be sure that the camera cannot lose power and is always shut
down or rebooted under software control.
1. Disable FBWF by selecting "Disable FBWF and Reboot" shortcut in the SI folder on the desktop
2. After the reboot, perform the Touchkit calibration or additional device drivers
3. Enable FBWF by selecting "Enable FBWF and Reboot" shortcut in the SI folder on the desktop
. After the reboot the system is ready to use
Although the camera will operate with the FBWF disabled, it is strongly suggested that the
filter be immediately re-enabled after any maintenance.

© 2008 Silicon Imaging, Inc Page 1
3.0 SiliconDVR Installer (For PC/Laptop Only)
The installation instructions for installing SiliconDVR are split into two sets: One for Intel
Pro1000 NIC-based systems, and a second set for other generic NIC’s systems not compatible
with the Pleora High Performance Driver for Intel Pro1000 NIC’s (eg. Marvell Yukon). These
installation instructions assume a clean install of SiliconDVR.
If a previous version of SiliconDVR has been installed on the computer, follow the
uninstall steps in ‘3.4 Uninstalling Previous Versions of SiliconDVR’.
The SiliconDVR Installer is only to be used on computers meeting the minimum system
requirements outlined below. It is not for use on the SI-2K
3.1 - Minimum System Requirements:
• Windows XP SP2 32-bit, SP3 32-bit, Vista Business 32-bit, Vista Ultimate 32-bit (Note:
SiliconDVR 1.1 is not compatible with 6 -bit versions of Windows).
• Intel Core 2 Duo 2.33Ghz Processor of faster. For Windows Vista, suggested CPU
processor is 2. Ghz Intel Core 2 Duo or faster.
• 2GB of RAM. For Windows Vista, GB of RAM suggested.
• Either Intel Pro1000 NIC or other 10/100/1000 Gigabit Ethernet NIC capable of 8K Jumbo
Packets
• Intel GMA950 embedded graphics, GMA X3100 embedded graphics or Nvidia
Geforce/Quadro series of discreet graphics cards.
• Hard-drive or SSD capable of sustained write throughput of 30MB/s.

© 2008 Silicon Imaging, Inc Page 15
3.2 Installing SiliconDVR for Pro1000 NIC’s:
1. Certify that the Pro1000 NIC being used for SiliconDVR has the Intel Pro1000 NIC driver
software installed and the NIC can operate as a “normal” NIC, capable of receiving normal
TCP/IP network traffic such as email, internet, file-sharing, etc.
2. Open the SiliconDVR Installer. You will be greeted by the installer splash-screen. Press the
“Next” button.
3. When you reach the “Select Components” screen, make sure that all three selections for
CineForm, Pleora eBUS and Pleora iPort are checked.
. Click the “Next” button and proceed with the installation of SiliconDVR.

© 2008 Silicon Imaging, Inc Page 16
5. After SiliconDVR is installed, the CineForm installer will launch. Click though the “next”
button and then when you arrive at the install screen, press the “Install” button.
6. After the CineForm Installer completes, the Pleora iPort Vision Suite will being installation.
Click the “Next” button.
7. Under the “Setup Type” window select the “Complete” choice for installation.

© 2008 Silicon Imaging, Inc Page 17
8. Once the iPort Vision Suite has completed installing, the Pleora eBUS driver Suite will launch.
Click though the “Next” button until the driver is completed installing.
9. After the eBUS driver has completed installation, the installer will go back to the SiliconDVR
installer splash-screen.
10. Once the SiliconDVR installer has completed, you will be prompted to reboot the computer.
11. Restart the computer.

© 2008 Silicon Imaging, Inc Page 18
12. Installing Drivers: After rebooting the computer, go into \Program Files\Pleora Technologies
Inc\Ethernet Bus\Binaries\ and launch the EbDriverTool.exe.
13. Once inside the EbDriverTool, you should see the active NIC on the computer available for
installing the eBUS drivers on for use with SiliconDVR. It should be listed as “NIC Driver” under
the “Driver” field.
1 . Click on the Intel Pro 1000 NIC that will be used with SiliconDVR, and then click on the
“Configure” button.
15. Inside the configuration window, choose the “GigE Link High-Performance IP Device
Driver” choice.

© 2008 Silicon Imaging, Inc Page 19
16. After the driver installs, close the configuration window.
17. The NIC in the main EbDriverTool window should now read “High Performance Driver” in the
driver field.
18. Quit the EbDriverTool application and then reboot the computer
19. After reboot, launch SiliconDVR.

© 2008 Silicon Imaging, Inc Page 20
3.3 Installing SiliconDVR for Generic NIC’s:
As a pre-installation procedure to optimize the generic NIC and set IP Addresses for use with
SiliconD R, follow these procedures:
1. Go into the Network Connections dialog box by right-clicking on Network Neighborhood and
going to “properties”.
2. Right-click on the “Local Area Connection” and go to “properties”.
3. Turn off the “Client for Microsoft Windows”, “QoS Packet Scheduler”, “File and Printer
Sharing”, and on Windows Vista, the “IPv6” option.
. Click on the “Internet Protocol Version (TCP/IPv )” control and then the “properties” button.
5. Disable obtaining and address over DCHP, and manually set the IP address of the NIC to
169.254.143.1. Then set the subnet mask to 255.255.255.0.
Table of contents


