Silvan Selecta 042M User manual

Instruction Manual
MANFOAM-2 REV F 05/05/20
14L FOAM MARKER
042M
VICTORIA (HEAD OFFICE)
Telephone: +61 (03) 9215 2700
Fax: +61 (03) 9215 2701
www.silvan.com.au
NEW ZEALAND
Hamilton, New Zealand
Telephone: +64 (07) 8496 033
Fax: +64 (07) 8496070
www.silvannz.co.nz
SILVAN AUSTRALIA PTY. LTD.
ABN 48 099 851 144

PAGE 1
Silvan Warranty
Our goods come with guarantees that cannot be excluded under the Australian Consumer Law.
You are entitled to a replacement or refund for a major failure and for compensation for any other
reasonably foreseeable loss or damage. You are also entitled to have the goods repaired or
replaced if the goods fail to be of acceptable quality and the failure does not amount to a major
failure.
We warrant our goods to be free from defects in materials and workmanship for the warranty
period of 12 months from the date the product is delivered to the consumer.
Silvan warrants its authorised Dealer, who in turn warrants the original purchaser (consumer) of
each new Silvan product that it will repair or replace the product, or, pay the cost of repair or
replacement, as determined by Silvan without charge for labour or any defective or malfunctioning
parts in accordance with the warranty limitations below.
This Warranty is in addition to any other rights and remedies available to consumers under the law
This Warranty Covers
Only conditions resulting directly from defects in workmanship or material under normal use and
service.
Warranty Exclusions
The Warranty does not cover:
•Conditions resulting from misuse, use of incompatible chemicals, exceeding machine
specifications including overloading, impact damage, negligence, accidental damage or failure to
perform recommended maintenance services as specified in the Owner/Operator Manual
applicable to the product.
•Damage caused by continued use of a product after initial failure
•Any product which has been repaired by other than an authorised Silvan service outlet in a way
which, in the sole and absolute judgment of Silvan, adversely affect its performance or reliability.
•The replacement of maintenance items such as diaphragms, batteries, V belts and ground
engaging components, etc.
HOW TO CLAIM WARRANTY
Return the goods to the place of purchase at your cost and within the warranty period along with
evidence of the purchase date. If the original supplier cannot be contacted, then contact Silvan as
below and we can direct you on how to proceed with your warranty claim.
HOW YOUR CLAIM WILL BE MANAGED
The repair of a defective product qualifying under this warranty will be performed by any authorised
Silvan service outlet within a reasonable time following the delivery of the product, at the cost of
the owner, to the service outlet’s place of business. The product will be repaired or replaced
depending on the extent of the problem at the discretion of Silvan and the Silvan dealer.
Warranty
PAGE 2
Whilst each type of Silvan foam marker incorporates all the necessary safety features it is essential
that any person operating them is aware of the safety precautions that should be exercised.
Silvan foam markers are designed and
manufactured solely for the purpose of
dropping foam to define the area sprayed
when agricultural chemicals are being applied
to crops. Under no circumstances should they
be used for any other purpose.
Before using the foam marker carefully read
and ensure you understand the contents of
this manual and any other manual relevant to
the safe operation of any associated tractor
and spraying machinery.
Before operating the foam marker read the
safety warnings carried on the unit and any
associated equipment.
Never allow an inadequately trained person
to operate the foam marker.
Before use of any chemicals including foam
concentrate refer to the chemical
manufacturer’s label and safety instructions
for safe handling procedures and the correct
method of use. Always use the recommended
personal protective clothing and equipment.
Ensure that all operators and associated
personnel are familiar with the legal
regulations and codes of practice that apply
to the safe use and storage of spray chemicals
including foam concentrate.
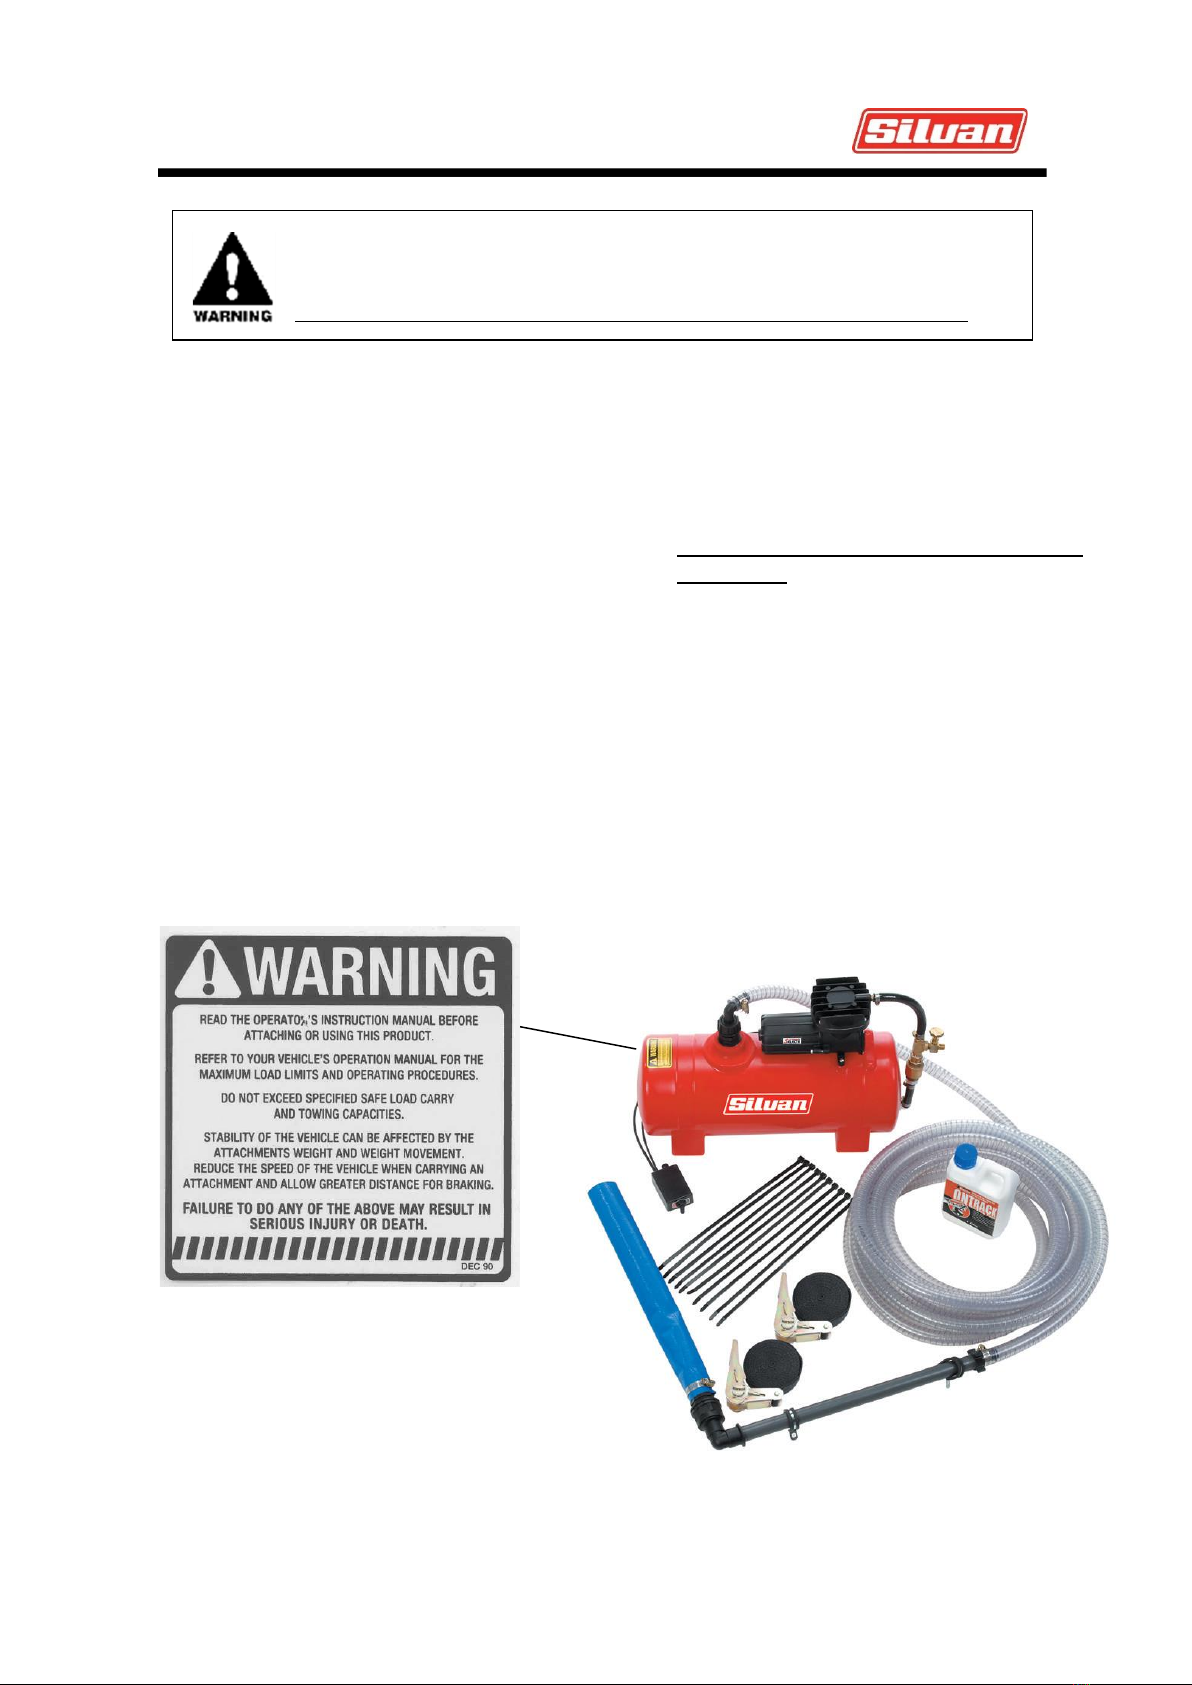
Safety Instructions
Before attempting to operate foam marker carefully read and take note of the
following safety warnings.
Failure to comply with these warnings may result in serious injury or death.
Part Number DEC 48
PAGE 3
Bubbler Standard Foam Marker:
Foam Tank:
Capacity 14L -Impact resistant polyethylene tank.
Air Supply:
12-volt DC diaphragm compressor with in-line non-
return valve and adjustable airflow bleed off valve.
Max 8psi pressure.
Operating Time:
25 to 60 minutes (fitted to 6m boom)
Controls:
Electric control box with single on/off switch.
Foam Delivery:
19 mm diameter reinforced PVC hose, 10metres.
Flexible foam dropper (single side only) with
mounting clamps.
1. Mount the 14L tank to the front or rear of the
vehicle using the 2 tie-down straps supplied with
the unit. Alternatively, it may be supplied fitted to
your new Silvan TPL unit.
2. Attach the electrical leads from the air compressor
to the control box supplied with the marker using
the pin connector supplied. Attach the electrical
leads from the control box to the vehicles 12-volt
battery. Connect the red lead to the positive
terminal of the vehicle battery and the black lead
to the negative terminal. Position the control
on/off switch box in a convenient location for the
operator and attach using the Velcro tape supplied
3. Cut a length of 19 mm wire reinforced hose to
reach from the foam tank to the end of the boom.
Fit one end of the hose to the elbow on top of the
foam tank and secure with a hose clamp. Route
the hose along the vehicle frame, attaching at
convenient points with plastic ties. Ensure that the
hose is not positioned where it can be accidentally
squashed or kinked.
4. Fit the foam dropper to the outer end of wire
reinforced hose and secure with a hose clamp.
5. Attach the rigid tubing section of the foam
dropper to the outer end of the boom with two
saddle clamps. Ensure the dropper is located so
that it does not interfere with the spray pattern of
the end nozzle.
General Considerations
Foam Concentrates
Refer to mixing instructions supplied with foam
concentrate.
Under normal operating conditions it is used in diluted
form at a rate of 1 part of concentrate per 100 parts
of water i.e. 140 ml of concentrate to 14 litres of
water. If this concentration is too thick or slow a rate
of 1 part per 200 parts of water may be necessary.
Water Quality
Foam quality and durability will deteriorate if the
concentrate is diluted with “hard” water. “Soft” water
will give the best foaming result and it is
recommended that rainwater or “soft” town water is
used in preference to bore or dam water.
A reduction in foam volume and durability becomes
noticeable when the calcium carbonate (CaCO3)
content of the water exceeds 300 parts per million
(ppm) and quality can be reduced by up to 40% when
CaCO3 reaches 1500 ppm.
Avoid foam concentrate contact with skin
and eyes and avoid inhaling vapour. Wear overalls,
PVC gloves and face shield or goggles. If product is
on skin immediately wash area with soap and
water. If poisoning occurs, do not induce vomiting.
Give plenty of water or milk to drink and seek
medical assistance. If in eyes, hold eyes open and
flood with water for at least 15 minutes and see a
doctor.
Water Temperature
Foam volume decreases with colder water
temperature. Up to 40% of foam volume can be lost
at 50C compared to 250C. The solution temperature
can be kept above 100C by using hot water if
necessary.
Specifications
Installation
Operation

PAGE 4
Weather Conditions:
Radiant energy from the sun has a far greater
impact on foam life than air temperature. In the
absence of clouds, the surface temperature of bare
ground rises rapidly under direct sunlight,
particularly on dark soils where soil temperature
can approach 550C on a sunny day of 250C air
temperature. Foam blobs falling on bare ground
under these conditions may last less than 20
minutes. Under cloudy conditions the soil
temperature will be like that of the air and foam
blobs will generally last 30 minutes or longer,
depending on the actual temperature. Foam falling
on green vegetation will also last appreciably
longer. Under high temperatures the life of foam
blobs can be extended by increasing the amount of
concentrate added to the tank by approximately
50%.
If the air temperature rapidly falls towards 50C, as
can happen at winter sunset, the volume and
quality of foam may deteriorate noticeably. Under
such conditions it is recommended that the
temperature in the foam tank is raised by adding
concentrate which has been diluted with warm
water.
Dry, windy conditions may require an increased
strength of concentrate to keep the foam on the
ground. The amount of concentrate added can be
increased up to double the normal rate if necessary.
When using increased strength solutions, if the
discharge of foam is slower than required because
it is too thick then dilute the mix by adding water.
Storage of Diluted Solution and Concentrate
Diluted foam solutions tend to deteriorate
considerably if stored in the marker tank for more
than two days, resulting in reduced foam volume
and quality. If the solution has been in the tank for
more than 24 hours, it is recommended that it be
drained and replaced with a fresh mix.
Store concentrate in its original container with the
lid securely closed in a well ventilated, cool area.
Concentrate can tend to age when stored for longer
than 6 months and it is advisable to thoroughly stir
and agitate older concentrate before use.
Principal of Operation
Air is pumped from the electric diaphragm
compressor through a hose fitted with a non-return
valve to the bottom of the foam tank.
As the air bubbles through the mixture of water and
foam concentrate it produces foam. The pressure
produced by the entering air forces the foam out
the top of the tank and along the hose to the foam
dropper at the end of the spray boom.
Operation:
Unscrew the foam hose from the top of the tank.
Take care that any built-up pressure in the tank is
released slowly first. Fill to approximately 3/4
capacity with clean water then add foam
concentrate at the recommended rate. Completely
fill the tank with water and refit the foam hose. To
thoroughly mix the solution and avoid creating
excess foam in the tank whilst adding water, insert
the filling hose below the water surface and use a
gentle flow.
Refer to the General Considerations section for
advice on water quality and foam concentrate
dilution rates.
To start foam generation, turn the compressor on
from the control switch and allow enough time for
foam to reach the boom dropper before
commencing spraying. Once the system has been
primed, foam generation can be stopped and
started by operating the control switch.
An adjustable bleed off tap is fitted and can be used
to reduce the rate of foam production. Operating
the tap reduces airflow to the tank and consequent
foam production.
Sometimes a foam marker may “blow out” due to
excess air escaping through the foam. To correct
this problem, reduce the concentration of foam
concentrate in the mixture by adding more water.
Operation (cont.)
ADJUSTABLE BLEED VALVE

PAGE 5
Flushing the System:
For efficient performance it is important to
remove unused foam and foam solution from
the system after each day’s use.
Remove the top and bottom hose connections
from the foam tank and drain any unused foam
solution, then flush the tank with water.
Electrical Fuses:
If the electrical system fails to operate remove
the fuse and check whether it has blown. If so,
first locate and rectify the fault, then replace
the fuse with a new 15 Amp fuse. A blown fuse
may indicate that an electrical lead has rubbed
through on a sharp surface.
Problem
Solution
Inconsistent Foam quality
Thin Sloppy or Thick Chunky foam
•Incorrect quantity of Foam marker concentrates for
conditions
-If sloppy add more Concentrate or bleed off more
air (less air in tank)
-If chunky, add more water or bleed off less air
(more air to tank)
•Poor water quality –using ‘Hard’ water reduces foam
performance
•Low water temperature –low temp decreases foam
volume
Foam coming out too quickly
•Too much air going thru system –Bleed off more air to
reduce flow
•Adjustments to air flow or concentration can take 5 to
10 min to show at the dropper.
Moisture appears to be entering the
motor. Dye residue is showing on
motor / fan
•Ensure bleed valve is always slightly open to eliminate
possible reverse flow of air back into the compressor
after unit is turned off.
•Ensure fluid does not enter motor while filling tank.
Motor is loading up
Motor is running slow
•Bypass more air to lower compressor pressure
•Check for loose or corroded connections
•Check for moisture damage to moving parts of
compressor & motor
Maintenance
Troubleshoot
Table of contents


