SKY PARAGLIDERS REVERSE 2 User manual
REVERSE 2
SKY
User Manual for REVERSE 2 Harness
Handbuch für Gurtzeug REVERSE 2
Mode d‘empoi de la REVERSE 2

ENG / DE / FR

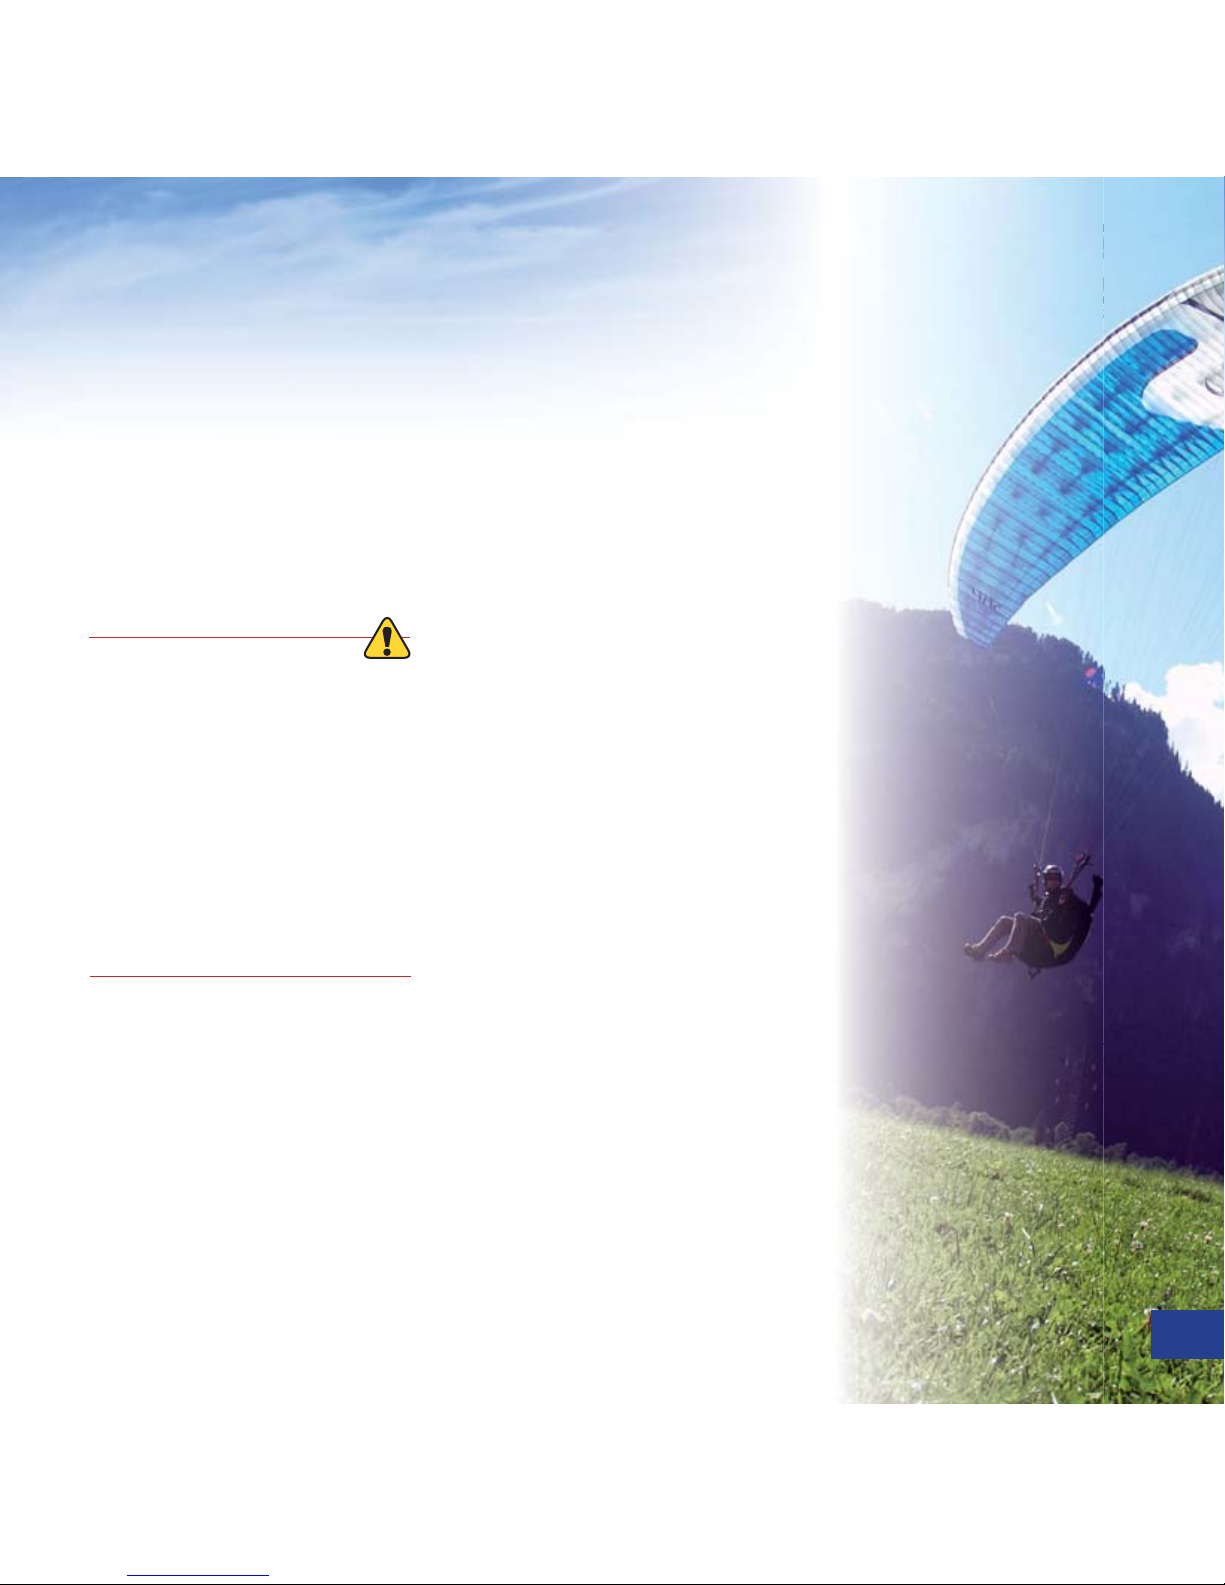
Thank youfor flying Sky Paragliders‘ products.
Thank you for buying REVERSE 2 harness.
We hope you will be satisfied with this product and wish you a lot of awesome flights. It is strongly recommended to
consult the manual before the first flight. The manual might help you to familiarise yourself with the product faster.
Danke,dass Sie sich für ein Produkt aus dem Hause Sky Paragliders entschieden haben.
Wir wünschen Ihnen viele schöne und unfallfreie Flüge mit dem neuen Sky Gurtzeug REVERSE 2.
Lesen Sie bitte diese Bedienungsanleitung sorgfältig durch. Bei auftretenden Fragen oder bei Problemen wenden Sie
sich bitte an den Fachhändler, Importeur oder direkt an Sky Paragliders. Dieses Produkt wurde zum Gleitschirmfliegen
entwickelt. Die Benutzung erfolgt immer auf eigene Gefahr. Der Pilot trägt alleine die volle Verantwortung für die
Inbetriebnahme des Produkts.
Mercide voler avec un produit Sky Paragliders, nous vous remercions de votre confiance.
Nous espérons que la REVERSE 2 vous apportera entière satisfaction et vous aidera à réaliser de très beau vols.
Avant votre premier vol, nous vous conseillons vivement de prendre connaissance de ce mode d‘emploi. Il vous
aidera à vous familiariser avec votre sellette.
Team Sky Paragliders
3

Contents Page 5
Inhalt Seite 16
Index Page 26
REVERSE 2
S, M, L, XL
ENG/DE/FR
4

Contents
English>
Introduction 6
1. General Information 6
2. Pilot‘s Profile 6
3. Reverse 2 Scheme 7
4. Harness Set-Up 8
1. Reserve Chute Installation 10–11
2. Speed System Adjustments 12
5. Check Before Flight 12
6. Take-Off 13
7. Landing 13
8. Adjustments of the Flying Position 14
9. Safety Information 15
10. Maintenance Checks 15
Contact 37
5
6
INTRODUCTION Introduction
At the time of delivery, this harness conforms to
the testing criteria of the „Luftfahrt-Bundesamts
LTF 91_09 (LTF - Luftfahrt-Tauglichkeits
Foderungen, or ”Flying Craft Airworthiness
Standard”) and/or the testing criteria for the
EN 1651-1999. Read more about the testing
regime in the technical data.
PLEASE NOTE
Any changes will invalidate the result of the
certification.
Use of this harness is at your own
responsibility. All liability is excluded by the
manufacturer or the distributor. The pilot is
responsible for airworthiness of his / her
aircraft. The pilot must comply with legal
regulations.
Model name: REVERSE 2
Total maximum weight in flight: see the
technical data.
Integrated reserve pocket with a large and
easy-to-grab handle.
Auto buckles.
SKY SAFETY STRAP SYSTEM.
Reversible.
Bar tacks as standard stitching procedure.
Cordura© material.
This user manual version dated 1 May 2011.
General Information
1
REVERSE 2 is aimed at:
Pilots who prefer sitting in flight.
Pilots keen on travelling and mountaineering
flights.
Simple and high-tech harness.
Pilot‘s Profile
2
6

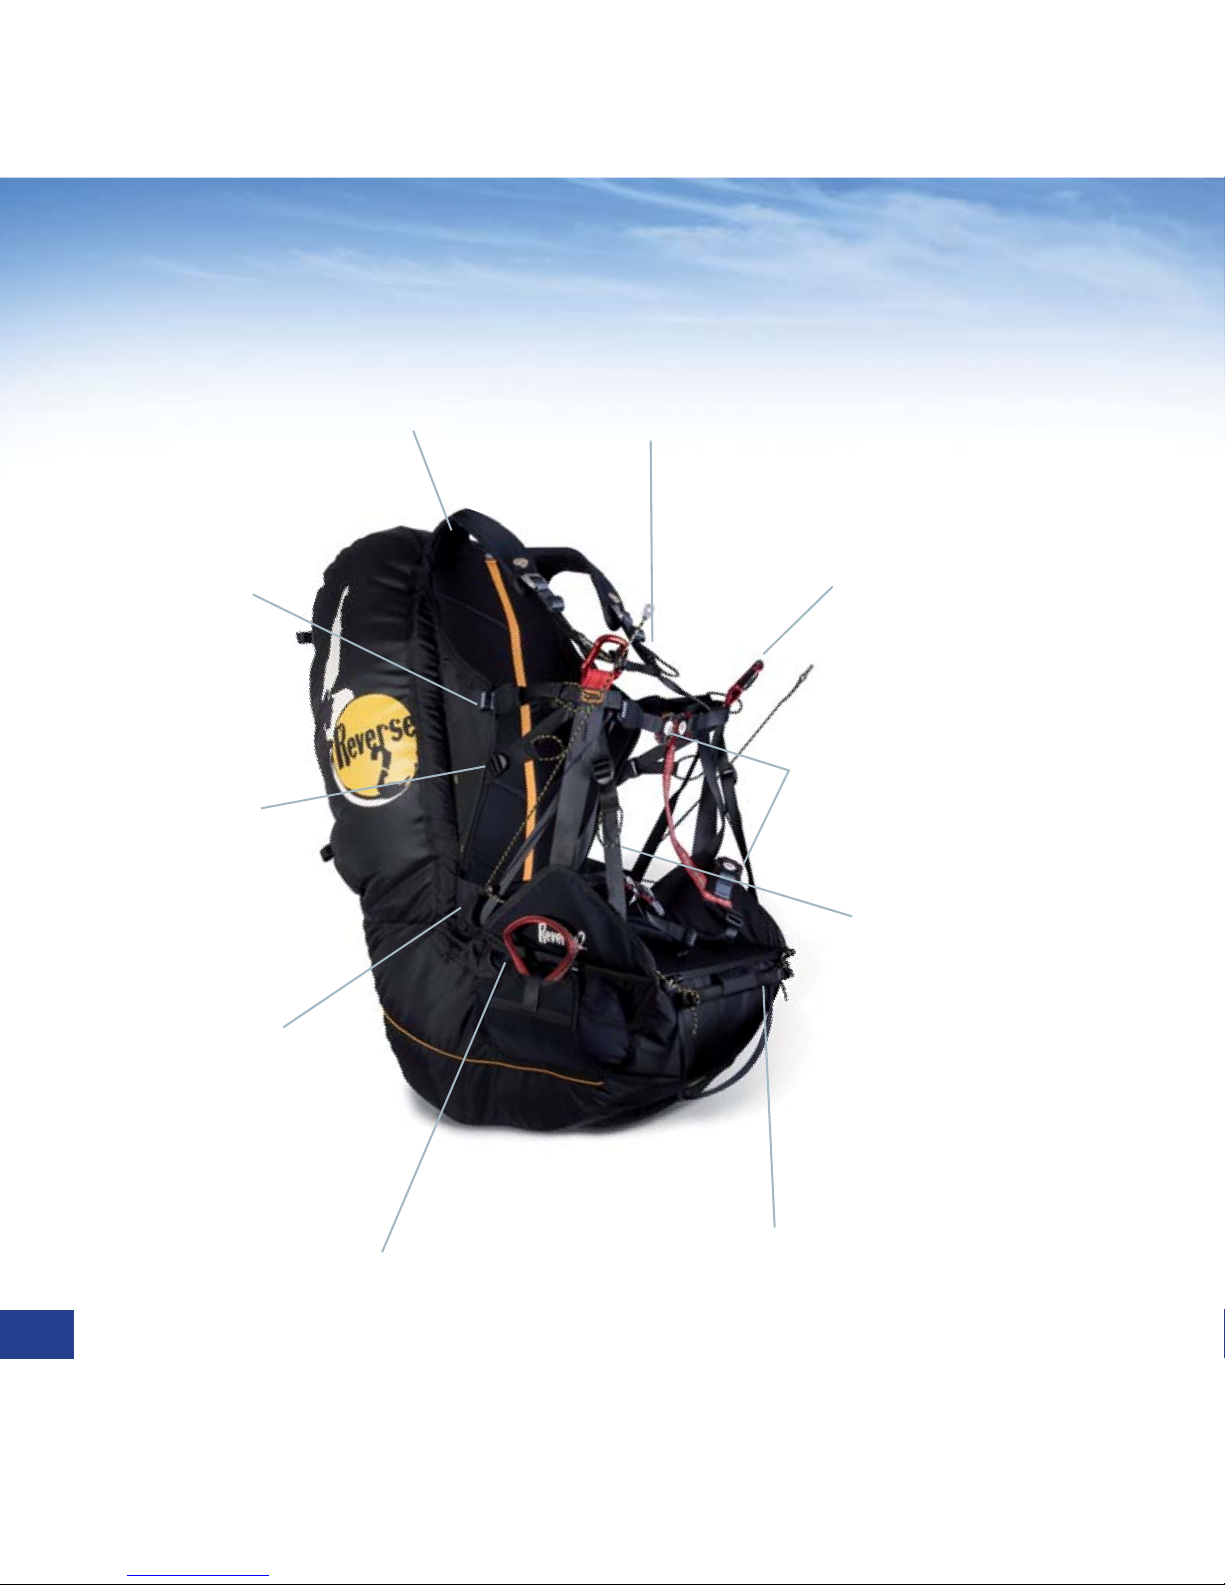
Shoulder Adjustement Straps
Main Suspention Points
Chest and Legs Straps with Automatic Buckles
Seat Board Adjustment
Speed Bar
Reserve Handle
Pulley for Speed System
Back Adjustement
Lateral Adjustement
Reserve Attachement
REVERSE 2
3
7

1) Reserve Chute Installation
The initial installation of the reserve parachute
must be done by specialists only.
We recommend that the initial installation of the
reserve parachute be done by an experienced
person. Ask the paragliding supplier to do the
initial installation of the reserve parachute, and
familiarise yourself with the process of installation.
The size of the reserve pocket on REVERSE 2 is
suitable for almost all current reserve systems. If it
is not possible to connect the harness reserve
handle to loops on the parachute deployment
bag inside the pocket, it can also be sewn in at
an appropriate place, which must be done by
a qualified person only.
WARNING!
After the installation of the reserve parachute in
the harness, it is ABSOLUTELY ESSENTIAL to
do a simulation under a static swing, making
sure that the parachute release system operates
correctly and the parachute comes out easily.
The elastic cord which closes the reserve pocket
must be checked regularly. If the cord is worn, it
must be replaced.
Every time you put the reserve parachute back
into the harness, check that it is sufficiently robust
by applying a load of 10 kg.
Before each flight, check that the pin and handle
are positioned correctly.
Harness Set-Up
4
8

9

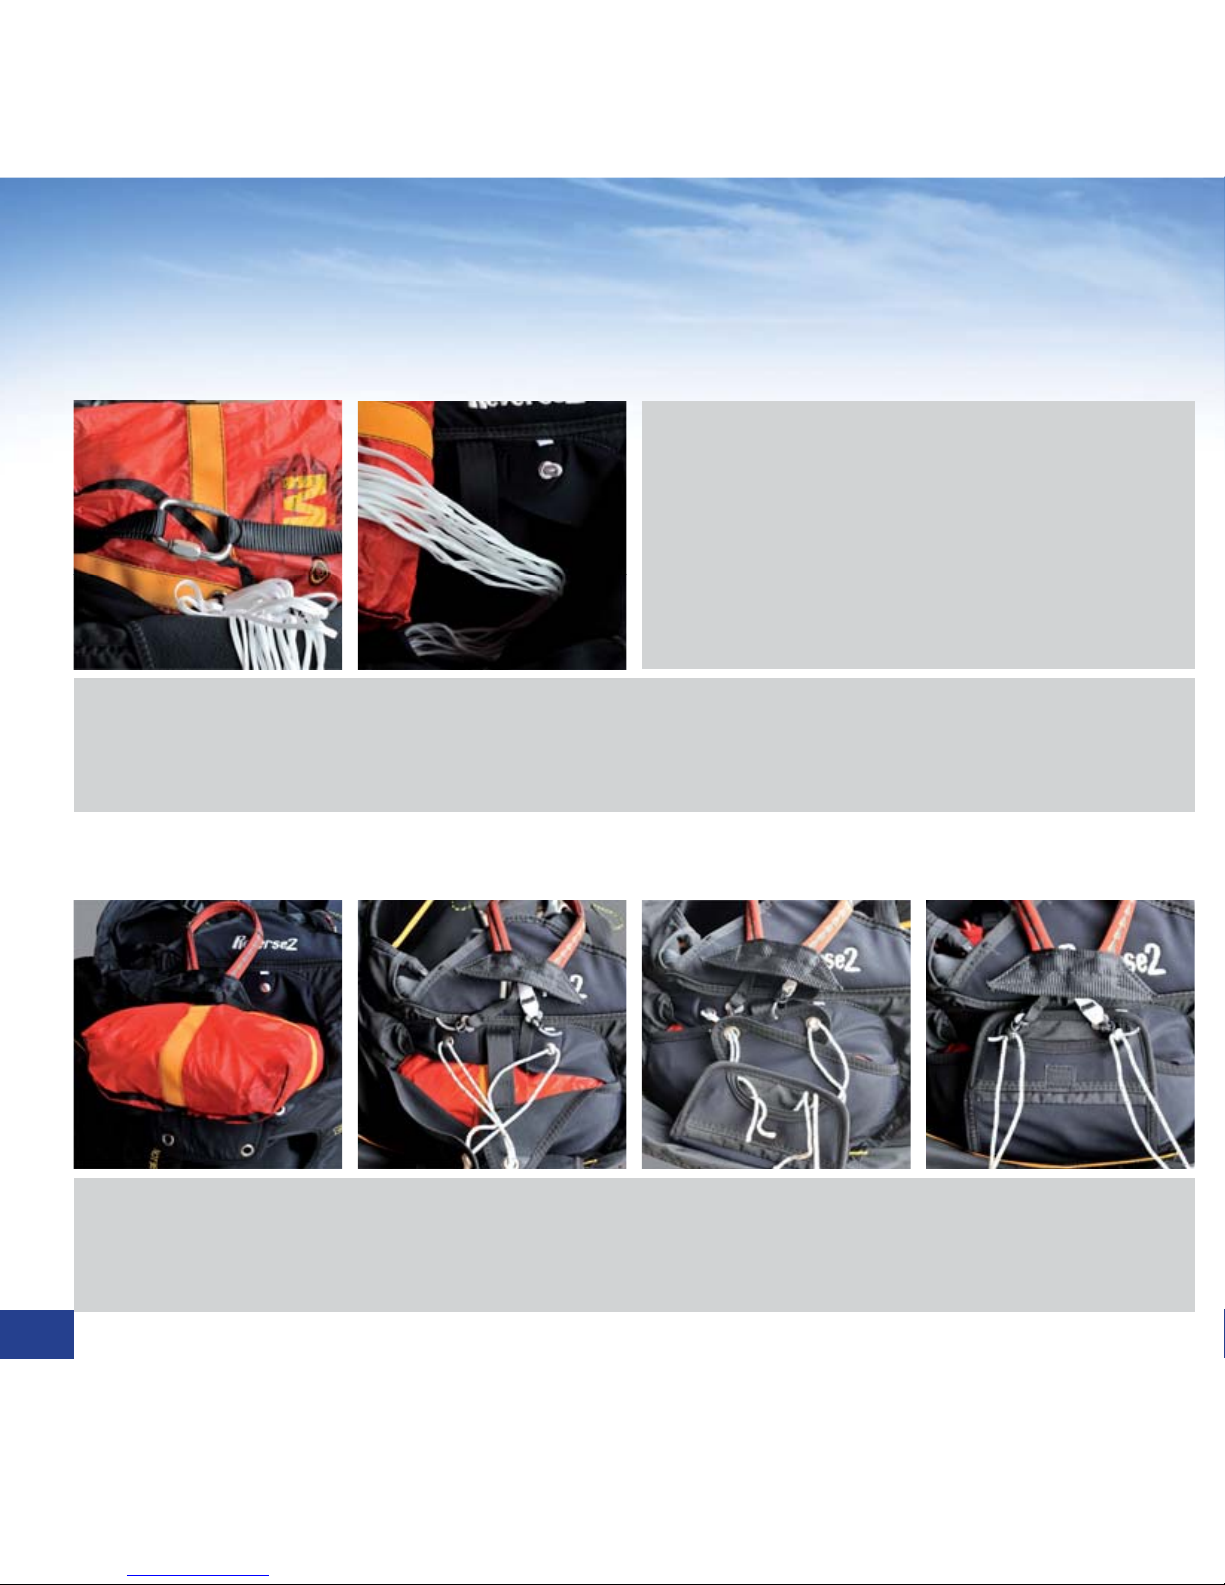
Installing the Reserve Chute
Reserve risers.
Step 1
Place the reserve in the container and close the flaps.
Step 2
Harness Set-Up
4
10

Close the pocket and put the needles in place.Step 3
Put the handle in place.Step 4
Installing the Handle
Closing the Container & Final Check
11
BEWARE!
PARAGLIDING IS AN EXTREMELY
DEMANDING SPORT REQUIRING THE
HIGHEST LEVEL OF ATTENTION, JUDGMENT,
MATURITY, AND SELF-DISCIPLINE. EVEN
SMALL DETAILS SHOULD BE CAREFULLY
CHECKED BEFORE FLYING.
Check the carabiners, and make sure that the
twist lock system enables them to be closed
automatically.
Check the buckles of your harness, they
should lock automatically.
Adjust the harness using a harness hanger or
simulator. When adjusting the simulator you
should make yourself familiar with the harness
and its parts. Test all adjustments, familiarise
yourself with using the reserve handle.
Check that the reserve handle and the needle
are in the right position.
What Else to Check Before
Take-Off:
Make sure that there are no twists on the lines
and risers that connect the harness to the glider.
Check chest, side and shoulder straps
adjustments.
Check that all buckles are locked.
Check your reserve handle.
2) Speed System Adjustment
The speed system should be adjusted at the
right length using a harness simulator.
The accelerator line cannot run through the
reserve handle. The line must „run inside“ on the
reserve side. Therefore REVEL 2 has a special
tube which is located on that side.
Speed System
4Check Before Flight
5
12

Before taking off it is extremely important to
adjust the harness so that you can be sure to get
into a sitting position easily after the take-off.
1. Put on the harness.
2. Fasten the leg buckles, and then the chest
strap buckle.
3. Push the leg straps down as far as possible
towards the knee, and then tighten them up
(if the leg straps are too high, it is difficult to get
into the harness after the take-off without using
one’s hands).
4. If necessary, loosen the shoulder straps (the
shoulder straps are adjusted according to the
size of the pilot, but must allow some free
movement, so that one can run easily).
5. Check that the lumbar straps are well-adjusted
so as to enable the required position after the
take-off.
6. Check that the chest strap is pre-adjusted
correctly.
7. Make sure that the leg straps and the chest
strap buckles are fastened correctly (closing
the buckles improperly often results in
accidents).
Take-Off
6
During the final approach change the sitting
position to the stading position. Do not hesitate
with the change of positions so that spinal
injuries caused by seated landings can be
avoided. Under no circumstances become
complacent about being equipped with a back
injury protection.
Landing
7
13

1) Side Adjustment
Choosing a position leaning too far back reduces
stability and increases the risk of twisting the
risers.
2) Adjustment of the Shoulder
Straps
In order to increase the comfort during the
take-off and while getting into a sitting position
the shoulder straps should be fairly loose to
avoid excessive straps‘ pressure in the standing
position.
3) Adjustment of the Chest
Strap
The tighter the chest strap is, the greater
efficiency of the Auto Balance System (stabilizing
system) and the less roll response will the wing
allow. The pilot may feel more stable in the
harness in turbulent conditions, the wing will
be more stable in case of an asymmetric
collapse, however it may be less inclined to
bank when turning. The stabilization brought
about by tightening the chest strap of REVERSE
2 remains reasonable, thanks to the integrated
Auto Balance System. REVERSE 2 is suitable for
pilots who wish to fly their wings using the weight
displacement method.
Warning: The chest strap adjustment can be
quite sensitive and it is best to be tested first it
under a static swing, and then in still air, before
trying to change it during a turbulent flight. Before
taking off, do not forget to pre-adjust your chest
strap. You will be able to enjoy a better flight
comfort.
Adjustment of the Flying Position
8
14

1) Flying Over Water
Do not use any kind of airbased protection
(Bump‘air, Cygnus-type Airbag, or Airtec) under
any circumstances if there is a risk of landing in
water. If you land in water using a Bump‘air,
there is a real danger that its buoyancy under the
base plate and behind the pilot’s back will cause
pushing the pilot‘s head under the water. During
SIV or flying over water, we recommend the use
of a lifejacket equipped with a collar which will
keep the pilot’s head above water in case of
losing consciousness.
2) Landing
Never land in a seat position, it could result in
serious injury, a back protector is not intended to
replace the landing gear.
Safety Information
9
1) Advice on Maintanance
The harness must be checked at regular
intervals, to eliminate the possibility of wear
and damages .
Any damaged parts should be repaired or
replaced by the manufacturer.
The carabiners must be replaced by new ones
every 5 years.
These carabiners must never be used for
anything else than a paraglider (not for
climbing or towing...).
All repairs must be carried out by the
manufacturer or by qualified persons who have
been authorized to do so by the manufacturer,
and always using the original materials (thread,
webbing, buckles).
The zip fasteners should be lubricated from
time to time, using a silicone spray.
The harness may be cleaned using mild soap
and a soft brush. If your harness gets wet, it is
advisable to treat your automatic buckles and
carabiners with silicone grease from time to time.
2) Disposal
The harnesses cannot be discarded. Please,
send the disused harnesses back to
Sky Paragliders or to your dealer. The used
harnesses will be disassembled and discarded
appropriately.
Maintenance & Checks
10
3) Guarantee
REVERSE 2 is guaranteed for 2 years against
any production fault since the date of purchase.
The guarantee does not cover:
Damage that was caused by misuse, by
neglecting the regular maintenance, or in case of
overloading the glider.
The guarantee also does not cover any damage
caused by inappropriate landings.
In case you are ever unsure about the information
contained in the manual, contact your SKY
dealer.
4) Conclusion
Aircrafts can become dangerous in critical flying
conditions. Always remember that your security
lies in your hands. Do not underestimate the
power and forces of nature.
Last but not least do not forget to enjoy flying.
The SKY Team wishes you a lot of exciting flights
and happy moments with your REVERSE 2.
15
Inhalt
Deutsch>
Einführung 17
1. Allgemeine Informationen 17
2. Anforderungen an den Piloten 17
3. Reverse 2 Schema 18
4. Gurteinstellungen 19
1. Installieren des Rettungsschirms 20–21
2. Beschleunigersystem Einstellungen 22
5. Überprüfungen vor dem Flug 22
6. Start 23
7. Landen 23
8. Verstellung der Sitzposition im Flug 24
9. Sicherheitsinformation 25
10. Wartung und Kontrolle 25
Kontakt 37
16
Einführung
Dieses Gleitschirm-Gurtzeug entspricht zum
Zeitpunkt seiner Auslieferung den
Prüfrichtlinien des Luftfahrt-Bundesamts LTF
91_09 (LTF - Luft-Tüchtigkeits-Forderungen) und/
oder den Prüfrichtlinien EN 1651-1999. Angaben
über die verwendeten Prüfrichtlinien finden Sie
in den technischen Daten.
VORSICHT
Jede eigenmächtige Änderung hat das
Erlöchen der Beriebserlaubnis zur Folge.
Die Benützung dieses Gurzeug erfolgt
auschließlich auf eigene Gefahr.
Jede Haftung vom Hersteller oder Vertrieb
ist ausgeschlossen. Der Pilot trägt die
Verantwortung für die Lufttüchtigkeit seines
Fluggerätes. Es wird vorausgesetzt, dass
der Pilot die gesetzlichen Bestimmungen
respektiert und seine Fähigkeiten den
Ansprüchen des Gleitschirms entsprechen.
17
Name des Gleitschirm-Models: Reverse 2
Zugelassenes Gewicht beim Flug, siehe
technische Daten.
Integrierter Rettungsschirmcontainer.
Automatikverschlüsse.
SKY SAFETY STRAP SYSTEM.
Durchgehendes Gurtband.
Handbuch Version vom 01.05.2011.
Allgemeine Informationen
1
REVERSE 2 Wendgurtzeug ist geeignet für
Piloten:
Die in sitz ender Position fliegen wollen.
Dür Bergsteiger die Gleitschirmfliegen.
Für Piloten die ein einfach zu bedienendes und
leichtes Gurtzeug suchen.
Anforderungen An Den
Piloten
2
17
Schultergurte
Hauptaufhängung
Brustgurt und Beinschlaufe mit Automatikschnallen
Sitzbrettstützung
Beschleunigersystem
Rettungsgriff
Umlenkrollen für Beschleuniger
Rückenabstützung
Seitlicher Brustgurt
Rettungsleinen
REVERSE 2
3
18

1) Installieren Sie den
Rettungsschirm
Bitte wenden Sie sich wegen der
Erstinstallation des Rettungsgerätes ins
Gurtzeug an einen Fachhändler.
Nach dem ersten Einbau des Rettungsgerätes
in das Gurtzeug muss eine sogenannte
Kompatibilitätsprüfung vorgenommen werden.
Diese Kompatibilitätsprüfung wird auf dem
Prüf- und Packnachweis eingetragen und
unterschrieben. Der Pilot selbst muss im
Gurtzeug in einem Gurtzeugsimulator sitzend die
Probeauslösung des Rettungsgerätes
vornehmen.
ACHTUNG!
Die Größe der Rettungsgerätekontainer des
REVERSE 2 passt für nahezu alle gängigen
Gleitschirmrettungssysteme. Sollte das zu
verwendende Rettungssystem am
Innenkontainer keine Möglichkeit bieten, den
Auslösegriff des Gleitschirmgurtzeugs
einzuschlaufen, so kann dieser auch an
geeigneter Stelle des Innenkontainers
angenäht werden. Diese Arbeit muss durch
einen Fachbetrieb ausgeführt werden. Die
Verschlussschlaufe des
Rettungsschirmkontainers muss regelmäßig
überprüft werden. Bei Abnutzung muss diese
Leine ausgetauscht werden. Vor jedem Einbau
des Rettungsgerätes muss die Festigkeit der
Verschlussschlaufe überprüft werden
(Mindestfestigkeit =10 kg).
Vor jedem Flug die richtige Position des Griffes
und des Splints überprüfen.
Gurteinstellungen
4
19
Installieren des Rettungsgerätes
Verbindung Rettungsgerät mit Gurtzeug mittels Schraubschäkel.
Schritt 1
Einbau des Rettungsgerätes in den Rettercontainer und Schließen des Rettercontainers.Schritt 2
Gurteinstellungen
4
20
Table of contents
Languages:
Other SKY PARAGLIDERS Accessories manuals


 installation instructions")


