Slingbox Solo User manual

QUICK START GUIDE

WELCOME!
Thank you for buying the SlingboxTM SOLO. Follow these instructions to connect your new
Slingbox and start watching your TV anywhere on your laptop or mobile*.
For more information on setup, visit support.slingmedia.com.
Remote Control
IR Cable
S-Video
Cable
Composite A/V
Cable
B
C
DE
WHAT’S IN THE BOX:
A/V Pack
Power/Network Pack Slingbox HD Connect
Quick Start Guide Slingbox SOLO
Power AdapterEthernet Cable
B
WHAT’S IN THE BOX:
A
Remote Control
IR Cable
Composite A/V
Cable
C
Quick Start Guide
Slingbox SOLO
Accessories Pack

STEP 1: CONNECT VIDEO/AUDIO SOURCE
HD COMPONENT and AUDIO CONNECTIONS
The Slingbox SOLO can connect to one High Definition (HD) device or one Standard Definition
(SD) device such as a DVR, Cable Box, Satellite Receiver or DVD Player.
Visit http://support.slingmedia.com for a list of compatible devices.
*To watch your Slingbox on your mobile device you must purchase SlingPlayer™ Mobile software separately.There
are versions of SlingPlayer Mobile specific to many PDAs, mobile phones and smart phones. A free 30-day trial is
available at http://www.slingmedia.com. SlingPlayer Mobile is not compatible with all PDAs, mobile phones, smart
phones or providers.
It may not work or be used in all countries. Note that some providers charge additional usage fees for video stream-
ing. Go to http://www.support.slingmedia.com for a list of supported mobile devices.
AUDIO
HD COMPONENT
If your A/V source has component output, use a component cable (sold separately).
t$POOFDUUIFDPNQPOFOUDBCMFHSFFOCMVFSFEGSPNUIF"7TPVSDFPVUQVUUPUIF4MJOHCPY
Component IN. This supplies the video signal only.
t5PDPOOFDUBVEJPSFNPWFUIFDPNQPTJUF"7DBCMFGSPNZPVSBDDFTTPSJFTQBDL
t$POOFDUUIFSFEBOEXIJUFDPNQPTJUFDPOOFDUPSTGSPNUIF"7TPVSDFPVUQVUUPUIF4MJOHCPY
Audio IN.
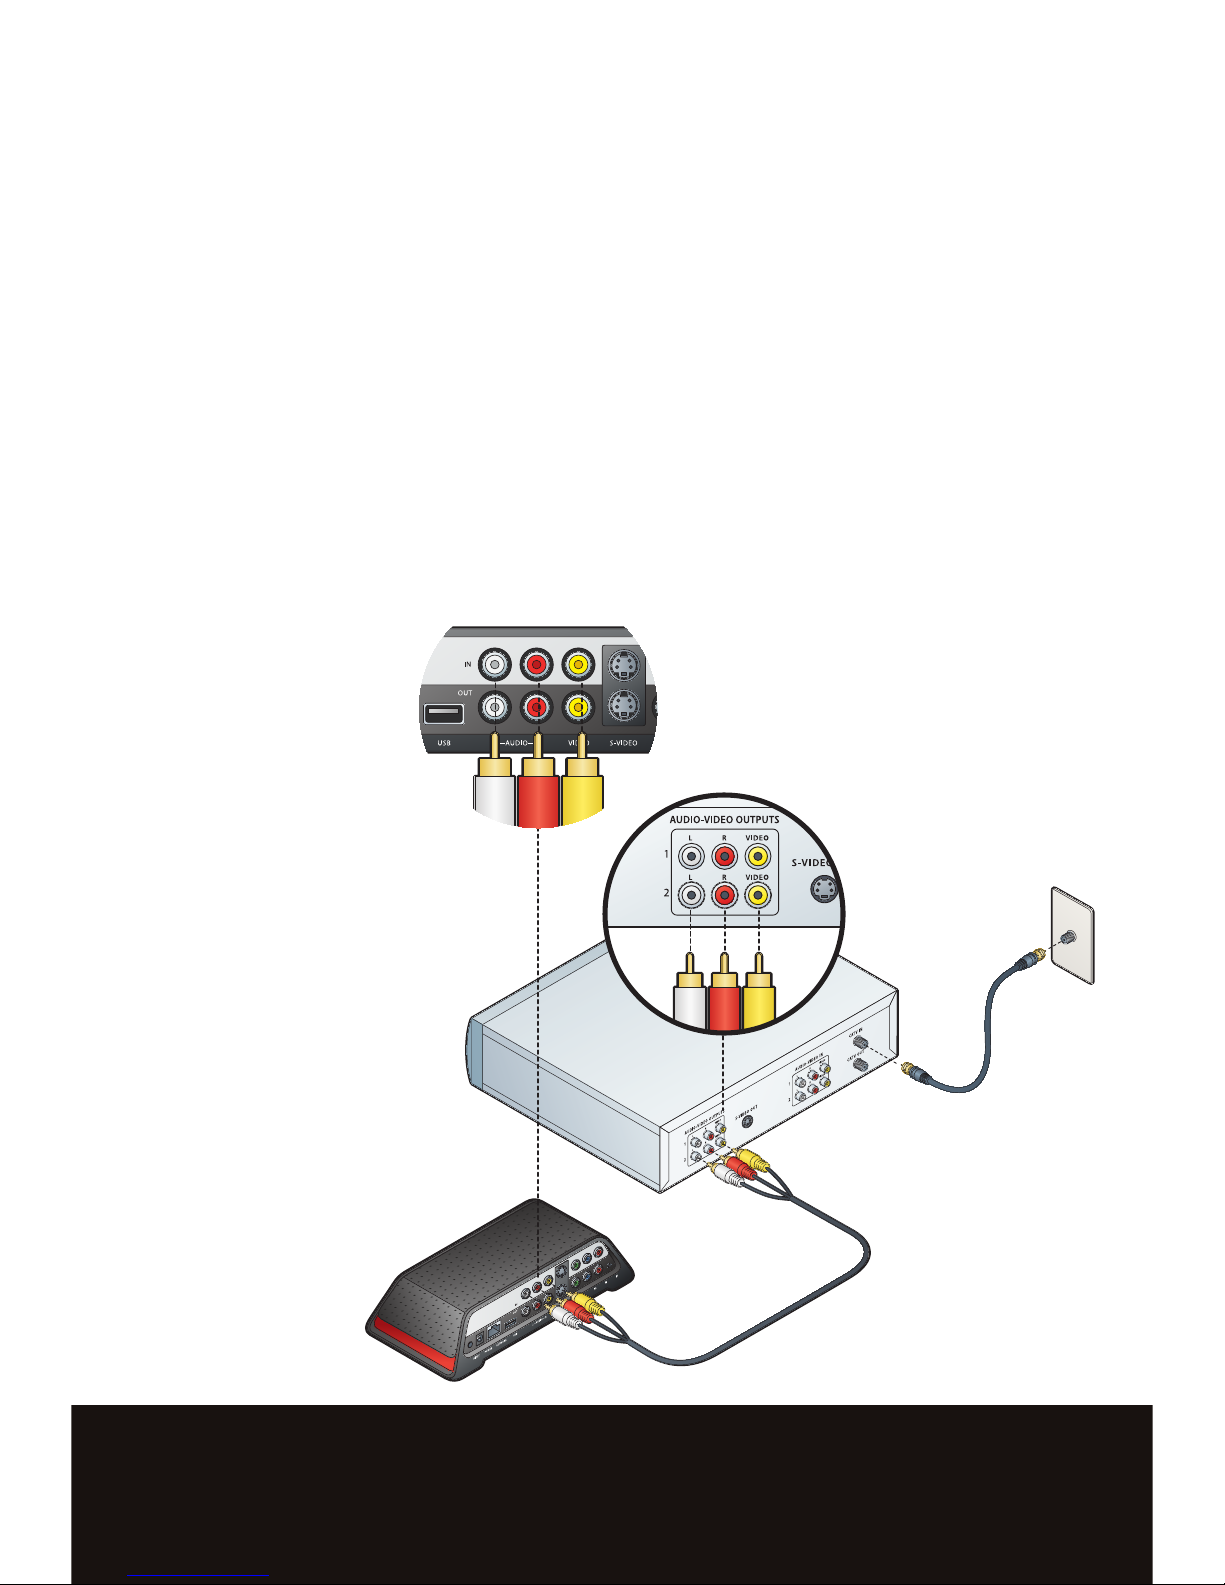
COMPOSITE and S-VIDEO CONNECTIONS
If your A/V source does not have component output, use composite or S-Video.
tTo connect composite, remove the composite A/V cable from the accessories pack.
tConnect the composite A/V cable (white, red, yellow) from the A/V source output to the
Slingbox Composite IN.
tTo connect S-Video, use an S-Video cable (sold separately).
tConnect the S-Video cable from the A/V source output to the Slingbox S-Video IN. This
supplies the video signal only.
tTo connect audio, remove the composite A/V cable from your accessories pack.
tConnect the red and white composite connectors from the A/V source output to the
Slingbox Audio IN.

STEP 2: CONNECT REMOTE CONTROL IR CABLE
t3FNPWFUIFSFNPUFDPOUSPM*3DBCMFGSPNUIFBDDFTTPSJFTQBDL
t$POOFDUUIFSFNPUFDPOUSPM*3DBCMFUPUIF*3DPOOFDUJPOPOUIF4MJOHCPY
t1MBDFUIFSFNPUFDPOUSPM*3DBCMFIFBETPOUIFUPQPSCPUUPNPGZPVS%73BOEPS
Cable/Satellite Box so they point at its IR sensor.
TIP: The IR sensor is on the front of your Cable/Satellite box or
DVR, usually behind a dark, sometimes reddish plastic
window. If you don’t see the sensor, shine a flashlight through
the window and look for a small bulb similar to the one on the
end of the remote control IR cable.
Make sure they extend out far enough over the front of the
device to send a signal to your DVR or Cable/Satellite Box. You
may want to affix the remote control IR cables using the
adhesive pads after installation is complete.

STEP 3: CONNECT TO YOUR NETWORK
tRemovFUIF&UIFSOFUDBCMFGSPNUIFBDDFTTPSJFTQBDk.
t1MVHPOFFOEPGUIF&UIFSOFUDBCMFJOUPUIF4MJOHCoY/&TW03,DPOOFDUJPO
t$POOFDUUIFPUIFSFOEUPyPVSIPNFOFUwPSLSPVUFS.
—PS
&5)&3/&5JA$,
$POOFDUFEUPRPVUFS
—PS
4-*/(-*/,
$POOFDUFEUPRPVUFS
ROU5&3
%JSFDU$POOFDU
* SlingLink sold separately.
5*1*GyPVIBWFNVMUJQMF
SPVUFSTPOyPVSIPNF
OFUwPSLQMFBTFHPUP
TVQQPSUTMJOHNFEJBDPN
GPSJOTUSVDUJPOTPOIoXUP
TFUVQUIF4MJOHCoYPO
yPVSOFUwPSL
The Slingbox works with any high-speed Internet connection or broadband
home network. You must have a router to use the Slingbox.
/O5&TIF64#QPSUIBT
CFFOEFTJHOBUFEGPS
GVUVSFVTF

STEP 4: CONNECT POWER SOURCE
tRemovFUIFQowFSBEBQUFSGSPNUIFBDDFTTPSJFTQBDL
t$POOFDUUIFQowFSBEBQUFSJOUPUIF4MJOHCoY1O8&3DPOOFDUJPO
t1MVHUIFQowFSBEBQUFSJOUPBOFMFDUSJDBMPVUMFU
TI1:*GUIFOFUwPSLMJHIU
EPFTOoUDoNFPOXJUIJO
30TFDPOETNBke
TVSFUIBUUIF4MJOHCoYJT
DPrSFDUMZDPOOFDUFE
UPZPVSOFUwPSLSPVUFr.
4FFTSPVCMFTIPPUJOHPO
UIFreverTFTJEeGoSmore
TPMVUJPOTPSHPUP
TVQQPSUTMJOHNFEJBDPN
When plugged in, the lights blink a few times as the Slingbox starts up.
Once the lights stop blinking, your Slingbox is ready.
NETWORK 1OWER

To enjoy your Slingbox, you will need:
tTV signal (Cable, Satellite, DVR)
tBroadband Internet Service
tA router on a home network
tPC or Mac Computer
You will also need to write down the type, brand and model of the audio/video device that will be
connected to your Slingbox SOLO. You’ll need this information later on for the software portion of
the setup.
DEVICE TYPE: (EX: DVR)
BRAND: (EX: DISH NETWORK)
MODEL: (EX: ViP622)
WHERE IT IS CONNECTED:
COMPONENT
COMPOSITE
S-VIDEO
WHAT YOU’LL NEED:
STEP 5: SOFTWARE SETUP
Now that you have the Slingbox setup, you are ready to install the software.
Before you begin, make sure your computer is on the same network as your Slingbox.
Please go to http://
downloads.slingmedia.com and follow the instructions to download the latest
SlingPlayer software for your computer.
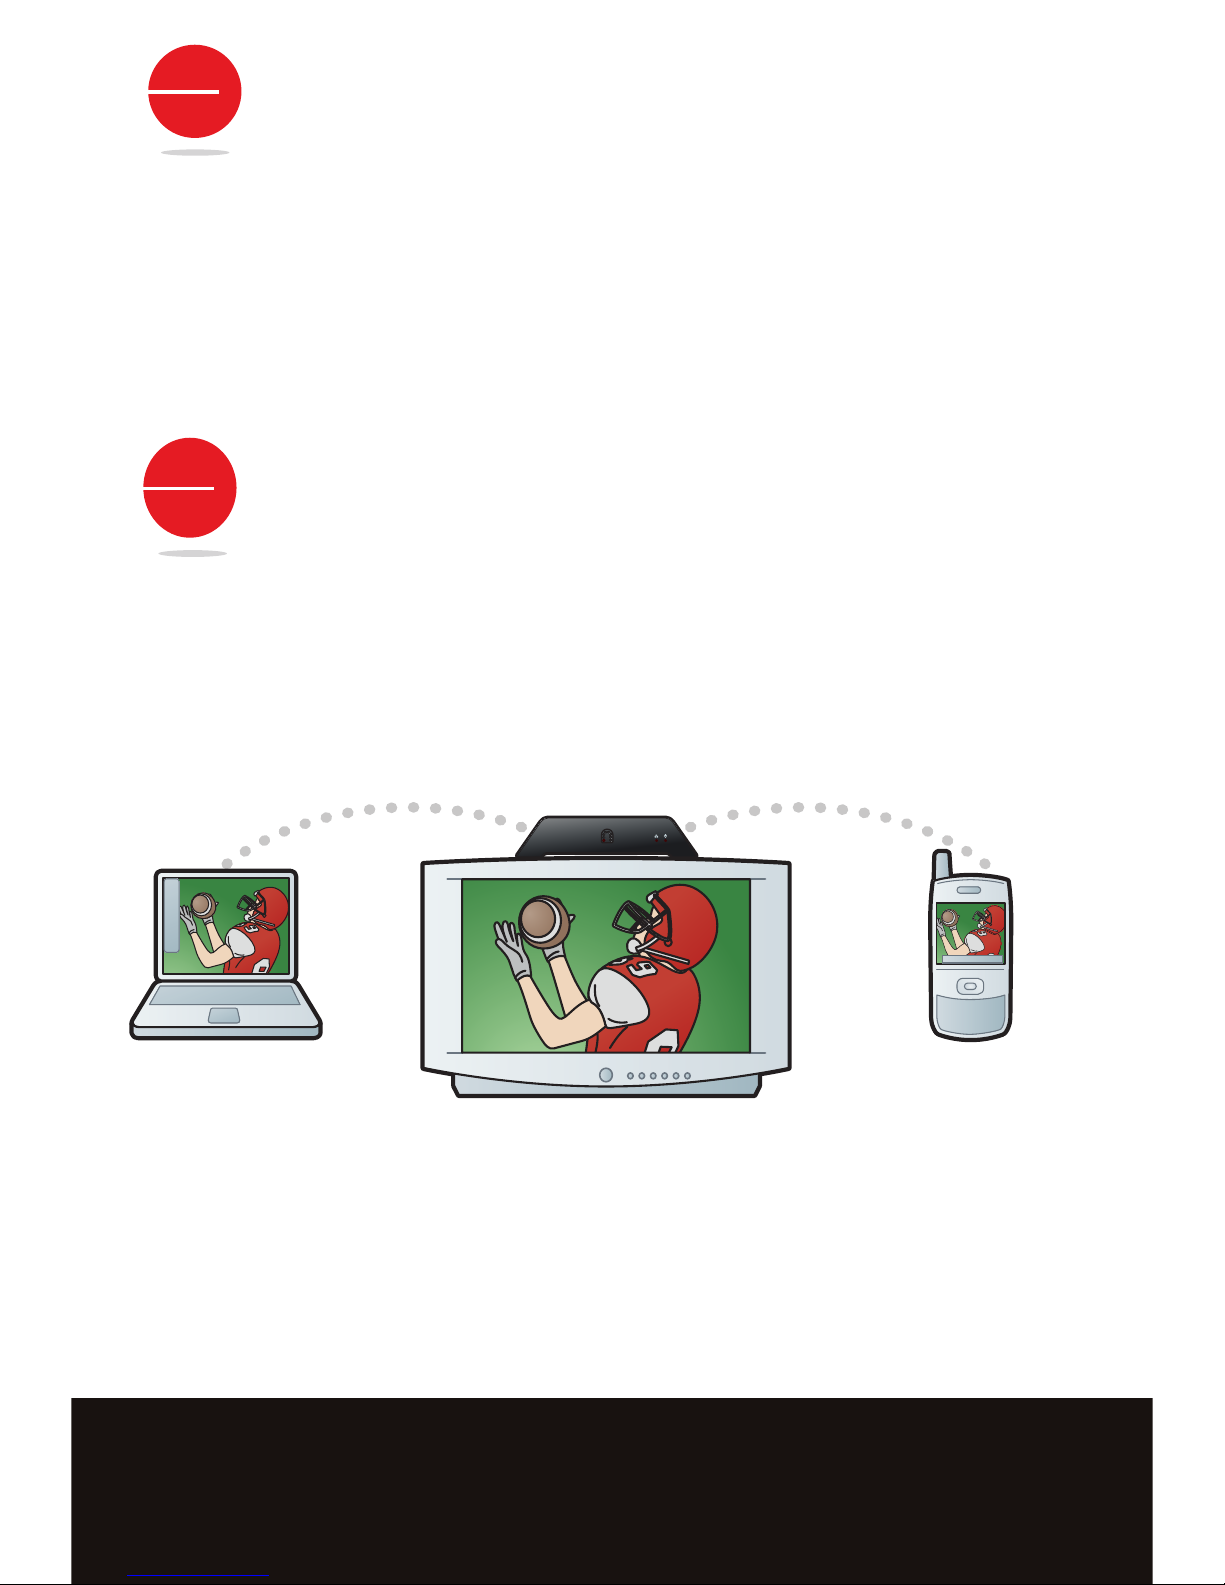
STEP 6: USING YOUR SLINGBOX
Congratulations! You are now ready to enjoy your TV on your PC, Mac or mobile*—at home or 3,000
miles away—via the Internet. Thanks for buying the Slingbox SOLO.
*To watch your Slingbox on your mobile device you must purchase SlingPlayer™ Mobile software separately.There
are versions of SlingPlayer Mobile specific to many PDAs, mobile phones and smart phones. A free 30-day trial is
available at http://www.slingmedia.com. SlingPlayer Mobile is not compatible with all PDAs, mobile phones, smart
phones or providers.
It may not work or be used in all countries. Note that some providers charge additional usage fees for video stream-
ing. Go to http://www.support.slingmedia.com for a list of supported mobile devices.

TROUBLESHOOTING
1. If the power light is not on:
Disconnect the power cable from both the Slingbox and the electrical outlet
and reconnect them - making sure that they are secure.
2. If the network light is not on:
Disconnect the Ethernet cable from the back of the Slingbox and re-insert it.
You will hear a click when it is fully inserted.
Do the same with the other end of the Ethernet cable, making sure that it is
attached to your router, optional SlingLinkTM or optional wireless game adapter.
Make sure your router and/or wireless game adapter is on the same network
as your Slingbox.
3. If the network light is continuously blinking:
Press and hold the reset button on the back of the Slingbox for five seconds.
The lights on the front of the Slingbox quickly flash from left to right, then flash
slowly. This resets the Slingbox to factory settings.
Turn your router off and back on again. Note: Most routers do not have on/off
switches. You may need to unplug and plug the router back into the electrical
outlet.
4. The Setup Wizard and the SlingPlayerTM application do not discover
the Slingbox on your network:
Some firewall security software blocks the Slingbox from being recognized on
your home network. If this occurs, you need to change your security software
settings to see the Slingbox as a device on your network.
5. You don’t see your audio/video source while installing the SlingPlayer software:
Re-check the cable connections between your A/V devices and the Slingbox.
Make sure the cables are fully inserted into the connectors on the back of the
Slingbox. The cables should fit snugly.
6. The Setup Wizard and the SlingPlayer application are not controlling
your device:
Make sure the remote control IR cable is fully inserted.
Move the emitters to a different location on the front of your Cable/Satellite
box or DVR.
7. If your TV is no longer receiving a signal:
Connect the output of the Slingbox to your TV’s inputs. Check to make sure
your TV is set to the correct input.
NEED MORE HELP?
Go to support.slingmedia.com.

FCC STATEMENT
This equipment has been tested and found to comply with the limits for a class B
digital
device, pursuant to part 15 of the FCC Rules. These limits are designed to provide
reasonable protection against harmful interference in a residential installation. This
equipment generates, uses and can radiate radio frequency energy and if not installed
and used in accordance with the instructions, may cause harmful interference to radio
communications. However, there is no guarantee that interference will not occur in a
particular installation. If this equipment does cause harmful interference to radio or
television reception, which can be determined by turning the equipment off and on,
the user is encouraged to try to correct the interference by one or more of the
following measures:
tReorient or relocate the receiving antenna.
tIncrease the separation between the equipment and receiver.
tConnect the equipment into an outlet on a circuit different from that to which the
receiver is connected.
tConsult the dealer or an experienced radio/TV technician for help.
This equipment has been certified to comply with the limits for a class B computing
device, pursuant to FCC Rules. Operation with non-approved equipment or cables is
likely to result in interference to radio and TV reception. The user is cautioned that
changes and modifications made to the equipment without the approval of manufac-
turer could void the user's authority to operate this equipment.

Copyright © 2007 Sling Media, Inc., Sling Media, Slingbox, SlingPlayer, SlingPlayer Mobile, and SlingStr
e
the registered trademarks of Sling Media, Inc. Other products and companies mentioned are the tradema
their respective owners and not Sling Media, Inc. This product is designed in the United States and man
u
-
tured in China. 082-10005

Slingbox SOLO
User Guide

Slingbox SOLO • Page 2
© 2007 Sling Media, Inc. All rights reserved. Patents pending.
Slingbox, SlingPlayer, SlingPlayer Mobile, SlingStream, and SlingBar are trademarks of
Sling Media, Inc.
Apple, Apple TV, iPod, iPod Hi-Fi, iTunes, Mac and Macintosh are registered trademarks of
Apple Inc.
All other products and services, screen images, logos, and trademarks are the property of their
respective owners. All names used are fictitious and the similarity to any person living or dead
is strictly coincidental.
All video images are simulated.
<Slingbox SOLO UG (en-US)>

Slingbox SOLO • Page 3
Table of contents
Welcome .............................................................................................................. 5
Getting to know your Slingbox PRO ..................................................................................................... 5
Connecting the audio and video cables .............................................................................................. 6
Connecting your Slingbox PRO when it’s not near your computer ................................................ 8
Updating SlingPlayer or the firmware for your Slingbox PRO ........................................................ 9
Restoring your Slingbox PRO to factory settings .............................................................................. 9
Specifications.................................................................................................... 11
Table 1: Slingbox PRO (US) .................................................................................................................. 11
Table 2: Slingbox PRO Power Adapter .............................................................................................. 11
Sling Media warranty and return policy ....................................................... 12
Safety, Environmental, FCC, and Legal notices ........................................... 14
Important safety instructions .............................................................................................................. 14
Environmental information .................................................................................................................. 16
Federal Communications Commission notices ................................................................................ 16
Legal notices .......................................................................................................................................... 16

Slingbox SOLO • Page 4
Slingbox SOLO • Page 5
Welcome
Thanks again for purchasing a Slingbox SOLO. This guide gives you helpful information
about your Slingbox.
If you’re looking for basic information about setting up your Slingbox, see the
QuickStart Guide that came with it. If you don’t have yours, you can find a PDF version
of the QuickStart Guide in the Slingbox SOLO section of the Sling Media Support Site
at http://support.slingmedia.com
Before going any further, read the important safety and environmental
information that begins on page 14.
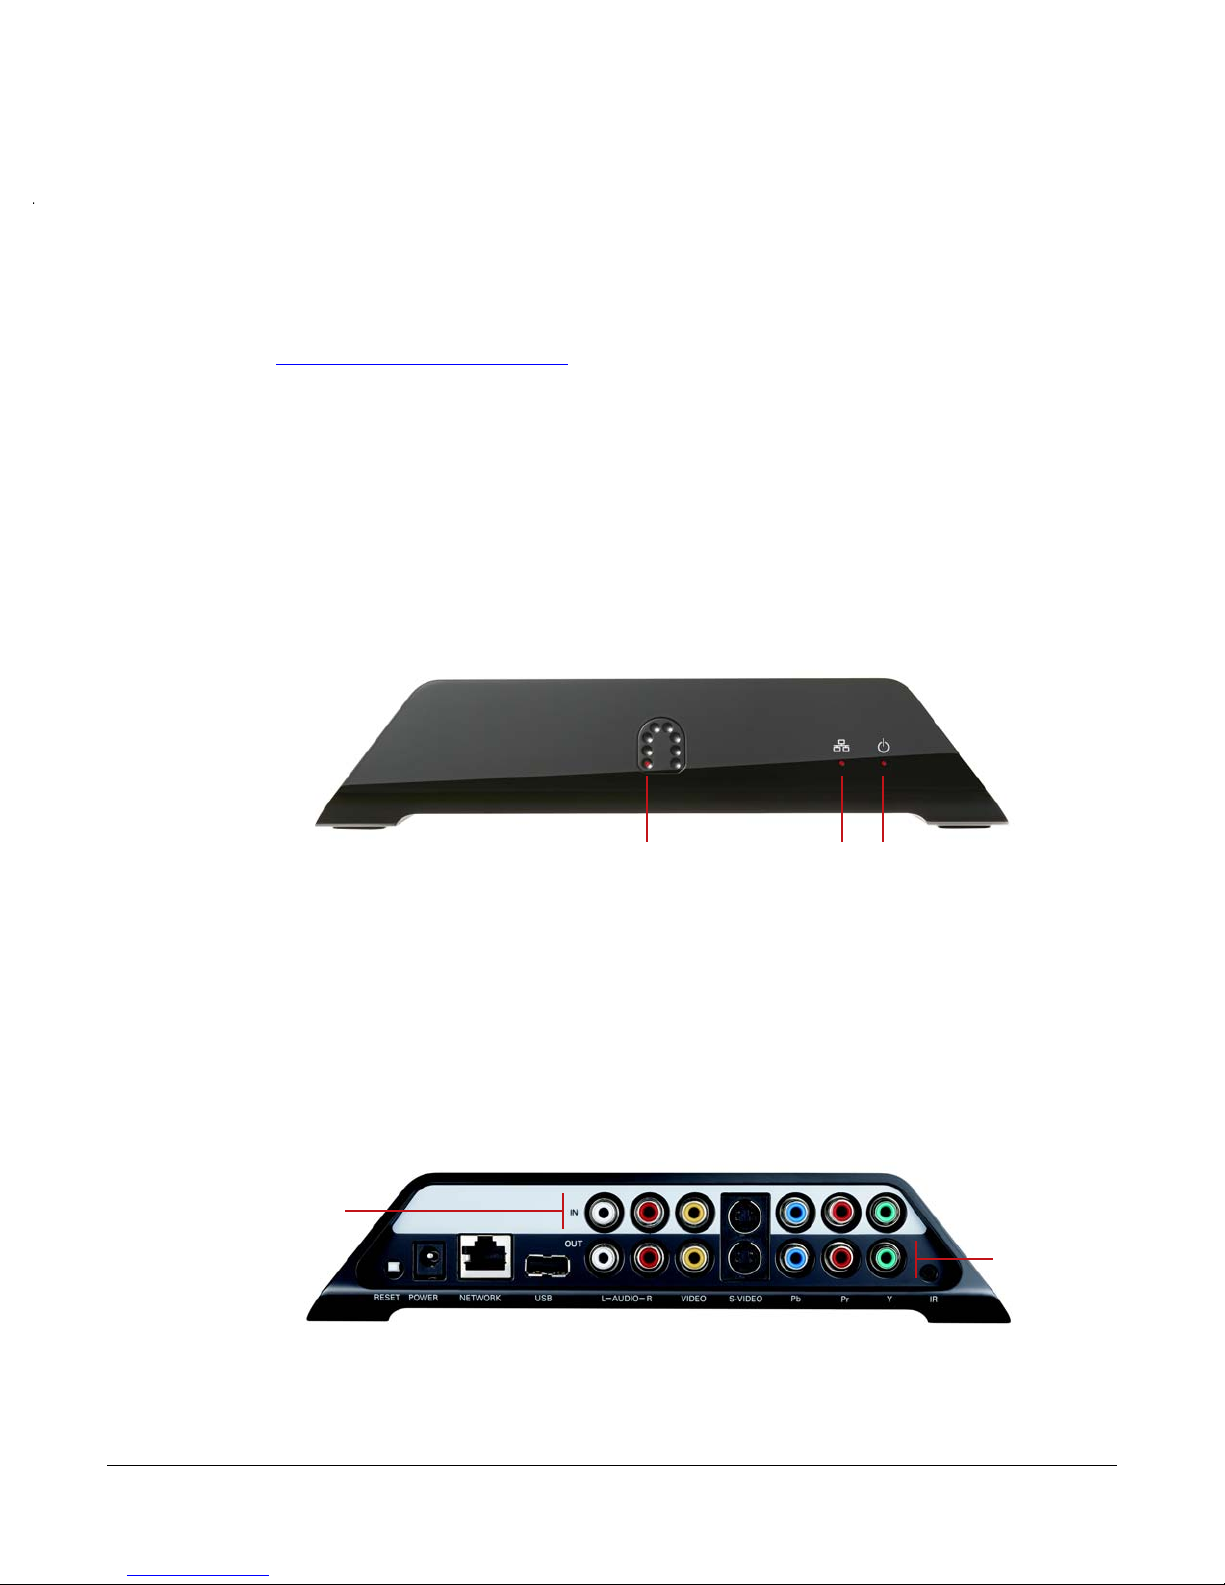
Getting to know your Slingbox SOLO
The front of your Slingbox SOLO has three lights on it.
The Access light glows when you are connected to your Slingbox, either at home or
remotely. The Network light glows when your Slingbox is communicating with your
home network. The Power light glows when your Slingbox is connected to power.
The back of your Slingbox SOLO has input and output ports. Cables from your video
device go into the Slingbox IN ports. Cables to your TV go into the OUT ports.
Power lightNetwork lightAccess light
IN
ports
are above.
Connect
them to
your video
device.
OUT
ports
are
below.
Connect
them to
your TV.
Slingbox SOLO • Page 6
Connecting the audio and video cables
Now that you’ve seen the back of your Slingbox, let’s connect it!
Step 1: Audio connections
It’s best to first connect the audio cables.
Step 2: Video connections
Next, choose the kind of video you have. Choose one of the methods below—the one
that provides the optimal video in your situation. After choosing, connect the cables.
Audio info Use these ports and cables Do this
These connections
provide stereo
sound.
Any cable with jacks
shaped like these are
also called RCA
cables.
Audio Connection
1.
Connect one end of the audio cables
to your video device and the other
to the IN ports on your Slingbox.
2.
Connect another set of audio cables
to the OUT ports and then to your
TV.
--White is for left audio.
--Red is for right audio.
Don’t connect the yellow cable yet.
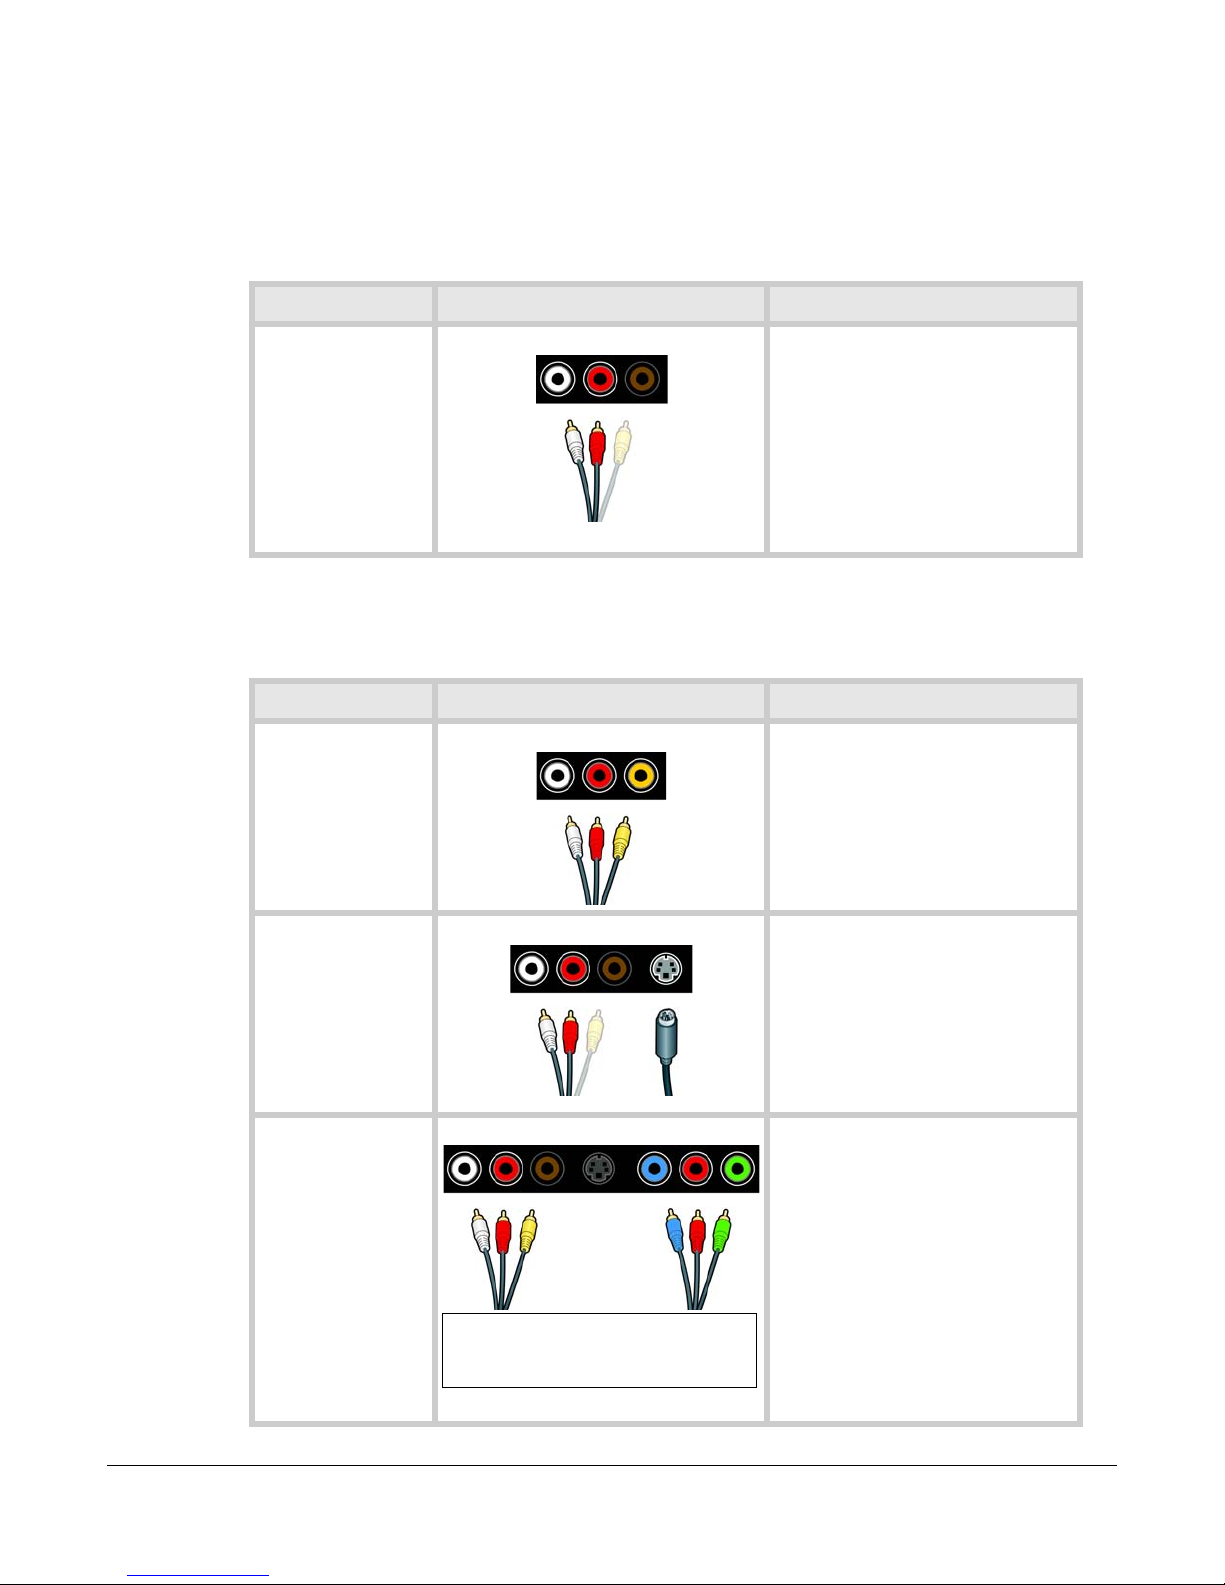
Video info Use these ports and cables Do this
Very good quality.
A connection that
uses the red and
white audio cables
along with the yellow
video cable is called a
composite
connection.
Composite Connection
1.
If you have an available yellow video
port on your video device, connect
one end of the yellow video cable to
your video device and the other end
to the IN ports on your Slingbox.
2.
Connect another yellow video cable
to the OUT port and then to your TV.
Better quality.
This is an S-video
connection.
S-video cables carry
no sound, so they
must be used with
the red and white
audio cables.
S-video Connection
1.
If you have an available S-video port
on your video device, connect one
end of the S-video cable to your
video device and the other end to
the IN port on your Slingbox.
2.
Connect another S-video cable to
the OUT port and then to your TV.
Don’t connect the yellow cable.
Best quality.
A connection that
uses the set of
green, blue, and red
cables is called a
component
connection.
Component video
cables carry no
sound, so they must
be used with audio
cables.
Component Connection A device with component video splits
the video signal into its three parts:
green, blue, and red.
1.
If you have available component
video ports on your video device,
connect one end of the component
video cables to your video device
and the other ends to the IN ports
on your Slingbox.
2.
Connect another set of component
cables to the OUT ports and then to
your TV.
Don’t connect the yellow cable.
Note that the component ports on some
Slingboxes are in a different order. Match
the colors, regardless of the order.
Slingbox SOLO • Page 7
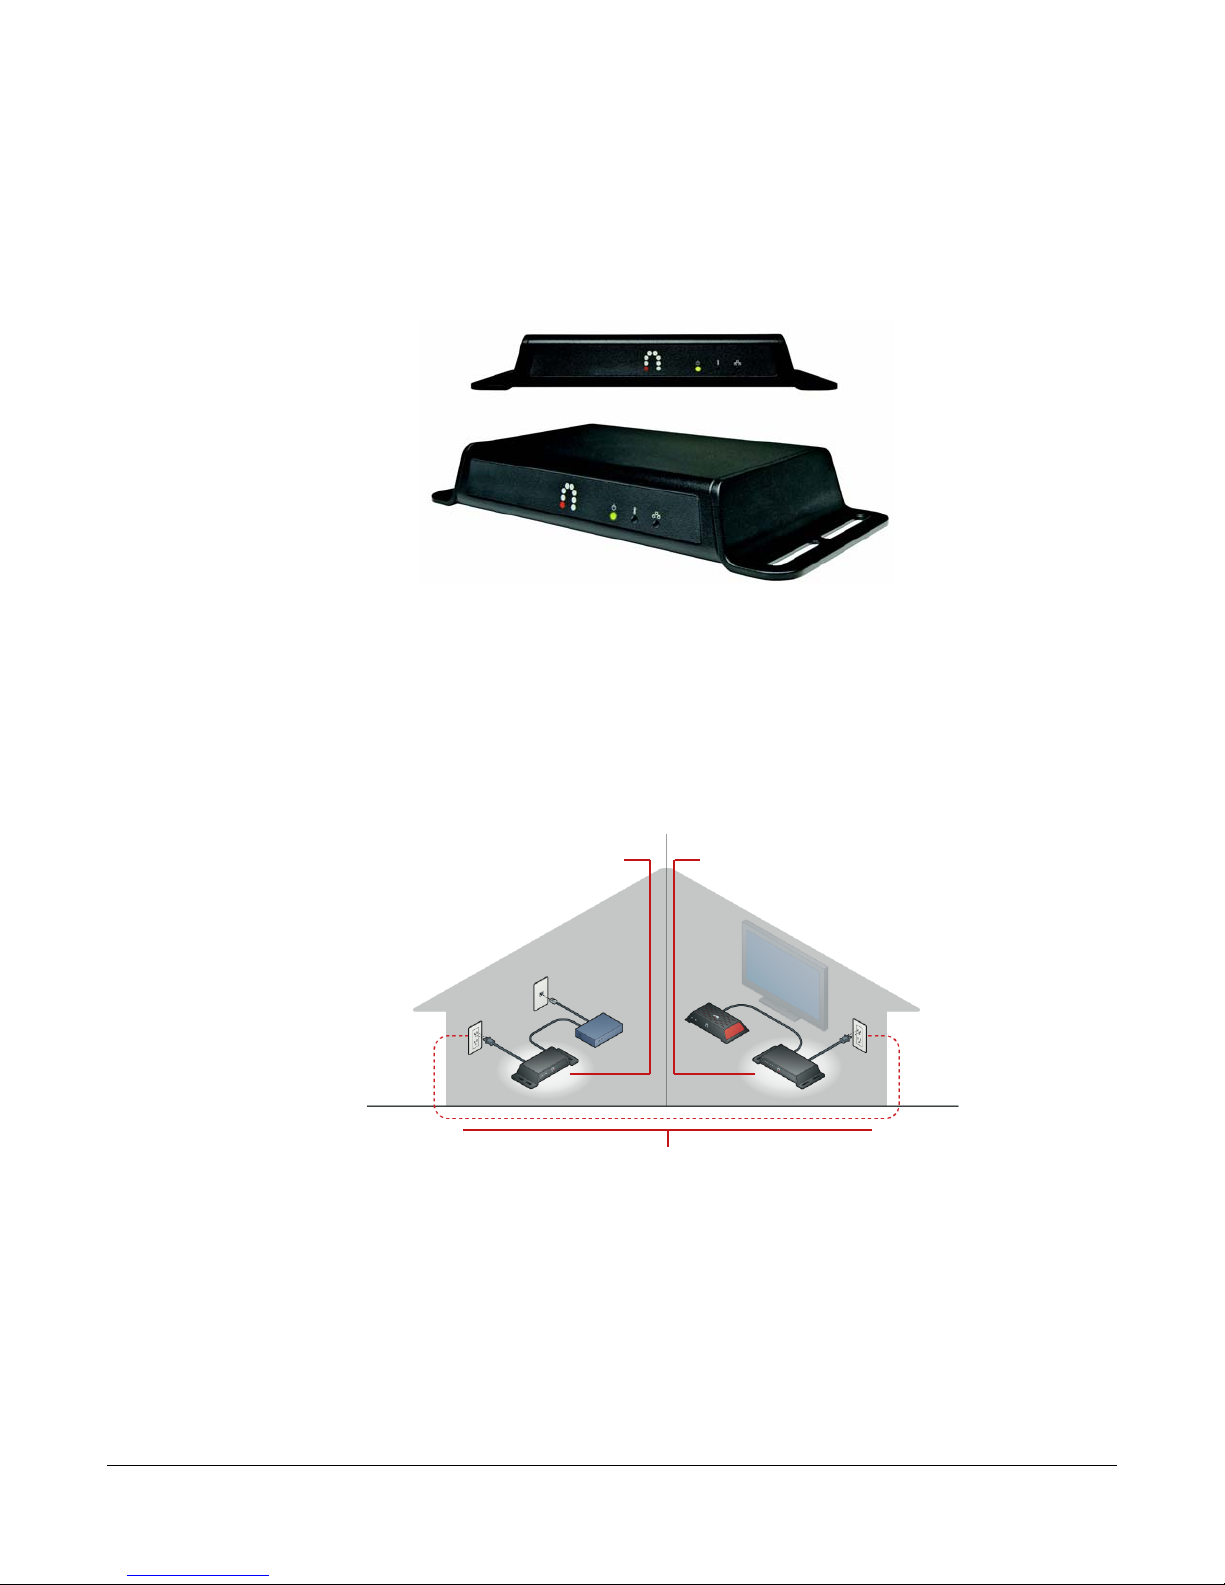
Connecting your Slingbox SOLO when it’s not
near your computer
Many times, your video equipment and your Slingbox are on one side of the house and
your computer is on the other. To connect these things, you could spend hours and
hours crawling around, stringing cables and configuring networking software. It’s
much easier to use the SlingLink TURBO set.
Each set consists of a 1-port unit that you connect to your router and another SlingLink
TURBO that you connect to your Slingbox. Plug one SlingLink TURBO into the wall
outlet near your router, and plug in the other wherever you have your Slingbox
installed, and voila! You're connected.
You don't even have to fiddle around with software to get it up and running.
There’s also a 4-port unit that you can connect to your Slingbox and three other
networkable devices.
One SlingLink TURBO is connected
to your router
and is plugged into a power outlet
The other SlingLink TURBO is connected
to your Slingbox
and is plugged into a power outlet
The SlingLink Turbos use your existing power line to communicate

Slingbox SOLO • Page 8
Updating SlingPlayer or the firmware for your
Slingbox SOLO
From time to time, we release updated versions of SlingPlayer software and Slingbox
firmware. Both of these make improvements and sometimes add features.
Most of the time, new firmware is included in a new version of SlingPlayer.
Occasionally, new firmware is released separately. Installation of either is simple.
To update SlingPlayer or the firmware for your Slingbox:
1.
When SlingPlayer informs you that a new version of firmware or a new
version of SlingPlayer is available, download the file and save it to a location
that’s easy for you to find.
2.
Follow the onscreen instructions.
Restoring your Slingbox SOLO to factory
settings
There are times that you may need to restore your Slingbox to its factory settings. For
example:
•If you replace the router that’s connected your Slingbox
•If you forget your password
•If you move your Slingbox to another home or network
With your Slingbox powered on, press and hold the Reset button on the back of
Slingbox for five seconds. The lights on the front of your Slingbox will quickly flash from
left to right and then flash slowly. Your Slingbox will reset after 30 seconds. Once reset,
the Power light stays solid.
Reconfiguring your Slingbox after resetting it.
The steps are slightly different, depending on the type of computer you’re using.
Reconfiguring with SlingPlayer for the PC
1.
With the Slingbox still connected to your network, go to the Slingbox menu
and select Slingbox Directory.
2.
On the left side of the Slingbox Directory window, click the Slingbox that
was reset.
Note:
If you restore factory settings, all of your Slingbox settings will be
cleared and it will need to be reconfigured using your SlingPlayer
software.
Other manuals for Solo
1
Table of contents


