Solena Crystal Ball User manual

LED Crystal Ball
REMOTE CONTROL DMX512 CRYSTAL BALL LED LIGHT
User's Manual
Read this anual before using. Do not atte pt to open the housing or repair
this device by yourself without contact us!

General
instructions
Troubleshooting
1. If the power supply indicator doesn't light up and the light doesn't work, please
Unpacking: check the power supply, the input voltage and the fuse.
Thank you for purchasing this product. lease read user guide for safety and before using 2. In Stand-Alone operation, if the power supply indicator is light up and sound
the product. Keep this manual for future reference. This product can create perfect light active indicator isn't light up, but the light is shut off doesn't work.
programs and effects since it has passed a series of strictly tests before delivery. lease check A. Because sound is too small make for light shut off in sound active, please
the attachments listed on the page after opening the carton. Immediately upon receiving increase the music volume or increase audio sensitivity with sensitivity knob,
a fixture, carefully unpack the box. Check the box contents to ensure that all parts are present please check as below.
and that they are in good condition. If any part appears damaged from shipping, or if the B. lease check if unit has been set up in slave mode, then set up in master mode.
box shows signs of mishandling, notify the shipper immediately. In addition, retain the box 3. In Master-Slave operation, slave unit don't function, please check as below.
and all the packing material for inspection.In any event, save the carton and all packing material A. Make sure to there's only one master in the chain, and the others are set in slave mode.
because, in case that you have to return the fixture to the factory, you will have to do so in its B. Make sure to control the unit without DMX console controlling.
original box, with its original packing. C. Make sure to take a good quality power cable and connection.
1. LED Light:
1 CS
2. ower Cable: 1 CS 3. User Guide: 1 CS
Warranty Warnings:
Safty Notice: 1. Damages caused by the disregard of this user manual are not subject to Warranty.
lease read the following notes carefully because they include important safety information The dealer will not accept liability for any resulting defects or problems.
about the installation,usage and maintenance of this product. It is important to read all these 2. lease consider that unauthorized modifications on the device are forbidden due to
notes before starting to work with this product. safety reasons. lease note that damages caused by manual modifications on the
device or unauthorized operation by unqualified persons are not subject to warranty.
3. If this device will be operated in any way different to the one described in this
manual, it may suffer damages and the guarantee becomes void. Furthermore, any
other operation may lead to dangers like short-circuit, burns electric shock, etc.
After trying the above solution you still have a problem, please contact your dealer
or our company for service.
Page 1 Page 10
LED Expected Lifespan
LEDs gradually decline in brightness over time. HEAT is the dominant factor that leads to
the
acceleration of this decline. ackaged in clusters, LEDs exhibit higher operating
temperatures than in ideal or singular optimum conditions. For this reason when all color
LEDs are used at their fullest intensity, life of the LEDs is significantly reduced. It is
estimated that a viable lifespan of 40,000 to 50,000 hours will be achieved under normal
operational conditions. If improving on this lifespan expectancy is of a higher priority,
place care in providing for lower operational temperatures. This may include climatic-

IR control Introduction
Technical
Specification
Function:
1.the user can choose the voice control, automatic work mode, DMX512 work mode with remote
control.
2.Under remote control mode, the remote controller works like a MINI DMX512 controller, can
manually adjust the brightness of the color and control jumping, frequently flashing, rotating,
movement, zoom(+/-). Speed is adjustable
3.Remote control distance is up to 8 Meters
recautions
A. Using infrared remote controller to control the machine running, the launch of the infrared
remote controller must on the machine head of infrared receiving head.
B. Infrared remote controller to control the machine run, infrared emission head sent via infrared
data, if the machine can receive data correctly, LED digital display will flash once, if not lease
check The launch of the infrared remote controller whether on the machine head of infrared
receiving head.
Page 9 Page 2
Feature:
◆With the newest LED technology, this LED light can creat an amazing and romantic
lighting effects for your place.
◆It has over 200 beams of LED lighting from the transparent case. The beams on the wall
looks like handreds of flowers drifting round and round.
◆Compact and lightweight, exquisite appearance, small size, streamline design, attractive
effects.
◆Clear and sharp lighting effects even without fog/smoke
◆Easy to use, plug and play
◆LCD digital display, manual function: color selection, jumping, dimmer, strobe, Sound
Active
◆Stable working, no hassle on warranty
◆Automatic rotation once power on
◆Built-in microphone can trigger external sound
◆DMX control function: 1. color change 2.strobe speed 3. brightness dimming 4.rotation
direction 5. rotation speed 6. Sound active
◆Remote control
Specification:
◆LED power output: 6x1W (Red:1W*2,Green:1W*2,Blue:1W*2)
◆long life working hours:20000 H
◆Rotation angle: 180°
◆Cooling system: air cool
◆Working environment temperature: 0℃-40℃
◆Operation Modes: AUTO, Sound, DMX, Master/Slave, Remote control
◆DMX Channel: 9
◆Input Voltage: 90V-240V AC 50-60Hz
◆LED Light size: 185*185*150mm
◆Net weight: 0.5Kg
◆Gross Weight: 0.8Kg
◆Volume weight: 1.6kg(/5000) on inner gift box, 23.6kg(/5000) on outer carton box.
◆Gift box size: 190*190*160(0.006m³)
Slave function
DMX IN
Color change
Speed control
Flash mode
Fade mode
Remote function
AUT mode
Down/decrease UP/ increase
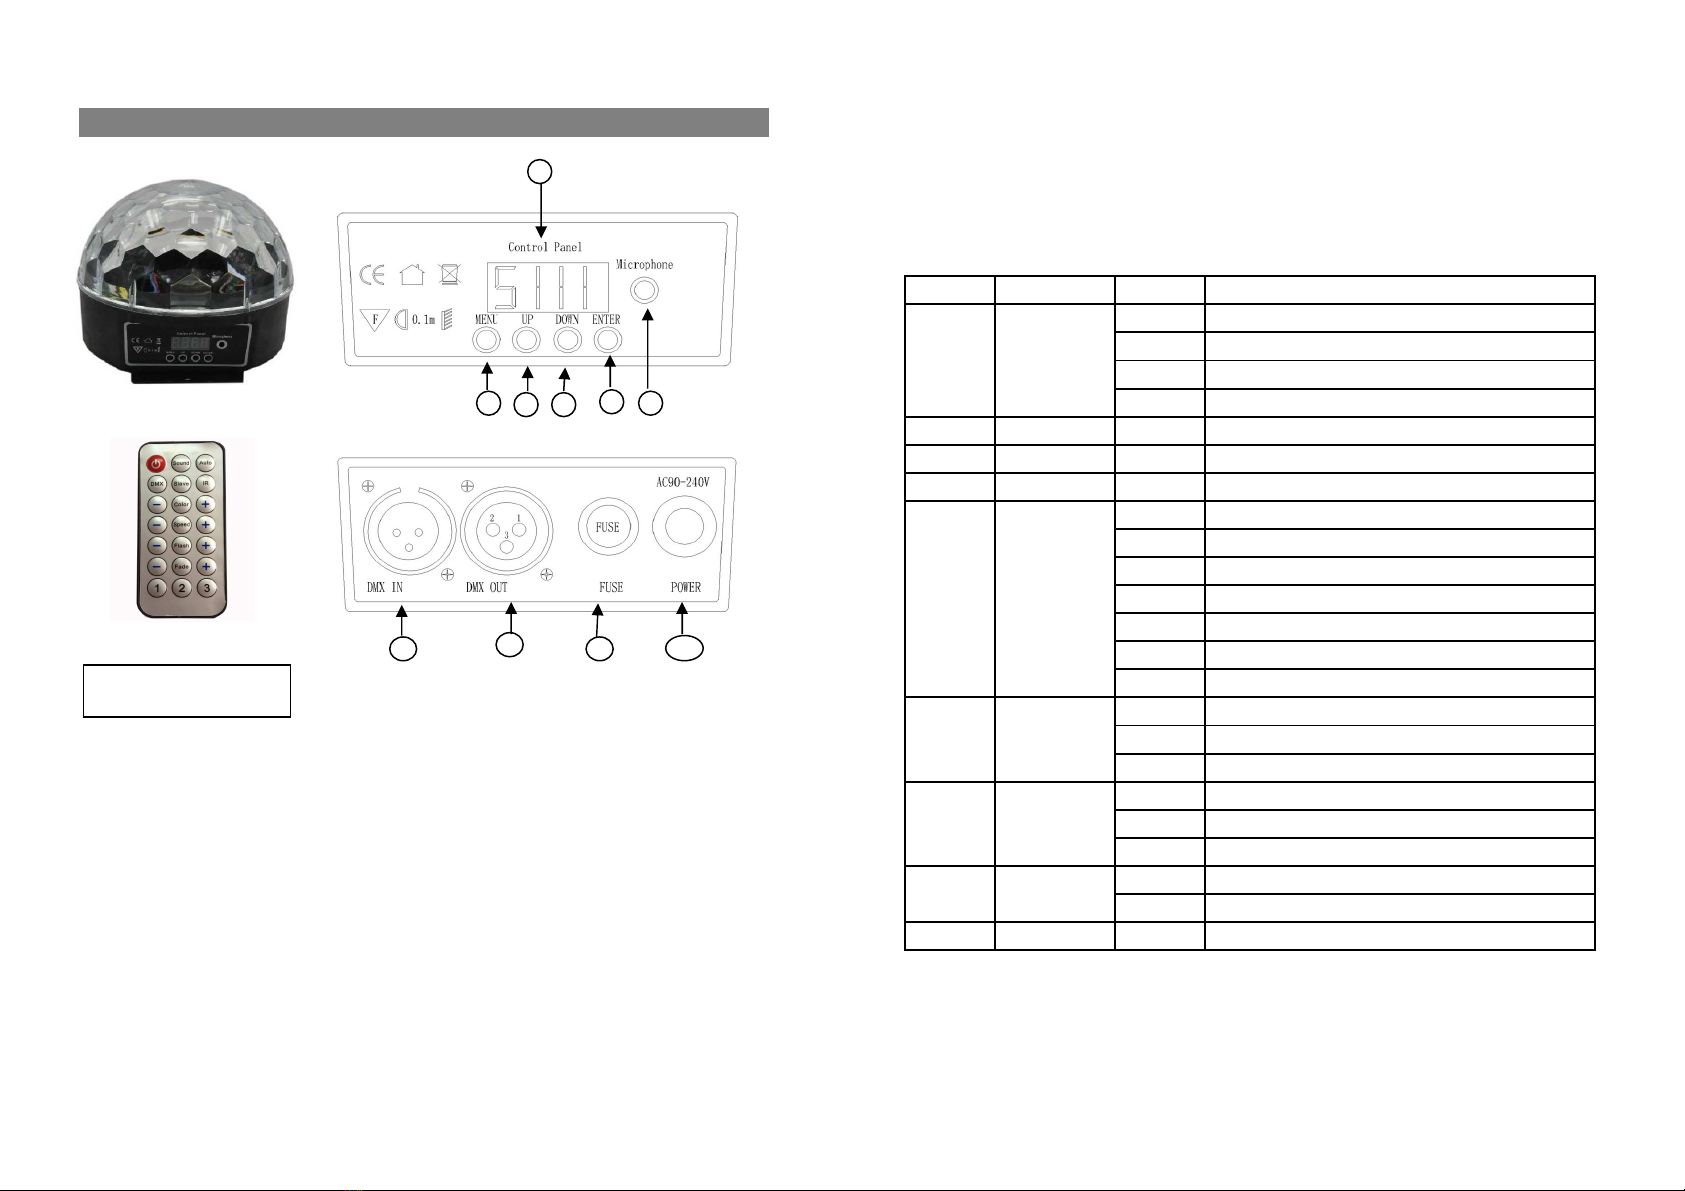
Fixture
Apperance
DMX Control
The system only accepts the DMX512 signal of international standard to control the system
Front anel Figure mode, the light beam ON /OFF, running direction, running speed and twinkle speed etc.
DMX Control:
The LED light only accepts the DMX512 signal of international standard to control the light.
DMX Control Para eter Chart
Channel Function Value Description
CH1 Mode
0~63 Close, LED OFF
64~127 Sound active mode
128~191 AUTO mode
192~255 DMX mode
Rear anel Figure CH2 Red brightness 0~255 dim ----bright
CH3 Green brightness 0~255 dim ----bright
CH4 Blue brightness 0~255 dim ----bright
CH5 LED color
control
0~31 R-G-B-RG-RB-GB-RGB color selection
32~63 R--G--B AUTO color change
63~127 RG--RB--GB color change
128~191 R--G--B--RG--RB--GB--RGB AUTO color change
192~223 R--G--B Sound color change
224~239 RG--RB--GB Sound color change
240~255 R--G--B--RG--RB--GB--RGB Sound color change
CH6 LED Strobe
0~63 No strobe
1. working mode selection 2. U (previous or speedy) 2. DOWN (next or slower) 64~191 AUTO strobe
4. Enter for confirmation 5. Built-in Michrophone 6.Digital LCD display 192~255 Sound Strobe
7. DMX IN 8. DMX OUT 9. Fuse
CH7 LED fade
0~15 No fade
10. ower Cable 16~223 AUTO fade
224~255 Sound Fade
CH8 Motor spin
control
0~95 No spin
96~255 Spin
CH9 Motor spin speed 0~255 Slow --- Fast
Page 3 Page
8
12 3 5
4
6
7
8
910
Re ote control distance is
up to 8 Meters
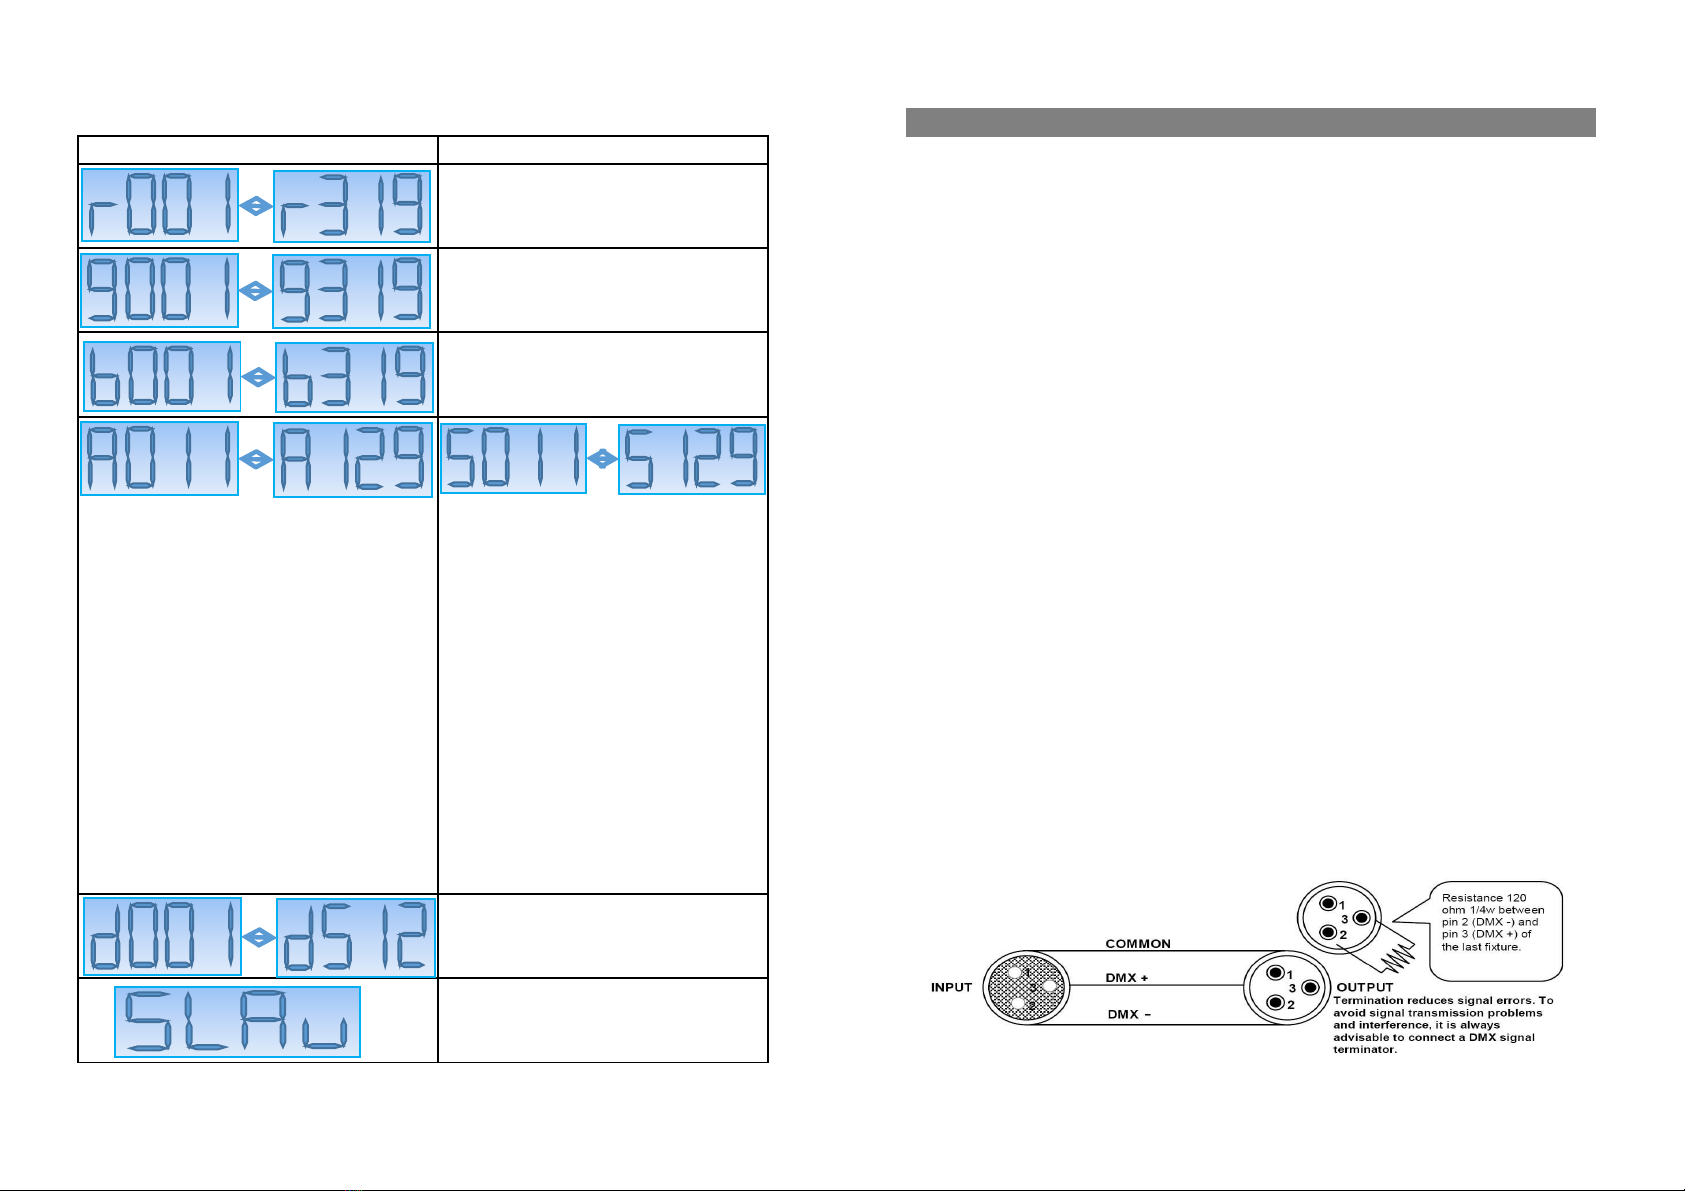
4 Digits to display 7 levels functions:
Function
&
Setting
Digital display Description Sound Active
Red Brightness: 1st digit stands for "Red", 2nd
and 3rd digits stands for levels from 00 to 31, 4th
digit stands for 9 levels motor spin speed
The change of the light pattern is controlled by sound, that is, the rhythm of the sound
control the effect of the changing light pattern. Turning the sensitivity knob in the
clockwise direction to increase the fixture’s sensitivity to sound, the knob in the counter
Green Brightness: 1st digit stands for "Red", 2nd
and 3rd digits stands for levels from 00 to 31, 4th
digit stands for 9 levels motor spin speed
clockwise direction to decrease. The light diode will automatically turn off after 8
seconds when the music stops.
Blue Brightness: 1st digit stands for "Red", 2nd
and 3rd digits stands for levels from 00 to 31, 4th
digit stands for 9 levels motor spin speed
AUTO
Auto cycles the built-in programs without being controlled externally. It has no light OFF.
The mode allows a single unit to react to the beat of the music in the master mode.
1. Install the units in a suitable position (laying or appending).
2. Set dipswitch to select Sound Active or AUTO mode.
AUTO display lighting effects: 1st digit stands
for AUTO, 2nd and 3rd digits stands for 11
kinds of effects, 4th digit stands for 9 levels of
motor spin speed.
01: Red AUTO Strobe
02: Green AUTO Strobe
03: Blue AUTO Strobe
04: RG AUTO Strobe
05: RB AUTO
Sound Active display lighting effects: 1st
digit stands for SOUND, 2nd and 3rd digits
stands for 11 kinds of effects, 4th digit
stands for 9 levels of motor spin speed.
01: Red SOUND Strobe
02: Green SOUND Strobe
03: Blue SOUND Strobe
04: RG SOUND Strobe
3. Turn on the unit power, the unit begins reset, then the unit begins working.
4. The unit will react to the low frequencies of music via the internal microphone.
Adjust the audio sensitivity knob on the back of the unit to make the unit more or less
sensitive in sound active.The panel has LED indicating for sound active.
Master-Slave Operation
This mode will allow you to link up to 32 units together without controller.
1. Install the units in a suitable position (laying or appending).
2. Choose a unit to function as Master mode, set dipswitch to select Sound Active or
AUTO mode. The others must be set to Slave mode, set dipswitch to select Slave mode.
3. Use standard XLR microphone cable chain your units together via the XLR connector
on the rear of the units. For longer cable runs we suggest a terminator at the last fixture.
Cabling must have a male XLR connector on one end and a female XLR connector on the other end.
DMX512 mode: 001---512 stands for value
Slave mode
Page
7
Page 4

Caution: Do not allow contact between the common and the ficture's chassis ground.
LCD
Digital
display
function:
Grounding the common can cause a ground loop, and your fixture may perform erratically.
Test cables with an ohm meter to verify correct polarity and to make sure the pins are
not grounded or shorted to the shild or each other.
4. Turn on the all units' power, the units begins reset, then the unit begins working.
The slave units will react the same as the master unit.
5. The units will react to the low frequencies of music via the internal microphone.
Adjust the audio sensitivity knob on the back of the master unit to make the unit more
or less sensitive in sound active.The panel has LED indicating for sound active.
Universal DMX Operation (DMX mode)
This mode allows you to use universal DMX-512 console to operate.
1. Install the units in a suitable position (laying or appending).
2. Use standard XLR microphone cable chain your units together via the XLR connector
on the rear of the units. For longer cable runs we suggest a terminator at the last fixture.
3. Assign a DMX address to each the unit using dipswitches, see the "DMX Address
Quick Reference Char".
4. Turn on the all units' power, the units begins reset, then the unit begins working.
5. Use DMX console to control your units.
Notes:
1. DMX console can not be used in Master-Slave operation (Sound Active or AUTO mode ).
2. There should be only one master unit in Master-Slave operation.
Page 5 Page 6
1:MASTER: SOUND/AUTO/DMX 2:SLAVE
DMX Signal
Light No 1 Light No 2 Light No 3 Light No ….
……...
2:SLAVE
Menu: function selection
UP/DOWN: LED brightness adjustment, or
DMX512 address value, or lighting effects under
Auto and Sound Active mode
ENTER: Step motor speed level
Quick Operation:
MENU: Red, green, blue LED brightness, AUTO, Sound Active, DMX512, Master/Slave.
U /DOWN: Red, green, blue LED brightness adjustment in 32 levels; DMX512 address value;
Lighting effects on AUTO and Sound Active
ENTER: 9 levels on step motor spin speed
Table of contents
Other Solena Dj Equipment manuals


