SONIQ MB300-AU User manual
Bluetooth CD Microsystem
MB300-AU
MD120614-01
-1-
Warning
M
C
B

Thank you for choosing this product. Here are the main chara
100-240V 50/60 Hz.
cteristics of your new
microsystem:
Equipped with a digital PLL tuner, you can easily search and memorize FM radios,
Thanks to its USB input, it becomes a real multimedia player, able to play all your favorite songs in MP3
and WMA format,
Finally, you can enjoy an uncompromised music experience with convenient and easy-to-use audio
settings.
FUNCTIONS
COMPATIBLE WITH AUDIO CD/CD-R(W)MP3/CD-R(W)WMA
DIGITAL DISPLAY
MATCHED TWO SPEAKERS TOTAL OUTPUT POWER : 2 X 5W RMS
DIGITAL PLL FM TUNER
USB READER FUNCTION
LIST OF MAIN PARTS
Master Unit
2 Speakers
Remote Control
Instruction Manual
-2-
Introduction
INTRODUCTION
-3-
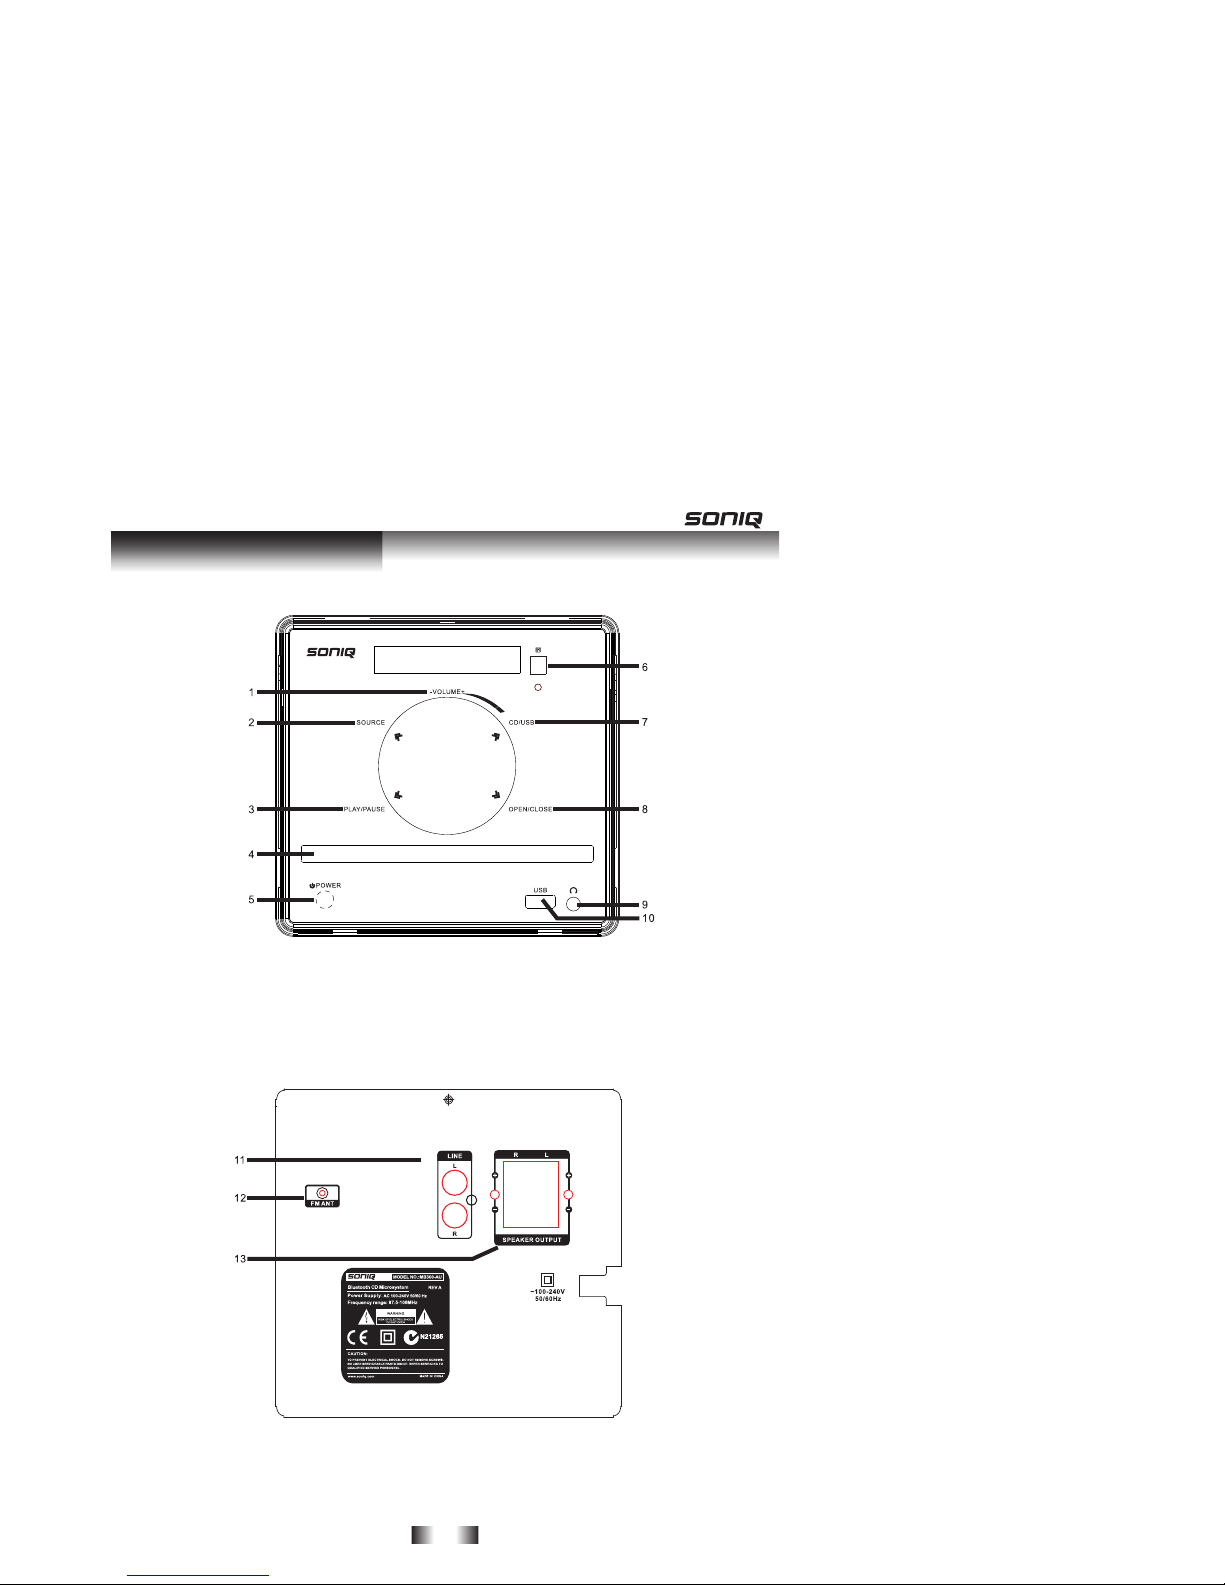
Functions & Controls
1.VOL ADJUST
2.SOURCE
3.PLAY/PAUSE
4.CD DOOR
5.POWER
6.REMOTE CONTROL SENSOR
7.CD/USB
8.OPEN/CLOSE
9.EARPHONE JACK
10.USB
11.LINE L/R
12.FM ANT
13.SPEAKEROUTPUT
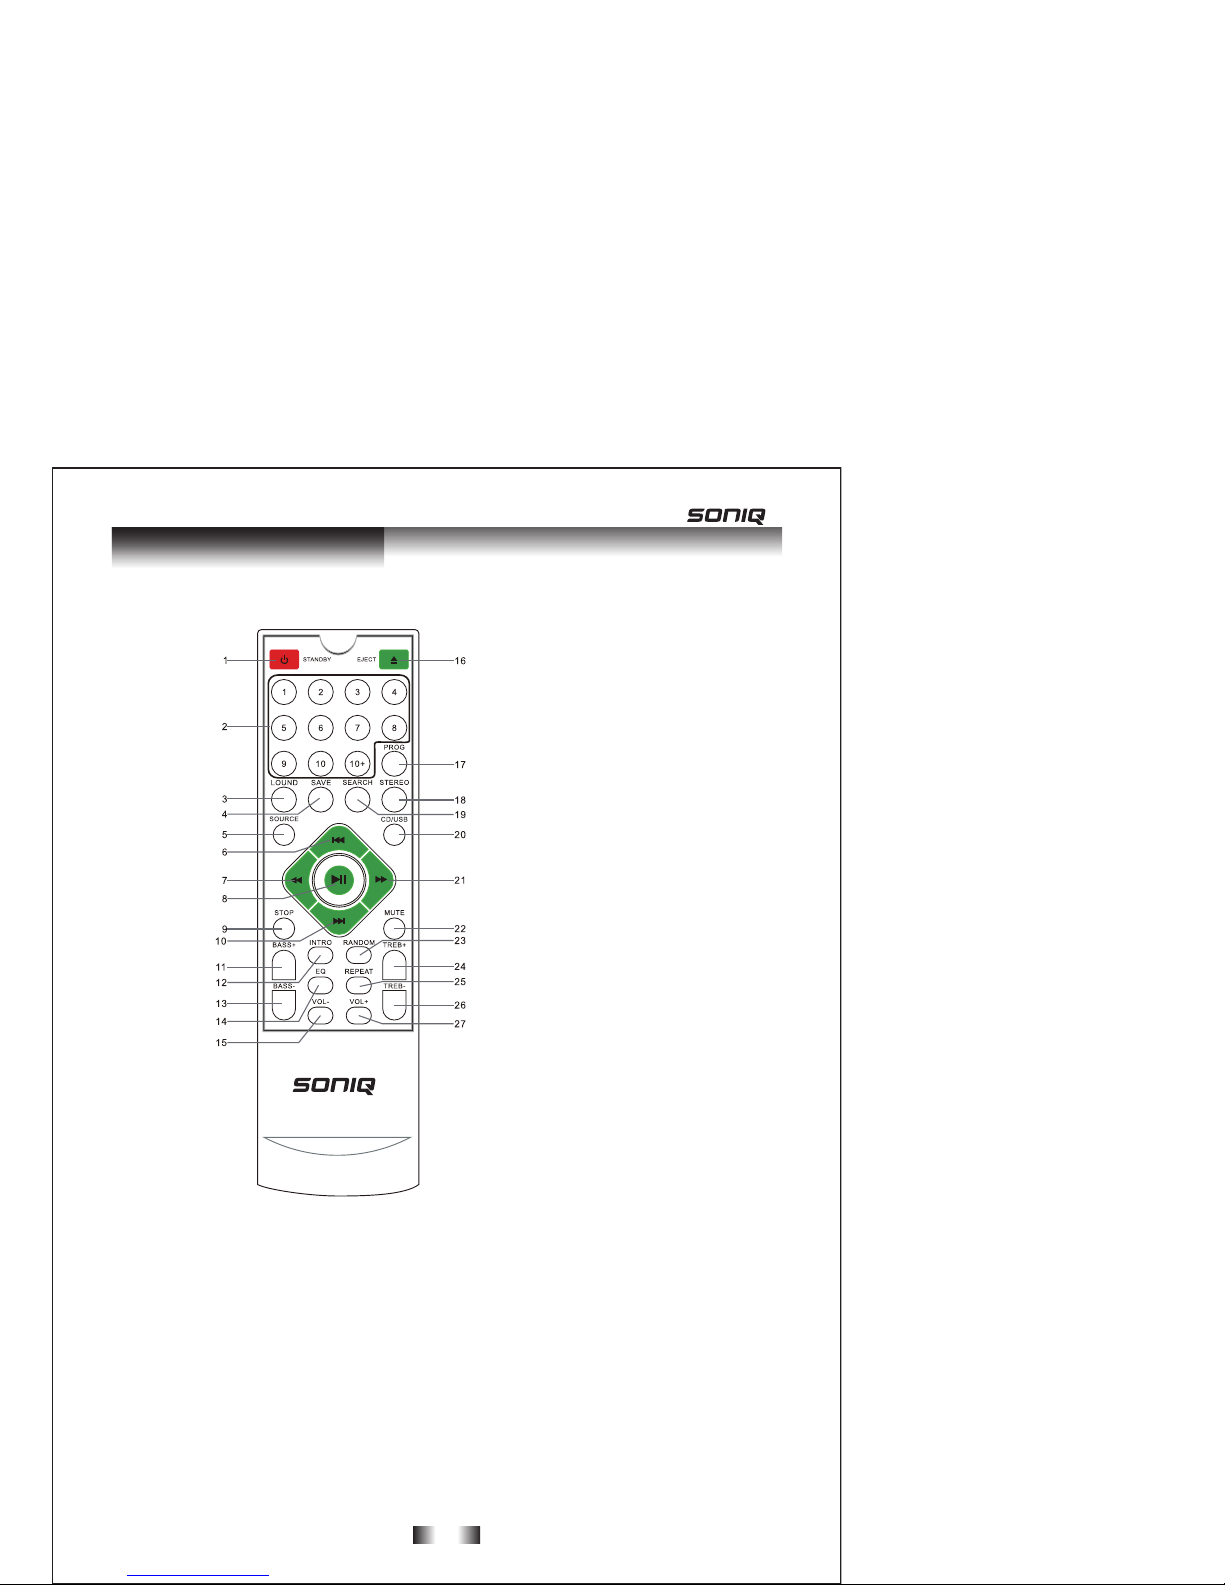
1. STANDBY
2. NUMERIC BUTTONS
3. LOUND
4. SAVE
5. SOURCE
6. PREV/CH-
7. REV/SEEK-
8. PLAY/PAUSE
9. STOP
10. NEXT/CH+
11. BASS +
12. INTRO
13. BASS –
14. EQ
15. VOL –
16. EJECT
17. PROG
18. STEREO
19. SEARCH
20. CD/USB
21. FWD/SEEK+
22. MUTE
23. RANDOM
24. TREB +
25. REPEAT
26. TREB –
27. VOL +
-4-
Functions & Controls
QT164

1. Remove the battery door.
2.
3. Close the battery door.
Note:
1. Battery chemicals can cause a rash. If the batteries leak, clean the battery compartment with a
cloth. If chemicals touch you skin, wash immediately.
2. If the remote control is not going to be used for an extended period of time, remove the batteries.
3. Dispose of used battery by following your local hazardous waste regulations.
You can connect the player to the speakers and enjoy listening.
Connect the speaker cables to the SPEAKER jacks on the back of the player.
PREPARATIVE
POWER
Press the POWER button on the remote control (or front panel) to turn on or go back to standby mode.
NUMBER BUTTONS
While playing songs, press the NUMBER buttons on the remote control to select the songs
you need. For example, the second song is required: press button 2. If the 16 th
song
is needed, press button 10+
and 6.
Press the VOL-/+ buttons on the remote control to turn up or down the volume of this unit.
You can also turn the VOLUME KNOB on the front panel to control volume.
PLAY/PAUSE
In play status, press the button to pause playback, press it again to resume
playing.
STOP
While playing CD disc, press the button on the remote control, and then press
button, the disc will be played from the beginning.
-5-
User Instructions
Take care to match the polarities of the remote to the batteries.EG:the +sign on the battery matches
the +sign on the remote control battery compartment.
INSTALL THE REMOTE CONTROL BATTERY
SYSTEM CONNECTION
BASIC OPERATION
1). Before turning on, check whether all the connections are correctly connected. Plug the power
cord at last.
2). Press POWER button on the front panel to turn on.
3). Press OPEN/CLOSE button on the front panel to open the disc door , put the disc into the CD
compartment, and then close the disc door . The unit starts reading and playing.
VOLUME ADJUSTMENT
PLAY/PAUSE
STOP
PLAY/PAUSE
MUTE
In play status, If the MUTE button is pressed, there will be no audio output, the sound is
eliminated. Then press MUTE again or press VOL+/- button to exit the mute status, the
sound resumes to its normal status.
MUTE
While playing the CD disc, press the button or button, the disc will play fast rewind or
fast forward. Press the PLAY/PAUSE button to exit this status and resume to normal playing.
REPEAT
While playing the CD discs, repeatedly press the REPEAT button to separately select the
different contents for repetition: Track repeat, All repeat.
Up to 20 tracks can be programmed in to play in any desired sequence.
1. In stop mode, press the PROG button, the display shows"PO1" in the display.
2. Press to input the desired track to be memorized.
3. Press PLAY/PAUSE to start playing. To cancel program play,press STOP .
Note: when you operate this function , please make sure the mode is STOP,
otherwise PROG does not
work under this circumstances.
RANDOM
While playing the CD disc, press the RANDOM button to play the disc in random.
SEARCH
While in radio mode, press the SEARCH button to search the bands automatically.
PREVIOUS/NEXT
While playing the CD disc, press or button to go to the previous or next song.
MONO/STEREO
While in radio mode, press the STEREO button on the remote control to select the mono or
stereo.
SAVE
While in radio mode, press the SAVE button on the remote control to store the current
band.
EQUALIZER
Note: Some disc content is unsuitable for this EQ format, it may arouse distortion while selecting.
-6-
SEEK- /SEEK+
While in radio mode, press the “SEEK- ” button or the “SEEK+ ” button, the player will seek the
frequency up or down.
CH- /CH+
While in radio mode, press “CH- ”or “CH+ ” button to go to the previous or next station.
User Instructions
Each mode will alter the sound field slightly.The display will show play status ,when you select any
mode after 3 seconds.
When a track number is entered
the display will show the track number you want to play,and then ,press "PROG" button to confirm.
PROGRAMMED PLAY BACK
number key
FAST REWIND/FAST FORWARD
BASS +/-
In play status, press the BASS +/- button on the remote control.
In play status, press the T
This function provides a better quality of BASS and TREBLE sound.
REBLE +/- button on the remote control.
TREBLE +/-
PLAYING USB
Press the “CD/USB” button to switch to CD/USB playback.
Connecting a USB device
1) Insert a USB key into the connector.
2) Press the CD / USB key to start.
Remark: Depending on the capacity of the device, the reading can take more than 1 minutes.
T
*USB can support IPOD / IPHONE charging:When the unit is in working mode,press "source"button to
swith to USB status for IPOD charging.
he unit cannot read my USB device.
- Once you have plugged your device to the unit, you may need to switch on the USB device
before it can operate.
- This unit does not support a direct USB connection with a computer. You need to use a USB
device, a MP3 player or a PMP (Portable Multimedia Player with hard disk).
- If you are using a USB external hard disk: you need to connect your device simultaneously to
an external power source.If you are using a self-powered PMP, make sure that the battery is
sufficiently loaded.
- Check that the file system of your USB device is formatted as FAT or FAT 32. USB device
formatted into NTFS are not compatible with this unit. Caution: If you attempt to modify
your file system, formatting your device will erase all data. Please refer to your USB device’s
instruction manual first.
plug your headphone into the Headphone socket (on the front panel). It will
enable you to listen to the audio in private.
Note: 1. Avoid impairing your hearing, please turn the volume to the lowest status before
listening.
2. When plugging the headphone, the speakers have no sound.
Remark: Headphone is not provided.
1. Enter FM Function
In the turn-on or playing status, press the SOURCE button on the remote control (or front panel) to
enter FM status. Press this button again to switch between FM and CD playing.
2. Select Bands
1) Select band by pressing button.
2) Select band by pressing number buttons: you may select the bands that have been saved by
pressing the number buttons. For example: press 10+ button once, 5button once, you may
-7-
“SEEK- ”or “SEEK+ ”
select the 15th band. Press the button, the band will be switched up or down.
3) Automatically search bands: press the SEARCH button, this unit will start to search bands from the
lowest part to highest part automatically. Meanwhile the searched bands will be saved orderly.
3. Audio Mode Selection(mono/stereo)
Press the STEREO button on the remote control, you may select Mono and Stereo output mode
in FM status. If the signal is not strong enough, you cannot select Stereo.
“CH- ”or “CH+ ”
User Instructions
USING HEADPHONE
FM RADIO OPERATION

4. Exit FM Status
Press the button on the remote control (or front panel) to exit FM status, and press
CD/USB to switch to other modes.
Remark: FM Frequency range: 87.5-108 MHz
NOTE: 1. You may adjust the best radio effect by adjusting the antenna.
2. You can search further bands by pressing SEARCH button when you adjusted the antenna in
a right position.
3. If the band is not clear by auto search, you can search manually by press
button.
4. The channel number could not exceed 20.
5. The frequency number can not be input directly.
LINE IN
BLUETOOTH CONNECTION
PERFORMANCE PARAMETERS:
There are line inputs. This unit has extra group of audio input terminals. You can input the analog
stereo audio signals from extra devices such as DVD, VCD, CD, VCR player, etc. Use the audio
cable (red for right, white for left) to connect the stereo audio output terminals of an extra device
to the stereo input terminals (LINE IN) of this unit.
Its corresponding signal source is LINE, which can be available by pressing SOURCE button.
The model of the unit is MB300-AU REVA,power on the unit then use your mobile phone to search the
bluetooth signal of the unit, the unit will synchronously play songs on your mobile phone while
connected successfully.
Before you can use a Blurtooth device with MB300-AU REVA,you must first pair them.
1. Press the “SOURCE” button on the remote control or front panel to swith to bluetooth status,at the
same time ,LED display screen shows‘BT’
2. Bluetooth is on and paired with a device,and the model of the unit will show ‘MB300’on bluetooth
device. The bluetooth device needs to input‘0000’password to pair.
3. When you receive an incoming call on your mobile phone, music audio will automatically mute and
you will hear the ring tones through the speakers. Once the call has ended, the current track will
resume playing automatically.
Note:In order to achieve best audio effect, you should put the volume of phone to the maxinum,and put
the volume of the unit to moderate.
-8-
“SEEK- ” or
“SEEK+ ”
Type MB300
Bluetooth standard
Modulation Mode
Voltage Supply
Support Bluetooth Association
Bluetooth V2.1+EDR
GFSK, 1Mbps, 0.5BT Gaussian
Battery voltage VDD:3.3 supply
OPP,OBEX,SPP,A2DP, AVRCP,
FTP ,HS/HF,DUN Profiles
Working current
Standby Current
Temperatrue range
Wireless transmission range
Transmission power
Sensitivity
≤30mA
<0.4mA
10 m
CLASS2 4dBm
User Instructions
-40°C to +80°C
SOUREC

-9-
Frequency range
Foreign interface
Audio performance
Audio S/R
Distortion degree
2.4GHz-2.480GHz
PIO, S ,,
,
PI Speaker Microphone
High acoustic fidelity sound
≥75dB
≤0.01%
Output ports L/R speaker and Headphone Jack
Input ports USB In and LINE bluetooth
Power supply ~100-240V 50HZ/60HZ
Max power 10W
Frequency 20Hz-20KHz ±3dB
Please use the following methods to solve the following problems while using this unit.
Audio cable not connected or not
ected securelyconn
Connect the cable as the
diagram
The volume is in the lowest status Turn the volume up
Disc not clean Use a piece of clean and
soft cloth to clean the disc
Disc scratched
Discontinuous sound
Disc distorted
Replace the disc with a
new one
Operation cannot be done
The disc door is not closed well Close the disc door
No disc inserted Place a disc in the
compartment
Play can not be realized
Inverse placement of disc
Be sure that the side with
pictures of the disc points
upwards
Fault Phenomenon Possible Cause Handing
Power supply cannot be
turned on
Power plug is not fully inserted into
the socket
Insert the power plug into
the socket securely
Battery is used up Replace with
a
new battery
The remote control does
not work Please aim at the remote
control window
User Instructions
Power OFF, and restart
the player after 10 seconds
No sound from
loudspeaker
The front end of the remote control
is not aimed at the infrared
reception part of the player
Embedded micro computer fails due
to lightning, static or other
SPECIFICATION
TROUBLE SHOOTING
-10-
Disposal Information
The symbol on the product or its packaging indicates that this product may not be treated
as household waste. Instead it should be handed over tothe applicable collection point for
the recycling of electrical and electronic equipment. By ensuring this product is disposed of
correctly, you will help prevent potential negative consequences for the environment and human
health, which could otherwise be caused by inappropriate waste handling of this product. For
more detailed information about recycling this product, please contact your local council office,
your household waste disposal service or the shop where the product was purchased.
“CE” marking states that the product is compliant to European Directives:
2006/95/EC Low Voltage Directive
2004/108/EC EMC Directive
2009/125/EC Eup Directive Regulation (EC) n° 1275/2009
2002/95/EC RoHS Directive
a full copy of Declaration of compliance to:
New Majestic S.p.A. Via Rossi Martini,41 – 26013 Crema (CR) Italy
Table of contents


