Starmobile Diamond V3 User manual

DIAMOND 3
V


TABLE OF CONTENTS
1. Your Phone
1.1. Phone Overview
1.2. Battery
1.2.1. Installing and Removing your Battery
1.2.2. Charging your Battery
1.3. Connecting to a Network
1.3.1. Inserting your SIM cards
1.3.2. Inserting your Memory Card
1.3.3.Turning Power On and Off
2. Getting Started
2.1. Setting up your Phone
2.2. Screen Control
2.3. Changing the Wallpaper
2.4. Touch & Type
2.5. Using the Lock Screen
2.6. Searching the Phone & the Web
3. Communication
3.1. Contacts
3.2. Making a Call
3.3. Call log
3.4. Messaging
4. Apps and Functions
4.1. FM Radio
4.2. Camera and BSI Technology
4.3. Gallery
4.4. Email
4.5. Play Store
4.6. Calendar
4.7. ES File Explorer
4.8. ES Task Manager
4.9. Maps
4.10. Downloads
1
1
3
3
3
4
4
4
4
4
4
6
7
8
8
9
10
10
10
11
11
11
11
12
12
12
13
13
14
14
14
15

5. Settings
5.1. SIM Management
5.2. Data usage
5.3. Proles
5.4. Storage
5.5. Battery
5.6. Accounts & sync
5.7. Language & input
6. Connect to Networks and Devices
6.1. Connecting to a computer via USB
6.2. Connecting to Wi-Fi networks
6.3. Sharing your mobile data connection
6.4. Connecting to Bluetooth Devices
7. Tune Performance
7.1. Optimizing battery performance
7.2. Extending battery life
8. Troubleshooting
9. Safety & Notice
15
15
16
16
16
16
17
17
17
17
17
18
19
20
20
20
21
24
DIAMOND V3
Enjoy a smarter mobile experience with the Android Operating
System. Featuring all Google apps plus more than 800,000 apps,
songs, books, movies and games ready for download on the Play
Store, the Android mobile platform extends your mobile device’s
functionality—keeping you connected, entertained and informed.
Source: Android Website (www.android.com)
About Android 4.1 Jelly Bean
Your Starmobile DIAMOND V3 comes pre-installed with the Android
4.1 Jelly Bean Operating System. Experience the smoothest and most
enhanced Android system yet with new features and improvements
such as:
Camera & Gallery You can now review photos easier
without having to leave the Camera app.
When in camera mode, simply swipe to see
a thread of photos taken previously. Swipe
back to return to camera viewnder to start
taking pictures again.
In Gallery, pinch to zoom out to enter
‘lmstrip mode’ which allows you to
quickly view photos. To delete an individual
photo while viewing in ‘lmstrip mode’,
simply swipe up or down. An undo button is
located at the bottom right corner of the
screen.
Enjoy new paging animations when swiping
between photos, focusing on an object in
camera mode, and switching between the
front and back cameras.
About Android
1
Chrome Browser Chrome for Android comes with unlimited
and incognito tabs, and Browser syncs your
tabs across devices once logged in to your
Google Account.
Data Usage Easily dismiss a data usage warning without
having to change data threshold set for
warning notication.
Disable background data usage on certain
Wi-Fi SSIDs by designating them as mobile
hotspots.
Android now automatically detects when
one Jelly Bean device is tethered to
another's Wi-Fi hotspot, and intelligently
enables or disables background data usage
on the SSID.
Face Unlock Supports Liveness Check (option to require a
‘blink’) as an added security measure.
Keyboard Allows for custom keyboard input styles
with keymaps for QWERTY, QWERTZ,
AZERTY, Dvorak, Colemak and PC styles.
More accurate and relevant dictionaries.
Language model adapts over time and
allows for bigram prediction and correction.
Provides designated keys for easier
switching between languages and input
styles.
Messaging & Talk Incoming SMS notications can now display
full text. Images can also be viewed in full
for MMS.
Features new notication style for Talk and
improved UI for the contacts list.
DIAMOND V3
Notications Redesigned notications shade allows you
to perform additional actions directly from
the notications panel itself (i.e. locking
automatic display rotation or viewing the
SSID of the Wi-Fi access point).
Notications are now grouped together, and
the rst item is automatically expanded.
Pinch to expand or collapse notications.
Get an image preview in notications after
taking a screenshot. Quickly share the
screenshot from the notication panel.
Contacts Now made more buttery with smoother
animations and improved search
performance.
Automatic retrieval of high res photos for
Google contacts with public Google+
proles. High res photos set on Google
accounts will be backed up and synced
across devices.
Add favorite contacts to a home screen
directly from the contact’s detail page.
Improved auto-joining algorithm allows for
a more organized phonebook and reduces
duplicate entries.
Phone Features a more responsive dial pad and
buttery smooth call log scrolling and tab
swiping.
When you miss a call, a new notication
allows you to return the call or reply by SMS
with a single touch. When a call is ongoing,
a new notication lets you hang up the call
DIAMOND V3

with a single touch.
Add phone numbers from the call log to
existing, read-only contacts.
Settings Easily see all accounts signed into on your
device from the primary Settings view.
System Now supports a more reliable device
encryption.
Long press the ‘Power Off’ option in the
power menu to boot your device to safe
mode.
Quickly reset default applications with the
new ‘Reset app preferences’ option.
Features a redesigned dialog with larger
icons for a more intuitive navigation.
Text-to-speech Supports a new conversational
text-to-speech voice in US English.
Voice Typing Newly embedded speech recognizer allows
use of voice typing feature even without an
Internet connection.
Widgets Personalize your home screen with new
widgets for apps, music, movies, books and
games. Widgets are now able to resize on
their own to t the screen.
Quickly remove apps or widgets from any
home screen by picking them up and
inging them to the top of the screen.
DIAMOND V3

The New Google Experience on Android
Improved Search Get to Google Search faster. Directly open
Functions Google Search from the lock screen by
swiping up.
Say “Google” to activate Voice Search from
within Google Search. Voice Search
recognition is now made faster and accepts
queries even with a poor network
connection.
Gmail Updated notications now display full text
of new mail plus preview and digest of your
inbox.
Google Play Features a new set of recommendation
widgets and smart updates for downloaded
applications.
Maps Now includes support for ofine maps
which may be accessed even without data
connection.
More accurate and responsive Compass
Mode for indoor and street views.
YouTube Features a more intuitive user interface and
provides a quick access guide to channel
subscriptions.
Allows you to preload videos from
subscribed channels for a seamless playback
even on slower networks.
Source: Android 4.1 Jelly Bean (www.android.com/about/jelly-bean/)
DIAMOND V3
1
Thank you for purchasing the Starmobile DIAMOND V3. This user
manual contains important and useful information regarding the use
and operation of this mobile device.
Note: The contents of this manual is protected by copyright laws and regulations. You
may not by any means, copy any part of this manual in any form or through any
cable or wireless network for transmission, or have this manual translated into
any language without permission from the company.
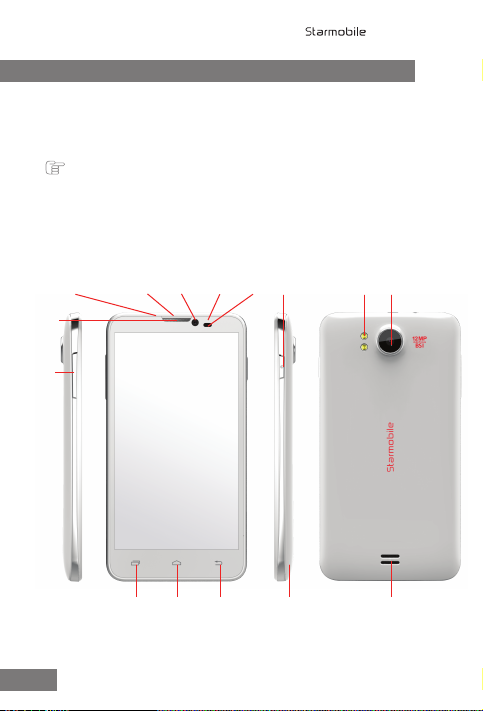
1.1 Phone Overview
1. Your Phone
DIAMOND V3
Charger/
USB Port
Earphone Jack Power Key
Receiver
Proximity/
Light
Sensor
Camera LED
Indicator Camera
LED
Flash
Menu Key Speaker
Battery
Cover
Home Key Back Key
Volume
Keys
2
1Volume Keys Press to adjust ringer volume,
call volume, and media volume
during music and video playback.
9Power Lock Key Press and hold to open phone
options menu: Power Off, Reboot,
or Airplane Mode
11 LED Flash Provides camera ash for taking
photos in low-light conditions
7Home Key Touch to return to Home screen;
Press and hold to open a window
showing your most recently used
applications
8Back Key Touch to return to the previous
screen or close the on-screen
keypad, dialog box, options menu,
or the notication panel
5Receiver Allows you to hear the caller’s
voice on the other end of the line
6Menu Key Opens a list of options available in
the current screen or application
4Front Camera Lens 2MP BSI camera for image and
video capture
3Earphone Jack Allows you to plug in an earphone
2Charger/USB Port Allows you to connect charger or
USB cable for data exchange
10 Back Camera Lens 12MP BSI camera for image and
video capture
12 Speaker Provides audio output for music
and video playback
DIAMOND V3

1.2 Battery
1.2.1 Installing and Removing your Battery
• To install the battery:
Align the metal connectors of the battery with the battery
terminals. Push the battery in until it locks into place. Put the
battery cover back in place.
• To remove the battery:
Lift the battery cover. Raise the bottom of the battery to
remove it from the mobile phone.
Note: Make sure that the mobile phone has been completely switched off before
removing the battery to avoid possible damages to the SIM card and the mobile
phone.
1.2.2 Charging your Battery
• Plug one end of the charger into the USB/charging port then
plug the other end into a standard AC power outlet.
• Once connected, the battery icon will repeatedly ash at the
top right corner of the screen. If the mobile phone is charging
while powered off, a battery indicator will also appear on the
screen. If the mobile phone has been depleted of battery life,
it will take a while before a charging indicator appears on
screen after it has been plugged to a power source.
• When charging is complete, disconnect the charger from both
the electrical outlet and the mobile phone.
When the battery level icon has stopped ashing, this means that the
battery is fully charged. This process usually takes 3 hours. It is normal
for the mobile phone and charger to become warm during charging.
ATTENTION:
• Charging must be performed in a well-ventilated area with an
ambient temperature of -10°C to +45°C.
• Use only the Starmobile-supplied battery and charger with your
Starmobile DIAMOND V3. Using accessories of other manufacturers
or vendors with your Starmobile DIAMOND V3 may invalidate any
approval or warranty applicable to the device. It may result in
non-operation of the mobile phone or loss of information.
3
DIAMOND V3
3
• If the mobile phone automatically shuts down or indicates that
“Battery is low”, charge your battery.
1.3 Connecting to a Network
1.3.1 Inserting your SIM cards
Your Starmobile DIAMOND V3 allows use of two separate
SIM cards at the same time.
• To install, slide in the SIM card with its gold chip facing
downward. Make sure the beveled edge of the SIM card is
properly aligned with the card slot. Once the SIM card is in
place, put in the battery and replace the cover.
1.3.2 Inserting your Memory Card
Your mobile phone supports micro SD cards up to 32GB.
• Slide up the memory card.
• When installing a micro SD card, ensure that its gold chip is
facing downward and that its beveled edge is properly
aligned with the card slot.
1.3.3 Turning Power On and Off
• Press and hold the Power key until the phone switches on.
• If you turn on the mobile phone without having inserted a
SIM card, the phone will display “Emergency call”. If a SIM
card has been inserted, the phone will automatically check if
the SIM is useable.
2.1 Setting Up Your Phone
The rst time you turn on the phone, you'll see a Welcome screen.
• To choose a different language, go to Menu > Settings >
Personal > Language and input.
• To set up your phone, touch Start and follow the instructions.
4
DIAMOND V3
2. Getting Started

4
A series of screens takes you through the setup process. If you already
have a Google or Gmail account, use your Gmail address and
password when asked. If you don't have Gmail or any other Google
Account, you may create one on www.gmail.com or by following
onscreen instructions.
2.1.1 Why use a Google Account?
AGoogleAccountletsyouorganizeandaccessyourpersonal
informationfromanycomputerormobiledevice:
• Never lose your contacts again. When you sign in to your
phone with a Google account, all the contacts you associate
with that account in the Contacts application are automati-
cally backed up. As a result, they're always accessible through
your Gmail account from any computer.
• Synchronize and back up everything. Whether you draft
an email, add a phone number, add an event to your
calendar, or take a photo, your work gets backed up
continuously by Google and synchronized with any computer
where you use the same Google Account.
• Access from anywhere. Check your latest calendar, email,
text messages, or social stream wherever you are no matter
what computer or mobile device you're using.
• Keep your information secure and available. Google
works round the clock to protect your personal data from
unauthorized access and to ensure that you get it when you
need it, wherever you need it.
• Use other Google services. Your Google Account also lets
you take full advantage of any other Google apps and
services that you may want to use, such as Gmail, Google
Maps, Navigation, Play Store, YouTube, Google Talk,
Messaging, and many more.
5
DIAMOND V3

2.2 Screen Control
Once you have nished setting up your phone, the Home screen
opens. At the bottom of the screen, you'll nd three Navigation
buttons that will always be available.
The Favorites tray is located just above the Navigation buttons:
The app icons you keep in the tray remain visible on every Home
screen.
The All Apps icon in the center is permanent. Touch it to see all
your apps and widgets.
The middle of your Home screen can hold app and widget icons, plus
folders.
Icon Name Description
Back
Opens the previous screen you were
working in, even if it was in a different
app. Once you back up to the Home
screen, you can’t go back any further in
your history.
Home
Opens Home. If you're viewing a left or
right Home screen, this opens the
central Home screen. (Press and hold to
view recent apps)
Menu Pop-up menu options
6
DIAMOND V3

• To open an app, folder, or widget, touch its icon.
• To see additional Home screens, swipe your nger quickly left or
right.
At the top of the screen, you'll see this display:
Status icons on the left tell you which apps have sent you
notications; for example, that a message has arrived, or it's time for a
meeting.
• To see your notications, swipe your nger down from the top
of the screen.
System icons on the right display the current wireless and network
connection strength, battery level, time, and more.
The Google Search option just below the status and system icons lets
you search within your phone or on the Internet.
2.3 Changing the Wallpaper
Wallpapers are images that take the place of the default background
for your Home screens. To customize your wallpaper:
• Touch & hold anywhere on a Home screen that's not occupied.
A list of options appears.
• Select a wallpaper source:
o Gallery: displays pictures that you've taken with your Camera
or downloaded to your device
o Live Wallpapers: displays a scrolling list of animated wallpapers
o Wallpapers: displays thumbnails of default images. Touch a
thumbnail to see a larger version.
7
DIAMOND V3

• For wallpapers selected from the Gallery, you will be asked to
crop out the desired portion of the image before setting it as
your wallpaper.
2.4 Touch & Type
Touch or tap to manipulate icons, buttons, menus, the onscreen
keyboard, and other items on the touchscreen. You can also change
the screen's orientation.
To select or activate something onscreen, touch it. To type something
such as a name, password, or search terms, just tap where you want
to type. A keyboard pops up that lets you type into the eld.
Other common gestures include:
• Touch & hold: Touch & hold an item on the screen by touching
it and not lifting your nger until an action occurs.
• Drag: Touch & hold an item for a moment and then, without
lifting your nger, move your nger on the screen until you reach
the target position. For example, you can drag to reposition
shortcuts on the Home screen.
• Swipe or slide: Quickly move your nger across the surface of
the screen, without pausing when you rst touch (so you don't
drag something instead). For example, you can slide a Home
screen left or right to view the other Home screens.
• Double-tap: Quickly tap a screen to zoom in. Double tap again
to zoom out.
• Pinch: When viewing maps, web pages or photos, place two
ngers on the touchscreen at once and pinch them together to
zoom out or spread them apart to zoom in.
• Rotate the screen: The orientation of the screen rotates with
the phone as you turn it from upright to its side and back again.
You can turn this feature on and off.
2.5 Using the Lock Screen
To protect personal information, you can adjust your phone's lock
settings:
1. From the Home or All Apps screen, touch the Settings icon .
8
DIAMOND V3
2. Scroll down and touch Security.
3. Touch Screen lock.
4. Touch the type of lock you'd like to use.
Once enabled, a lock screen display will show up whenever your
screen wakes up, prompting you to enter the pattern, PIN, or other
specied key.
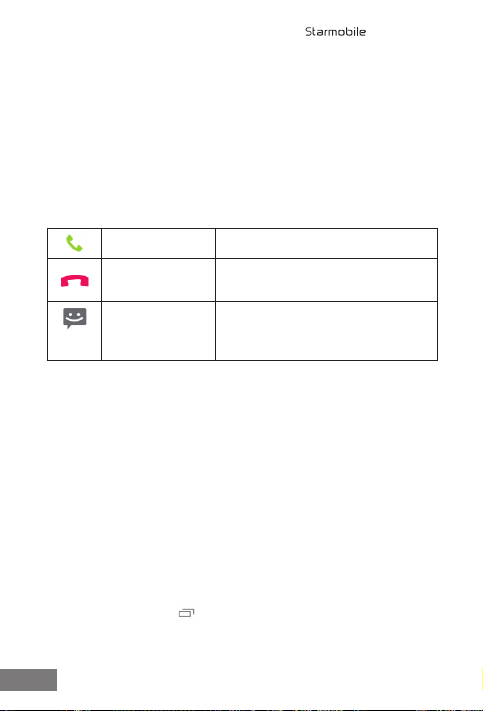
While the screen is locked, you can respond to incoming calls in three
ways. Touch the white phone icon and slide over one of these icons:
2.6 Searching Your Phone & the Web
Google Search can help you nd anything you need on your phone or
the web:
• At the top of any Home screen, touch Google to type your search
term, or the Microphone button to make a voice command.
As you type, suggestions from Google web search will appear below
the Search box, and results from your phone (such as apps and
contacts) below that.
Touch a suggestion to search for it immediately, or touch its arrow just
to add the term to the search eld without starting to search.
To change the way Google searches on your phone or the web:
1. Touch Google at the top of the screen.
2. Touch the Menu key at the lower left corner of the screen.
3. Select Settings.
4. Choose either Searchable items or Google Search.
Answer call Start talking to the caller.
Reject call Decline the call.
Send a message Opens a list of default text
messages. Touch one to send it
to the caller immediately.
9
DIAMOND V3
3. Communication
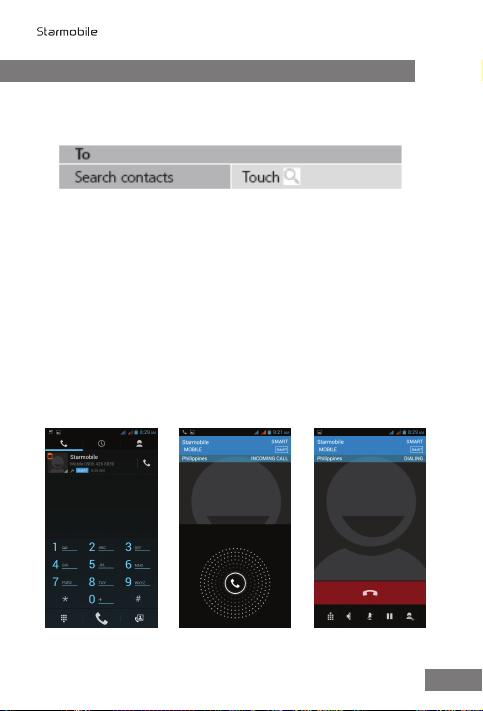
3.1 Contacts
The Contacts application stores and manages all your contacts.
• Search contacts
In the phonebook list interface, input the rst character of the name
you are searching for in the cursor to display all records meeting the
conditions. Search results will be different due to different input
content.
Select a contact and touch the contact's name. Options will allow you
to call or write a message to the contact. If you touch and hold the
contact number, additional options will be available to you such as
Copy to Clipboard and Associate SIM card.
3.2 Making a Call
You can place calls from the Phone app, the Contacts app, or other
apps or widgets that display contact information. Wherever you see a
phone number, you can just touch it to dial.
Dial pad Incoming call screen During a call
10
DIAMOND V3

3.3 Call log
The Call log displays all the calls you've placed, received, or missed. It
provides a convenient way to redial a number, return a call, or add a
number to your Contacts. Within the Phone app , the Call log is
under the middle tab .
Touch the icon to call back, or touch a number beside it for more
information about the call.
Arrow icons beside a call indicate the type of call. Multiple arrows
indicate multiple calls:
• Missed incoming call
• Received incoming call
• Outgoing call
3.4 Messaging
You can compose, send and receive text messages from your phone.
You can also compose, send, and receive multimedia messages, which
contain media les such as pictures, videos, and audios.
When you view your messages, they appear as conversations, which
means that all messages to and from a particular person will be
grouped together.
4.1 FM Radio
Your device is equipped with an FM radio. Use a headset when
listening to FM radio for optimal sound quality.
To begin, scan for available radio frequencies. It is recommended to go
outdoors when searching for frequencies to get a stronger reception.
You can also make a radio recording by pressing the menu located at
the upper right corner of the screen > select ‘Record FM’.
4. Apps & Functions
11
DIAMOND V3
Table of contents


