Stelmet 230100A007 Series User manual
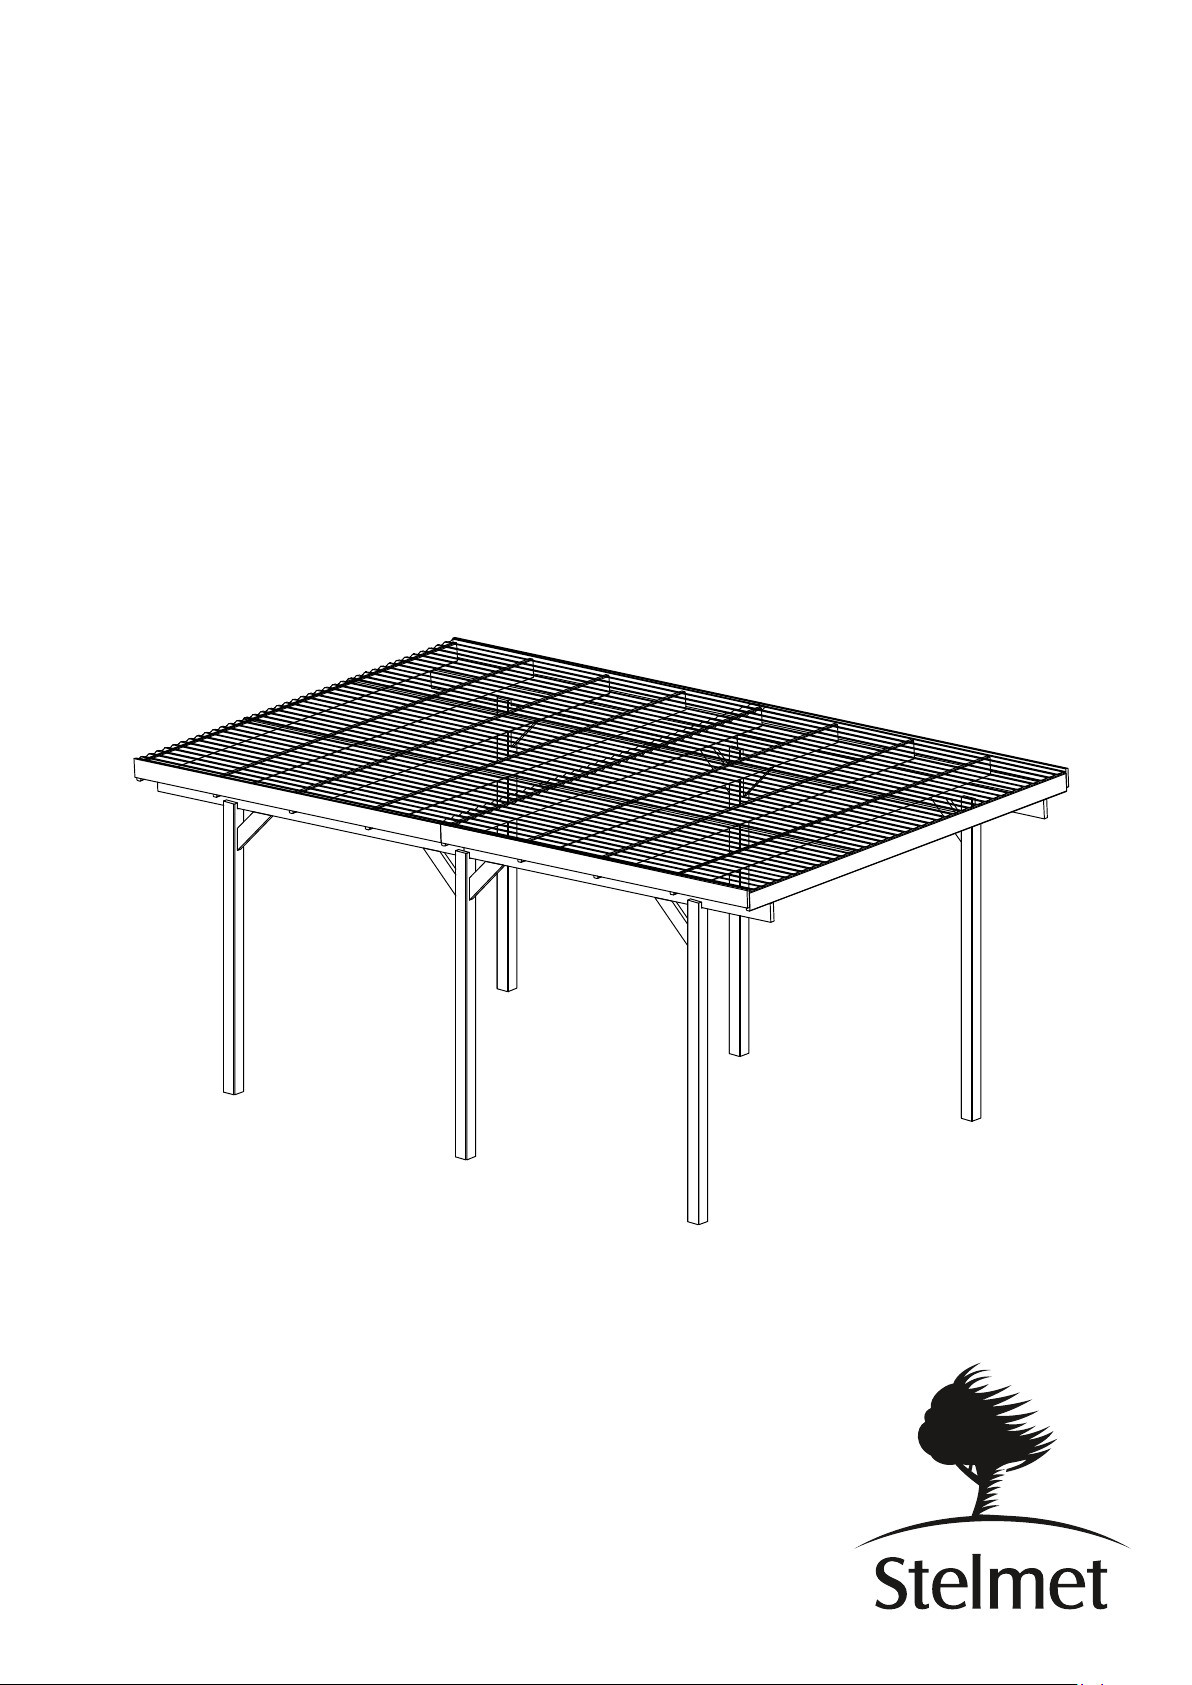
Wiata garażowa drewniana z dachem PVCCarport 304 x 500 x 236 cm 230100A007_30_10_2020www.stelmet.com

Instrukcja składowania, montażu, użytkowania i konserwacji
Przechowywanie
Pakiet należy przechowywać na płasko, w suchym oraz przewiewnym miejscu.
Chronić przed bezpośrednim działaniem warunków atmos erycznych takich jak deszcz, grad, nasłonecznienie.
Przygotowanie do montażu
Przed przystąpieniem do montażu należy przeczytać treść instrukcji montażu oraz sprawdzić kompletność
zestawu jak i jakość elementów składowych. W przypadku wystąpienia jakichkolwiek nieprawidłowości należy
niezwłocznie skontaktować się ze sprzedawcą.
Elementy zestawu rozłożyć na czystej powierzchni w celu zidenty ikowania ich zgodnie z instrukcją montażu oraz
aby uniknąć ich ewentualnego uszkodzenia, zabrudzenia lub porysowania.
Należy pamiętać aby nie chodzić po płytach PVC gdyż grozi to ich uszkodzeniem.
Wyposażyć się w narzędzia oraz akcesoria potrzebne do przeprowadzenia prawidłowego montażu.
Garaż przeznaczony jest do montażu na kotwach słupkowych, które nie są częścią zestawu
należy je dobrać w zależności od rodzaju podłoża (przykręcane do betonu, zalewane, wbijane).
Miejsce montażu powinno zapewniać odpowiednią stabilność i sztywność połączenia kotwa – podłoże.
Zaleca się użycie kotw do betonu, które będą zamocowane do wylewek punktowych (stop betonowych
undamentowych) lub do undamentu.
Nie zaleca się montażu kotw na kostce brukowej. W takim wypadku należy zdemontować część kostki i
przygotować wylewki punktowe lub użyć kotw wbijanych.
Montaż
Montażu powinny dokonywać 2-3 osoby dorosłe.
Przewidywany czas montażu 6-12 h (czas ten nie uwzględnia przygotowania/wypoziomowania powierzchni lub
wykonania undamentów 8-24 h).
Całkowity czas montażu zależy od stanu pierwotnego powierzchni i sposobu zakotwienia garażu.
Panele dachowe PVC posiadają dwie strony o strukturze chropowatej oraz gładkiej.
Należy pamiętać aby panel dachowy został przykręcony gładką powierzchnią do dołu!
Skrajne panele dachowe PVC należy układać z zachowaniem odstępu od desek opierzeniowych zgodnie z
rysunkiem nr 6. Przed przykręceniem paneli należy je nawiercić. Średnica otworu powinna być 2x większa niż
średnica wkrętu.
Nie wolno chodzić po płytach PVC! W celu przykręcenia śrub na środkowej części dachu należy zaopatrzyć się
w deski lub płyty styropianowe aby rozłożyć ciężar osoby dokonującej montażu. Możliwy jest również montaż
płyt PVC przy użyciu odpowiednio wysokiej drabiny bez konieczności wchodzenia na płyty, który jest zalecany
przez irmę Stelmet.
Podczas montażu płyt PVC należy zachować szczególną ostrożność!
W miejscach łączenia drewna za pomocą wkrętów należy wykonać otwór o średnicy mniejszej o 2 mm od średnicy
używanego wkrętu. Jest to niezbędna czynność aby zapobiec pękaniu drewna podczas skręcania.
Wszelkie prace montażowe oraz budowlane powinny być wykonywane z zachowaniem szczególnej ostrożności
i zasad BHP.
•Należy wyposażyć się w środki ochrony osobistej tj. rękawiczki, okulary, itp..

•Należy zachować szczególną ostrożność podczas korzystania z drabiny lub rusztowania ze względu na
istniejące ryzyko upadku.
•Dzieci powinny znajdować się w bezpiecznej odległości od miejsca montażu.
Konserwacja i pielęgnacja
Należy okresowo kontrolować stan wyrobu, stabilność konstrukcji oraz wszelkie połączenia (4 razy w roku).
W sezonie zimowym należy regularnie usuwać zalegający śnieg. Natomiast w pozostałych porach roku zalegające
liście, igliwie, gałęzie oraz tym podobne.
Płyty PVC należy czyścić delikatnym strumieniem wody lub myjką ciśnieniową (najniższe ciśnienie). Dopuszcza się
stosowanie ługu mydlanego.
Do mycia nie zaleca się stosowania innych środków czyszczących, które mają działanie żrące lub odtłuszczające.
Do mycia mechanicznego należy użyć szczotki z miękkim włosiem aby uniknąć porysowania płyt.
Szczegółowe informacje dotyczące konserwacji, pielęgnacji, gwarancji i jej wyłączenia znajdziesz pod adresem
www.stelmet.com

Storage, assembly, use and maintenance instructions
Storage
Store the package lat, in a dry and airy place.
Protect against direct weather conditions such as rain, hail, sunshine.
Preparation for assembly
Be ore starting the assembly, read the contents o the assembly instructions and check the completeness o the
set and the quality o the components. In case o any irregularities, contact the seller immediately.
Lay out the elements o the set on a clean sur ace in order to identi y them according to the assembly instructions
and to avoid possible damage, dirt or scratches.
Do not walk on the PVC panels as this may damage them.
Equip yoursel with the tools and accessories needed or proper installation.
The garage is designed for mounting on post anchors, which are not included in the kit -
they should be selected depending on the type of base (screwed to concrete, poured, hammered).
The place o installation should provide adequate stability and rigidity o the anchor-substrate connection.
It is recommended to use concrete anchors, which will be ixed to the point spouts (concrete oundation alloys)
or to the oundation.
It is not recommended to install anchors on paving stones. In such a case, a part o the paving block should be
disassembled and the point spouts should be prepared or the driving anchors should be used.
Assembly
The assembly should be done by 2-3 adults.
Estimated installation time 6-12 h (this time does not include preparation/leveling o the sur ace or making
oundations 8-24 h).
The total assembly time depends on the original condition o the sur ace and how the garage is anchored.
PVC roo panels have two sides with a rough and smooth structure.
Please make sure that the roof panel is screwed down with a smooth surface!
The outermost PVC roo panels should be laid with a distance rom the planks as shown in Figure 6.
Be ore screwing the panels, they must be drilled. The diameter o the hole should be 2x larger than the screw
diameter.
Do not walk on PVC boards! To screw the screws on the central part o the roo , you must provide planks or
polystyrene boards to distribute the weight o the installer. It is also possible to install the PVC boards using an
appropriately high ladder without climbing onto the boards, which is recommended by Stelmet.
Special care must be taken when installing PVC panels!
In places where wood is joined with screws, a hole should be made with a diameter 2 mm smaller than the
diameter o the screw used. This is necessary to prevent the wood rom cracking when screwing.
All assembly and construction works should be per ormed with special care and health and sa ety rules.

• You should wear personal protective equipment such as gloves, glasses, etc.
• Be especially care ul when using ladders or sca olding due to the risk o alling.
• Children should be kept at a sa e distance rom the installation site.
Maintenance and care
The condition o the product, the stability o the structure and all connections should be periodically checked (4
times a year). In the winter season, remove snow regularly. In the other seasons o the year, leaves, needles,
branches and the like should be removed regularly.
PVC panels should be cleaned with a gentle jet o water or a pressure washer (lowest pressure). Soapy lye is
permitted.
Other cleaning agents that have a caustic or degreasing e ect are not recommended or cleaning. For
mechanical cleaning use a so t bristle brush to avoid scratching the panels.
Detailed information on maintenance, care, warranty and its exclusion can be found at www.stelmet.com.

Anweisungen zur Lagerung, Montage, Verwendung und Wartung
Lagern
Die Verpackung sollte lach an einem trockenen und belü teten Ort gelagert werden.
Vor direkter Witterungsein lüsse wie Regen, Hagel und Sonnenlicht schützen.
Vorbereitung für die Montage
Lesen Sie vor Beginn der Montage den Inhalt der Montageanleitung und überprü en Sie die Vollständigkeit des
Sets und die Qualität der Komponenten. Bei Unregelmäßigkeiten wenden Sie sich bitte umgehend an den
Verkäu er.
Stellen Sie die Elemente des Sets au eine saubere Ober läche, um sie gemäß der Montageanleitung zu
identi izieren und mögliche Beschädigungen oder Verschmutzungen , Verkratzen zu vermeiden.
Gehen Sie nicht au PVC-Brettern, da diese dadurch beschädigt werden können.
Besorgen Sie sich die Werkzeuge und das Zubehör, die ür eine ordnungsgemäße Montage er orderlich sind.
Der Carport ist für die Montage an Pfostenankern vorgesehen, die nicht im Set enthalten sind. Die
Pfostenanker sollten je nach Art des Untergrunds ausgewählt werden (auf Beton geschraubt, ausgegossen,
eingeschlagen).
Der Einbauort muss eine ausreichende Stabilität und Stei igkeit der Anker-Untergrund-Verbindung
gewährleisten. Es wird emp ohlen, Betonanker zu verwenden, die an Punktausläu en
(Beton undamentlegierungen) oder am Fundament be estigt werden.
Es wird nicht emp ohlen, die Anker au P lastersteinen anzubringen. Ent ernen Sie in diesem Fall einen Teil des
P lastersteines und bereiten Sie Punktestrich vor oder verwenden Sie Einschlaganker.
Montage
Die Montage sollte von 2-3 Erwachsenen durchge ührt werden.
Geschätzte Montagezeit 6-12 Stunden (diese Zeit beinhaltet nicht die Vorbereitung / Nivellierung der
Ober läche oder die Vorbereitung des Fundaments 8-24 Stunden).
Die Gesamtmontagezeit hängt vom Zustand der Ober läche und der Art der Verankerung des Carports ab.
PVC-Dachplatten haben zwei Seiten mit einer rauen und glatten Struktur.
Achten Sie darauf, dass die Dachplatte mit der glatten Oberfläche nach unten verschraubt wird!
Die äußersten PVC-Dachplatten sollten in einem Abstand von den Be estigungsbrettern verlegt werden, wie in
Abbildung 6 dargestellt. Die Platten müssen vor dem Einschrauben gebohrt werden. Der Lochdurchmesser
sollte 2x größer als der Schraubendurchmesser sein.
PVC-Platten dürfen nicht betreten werden! Um die Schrauben au den mittleren Teil des Daches zu schrauben,
müssen Sie Bretter oder die Polystyrolplatten zur Ver ügung stellen, um das Gewicht der Person zu verteilen,
die die Montage durch ührt. Es ist auch möglich, PVC-Platten mit einer ausreichend hohen Leiter zu installieren,
ohne au die Platten klettern zu müssen, was von Stelmet emp ohlen wird.
Seien Sie besonders vorsichtig beim Einbau von PVC-Platten!
An Stellen, an denen Holz mit Schrauben verbunden wird, sollte ein Loch mit einem Durchmesser hergestellt
werden, der um 2 mm kleiner ist als der Durchmesser der verwendeten Schraube. Dies ist ein notwendiger
Schritt, um zu verhindern, dass das Holz beim Verdrehen reißt.
Alle Montage- und Bauarbeiten sind mit besonderer Sorg alt durchzu ühren
sowie Gesundheits- und Sicherheitsvorschri ten.

• Sie sollten persönliche Schutzausrüstung wie Handschuhe, Brille usw. tragen.
• Seien Sie besonders vorsichtig, wenn Sie Leitern oder Gerüste verwenden, da die Ge ahr eines Sturzes
besteht.
• Kinder sollten in sicherem Abstand vom Montageort gehalten werden.
Wartung und Pflege
Der Zustand des Produkts, die Stabilität der Konstruktion und aller Verbindungen muss periodisch (4 mal pro
Jahr) überprü t werden.
Während der Wintersaison sollte der verbliebene Schnee regelmäßig ent ernt werden. In den übrigen
Jahreszeiten müssen jedoch die restlichen Blätter, Nadeln, Äste und dergleichen ent ernt werden.
PVC-Platten sollten mit einem leichten Wasserstrahl oder einem Hochdruckreiniger (niedrigster Druck)
gereinigt werden. Die Verwendung von Sei enlauge ist erlaubt.
Es wird nicht emp ohlen, andere ätzende oder ent ettende Reinigungsmittel zu verwenden. Verwenden Sie zur
mechanischen Reinigung eine Bürste mit weichen Borsten, um Kratzer au den Platten zu vermeiden.
Detaillierte Informationen zu Wartung, Pflege, Garantie und deren Ausschluss finden Sie unter
www.stelmet.com

Instructions de stockage, d'installation, d'utilisation et d'entretien
Stockage
Le paquet doit être stocké à plat, dans un endroit sec et ventilé. Protéger contre les e ets directs des conditions
météorologiques telles que la pluie, la grêle et l’ensoleillement.
Préparation avant le montage
Avant de commencer l'assemblage, lisez le contenu du manuel d'installation et véri iez l'exhaustivité de
l'ensemble et la qualité des composants. En cas d'irrégularités, veuillez contacter immédiatement le vendeur.
Disposez les éléments de l'ensemble sur une sur ace propre pour les identi ier con ormément aux instructions
de montage a in d'éviter d'éventuels dommages, salissures ou rayures. Il aut veiller à ne pas marcher sur les
panneaux en PVC car cela pourrait les endommager. Équipez-vous des outils et des accessoires nécessaires à une
installation correcte.
Le carport est conçu pour être monté sur des ancrages de poteau, qui ne sont pas inclus dans le colis - ils
doivent être choisis en fonction du type de sol (ancrages vissés dans le béton, pour béton coulé, à enfoncer).
L'emplacement d'installation doit assurer une stabilité et rigidité su isante de l'ancrage du pied de poteau dans
le sol. Il est recommandé d'utiliser l’ancrages pour le béton ixés à des chapes (semelles en béton , pieux de
ondation) ou directement sur les ondations.
L'installation d'ancres sur les pavés n'est pas recommandée. Dans ce cas, démontez une partie du pavé et
préparez des chapes en béton ou utilisez des ancres à en oncer.
Montage
L'installation doit être e ectuée par 2-3 personnes adultes.
Temps de montage estimé entre 6h et 12h (ce temps n'inclut pas la préparation / nivellement de la sur ace ou
construction des ondations, 8-24 heures).
Le temps total nécessaire pour le montage dépend de l'état de la sur ace et de la méthode d'ancrage du carport.
Les panneaux de toiture PVC ont deux côtés di érentes, structure rugueuse et lisse.
Ne pas oublier de fixer le panneau de toiture surface lisse tournée vers le bas!
Les panneaux de toiture PVC les plus externes doivent être posés avec une distance par rapport à des lattes
comme indiqué sur la igure 6.
Avant de visser les panneaux, aire un pré-perçage. Le diamètre du trou doit être 2x plus grand que le diamètre
de la vis.
Ne pas marcher sur les panneaux PVC ! A in de visser les vis sur la partie centrale du toit, vous devez vous
procurer des planches ou des panneaux en polystyrène pour bien répartir le poids de la personne e ectuant le
montage. Il est également possible de ixer les panneaux PVC à l'aide d'une échelle su isamment haute sans
avoir besoin de monter sur le toit et marcher sur les panneaux, ce qui est recommandé par Stelmet.
Une prudence particulière s'impose lors de l'installation de panneaux PVC!
Pour assembler deux pièces de bois avec des vis, aire un avant trou d'un in érieur de 2 mm au diamètre de la
vis utilisée. Il s'agit d'une étape essentielle pour éviter les éventuelles issures lors du serrage des vis.
Tous les travaux de construction et de montage doivent être e ectués avec un soin particulier et les règles de
santé et de sécurité.
•Vous devez vous munir d'un équipement de protection individuelle c'est-à-dire gants, lunettes, etc.

•Soyez particulièrement prudent lorsque vous utilisez une échelle ou un écha audage en raison d’un
risque de chute.
•Tenez les en ants éloignés pendant l'installation.
Maintenance et entretien
L'état du produit, la stabilité de la structure et toutes les points de connexion doivent être véri iés
périodiquement (4 ois par an).
Pendant la saison hivernale, enlever régulièrement la neige restante. Pendant les autres saisons de l'année,
enlever les euilles mortes, les aiguilles, les branches et similaires.
Nettoyez les panneaux en PVC avec un jet d'eau doux ou un nettoyeur à pression (pression la plus basse). La
lessive savonneuse est autorisée.
Les autres produits de nettoyage qui ont un e et caustique ou dégraissant ne sont pas recommandés pour le
nettoyage.
Utilisez une brosse à poils doux pour le nettoyage mécanique a in d'éviter de rayer les panneaux.
Des informations détaillées sur l'entretien, les soins, la garantie et ses exclusions sont disponibles à l'adresse
suivante www.stelmet.com
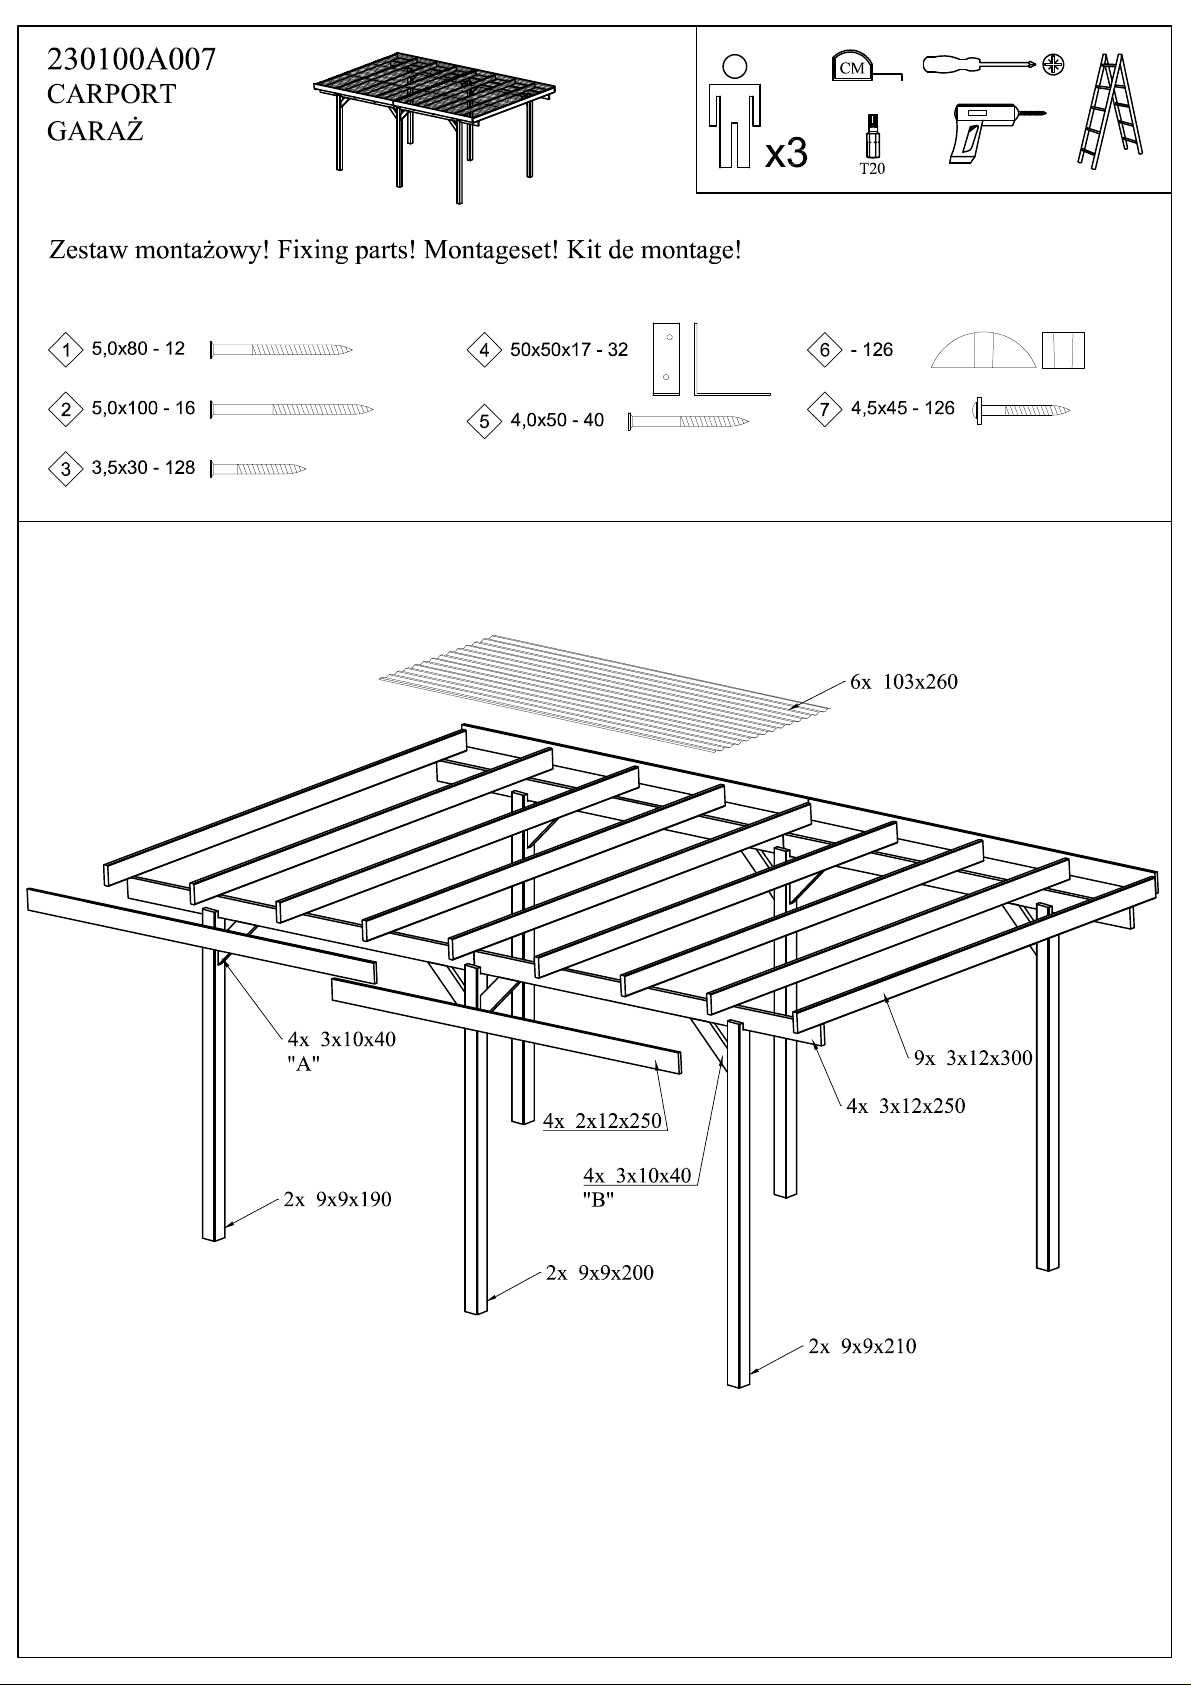

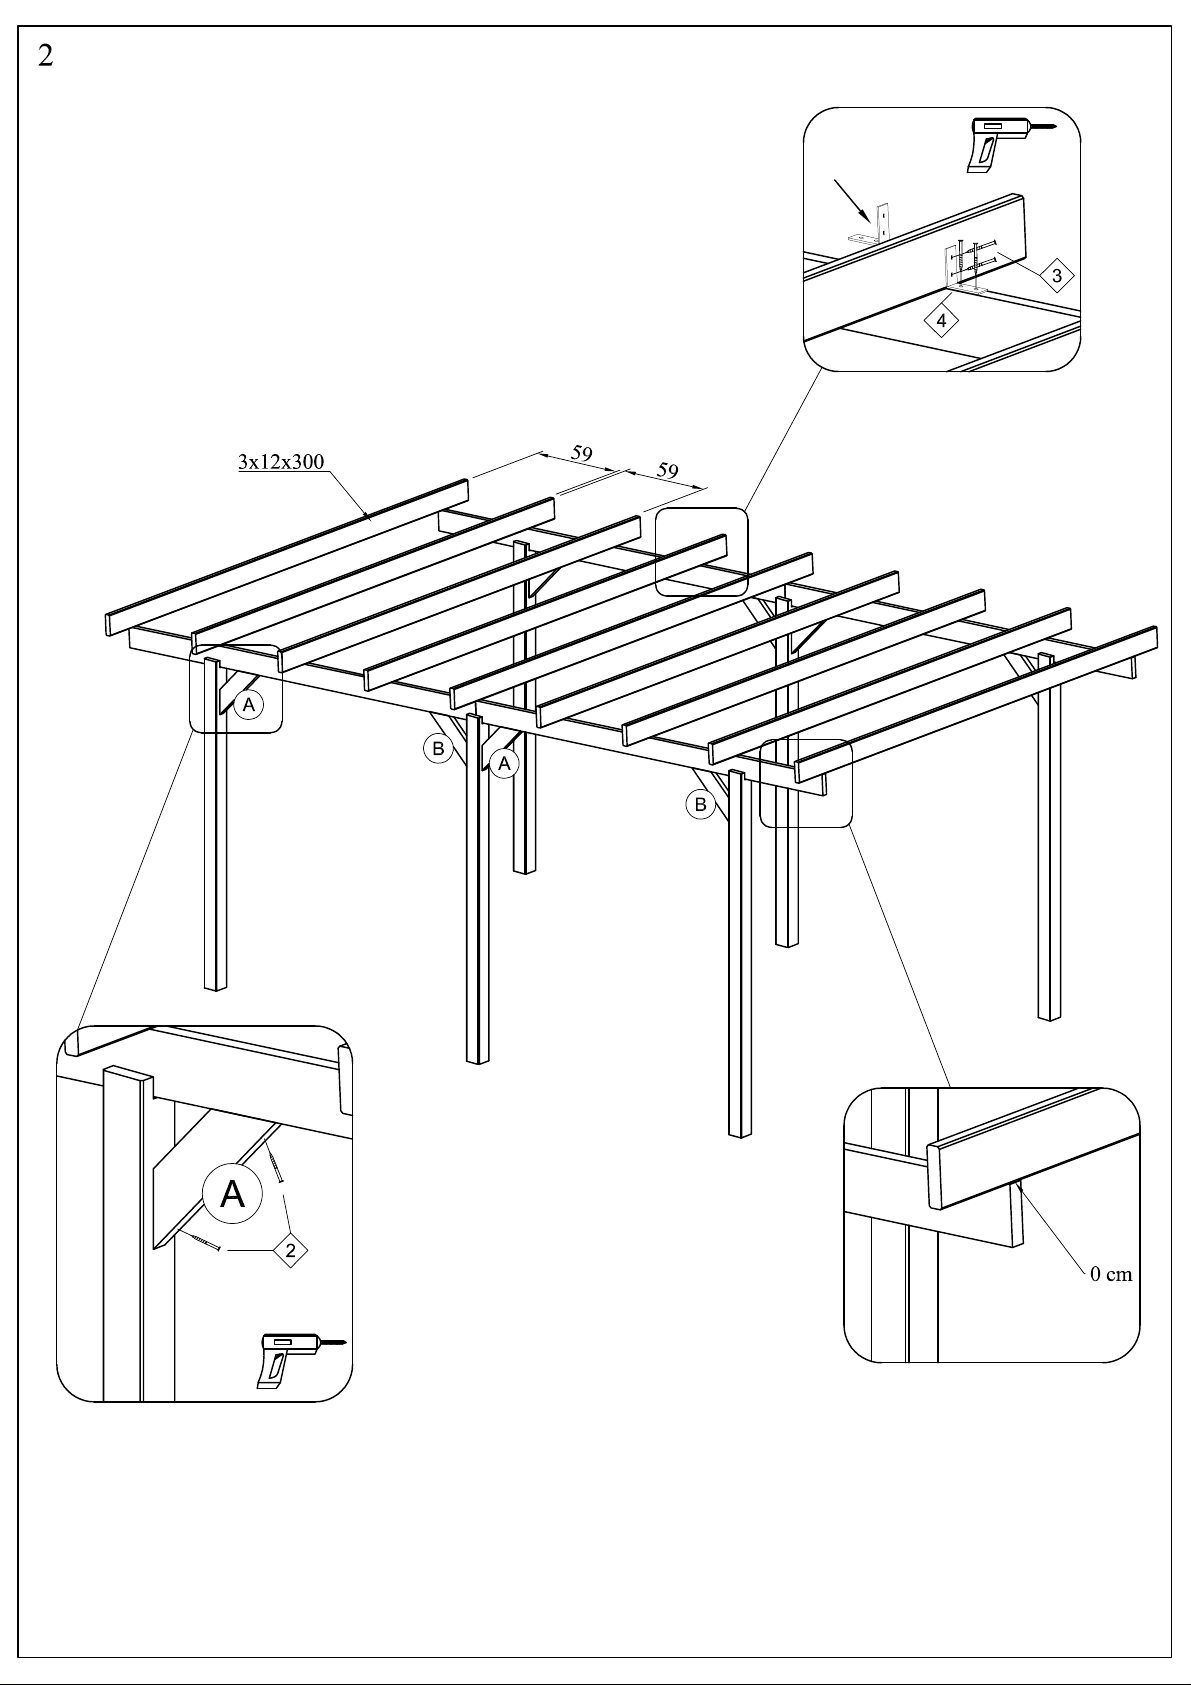
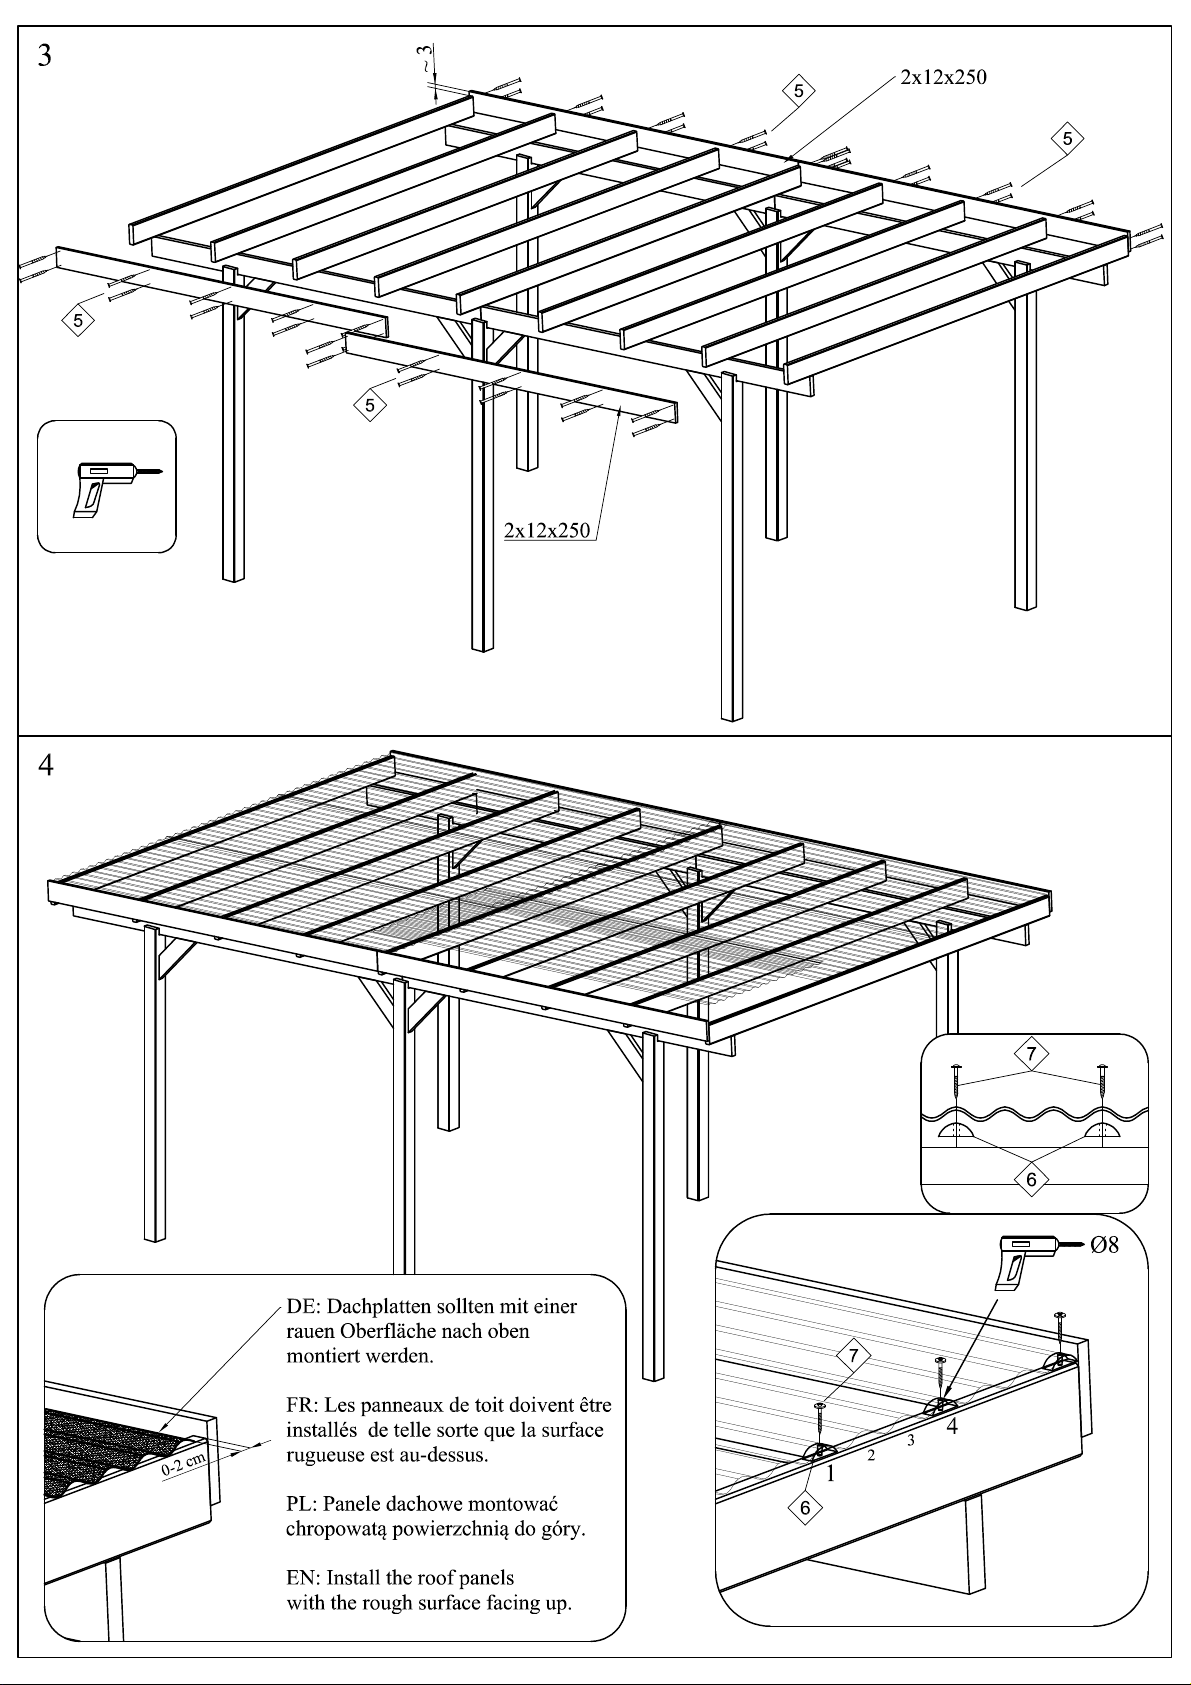
Table of contents
Languages:
Popular Outdoor Furnishing manuals by other brands

Global Industrial
Global Industrial 240126BK Assembly instructions

Courtyard Creations
Courtyard Creations RUS0238 Assembly instructions

ZINUS
ZINUS OPOOL2-55B Assembly instruction

CONFORAMA
CONFORAMA XT5032 Assembly instructions

Billyoh
Billyoh 7ft Expert T & G Corner Summerhouse INS-0088 Building instructions

Safavieh Outdoor
Safavieh Outdoor PAT1508A Assembly

Mercia Garden Products
Mercia Garden Products 01LOGST-V1 General instructions

Northbeam
Northbeam MPG-GDB01 Care Instructions

Arboria
Arboria Pyramid Trellis Assembly instructions

Westin
Westin Laguna OP2007 instruction manual

Atleisure
Atleisure Westerly FRN-313160 Use & care instructions

Costway
Costway HW52432 user manual


