Supertech Trailer Valet 5X User manual

Operating Manual
The most advanced trailer dolly on the planet
More information https://www.caravansplus.com.au

injury to persons and property for which the manufac-
turer cannot be held liable.
ASSEMBLY............................................................................................................ 6
WARNINGS...........................................................................................................4
WARRANTY.........................................................................................................10
OVERVIEW............................................................................................................5
OPERATING INSTRUCTIONS ........................................................................... 8-10
MAINTANENCE...................................................................................................11
Table of Contents
2
WARNING
!
SPECIFICATIONS.................................................................................................. 3
WHAT’S IN THE BOX.............................................................................................3
INSTALLATION..................................................................................................... 7
More information https://www.caravansplus.com.au

The Trailer Valet is made of high strength steel and given a powder coat finish made to resist corrosion
from the elements and marine use. When cared for properly, it will provide years of service. Trailer Valet
mounts to the side of trailer tongue. Once mounted to your trailer, the Trailer Valet makes maneuvering
your trailer much easier than your old jack. Hitching and unhitching, leveling, and moving is now done with
precision. The Trailer Valet 5X is designed for trailers up to 5,000 lbs. The Trailer Valet is for use only on
paved surfaces or compacted gravel and soils that are free of debris.
Wheel size: 8 inches
Jack range: 16 inches
Tongue max weight: 500 lbs.
Trailer max weight: 5,000 lbs.
Weight: 50 lbs.
Maximum dimensions: 28” H x 14” L x 7.5”
Patented under US Patent number 6,619,671 and 6,739,601.
Thank You for your Purchase!
complete the owner’s record below:
Purchase Date:________________ Retailer:_____________________________Order No.:______________________
Specifications
3
Before assembling your Trailer Valet, double check that you have all the parts and tools you’ll need.
Included in the box:
1 -- Assembled Trailer Valet
4 -- Lock washers
1 -- Drive handle (Part Number 4)
1 -- Mounting bracket (Part Number 20)
2 -- Trailer mount clamp (Part Number 21)
1 -- Rotation pin (Part Number 23)
1 -- Owner’s manual
4 -- Washers
4 -- Bolts and nuts
1 -- Stow pin (Part Number 22)
1 -- Security bolt (Part Number 21b)
Tools that you will need:
2 -- Crescent wrench
What’s In The Box
More information https://www.caravansplus.com.au

The use of gloves is recommended while aaching the
Warnings
device. Do not modify the device or use the device for
exceed the designated weight limits.
As with all devices with moving parts, do not wear
excessively loose clothing, as it may become caught,
Before each use of the Trailer Valet, check for damaged
parts. Carefully inspect the device for any part that
appears to be damaged to determine if the device will
operate properly. Check for alignment and secure
aligned, secured or both, DO NOT use the device. We
replaced by a qualified technician.
When servicing, use only factory replacement parts.
Do not operate the device while under the influence of
your ability to operate the device.
This product must be installed and used in strict
Operator and bystanders should never place any part of
product or the load being supported or moved.
This product is not intended to be used as a transport
Have wheel blocks ready in case of emergency.
Never exceed the maximum rated capacity. Refer to the
rated capacity. If uncertain, contact Customer Support at
626-400-6299 or visit the website www.trailervalet.com.
side forces may cause failure and must be avoided.
4
Always read and understand your drill/driver operator’s
Always remember to set the brakes before leaving or if
you are having trouble maintaining control of the trailer.
device to the trailer.
DO NOT use the Trailer Valet on slopes and inclines.
Have a second person guide your trailer’s movements
while using the Trailer Valet to avoid property damage,
especially in narrow or poorly visible areas.
The Trailer Valet is designed for use on solid surfaces or
compact gravel and grass. DO NOT use the product on
excessively soft surfaces or muddy terrain, since the
device will not be able to gain traction. If there is no
traction despite being on a solid surface, consider
lowering the Trailer Valet further or shifting more of the
weight of your trailer forward.
In preparing this manual, we strive to cover all possible
conditions that the customer may encounter when using
the Trailer Valet. The operator of the product must
exercise common sense, caution and full judgment when
assessing situations not covered or cautioned in this
manual.
DO NOT submerge the Trailer Valet in water (salt or fresh)
or leave it in water for prolonged periods, since this can
damage the gears and erode lubricants.
the body under or in the path of any poron of this
More information https://www.caravansplus.com.au

Overview
PART DIAGRAM:
1.
3.
5.
4.
2.
Axle Yoke Assembly
ACME Jack Assembly
Jack Crank
Drive Handle
Steering/Brake Handle
6. Brake Cap Assembly
7.
9.
11.
10.
8.
Left Bearing Housing
Right Bearing Housing
Gear Cover
Low Gear Driveshaft
High Gear Driveshaft
21b.
14.
15.
13.
Safety Bolt
Gear Chains
Easy-Grip Handle
Handle Clip
5
13.
15.
17.
16.
14.
Brake Engagement Lever
Axle Bearings
Drive Wheel
Follow Wheel
Axle Gear
18. Low Gear Chain
19.
21.
23.
22.
20.
High Gear Chain
Trailer Mount Bracket
Trailer Mount Clamp
Stow Pin
Rotation Pin
12. Drive Shaft Bearing
24. Tire
W
!
W
!
More information https://www.caravansplus.com.au

Assembly
6
1
2
More information https://www.caravansplus.com.au

t
Set the stow pin to secure the Trailer Valet and set the
Only use the
in the box
Installation
Things you will need to operate your Trailer Valet:
Trailer Valet
Crank Handle
Items sold separately:
Standard Drill/Driver (minimum drive torque
Upon removing the dolly from packaging, it is very
important to thoroughly inspect all parts of the system
before using the device. Any part that is missing or
damaged must be immediately replaced. Contact
Trailer Valet Customer Service at 1-626-400-6299.
1)
2)
WARNING
!
Step 1: CHOOSE A LOCATION ON THE TONGUE WHERE
THE TRAILER VALET CAN FREELY ROTATE FROM ITS
VERTICAL POSITION TO ITS HORIZONTAL STOW
POSITION.
WARNING
!
7
1)
WARNING
The Trailer Valet is only to be installed
on trailer tongues that are rectangular in profile.
Valet as it will rotate, allowing the trailer to drop.
!
Step 2: INSTALL THE MOUNTING BRACKET
The safest way to install the Trailer Valet
is while the trailer is securely mounted to your
vehicle or mounted on an exisng jack.
WARNING
!
NOTE: It is recommended that you make sure the
Trailer Valet will have the necessary clearance from
the ground to operate and rotate into the stow
2)
NOTE: The trailer should be high enough so that the
Trailer Valet is at least 1 inch off the ground at this
stage of installaon. If the Trailer Valet is not high
enough, adjust trailer height or mounng bracket
and test again.
3)
Sep 3: SECURE THE TRAILER VALET
WARNING
!
WARNING
!
in
The mounng bracket has 7 holes to fit a variety of trailer
frames. Have a tongue clearance of at least 13 inches off
the ground before installing the bracket. Set aside 8 inches
of space on the tongue for the mounng bracket.
WARNING
!
Drill Aachment (available at
www.trailervalet.com)
Place the mounng bracket (Part Number 20) and
clamps (Part Number 21) onto the area of the tongue
you designated in Step 1, and secure onto the tongue
with the 4 bolts, each bolt having one washer, one
spring washer and one nut. Do not completely ghten
the bolts yet.
Evenly and firmly ghten the 4 bolts.
res are damaged due to its failure to hold air. Check re
pressure before using the Trailer Valet for the first me,
since air pressure might have been lost in transit.
Tires must be above 75 psi (pounds per
square inch) prior to use. Do not use the device if the
WARNING
!
WARNING
!
WARNING
!
More information https://www.caravansplus.com.au

Connect the drill socket to your drill/driver.
In this guide, you are shown the basic fundamentals
use of your Trailer Valet. Knowing the proper dollying
techniques can help keep you and others around you safe.
Apply your knowledge of your Trailer Valet and the basic
Operating Instructions
8
WARNING
!
Step 3: TESTING THE ASSEMBLY
NOTE: Keeping the trailer jack close to the ground prevents
serious damages from occuring due to unexpected failures.
unable to hold the weight, lower the jack and remove the
device to check air pressure.
1)
Aach the drive handle to the low or medium gear of
the drivesha.
WARNING
!
Always ensure the operator and bystanders
are aware of the stability of the load.
1)
If you are using a cordless drill, be sure your
WARNING
!
2)
Secu e
Using the Trailer Valet
Step 1: SECURE THE TRAILER VALET
.
uncontrolled trailer movement by locking the Trailer
Step 2: RAISE THE TRAILER VALET
NOTE: Some hitching mechanisms can become stuck to
the ball. Slightly rocking the trailer will loosen the
disconnect any towing safety chains, the brake-turn
Step 4: MOVE THE TOWING VEHICLE
Once the hitch ball of the towing vehicle is detached from
the trailer coupler and the Trailer Valet fully hoists the
trailer, move the towing vehicle away from the trailer.
NOTE: Driving the Trailer Valet with the jack extended will
cause excessive wear on the jack and possibly result in
injury, and/or property damage. Always lower the jack to
its lowest height before moving your trailer with the
Trailer Valet.
WARNING
!
Step 5: CHOOSE YOUR GEAR
greater speed, while the low gear (located at the top
according to your trailer-moving needs.
controlling the trailer.
Mount the Trailer Valet onto the mounng bracket, drop
Remove the rotaon pin (Part Number 23) from the
boom of the jack and turn the crank (Part Number 3) to
raise the trailer up off the hitch ball, if aached to a
towing vehicle.
Raise the trailer gradually unl the exisng jack is above
ground (during first use and unl you ar comfortable with
using the Trailer Valet) and the trailer is completely
supported by the Trailer Valet.
Step 6: ATTACH YOUR PREFERRED DRIVER
drill/driver manufacturer’s recommendaons. DO NOT
use a drill on the high gear drivesha of the Trailer Valet.
LOW GEAR
HIGH GEAR
rthe chuck of your drill around the drill socket
More information https://www.caravansplus.com.au

Lower the jack as high as possible and leave the
Trailer Valet hoisted on the mounng bracket.
Remove the coer and stow pins, rotate the Trailer
Valet 90 degrees (to where the steering handle faces
up).
Have one hand firmly gripped on the steering
handle, which acts as a brake when lowered, and
the other hand firlmly
gripped on the
drill/driver.
Operating Instructions
9
The drill can loosen and cause injury.
WARNING
!
3)
4)
Align and insert the drill socket to the low gear
If using a corded drill/driver, verify that the power
on the Trailer Valet or moving vehicle will not damage
the cords or that the cords cannot be stepped on,
tripped over, or otherwise subjected to damage or
Hold the drill/driver firmly when engaging.
WARNING
!
1)
3)
NOTE: It is important that you steer the device only when you
steering handle at a dead stop will cause the gears to fall out
of alignment.
1)
Remove the drill/drive handle.
2)
3)
Step 7: RAISE THE STEERING HANDLE AND ROTATE THE
DRIVESHAFT
Step 1: CONNECT YOUR TRAILER TO THE HITCH BALL
Step 8: PARK YOUR TRAILER
Once you have moved your trailer to your desired
so that the brake is engaged to prevent movement.
Follow this by placing wheel blocks below your trailer’s
wheels to secure your trailer from accidental movement.
NOTE: The Trailer Valet brake is
not
a progressive brake,
and it is not intended to regularly stop your trailer if it is
misuse of the Trailer Valet.
WARNING
!
2)
Re-Hitching Your Trailer
1)
the ground.
Remove any wheel blocks below the trailer.
coupler is above the hitch ball of the towing vehicle.
hitch ball, and lock the coupler.
2)
3)
Step 2: REMOVE THE TRAILER VALET
4)
4)
Remove the stow pin and detach the Trailer Valet from
and store the Trailer Valet in a safe place.
guide the trailer unl the
Lower the exisng jack unl the Trailer Valet is above ground.
Remove the rotaon pin (Part Number 23).
Slowly li the streeing
handle unl the brake is
disengaged and start
cranking.
1)
More information https://www.caravansplus.com.au

WARNING
!
Warranty
10
Operating Instructions
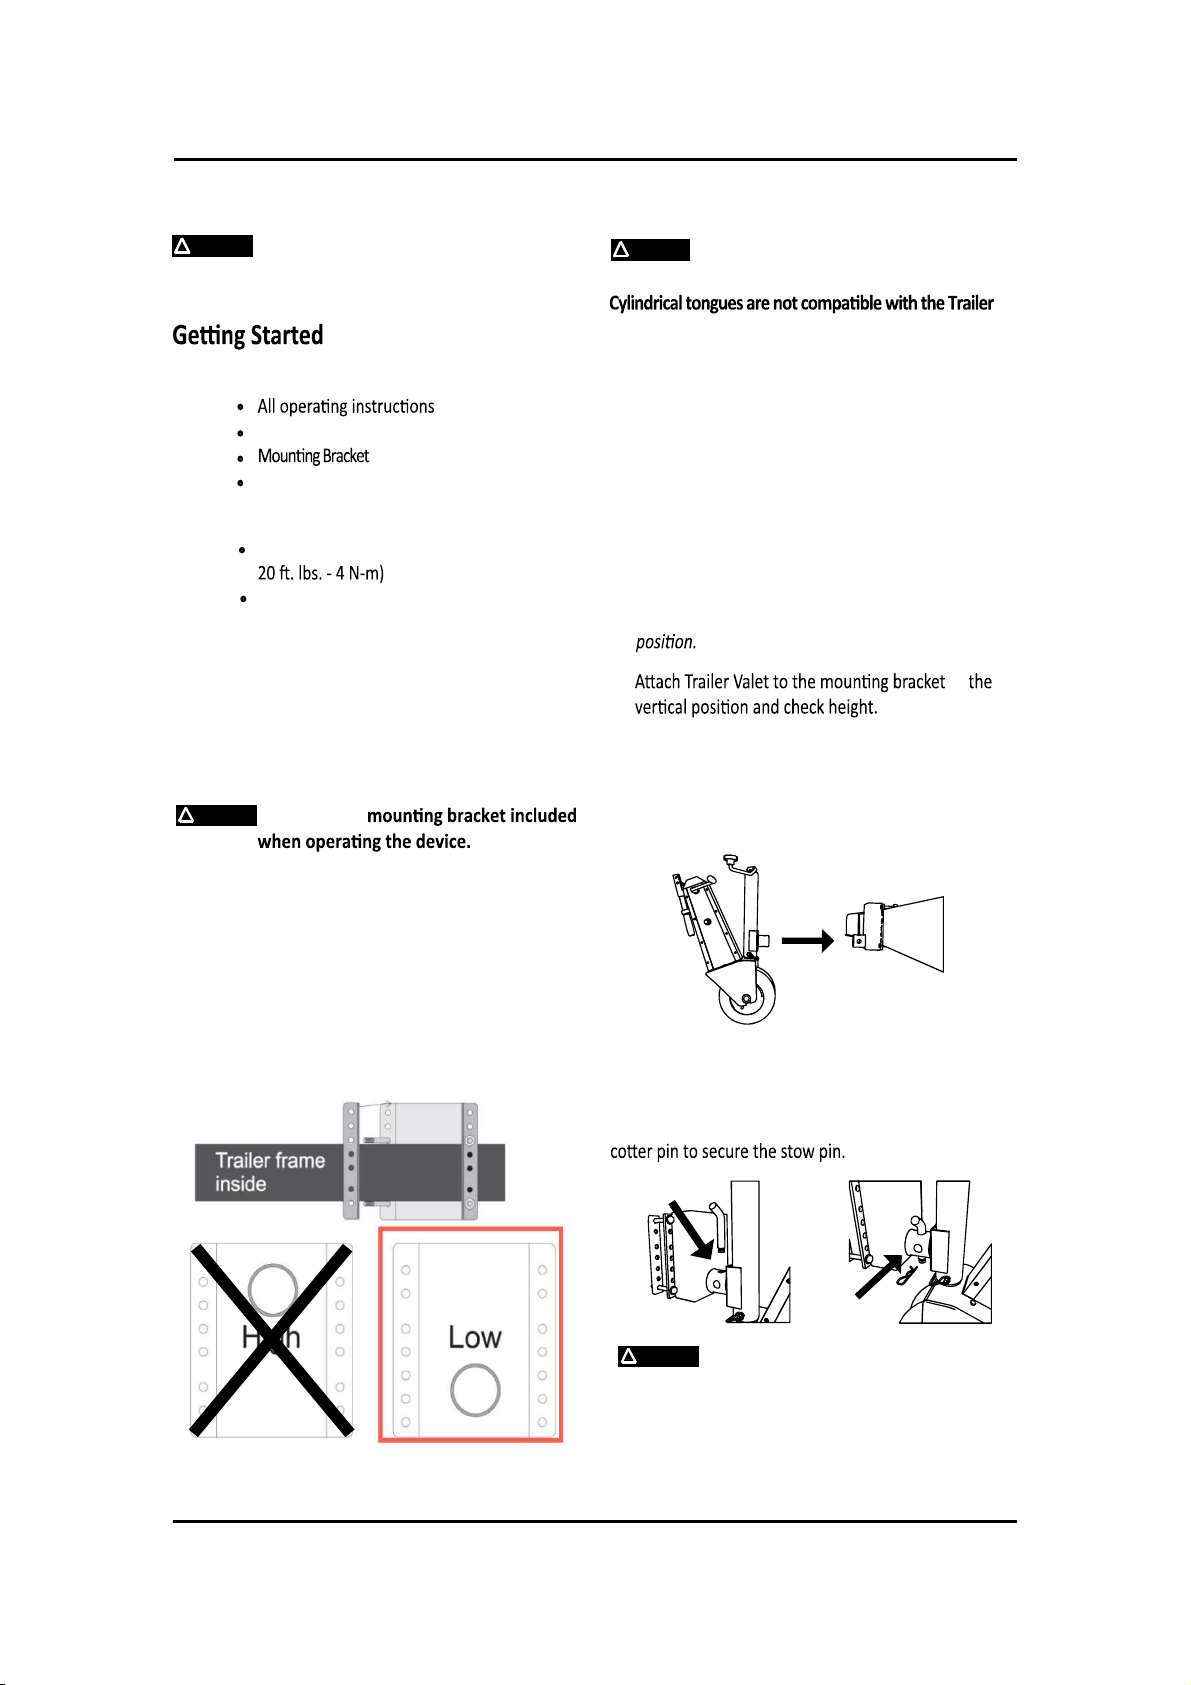
The Trailer Valet 5X comes with a security bolt (Part
Number 21b) that is an opon to secure the device
while trailering. If you travel with the 5X and choose to
use it, the bolt aaches through the back of the
mounng bracket and ghtens into the tube of the 5X.
Make sure this bolt is loaded onto both the Trailer Valet
and the mounng bracket, along with
the rotation and
stow pins, before trailering.
Restore the stow and rotaon pins through the
horizontal holes. This will allow the Trailer Valet to
remain aached on the trailer while being towed
and ready for reuse.
2)
One-Year Warranty (”Warranty”).
SuperTech S. Corp. (”We” or “Us”) warrants to the original consumer purchaser only (”You”)
that the producctd will be free from material defects in both material and workmanship, ordinary wear and tear excepted,
provided that installaon and use of the product is in accordance with product instrucons. There are no other warranes,
expressed or implied, including the warranty of merchantability or fitness for a parcular purpose. This warranty is not transfer-
rable.
If it is necesssary to ship the Product to Us, you may either (1) pay for your own shipping, or (2) include a request to mail
You a shipping label as part of Your claim. Any returned product replaced by Us becomes our property. Please retain Your
purchase receipt to verify date of purchase and that You are the original consumer purchaser. The Product and a copy of
the purchase receipt must be provided to Us in order to process Your Warranty claim.
Limitaons on the Warranty.
This Warranty does not cover: (a) normal wear and tear; (b) damage through abuse, neglect,
misuse, natural events, conngencies beyond Our control or as a result of any accident; (c) damage from misapplicaon,
overloading or improper installaon; (d) improper maintenance and repair; (e) damage as a result from the shipping and
handling by third-party vendors; and (f) product alteraon in any manner by anyone other than Us, with the sole excepon of
alteraons made pursuant to product instrucons and in a workmanlike manner.
To make a Warranty claim, contact Us
90601 or 1-626-400-6299
Remedy Limits. Product replacement is Your sole remedy under this Warranty. We shall not be liable for service or labor
You acknowledge and agree that use of the product for any purpose other than the specified use(s)
Governing Law. This Warranty gives You specific legal rights, and You also may have other rights which vary from state to
state. This Warranty is governed by the laws of the State of California, without regard to rules pertaining to conflicts of law.
by mail or in person at 2368 Peck Road, City of Industry, CA
the Product at any me.
Obligaons of Purchaser.
, idenfy the product by model number and follow the claim instrucons that will be provided.
Refund Policy.
If you purchased the product through us and wish to return the Product for a refund, contact Us, provide a
reason for your return and follow the instrucons that will be provided. We will inspect the Product and, if it is in an
acceptable condion, process a refund minus a 15 percent re-stocking fee. If you purchased the Product through a
third-party vendor, your acons are subject to the policies of the vendor; contact the vendor for further informaon.
the
More information https://www.caravansplus.com.au

Maintenance
Check
Before First Every 90
Days
Before
Each Use
Read and understand your drill/driver operator’s
Keep device free from contaminants.
Use the cleaning towel provided to remove any
dirt and debris.
front cover of the device.
11
The Trailer Valet is made of high strength steel and given a powder coat finish made to resist corrosion. However, if
the device is used in a marine environment or where road salt is encountered, rinse off the interior and exterior with
fresh water and allow to dry. DO NOT SUBMERGE THE TRAILER VALET IN WATER, as this can damage the gears and
erode lubricants.
More information https://www.caravansplus.com.au

SUPERTECH S. CORP.
2368 Peck Road
Industry, CA 90601
Customer Service: 1-626-400-6299
Email: suppor[email protected]
or visit: www.TrailerValet.com
12
More information https://www.caravansplus.com.au
Table of contents
Popular Lawn Mower manuals by other brands

Husqvarna
Husqvarna Automower 305 quick guide

Husqvarna
Husqvarna 65RSW21HV owner's manual

Ariens
Ariens GRAVELY Sno-Thro 834035 Owner/Operator & Parts Manual

GGP ITALY SPA
GGP ITALY SPA MC 534 TR 4S Operator's manual

Husqvarna
Husqvarna CT135 Spare parts

Wolf Garten
Wolf Garten NX9 Original operating instructions