Temco SG01 User manual

BONE
CONDUCTION HEADSET
SUNGLASSES
TYPE
OWNER’S
MANUAL SG01
●Thank you for purchasing our
product.
●Please review this
“OWNER
’
S
MANUAL” carefully
before
using this
product.
●Please keep this manual available for quick
reference.

Safety
Instructions
●Review this “Safety Instructions” before using the product for
safe
and correct
usage.
●All of the following contains important safety instructions and
must
be strictly
followed.
●Descriptions of sign and terminology are as
follows.
〈Terminology〉
Warning
Caution
Wrong usage may cause serious or fatal injury to
people.
Wrong usage could result in
injury
.
〈Sign〉
What not to
do.
Prohibited
Compulsory
Caution
Explicit description is given or attached to the
sign.
Action/instructions
which must be
followed.
Explicit description is given by or attached to the
sign.
indicates matter requiring special
attention.
Explicit description is given by or attached to the
sign.
WARNING
Prohibited
Prohibited
Prohibited
DO NOT disassemble or modify the product. Such act
may
cause malfunction, electric shock or
fire.
If anything unusual such as smoke, heat or bad smell
is
detected, immediately disconnect the power and stop
the
usage. Continued use may cause electric shock or
fire.
DO NOT throw the product into the fire. Built-in battery
may
explode.

CAUTION
Prohibited
Prohibited
Caution
Caution
DO NOT expose the product to heavy rain. Such
condition
may cause
malfunction.
DO NOT expose the product to open flame or under
the
direct sunlight for a prolonged period of time. Such
environ-
ment may cause malfunction or
fire.
DO NOT drop or apply shock to the product. Such act
may
cause irreparable damage to the
product.
DO NOT lick, bite or put the product into the mouth.
Such
act may result in serious injuries/accidents. Take
utmost
caution around
children.

Kit
Checklist
Ensure that the package contains all of the
following.
●Sunglasses
One
●USB Charge Cable
One
●Case
One
●Glass wiper
One
●Owner
’
s
Manual
One
Parts
②Microphone
⑤Indicator(Blue)
⑥Indicator(Red)
⑧USB Charge
Cable
①Bone Conduction
Speakerr
⑦Charge
jack
③Volume control
button
④Power/Pairing
button
⑩Modern
(pads)
⑨Charge
plug
Before Using the
Product
Charge the headset using the attached USB Chage
Cable⑧.
Insert the charge plug ⑨ of the USB Charge cable to the charge
jack
⑦ of the sunglasses
.
The indicator ⑥ turns red as the sunglasses start to charge. The
light
goes out automatically when charging is
completed.

How to
Use
1.
ON/OFF power
switch.
Push Power/Pairing button from 7
seconds.
Blue indicator ⑤ flashes(slow)as the power turns
ON.
Another push to the Power/Pairing button ④ from 7 seconds turns
the
power OFF and the indicator goes
out.
2.
Volume
control
The volume can be controlled in five
levels.
The volume increases by one level as each time the volume button
③
is
pushed.
Another push at maximum level brings back to the lowest level.
(1, 2, 3, 4, 5 1, 2,
3・・・)
3.
Default
setting
Regarding default setting, please refer paring section in Page
6.
4.
Reconnect with the mobile
phone
Once the pairing with your mobile is completed, automatic
reconnec-
tion and wait mode is achieved by turning the power switch
ON.
*
Some mobile phones may require the following
procedure.
Turn ON the power switch of the product. Select [BT-02] from
the
equipment list on your mobile screen. Connect the
product
with your
mobile.
To answer incoming
Call
5.
Once the headset is in wait mode, switching to a talk mode
is
automatic when there is an incoming on your mobile. Pressing
the
Power/Pairing button ④ also switch to a talk
mode.
*If there is an incoming on your mobile while listening to the music,
volume
is minimized and automatic connection with the mobile is
made
(automatic switch
function).
To end a
call
6.
Wait for the other party to hang up or push Power/Pairing button ④
to
end a
call.
Talk mode changes to a wait
mode.
The mode switches back automatically to the music mode if you
were
listening to
music.
To reject incoming
call
7.
Press Power/Pairing button ④ from 3 to 6 seconds while the phone
is
ringing. The call is rejected without
answering.

Pairing
CONNECTION INSTRUCTIONS FOR THE
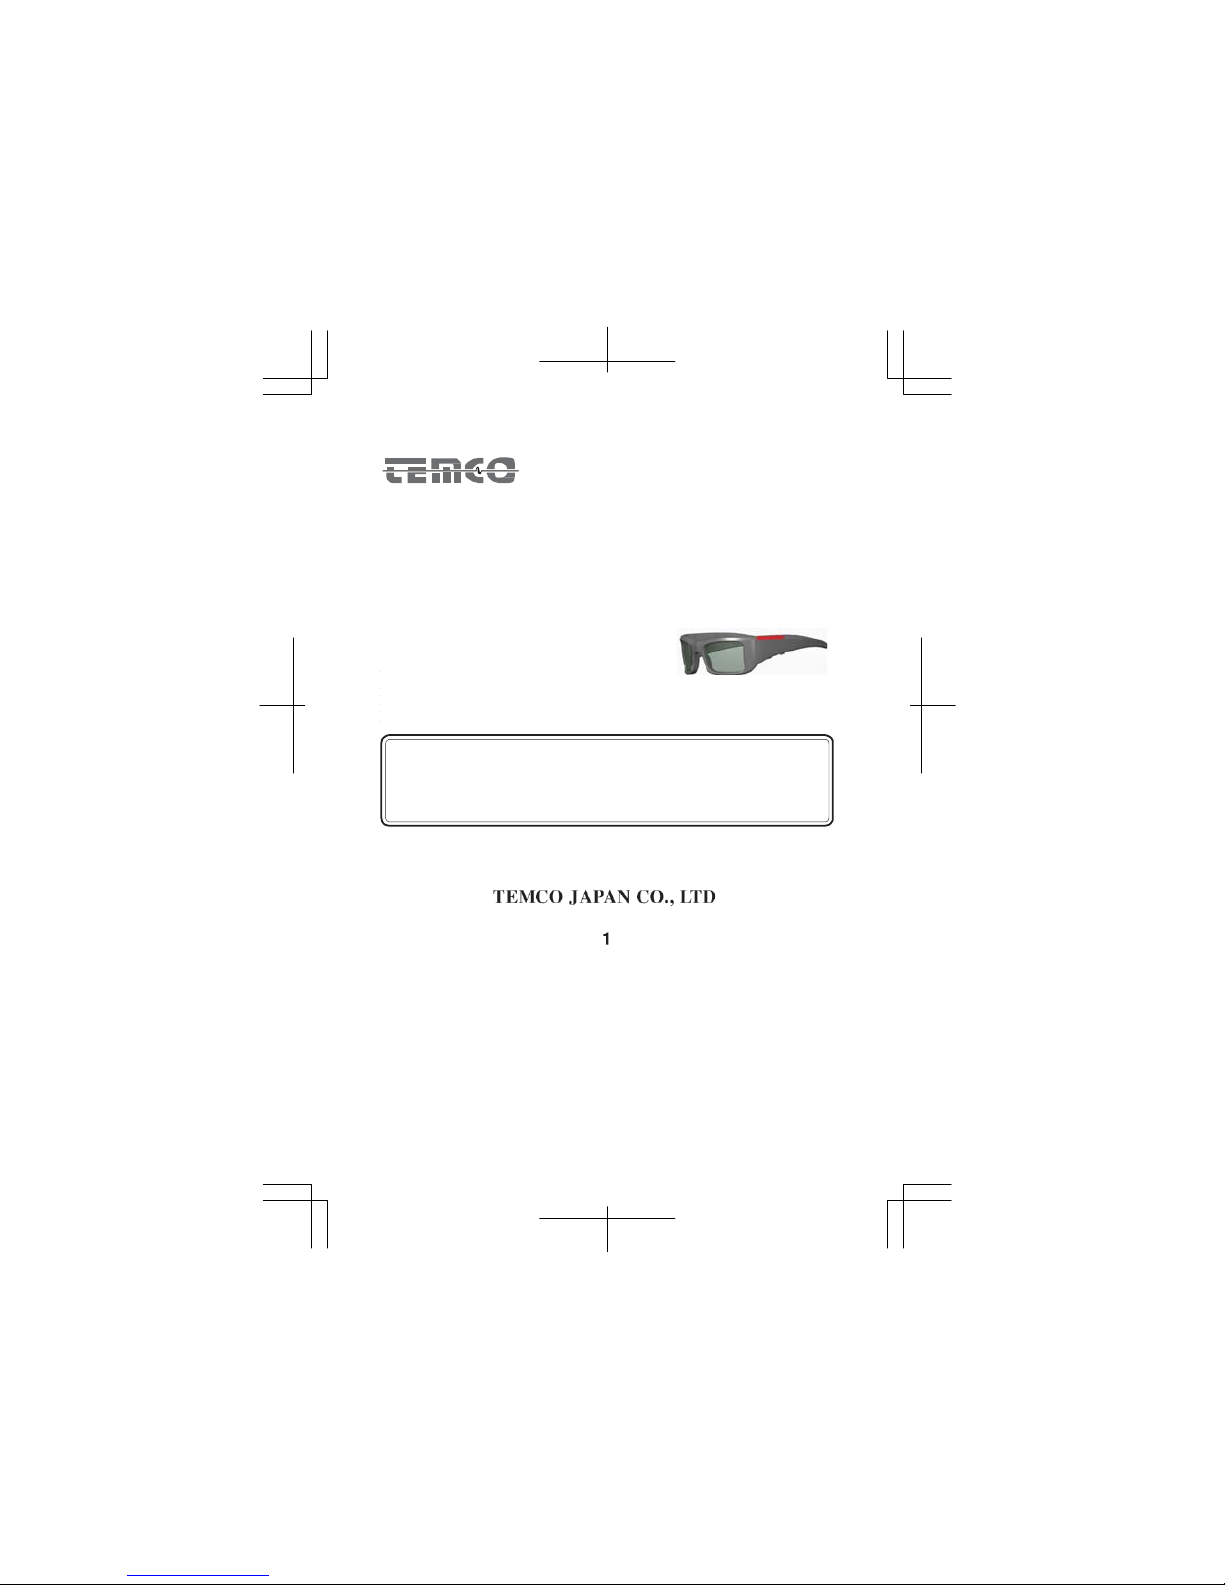
D01
Your new SG01 can only be connected to mobile phones, mp3
and
GPS navigators that come provided with a communication
system.
To connect the SG01 to your mobile phone or mp3, it is necessary
to
make an initial setting operation called
“PAIRING”.
The PAIRING process is required for only the first time you are
going
to use your SG01
system.
(After the first power up pf the unit, you will only have to follow
the
normal ON/OFF procedure going
forward.)
PAIRING
PROCEDURE
1) Your SG01 must be switched
off.
2) Again, your mobile phone or MP3 must have systems
and
they
must be enabled on your device. (Please refer to your phone
or
mp3
manual for directions /
support).
3) Push your SG01 on/off-pairing button and keep it pressed for
about
7 seconds – until you see a fast blue blinking LED light on the
unit.
4) Take your now enabled phone or MP3 and
select
“search option”. When your phone or mp3 will detect SG01, the
name
of SG01(BT-02)will appear. Please select the unit to PAIR with
your
phone or
MP3.
PLEASE
NOTE
Some models of mobile phone or MP3 also may require you to insert
a
password.
Should this be requested-Please enter 0000 as your code and
press
enter
.
5) The blue indicator will change from a fast to a slow flashing
LED
light when the pairing operation is
successful.
YOUR PAIRRING OPERATION IN NOW
COMPLETE
IMPORTANT NOTE :If you wish to use your mobile phone for
phone
calls and your MP3 for listening to music at the same time , it is
neces-
sary to do the PAIRING operation for both the mobile phone and
the
MP3. (Note – PAIR one unit at a time / only one unit is to be
powered
on at a time to have a successful
PAIRING.
(You can not have both the phone and the MP3 units powered on
the
time when
PAIRING.)

7.To switch a
call
Push the volume control button ③ from 3 to 6 seconds while
talking
on the
headset.
The call is switched from the headset to your mobile
phone.
Also, while talking on the mobile, push the volume control button
③
on the headset from 3 to 6 seconds to switch the call from the
mobile
to the
headset
8.Redial
Push the volume control button ③ from 3 to 6 seconds while in a
wait
mode. Previous number can be redialed from the
headset.
※ Remarks: For switching a call(#7) and redialing(#8),waiting
time
could be changed depends on the equipment of each mobile
phones.
Please release the finger from the hold button while alert
sound
comes.
Special Instructions for Power/Pairing Button
LED display and the headset mode change according to the duration
of
the Power/Pairing button pushed at “OFF” and doing nothing after
the
Button is released as shown in the following chart. Shaded part
shows
the normal workable range. Please use in the workable
range.
If nothing is done while in Pairing Mode, the mode is cancelled after 120 seconds
and
the power shuts “OFF”. The same occur when the pairing process
fails.
When using the headset after the pairing is completed, pushing the Power/Paring
button
for more than 6 seconds in a row, brings back the paring
mode.
If in a wrong mode, turn the power “OFF” and push again the Power/Pairing button
for
the mode of your
choice.

Note
1. Rechargeable high-performance lithium polymer battery is used, but
it
is expendable. Although the battery under normal use has a long
life,
such characteristic deteriorates with time. For maximum
perfor-
mance, usage under normal temperature is
recommended.
2. In outdoor use under strong wind condition, party on the other
end
may have difficulty hearing your voice. In such case, move to
less
windy
location.
Specifications
Microphone
Type
Electret
Condenser
Output
Impedance
Less than
2.2KΩ(RL=2.2KΩ)
Frequency
Response
200Hz
〜
8000Hz
Microphone
Sensitivity
‐44dB±4dB
at 1KHz,
(OdB=1PV/Pa)
Directivity
Non-directional
Receiver
Type
Magnetic
Input
Impedance
10Ω±30% at
1KHz
Frequency
Response
300Hz ~
3000Hz
Output
Level
110d±5dB at
1kHz(OdB=1µN/1mW)
Headset
Size(WxHxD)
151 x 55 x 170
mm
Weight
47g(1.7
OZ)
Built-in
Battery
Lithium Polymer 3.7V
250mAh
Operation
Time
Approximately
5hours
Wireless
Method
Tuned to BLUETOOTH
2.1
Profile
HSP, HFP,
A2DP
Charge
Method
USB Charge
Cable
Charge
Time
Approximately 3
hours
8

Troubleshooting
If problem arise, refer to the following before requesting repair
service.
Common
Problem
Check
point
●Electric power
does
not turn
ON
●Battery is fully
charged.
●Power/Pairing Button is pushed 3 to
6
seconds.
●Other party’s voice
is
inaudible.
●Pairing process with mobile phone is
completed.
●The headset is connected to your mobile
phone.
●Volume level is adjusted to an audible
level.
●Volume level of the mobile is properly
adjusted.
●Other party’s voice
is
hardly
audible.
●Volume control is properly
adjusted.
●Volume control of the mobile is properly
adjusted.
●Other party can
not
hear
you.
●Pairing process with the mobile is
completed.
●The headset is connected to your mobile
phone.
●Too noisy or windy
environment.
●Your mobile
phone
does not recognize
the
headset at
pairing
process.
●The Power/Paring button is pushed for
more
than 6
seconds.
●Pairing process
is
completed but there
is
no connection with
the
mobile
phone.
●Wrong Bluetooth equipment is selected
when
setting the mobile
phone.
●When a call is made
on
the mobile, there is
no
automatic
connection
with the
headset.
●Some mobile are not automatically
connected.
To connect, push the volume button from 3 to
6
seconds.
【Attention】
Lower battery indicates fast flashing twice as the time of slow
blinking
in a standard mord. (Blue indicator ⑤). You can also hear
beaping
sounds from the speaker while internal blinking. Please recharge
the
battery if the light flases accordingly
this.
*
Standar
d
mode
*
L
o
w
er
Batt
ery
mode
●●●●●●
→
●●●●●●●●●●
→
9

Warranty
In case of malfunction in spite of correct usage that is consistent with
this
Owner’s Manual and if it occurs during the valid warranty period, we
provide
free of charge repair service or replace defect product. Temco and Buhek
shall
not be liable for any incidental or consequential damages resulted
from
malfunctioning of the
product.
When requesting repair service, Warranty Card must be attached to the
product
and presented to the dealer from whom you purchased. Warranty Card
without
the date of purchase and store stamp/signature will not be considered as
proof
of purchase and free of charge repair will not be
provided.
TIMPORTANT NOTE: FOR E.C.COUNTRIES,CUSTOMERS
MUST
EXHIBIT,TOGETHER WITH THE CERTIFICATE, A VALID RECEIPT
ISSUED
BY THE DEALER, SHOWUNG THE DATE OF PURCHASE OF
THE
PRODUCT
The followung are sime of the examples which will not qualify for free of
charge
repair service. You will be asked to
pay.
Warranty period is
expired.
If Warranty Card is not presentedor incompletely filled or if there is an
evidence
of
tampering.
Malfunction is caused by mishandling, improper repair work,
unauthorixed
modification and adjustment, disassembling and wrong cable
connection.
Damge resulting from transporting the product after the purchase, traveling,
or
mishandling of the product such as
dropping.
Damage caused by abnormal voltage or use of unspecifide
voltage.
Damage csused by acts of God; caused by fire,natural
disaster,seawind.
Replacement of expendable supply such as
battery.
Repair service done during warranty period does not extend warranty
period.
Defective devices or components returned to be replaced woll become
Buhel’s
property.
WARRANTY
Model
SG01
Name
Address
Phone number
Date of
Purchase
Dealer info AND
STAMP
Term of
Warranty
TWO Y
ear
DISTRIBUITED BY
BUHEL SRL
VIA
DELLA RESISTENZA 37
20090
BUCCINASCO
(
MILANO
)
ITALY
TEL.
+3902488951
– FAX
+39024571225
www.buhel.com
ENGINERED
BY
TEMCO
JAPAN CO., LTD -
JAPAN
MADE BY
TEMCO SHANGHAI
CO., LTD –
CHINA
10

FCC ID: OQB-SG01
IMPORTANT REGULATORY INFORMATION
This device complies with Part 15 of the FCC Rules:
Operation is subject to the following two conditions:
1. This device may not cause harmful interference and
2. This device must accept any interference that is received, including any
interference that may cause undesired operation.
WARNING:
Changes or modifications to this unit not expressly approved by the party
responsible for compliance could void the user’s authority to operate the
equipments.
!
!
Table of contents