Titan Attachments SSBP150 User manual
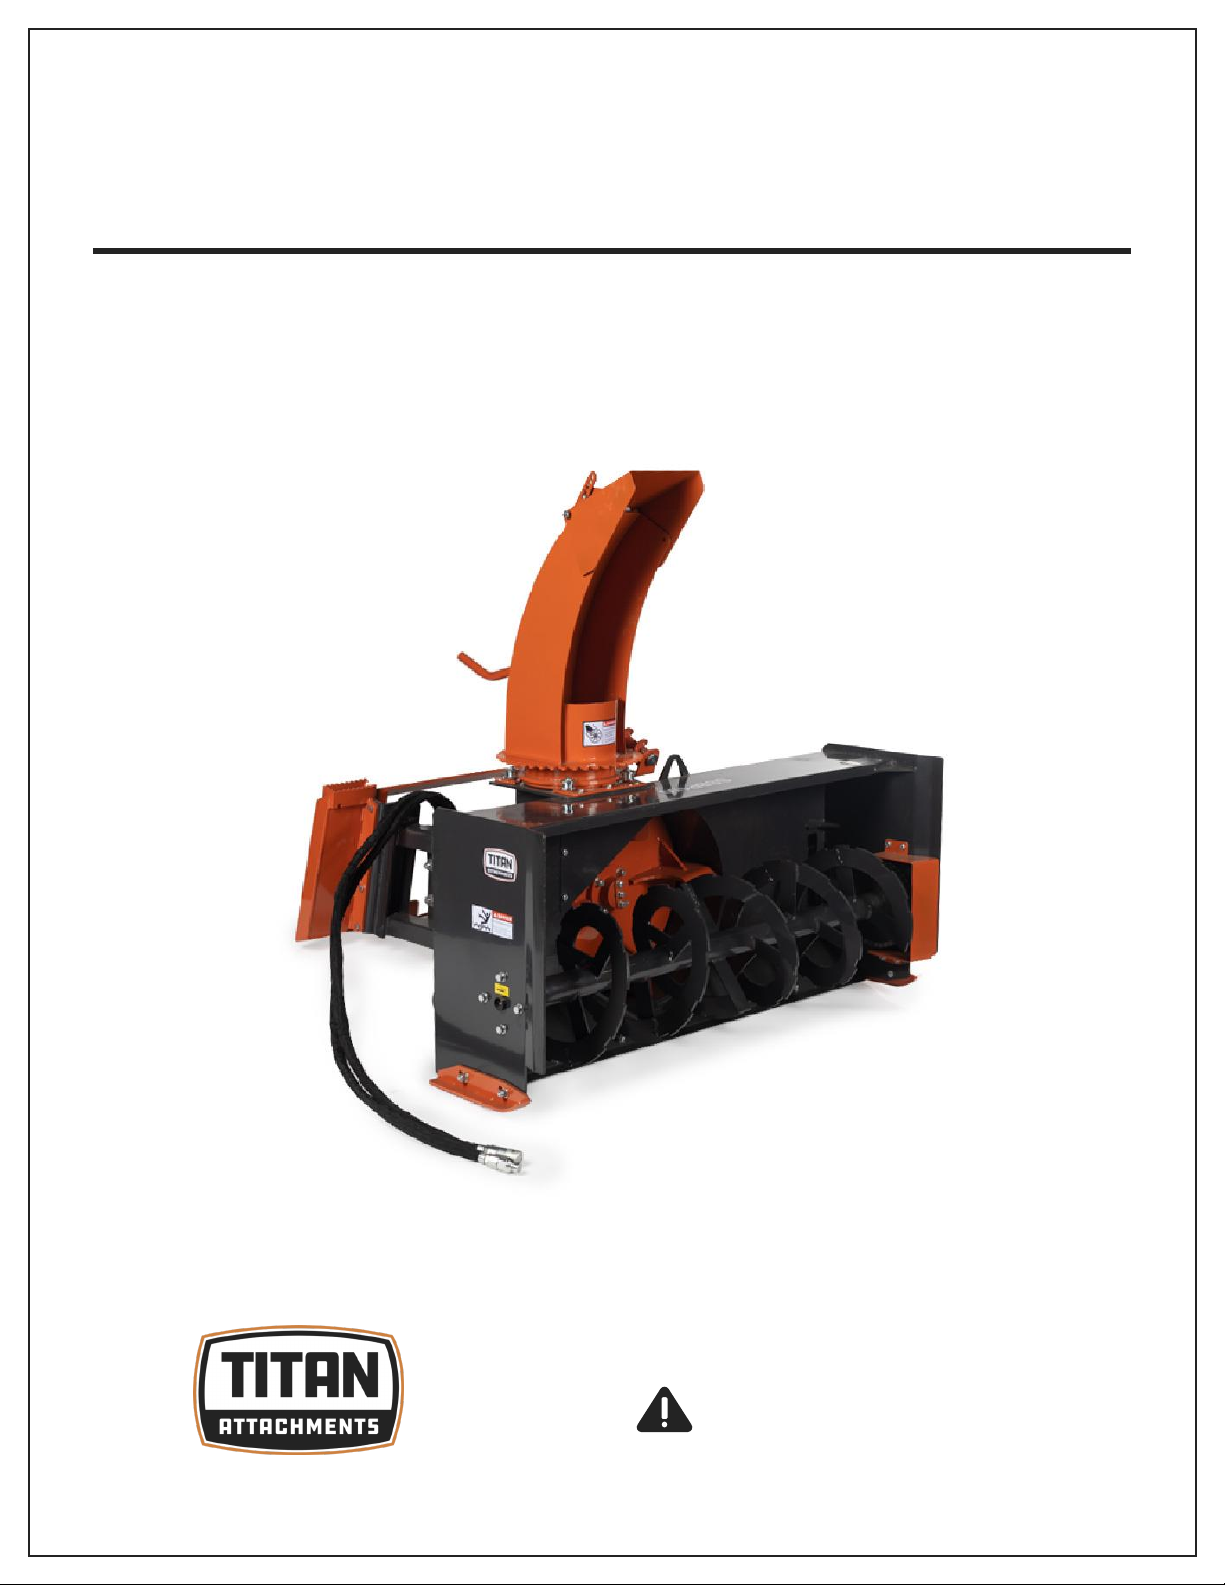
SKID STEER SNOW BLOWER
SSBP150, SSBP180
170309, 170310
Operator’s Manual
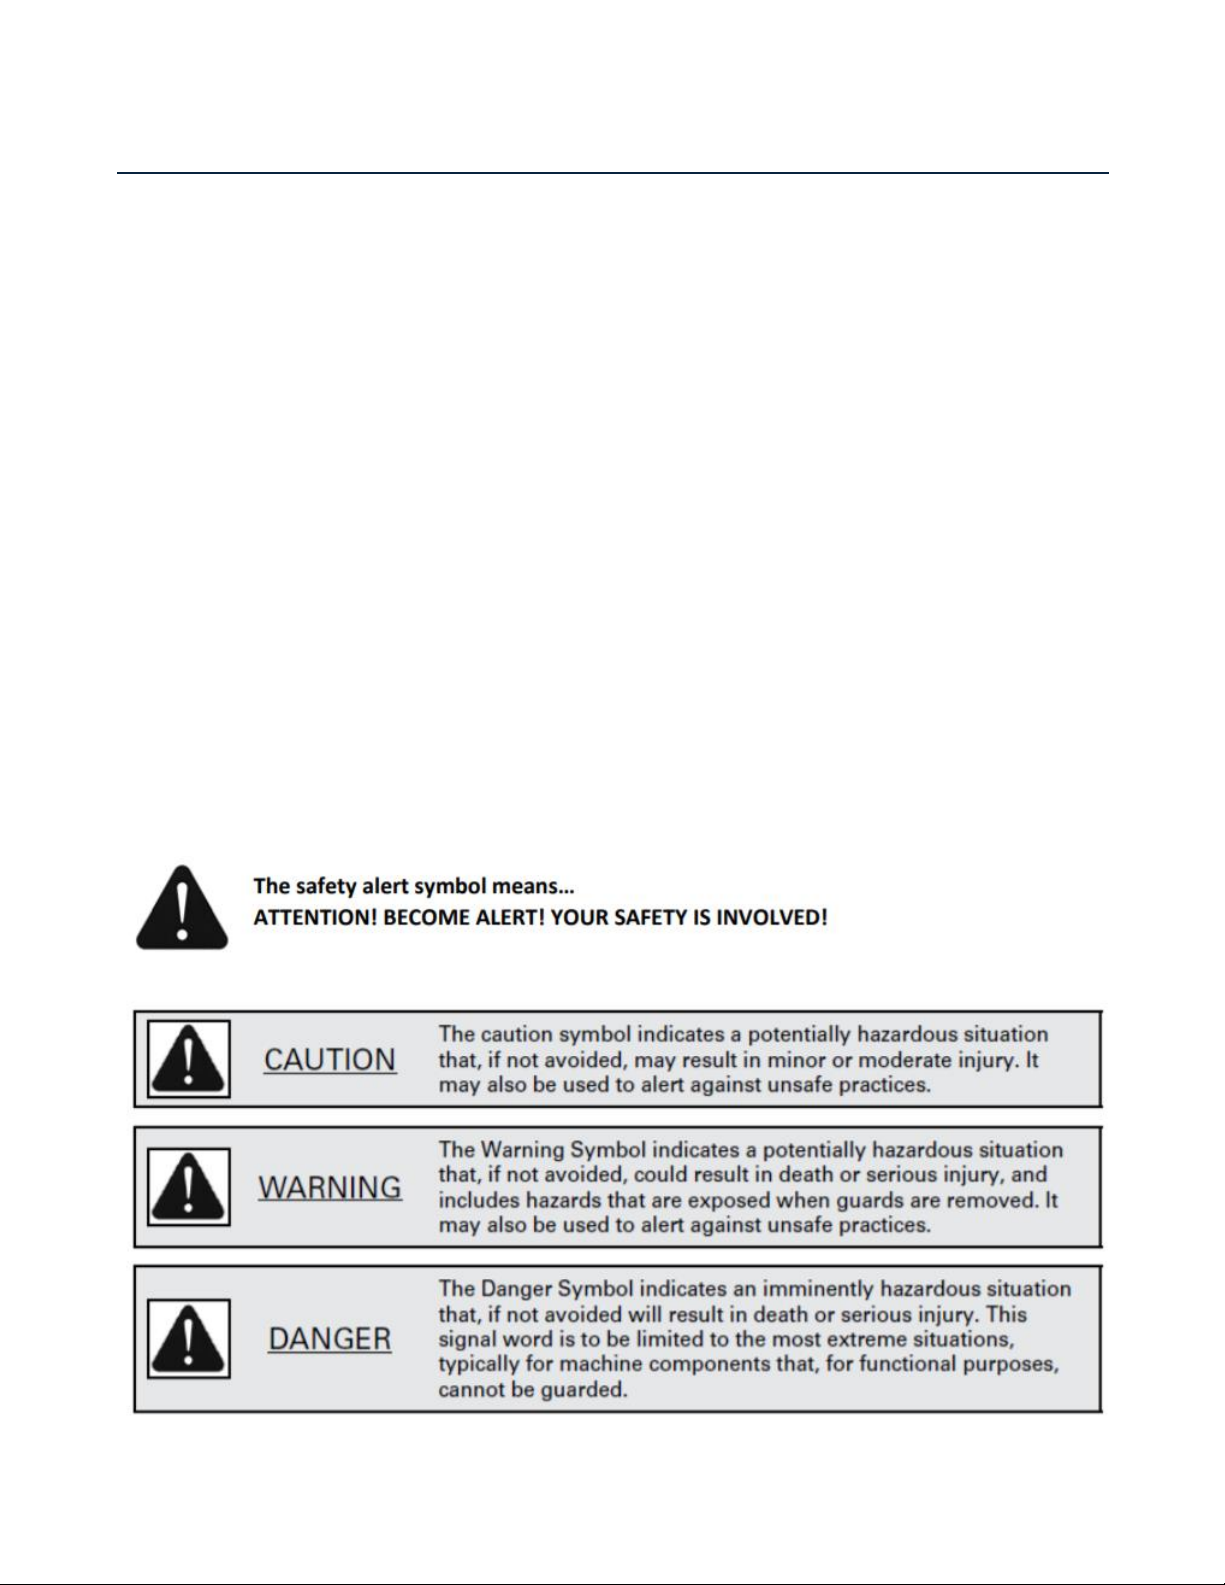
Read the Operator’s Manual entirely. When you see this
symbol, the subsequent instructions and warnings are
serious follow without exception. Your life and the lives
of others depend on it!
2
SAFETY –GENERAL SAFETY INFORMATION
All products are designed to give safe, dependable service if they are operated and maintained
according to instructions. Read and understand this manual before operation.
Remember, YOU are the key to safety. Good safety practices not only protect you, but also the
people around you. Make these practices a working part of your safety program. Be certain that
everyone operating this equipment is familiar with the recommended operating and maintenance
procedures and follows all the safety precautions. Most accidents can be prevented. Do not risk
injury or death by ignoring good safety practices.
Tragic accidents can occur if the operator is not alert to the presence of children. Children are
generally attracted to machines and work being done. Never assume children will remain where you
last saw them.
A safe operator is the best assurance against accidents. All operators, no matter how experienced
they may be, should read this operator’s manual and all other related manuals before attempting to
operate the equipment. Please read the following section and pay particular attention to all safety
recommendations contained in this manual and those labeled on the equipment and on the skid
steer.
The alert symbol is used throughout this manual. It indicates attention is required and identifies
hazards. Follow the recommended precautions.

3
SAFETY –SAFETY PRECAUTIONS
SNOW BLOWER
1. Read and understand this operator’s manual and skid steer operator’s manual. Know how to
operate all controls and how to stop the unit and disengage the controls quickly.
2. Before attempting to remove obstructions (including plugged wet snow) from the snow
blower (i.e., deflector, chute, fan, or collector auger areas) always turn off the skid steer.
3. Never wear loose, torn, or bulky clothing around the skid steer and the snow blower. It may
catch on moving parts or controls, causing injury.
4. Before and during the snow season, thoroughly inspect the area where the equipment is to
be used and remove all objects that may cause damage to the equipment.
5. Set transmission to neutral and disengage clutch, if equipped, before starting the engine.
6. Do not operate equipment in wintertime without wearing adequate winter garments and
protective clothing.
7. Never attempt to make any adjustments while engine is running. Read this manual carefully
to acquaint yourself with the equipment as well as the skid steer operator's manual.
Working with unfamiliar equipment can lead to accidents. Be thoroughly familiar with the
controls and proper use of the equipment.
8. Keep all safety guards in place and verify hardware for proper tightening.
9. Check for moving parts excessive wear regularly. Replace worn parts with genuine parts.
10. Replace all missing, illegible, or damaged safety and warning decals. See list of decals in
operator's manual.
11. Keep safety decals clean of dirt and grime.
12. Do not modify or alter this equipment or any of its components, any equipment or any of its
components or any equipment function without first consulting your dealer.
13. Use of counterweights is recommended. Weights provide the necessary balance to improve
stability, traction, and steering. Use only those recommended by your dealer.
SKID STEER
1. Read the operator's manual carefully before using skid steer. Lack of operating knowledge
can lead to accidents.
2. Do not permit anyone but the operator to ride on the skid steer. There is no safe place for
passengers.

4
SNOW BLOWER OPPERATIONS
1. Before leaving the skid steer unattended, take all possible precautions. Park the skid
steer/snow blower on level ground, place the transmission in neutral, set the parking brake,
disengage the Aux hydraulics, lower the equipment to the ground, place all levers including
auxiliary control levers in neutral, shut off the engine and remove the ignition key.
2. Before starting the skid steer/snow blower, remove any ice that has accumulated in the
auger/fan
3. Prior to operation, clear work area of all objects that can be picked up and thrown. Mark all
curbs, pipes, etc. that cannot be moved.
4. Be sure the Aux hydraulics switch/lever is in OFF position before starting engine.
5. Exercise extreme caution when operating on or crossing a gravel drive, walks, or roads. Stay
alert for hidden hazards or traffic.
6. Do not carry passengers.
7. Adjust skid shoes –housing height to clear gravel or crushed rock surface.
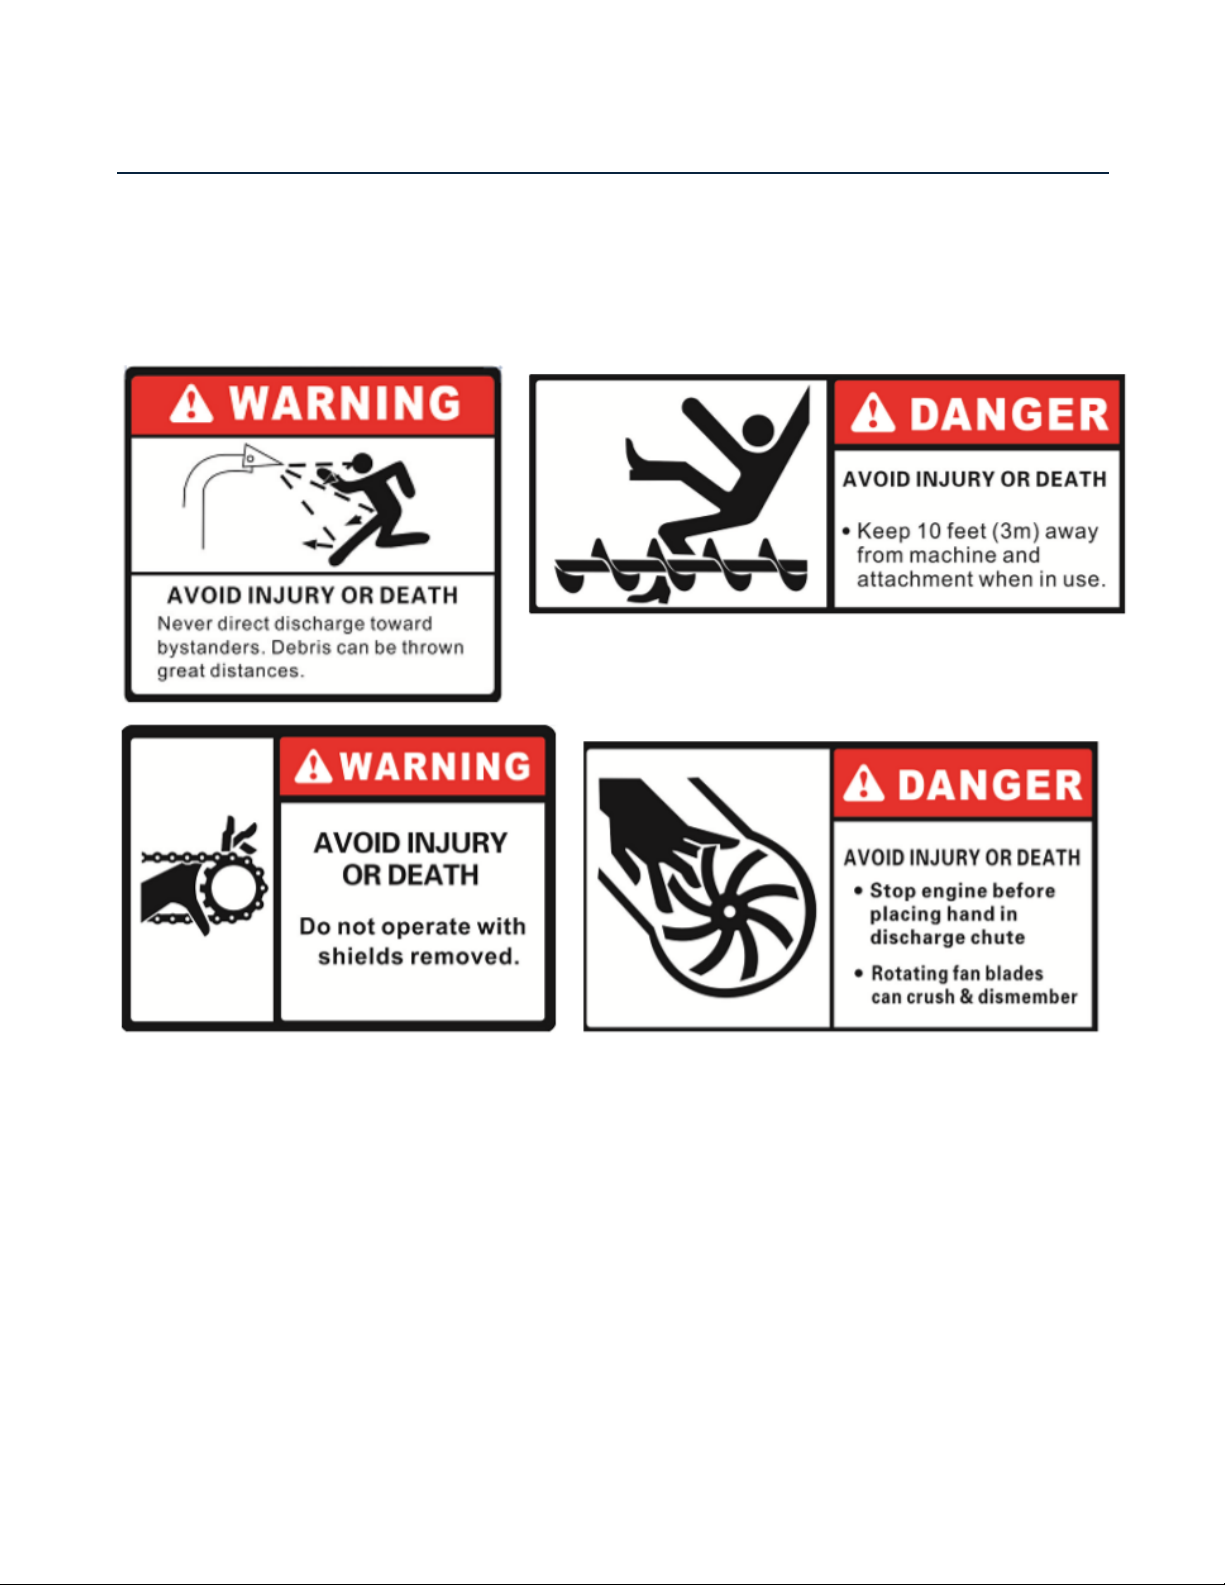
8. Keep clear of rotating parts. Do not put hands or feet under or into snow blower with engine
running and allow the rotating parts to stop BEFORE unclogging the collector/fan housing or
chute, and making any repairs, adjustments, or inspections. Use only a 36" long piece of
wood to unclog blower.
9. Park the skid steer/snow blower on level ground, place the transmission in neutral, set the
parking brake, disengage the Aux hydraulics, lower the equipment to the ground, place all
control levers in neutral, shut off the engine, remove the ignition key and allow the rotating
parts to stop BEFORE unclogging the collector/fan housing or chute, and making any repairs,
adjustments, or inspections. Use only a 36" long piece of wood to unclog blower.
10. If the snow blower starts to vibrate abnormally, disengage the Aux hydraulics, stop the
engine immediately and check for cause. Excessive vibration is generally a sign of trouble.
11. Do not run the engine indoors except when starting engine and transporting attachment in
or out of building. Carbon monoxide gas is colorless, odorless, and deadly.
12. Do not attempt to operate on steep slopes. If operating on slopes is necessary, exercise
extreme caution when changing direction.
13. Never operate snow blower without guards, and other safety protective devices in place.
14. Keep clear of chute discharge. This chute has the capability of throwing objects at far
distances.
15. Never operate snow blower near glass enclosures, automobiles, window wells,
embankments, etc. without proper adjustment of snow discharge angle.
16. Never operate machine at high transport speeds on a slippery surface.
17. Use extra caution when backing up.
18. Do not direct discharge at bystanders or animals. Ejected objects may cause injury.
19. Disengage power to auger/fan when transporting or when not in use.
20. Never operate the snow blower without good visibility and lighting.
21. Prolonged exposure to loud noise can cause impairment or loss of hearing. Wear a suitable
hearing device such as earmuffs or earplugs to protect against objectionable or
uncomfortable noises.
22. Never allow anyone near the work area.

5
DURING OPPERATIONS
1. Do not allow passengers on the skid steer/snow blower at any time. There is no safe place
for passengers on the equipment. The operator MUST sit in the skid steer seat.
2. Eye and hearing protection is recommended when operating the snow blower.
3. Operate only during daylight hours, or when the area is well lit with bright artificial light.
4. Park the skid steer/snow blower on level ground, place the transmission in neutral, set the
parking brake, disengage the Aux hydraulics, lower the equipment to the ground, place all
control levers in neutral, shut off the engine and remove the ignition key BEFORE leaving the
operator’s seat.
5. Inspect the snow blower after striking any foreign object to assure that all snow blower parts
are safe and secure and not damaged.
6. Be especially observant of the operating area and terrain. Watch for holes, rocks, or other
hidden hazards. ALWAYS inspect the area prior to blowing.
7. DO NOT blow near the edge of drop-offs or banks.
8. DO NOT blow on steep slopes as overturn may result.
9. Operate up and down (not across) intermediate slopes. Avoid sudden starts and stop.
10. Drive skid steer backwards up steeper slopes with blower off. Then blow as you travel down
the slope.
11. Slow down before you change directions on any slope.
12. Use wheel weights on your skid steer to increase stability on slopes.
13. Never stand alongside of the unit while the engine is running.
MAINTENANCE
Always use genuine parts when replacement parts are required during operation.
1. Keep the skid steer and snow blower properly maintained.
2. Park the skid steer/snow blower on level ground, place the transmission in neutral, set the
parking brake, disengage the Aux hydraulics, lower the equipment to the ground, place all
control levers in neutral, shut off the engine and remove the ignition key and allow the
rotating parts to stop BEFORE making any snow blower adjustments.
3. To avoid injury, do not adjust, unclog, or service the snow blower with the skid steer engine
running. Make sure rotating components have completely stopped before leaving the
operator's seat.
4. Keep the skid steer/snow blower clean. Snow and ice build-up can lead to malfunction or
personal injury from thawing and refreezing in garage.
5. Always wear eye protection when cleaning or servicing the snow blower.
6. Service the unit in safety: DO NOT service the skid steer while the engine is running or hot,
or if the unit is in motion. Always lower snow blower to the ground. If necessary to service
unit with blower raised, securely support with stands or suitable blocking before working
underneath. Do not rely on hydraulically supported devices for your safety. They can settle
suddenly, leak down, or be accidentally lowered.
7. Do not attempt to service machine, clear obstructions or unplug blockages with the engine
running. Always shut off engine and allow all motion to cease.
8. The manufacturer will not claim responsibility for fitment of unapproved parts and/or

6
accessories and any damages as a result of their use.
9. Make sure all shields and guards are securely in place following all service, cleaning, or
repair work.
10. Do not modify or alter this equipment or any of its components or operating functions. If
you have any questions concerning modifications, consult with your dealer.
11. Do not operate a unit which is defective or has missing parts. Make sure that all
recommended maintenance procedures are completed before operating the unit.
12. Check all controls regularly and adjust where necessary.
13. Periodically check all nuts and bolts for tightness, especially wheel hub and rim nuts.
14. Snow blower fan and auger must be checked for tightness. Remove any twine, wire, etc. that
may have wrapped on the fan or the auger.
15. To avoid serious personal injury: Escaping hydraulic/diesel fluid under pressure can
penetrate the skin causing serious injuries. Do not use your hands to check for leaks. Use a
piece of cardboard or paper to search for leaks.
16. Stop engine and relieve pressure before connecting lines. Tighten all connections before
starting engine or pressurizing lines.
TRANSPORTING
1. Transporting on public roadway: When driving the skid steer and equipment on the road or
highway under 25 mph, at night or during the day, use flashing amber warning lights and the
Slow-Moving Vehicle ("SMV") identification emblem.
2. Check local traffic codes that may apply to unit usage on public roads and highways in your
area. The use of flashing amber lights is acceptable in most localities. However, some
localities may prohibit their use.
3. Always disengage equipment drive prior to transporting unit.
STORAGE
Before storing the snow blower, certain precautions should be taken to protect it from
deterioration.
1. Clean the snow blower throughout.
2. Make all the necessary repairs.
3. Replace all safety signs that are damaged, lost, or otherwise become illegible. If a part to be
replaced has a sign on it, obtain a new safety sign from your dealer and install it in the same
place as on the removed part.
4. Repaint all parts from which paint has worn or peeled.
5. Lubricate the snow blower as instructed under the "Lubrication" section.
6. When the snow blower is dry, oil all moving parts. Apply oil liberally to all surfaces to protect
against rust.
7. Store in a dry place.
7
SAFETY SIGNS
The following illustration shows the approximate location and detail of safety signs. Keep all
safety signs clean and legible and replace any that are damaged or missing. When original parts
are replaced, any safety signs affixed to those parts should be replaced as well. Replacement
safety signs are available from your local dealer.
8
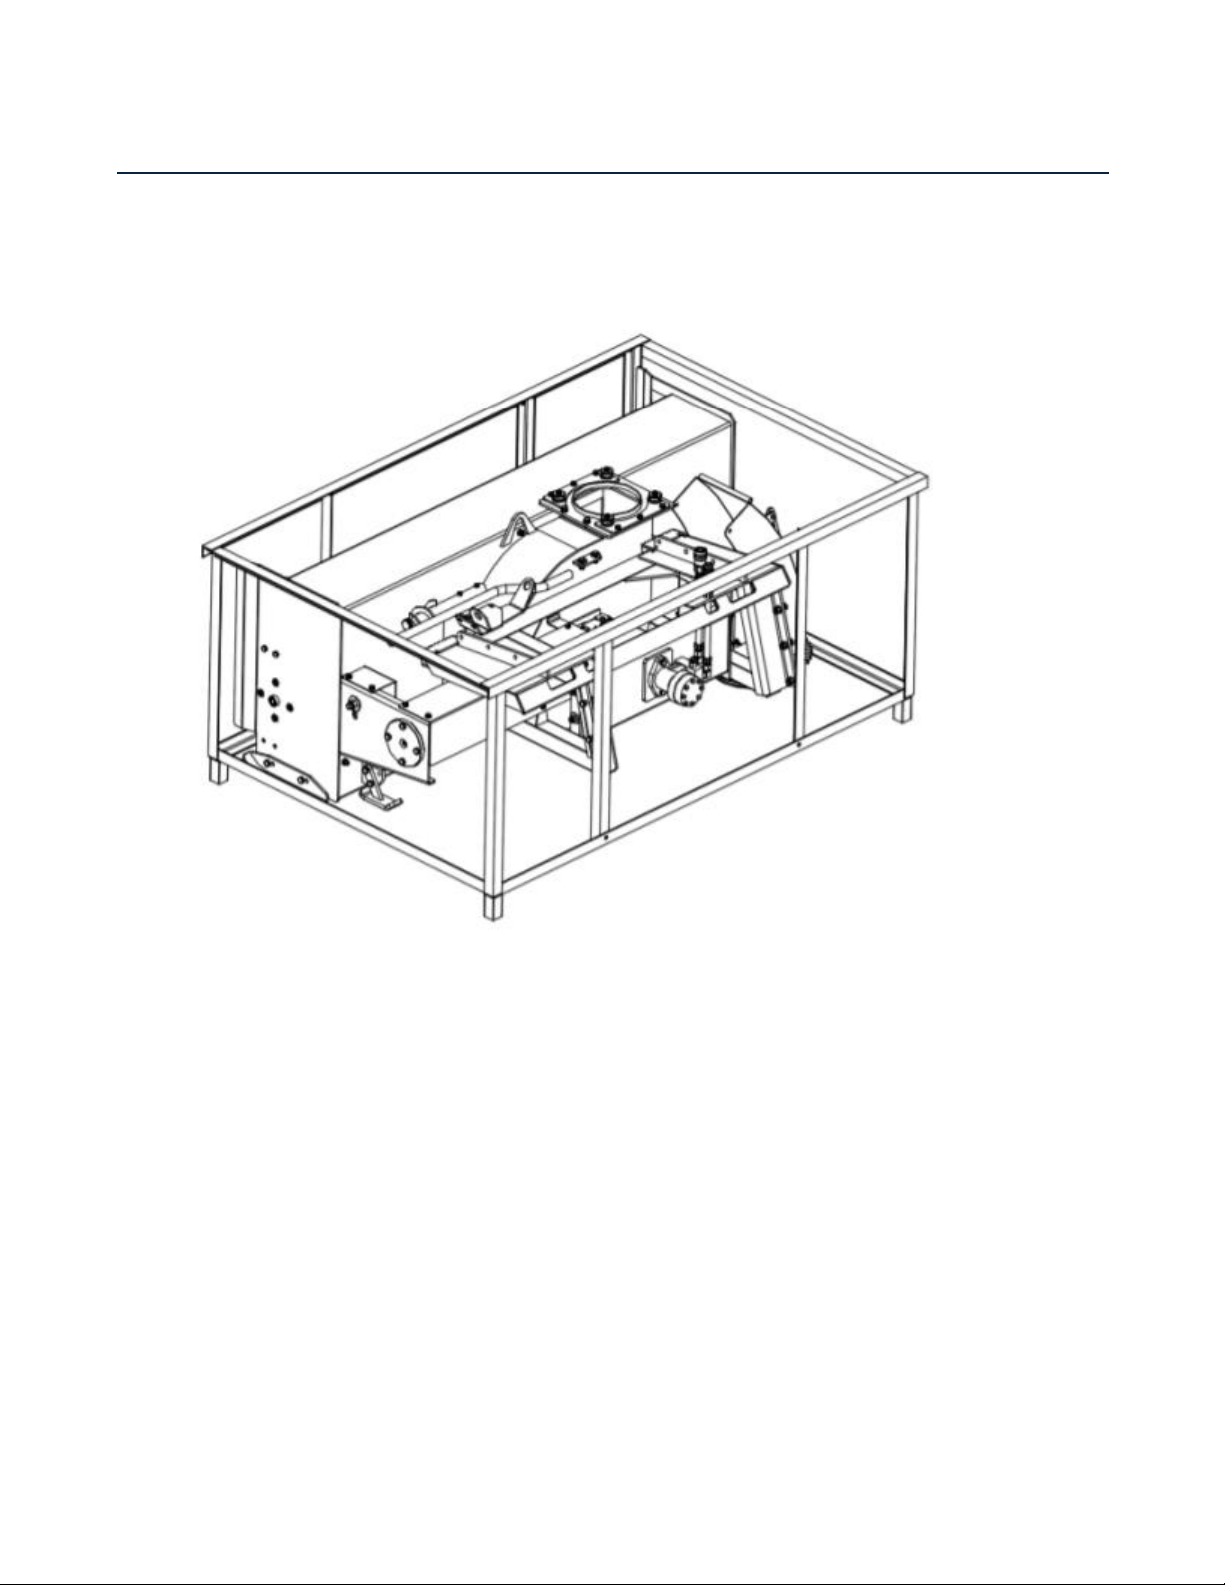
PACKING LIST AND ASSEMBLY INSTRUCTIONS
PACKING DESCRIPTION
a. Remove the packing, check goods are without defect and omission.
FIGURE 1: Your New Snowblower as It Is Shipped To You
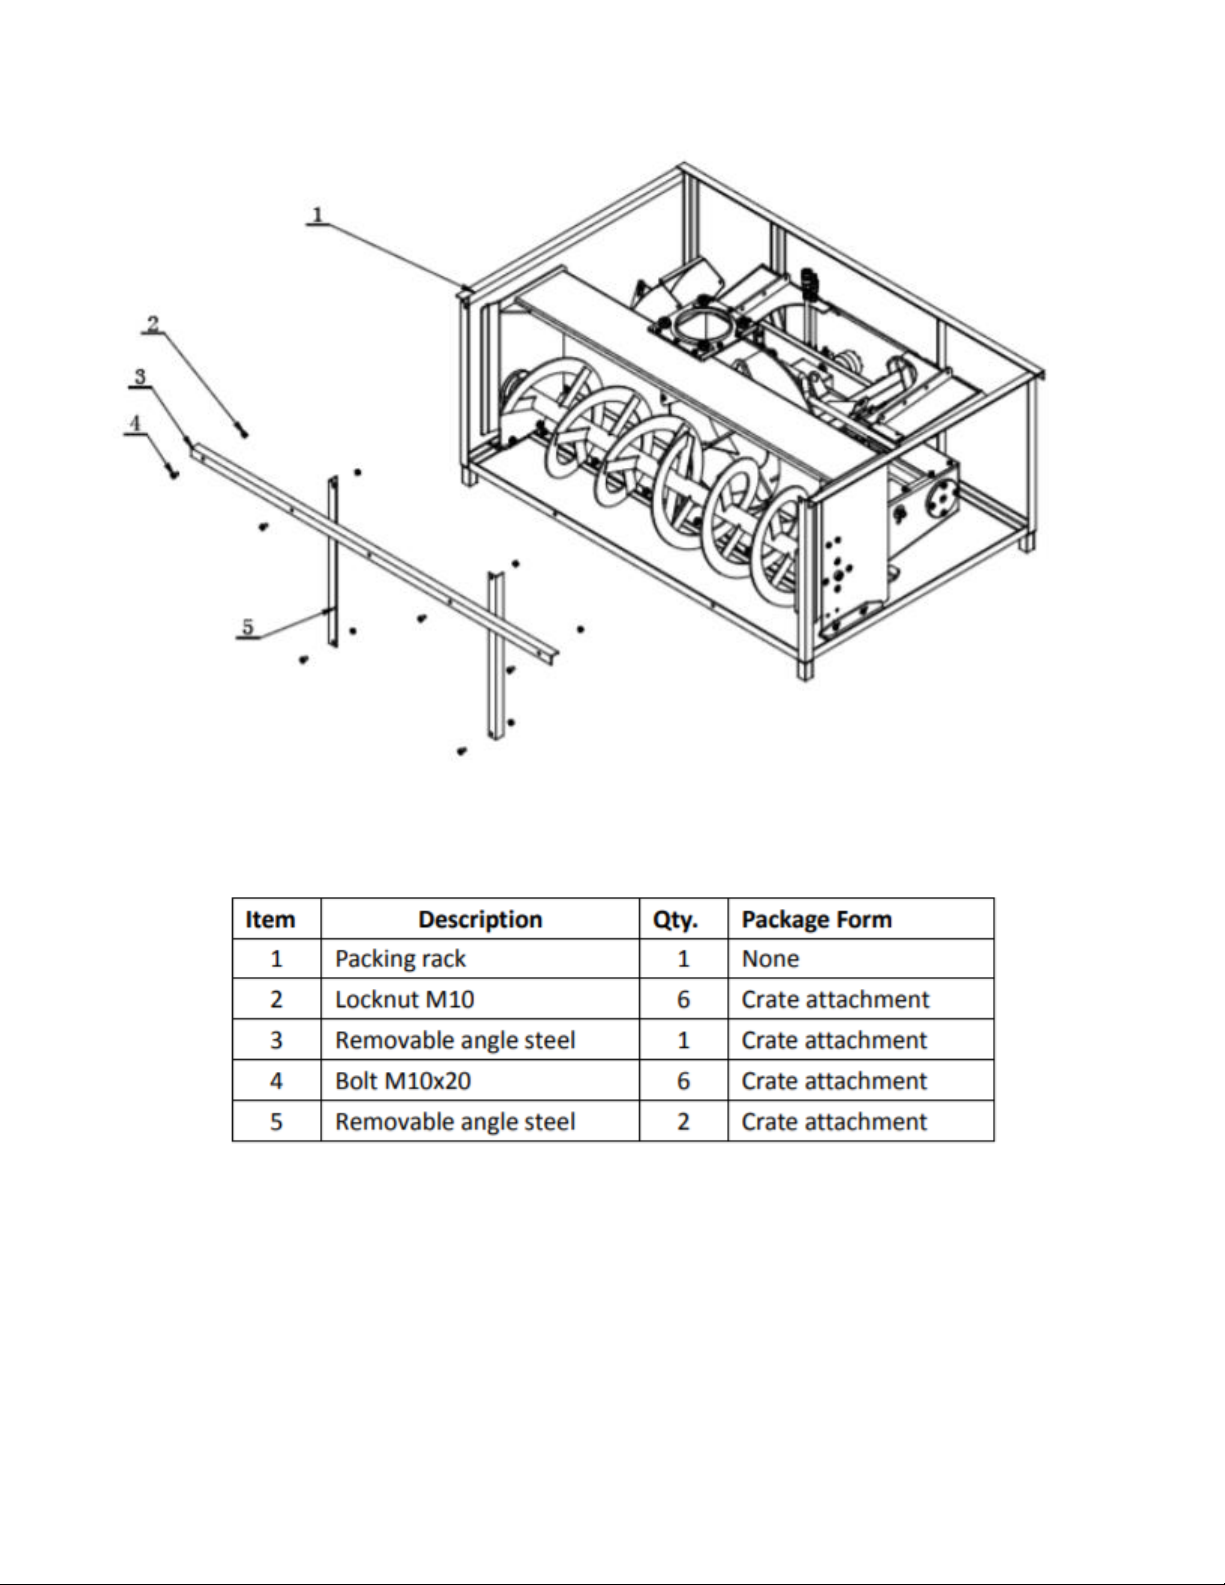
9
FIGURE 2: Packaging frame decomposition
PACKING RACK LIST:

10
1.2 PACKING LIST
FIGURE 3: The Snowblower and Accessory in Package
The detailed packing list as the following Table 1.
TABLE 1: Packing List
NOTE: PAY ATTENTION TO THE MOTOR STEERING.

11
The detailed description of Handle & Rear Bracket and Screw Rod Assembly
FIGURE 4: Handle & Rear Bracket and Screw Rod Assembly
The detailed description of Discharge Chute Assembly & Snow Spray Mask Assembly
and Fittings
FIGURE 5: Discharge Chute Assembly, Snow Spray Mask Assembly & fittings
12
INSTALLATION WIZARD
The installation wizard will guide you to finish the final assembly of your new Snow Blower.
TOOLS REQUIRED
•1/2” Ratchet Wrench with 10mm, 14mm, 17mm and19mm sleeves
•8-10, 12-14, 17-19 Spanner
TORQUE APPLICATION
INSTALLATION
STEP 1: Installing Discharge Chute Assembly, Snow Spray Mask Assembly, and Fittings 1
FIGURE 6: Discharge Chute Assembly, Snow Spray Mask Assembly, and Fittings 1
a. Install the Discharge chute and Snow spray mask with hinge rod.
b. Install 2pcs of plain washer 10 and cotter pins onto both side of the hinge rod.
c. Install the adjusting plate as discharge angle required, then put the flat washer 10 onto
the pin shaft. Finally secure with the R pin.
d. Install above components onto the snow blower as Figure7

13
FIGURE 7: Discharge Chute Assembly, Snow Spray Mask Assembly, and Fittings 2
NOTE: The support ring must be located in the roller groove.
STEP 2: Installing Handle, Rear bracket & Screw rod assembly
a. Locate the front bracket on the position shown in the Figure8, and then fix it with
M10x25 bolt, plain washer 10 and spring washer 10.
FIGURE 8: Front bracket installation location
b. Locate the Rear bracket on the position shown in the Figure9, and then fix it with M10x20
bolt, large plain washer 10 and spring washer 10.

14
FIGURE 9: Rear bracket installation location
c. Insert the pin shaft into the hole of the front bracket, put the washer 28 into the inner
side, and then fix the Screw rod weldment with the pin shaft with the M6x45 bolt and
locknut M6.
FIGURE 10: Screw rod weldment installation
d. Insert the handle into the hole at the other end of the Screw rod weldment through the
rear bracket hole, adjust the length of the handle, screw in the m8x20 bolt and tighten it.

15
FIGURE 11: Handle installation
Note: Pay attention to the meshing of welding parts and gear disc.
WARNING: SAE EP 90W Gear oil must be filled before you finish the final assembly
and start your first use. Overfilling or underfilling gear oil may cause gearbox
seizing or damage.
GEAR OIL FILLING
Check oil level in gearbox by removing the
cap located on the side of the gearbox. Oil
should be level with middle side of plug
hole. Add oil necessary by removing top
cap and side plug. Add oil until it flows
from middle side plug hole.
Item 1 –Cap for inlet gearbox oil
Item 2 –Gearbox
Item 3 –Plug for Gearbox oil level
FIGURE 11: Gearbox construction

16
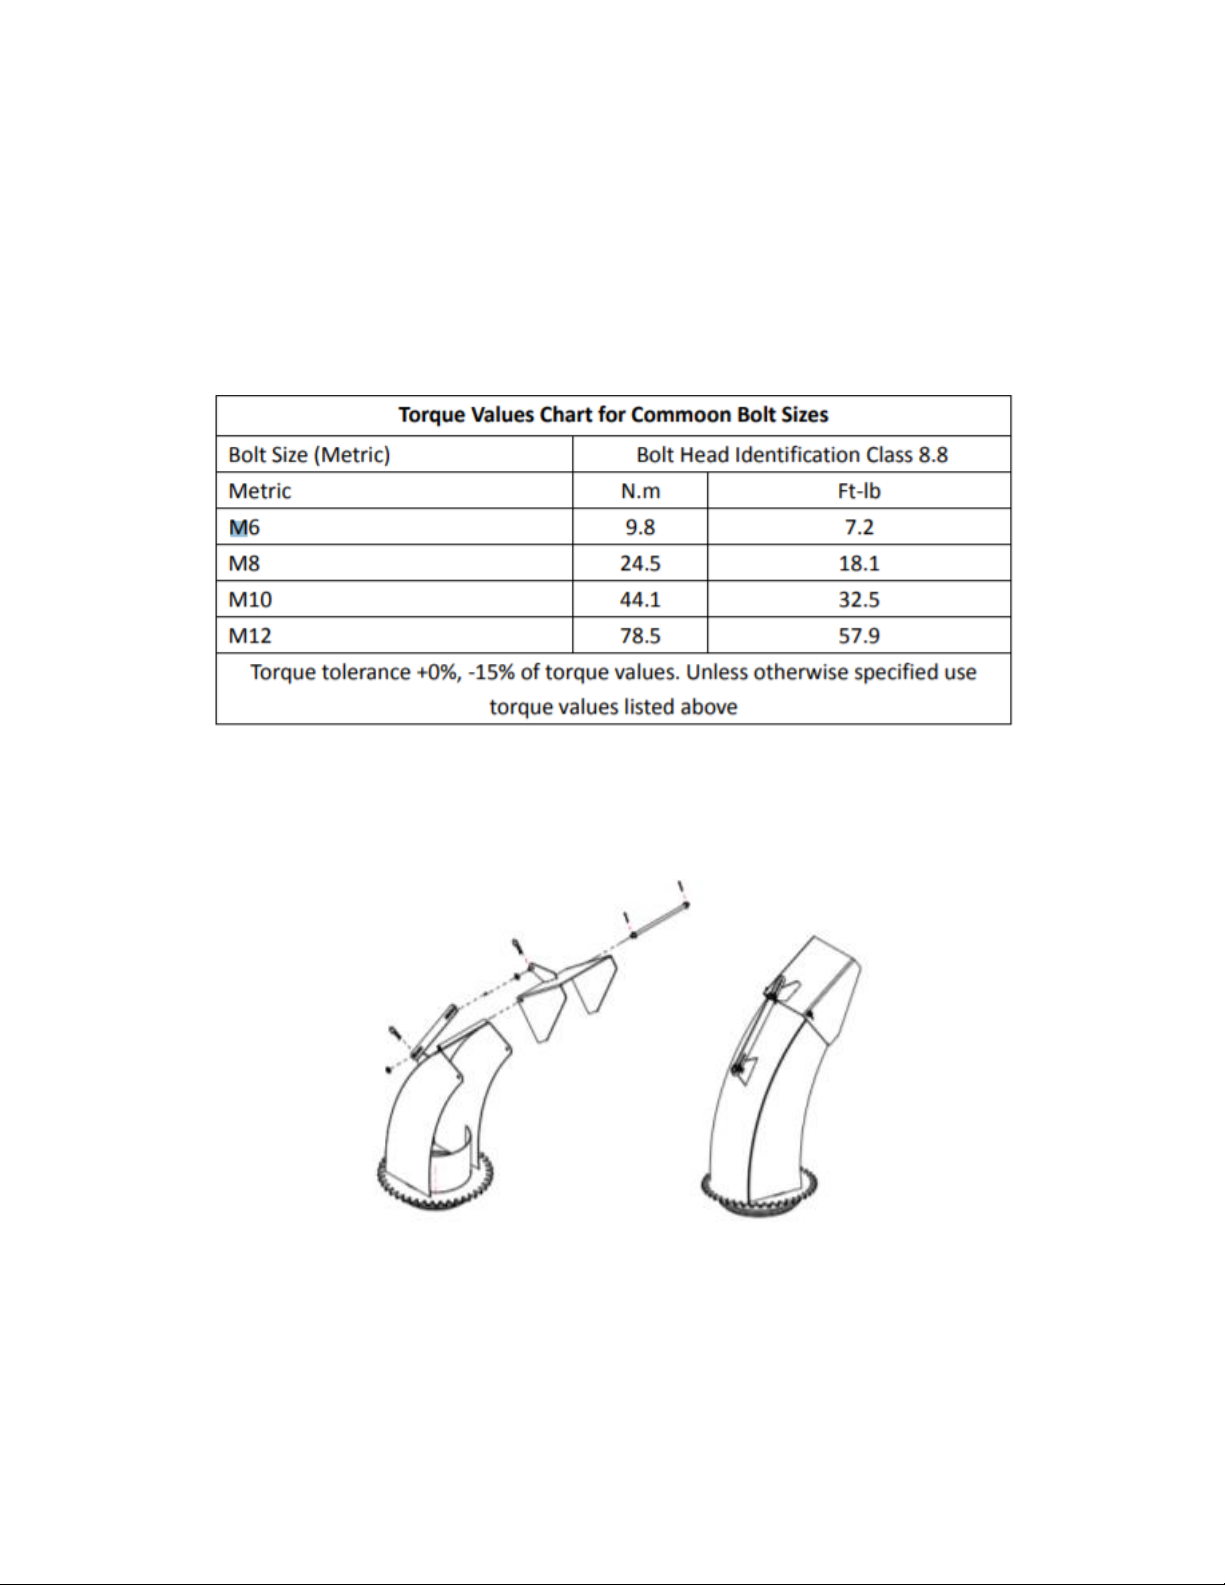
BOLT TORQUE
The tables shown below give correct torque values for various bolts and cap screws. Tighten all
bolts to the torques specified unless otherwise noted. Check tightness of bolts periodically,
using bolt torque chart as a guide. Replace hardware with the same strength bolt.
Torque figures indicated above are valid for non-greased or non-oiled threads and heads
otherwise specified. Therefore, do not grease or oil bolts or cap screws unless otherwise
specified in this manual. When using locking elements, increase torque values by 5%.
17
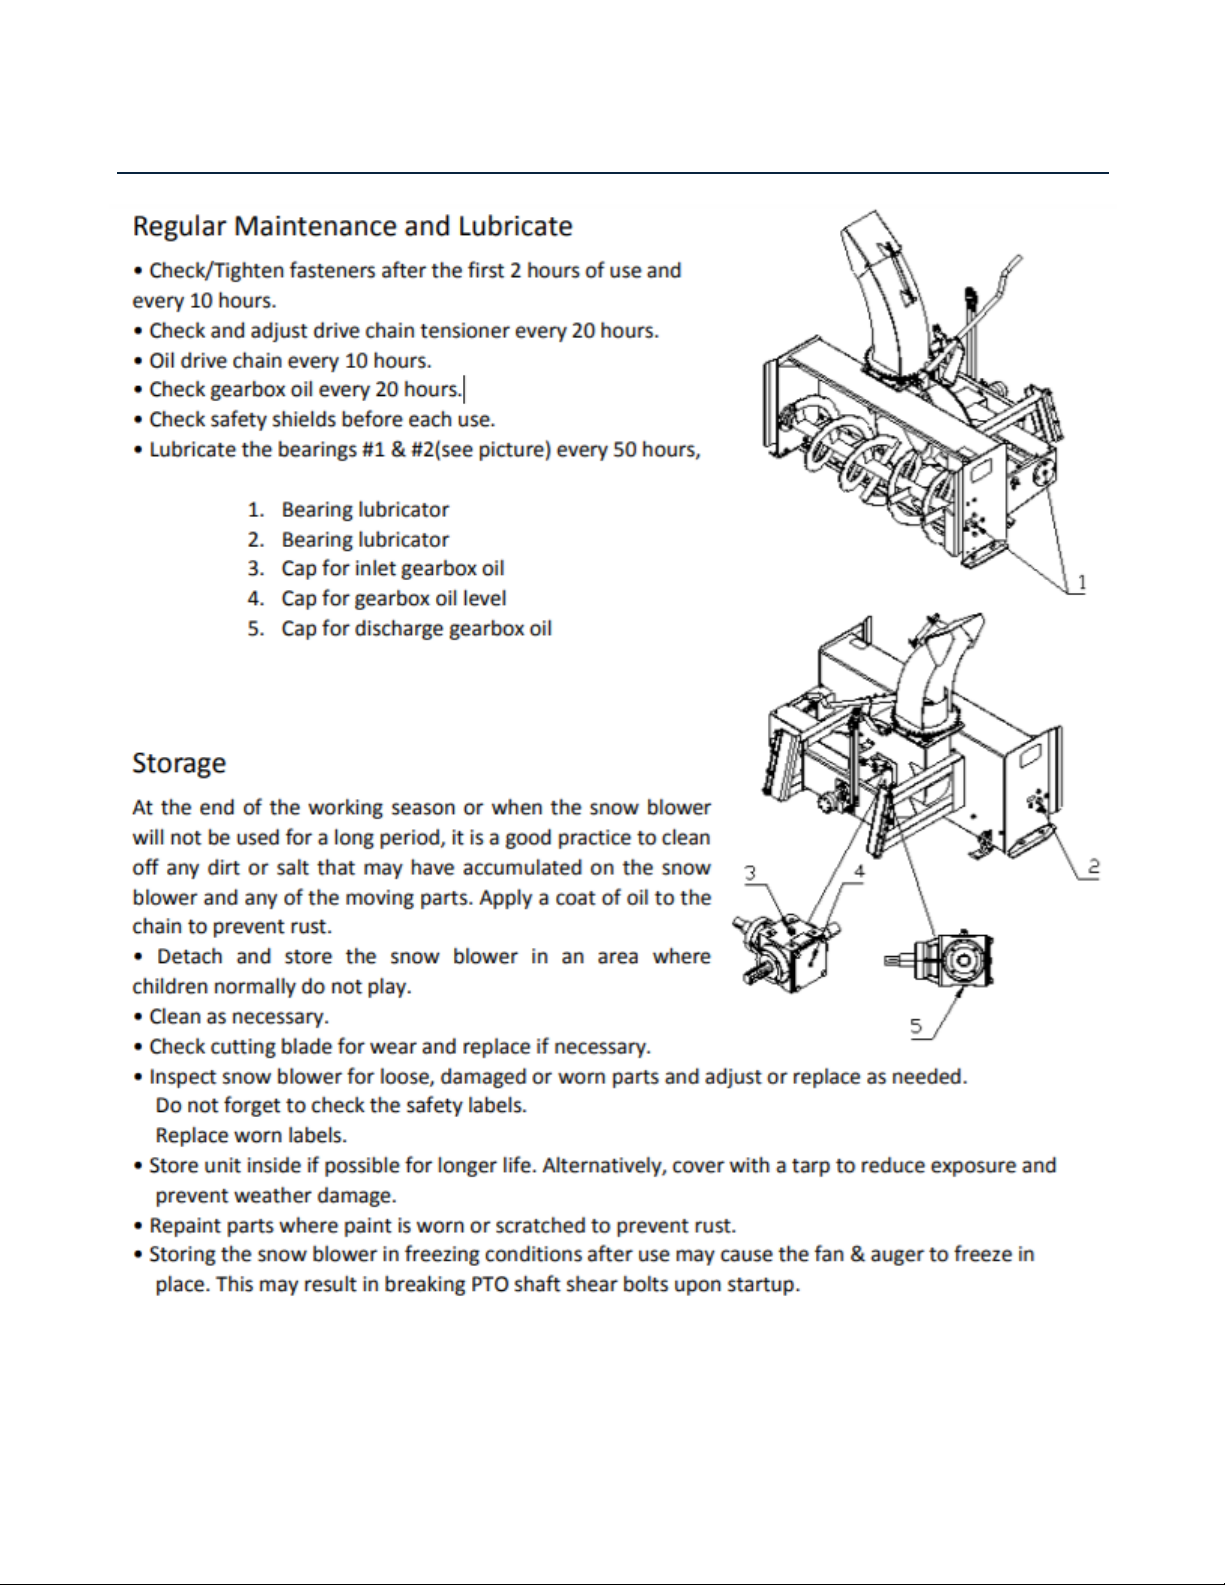
MAINTENANCE AND STORAGE

18
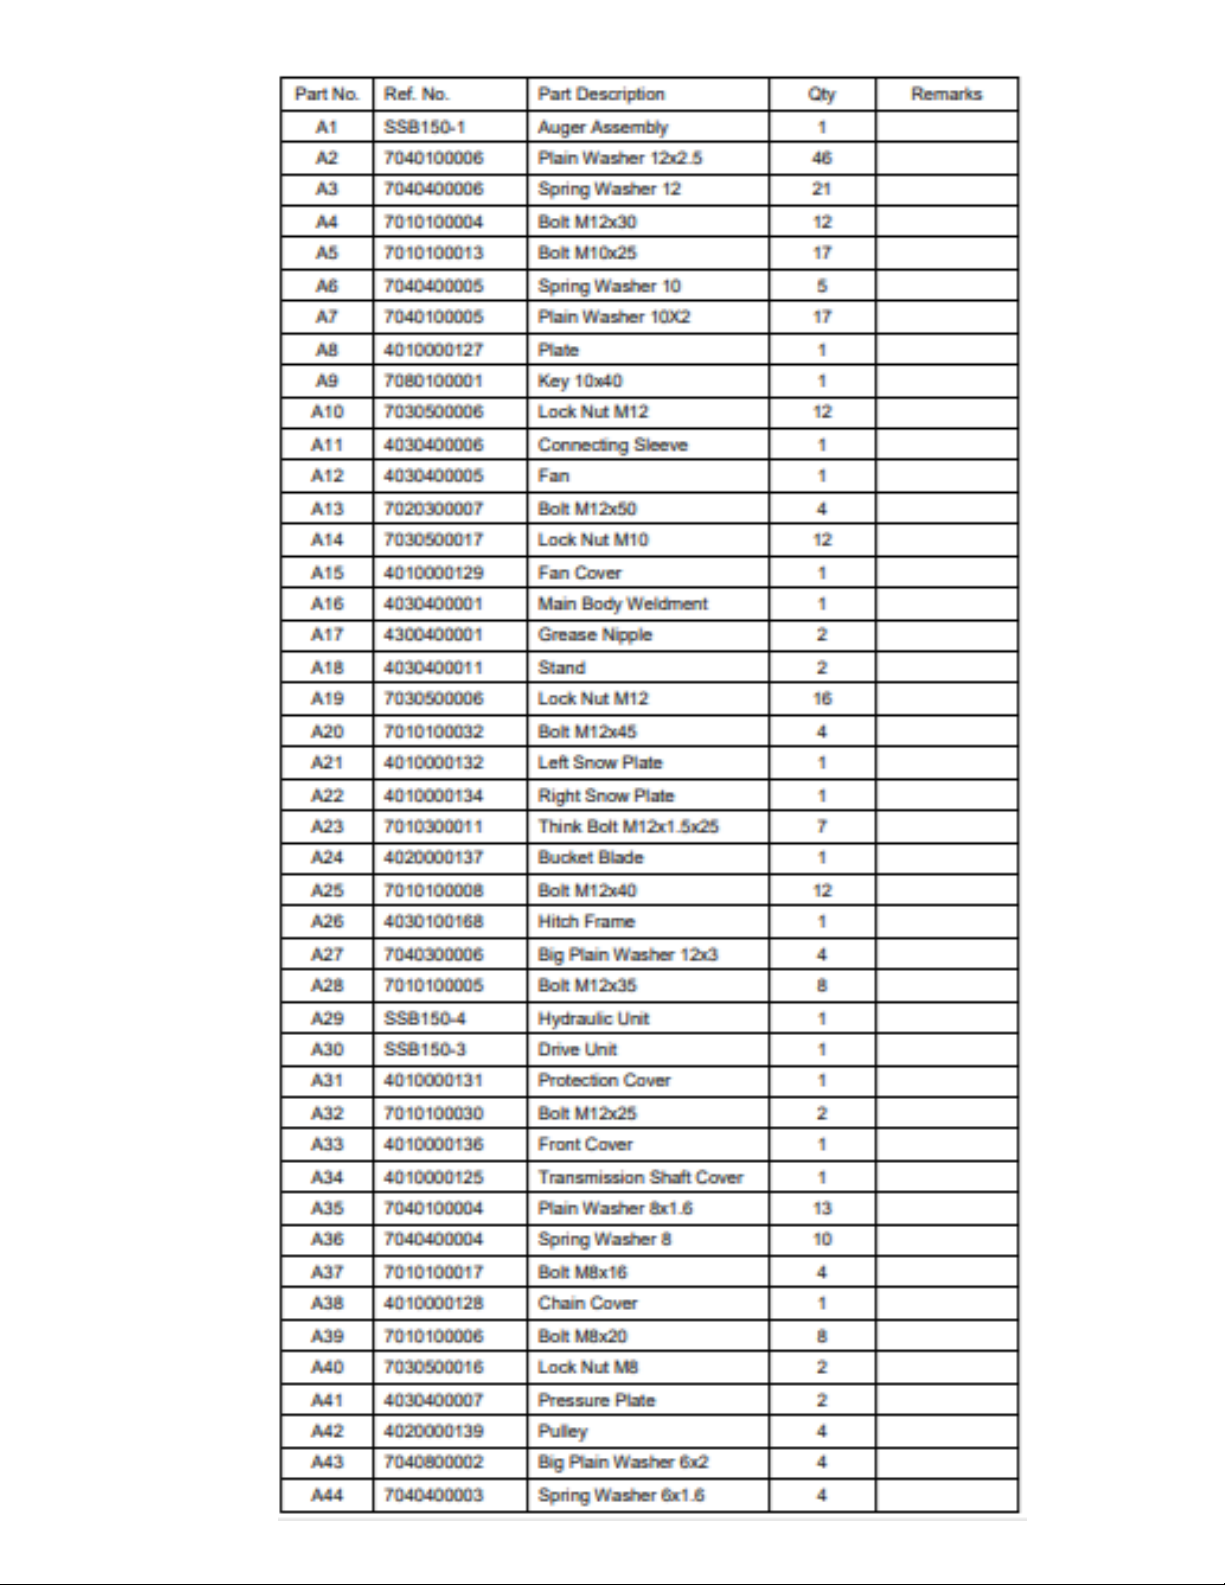
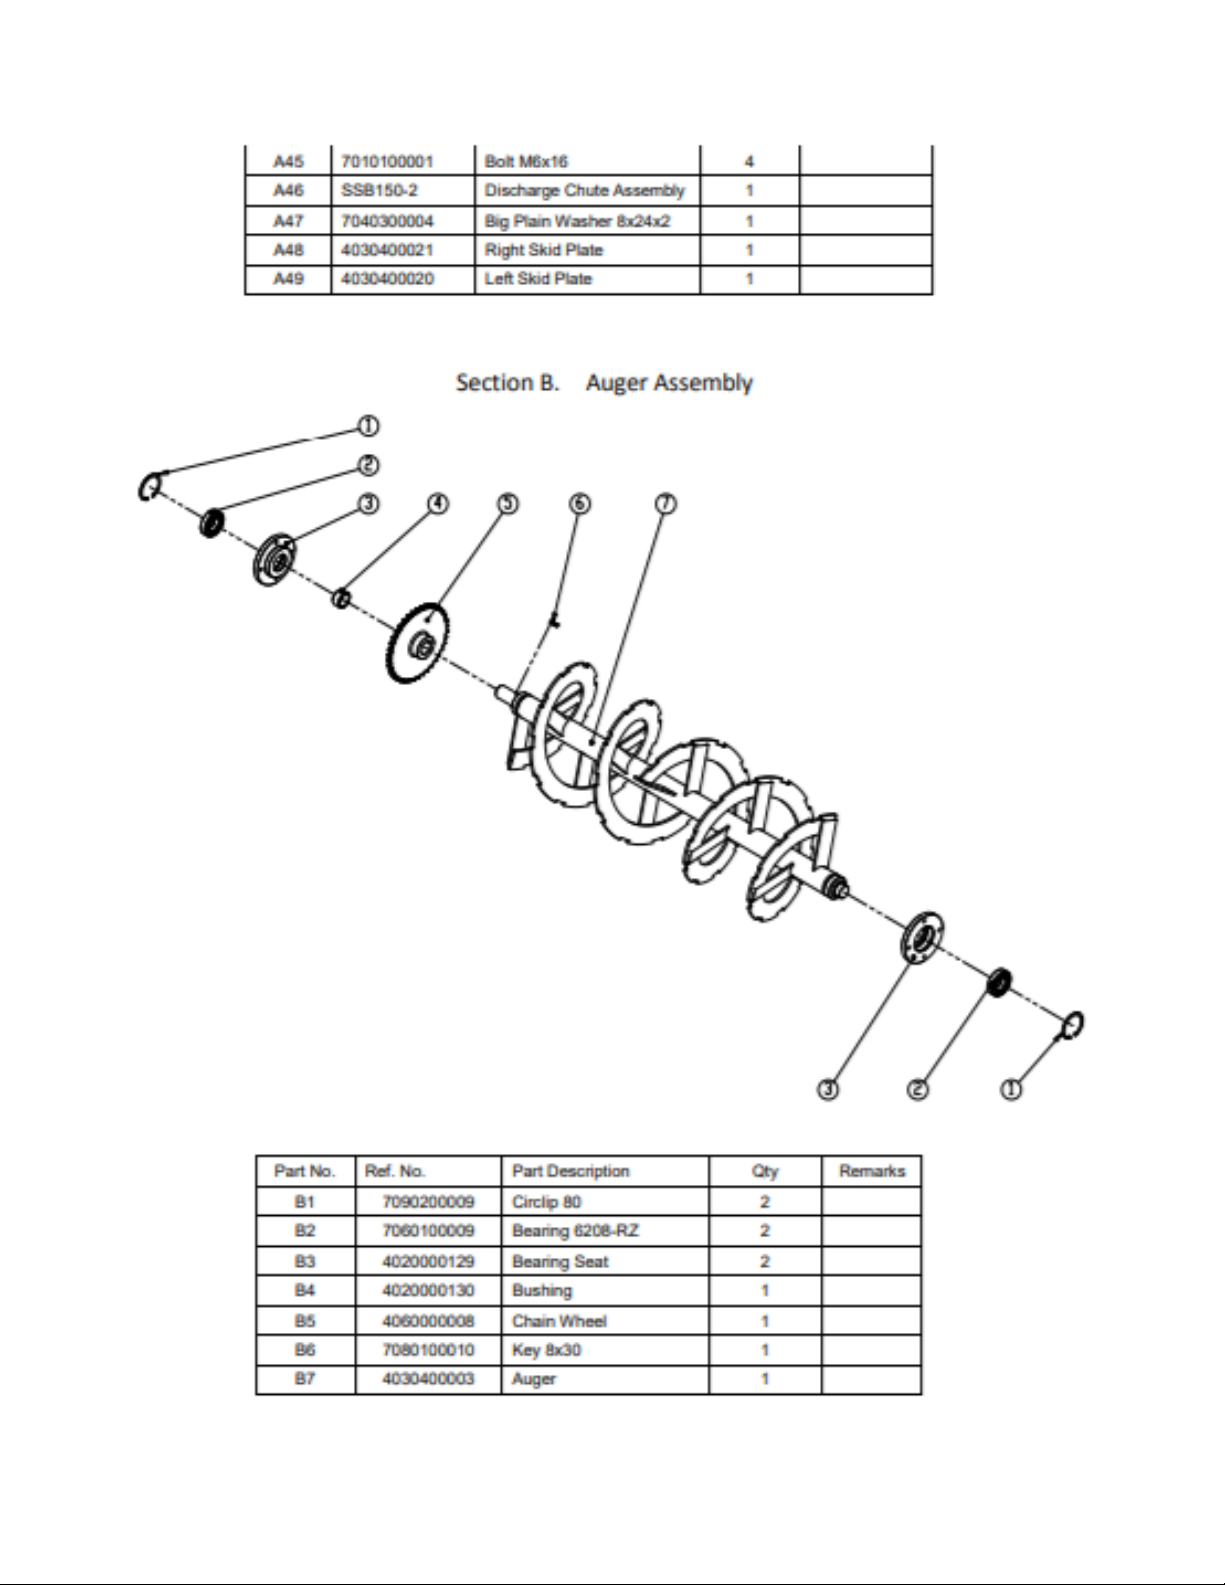
SSBP SERIES SKID STEER SNOW BLOWER PART LIST
19
20
This manual suits for next models
3
Table of contents


