Trakm8 dogcam Bullet HD2 User manual

RoadHawk, c/o Trakm8
Unit 9B, Callywith Gate Ind Est,
Bodmin, PL31 2RQ
Tel. 01208 269 159
Web. www.roadhawk.co.uk
These instrucons cover the following cameras:
dogcam Bullet HD2
dogcam Bullet R+
RoadHawk Ride Bullet R+
RoadHawk Bullet R+ Moto Edion
RoadHawk Ride R+ Cycle Edion
These cameras represent a revoluon in high denion bullet cameras.
Not only are they smallest and lightest full HD 1080p bullet cameras on the
market, they are the only camera systems to oer soware conguraon to
produce the highest quality video and audio no maer the operang condions.
Track tested and developed in associaon with Formula One engineers,
these cameras are the perfect helmet and motorsport camera and have
been proven to withstand extreme vibraon and temperature environments.
User Guide: Charging
Your Bullet camera has a built-in 660maH li-poly baery for a recording duraon of between 60 mins and 1.5 hours depending on
the operang environment and temperature.
The baery is rated for over 1000 charge cycles. The Li-Poly baery does not suer from baery memory eect and it is therefore
not essenal for the baery to be completely at before charging.
Over the lifeme of the baery some degradaon is expected. We recommend to occasionally run the baery completely at as
this helps the baery to maintain its condion. Charge your camera on a regular basis and avoid leaving it uncharged for long periods.
To charge the internal baery, connect to any USB power source. When you plug the camera into a USB supply, the LED on the rear
of the camera will turn RED to indicate charging. Once the camera is fully charged the LED will go out. (The charging LED is located
next to the USB port at the rear of the camera).
It is advisable not to leave the charging camera unaended for any amount of me. We recommend charging the camera in an area
that cannot be damaged should a re take place.’
Alert
135° wide
Angle
1080P Water Proof
up to 10m
MAY16004
Brand
Thank you for purchasing your
RoadHawk Bullet Camera

RoadHawk, c/o Trakm8
Unit 9B, Callywith Gate Ind Est,
Bodmin, PL31 2RQ
Tel. 01208 269 159
Web. www.roadhawk.co.uk
User Guide: SD Memory Card
Video is stored on a MicroSD card which is inserted in to the rear of the camera.
The 8Gb MicroSD card supplied with the camera will hold around 1.5 hours of video at 1080p at its highest quality seng. Once the
card is full, with the camera in standard mode you will not be able to connue recording.
In ‘loop recording’ mode the camera will delete the earliest 15 minutes of recording and connue to write to the memory card.
Please copy any videos you wish to keep from the camera and format the card to make more space.
To insert the SD card:
Remove the screw-on end cap.
Gently insert the MicroSD card with the wring facing up and push unl it clicks and holds in to place.
The SD card should not be protruding from the back plate of the camera when fully inserted.
Tighten the screw-on cap. Make sure it is screwed on very ght as this creates the waterproof seal for the camera.
Never force the MicroSD card in to the slot.
A note about SD memory cards:
We recommend using high quality, branded SD cards with your bullet camera.
Memory cards should be rated class 6 or higher.
You can use 4Gb to 32Gb Micro SD cards in this camera.
From me to me, SD cards can become corrupt causing the camera to not record video or to create corrupted video les. You
should format your SD card on a regular basis to minimise the risk of the card becoming corrupt.
Formang the SD card will wipe it clean and delete any videos you might have recorded.
To format the SD card PC:
Plug the camera in to a USB port on your computer.
Go to the start buon in windows and select “Computer”.
Locate the drive that represents the SD card in your
camera.
Right click on the drive and click on Format. Check “quick
format” and follow the on screen instrucons.
To format the SD card MAC:
Connect the camera to a USB port on your computer.
Open your “disk ulity” applicaon (hint: press CMD + SPACE
and type in disk ulity).
On the le side, click on the disk the represents the SD card in
the camera.
Click on the ERASE tab.
Make sure the drop down box says MS-DOS (FAT).
Click ERASE.
MAY16004
RoadHawk, c/o Trakm8
Unit 9B, Callywith Gate Ind Est,
Bodmin, PL31 2RQ
Tel. 01208 269 159
Web. www.roadhawk.co.uk
User Guide: Mounng your Camera
Camera Cradle Mount
Your bullet camera is supplied with various mounts.
Choose the mount most suitable for your applicaon.
Camera Bar Mount (oponal)
Make sure the surface is clean and dry before applying a 3M pad.
Make sure you know the exact posion you want the camera to be in before applying the 3M pad.
Peel back the 3M scker from the pad and press the tray rmly in to posion.
Camera Helmet Mounted
Leave it to bond for at least a couple of hours before use.
Once the adhesive mount has been applied, do not remove and reuse.
Always use a safety tether.
Always tether your camera before use. A tether is supplied.
Aach the tether to the end cap of the camera.
Tether the camera in such a way so that it cannot be lost if a camera mount fails.
User Guide: Making a Recording
Your bullet camera has three / four states:
OFF.
ON & RECORDING.
USB Mode.
Remote standby (R+ models only).
The camera’s LED next to the power buon will ash GREEN/BLUE to indicate the camera is recording.
If the baery is at or there is no available space on the SD card or if the SD card is not inserted then the camera will turn on briey
and turn o again.
MAY16004

RoadHawk, c/o Trakm8
Unit 9B, Callywith Gate Ind Est,
Bodmin, PL31 2RQ
Tel. 01208 269 159
Web. www.roadhawk.co.uk
To Start recording:
Press and hold the power buon for 2 seconds.
The camera will vibrate to let you know it is recording.
DO NOT LOOK DIRECTLY AT THE FRONT ON THE CAMERA WHEN STARTING OR WHILE THE LASER IS ON.
To Stop recording:
Press and hold the power buon for 2 seconds.
The camera will vibrate twice and then shut down.
(CAUTION: THE LASER WILL ALSO FLASH MULTIPLE TIMES WHEN SHUTTING DOWN).
User Guide: Making a Recording
Your bullet camera has three / four states:
OFF.
ON & RECORDING.
USB Mode.
Remote standby (R+ models only).
The camera’s LED next to the power buon will ash GREEN/BLUE to indicate the camera is recording.
If the baery is at or there is no available space on the SD card or if the SD card is not inserted then the camera will turn on briey
and turn o again.
MAY16004
RoadHawk, c/o Trakm8
Unit 9B, Callywith Gate Ind Est,
Bodmin, PL31 2RQ
Tel. 01208 269 159
Web. www.roadhawk.co.uk
Rear caps supplied with camera
There are two rear caps supplied with your bullet camera.
The sealed end cap is designed for when the camera is being submerged in water and heavy rain.
For beer audio use the cap with holes in it.
If you are lming at speed, the sealed cap will reduce wind noise.
Also check the microphone volume level sengs to help reduce wind noise.
User Guide: Playing back your Video
Your bullet camera produces .MOV video les.
These les are compable with up to date computer operang systems.
In most cases, Windows media player for Windows or Quickme for MAC computers will be able to play your video.
If you nd the playback is not smooth or you get a message about the video codec not being supported then you will need to
download some free soware.
We recommend VLC which can be downloaded for FREE from www.videolan.org
VLC usually does a beer job of playing back H.264 video than any built-in playback soware.
Connect your camera to your computer.
When the camera turns on, it will act as an SD card reader.
WINDOWS:
Go to COMPUTER and you will see your camera as a
removable device.
Double click to access the SD card. You will see a folder
called DCIM.
Double click this to see your video les.
Double click the le to watch your video - OR - right
click the video and select “open with VLC” if you have it
installed.
MAC:
Click on your desktop background. Press CMD+N to open a
nder window.
On the le under DEVICES you will see the SD card in the
connected camera.
Click on this and then click on DCIM to see your videos.
Double click the le to watch your video - OR - right click the
video and select “open with VLC” if you have it installed.
MAY16004

RoadHawk, c/o Trakm8
Unit 9B, Callywith Gate Ind Est,
Bodmin, PL31 2RQ
Tel. 01208 269 159
Web. www.roadhawk.co.uk
User Guide: Changing Sengs
To change the sengs you need to plug the camera into the computer and launch the camera soware.
When you rst turn your camera on it reads a le on the SD card called sengs.txt.
Do not try to edit this le yourself.
Use the supplied soware to make changes to your camera.
WARNING: If you use extreme values on some of these sengs, the camera will not perform well.
For example: Seng the brightness too low will result in a completely black image being recorded.
Click SETTINGS in the conguraon soware.
Click to make a change to a seng and a brief explanaon will show on the le side describing the funcons of that seng.
Once you have made the desired changes to the sengs on your camera, press the SUBMIT buon to save them to the camera.
Unplug the camera and turn on to apply the new sengs.
Seng the me/date:
The camera has a built-in clock.
If you enable me/date stamp in the sengs it will be recorded in the lower right corner of your video.
Once you have made a recording with the me/date.
To set the me and date on your camera, click the Set Time link in the top right hand corner of the soware.
Use the drop down boxes to choose your own me and date and click Set as Above to apply them to the camera.
Alternavely, click Set as System Time to apply the me and date as set by your computer.
As soon as you have done this, a Seme.txt le is wrien to the SD card of the camera. Unplug the camera and turn it on to apply.
MAY16004

RoadHawk, c/o Trakm8
Unit 9B, Callywith Gate Ind Est,
Bodmin, PL31 2RQ
Tel. 01208 269 159
Web. www.roadhawk.co.uk
User Guide: Bullet R+ Remote
Both the dogcam and RoadHawk Bullet R+ cameras are supplied with a wireless remote controller and a wireless remote receiver.
The Remote receiver part needs to be aached to the camera in order for the remote controller to be acve.
Aach the remote receiver to your camera and twist unl ghtly in to posion (being careful to ensure it is located in the 3 small
locang lugs).
Press and hold the power buon on the remote controller to power on the remote.
The LED on the remote will turn GREEN to indicate it is in standby mode.
Press and hold the buon on the camera. The camera will vibrate once and the LED on the camera will be GREEN to indicate the
camera is also in standby mode.
Controlling the camera with the remote:
To start recording, press and hold the middle buon on the remote controller for about 2 seconds. The camera will vibrate once
and start recording. The LED on the camera and on the remote will ash GREEN and BLUE to indicate recording.
To stop recording, press and hold the middle buon on the remote for 2 seconds. The camera will vibrate 3 mes and stop
recording. The LED on the camera and the remote will turn GREEN to indicate the camera has gone in to standby mode.
To take a sll photo, make sure the camera is in standby mode (green LED only showing on remote and camera) Press the le
buon on the remote control briey. The camera will vibrate once and the LED on the remote will turn blue for a few seconds.
Controlling more than one camera with a single remote:
Turn on the remote by pressing the right buon. The remote will turn on and go in to standby mode (GREEN LED)
With the cameras within 1m range of the remote, turn on both cameras at the same me. The remote will blink 3 mes. The
remote is now synced with both cameras and can be used to control both cameras simultaneously.
Charging the remote:
The remote controller has a built-in rechargeable baery. The baery is sealed inside the remote. To charge this baery, open the
waterght door on the right side of the remote controller. Plug the remote in to any USB cable. The LED on the camera will light red
to indicate it is being charged.
Once the remote controller is fully charged, the LED will go o. A full charge will take between 1 and 2 hours.
It is possible to use the remote with the camera whilst it is charging.
When the remote controller is turned on, the baery will last for about 6 hours in standby mode.
PLEASE NOTE:
It is NOT possible to use the remote to turn the camera on and o. You have to manually turn both the camera and remote in to
standby mode by following the instrucons above.
When the camera and the remote are in standby mode, the baeries will eventually go at even if you are not recording. The life of
the baery in the camera when in standby mode is approx. 4 to 5 hours.
With the remote aached to the camera, you should be geng between 60 and 75mins record me depending on the
temperature and condions the camera is being used in.
When connecng the remote receiver to the camera, ensure it is fully ghtened so that the camera will sll be waterproof. If the
remote receiver is not all the way in then it may fail to operate correctly.
MAY16004

RoadHawk, c/o Trakm8
Unit 9B, Callywith Gate Ind Est,
Bodmin, PL31 2RQ
Tel. 01208 269 159
Web. www.roadhawk.co.uk
User Guide: Maintenance
With the rear cap fully screwed on ghtly you can wash your camera in warm water.
Dry the camera with a so cloth.
Clean the lens of the camera with a micro bre lens cloth.
If the outer lens becomes scratched or damaged then it can be replaced.
Your camera uses a Li-Poly baery.
This baery can go out of condion if le uncharged for a long me.
You should try to charge and use your camera on a regular basis.
Try not to leave the camera’s baery uncharged for a long me.
User Guide: Updang your Camera
From me to me there might be rmware updates available for your camera.
The rmware is the operang system for your camera.
A new rmware might resolve bugs, make the camera more reliable, increase baery life or add new features.
Load your camera’s conguraon soware.
Connect the camera to the computer using the USB cable.
The soware will recognise your camera is connected and check for updates.
If an update is available the soware will prompt you to update.
The updated rmware will download and be saved on to the SD card in your camera.
Once this has happened, unplug the camera from your computer and wait for 5 seconds.
Plug the camera back in to your computer and wait for the LED to stop ashing.
DO NOT REMOVE THE CAMERA BEFORE THE UPDATE IS FINISHED
Once the LED is OFF, unplug the camera and start to use as normal.
Aer a successful update, you can plug the camera back in to your computer and the soware will tell you if your camera is up to date.
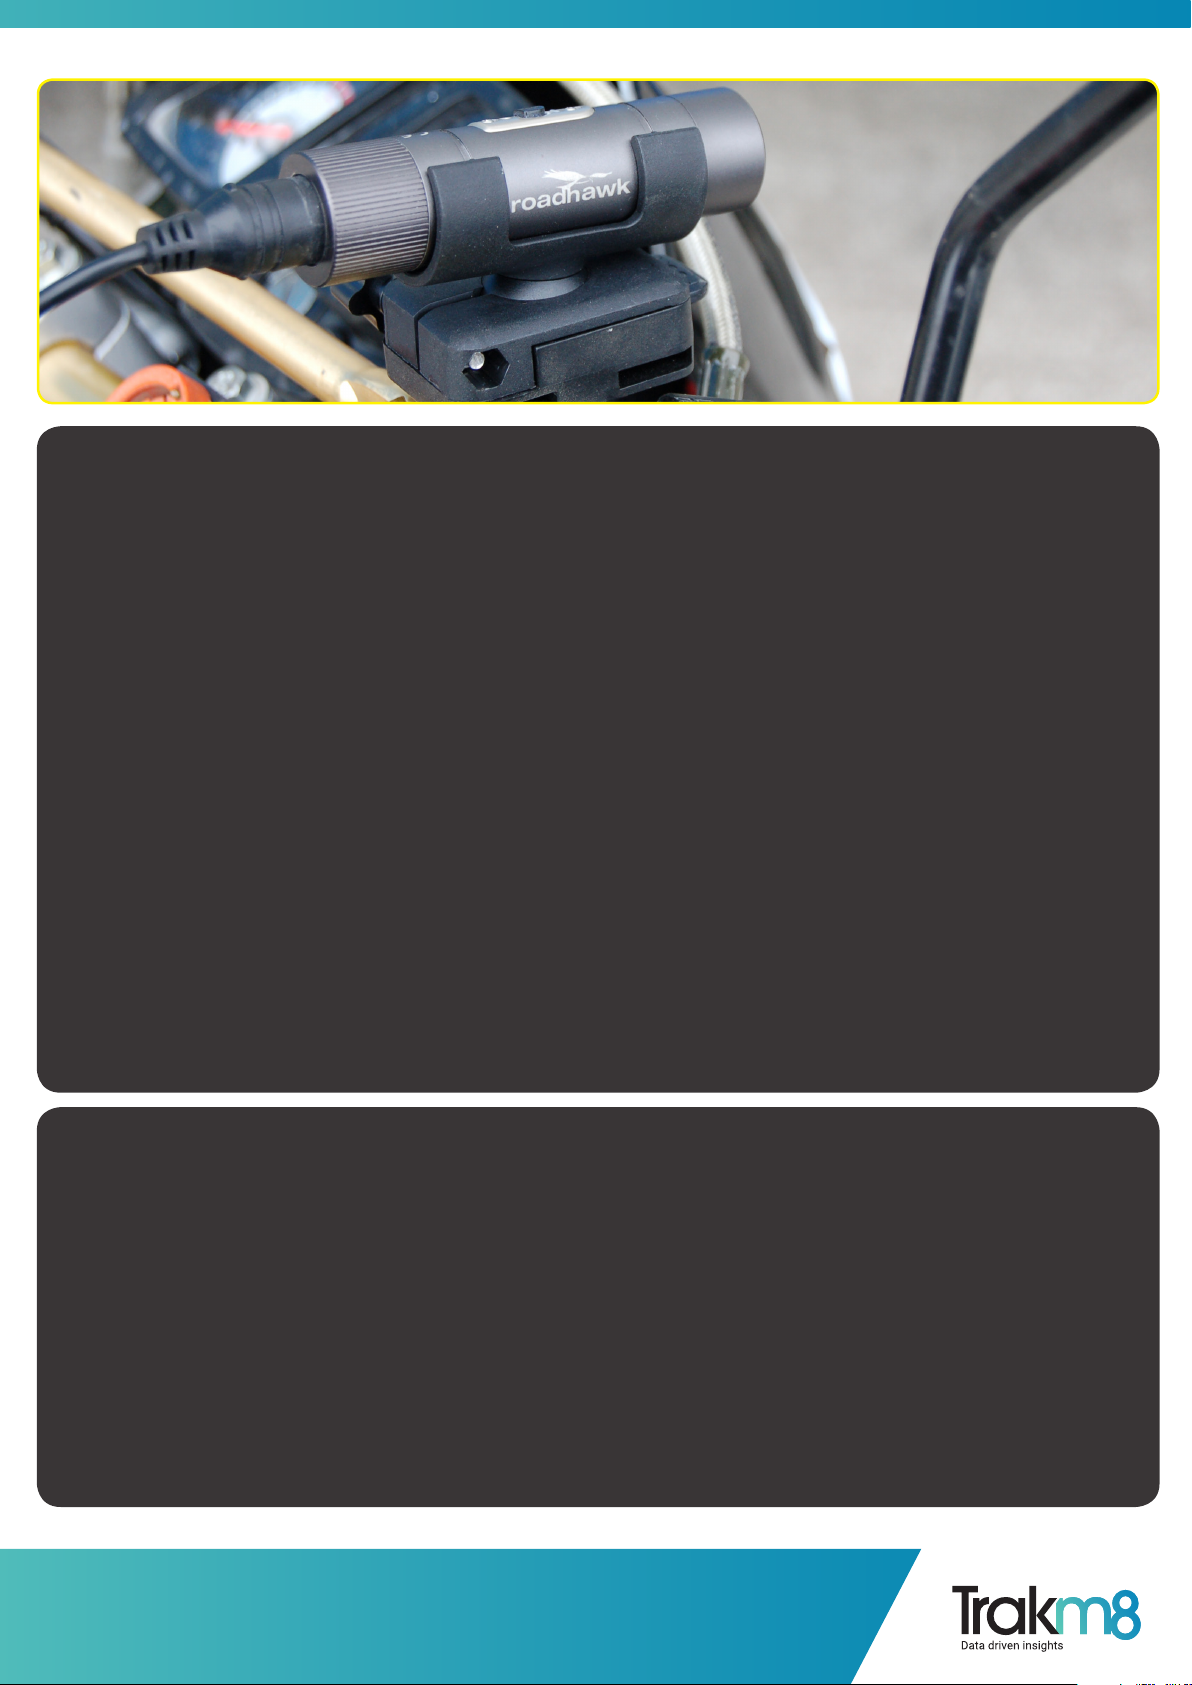
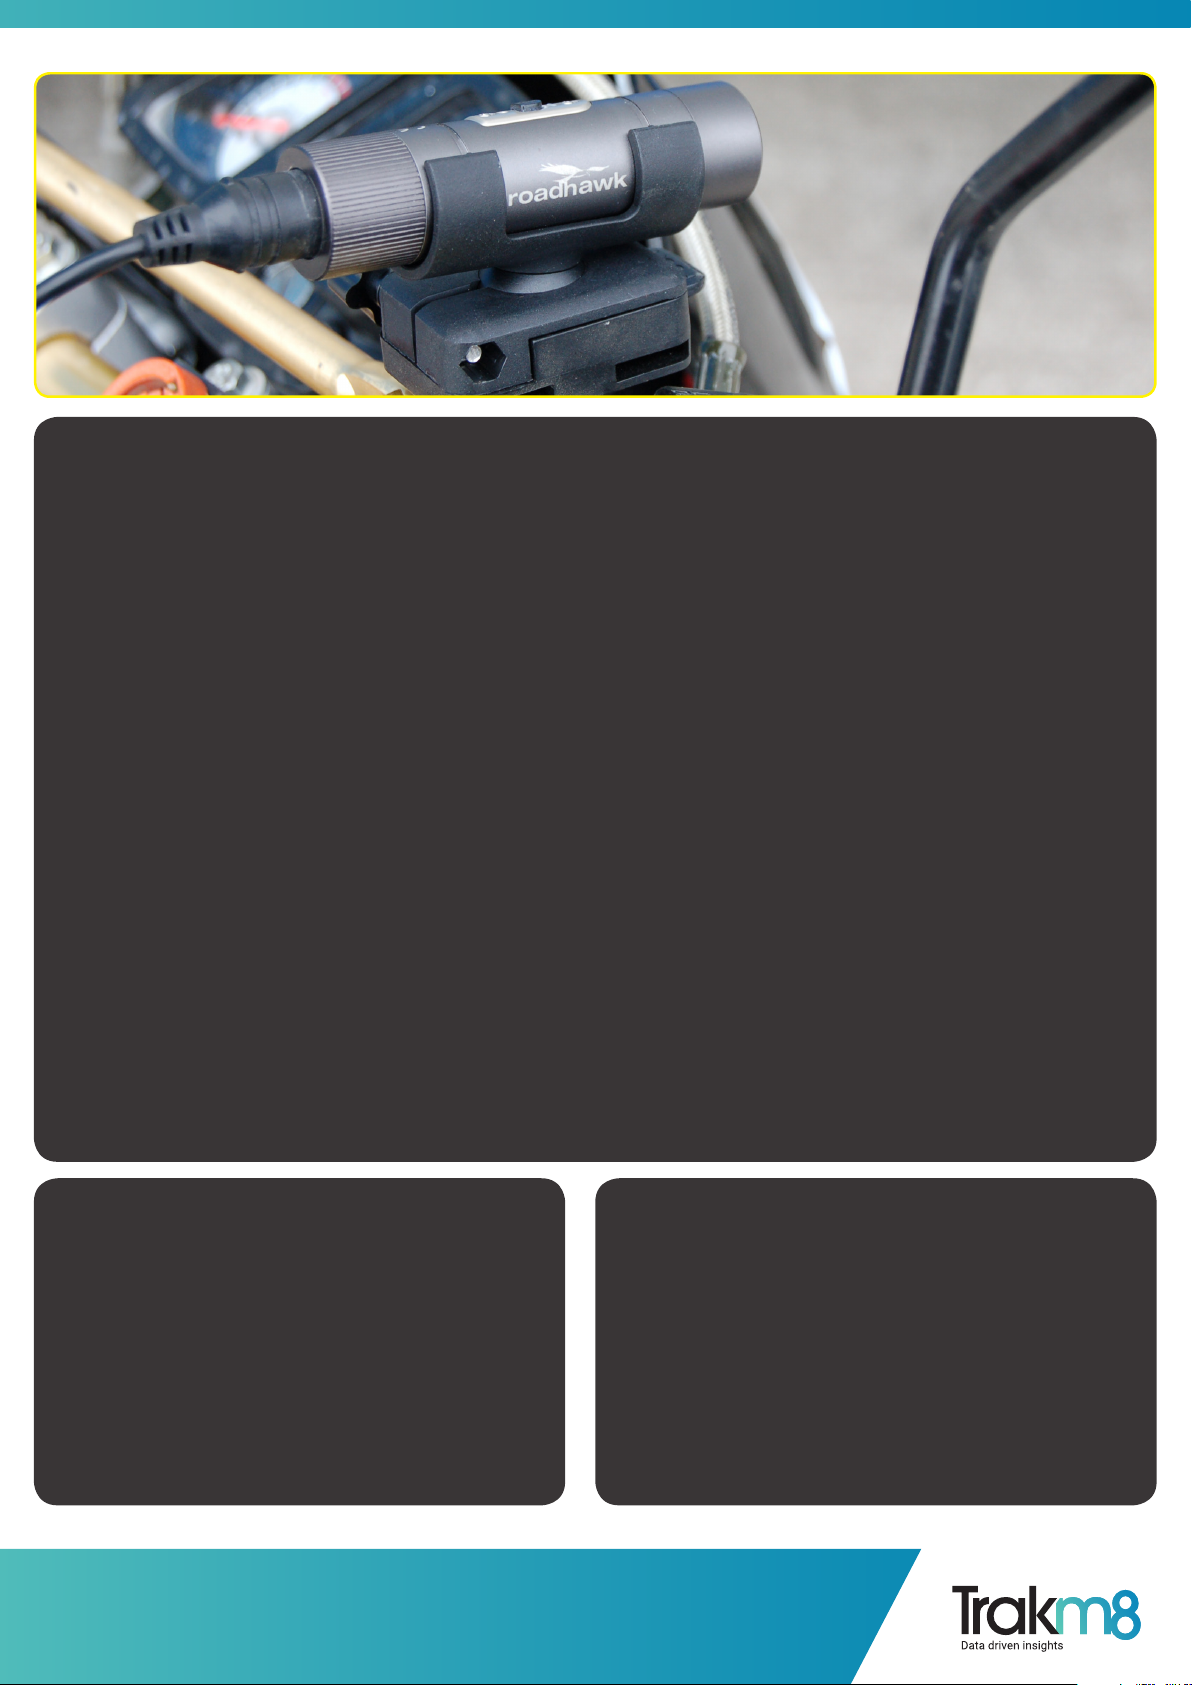
MOTO Hardwire Kit
The Moto version is supplied with a hardwire kit so you can permanently power your camera while your ignion is on. There are
3 wires to the control unit, Red (Live), Black (Negave), Blue (Switched Live). We recommend you have the hardwire kit ed by a
Qualied Motorcycle electrician. The other end has the USB socket specic to the camera.
If ng yourself, please refer to your make of motorcycles workshop manual.
MAY16004

RoadHawk, c/o Trakm8
Unit 9B, Callywith Gate Ind Est,
Bodmin, PL31 2RQ
Tel. 01208 269 159
Web. www.roadhawk.co.uk
User Guide: Specicaon
Sensor: 5 Mega Pixel
Resoluon: 1920 x 1080 (30, 25fps) - 1280 x 720 (60, 50fps)
Scan type: Progressive
Video Encoding: H.264 .MOV Files
Bit Rate: Up to 12mb/s in high quality mode
Power Supply: Embedded 660mAh Li-Polymer Baery
Baery Life: 60 to 90 mins record me
Power Consumpon: <1.5w
Memory: Up to 32GB MicroSD Card Class 6 or beer
Lens: 6 element glass lens
Field of View: 135 degrees at 720p
Working Temp: -10C to +55C
Storage Temp: -20C to +60C
Waterproof Depth: 10m MAX
Laser: Class 2 Single Laser <1w
Dimensions: 84mm (l) x 23mm (dia)
Weight: 62g
USB: 2.0 (high speed)
Operang System: Win 8 / WIn7 / WinXP / Vista / Max OS 10.7 or beer
1080p/30fps @ 12 Mbit/s data rate,1GB memory can record 10 minutes of video.
720p/60 @ 12 Mbit/s data rate, 1GB memory can record 12 minutes of video.
User Guide: Laser Warning
Your camera has a class 2 red laser.
When you turn the camera on, it will re the laser from the front lens.
WARNING:
Never look in to the laser beam.
Never point the laser at anyone’s face.
Never point the laser at road trac or aircra.
Never point the laser at animals.
The laser funcon can be disabled in the conguraon soware.
If you are using the camera in or on a vehicle on a public road then you should disable the laser.
MAY16004

RoadHawk, c/o Trakm8
Unit 9B, Callywith Gate Ind Est,
Bodmin, PL31 2RQ
Tel. 01208 269 159
Web. www.roadhawk.co.uk
User Guide: Trouble Shoong
Camera turns o within a few seconds of being turned on.
Check the baery is charged fully.
Check the SD card is fully inserted.
Check the SD card is not full.
No sound can be heard during playback:
Check the Mic Sensivity sengs in the soware.
When the sealed rear cap is used, audio will be much quieter.
Sound is too loud/distorted:
Check the mic sensivity sengs in the soware.
When recording at high speeds, use the sealed rear cap to reduce wind noise.
Recorded image is too dark or too bright:
Check the sengs of the camera using the conguraon tool.
Click “Default sengs” in the soware to return the camera to its factory set condion.
Video les are corrupt or les are not being saved correctly.
This will almost certainly be related to the SD card itself rather than the camera.
Make sure you format your SD card on a regular basis.
If you use a SD card that is too slow, the camera will not be able to save the video les correctly.
Use only high quality class 6 or higher SD cards with this camera.
Video is not smooth during playback:
This is almost certainly related to your computer or the video playback soware you are using.
Check your computer meets the minimum specicaon required for 1080p video playback.
Most netbooks cannot reliably playback 1080p video.
Ensure your an-virus soware is up to date and scan your computer for malware.
Install VLC for FREE from www.videolan.org and use it to play your video les.
MAY16004
This manual suits for next models
4


