VITACLAY VM7900-6 Installation guide
0
VitaClay® Smart Organic Multi-Cooker
Operating and Care Instructions
For models VM7900-6 & VM7900-8
READ ALL INSTRUCTIONS BEFORE INITIAL USE
HOUSEHOLD USE ONLY
© 2008 Essenergy, Inc. All rights reserved

1
Welcome to VitaClay! We’re so glad you’re here.
This guide is to help you have a safe and truly satisfying
experience. We have created a line of electronic cooking
devices that are both easy to use and healthy for you and
your family. Enjoy!
Clay is the most traditional cooking material there is, used
in every culture for thousands of years. At VitaClay, we
care about your health and the health of the environment.
That’s why we set out to create cookware that not only
saves time and money in the kitchen but allows you to
utilize traditional cooking methods to turn whole foods into
healthy meals with the push of a button!
We have sourced the world’s purest clay to create our clay
pots, so you can rest assured that no impurities, heavy
metals, toxins or chemicals will ever be leached into your
food. Not only will your food be clean and healthy, it will
taste great and have an unparalleled texture.
Our clays are tested to ensure they are free of the common
contaminants in modern cookware including lead,
aluminum, cadmium and arsenic. And since our pots are
unglazed, you do not have to worry about the harmful
chemicals found in other pots. We just don’t believe
convenience is worth risking your health.
Thank you for purchasing your new VitaClay Smart
Organic Multi-Cooker!
To register your new product: Go online to
vitaclaychef.com, scroll down to the bottom of the
homepage, under the center “Support” column, click on
“Product Registration”

2
Table of Contents
Important Safety Information...............................................3
Grounding Information and Instructions..............................6
Caring for your Clay Pot......................................................7
Parts and Assembly Illustration...........................................9
How to read your Control Panel Display...........................10
Let’s Get Started! .............................................................11
Smart Organic Multi-Cooker Basics ......................11
How to use your Function Keys..............................13
How to Choose a Cooking Mode............................15
How to Cook with each Mode ................................16
Regular, Brown & Sweet Rice Cooking Modes.................16
Rice or grain to water ratios ...................................16
Rinsing the rice ......................................................18
Basic Rice Cooking Directions...............................18
Basic Grain Cooking Directions..............................20
How to use the Reheat mode.................................20
A general guide to:
Flavoring Rice and Grains ................................21
One-Pot rice or Grain Meal...............................22
Slow Cooking Modes........................................................22
Basic Soup or Stew Cooking Directions.................23
How to Delay Start for Slow Cooking.....................24
A general guide to:
Soups, Broths and Porridge..............................25
Cooking Dry Beans and Lentils.........................25
Cooking Oatmeal..............................................27
Steaming Vegetables........................................27
Steaming Fish...................................................28
One Pot Pasta Meal..........................................28
Yogurt Cooking Mode.......................................................29
Basic Yogurt Cooking Directions ..........................29
Care, Cleaning and Proper Maintenance .........................34
Tips, Shortcuts & FAQ......................................................36
Warranty...........................................................................38

3
Important Safety Information
When using your VitaClay® Smart Organic Multi-Cooker or
any electrical appliances, basic electrical precautions
should always be followed to reduce the risk of fire, electric
shock and injury, including but not limited to the following:
•Your Smart Organic Multi-Cooker (“Cooker”) appliance
is intended for household countertop use only and is
not intended for commercial or outdoor use. Do NOT
place the Cooker on or near a hot gas or electric stove
burner. Do NOT place the Cooker inside a hot oven or
broiler.
•WARNING: Spilled food can cause serious burns.
Keep appliance and cord away from children.
•CAUTION: To ensure continued protection against risk
of electric shock, connect to properly grounded outlet
only. Always attach plug to appliance first, then plug
cord into the wall outlet. When you plug in the power
cord, please ensure a solid connection with the cord and
both Cooker and the electrical outlet. To disconnect,
turn unit off and remove the plug from wall outlet by
holding the plug. Do NOT pull the cord. Never drape
cord over edge of counter. Never use outlet below
counter. Only cook in the removeable container.
Read all instructions before using your Smart
Organic Multi-Cooker. Save for future reference.

4
•Do NOT immerse the heating unit of the appliance in
water or any other liquid. To prevent electrical shock, Do
NOT place the cord, plug or cooking unit near water or
other liquids. Keep power cord plug and socket dry and
clean. Do NOT touch power plug with wet hands.
CAUTION: To reduce the risk of electric shock, cook
only in removable container.
•Ensure your Cooker is always placed on a flat, level
surface before use. Provide adequate air space above
and on all sides for air circulation. On surfaces where
heat may cause a problem, an insulated heat pad is
recommended.
•DO NOT move the Cooker when it is in cooking or
warm mode. After cooking, use extreme care when
moving your Cooker or the clay pot insert if it is filled
with hot liquid. Spilled food can cause serious burns.
Keep appliance and cord away from children.
•Always unplug the Cooker when not in use or before
cleaning. Allow the Cooker to cool before cleaning or
removing parts.
•Do NOT use this Cooker for anything other than its
intended use. The use of accessory attachments not
supplied or recommended by Essenergy may cause
injury, fire or electrical shock and may also damage the
Cooker. The Cooker should be used for its intended
purpose only and not for other cooking purposes such
as stir frying, braising, browning or deep oil frying.
•During the cooking process, the steam valve vents
needs to be in place for safety and performance. Do
NOT touch the steam cap during cooking process as it

5
becomes very hot. Do NOT put your face near the
steam cap, as scalding or burning can occur; Do NOT
place any object that is heat sensitive close to, nearby
or above the Cooker; Do NOT use a cloth to cover the
steam cap, as this may damage the Cooker.
•The clay or stoneware pot and lid become very hot
during the cooking process and/or when cooking is
finished. Use a dry cloth to pick up the clay pot and lid.
Do NOT use bare hands. When lifting the lid on a
heated Cooker, carefully lift and tilt lid away from you to
avoid scalding and to allow condensed water to drip into
pot. Steam and condensation will be very hot; be very
careful not to burn yourself. Do NOT touch hot surfaces;
Use the handles or knobs provided.
•Do NOT operate any appliances that have damaged
plugs or cords, malfunctioned or been damaged in any
way. Return the appliance to the manufacturer or
qualified service technician for repair or adjustment.

6
Grounding Information and Instructions
This appliance must be grounded. It is equipped with a
3-wire detachable cord with grounded plug. The plug must
be plugged into an outlet that is properly installed and
grounded.
WARNING: Improper use of the grounded wire can result in
a risk of electric shock. Consult a qualified electrician if
necessary. Do NOT attempt to defeat this safety feature by
modifying the plug. The short power cord is provided to
reduce the hazards resulting from entanglement or tripping
over a long cord.
If it is necessary to use an extension cord, the cord should
be positioned so that it does not drape over the counter or
tabletop where it can be pulled on by children or tripped
over and:
•Use only 3-wire extension cord with 3-blade grounding
plug.
•The marked rating of extension cord must be equal to or
greater than the rating of this appliance. Electrical rating
is listed on the bottom of this unit.

7
Caring for your Clay Pot
Unglazed natural clay promotes health by preserving all
essential nutrients and vitamins in your foods. It creates
excellent texture and intensifies flavors of food. In order to
preserve the quality and lifespan of your clay pot, here are
a few helpful tips and instructions to follow:
•ALWAYS avoid temperature shock: never add frozen
items to a very hot pot or place a hot pot on a cold,
marble counter or directly into the refrigerator. Use a
cloth trivet for the counter and allow to cool down before
placing in the refrigerator. Do NOT place the clay pot in
the freezer. Similarly, Do NOT add boiling water to a
very cold pot (out of the refrigerator). Allow the pot to
normalize to room temperature before adding very hot
or very cold items.
•DO use your Smart Organic Multi-Cooker with
adequate water-based liquids. Be sure that water-
based liquids are always present in the clay pot during
cooking to prevent the pot from becoming too dry and
overheated. ALWAYS cook with liquid present at a
minimum of 2 cups (US cup) in the pot but the recipe
may need more.
oFor first-time cooking use that is longer than 1
hour, please CHECK your liquid levels halfway
through cooking time to see if liquid is running low,
add same temperature or room-temperature liquid as
needed. If the liquid is almost gone, turn the machine
off and allow it to cool down before adding more
liquid and then restart the cooking process. Use the
Cooking Chart for the first-time cooking and reduce
or add liquid amount as needed thereafter.
oIf the liquid completely evaporates, the clay pot will
begin “dry heating”, immediately unplug the power

8
cord, allowing the Cooker to cool down naturally.
During cooling, DO NOT add water or remove your
pot from the Cooker Housing.
oDO NOT cook easy to burn foods like milk,
cheese, tomatoes, instant or quick oatmeal without
enough liquid or for too long. Use the proper
settings, see the Cooking Chart for details.
•The clay parts are designed for cooking with the
provided Cooker Housing ONLY. DO NOT heat the pot
on stove top or oven. NEVER use the pot for frying,
braising, browning or deep oil frying.
•Avoid sudden temperature changes. DO NOT add cold
water to heated pot. DO place hot pot on a fabric or
cotton potholder or dry cloth. DO NOT put hot pot on
any cold surface such as countertop or in the sink.
•When your meal has just finished cooking, the Cooker
will still be hot, DO NOT place clay parts in water or on
cold surface. This can SHOCK the pot to the pot and
may cause it to crack.
•The clay pot is fragile. Be careful when carrying or
storing. Do NOT start cooking function while the clay pot
is empty. Dry heat can cause the pot to crack or break.
Always have some liquid present in the clay pot when
the cooking cycle begins. Please handle with care. DO
NOT hit it on hard surface or drop it, as it may break.
•Be sure that the outside of the pot is dry before
placing inside the housing to cook. If liquids have
been soaking in the clay pot for a very long time, a leak
could occur. Use a dry towel to dry the outside surface
of the inner clay pot.
9
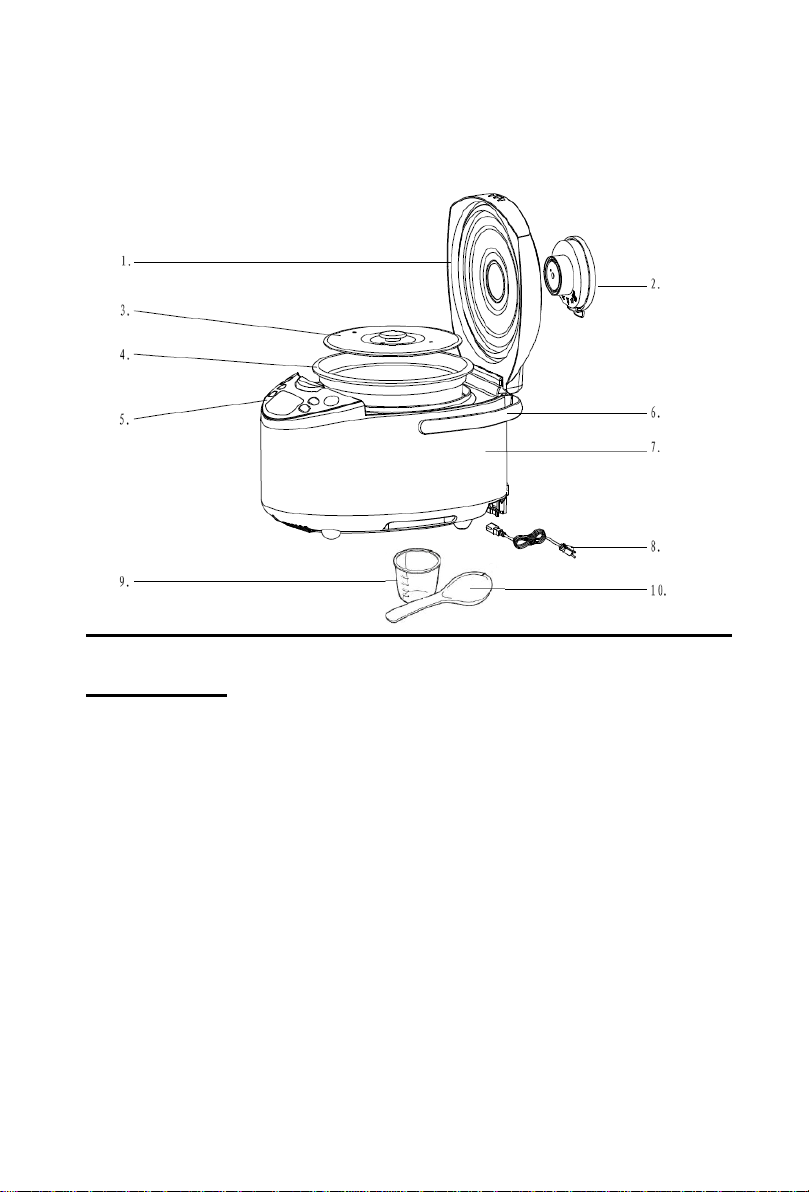
Parts and Assembly Illustration
Key to Parts
(1) Cooker Cover
(2) Steam Cap
(3) Clay Lid
(4) Clay Pot
(5) Control Panel, see below
(6) Handle
(7) Main Housing
(8) Power Cord
(9) Measuring Cup
(10)Rice Spoon
(11)Stainless Metal Hook (not shown, for lifting the hot
clay lid off the clay pot)

10
How to read your Control Panel Display
(1) “Delay”Start Key –Function key to turn on delay start
mode. Function is on when Indicator Light glows red.
(2) “Hour”& “Minute”Timer Keys –Use for setting
Soup, Stew and Yogurt mode cooking time, and Delay
Start time.
(3) LCD Display –Displays time at center and via the
“black arrows” around the parameter indicates rice
cooking modes along top edge, slow/stew/yogurt
cooking modes along left edge and delay/time
left/warm time along right edge.
(4) “Start/Cancel”Key –Function key to start or cancel
any mode. Cooker is on and cooking when Indicator
Light glows red.
(5) “Rice Cooking”Key –Function key to select Rice
Cooking modes (regular, brown, sweet rice, reheat).
(6) “Slow Cooking” Key –Function key to select Soup,
Stew or Yogurt cooking mode.
1
2
3
4
5
6

11
Let’s Get Started!
Remove all packaging from your VitaClay® Smart Organic
Multi-Cooker and its accessories prior to use. Make sure all
parts are accounted for (see Parts & Assembly Illustration),
undamaged and free of debris.
IMPORTANT: CLEAN UNIT THOROUGHLY BEFORE
FIRST USE:
•Hand wash the clay pot and cover in warm water
with a small amount of detergent.
•Rinse and dry clay pot thoroughly before placing in
Housing.
•Remove the large info-graphic sticker from the
stainless-steel Housing.
•DO NOT submerge the Housing in water, it is ok to
gently wipe it with damp cloth.
Plug the power cord into the unit first and then plug into the
wall outlet. When the cooker is ready for operation you will
hear a long “beep”.
A slight odor and/or smoke smell may be noticed during the
initial use of this appliance. This is normal with many
heating appliances and will not occur after the first few
uses.
Smart Organic Multi-Cooker Basics
(Important Do’s and Don’ts to ensure success!)
Your Smart Organic Multi-Cooker (“Cooker”) is a faster,
easier, truly a mess-free and notably more delicious and
nutritious way to make a rice, soup, chili, stew, or most
anything you can make in a regular slow cooker.
Cooking time is significantly shortened when compared to a
slow cooker.

12
The minimum food and liquid volume should be ¼ of the
pot.
DO NOT dry heat, fry or cook ANY foods dry -- without
liquid in pot. Dry heating can shorten the life of the clay pot
and Cooker. DO NOT dry heat to bake or to stir fry
foods.
Keep the Cooker surface and base inside clean and on a
flat surface to maintain normal operating conditions.
DO NOT disassemble the Cooker Housing, as this will
invalidate the warranty.
During cooking, you may stop the cooking mode at any
time by pressing the “Start/Cancel” key. The Cooker will
then revert to the Waiting mode and the “Start/Cancel
Indicator Light will blink. Reset as needed.
The 3 Slow cooking modes default to a cooking time within
7 seconds of selecting a mode. You must use the “Hour” &
“Minute" Timer Keys to adjust a custom cooking time.
If there is a power outage during cooking, you may have to
start the cooking cycle again.
During the cooking process, the steam cap should always
be in place for safety and performance.
The clay pot and lid become very hot during the cooking
process and/or when cooking is finished. Use a dry cloth to
pick up the clay pot and use the enclosed lid lifter for the lid.
Do not use bare hands.
Always ensure that the Cooker’s heating element located in
the main Housing is clean and dry. Any particle (food or
dirt) will interfere and may prevent the Cooker from cooking

13
evenly, cause a burning smell or could cause the clay pot to
crack. If there is any food residue on the heating element,
wipe with a damp (not wet) cloth or Magic Eraser sponge
until clean. Never fill the main housing with water and never
immerse it in water.
Do open the lid during cooking to check the cooking
progress. Unlike other pots, opening the lid does not affect
the cooking time! Go ahead, use a thermometer to check
doneness, add in vegetables that need just a brief amount
of time to cook, or stir and check your seasoning. This is
not necessary every time, but in the beginning, it gives you
a quicker learning curve.
Note: All recipes in this booklet are based on U.S.
measurements (standard U.S. measuring cups and
spoons). Plastic cup included with the Cooker is not U.S.
measurement, if using adjust accordingly.
See Tips, Shortcuts & FAQ section for additional
guidance.
Use the “VitaClay Cooking Charts for VM7900 &
VF7700” for first-time cooking. After that, reduce or add
liquid amount and cooking time as needed based on your
results and preferences.
How to use your Function Keys
Rice Cooking Key (#5 on diagram)
•Press the “Rice Cooking” key to select one of the 4
Rice Cooking modes: “regular”, “brown”, “sweet rice”
or “reheat”. The black indicator arrow will show
which mode is active.

14
Slow Cooking Key (#6 on diagram)
•Press the “Slow Cooking” key to select one of the 3
Slow Cooking modes: “stew”, “soup” or “yogurt”. The
black indicator arrow will show which mode is active.
Start/Cancel Key (#4 on diagram)
•After you have selected your cooking mode, press
the “Start/Cancel” key once to start the cooking
cycle.
•Press the key again to cancel the cooking cycle.
Hour & Minute Timer Keys (#2 on diagram)
Use with the “soup”, “stew” or “yogurt” cooking modes:
•Press the “Hour” key to set cooking hours.
•Press the “Minute” key to set cooking minutes in
10-minute increments (Yogurt only allows 30
minutes).
•These keys also allow you to set the “Delay” Start
Time (see below).
Delay indicator arrow indicates the delay start function is
on.
Time Left indicator arrow indicates the time displayed on
the clock is the remaining time left for the cooking cycle
(cooking timer counts down to zero from original time set).
Warm Time indicator arrow indicates the time displayed
on the clock is the amount of time the cooker has been in
the “Warm”mode (warm mode timer counts up from zero
after the cooking cycle has ended). The cooker will
automatically remain in the “Warm” mode for 12 hours. The
clay pot will maintain a temperature between 158F and
167F (70C to 75C).

15
How to set the Delay Start Timer
•Press the desired cooking mode using the “Rice
Cooking” or “Slow Cooking” function keys. If “Slow
Cooking” set cooking time using the “Hour” and
“Minute” Timer keys. (Rice cooking times are pre-
programmed.)
•While the “Start/Cancel” indicator light is still blinking,
press the “Delay” Start key.
•Using the “Hour” and “Minute” Timer keys, set the
desired time to delay cooking. This time will be
displayed on the clock. (For example, to delay the
cooking start time for one hour, set clock to read
“1:00” or to delay for 3 hours and 30 minutes, set
clock to read “3:30”.)
•Press the “Start/Cancel” key
•The LCD Display clock will show the delay start time
and the “Delay” Start indicator light will be
illuminated indicating the cooker will begin cooking at
the desired time.
How to choose a Cooking Mode
There are 7 cooking modes + a keep warm mode: The Rice
Cooking mode offers: “regular”, “brown”, “sweet rice” or
“reheat” and the Slow Cooking mode offers: “stew”, “soup”
or “yogurt”.
•Regular Rice mode is for cooking white rice such as
jasmine, basmati, medium and long-grain as well as
grains such as quinoa.
•Brown Rice mode is for cooking brown rice, mixed
whole grains and wild rice.
•Sweet Rice mode is for cooking sweet or sticky rice.
•Reheat mode is for reheating previously cooked cold
rice.
•Soup mode is for vegetable stock, bone broth, soups
(liquid-based) and porridges such as congee or jook
as well as larger cuts of meat with sufficient liquid.

16
•Stew mode is for stews (these are thicker than
soups), beans and most classic crockpot-style
recipes.
•Yogurt mode is for home-made yogurt.
For a detailed quick reference guide consult the “VitaClay
Cooking Charts for VM7900 & VF7700” that come with
your Cooker.
How to cook with each Mode
Regular, Brown & Sweet Rice Cooking
Modes
The regular, brown and sweet rice modes utilize a micro-
computerized cooking mode that enables the Cooker to
automatically determine the cooking time needed. You will
not be able to set the length of cooking time; however you
may cancel the program at any time if the rice is cooked to
your liking.
Quinoa may successfully be cooked with the regular mode
function whereas mixed whole grains are best cooked in
the brown mode.
Important: Do NOT cook oatmeal in the regular, brown or
sweet rice cooking modes. Use the Slow Cooking stew
mode.

17
Rice or grain to water ratios
Rice and grains are natural products and the amount of
water needed for cooking will depend on the age and size
of the product as well as personal taste. The following
ratios are suggested and based on rinsed rice*.
Type of
rice/grain
Ratio of
rice to
water/broth
Rice/grain
Water,
broth or
stock
Setting
White
rice**
1:1 or
1:1.25
1 cup
1 cup to
1-1/4 cups
regular
Sweet
rice
1:1.5
1 cup
1-1/2 cups
sweet
rice
Brown or
wild rice
1:1.5
1 cup
1-1/2 cups
brown
Quinoa
1:1.5 or
1:2
1 cup
1-1/2 cups
to 2 cups
regular
Mixed
whole
grains
1:1.5
1 cup
1-1/2 cups
brown
*If rice is not rinsed, add an extra ¼ cup liquid to pot.
**Assumes sushi, jasmine, etc. Arborio (risotto-style rice)
can be made in the regular or stew mode.
NOTES:
(1) If you prefer to use more water, such as a 1:2 ratio,
use the stew mode for 30-40 minutes.
(2) if using a rice that has suggested rice cooker
directions for rice to water ratios, follow the
directions on the package.
Chef’s Tip: You can always substitute water with vegetable
stock or bone broth to enhance flavor and increase
nutrition.

18
Rinsing the rice
To make great rice, we highly recommend that you rinse
the plain raw rice before cooking. Simply place desired
amount of rice in a strainer or bowl and rinse under water,
stirring with your hand, until the water runs clear.
Note: if you are using a flavored or enriched rice product, or
the package instructions specifically state not to rinse the
rice, you should skip this step.
Basic Rice Cooking Directions (Rice, Brown,
and Sweet Rice cooking modes)
•Rinse rice as noted above and add to clay pot (#4 on
parts and assembly diagram). Add desired amount
of water to pot, stir and cover with the clay pot lid.
•Ensure the exterior of the pot is clean and dry.
•Place covered clay pot into the Cooker on the
heating element.
•Close the Cooker cover. You will hear a “click” when
it snaps shut. Plug cord into a 120-volt AC/60Hz
outlet. The Cooker will beep and “Start/Cancel”
indicator light will start blinking.
•Use the “Rice Cooking” key to select a rice cooking
mode suitable for your rice or grain as noted in the
above chart. The black indicator arrow on the LCD
display will show which mode is active.
•Press the “Start/Cancel” key to start the cooking
mode. At this point, the “Start/Cancel” indicator light
will no longer blink and will glow red.
•The LCD display will show 1 of 3 options:
o“0:45” on the clock and the indicator arrow on the
right side will be positioned at “time left” if the
regular mode was selected. This means your
Cooker will cook for approximately 45 minutes in

19
the regular mode -- less time is needed for small
amounts and more time for larger amounts.
o“1:00” on the clock and the indicator arrow on
the right side will be positioned at “time left” if the
brown mode was selected. This means your
Cooker will cook for approximately 60 minutes in
the brown mode -- less time is needed for small
amounts and more time for larger amounts.
o“0:40” on the clock and the indicator arrow on the
right side will be positioned at “time left” if the
sweet rice mode was selected. This means your
Cooker will cook for approximately 40 minutes in
the sweet rice mode -- less time is needed for
small amounts and more time for larger amounts.
•A few minutes before cooking is complete, the
Cooker will beep and once done will automatically
switch to the Warm mode. The “Start/Cancel” Light
will still glow red; the LCD display will show “0:00"
and the indicator arrow will now point to “warm time”
oThe Cooker will stay in the Warm mode for up to
12 hours. The timer will show the elapsed time in
10-minute intervals. For example, 30 minutes
would be shown as “0:30” on the LCD display.
•The rice may now be served; however, to achieve
the best results we suggest that you allow the
rice to remain in the Warm mode for 10-20
minutes before serving. (This allows the rice to
“release” from the bottom of the clay pot.)
•To end the Warm mode and turn the Cooker off,
press the “Start/Cancel” key and unplug the Cooker.
•It is advised that you Do NOT keep the rice in the
Warm mode for longer than 2 hours.
This manual suits for next models
1
Table of contents
Other VITACLAY Kitchen Appliance manuals


