WBOX Technologies 0E-HD4MP28DM User manual

4MP HD Analog Camera
OSD Operation Manual
Operation Guide
If you have any questions, please call W Box Tech Support 1-833-574-9124 for
assistance.
0E-HD4MP28DM
0E-HDD4MP28
0E-HD4MPMODM
0E-HD4MPMOEY

Operation Guide
Contents
Issue V1.0 (2019-05-08)
ii
About This Document
Purpose
This document describes how to use the web management system for DVR and the cameras managed
by DVR.
Symbol Conventions
The symbols that may be found in this document are defined as follows.
Symbol
Description
Indicates an imminently hazardous situation which, if not
avoided, will result in death or serious injury.
Indicates a potentially hazardous situation which, if not
avoided, could result in death or serious injury.
Indicates a potentially hazardous situation which, if not
avoided, may result in minor or moderate injury.
Indicates a potentially hazardous situation which, if not
avoided, could result in equipment damage, data loss,
performance deterioration, or unanticipated results.
NOTICE is used to address practices not related to personal
injury.
Calls attention to important information, best practices and
tips.
NOTE is used to address information not related to personal
injury, equipment damage, and environment deterioration.

Operation Guide
Contents
Issue V1.0 (2019-05-08)
iii
Contents
About This Document.................................................................................................................... ii
1 OSD Main Menu...........................................................................................................................1
1.1 Procedure......................................................................................................................................................................1
1.1.1 Camera Control Using Five Buttons..........................................................................................................................1
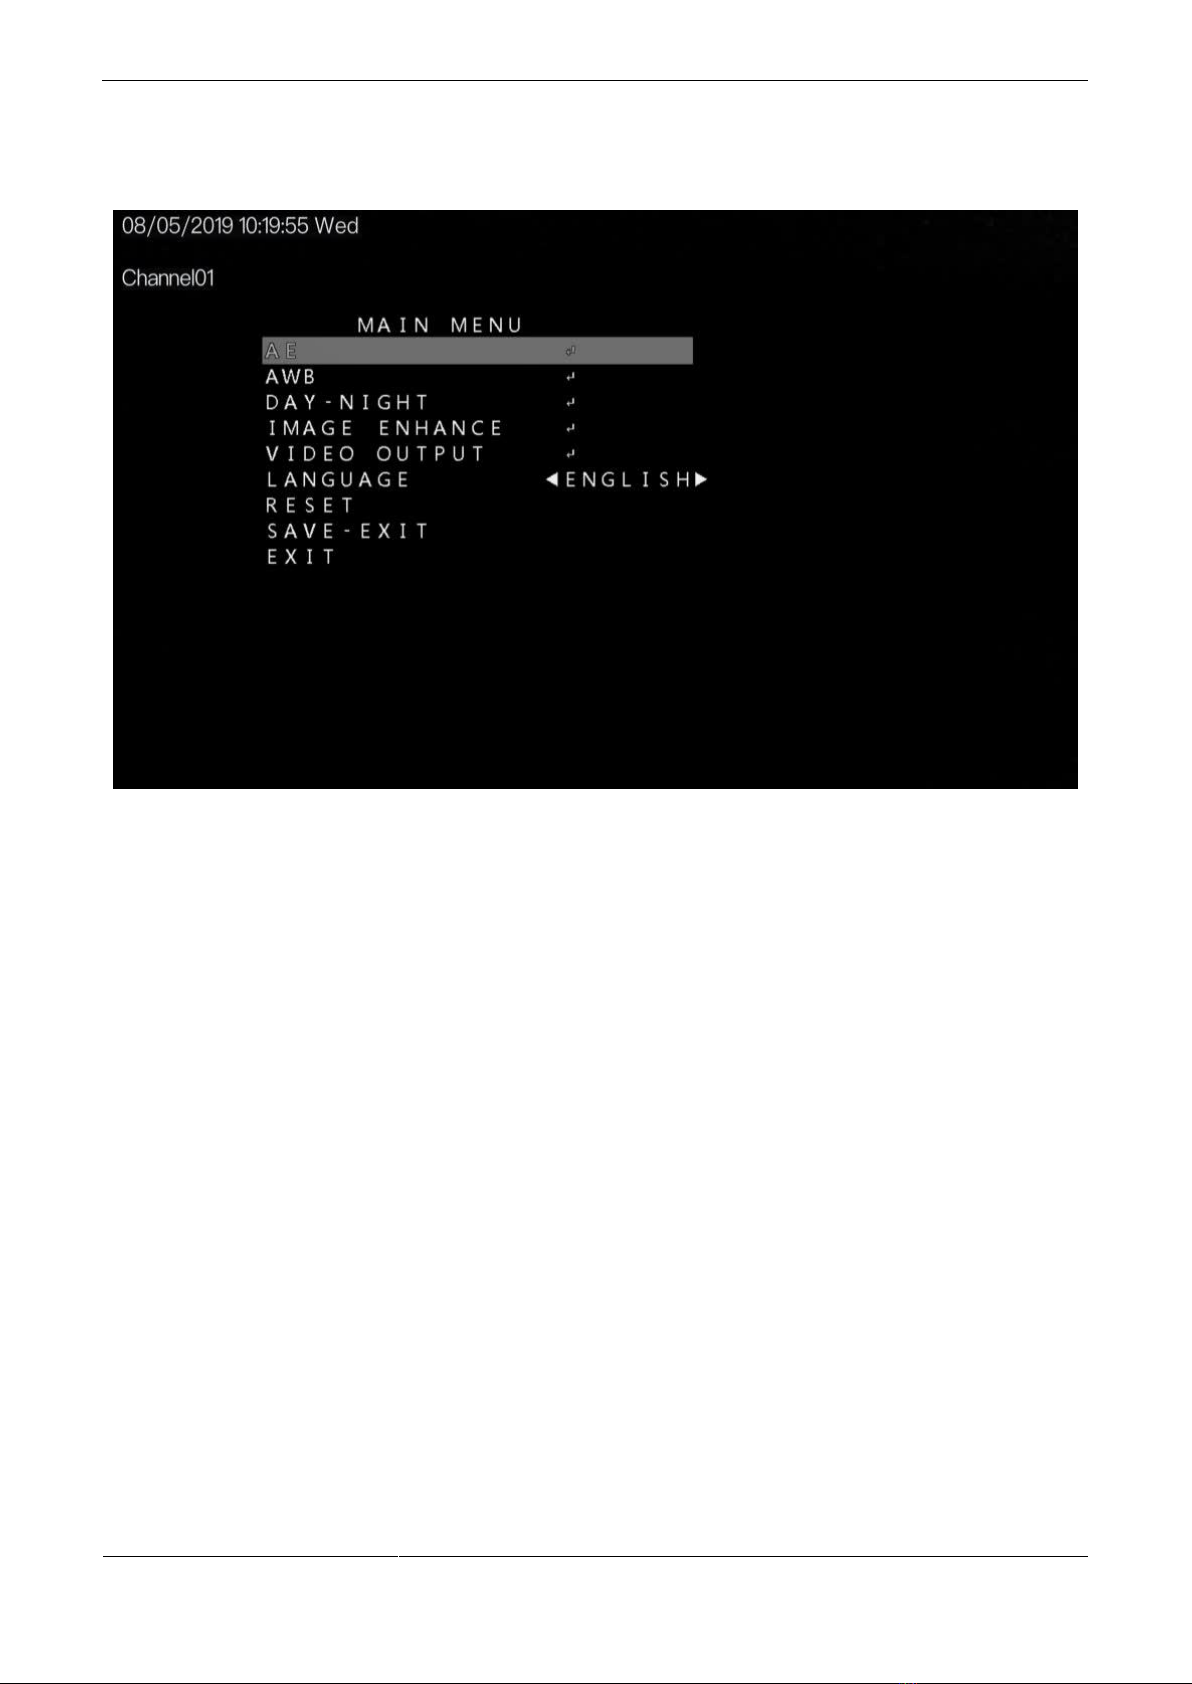
1.2 OSD Main Menu Interface ...........................................................................................................................................1
2 OSD Setting ...................................................................................................................................3
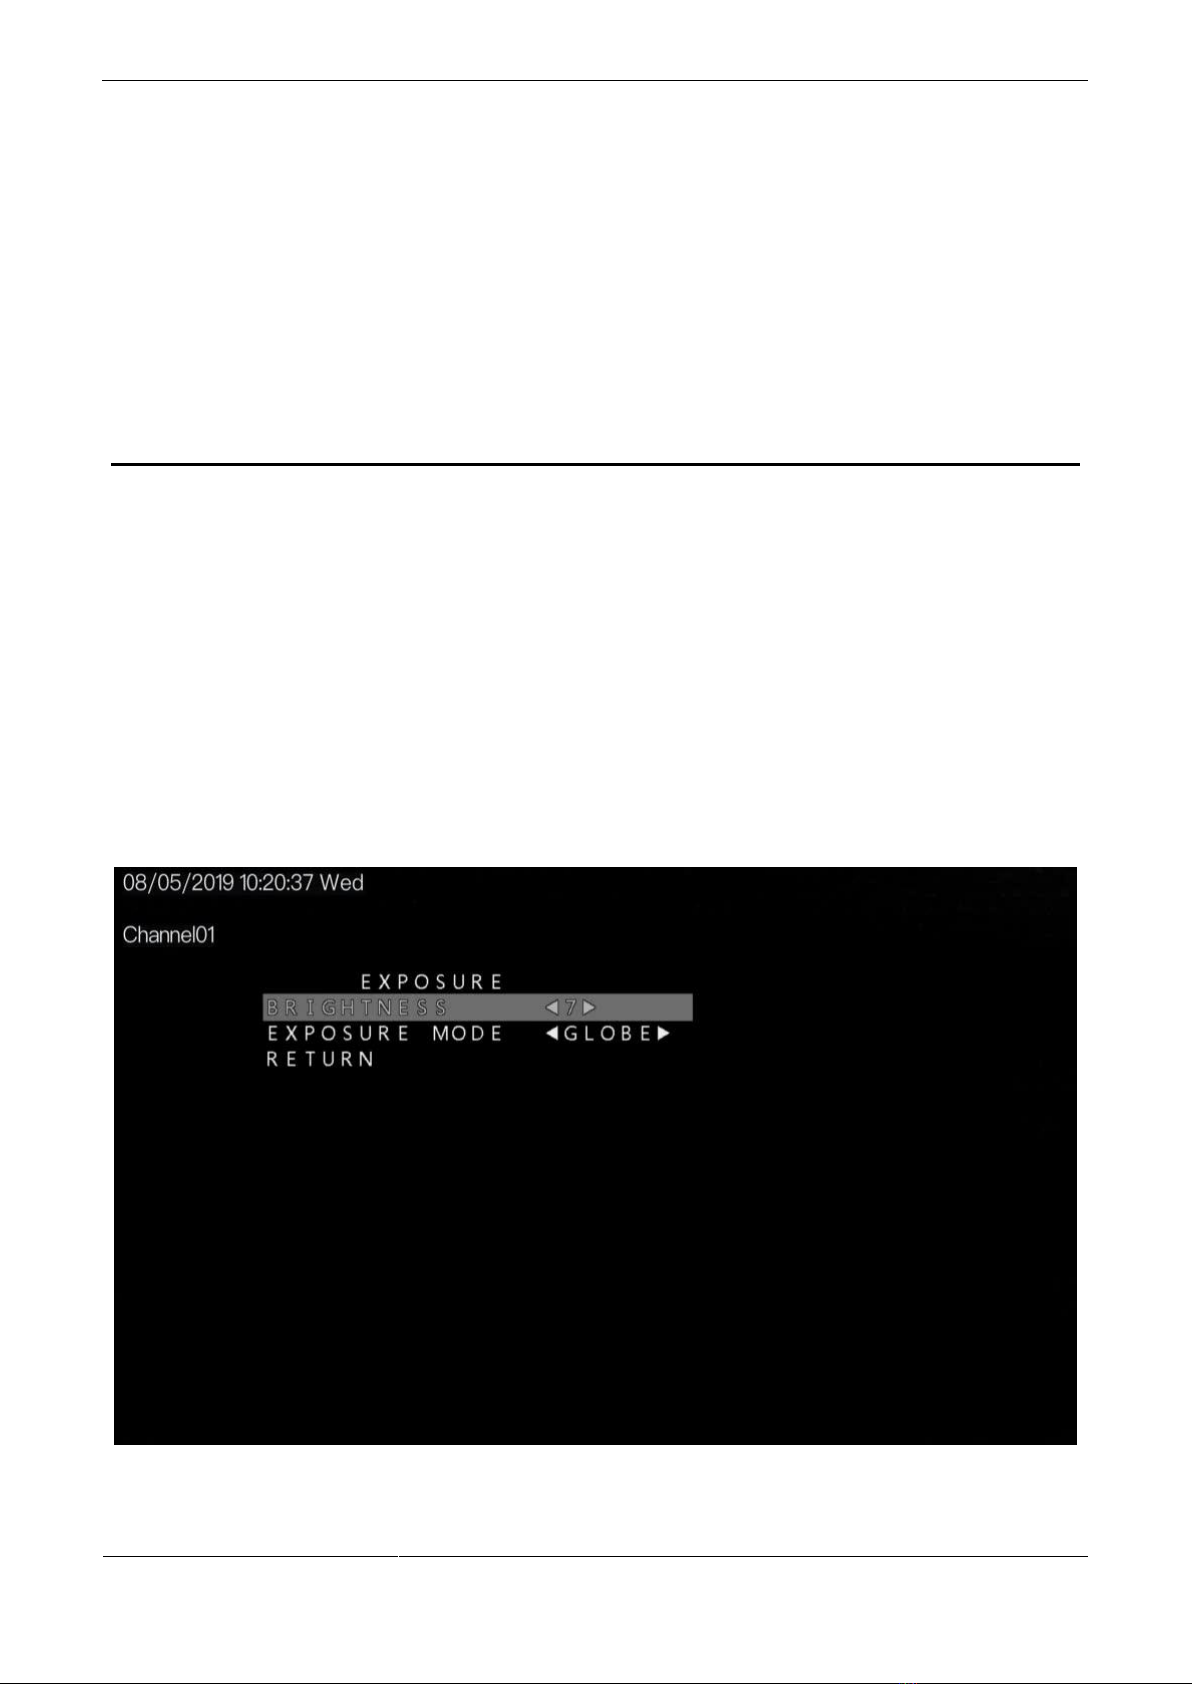
2.1 AE.................................................................................................................................................................................3
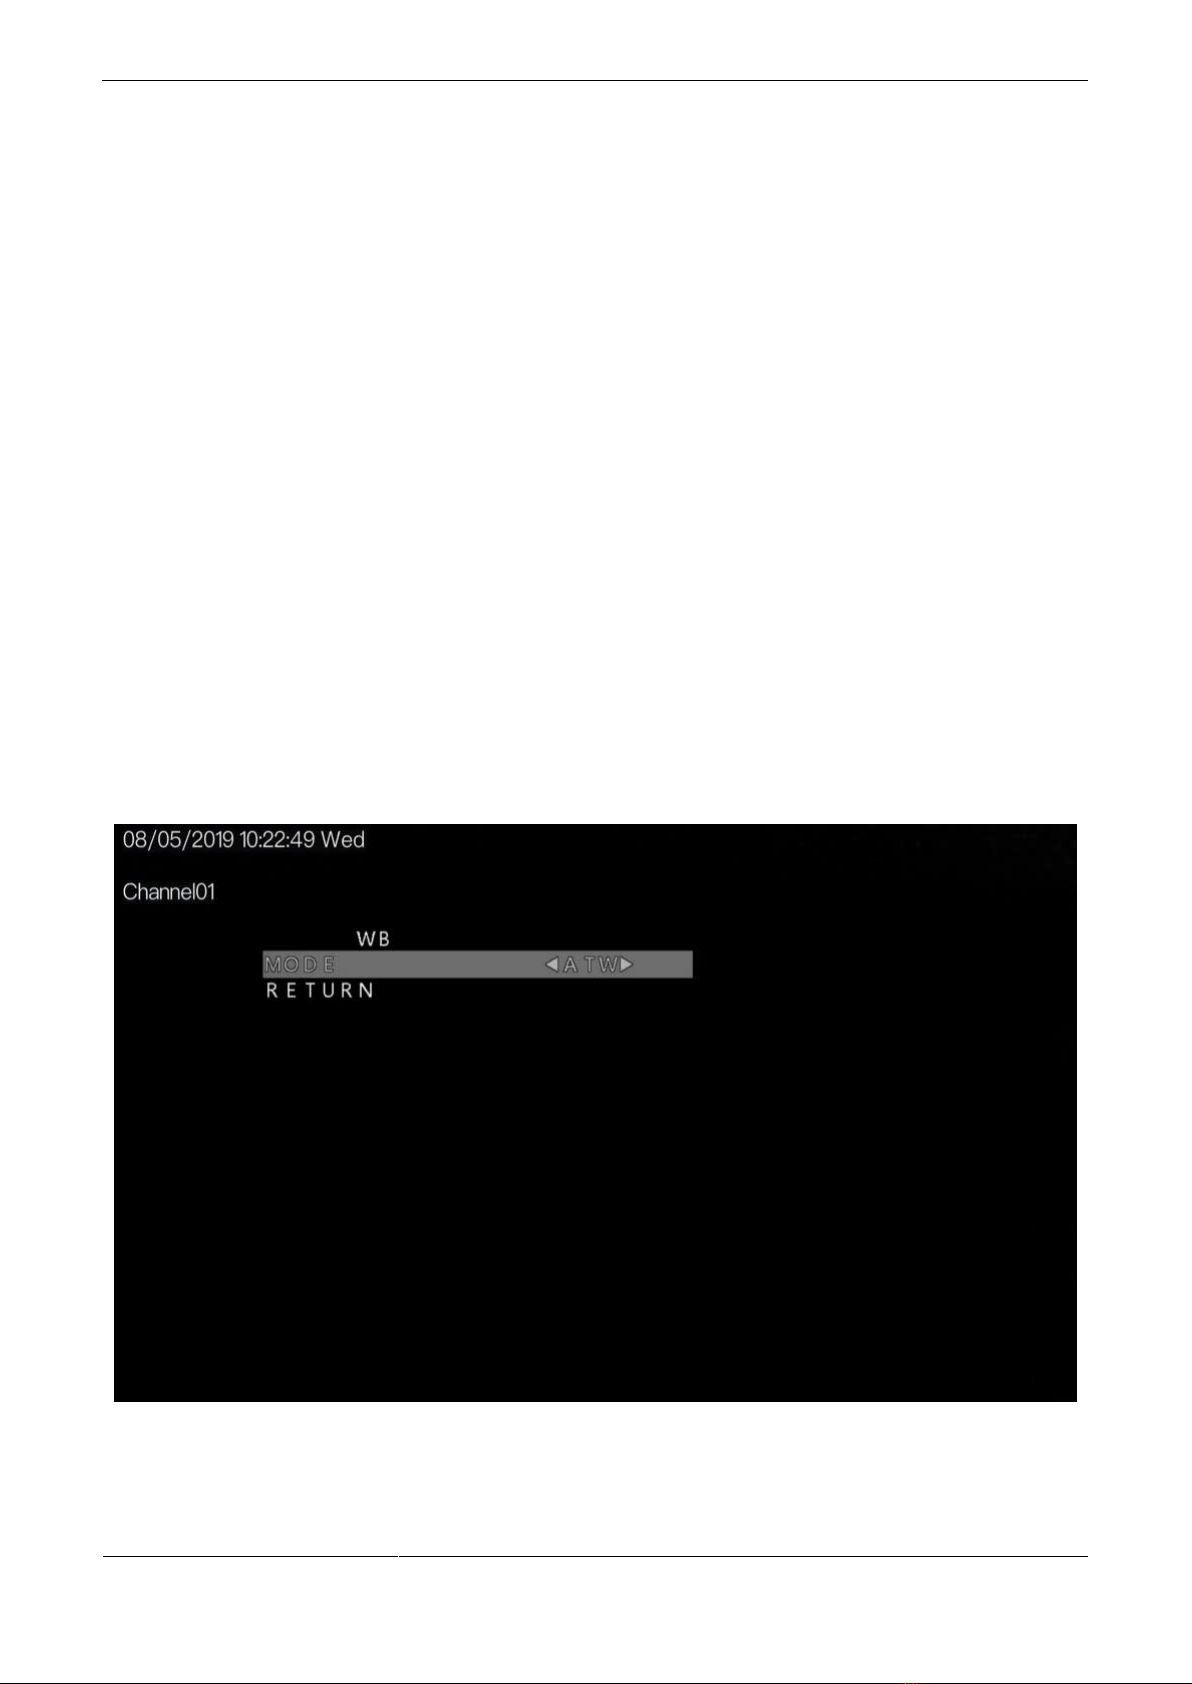
2.2 AWB .............................................................................................................................................................................4
2.3 DAY-NIGHT.................................................................................................................................................................5
2.4 IMAGE ENHANCE.....................................................................................................................................................6
2.5 VIDEO OUTPUT.........................................................................................................................................................8
2.6 LANGUAGE................................................................................................................................................................8
2.7 RESET..........................................................................................................................................................................9
2.8 SAVE-EXIT..................................................................................................................................................................9
2.9 EXIT.............................................................................................................................................................................9

Operation Guide
Issue V1.0 (2019-05-08)
1
1 OSD Main Menu
1.1 Procedure
1.1.1 Camera Control Using Five Buttons
If your camera has four arrow buttons and one SET button, you can use the buttons to operate the OSD
main menu. Figure 1-1 shows the five buttons.
Figure 1-1 Five-button layout
The buttons have the following functions:
⚫SET: Press this button to open the OSD main menu or end setup.
⚫UP/DOWN: Press the two buttons to select the upper or lower menu.
⚫LEFT/RIGHT: Press the two buttons to select different modes.
----End
1.2 OSD Main Menu Interface
The OSD main menu interface includesAE, AWB, DAY-NIGHT, VIDEO OUTPUT, LANGUAGE,
RESET, SAVE - EXIT, and EXIT, as shown in Figure 1-2.

Operation Guide
Issue V1.0 (2019-05-08)
2
Figure 1-2 OSD main menu interface
----End

Operation Guide
Issue V1.0 (2019-05-08)
3
2 OSD Setting
2.1 AE
AE is intended to adjust image brightness by setting parameters such as aperture, shutter, and gain. The
EXPOSURE interface includes BRIGHTNESS, EXPOSURE MODE.
Procedure
Step 1 Press the UP or DOWN button to select AE.
Step 2 Press the SET button to open the EXPOSURE interface, as shown in Figure 2-1.
Figure 2-1 EXPOSURE interface
Step 3 Press the UP or DOWN button to select BRIGHTNESS and press the LEFT or RIGHT
button to select a brightness value. The default brightness is 6 and the setting range is 1-20.

Operation Guide
Issue V1.0 (2019-05-08)
4
Step 4 Press the UP or DOWN button to select EXPOSURE MODE and press the LEFT or
RIGHT button to select a exposure mode.
The exposure mode includes GLOBE, and BLC.
−BLC: Press the LEFT or RIGHT button to select BLC, press the LEFT or RIGHT
button to adjust BLC value. The default BLC is 5 and the setting range is 1-9.
−GLOBE: Press the LEFT or RIGHT button to select BLC.
Step 5 Press the UP or DOWN button to select RETURN and press the SET return to the OSD
main menu interface.
----End
2.2 AWB
White balance is intended to reproduce the actual colors of the observed scene when the illuminance
and color temperature of the target object are changed. You can set WB to ATW or MWB.
Procedure
Step 1 Press the UP or DOWN button to select AWB. Press the SET button to open the WB
interface, as shown in Figure 2-2.
Figure 2-2 AWB interface
Step 2 Press the LEFT or RIGHT button to set the MODE.The options are ATW and MWB. The
default mode is GRAY WORLD
When MWB mode is selected, you can set white balance parameters, as shown in Figure 2-3.

Operation Guide
Issue V1.0 (2019-05-08)
5
Figure 2-3 MWB interface
1. Press the UP or DOWN button to select RGAIN, and press the LEFT or RIGHT button
to set RGAIN. The default RGAIN is 40 and the setting range is 1-127.
2. Press the UP or DOWN button to select BGAIN, and press the LEFT or RIGHT button
to set BGAIN. The default BGAIN is 30 and the setting range is 1-127.
Step 3 Press the UP or DOWN button to select RETURN, and press the SET button to return to the
OSD main menu interface.
----End
2.3 DAY-NIGHT
You can set Day-Night to AUTO, COLOR, B / W, or EXT.
Procedure
Step 1 Press the UP or DOWN button to select Day-Night. Press the SET button to open the Day
/Night interface, as shown in Figure 2-4.

Operation Guide
Issue V1.0 (2019-05-08)
6
Figure 2-4 DAY/NIGHT interface
Step 2 Press the LEFT or RIGHT button to set the Mode.
Step 3 Press the UP or DOWN button to select RETURN and press the SET return to the OSD
main menu interface.
----End
2.4 IMAGE ENHANCE
The Image Enhance interface includes CONTRAST, SHARPNESS, COLOR GAIN, DNR,
MIRROR and D-WDR, as shown in Figure 2-5.

Operation Guide
Issue V1.0 (2019-05-08)
7
Figure 2-5 Image enhance
Procedure
Step 2 Press the UP or DOWN button to select IMAGE ENHANCE. Press the SET button to open
the IMAGE ENHANCE interface.
Step 3 Press the UP or DOWN button to select CONTRAST. Press the LEFT or RIGHT button to
set the CONTRAST value. The default contrast is 4 and the setting range is 1-16.
Step 4 Press the UP or DOWN button to select SHARPNESS. Press the LEFT or RIGHT button to
set the SHARPNESS value. The default sharpness is 6 and the setting range is 1-16.
Step 5 Press the UP or DOWN button to select COLOR GAIN. Press the LEFT or RIGHT button
to set the COLOR GAIN value. The default color gain is 10 and the setting range is 1-16.
Step 6 Press the UP or DOWN button to select DNR. Press the LEFT or RIGHT button to set the
DNR value. The default DNR is 4 and the setting range is 1-16.
Step 7 Press the UP or DOWN button to select MIRROR. Press the LEFT or RIGHT button to set
the MIRROR value. The MIRROR mode includes DEFAULT, H, V and HV, the default is
DEFAULT.
Step 8 Press the UP or DOWN button to select D-WDR. Press the LEFT or RIGHT button to
choose OFF or ON.
Step 9 Press the UP or DOWN button to select RETURN and press the SET return to the OSD
main menu interface.

Operation Guide
Issue V1.0 (2019-05-08)
8
2.5 VIDEO OUTPUT
The Video Output interface includes HD and VIDEO STANDRAD.
Procedure
Step 1 Press the UP or DOWN button to select VIDEO OUTPUT. Press the SET button to open the
VIDEO OUTPUT interface, as shown in Figure 2-6.
Figure 2-6 Video Setting interface
Step 2 Press the UP or DOWN button to select HD, and press the LEFT or RIGHT button the
interface will show more item REBOOT && APPLY. The options are AHD, CVBS, TVI
and CVI. The default value is AHD.
Step 3 Press the UP or DOWN button to select VIDEO STANDARD and press the LEFT or
RIGHT button to choose. When the HD mode is CVBS, the video standard modes are PAL
and NTSC. Other HD modes, video standard are 4MP 25, 4MP 30 4MP 15, 1080P25 and
1080O30. The default value is 4MP 25. Switch the standard the screen will show APPLY
&REBOOT. Press the SET to apply standard.
Step 4 Press the UP or DOWN button to select RETURN and press the SET return to the OSD
main menu interface.
2.6 LANGUAGE
Press the UP or DOWN button to select LANGUAGE, and press the LEFT or RIGHT button to set
this parameter. Supports 3 languages, English, Chinese, Traditional Chinese.

Operation Guide
Issue V1.0 (2019-05-08)
9
2.7 RESET
Press the UP or DOWN button to select RESET, and press the SET button to reset the camera OSD
parameter.
2.8 SAVE-EXIT
Press the UP or DOWN button to select SAVE-EXIT, and press the SET button to save the OSD
settings and return to the camera's real-time video interface.
2.9 EXIT
Press the UP or DOWN button to select EXIT, and press the SET button to discard the OSD settings
and return to the camera's real-time video interface.
This manual suits for next models
3
Table of contents