Xiangde Electronic Technologies DV030HBF User manual

DigitalCamcorder Owner Manual
DV030HBF
Pleasereadthismanual carefullybeforeusingandkeepit
forfuturereference.

1
TableofContents
Introduction.............................................................................................................................................................2
KeyFeatures..........................................................................................................................................................2
Whatyourcamcorderincluded..............................................................................................................................3
ComputerSystemRequirement forWindows2000/XP........................................................................................3
ComputerSystemRequirement forWindowsVista..............................................................................................4
ComputerSystemRequirementsforMacintosh...................................................................................................4
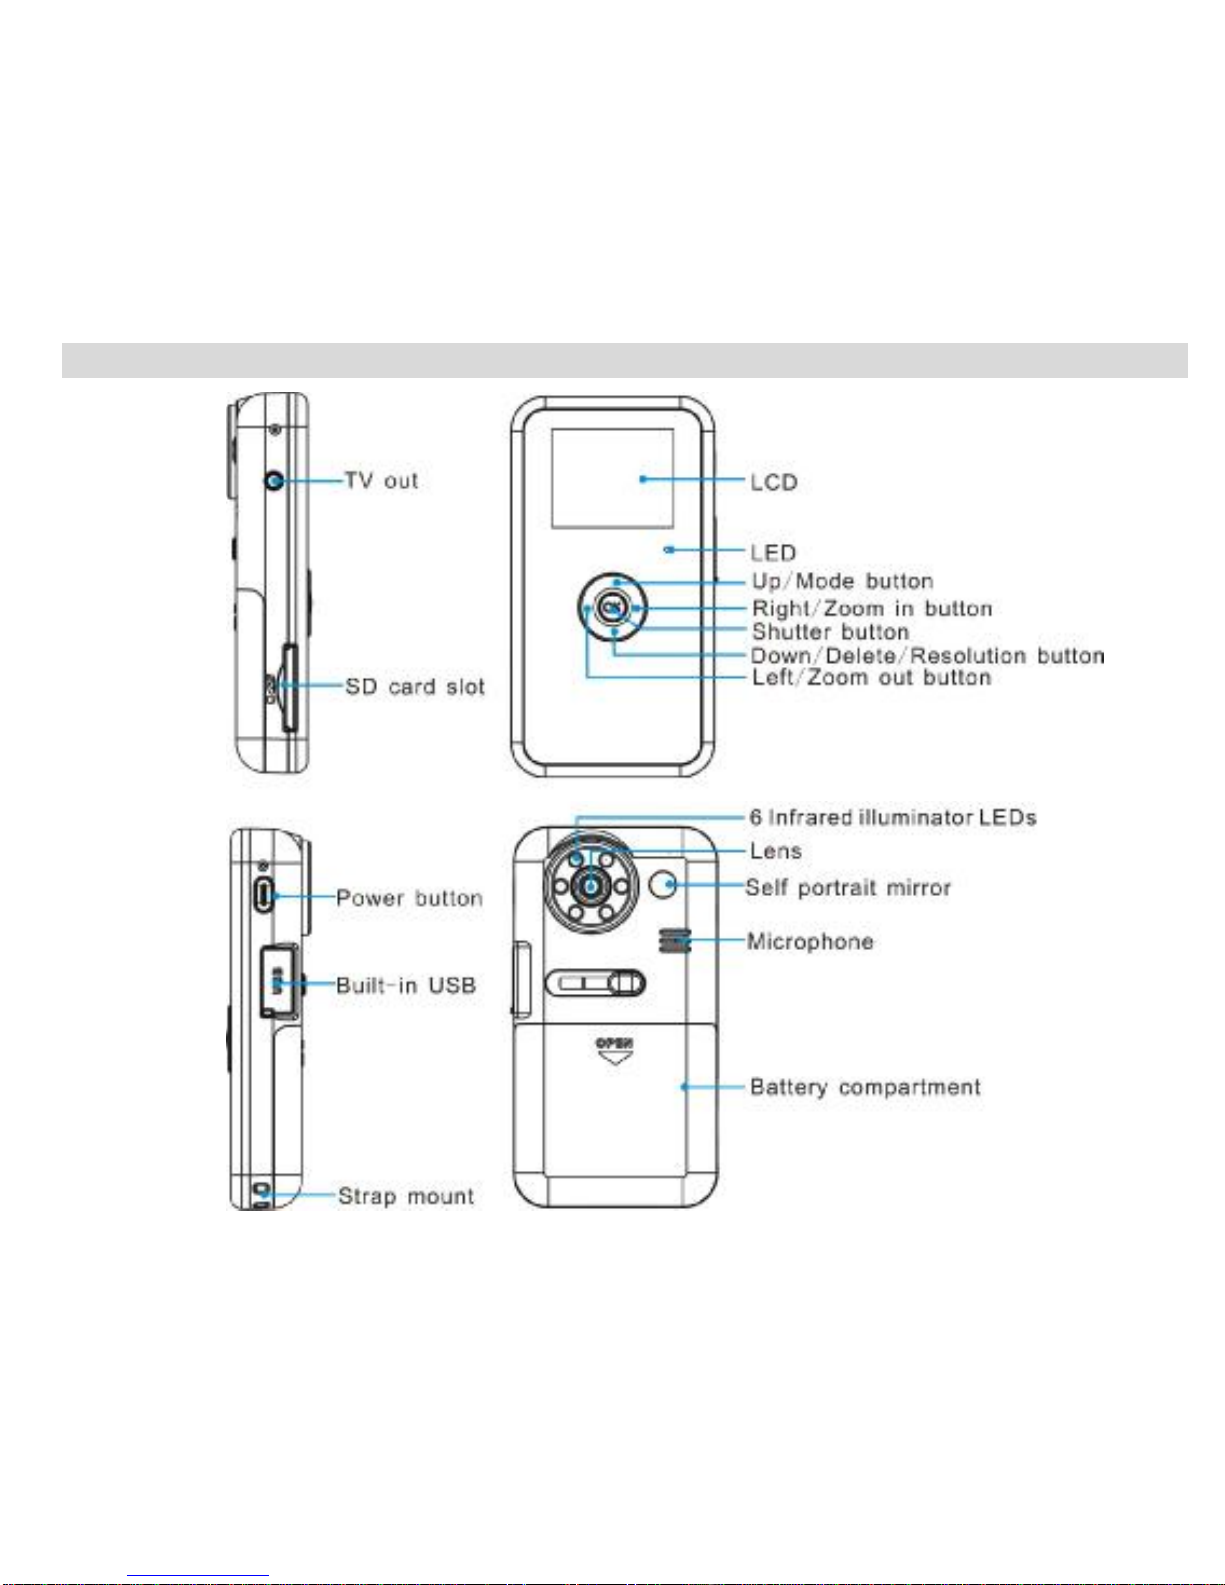
AQuickLookatYourDigital Camcorder...............................................................................................................5
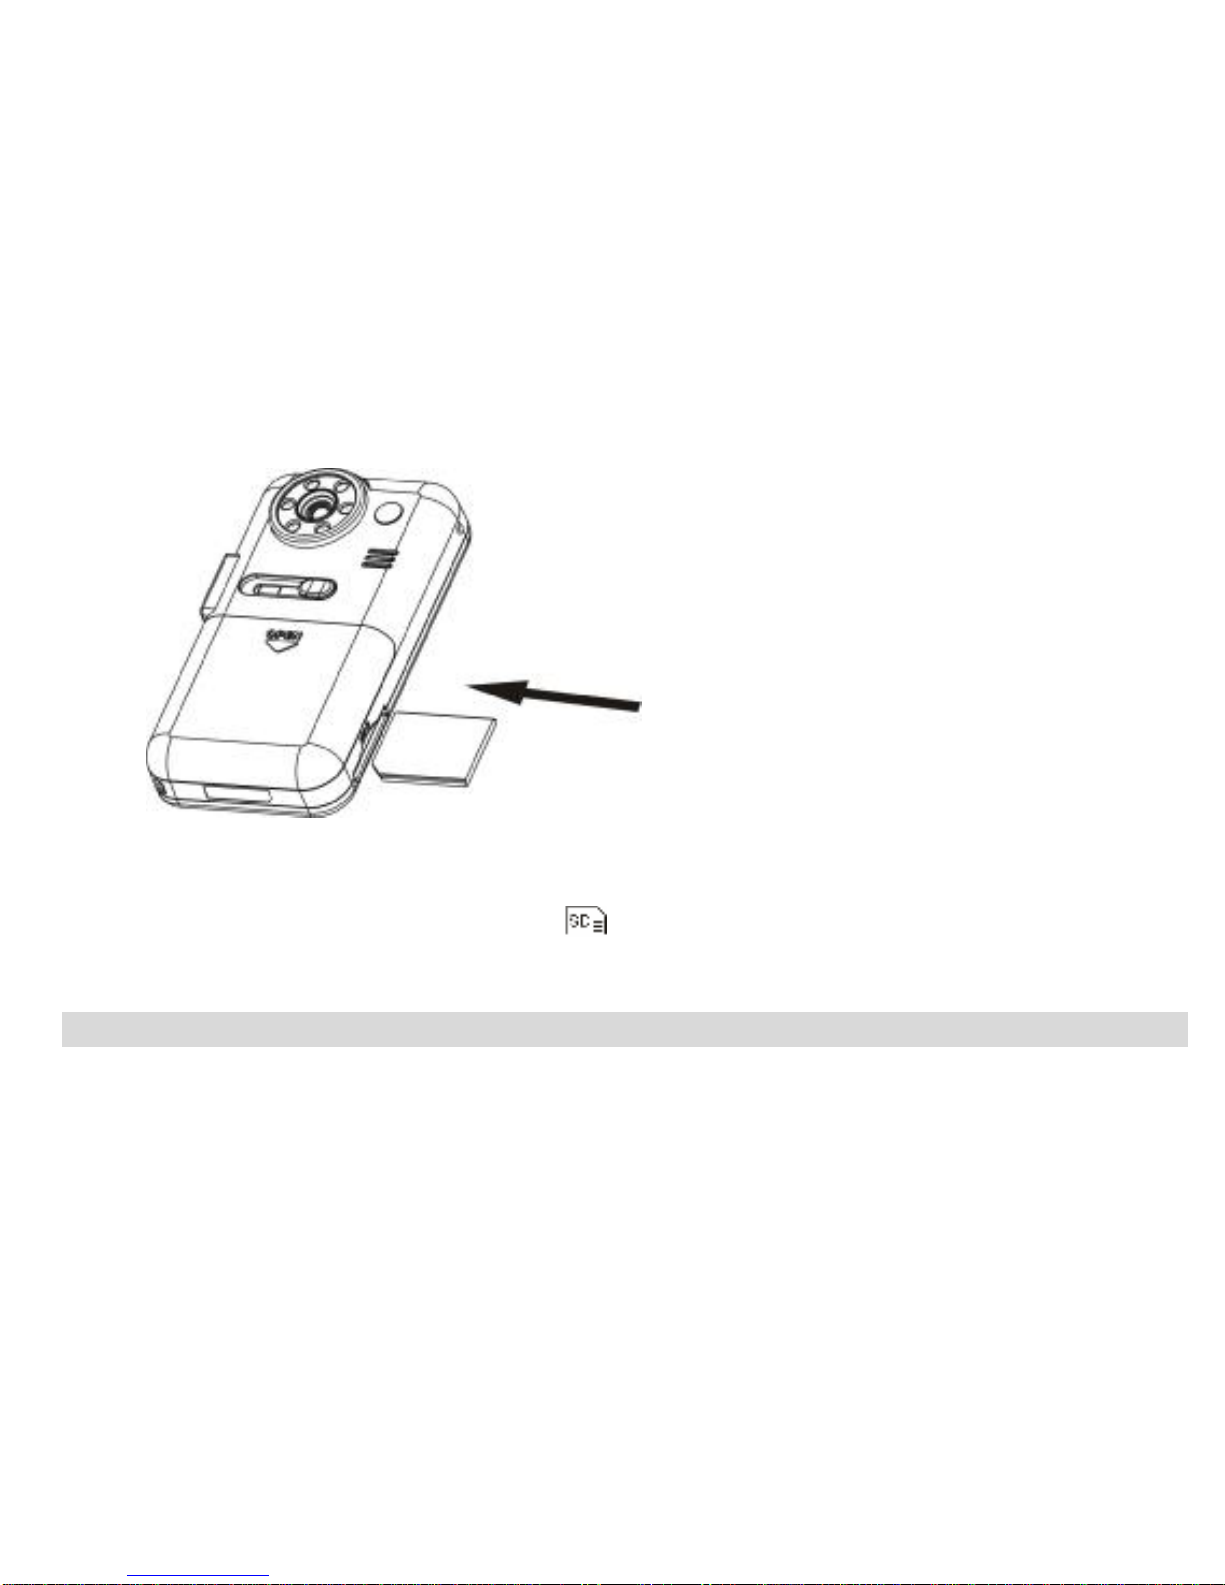
PrepareYourDigitalCamcorderforUse...............................................................................................................6
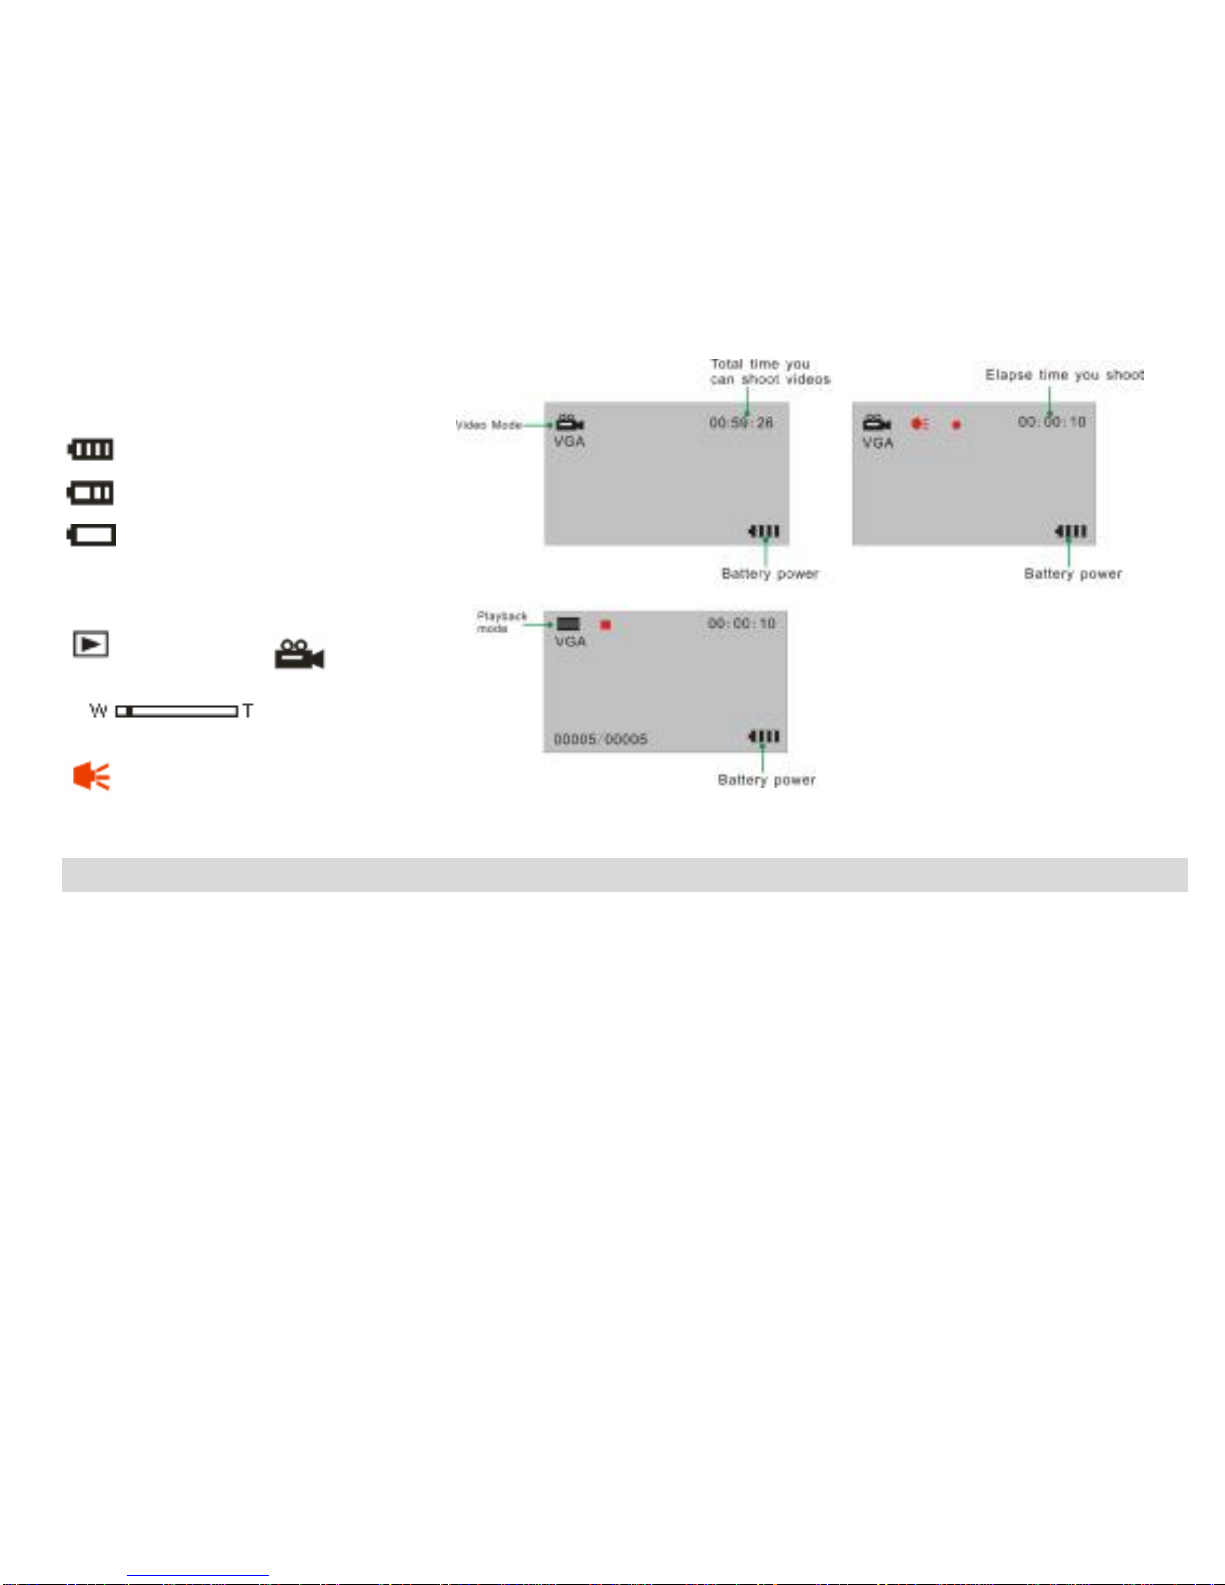
StartingYourDigital Camcorder.............................................................................................................................8
TVout function......................................................................................................................................................11
TransferFilestoYourComputer..........................................................................................................................13
SoftwareInstallation.............................................................................................................................................15
Video impression Application...............................................................................................................................16
Specifications........................................................................................................................................................21

2
Introduction
ThanksforpurchasingthiskindofDigital Camcorder,itnot onlycan shootvideos,and theinternal NandFlash
but alsocan beused asaUdiskforstoreanyformat files. Pleaseread thismanual carefullybeforeusing.
Key Features
ØDigital Video resolution-640x480pixels(VGA),320x240pixels(QVGA).
Ø1.8 LCD screen
Ø8XDigital Zoom
ØInfrared NightVisionfunction
ØInternal NandFlash2GB
ØTVout function
ØSupportexternal SDmemorycardup to4GB
ØVideo impression softwareisatoolforproducing custommoviesand slideshowsusingyourownvideo
clips,andsoundtracks.

3
Whatyourcamcorder included
ØDigital Camcorder
ØOwnerManual
ØTVcable
ØBuilt-inUSB
ØSoftwareCD
Computer System RequirementforWindows2000/XP
TobeabletodownloadvideostoyourPCyou willneed thefollowingminimumconfiguration:
ŸPentiumprocessororabovewithWindows2000, XP
Ÿ128MBRAM,morethan 125MBfree diskspace.
ŸAvailableUSBInterface
ŸCD-ROMDrive
ŸRecommended screenresolution 1024X768pixelsorhigher.
Ÿ16-bitcolororhigherdisplayadaptor.

4
Computer System RequirementforWindowsVista
TobeabletodownloadvideostoyourPCyou willneed thefollowingminimumconfiguration:
ŸWindowsVista
Ÿ800MHzprocessorand512MBofsystemmemory
Ÿ20GBharddriverwithatleast15GBof availablespace
ŸSupport forSuperVGAgraphics
ŸAvailableUSBInterface
ŸCD-ROMDrive
Computer System RequirementsforMacintosh
ŸPowerMacintoshG3500 MHzorhigher
ŸMacOSXversion10.2.6orlater
Ÿ128MBormoreavailablesystemRAM(256MBrecommended),150 MBfree disk space
Ÿ800x600orhigher-resolution monitordisplayingmillionsofcolors
Note: you can justuseMSDC function inMacsystem.

5
AQuick LookatYourDigitalCamcorder

6
Iconson yourLCD screen
Batterypowerlevel
Full batterypower
Mediumbatterypower
Lowbatterypower
Modes
Playback Video
DigitalZoom
Infrared NightVision
Prepare YourDigital Camcorder forUse
BatteryInstallation
YourDigital Camcorderrequires4AAAbatteries,alkalinebatteryisrecommended.Becauseof2GBNand
Flashmemoryisbuiltin,thedatainyourinternal memorywon tbe lostregardless ofanypoweringoffand
batterychanging.
InsertthebatteryintoyourDigital Camcorderasbelow:
1. Slideandopenthebatterycover.
2. Locatethecorrectpolarityinbatterycompartmentandput inthebatteryasthecorrectpositive

7
pole/negativepole.
3. Slideandclosethebatterycover.
Note:
1. Donotmixoldand newbatteries.
2. Donotmixalkaline,standard(carbon-zinc),orrechargeable(nickel-cadmiummetalhydride)
batteries.
3. Pleasetakeawaythebatterywhen you do notuseitforsaving batterypower.
4. The icon will flashontheLCDscreenwhenbatteryinsufficient and it willbeautomaticallypowered
off.
SDcard installation
YourDigital CamcorderhasamemorycardslotthatenablesyoutoinsertanycompatibleSDmemorycardup
to4GB.Adding amemorycardwill allowyoutoincreasethecapacityofyourDigitalCamcorderbeforeyou
havetotransfervideostoaPC.AfteryouinsertaSDmemorycard, thevideo youshootwillbestoredinSD

8
memorycard. Pleasefollowthesteps:
1. Locatethememorycardslot on thesideof yourDigitalCamcorder.
2. InsertthememorycardcorrectlyastheiconshowingneartotheSDcardslot.
3. Press thememorycarduntil you heara “Click”sound,thememorycardwill beflushed withyour
camcordersurface.
Note: Afteryou insertaSDmemorycard,icon will showon theLCD,indicating thatyourSDmemory
cardisinstalled successful,and thevideo youshoot will bestoredonthecard.
Starting YourDigitalCamcorder
Poweron
Press andholdPowerbutton about 3seconds,yourDigitalCamcorderwillsoundabeeptoindicatepoweron.
Poweroff
Press andholdPowerbutton about 3secondstopoweroff yourcamcorder. It willautomaticallypoweroffafter

9
idlefor60secondsorthereisinsufficientbatterypower.
VideoMode
Resolutionsettings
YourDigital Camcordersupports2resolutions-VGA&QVGA,press Delete/Resolution button tochange
betweenthem. VGA/QVGAwillappearon theLCDscreen.
ShootingVideoswithautomaticInfraredNight Vision
TurnonyourDigital Camcorder.ComposeyourobjectwithLCD screen.Press Shutterbuttontostartshooting,
Icon willshowon theLCDtoindicatethattheLEDsthat surroundedthelensoftheCamcorderappeared
red(TheInfrared NightVision function ison)forremovingtheinfrared fromtheimageand producemore
realisticcolors. TheelapsetimewillshowontheLCDscreen,press Shutterbuttonagaintostopshootingand
saveittoAVIfileinthecamcordermemoryorSDmemorycard.Youcan shootabout59minutesAVIin VGA
totallyusinginternal memory.
Note:
1. The InfraredilluminatorLEDswill belightup forassist shooting,butweredarktotheunaided eye.

10
2. YourDigitalCamcorderwill automaticallyadjusttheInfrared NightVision function according totheEV
value.
DigitalZoom
YourDigital Camcordersupports8xdigital zoomfunction,enablesyoutoenlargeyourobjectto8x.
Press Rightbutton tozoomin yourobject,press Leftbutton tozoomback out.
Playback Mode
Youcanplayback,deleteorformat theAVI filesyoushootinthismode.
PlaybackAVI files
Poweron yourcamcorder,press Modebuttontoenterplayback mode, theicon willshowon theLCD.
1.Press Right/Leftbutton toselectafileyouwanttopreview.
2.Press Shutter/OKbuttontoplaytheAVI file.

11
3.Press Shutter/OKbuttonagain tostop.
Delete
Youcandeleteunwanted filesinthismode.
1. Selectan AVI filebypressing Right/Left button.
2. Press Deletebutton.
3. Press Up/Downbuttontoselect:
DeleteOne: deletecurrent fileyouselected.
Deleteall: deleteallfilesinyourcamcorder.
Format:Format yourinternal memoryorexternalmemorycard.
Note: you can press Left/RightbuttontoexittheDeletemenu.
4. Press Shutter/OKbutton.
5. Press Right/Left buttontoselectYes/No.
6. Press Shutterbutton againtoconfirmdeletion.
Note:
1. Formatwilldeletealldatainyourcamcorderwithoutcomeback,pleasemakesurebeforeusing this
function.
2. Press Modebutton toexit totheVideo shootingmode.
3. Youcanpress Deletebuttonrepeatedlytoenterandexit themenu.
TVoutfunction
YourDigital CamcordersupportsTVoutfunction.
YoucanuseanyTVscreen insteadof yourDigital Video LCD Screentoviewyourvideos.
Pleasefollowthebelowsteps:

12
1. Poweron yourDigitalCamcorder.
2. Turnon yourTV.
3. ChangetheTVmodetoPAL/NTSC.
4. ConnectyourDigital CamcordertotheTVwiththeTVcablesupplied.
5. The imagewill nowappearon theTVscreen.
6. Tosee avideo beingcaptured inrealtimeon yourTV,pointtheCamcorderattheobject andbegin
torecordasdescribed intheShootingVideossection above.
7. The imagebeingrecorded appearson yourTVscreen (insteadoftheCamcorder sLCD)
8. YoucanalsousetheTVscreen insteadof yourCamcorderscreen toplaybackandviewyourvideos.
Note:EnsureyourDigital Camcorderhassufficientbatterypowerbeforeusing thisfunction.

13
Transfer FilestoYourComputer
Fordownloadingvideos, youareonlyrequired toconnectyourcamcordertoPC. Yourdigital camcorderhasa
Built-inUSB,youneed:
Note:You havetomakesurethebatterypowerissufficientbeforeconnecting yourcamcorderto PC.
1. Open therubberUSBcover.
2. Press and slidetheUSB out.
3. Connectyourdigital camcordertoPC, “MSDC”willshowon theLCD screen..
4. DoubleclickMYCOMPUTER.
5. DoubleclickRemovabledisk.
6. DoubleclickDCIMfolder.
7. Nowyoucancopyand pastefilestoyourcomputer.
Uploading Video to http://www.youtube.com/
1. ConnectyourDVtoyourcomputer.
2. “MSDC”willappearon theLCD.
3. The Removablediskwindowwillappearon yourPCscreen:
4. Select “Install CameraWeblink”inthefirst timeinstallation.
5. Click “OK”button toinstalltheWeblink,afterinstallation, thewindowwillappearasbelow:

14
6. Click “Yes”button toenterYouTube.comor “No”button toexit.
7. Nowyoucan uploadyourfavoritevideo tothewebviaclickbutton “Upload”on thetop rightside.

15
Note: If yourcomputercan notpop-uptheremovablediskwindow, you can operateasbelowsteps:
1.Open MyComputer/RemovableDisk.
2.Doubleclick toinstallthe “CameraWeblink”.
3. Afterfinishinstallation,then youcan select “Yes”toentertheweb link.
4. Nowyoucan startuploading.
Note:Youcannotentertheuploading modeifyourDVhas no batteryinserted.
Afteryou connected yourDVtoPC,yourDVwillbeautomaticallyturned on,anditwon tbeswitched off when
youpullouttheUSB cable.
SoftwareInstallation
Pleaseput thesoftwareCD inyourcomputer. Choosetherightlanguageperyourrequest. Thiswilllaunchthe
Video impression softwareinstallation. Followthedirectionsappearonyourscreen.
NOTE:
Do notconnecttheDVto yourcomputerduring installingsoftware.

16
Pleasecheckthe “Install DirectX”whichsupportplayingvideofiles.
Ifyourcomputercan tinstall automatically,pleaseinstallmanuallyasthefollowingsteps.
1.PlacetheCD intoyourCD-ROMdrive.
2. ClickrightkeyattheCD-ROMdrive,then click \open\autorun.exe.
3. Followthedirectionsoftheinstallation wizard.
Videoimpression Application
Video impression softwareisatoolforproducingcustommoviesand slideshowsusing yourownvideo clips,
picture, and sound tracks.Thereare6stepstoachieveproducingwonderful movies.
1. Media
1. Onthemaininterfaceofthissoftware, clicktheicon toselectfiles.
2.ToourDV, therearetwowaystogetthevideo clips,audiofiles.

17
Selectfiles directlyfromtheDV
ForyourDV,InPCMode,youselect “Mass Storage”,and then connectDVtoPCwithUSB cable.The
flashmemorywillbeusedasamovableharddisk on yourcomputer, andyoucan select filesfromit.
Selectfiles frommemorycard
Youcanalsoselect filesdirectlyfromamemorycard.
4. Add itemsfromyouralbumstotheStoryboard,and theywill combinetocreateyourfinalmovieorslide
show.
2. Edit
Thisstepisonlyavailableforvideo projectsandnotslideshows. Itletsyou adjustthebrightness andcontrast
ofstillimagesandvideoson theStoryboard.Youcanalsosetthedisplaytimeforstillimagesand"trim"audio
andvideofilestoplayonlythesectionsthatyouwant.

18
3. Effects
Hereyoumayadd specialeffectsthat occurasonecomponent on theStoryboardchangestotheother.You
mayeitheraddthese “transitions”manually,orapplya"theme"toyourentireproject.
4.Text
You can addtexttoanyvideo orstillimageonthe Storyboard.Textcan appearstationaryormoveabout

19
thescreen invariousways. Thisstepisonlyavailableforvideo projects. Meantime, youcan set thefont, size,
color,andshadowoftext.
5. Narrate
Thisstep islabeledas"Audio"when workingon aslideshowproject. Hereyoumayrecordaudiotracksand
addthemtotheStoryboard. You can includeasmanyaudiotracksasyou like,withtwoplayingback
simultaneouslyatanygiventime. Becauseyourvideosmayalreadyhavesound,youmayactuallyhaveatotal
ofthree tracksplaying atonce.
6: Produce
Thefinal step savesyourproject. Whenyou're finished withthisstep,everything on theStoryboard
Table of contents