Acer 7763PA - PalmPro SVGA DLP Projector User manual

PLEASE READ
This manual is provided as a free service
by Projector.com.
We are in no way responsible for the
contents of the manual. We do not guarantee
its accuracy and we do not make any claim
of copyright. The copyright remains the
property of their respective owners.
ABOUT PROJECTOR.COM
Projector.com (http://www.projector.com) is
your review and buying guide resource for
DLP and LCD video projectors.
Visit the site to read the latest projector
news and reviews, read and comment on
projector specifications, download user
manuals and much more.

Downloaded from Projector.com
Digital Multimedia Projector
PalmPro 7763PA/65PA
OPERATING GUIDE
Thank you very much for purchasing this Acer DLP™ Technology Projector.
Please read this operating guide to ensure correct use of the device. After reading this
manual, keep it for future reference.
Outline
This DLP™ Technology Projector can display
various computer signals and NTSC/PAL/SECAM
video signals.
Features
(1) High brightness
(2) High resolution
(3) Compact size, light weight for portability
(4) RGB input terminal
(5) RS232 Communication
(6) Mouse emulation
(7) Complies with VESA DDC1/2B specifications
English I

Downloaded from Projector.com
Copyright
Copyright © 2001 by Acer Communications & Multimedia Inc... All rights reserved. No
part of this publication may be reproduced, transmitted, transcribed, stored in a
retrieval system or translated into any language or computer language, in any form
or by any means, electronic, mechanical, magnetic, optical, chemical, manual or
otherwise, without the prior written permission of this company.
Disclaimer
Acer Communications & Multimedia Inc.. makes no representations or warranties,
either expressed or implied, with respect to the contents hereof and specifically
disclaims any warranties, merchantability or fitness for any particular purpose.
Further, this company reserves the right to revise this publication and to make
changes from time to time in the contents hereof without obligation of this company
to notify any person of such revision or changes.
Fill this in!!
For the convenience of service, record the following
information in the space below. The serial number is
on the back of the product.
Monitor Information
Product Name: 7763PA/65PA
Serial Number:
Date of
Purchase:
Dealer Information
Dealer:
Telephone
Number:
Address:
Caution
TO PREVENT SHOCK, DO NOT OPEN THE CABINET. NO USER –SERVICEABLE PARTS
INSIDE. REFER SERVICING TO QUALIFIED PLUS SERVICE PERSONNEL. AND
PLEASE READ ALL OF THESE INSTRUCTIONS BEFORE YOU OPERATE YOUR
PROJECTOR. SAVE THESE INSTRUCTIONS FOR FUTURE REFERENCE .
Safety Instructions
1. Read all of these instructions before you operate your projector and save for
future reference.
2. The lamp becomes extremely hot during operation. Allow the projector to cool
for approximately 45 minutes prior to removing the lamp assembly for
replacement. Do not operate lamps beyond the rated lamp life. Excessive
operation of lamps beyond rated life could cause them to explode in rare
occasions.
3. Power is still available when the projector is in the standby mode. Never
replace lamp assembly or any electronic components unless the projector is
unplugged.
4. Do not attempt to service this product yourself, as opening or removing covers
may damage the components inside and will void your warranty.
English II
5. Do not place this product on an unstable cart, stand, or table. The product may
fall, causing serious damage to the product.

Downloaded from Projector.com
6. The Standard Remote Control contains a low-power laser that acts as a pointing
device during presentations. The light beam may cause injury if pointed
directly into a person’s eyes.
7. This product is capable of displaying inverted images for ceiling mount
configurations. Please use suitable equipment for mounting the unit and make
sure it is securely installed.
8. Openings in front or at two sides are for ventilation. They must not be blocked
or covered.
9. For ventilation reasons, the fan continues to operate for about 1 minute after
the projector has been powered off. Please do not unplug the power cord until
the fan stops.
10. Do not look straight at the projector lens during operation. The intense light
beam may injure your eyes.
English III

Table of Contents
Introduction..................................................... 1
Projector Features .......................................... 1
Description .................................................. 2
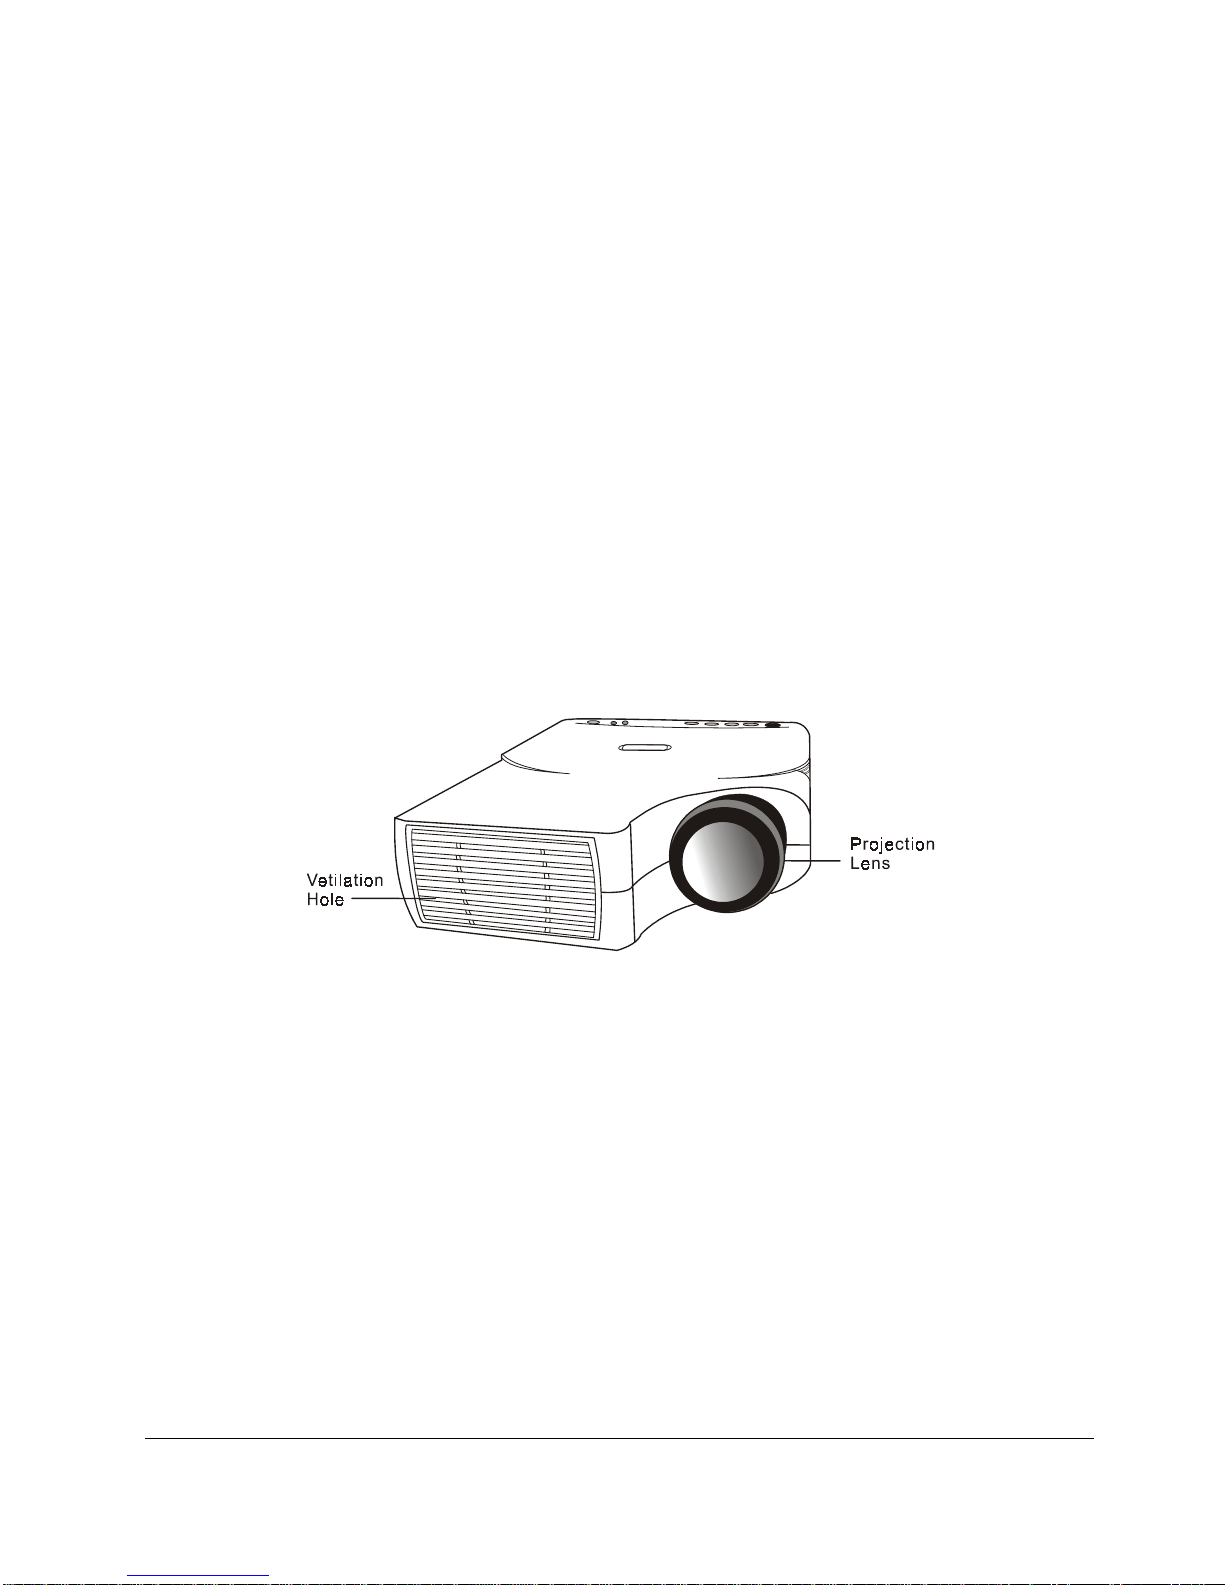
A FRONT (figure) .......................................... 2
B REAR (figure) ........................................... 2
C BOTTOM (figure) ......................................... 4
Installation ................................................. 4
A. Positioning ......................................... 4
B. Adjustable Feet .................................... 4
Moving the Projector ......................................... 5
Accessories .................................................. 6
Connection....................................................... 7
A Connecting the Projector to Computer/Notebook ....... 7
B Connecting the Projector to Macintosh/Power Book .... 8
Operation........................................................ 9
Turn On/Off Procedure ........................................ 9
A Power on ................................................ 9
B Standby ................................................. 9
External Control ............................................ 10
A Control Pad ....................................... 10
B Remote Control .................................... 12
Usage and Replacement of Lamp ............................... 14
A Lamp/temperature Status LED Indicator .................. 15
B Replacing the Lamp ..................................... 17
OSD ......................................................... 20
Main OSD Menu ............................................... 20
A Display Page ...................................... 21
B Image Page ........................................ 22
C Control Page ........................ 錯誤! 尚未定義書籤。
D Source Page ........................................ 24
Other Correspondent Remote Functions and Messages ........... 25
Maintenance and Troubleshooting................................. 27
A Lamp Replacement ................................... 27
B Cleaning the Lens .................................. 27
C Troubleshooting ..................................... 27
Specifications.................................................. 29
A Optical ............................................ 29
B Electrical ......................................... 29
C Mechanical .......................................... 29
D Preset Display Resolution Table ..................... 29
Appendix........................................................ 30
AV Connection Port .......................................... 30
AV Control Pad .............................................. 30
A Connecting the Box ................................. 31
English IV

English 1
A
B
C
D
E
F
Introduction 1
Projector Features
Image Resolution
Fully compatible with true SVGA(63PA)/XGA(65PA), and supports SXGA
using advanced intelligent compression technology. The advanced
intelligent compression technology enables it to present clear
compression SVGA/XGA images without line omission.
Brightness
Provides superior brightness using TI’s Digital Micromirror Device
(DMD) and our own optical design, with a geometric effect that
increases light usage efficiency. By increasing the light usage
efficiency we can better reproduce the three basic colors (RGB)
required for color reproduction on a single DMD.
Portability
This projector has a sophisticated shape, like that of an attaché
case, with a retractable carrying handle that is extremely compact
and lightweight. It helps you make powerful presentations wherever
you go with its 5-pound weight and B5 size.
Keystone
The projection position is already set to the height of the line of
vision; there is no keystone effect. Even when projecting above or
under the height of the line of vision, image distortion (if any) can
be adjusted using the hotkey “KEYSTONE” correction function.
Multilanguage
The OSD (On Screen Display: information screens and menus) in 7
languages (English, French, German, Italian, Spanish, Simplified
Chinese and Traditional Chinese) provides you with additional
information to help you make corrections with OSD operation in your
native languages.
Auto Detect System
This projector can detect display signals from PCs with frequently
used timing automatically or use hotkey “AUTO” to do the optimization
simultaneously. It does not require complicated adjustments in order
to project picture images from PCs.

G
H
A
Ceiling Mount and Rear Screen Projection
The projector is equipped with a full mirror scan conversion function
(vertical/horizontal mirror), which allows the image to be reversed
for ceiling mounting as well as for rear projection applications.
AV box
An AV box is optional, and users can attach one or two to the
projector. Additionally, our AV box video standard is compatible
with:
NTSC U.S. and Canada standard
PAL Western Europe standard
SECAM France and Eastern Europe standard
NTSC4.43 Middle East standard
If users want to watch CATV, AV box will serve the need.
Description
FRONT (figure)
Figure 1 Front view
B REAR (figure)
English 2

Figure 2 Rear view
English 3

C BOTTOM (figure)
Figure 3 Bottom view
Installation
A.
•
Positioning
This projector is basically designed to project on a flat
projection surface. It can focus from 1.5m–14m and adjust the
screen size like figure below.
Figure 4 Positioning
B.Adjustable Feet
Picture tilt and projection angle can be adjusted by twisting
Adjustable Feet. Projection angle can be adjusted 2°to 8.5°degrees
by rotating Adjustable Feet.
English 4

Figure 5 Adjustable feet
Moving the Projector
Use the carrying handle when moving the projector.
Replace the lens cover and rotate the feet fully clockwise (to
shorten the feet) when moving the projector to prevent damage to the
projector.
Caution
The carry bag (supplied) is intended to protect the projector from
dust and scratches on the surface of the cabinet. It is not designed
to protect the projector from external shock.
Do not transport the projector in an unsuitable transport case by
using a courier or transport service. This may cause damage to the
projector.
Figure 6 Moving the projector
English 5

Accessories
Please check and make sure your box contains everything listed below.
If any pieces are missing, contact your dealer.
Please save the original box and packing materials in case you ever
need to ship the unit.
Remote Control
Mac Adapter
15pin D-sub connector
PS/2 Mouse adapter
General cable
ADB Mouse adapter
Serial Mouse adapter
AAA Batteries
Manual
User's manual
Projection
Lens
Figure 7 Accessories
English 6

English 7
A
Connection 2
Connecting the Projector to Computer/Notebook
Figure 8 Connection to PC
Figure 9 Connection to notebook

B Connecting the Projector to Macintosh/Power Book
Figure 10 Connection to Macintosh
Figure 11 Connection to Power Book
English 8

English 9
A
B
Operation
3
Turn On/Off Procedure
Power on
Press the Standby/On key to turn on the lamp. The LED will blink
green during warm up and then light solid green.
"INPUT SIGNAL DETECTED, ACTIVATING AUTO IMAGE" will be
displayed on the screen after the projector has identified
the input signal;
“SEARCHING“ message will be displayed on the screen if there
is no signal input;
“SYNC IS OUT OF RANGE” message will be displayed on the
screen if the horizontal frequency of the input signal
exceeds the range of the projector.
Standby
Press the Standby/On key for 2 seconds to turn off the lamp. The LED
will then blink orange and the lamp will shut down, but the fan will
continue to run for about 1 minute to cool the lamp. After the fan
stops, the LED will turn to a light solid orange.
*Lamp Protection Procedure: If you try to turn on the lamp again
while the LED is blinking, the projector will ignore the command
until it has cooled down for one minute.

MAIN UNIT FUNCTION
AUTO To correct the size and phase of the
projected image automatically.
KEYSTONE + To correct the upper distortion of the
projected image when keystone occurs.
KEYSTONE - To correct the lower distortion of the
projected image when keystone occurs.
MENU To call the OSD menu.
Standby/On To turn the projection lamp on and off.
Standby/On indicator Functions as an indicator showing the
standby status.
Lamp status indicator Lights or blinks when the lamp does not
light.
External Control
A Control Pad
Hotkey
Menu Auto
- Keystone
+ Keystone Stanby/On
Indicator
Stanby/On
Lamp Status
Indicator
Remote
Receiver
Figure 12 Hotkey control pad
Menu operating
When you press MENU button into OSD menu, all hotkeys become menu
operating buttons.
English 10

Figure 13 Menu control pad
MAIN UNIT FUNCTION
Menu To call the OSD menu.
To enter sub pages.
To select items.
4( KEYSTONE+ ) To navigate through sub pages or to increase
the scale bar number.
3( KEYSTONE- ) To navigate through sub pages or to decrease
the scale bar number.
Exit (AUTO) To exit from the current page or OSD menu, and
save setting changes.
English 11

B Remote Control
STMANDBY/ON Laser
Exit
Source
Blank
Freeze
L-Click R-Click
Volume
Mute
Add/Erase
Reverse
Menu
Magnify
Channel down
Channel up
Drag
Return
1 2 3
4 5 6
7 8 9
0 scan
(LED)
Figure 14 Remote control
English 12

Main Unit Function
Standby/On To turn the projection lamp on and off.
Freeze Pressing this button displays a still (frozen)
picture.
Magnify Pressing this button partially magnifies a displayed
picture.
(Move the picture with the Disk Pad after pressing
the Magnify button.)
Disk Pad When the OSD menu is active, Disk Pad acts as
56selecting device. When the on-screen menus are
not active, it works as mouse pad. When the magnify
function is active, use disk pad to move through the
picture.
Menu Call the OSD Menu.
To enter sub pages.
To select items.
Blank The blank screen is displayed by pressing Blank. And
the blank screen will be revealed partially from top
to bottom by pressing Blank again.
Source Selects the input source.
Mute Mutes the sound.
Volume Adjusts volume. The sound gets louder or quieter by
pressing the "+" or "-" button.
Laser Laser pointer on button. Use as a stick (for
indication).
Mouse Left-
Click When operating in mouse emulation mode, it registers
a left mouse click. (bottom button)
Mouse Right-
Click When operating in mouse emulation mode, it registers
a right mouse click.
Exit To leave current OSD Pages.
34Drag To move Left/Right among OSD items.
The remote control allows you to operate the function keys on the projector and to
emulate mouse function when the projector is connected to a computer.
Inserting Batteries in the Remote Control
Be sure to follow instructions in placing batteries into the remote
control units.
Push and slide the lid in the direction of the arrow.
•
•
•
Install two ’AAA’ batteries as indicated inside the battery
compartment.
Replace the lid and snap into place.
English 13

Caution
•
•
Avoid excessive heat and humidity.
Do not mix new and old or different types of batteries.
Figure 15 Battery replacement process
Remote Control Range
The remote sensors are located on the back of the unit. It can
function in a range 50 degrees horizontal and 30 degrees vertical
relative to a line that is a right angle to the remote sensor. The
distance between the remote control and remote sensor must be
shorter than four meters (13 feet).
Figure 16 Range
Usage and Replacement of Lamp
The light source lamp has a limited service life.
The picture will become dark or the color will fade after the lamp
has been used for a long time. In such cases, continued use of the
lamp could cause a malfunction. Replace the lamp with a new one.
English 14

A Lamp/temperature Status LED Indicator
1. Lamp in excess of service hours
When the LED light is a continuous red, it means the lamp has
exceeded (*1500) service hours. After this light appears, it is
advisable to replace the projection lamp as soon as possible.
i. “PLEASE CHANGE A NEW LAMP. AND RESET THE LAMP TIMER” will be
displayed on the screen if the lamp has been operated for 1400
hours (see figure 17).
ii. “PLEASE CHANGE A NEW LAMP. THE POWER WILL TURN OFF AFTER 20
HOURS” will be displayed on the screen if the lamp has been
operated for 1480 hours. The “20” will count down (see figure
18).
iii. “PLEASE CHANGE A NEW LAMP” will blink on the screen together
with a red LED if the lamp has been operated for more than
(*1500) hours (see figure 19). The power will turn off
automatically after 10 minutes. All three of the above messages
will not display for more than 3 minutes, but each message will
be displayed whenever you turn on the lamp.
Figure 17 Lamp replacement warning signal Ⅰ
Figure 18 Lamp replacement warning
signal ⅡFigure 19 Lamp replacement
warning signal Ⅲ
English 15
Other manuals for 7763PA - PalmPro SVGA DLP Projector
1
This manual suits for next models
1
Table of contents
Other Acer Projector manuals

Acer
Acer X127H User manual

Acer
Acer H5370BD User manual

Acer
Acer P5270 - XGA DLP Projector User manual

Acer
Acer X1270 Series User manual

Acer
Acer K520/H112/PH-X01 Series User manual

Acer
Acer P1273 Series User manual

Acer
Acer PD726 Series User manual

Acer
Acer S5201M Series User manual

Acer
Acer X138WH User manual

Acer
Acer A1P1901 Series User manual