ACONATIC 43HS521AN User manual

说明书内容见下页。
A5(143x210mm)
TCL多媒体 SCBC(战略客户业务中心)
设计中心-平面设计室
物料编码
物料名称 说明书
资料更新履历
销售型号
销往地
制作要求
尺寸
材质
颜色
要求
备注:
品牌
机型/机芯 BOM
/批次
是否折
叠或装
订要求
平面设计制作规范表
是否送样
基本内容
工艺或使用方法
业务/DQA
会 签
制作人
平面审核 硬件会签
结构会签
软件会签
制作日期
刘德勇 2019.07.22
72-43D190-X84Z1
MICROMAX
E7-43D190YY-TH0
43D1901 3RT841B1T2B
43HS521AN
否
white word on the
black background
(白底黑字。)
80G paper
(80克书写纸)

OPERATION MANUAL
43HS521AN

3.Do not install this equipment in a confined or building-in space such as a book case or similar unit, and remain a well
ventilation conditions at open site. The ventilation should not be impeded by covering the ventilation openings with
items such as newspaper, table-cloths, curtains etc.
4.Please refer the information on exterior bottom enclosure for electrical and safety information before installing or
operating the apparatus.
6.To reduce the risk of fire or electric shock, do not expose this apparatus to rain or moisture. The apparatus shall not
be exposed to dripping or splashing and that objects filled with liquids, such as vases, shall not be placed on apparatus.
7.The battery (battery or batteries or battery pack) shall not be exposed to excessive heat such as sunshine, fire or the like.
5.The mains plug/appliance couple is used as disconnect device, the disconnect device shall remain readily operable.
WARNING
This lightning flash with arrowhead symbol within an equilateral triangle is intended to alert the user to the presence
of non-insulated “dangerous voltage” within the product's enclosure that may be of sufficient magnitude to constitute
a risk of electric shock.
1.To reduce the risk of electric shock, do not remove cover (or back) as there are no user-serviceable parts inside. Refer
servicing to qualified personnel.
IMPORTANT SAFETY INSTRUCTIONS
2.The exclamation point within an equilateral triangle is intended to alert the user to the presence of important operating
and maintenance instructions in the literature accompanying the appliance.
ATTENTION: RISQUE DE CHOC ELECTRIQUE-NE PAS OUVRIR
8.Never place a television set in an unstable location. A television set may fall, causing serious personal injury
or death. Many injuries, particularly to children, can be avoided by taking simple precautions such as:
- Using cabinets or stands recommended by manufacturer of the television set.
- Only using furniture that can safely support the television set.
- Not placing the television set on tall furniture (for example, cupboards or bookcases) without anchoring
both the furniture and television set to a suitable support.
- Not placing the television set on cloth or other materials that may be located between the television set and
supporting furniture.
- Educating children about the dangers of climbing on furniture to reach the television set or its controls. If your
existing television set is being retained and located, the same considerations are above should be applied.
9.No naked flame sources, such as lighted candles, should be placed on the apparatus.
10.Keep a minimum distance of 5 cm around all edges of the display for sufficient ventilation.
Correct Disposal of this product. This marking indicates that this product should not be disposed with
other household wastes throughout the EU. To prevent possible harm to the environment or human health
from uncontrolled waste disposal, recycle it responsibly to promote the sustainable reuse of material
resources. To return your used device, please use the return and collection systems or contact the retailer
where the product was purchased. They can take this product for environmental safe recycling.
Notes for battery disposal
The batteries used with this product contain chemicals that are harmful to the environment. To preserve our
environment, dispose of used batteries according to your local laws or regulations. Do not dispose of batteries
with normal household waste. For more information, please contact the local authority or your retailer where
you purchased the product. All trademarks are the property of their respective owners and all rights are
acknowledged.
This equipment is a Class II or double insulated electrical appliance. It has been designed in such a way
that it does not require a safety connection to electrical earth.
To prevent the spread of fire, keep candles or other open flames away from this product at all times.

3
Chapter 1: Introduction
Chapter 3: Initial Setup
4
4
4
4
4
4
4
5
6
7
8
Precautions .................................................................................................................................................
Product ........................................................................................................................................................
Power and Plug ...........................................................................................................................................
Power Cord and Signal Cable .....................................................................................................................
Use Environment .........................................................................................................................................
Cleaning ......................................................................................................................................................
Hanging the TV Set on the Wall ..................................................................................................................
Buttons on the TV .......................................................................................................................................
Sockets .......................................................................................................................................................
Remote Control Functions ..........................................................................................................................
How to Pair Remote Control with the TV......................................................................................................
Chapter 2: General Operation
9
9
10
Switching on ...............................................................................................................................................
Switching off ...............................................................................................................................................
Network connection ....................................................................................................................................
Chapter 5: Using your TV
Google Initial Setup.....................................................................................................................................
Accessing channels ....................................................................................................................................
Watching connected devices ......................................................................................................................
Volume.........................................................................................................................................................
Using Quick Access Menu...........................................................................................................................
Using System Settings................................................................................................................................
Channels Setup ......................................................................................................................................
Picture & Display ....................................................................................................................................
Chapter 6: Other Information
Technical Specification ..............................................................................................................................
Chapter 4: Home Features
Homepage Operation .................................................................................................................................
Sound ...................................................................................................................................................
14
14
14
14
15
16
14
16
TV Initial Setup............................................................................................................................................
13
11
12
Smart Zone ...........................................................................................................................................
System ....... ...........................................................................................................................................
17
17
18
19
20
19
18
Multimedia...................................................................................................................................................
Troubleshooting .........................................................................................................................................
Base Installation ........................................................................................................................................
Attention and Frequently Asked Questions ................................................................................................
Display & Sound ......................................................................................................................................
TV ............................................................................................................................................................ 14
15
External Input.......................................................................................................................................... 15

4
Precautions
Product
Read all of the instructions before operating the set.
Keep these instructions well for future use.
Do not block or cover the ventilation openings on the
back cover.
Do not push objects of any kind into this unit through
the cabinet slots as they could touch the current
carrying parts or short-circuit parts, resulting in fire,
electric shock, or damage to the unit.
Do not attempt to open the cabinet as this may cause
damage. There are no parts inside you can service by
yourself. Refer all servicing to qualified personnel.
Do not touch the screen surface with fingers as this
may scratch or mar the TV screen.
Do not impact the TV screen with hard pressure as
this may damage the TV screen severely.
Cleaning
Dust the set by wiping the screen and the cabinet with
a soft, clean cloth or some special liquid cleaner.
Do not apply excessive force to the screen when
cleaning.
Do not use water or other chemical cleaner to clean the
screen as this may damage the surface of the TV
screen.
Unplug the set under the following conditions:
- If the set will not be used for a long period of time.
- If the power cord or the power outlet/plug is damaged.
- Follow the instructions to install and adjust the
product. Adjust those controls that are covered in this
operating instructions as improper adjustment of other
controls may result in damage. If this happens, unplug
the set and refer to the service personnel.
- If the set is subject to impact or has been dropped to
have the cabinet damaged.
Power and Plug
Do not allow anything to rest on or roll over the power
cord and the signal cable.
Protect the power cord and the signal cable from being
trampled.
Do not overload the power cord or the power outlet.
Do not expose the power cord and the signal cable to
moisture.
Power Cord and Signal Cable
Do not place the set on an unstable cart, stand, or table.
Place the set on a place that allows good ventilation.
Do not use the set near damp, and cold areas. Protect
the set from overheating.
Keep the set away from direct sunlight.
Apparatus shall not be exposed to dripping or splashing
and no objects filled with liquids, such as vases, shall be
placed on the apparatus.
Do not use the set near dust place.
Use Environment
Hanging the TV Set on the Wall
Warning: This operation requires two people.
To ensure a safe installation, observe the following safety
notes:
Chapter 1
Note:
Illustrations within this publication are provided for
reference only.
All other safety instructions about our TV sets are also
applicable here.
Check that the wall can support the weight of the TV
set and wall mount assembly.
Follow the mounting instructions provided with the wall
mount.
The TV set must be installed on a vertical wall.
Make sure to use only screws suitable for the material
of the wall.
Make sure that the TV set cables are placed so that
there is not danger of tripping over them.
5
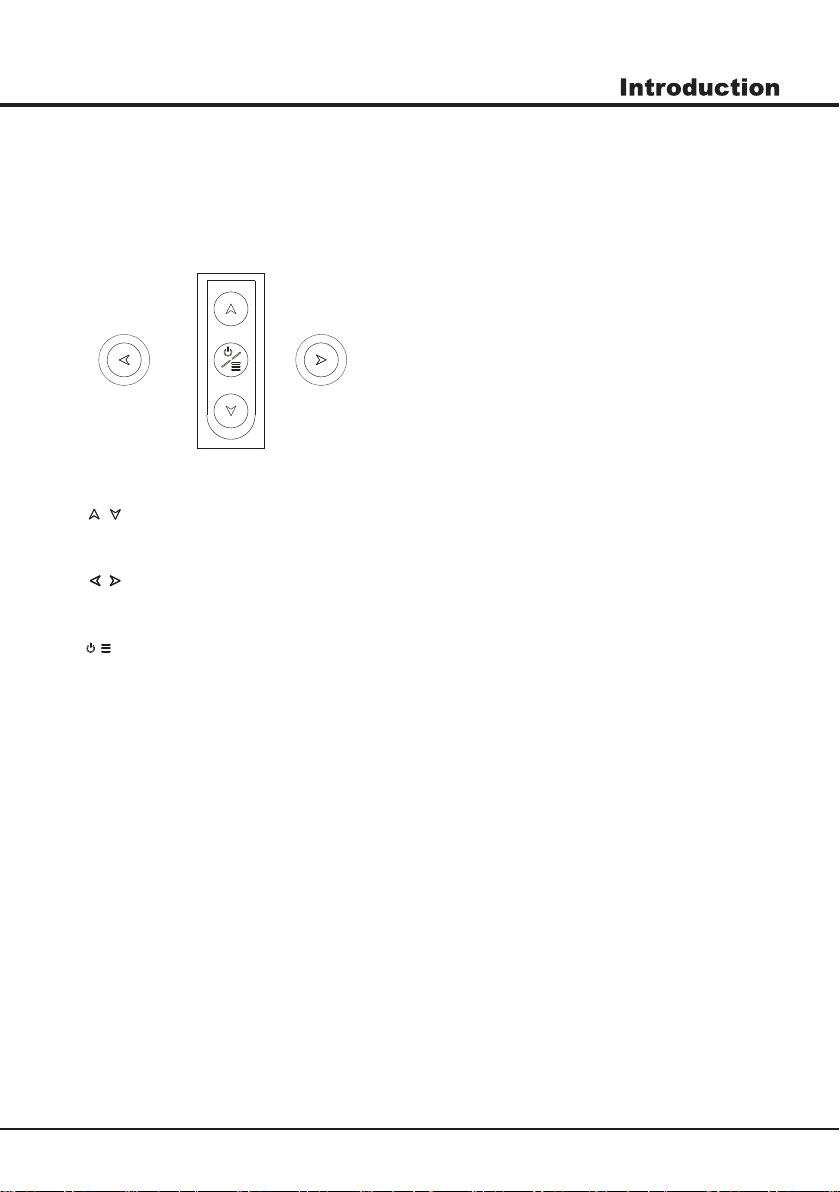
Buttons on the TV
Note: The location and names of the function buttons and power button on the TV may vary according to TV model.
And some buttons may not available for some models.
2. \ button
Increases/decreases the volume.In the menu system,they act like the right/left direction buttons on the
remote and adjust menu controls.
1. \ button
Scans up/down through the channel list. In the menu system, they act like the up/down direction buttons on the
remote and adjust menu controls.
/button
Turns the TV on or standby.The TV is on,press it, brings up the main menu or press to return to the previous menu.
Before enter menu, long press it for three seconds to display the Source Select.
3.
Note:The location and names of the function buttons and power button on the TV may vary according to TV model.

6
ANTENNA/CABLE IN
ANTENNA/CABLE IN socket (input)
Lets you connect a coaxial cable to receive the signal from your antenna, cable,
or cable box.
HDMI
EARPHONE/HEADPHONE socket (output)
Allow you to connect earphones to listen to the sound coming from the TV.
Note: Excessive sound pressure from earphones can cause hearing loss.
EARPHONE/HEADPHONE
USB
HDMI socket (input)
The HDMI (High-Definition Multimedia Interface) socket can be used to connect a
PC with a compatible video card installed, certain DVD players or a high-definition
compatible digital satellite decoder.This socket provides an uncompressed digital
connection that carries both video and audio data by way of an integrated mini-plug
cable.
Note: Only HDMI sockets with the MHL identification will support the MHL function,
MHL stands for Mobile High-definition Link, and allows you to link an MHL-capable
mobile device to the television.
USB sockets (input)
These sockets can be used to connect an USB device.
Note: The number of USB sockets on the TV may vary according to TV model.
Sockets
Note: The location and names of the sockets on the TV may vary according to
TV model, and some sockets may not available for some models.
LAN/RJ45 RJ45 plug for connecting to external modem or network access equipment.
LAN/RJ45
AV audio + video mini sockets (input)
AV IN
VIDEO
R
L
AUDIO
The AV IN sockets can be used to connect a range of equipment, including
video recorders, camcorders, decoders, satellite receivers, DVD players, or
games consoles. The VIDEO IN socket provides composite video connection.
OPTICAL OUT OPTICAL OUT socket
This output can be used to connect a compatible digital audio receiver.

7
Remote Control Functions
Most of your television's functions are available on the menu that appear on the screen. The remote control
supplied with your set can be used to navigate through the menus and to configure all the general settings.
Note: The location and names of the buttons on the remote control may vary according to TV model, and not
all buttons available on all models.
FAV LIST
/
AD
SSMMAARRTT
To enter Homepage.
Enter into Quick Access Menu.
Goes tothe Google App Drawer.
Standby / Power On.
To enter SMART function interface.
To select audio language available for selected digital TV program.
To select the previous or the next photo, music or video.
To exit menu,interface and running APP.
Enter into Using TV System menu.
/
AD
To select a sound type available for selected analogue TV program;
to select an audio language available for selected digital TV program.

Introduction
8
Step 1: Press button to enter the home page.
Step 2: Press button to enter the “RC pairing”.
Step 3: Follow the “Settings tips page”,Press OK and together.
Step 4: The screen will display “Pairing...”, Pair finished the screen will
display “Success!”.
NOTE:If you wait more than 2 minutes and it can’t pair,
please repeat the above steps for pairing again.
If you want to unpair the Bluetooth remote, As follow:
Step 1: Press button to enter the home page.
Step 2: Press to choose ,and then press OK to enter.
Step 3: Press to select “Remotes & Accessories” and then to chooe
the Bluetooth remote name to enter next steps.
Step 4: Press unpair and then choose OK button.
How to Pair Remote Control with the TV
This is a Bluetooth remote control, and before using it,
please pair it with the TV firstly.The following steps are for
your reference:
▲/▼ ◄/►
HOME
HOME
.
Remote Control Functions
Most of your television's functions are available via the menus that appear on the
screen. The remote control supplied with your set can be used to navigate through
the menus and to configure all the general settings.
POWER
(On/Off button) Turns the TV on or off.
(up, down, left and right direction buttons) Highlights different items
in the menu system and adjusts the menu controls.
OK Confirms your selection.
Exit the menu and return to the previous menu.
Goes to the smart TV homepage.
Scans up or down through the current channel list.
Increases or decreases the TV's volume.
+/-
To enter source selection interface.
(Mic)Click to interact with Google Assistant of the TV.
(Available only when the network connection is normal.)
To mute and un-mute the sound.
Enter into Using TV System menu.
To enter SMART function interface.
Enter into Quick Access Menu.
Goes to the YouTube homepage.
Goes to the Google App Drawer.
To Enter into virtual keyboard.
9
Switching on
Follow the instructions on this page on how to switch on your TV set and the remote
control before going on to following pages describing how to use the channel set-up
procedure.
1. Insert two batteries in the remote control.
Precautions on using batteries:
- Only use the battery types specified.
- Make sure you use the correct polarity.
- Do not mix new and used batteries.
- Do not use rechargeable batteries.
- Do not expose batteries to excessive heat such as sunshine, fire or the like,
throw them in a fire, recharge them or try to open them, as this could cause
them to leak or explode.
- Remove the batteries from the remote control if you are not using it for a long
period of time.
3. Connect an outside aerial to the ANTENNA IN socket at the back of the TV set.
4. When powered on, the TV will be turned on directly or be in standby.
Note: For some models, switch the TV on by pressing the power button.
If the power indicator lights up, the TV set is in standby mode. Press the
button on the remote control or on the TV set to turn on the TV.
2. Connect the power cable FIRST to the television, THEN to a mains socket.
(Note: If the power cable is connected to the television, please only connect the
power cable to the mains socket.)
If your TV is connected to an AC supply
Your TV set should only be connected to an AC supply. It must not be connected
to a DC supply. If the plug is detached from the cable, do not, under any
circumstances, connect it to a mains socket, as there is a risk of electric shock.
If your TV is connected to a DC supply
Your TV set should only be connected to a DC supply. It must not be connected
to a AC supply. If the plug is detached from the cable, do not, under any
circumstances, connect it to a mains socket, as there is a risk of electric shock.
Switching off
To put the TV set into standby mode, press the button on the remote control
or on the TV, the TV set remains powered up, but with low energy consumption.
To switch off the TV set, unplug the mains socket from the mains outlet.
Note: For some models, press the power button to switch off the TV set .
Chapter 2
10
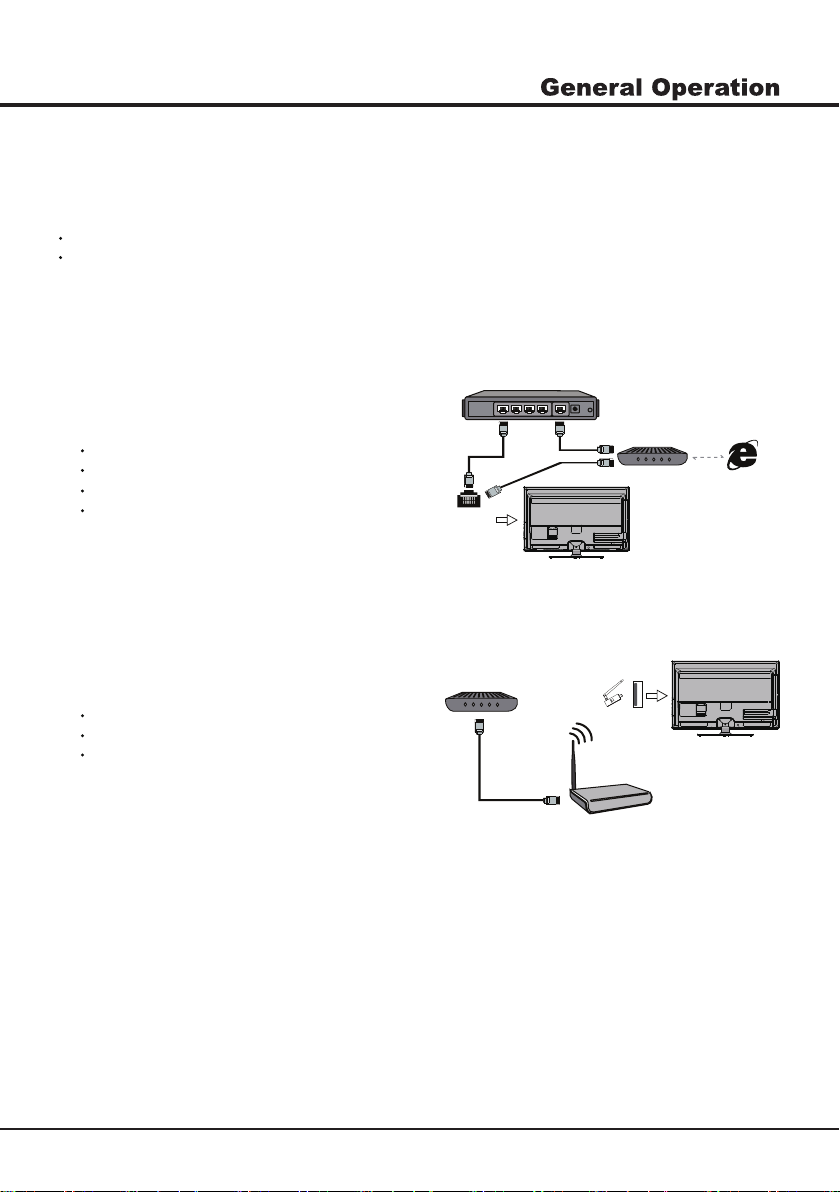
Network Connection
To access the internet, you must subscribe high speed broadband internet service from your internet service provider.
Your TV can be connected to your home network in two ways:
Wired, using the RJ45 (LAN) connector on the back panel.
Wireless, using the internal wireless or external wireless USB adapter and your home wireless network.
ModemInternet
TV Set
Router
Ethernet
Port on the
back panel
or
Wireless
USB Adapter
Wireless Router
Modem
USB
port on the
back panel
TV Set
Connecting to a wired network
To connect to a wired network:
1. Ensure you have:
An ethernet cable long enough to reach your TV
A router or modem with an available Ethernet port
A high-speed internet connection
An Ethernet (LAN) port on the back of the TV
2. Connect your ethernet cable to the router and to the
Ethernet port on the back of the TV.
3. Use the Network Settings to configure the TV.
Connecting to a wireless network
To connect to a wireless network
1. Ensure you have:
A router broadcasting a high-speed wireless signal
A high-speed internet connection
A wireless USB Adapter (not need for a built-in
wireless connection).
2. The TV set with Wi-Fi Module.
Note: Some models may have internal wireless module,
then the wireless USB adapter is unnecessary. Some
external wireless adapters cannot be campatible with
the TV.
3. Use the Network menu to configure the TV.
Note: This function is not available for certain models. Instructions below are just the usual ways to connect your TV
to the wired or wireless network. The connection method may be different depending on your actual network
configuration. If you have any questions about your home network, please refer to your ISP (Internet Service Provider).
Chapter 3
11
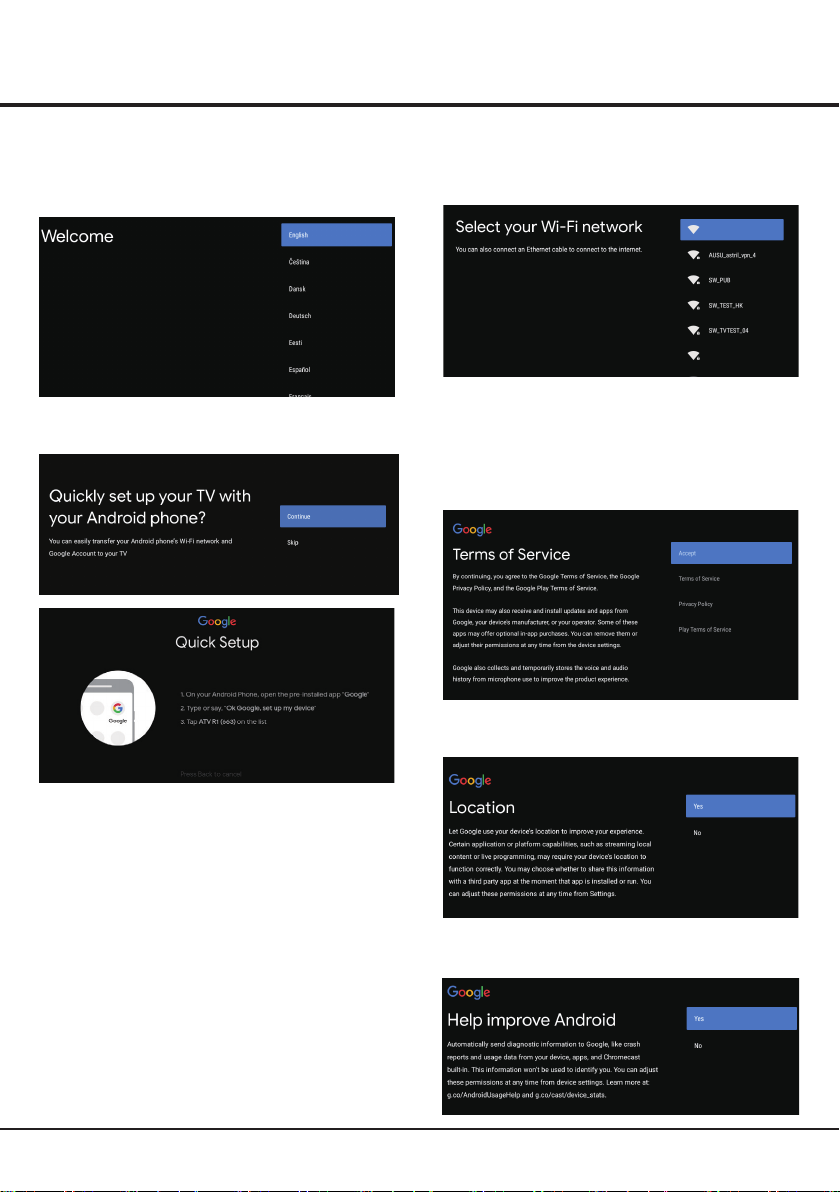
Initial Setup
Step 6: Select whether or not to allow Google to help
improve your Android TV.
Step 3: Select whether or not to connect your TV set to
the WLAN network.
Note: If you have connected the TV to the WI-FI network,
it will check for updates like Google service updates and
so on. Then please select whether or not to sign in to your
Google account.
WIFI
WIFI
Step 4: Read to accept the Google terms of service and
privacy policy.
Step 5: Select whether or not to let Google or third party
to use your TV location.
Google - Initial Setup
When you turn on the TV for the first time,there will show
a wizard to guide you to finish the following initial settings:
Step 1: Select the menu language as you need.
Step 2: (Only for some countries) Select whether or not
to use and Android device to setup the TV.
Note: If you don’t want to use your Android device to
setup the TV,you will skip to Step 3.If you want to use
your Android device to setup the TV, please turn on the
Bluetooth functions of your Android phone, then find and
open “Google” application on your phone. Follow the
instruction tips to set device.
12
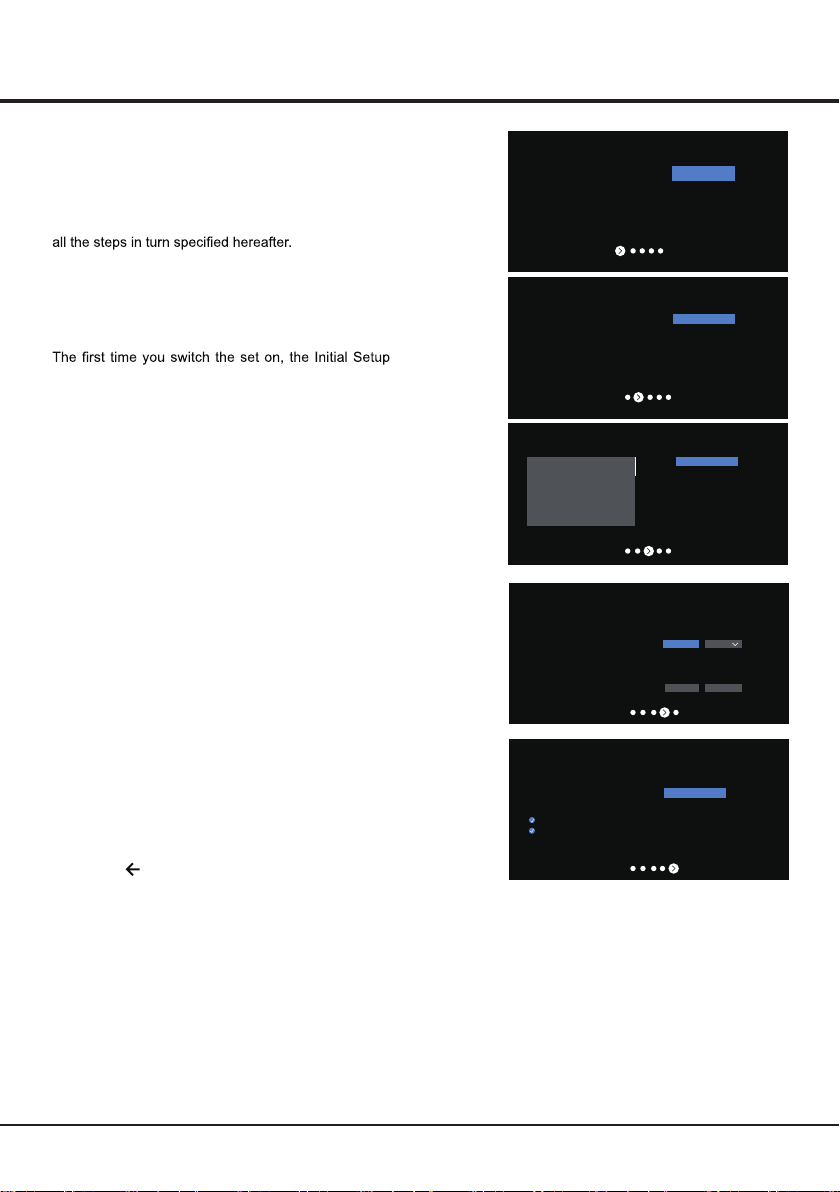
Initial Setup
TV - Initial Setup
Initial setup involves selecting all the settings required
to be able to search for and store all the analogue
channels you can receive.
Make sure that the television is switched on and follow
Note: If the channel search retrieved only few
channels it could be caused by poor broadcasting
and therefore is not coverd by manufacturer
warran t y. Manufacturers cannot b e h e l d
responsible for lack of or poor broadcasting in
some areas.
wizard opens, which guides you through the initial
setup process.
Step 2: Were are you?
Press ▲/▼ to select your Country/Region.Press to
comfirm and move to next step.
OK
Note: Picture menu settings will not be accessible
when you select Shop Mode.
Home Mode: You Would be able to view the standard
settings for Picture and sound modes.
Shop Mode: You can enjoy enhanced setting for Picture
and Sound modes.
Step 1: Environment
Press ▲/▼ to select your environment.Then press to
enter next step.
OK
Step 3: Terms & Conditions
Use ▲/▼ toread Terms & Conditions,then press OK to
comfirm and move to next step.
Step 4: Channel installation
Use ▲/▼ toselect Tunner mode:Antenna,Cable or Satellite;
Type:Digital,Analogue and All,then press OK to comfirm and
move to next step.
Step 5: Please check settings
When all setup is done, the [Please check settings] interface
displays on the screen, and press OK to finish the initial setup.
You can also go back to former step and make any changes
by using button.
Country/Region INDIA
Environment Home
Step 1:
Step 2:
Step 3:
Step 4:
Step 5:
Home
Shop
12345
Next
Environment
Please choose your Environment:
Home
Shop
Shop with demo
Where are you?
We will provide you with the local time,climate
and more information.
Country/Region
THAILAND
TURKEY
TURKMENISTAN
UNITED ARAB EMIRATES
UZBEKISTAN
Next step is to represent you have read and agreed.
Terms & Conditions
Please read the terms & conditions and agree.
Terms and Conditions
The contents and services (collectively the
“Licensed Application”) made available to you
through this TV set (this “Device”) are licensed, not
sold, to you for use only under these terms and
conditions. The providers of the Lisensed Application
(each an “Application Provider”) reserve all rights not
expressly granted to you.
1.Scope of License
The license granted to you for a Licensed
Application by the relevant Application Provider
is limited to a non-transferable license to use the
Licensed Application on the Device that you own or
NEXT
Channel installation
Tuner mode
Antenna
Cable
Type
Digital
Scan Skip
Please verify settings in system settings.
Please check settings
NEXT

13
Note: This manual is for common use. Figures and illustrations in this User Manual are provided for reference only
and may differ from actual product appearance. And for some models, certain options are not available.
You can select all the features from homepage.
Press to display homepage.
Press ▲/▼/◄/►to select icons from the screen list.
Press OK to enter each option.
To exit the menu, press .
Homepage Operation
Chapter 4 Home Features
Youtube: Browse this application to watch a wide variety of online videos.
CUSTOMISE CHANNELS
Add and remove channels from your Home screen
7. Featured: Show the list of featured contents from Google Play Movies & TV.
8. CUSTOMISE CHANNELS: Add and remove channels from your Home screen.
14
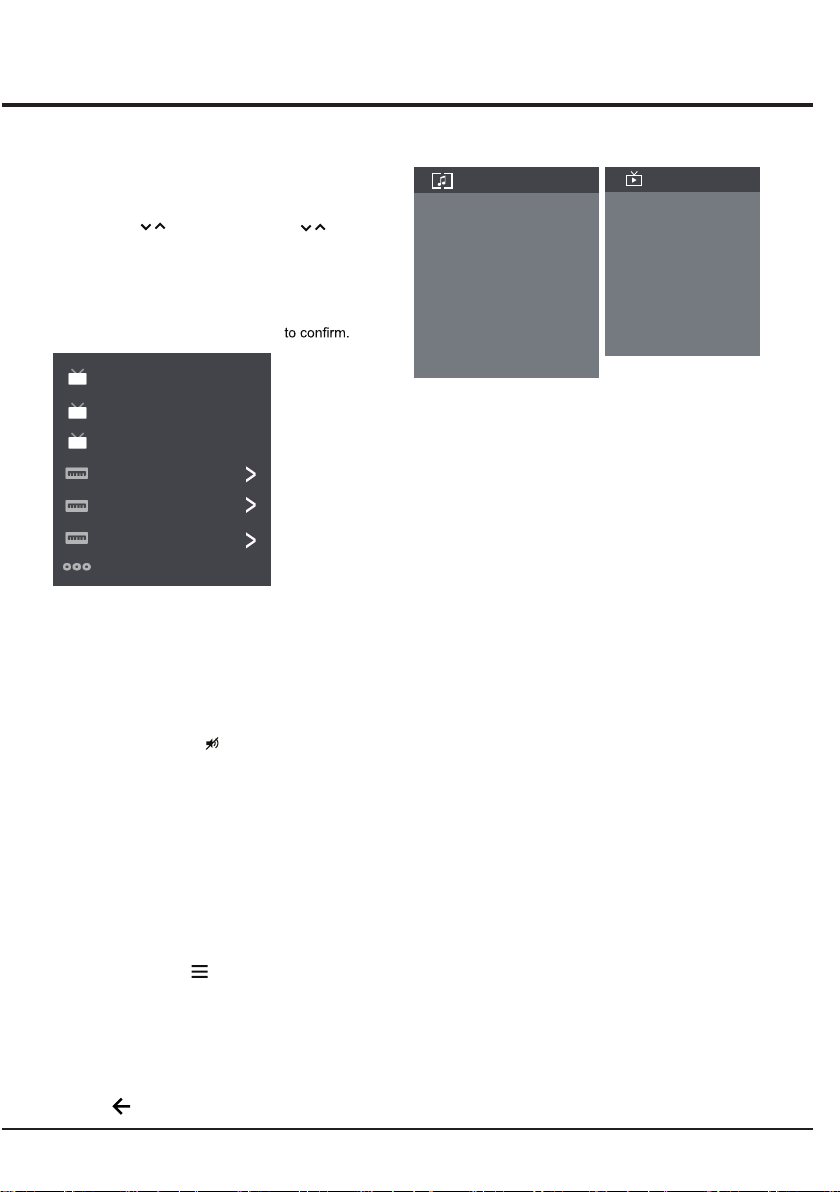
Watching connected devices
Press SOURCE then press to select your
desired source, and then press OK
Accessing channels
Using the numeric buttons:press the corresponding
numeric buttons on the remote control to access the
channels.
Using the buttons:press the buttons on
the remote control or the corresponding buttons on the
TV set to scroll through the channels.
CH / CH /
Using your TV
▲/▼
Using Quick Access Menu
Note: Some of the functions might be unavailable
in certain sources. And for some models, certain
options are not available.
This section explores the menus and settings of your
TV. Each menu is outlined and detailed to help you get
the most from your TV. To access the menu system:
1. In TV mode, press on the remote control to
display the quick access list.
2. Press ▲/▼ to select the desired item, then press
OK to open the corresponding submenu.
3. In submenu, use ◄/► and OK buttons to make
the adjustments, or use ▲/▼ to select an item, use
OK/►to enter and operate according to the on-
screen display or guide.
4. Press to return to the previous menu.
.
Chapter 5
Volume
Volume control: press the VOL +/- buttons on the
remote control or the corresponding buttons on the TV
set to increase or decrease the volume.
Sound mute: press the button to temporatily mute
the sound. Press this button again or the vol + button
to restore the sound.
ATV
Cable
ANTENNA
HDMI 1
HDMI 2
HDMI 3
AV
Info:Select this option to view TV infomation.
Picture Off: Select this option to enter into Audio Only
mode.
Picture adjustments: Enter to ajust picture mode or
Advanced settings.
Screen: Select this option to ajust the picture size.
Sound adjustments: Select this option to set the sound
adjustments.
Speakers:To enter TV speaker settinghs.
HDMI Settings:Enter to set up HDMI devices for
streamlined control.
Display & Sound
Info
Picture Off
Picture adjustments
Screen
Speakers
Sound adjustments
HDMI Settings
Watch TV
Audio Language
Add to Favorites
Remove from Favorites
Scan channels
Favorites setup
TV
Watch TV: Open with Live TV or Live Channels.
Audio Language: To choose Audio Language.
Add to Favorites: To add Favorite program.
Remove from Favorites: To remove Favorite program.
Favorites setup: Open to set Favorite program information.
Scan channels: To setup Analogue or Digital channels.
TV
Display & Sound
Note:The available source might differ depending
on the model.

15
Using your TV
Channels Setup
Using TV Settings
The Settings menu allows you to the TV with
your preferences.
This section explores the menus and settings of your
TV. Each menu is outlined and detailed to help you get
the most from your TV. To access the menu system:
1. In TV mode, press on the remote control to
display the quick access list.
2. Press ▲/▼ to select the desired item, then press
OK /►to open the corresponding submenu.
3. In submenu, use and OK buttons to make
the adjustments, or use ▲/▼ to select an item, use
OK to enter and operate according to the on-screen
display or guide.
4. Press to return to the previous menu.
Note: Some of the functions might be unavailable
in certain sources. And for some models, certain
options are not available.
Settings
Channels
Set up your TV to receive broadcast signal.
Analogue Setup
Select to customise and receive programmes.
Analogue Setup
- Analogue Auto Tuning: Press OK to start the automatic
search process. The search may take a few minutes.
During the process, you can press OK to abort.
- Analogue Manual Tuning: Press OK to enter the
interface.Press ◄/► to select your system,the
press ▲/▼ select Frequency and press OK to search,
fine tune or store the channel.
- Program Sorting: To sort the program.
- Program Labels: To set the program labels.
▲/▼
Digital Setup
Select to customise and receive digital broadcast services.
Digital Setup
- Digital Antenna Tuning:Press OK to start the automatic
search process.The search may take a few minutes.
During the process, you can press and chosse YES
to exit .
- Subtitle Setup:
(1)Subtitle Setting:Include Off,On and For Hard of Hearing.
(2)Primary Preferred Language:
Press OK and than use ▲/▼ to select Primary Preferred
Language.
(3)Sencond Preferred Language:
Press OK and than use ▲/▼ to select Sencond Preferred
Language.
- Audio Setup
(1)Audio Description:Include Off and On.
(2)Audio Description Mixing Level:
Press OK and than use ◄/► to set Audio Description Mixing
Level.
(3)Audio Type: Include Normal and For Hard Of Hearing.
(4)Primary Preferred Language:
Press OK and than use ▲/▼ to select Primary Preferred
Language.
(5)Sencond Preferred Language:
Press OK and than use ▲/▼ to select Sencond Preferred
Language.
- Guide Set-up:Update Guide in stanby:Include Off and On.
- Technical Set-up:
(1)Auto Service Update:Include Off and On.
(2)Service Replacement:Include Off and On.
(3)Programme list Transfer: To transfer Programme list.
- CA Module Set-up: To set up CI card function.
- CA Module PIN: To set up CI PIN code.
- Delete Service List: To delete CI service.
Note:CA Module Set-up, CA Module PIN and Delete Service
List are not availbale for certain model.
External Input
CEC Control:Go to CEC device list to register new devices.
Device AUTO POVER Off:Power off HDMI devices with the TV.
TV Auto Power On:Power on the TV with a connected HDMI
device.
CEC Device List: Turn devives on and select [Enable] to enable
control of HDMI devices.
Device Control Keys:Pass through addtion remote buttons
to cec compatible devices.
Settings
External Input
Select to configure external inputs.
HDMI CEC Settings
Select CEC compatible devices for stremlined control.

16
Using your TV
Sound Ajustment:Adjust sound and speaker-related
options.
- Sound Mode:Optimize sound quality for general
content.Use ▲/▼ to scroll through the sound preset
settings:Sports,Standard,Cinema,Music and News.
- Surround:Reproduces life-like surround sound when
playing 5.1-channel audio sources.Include On and Off.
- Advaned Setting:Access advanced sound enhancing
options.
Volume Setting:
1)Auto Volume:Keeps the volume level constant for all
programs and inputs.Include On and Off.
2)Balance:Adjust the speaker blance.
3)Digital Audio Out Volume:Applied for PCM only.The
volume levels between PCM and compressed audio will
differ.
4)Digital Audio Out Delay:Set the delay time for Digital
Audio.
5)Volume offset:Adjust the soundlever of the current
input relative to other inputs.
Sound mode related:
1)Surround effect:Use◄/► to scroll through Surround
effect.
2)Equalizer: Use◄/► ▲/▼ to scroll through Equalizer.
Reset:To reset all Sound adjustment settings.
TV Placement: Select how TV SET placed. Include Desk
Top and Wall Mount.
Digital Audio Out:Optical out for audio signals from the
Digtal Audio Out.
Dolby Digital Plus:Include On and Off.
Sound
Sound Ajustment
Adjust sound and speaker-related options.
Settings
Sound
Adjust sound and speaker-related options.
TV Placement
Deak Top
Digital Audio Out
PCM
Dolby digital plus
On
Piture & Display
Picture Ajustment
Adjust the picture settings such as Brightness, color and hue.
Settings
Piture & Display
Adjust the picture and screen settings.
Display Setting
Adjust the aspect ratio and viewable screen area.
Picture Ajustment:
- Picture Mode:Optimize picture quality for general
content.Use ▲/▼ to scroll through the Picture preset
settings:Standard,Dynamic,Movie,Sport and Personal.
- Advanced Settings:
Access advanced picture enhancing options.
Brightness: Adjusts the brightness of the picture.
Color: Ajusts the color saturation.
Clarity:Advanced technique for picture enhancement.
Reset: To reset picture ajustment.
Display Setting:
- Screen mode: Ajust the picture size.Use ▲/▼ to scroll
through the sound preset settings:Wide,Normal,Full and
Zoom.
- Auto screen:Automatically adjusts screen mode based
on the signal.Include On and Off.

System
Language:Use▲/▼ to scroll through Language.
Environment: Enter to set Home or shop mode.
-Home Mode: You Would be able to view the standand
settings for Picture and Sound Modes.
-Shop Mode:You can enjoy enhanced setting for Picture
and Sound Modes.
Note: Picture menu settings will not be accessible
when you select Shop Mode.
Shop Demo:Enter to set E-show.
Note:E-show is not availbale for certain model.
Power:Enter to set Power mode.
- Wake on Wifi:Enable wake on WIFI Settings.
- Network stand by:Enable STR Settings.
Sleep Timer:Set the TV to turn off automatically.
Language
English
Environment
Home
Settings
System
Setup your TV options
Shop Demo
E-show
Power
Sleep Timer
Using your TV
17
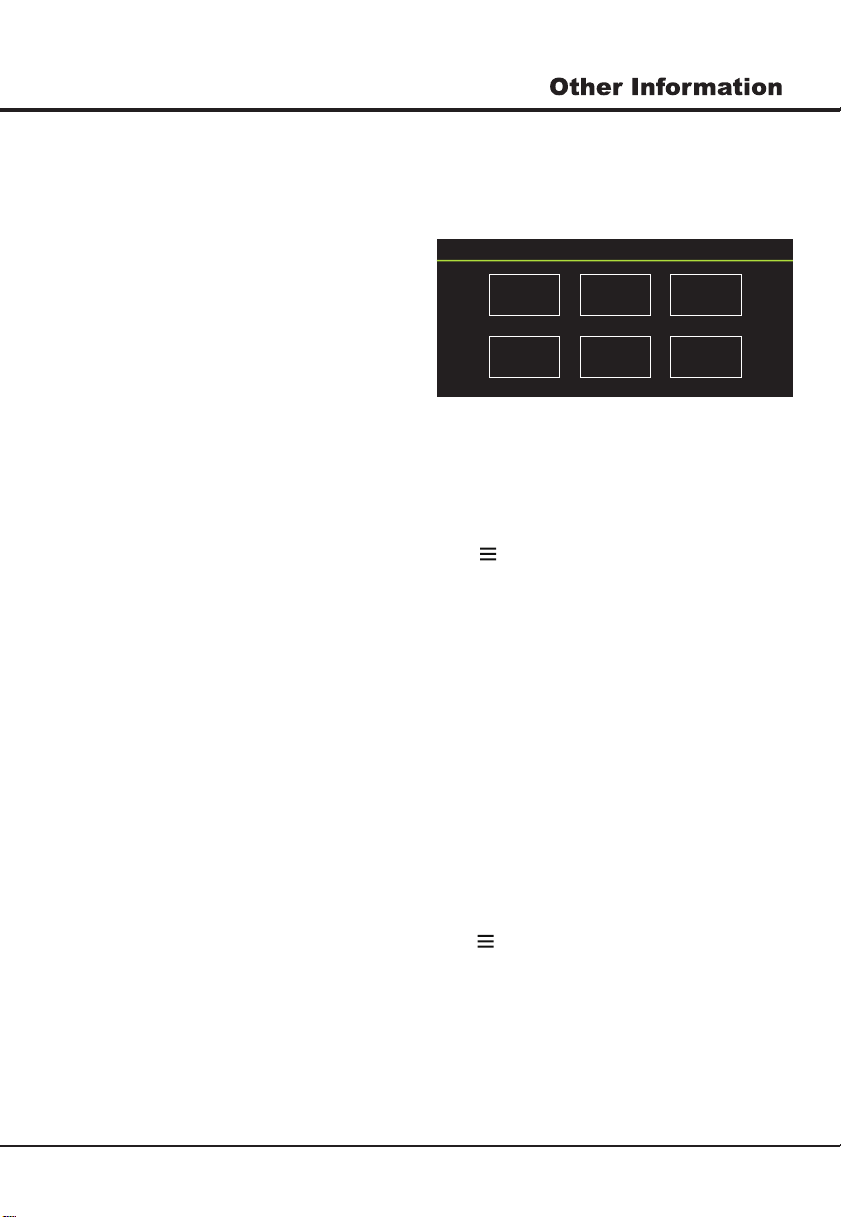
Smart Zone
Enjoy Music:Select this option to enter into Audio Only
mode.
Fast Cast:An app that quickly delivers mobile content to
TV,allowing users to quickly deliver multimedia content
such as photos,videos,music and more to TV terminals.
Fast Cast Step:
1.Download Fast Cast mobile App.
2.Mobile and TV are connect the Same Wi-Fi.
3.Search device and connect TV.
Note:
1.This function may be unavailable for some mobile
devices, and it subject to chipset support the files format.
2.Recommendations of working environments:
A: Local Area Network Speed recommendations on:
1M/S~2M/S.
B: Files required:MP4、AVI、TS、FLV、f4v、m3u8
(subject to chipset supported).
Sleep Timer:The options inlude:
Off,10Min,20Min,30Min,
60Min,90Min,120Min,and 180Min.
World clock: Enter to add World clock.
Night mode:Turn on to Keep loudness and brightness
to prevent disturb others.Clear sound and brightness
at a low level.
Enjoy Music Night mode
Fast Cast World clockSleep Timer
18
Attention and Frequently
Asked Questions
Attention:
Some non-standard mobile storage device may
not be recognized. Please change to use the
standard device.
Note: For coding files, there are many kinds non-
standard coding method, so this system can not be
guaranteed to support the file formats using any coding
method.
Frequently Asked Questions:
1. Under the following conditions, this system cannot
decode the file and the file cannot be play normally:
-The parameters of file, such as the pixel of picture,
code rate of audio and video file, sampling rate of
audio file, exceed the limit of the system;
-The format of file is not matched or the file is harmed.
2. Hot plug: Do not disconnection when the system is
reading or transmitting data, avoid damaging the system
or the device.
3. Pay attention to the power supply of the device when
you are using a mobile hard disk or a digital camera.
If the power supply is not sufficient or not stable, you
may encounter problems during operating or can not
operate at all. In this case, please restart the device,
or unplug the device and plug it again, and ensure that
its power supply is normal.
4. The system supports standard USB1.1 and USB2.0
devices, such as standard U-disks, MP3 players,
mobile hard disks, etc..
5. For obtaining better audio and video quality, suggests
to use the external device which accords with USB2.0
standard.
6. When playing the video with high compression ratio,
these phenomenons, such as picture standstill and
menu long time response, are normal.
7. For some USB device with power supply, such as large
size hard disk, MP4, etc., suggests using it with power
to avoid electric power shortage.
Chapter 6
Multimedia
Connect a USB device to a USB socket, the screen will show
USB file name and then press OK to enter .If no USB device
connected, the USB interface will be not displayed.
Photo:
1. Select Picture icon, then press OK button to view the
picture.
2. Press Up, Down, Left or Right direction button to select
your desired picture file and press OK to show.
3. While showing picture, press OK to display the play console.
For Previous and Next use remote left and Right key.
4. Use OK key to see more option: Leftrolation,rightrolation,
Manual play, Information, Play mode,BGM:on or off.
Video:
1. Select Video icon, then press OK button to view movie file.
2. Press Up, Down, Left or Right direction button to select
your desired file and press OK to Play.
3. While playing a Video, press OK Menu of remote to display
the play console. For the Play console, Press Ok key of remote
to Play and Pause the video file.Left key of remote to Fast
backward.Right key of remote to Fast forward.
4. Use key to see more option:Photo,Scale,Looping
mode,Subtitle,Audio track.
5. Press Return key of remote to Stop playing and Press
Return to Exit.
1. Select Disk icon, then press OK button to choose folder.
2. Press Up, Down, Left or Right direction button to select your
desired file and press OK to Play.
3. Press Return key of remote to Stop playing.
PhotoVideo Music Disk
Disk:
1. Select Music icon, then press OK button to listen to Music.
2. Press Up, Down, Left or Right direction button to select your
desired file and press OK to Play.
3. The Play console includes Previous, Play/Pause,Fast
backward/Fast forward,Next.
Press key to see PlayList.
4. Press Return key of remote to Stop playing.
Music:
Table of contents
Other ACONATIC TV manuals


