ACOUSTIC SOLUTIONS DVD-263 User manual

7” Dual Screen
Portable DVD Player
DVD-263
OPERATION MANUAL
DVD263 Acoustic 00CA 14/6/07, 14:50Page 1 Adobe PageMaker 6.5C/PPC

DVD266C Wharfdale UK rev 23/5/07, 11:41Page 2 Adobe PageMaker 6.5C/PPC
2
DANGER
LASER SAFETY
This unit employs an optical laser beam system in the DVD mechanism, designed with
built -in safeguards. Do not attempt to disassemble, refer to qualied service personnel.
Exposure to this invisible laser light beam may be harmful to the human eye.
THIS IS A CLASS-1 LASER PRODUCT. USE OF CONTROLS, OR ADJUST-
MENTS OR PROCEDURES OTHER THAN THOSE SPECIFIED HEREIN,
MAY RESULT IN HAZARDOUS LASER LIGHT BEAM EXPOSURE.
INVISIBLE LASER RADIATION WHEN
OPEN AND INTERLOCK FAILED
OR DEFEATED. AVOID DIRECT
EXPOSURE TO LASER BEAM.
PLEASE READ THE INSTRUCTION CAREFULLY BEFORE OPERATING THIS UNIT.
IF THIS PRODUCT IS SOLD WITH SWITCHING ADAPTOR AND IN-CAR ADAPTOR
Switching Adaptor In-Car Adaptor
1. Input : AC100-240V~ 0.5A 50/60Hz 1. Input : DC
...
12V
2. Output: DC 12V
...
2000mA 2. Output : DC
...
12V 2A
WARNING
To prevent re or shock hazard, do not expose this appliance to rain or moisture.
The apparatus should not be exposed to dripping or splashing and that no objects lled with liquids,
such as vases, shall be placed on the apparatus.
The ventillation should not be impeded by covering the ventilation openings with items, such as
newspapers, table-cloths, curtains, etc.
No naked ame sources, such as lighted candles, should be placed on the apparatus.
The mains plug is used as the disconnect device. The disconnection device shall remain readily operable.
In order to disconnect the apparatus from the mains completely, the mains plug should be
disconnected from the mains socket outlet completely.
In-Car Adaptor Fuse Replacement
Should the player fail to operated with the DC car adaptor/cord, check the fuse (2A). If brown, check all
connections and inspect the cord for any damage. Always replace the fuse with the same type and rating.
If the fuse blows again after replacement, this indicates a potential problem. DO NOT replace fuse
with a higer rating. Doing so, may cause damage to the player.
CAUTION
Since the CD circuitry may cause interference to other radio tuners nearby, switch this unit off when
not in use or move it away from the affected radio tuner.
RISK OF ELECTRIC SHOCK
DO NOT OPEN
WARNING: TO REDUCE
THE RISK OF ELECTRIC
SHOCK, DO NOT REMOVE
COVER (OR BACK). NO
USER-SERVICEABLE PARTS
INSIDE, REFER SERVICING
TO QUALIFIED SERVICE
PERSONNEL.
The exclamation point within an
equilateral triangle is intended
to alert the user to presence of
important operating and main-
tenance (servicing) instructions
in the literature accompanying
the appliance.
The lighting ash with arrowhead
symbol, within an equilateral trian-
gle, is intended to alert the user to
the presence of uninsulated “dan-
gerous voltage” within the product’s
enclosure that may be of sufcient
magnitude to constitute a risk of
electric shock to persons.
WASTE ELECTRICAL PRODUCTS SHOULD NOT BE DIS-
POSED OF WITH HOUSEHOLD WASTE. PLEASE RECYCLE
WHERE FACILITES EXIST. CHECK WITH YOUR LOCAL
AUTHORITY FOR RECYCLING ADVICE.
3
Getting Started
Before attempting to connect, operate or adjust this product, please read these
instruction completely and keep this manual for future reference.
Dear customers :
We would like to take this opportunity to thank you for purchasing this DVD Player.
We strongly recommend that you carefully study the operating instructions before
operating the unit.
Main Features
• Front loading DVD / MP3 / CD player.
Standards
Video : NTSC or PAL
Audio : LT/RT stereo
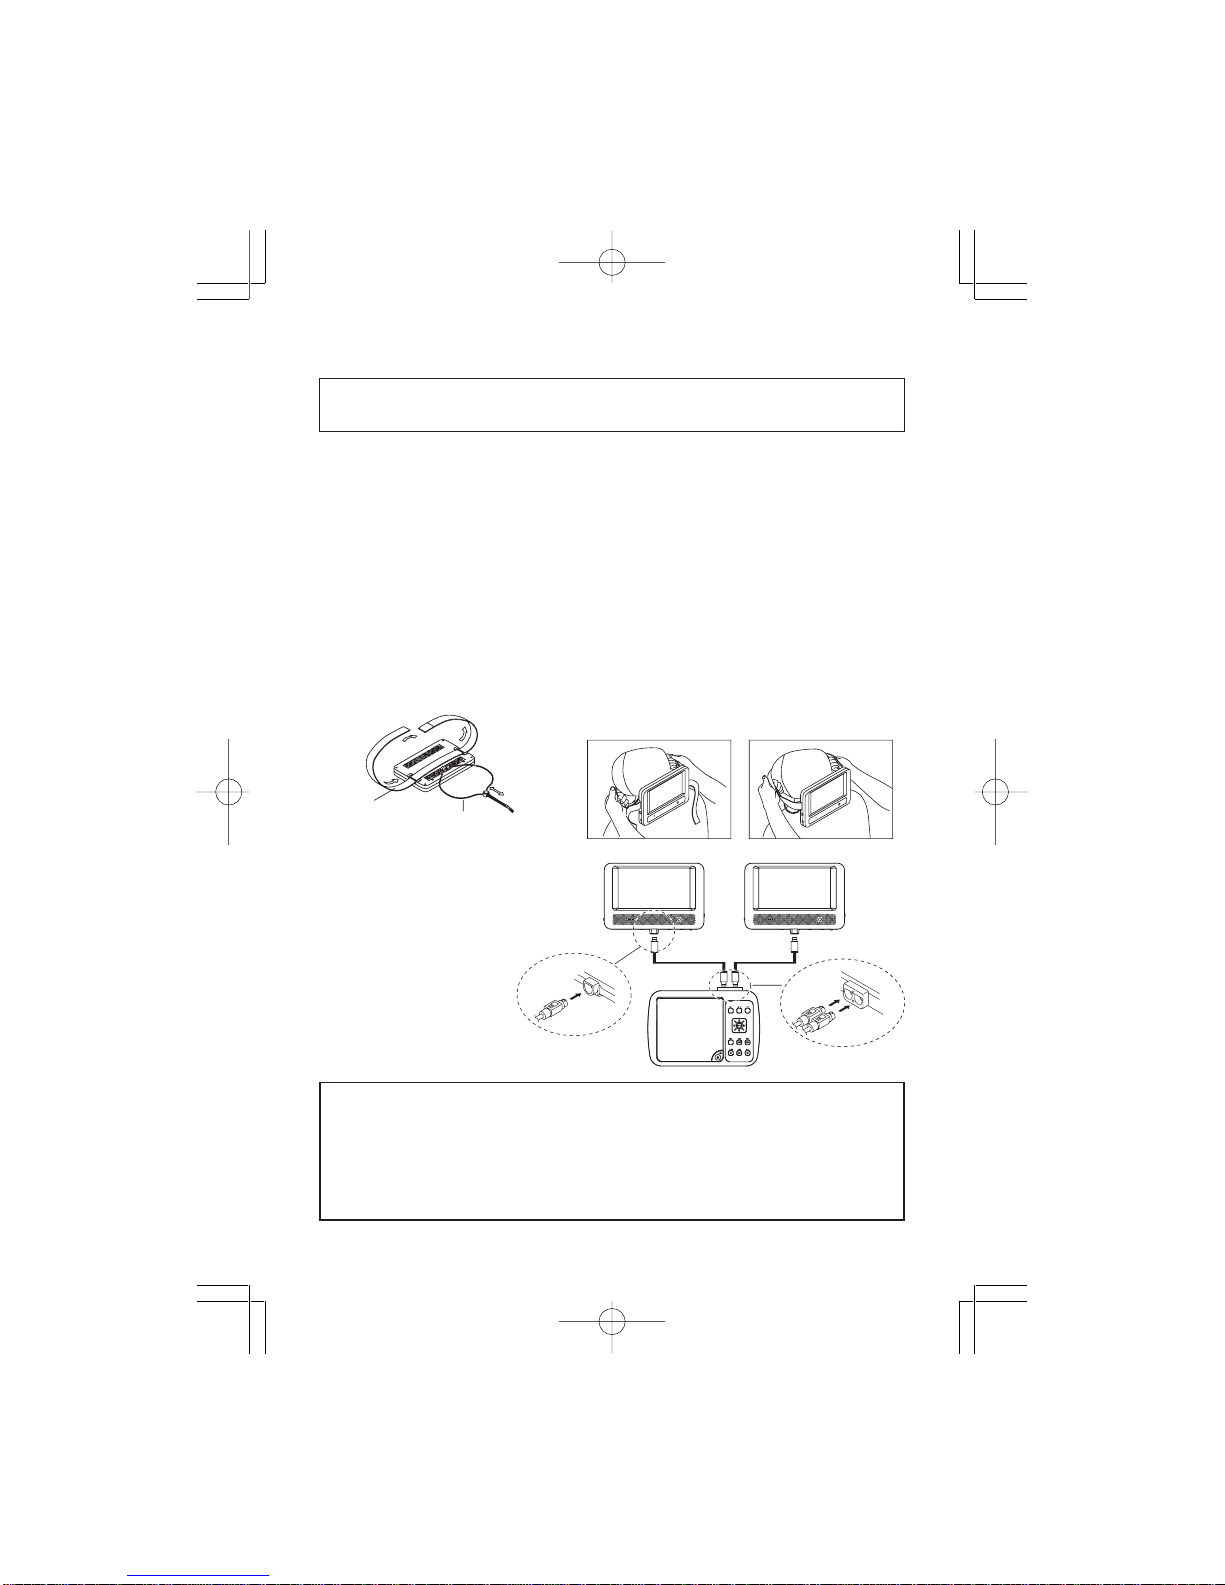
Installation and Connection
• Use supplied mounting straps to install the monitors onto the seat back in a car.
• Use the included DIN cables to
connect the monitors
to the main unit.
DIN Cable
Connect to Monitor ports
(Output)
Connect to Monitor ports
(Intput) Connect to Monitor ports
(Intput)
DIN Cable
Monitors
Main unit
MONITOR MAIN UNIT
CAUTION:
• This unit should never be used by the vehicle’s driver or left unsecured in the
vehicles while driving.
• If this unit is being used in your vehicle, be sure that it is secured or held safely,
and does not obstruct any safety device, including air bags or seat belts.
• All passengers should wear seat belts when using this unit in a moving vehicle.
• If in doubt, please contact your vehicle manufacturer for further advice.
1. Loop the safety band
around the headrest. 2. Tightly wrap the mounting
strap around the headrest.
S
trap
M
ounting
Safety Band
Adjustable
DVD263 Acoustic 00CA 14/6/07, 14:50Page 3 Adobe PageMaker 6.5C/PPC

4
* Player is CD-R, CD-RW compatible.
Region Management Information
This DVD Player is designed and manufactured to respond to the Region Management
Information that is recorded on a DVD disc. If the Region number described on the DVD
disc does not correspond to the Region number of this DVD Player, this DVD player can-
not play that disc.
This Region number of this DVD player is .
Disc maintenance
– Before playback, wipe the disc from the center hole toward the outer edge with a clean
cloth.
– Never use bezine, thinner, cleaning fluid, static electricity prevention liquids or any
other solvent.
Note : Dirty disc may cause bad picture.
Audio & Video
Audio
Audio
Disc size 12cm
single side, single layer / single side, double layer
PAL and NTSC DVD disc
Playback time 135min / 240min max.
Disc size 12cm / 8cm
CD disc
Playback time 74min/20min max.
MP3 format disc disc
Disc types
Correct
F
rom the center to the edge
Incorrect
MP3
DVD263 Acoustic 00CA 14/6/07, 14:50Page 4 Adobe PageMaker 6.5C/PPC
5
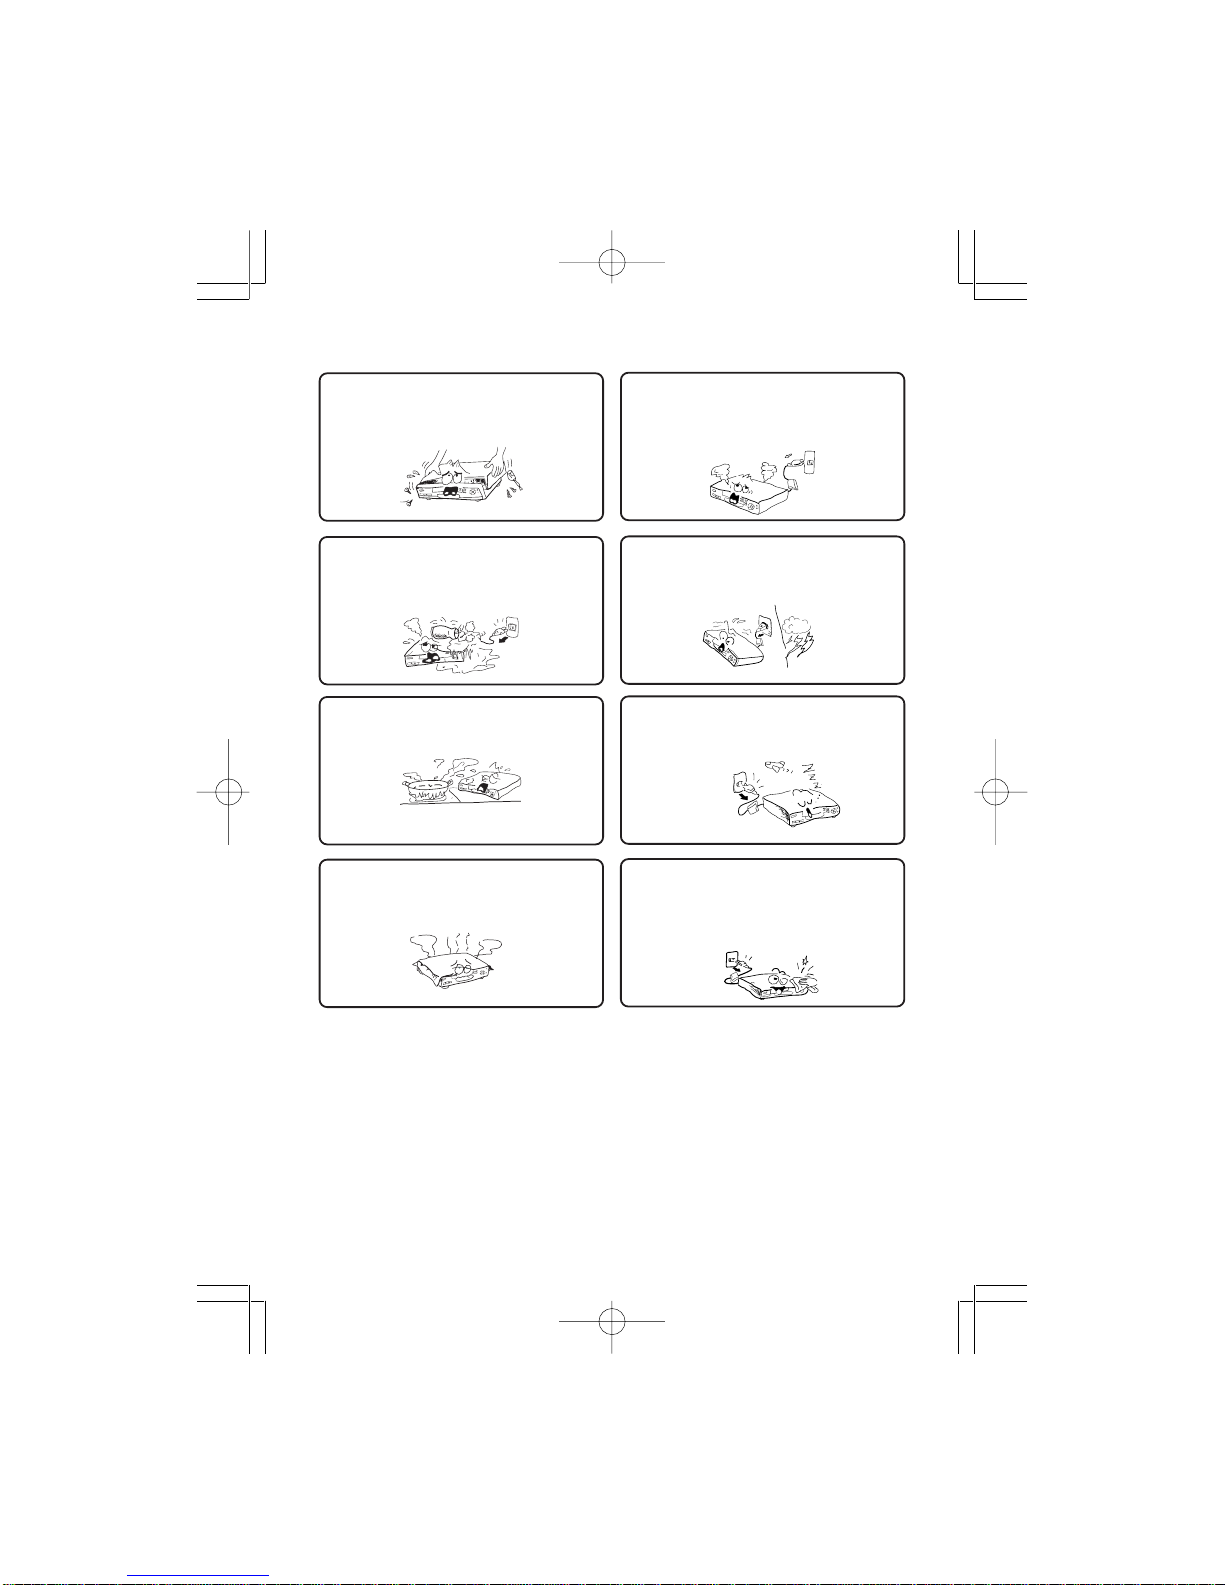
Safety precautions
Warning
To avoid electrical shock, do not open the
cabinet, refer servicing to qualified person-
nel only.
Warning
Keep the unit away from flower vases, tubs,
sinks, etc. If liquids are spilt into the unit,
serious damage could occur.
Warning
Do not expose this equipment to rain or
moisture.
Warning
Do not block ventilation holes of the unit so
that air can circulate freely,
Attention
If smoke, malodour or unrelated noise are
emitted from the unit, turn off the power and
disconnect the AC power cord.
Attention
Touching the unit is dangerous especially if
during thunder.
Attention
When left unused for a long period of time,
the unit should be unplugged from the house-
hold AC outlet.
Attention
Be sure to turn the unit off and disconnect the AC
power cord before cleaning the unit surface. If the
surface is dirty, wipe clean with a cloth which has
been dipped in a weak soap and water solution and
wrung out thoroughly, and then wipe again with a
dry cloth.
Note: This unit is a class 1 laser product and uses a visible laser beam which could
cause hazardous radiation exposure if directed. Be sure to operate it correctly as
instructed.
DVD263 Acoustic 00CA 14/6/07, 14:50Page 5 Adobe PageMaker 6.5C/PPC

6
Location of Control
Main Unit
1. DC IN 9V – 12V
2. Connect to Display Socket (for Monitor 1)
3. Connect to Display Socket (for Monitor 2)
4. Direction Buttons
(Up / Down / Left / Right )
5. Title Button
6. Display Button
7. Setup Button
8. Enter Button
9. Push Open Knob
10. Menu Button
11. Pause Button
12. Stop Button
13. Play Button
14. Previous / Next Button
15. Remote Sensor
16. Power On/Standby Indicator
a. Power On - Green light
b. Standby - Red light
17. On / Off Switch
18. AV/DVD Selector (for Monitor 2)
19. AV/DVD Selector (for Monitor 1)
20. Coaxial Digital Output Jack
21. AV Output Jack (DVD only)
22. AV Input Jack
23. Phones Jack
24. Volume Control
Display
1. On / Off Switch
2. Speakers
3. Standby Indicator
4. Remote Sensor
5. Volume Control
6. Phones Jack
7. Connect To Main Unit Socket
8. Brightness Control
9. Colour Control
10. Screen Control (Normal/Wide)
1
1
7
23
54678
11910 121314
15 16
1
8
1
9
2
0
2
1
2
2
2
3
2
4
1
23
67
8910
2
5
4
DVD263 Acoustic 00CA 14/6/07, 14:50Page 6 Adobe PageMaker 6.5C/PPC
7
Battery installation (remote control unit)
1. Remove the battery cover.
2. Insert two batteries (AAA) making sure the polarity (+/-) matches the marks inside the
unit.
3. Replace the cover.
- Do not attempt to recharge, short-circuit, disassemble, heat or throw the batteries into
a fire.
- Do not mix old and new batteries
- Dispose of properly in accordance with local laws.
Note : Weak batteries can leak and severely damage the remote control unit.
CAUTION: Danger of explosion if battery is incorrectly replaced. Replace only with the
same or equivalent type.
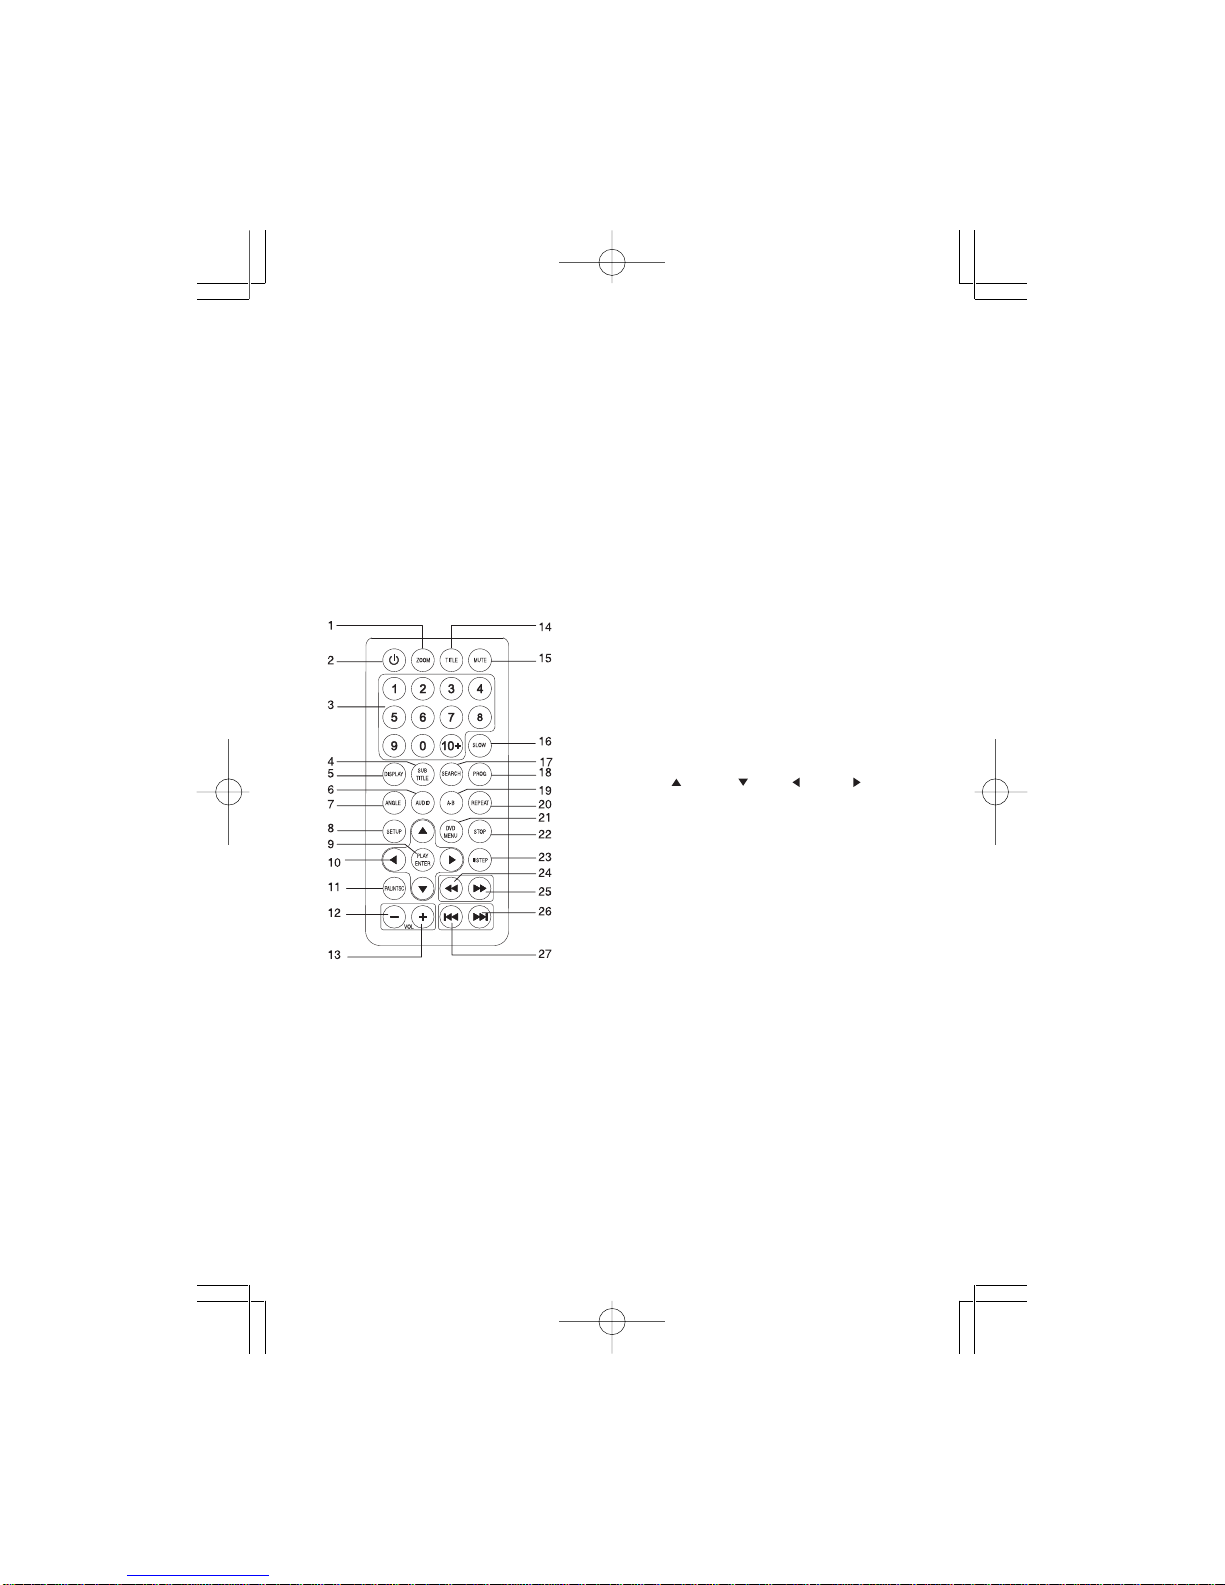
Remote Control Unit 1. Zoom Button
2. Standby Button
3. Numeric Buttons
4. Subtitle Button
5. Display Button
6. Audio Button
7. Angle Button
8. Setup Button
9. Play / Enter Button
10. Direction Buttons
( Up / Down / Left / Right )
11. PAL / NTSC Button
12. Volume - Button
13. Volume + Button
14. Title Button
15. Mute Button
16. Slow Button
17. Search Button
18. Program Button
19. Repeat A-B Button
20. Repeat Button
21. DVD Menu Button
22. Stop Button
23. Step/Pause Button
24. Fast Backward Button
25. Fast Forward Button
26. Next Button
27. Previous Button
DVD263 Acoustic 00CA 14/6/07, 14:50Page 7 Adobe PageMaker 6.5C/PPC

8
OPERATION
NOTICE: MOVE THE AV/DVD SELECTOR SWITCH TO DVD MODE FOR PLAYBACK
OF DVD DISCS.
Play Discs
1. Press the PUSH TO OPEN button on the front panel to open the DVD door and put the
disc on the loader. The label side should be facing upwards. For a Double-sided DVD
Disc, put the disc with labelA/1 up.
2. Close the DVD door, the disc will be loaded automatically.
• If it is a DVD disc, it will show the Menu / Title Page on the screen.
• If it is a CD, it will play the first track directly.
3. Press the STOP button if you want to stop the Disc playback. You can resume play-
back by pressing the PLAY button and it will start at the location where you pressed
stop (Resume Play).
4. Press the STOP button twice to stop the disc and cancel the resume function.
II (PAUSE) STEP
This function is applicable for DVD and CD audio.
• For DVD, the picture will freeze.
• For CD audio, it will become muted.
1. Press the PAUSE button ( ) to pause play.
2. Press the PLAY button again to resume play.
DVD Setup Mode
• Setup Mode provides the menu for the configuration of SYSTEM SETUP, LANGUAGE
SETUP, VIDEO SETUP and SPEAKER SETUP.
• Item selection in the Setup Menu is done by using the direction buttons and the ENTER
button.
• To exit the Setup Menu, press the SETUP button again or select EXIT and press the
ENTER button.
DVD263 Acoustic 00CA 14/6/07, 14:50Page 8 Adobe PageMaker 6.5C/PPC

9
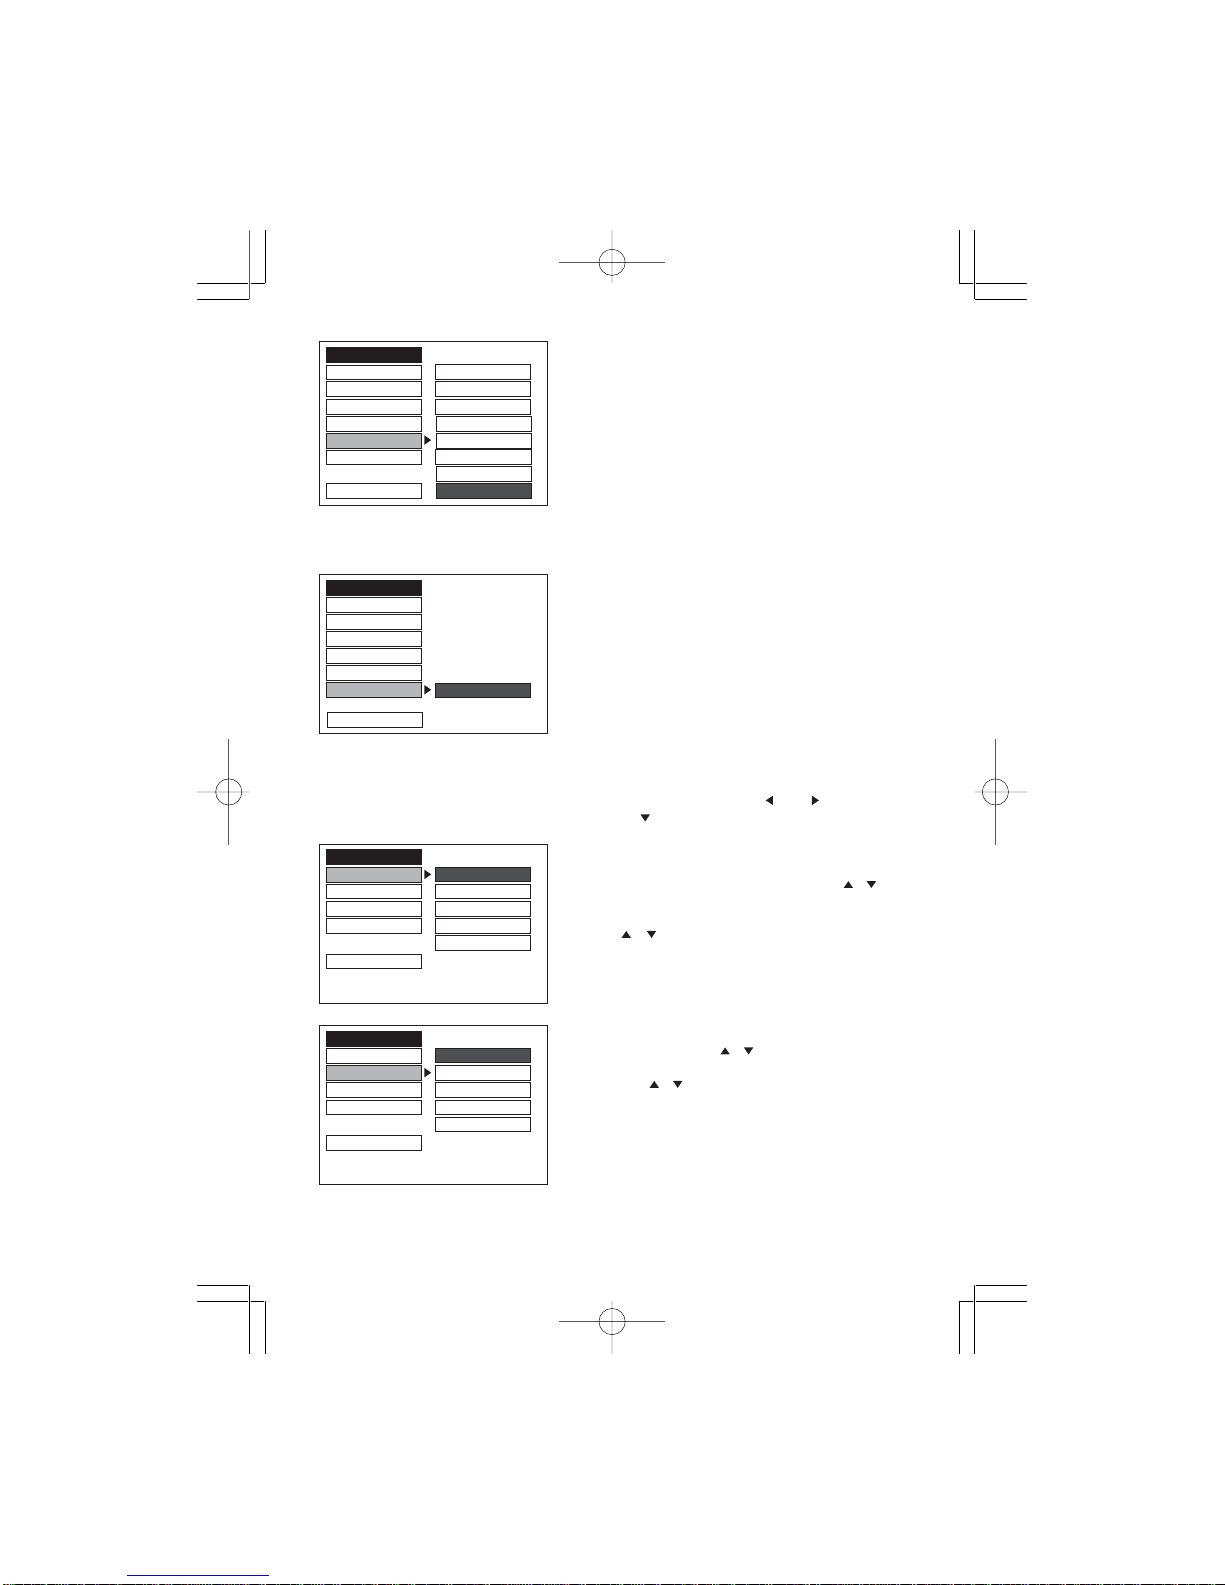
SYSTEM SETUP
In STOP mode, press the SETUP button and highlight SYSTEM setup with remote control.
Once done, press the button to confirm.
To select the desired item, use the direction buttons ( , , , ), then press the ENTER
button to confirm the selection.
TV SYSTEM
- NTSC
-PAL
- AUTO
SCREEN SAVER
- ON (default)
- OFF
TV TYPE
- 4:3 PS (Pan Scan)
- 4:3 LB (Letter Box)
- 16:9 (wide screen) (default)
PASSWORD:_ _ _ _
The password option is initially locked, and you
cannot set the ratings limit or change the password.
In order for the Rating feature to work, the pass-
word mode must be turned on. If you want to set
the rating limit, you will need to enter the default
password, which is 0000, then press ENTER to
confirm. To change the password, you will be
prompted for the old password, then be prompted
for a new. Enter a 4-digit number (this is your
password).
SYSTEM SETUP
TV SYSTEM NTSC
SCREEN SAVER PAL
TV TYPE AUTO
PASSWORD
RATING
DEFAULT
EXIT SETUP
SYSTEM SETUP
TV SYSTEM
SCREEN SAVER ON
TV TYPE OFF
PASSWORD
RATING
DEFAULT
EXIT SETUP
SYSTEM SETUP
TV SYSTEM
SCREEN SAVER
TV TYPE
PASSWORD - - - -
RATING
DEFAULT
EXIT SETUP
SYSTEM SETUP
TV SYSTEM
SCREEN SAVER
TV TYPE 4:3 PS
PASSWORD 4:3 LB
RATING 16:9
DEFAULT
EXIT SETUP
DVD263 Acoustic 00CA 14/6/07, 14:50Page 9 Adobe PageMaker 6.5C/PPC
10
RATING
When playing discs with the parental lock function,
you may select an age control grade according to
the grade of the disc and your own preference.
For example, if PG is selected, DVD Video discs
rated higher than the PG guide cannot be played.
- 1 KID SAFE
-2G
-3PG
- 4 PG13
- 5 PG-R
-6R
- 7 NC17
- 8 ADULT (default)
DEFAULT : RESTORE
Choose this option to restore all the choosen setup
options to their default (factory) settings.
LANGUAGE SETUP
In the STOP mode, press the SETUP button and then the direction ( and ) to
highlight LANGUAGE SETUP. Once done, press button.
OSD LANGUAGE
(ON SCREEN DISPLAY) LANGUAGE
Press the UP/DOWN direction buttons ( / ) to
highlight OSD LANGUAGE. Press ENTER to
move the cursor to the column of choices. Use
the ( / ) buttons to select the desired OSD
Language, and press ENTER:
- ENGLISH
- GERMAN - FRENCH
- SPANISH - ITALIAN
AUDIO LANGUAGE
Press the direction ( / ) buttons to highlight
AUDIO LANG and press ENTER.
Use the ( / ) button to select the desired
AUDIO Language, and press ENTER:
- ENGLISH
- GERMAN - FRENCH
- SPANISH - ITALIAN
LANGUAGE SETUP
OSD LANGUAGE
ENGLISH
AUDIO LANG GERMAN
SUBTITLE LANG SPANISH
MENU LANG FRENCH
ITALIAN
EXIT SETUP
LANGUAGE SETUP
OSD LANGUAGE
ENGLISH
AUDIO LANG GERMAN
SUBTITLE LANG SPANISH
MENU LANG FRENCH
ITALIAN
EXIT SETUP
SYSTEM SETUP
TV SYSTEM 1 KID SAFE
SCREEN SAVER 2 G
TV TYPE 3 PG
PASSWORD 4 PG 13
RATING 5 PG - R
DEFAULT 6 R
7 NC 17
EXIT SETUP 8 ADULT
SYSTEM SETUP
TV SYSTEM
SCREEN SAVER
TV TYPE
PASSWORD
RATING
DEFAULT RESTORE
EXIT SETUP
DVD263 Acoustic 00CA 14/6/07, 14:50Page 10 Adobe PageMaker 6.5C/PPC

11
SUBTITLE LANGUAGE
Press the direction ( / ) buttons to highlight
SUBTITLE LANG and press ENTER.
Use the ( / ) buttons to select the desired
SUBTITLE Language, (or OFF to select none)
and press ENTER:
- ENGLISH - FRENCH
- GERMAN - ITALIAN
- SPANISH - OFF
MENU LANGUAGE
Press the direction ( / ) button to highlight
MENU LANG and press ENTER.
Use the ( / ) buttons to select the desired
MENU Language, and press ENTER:
- ENGLISH
- GERMAN - FRENCH
- SPANISH - ITALIAN
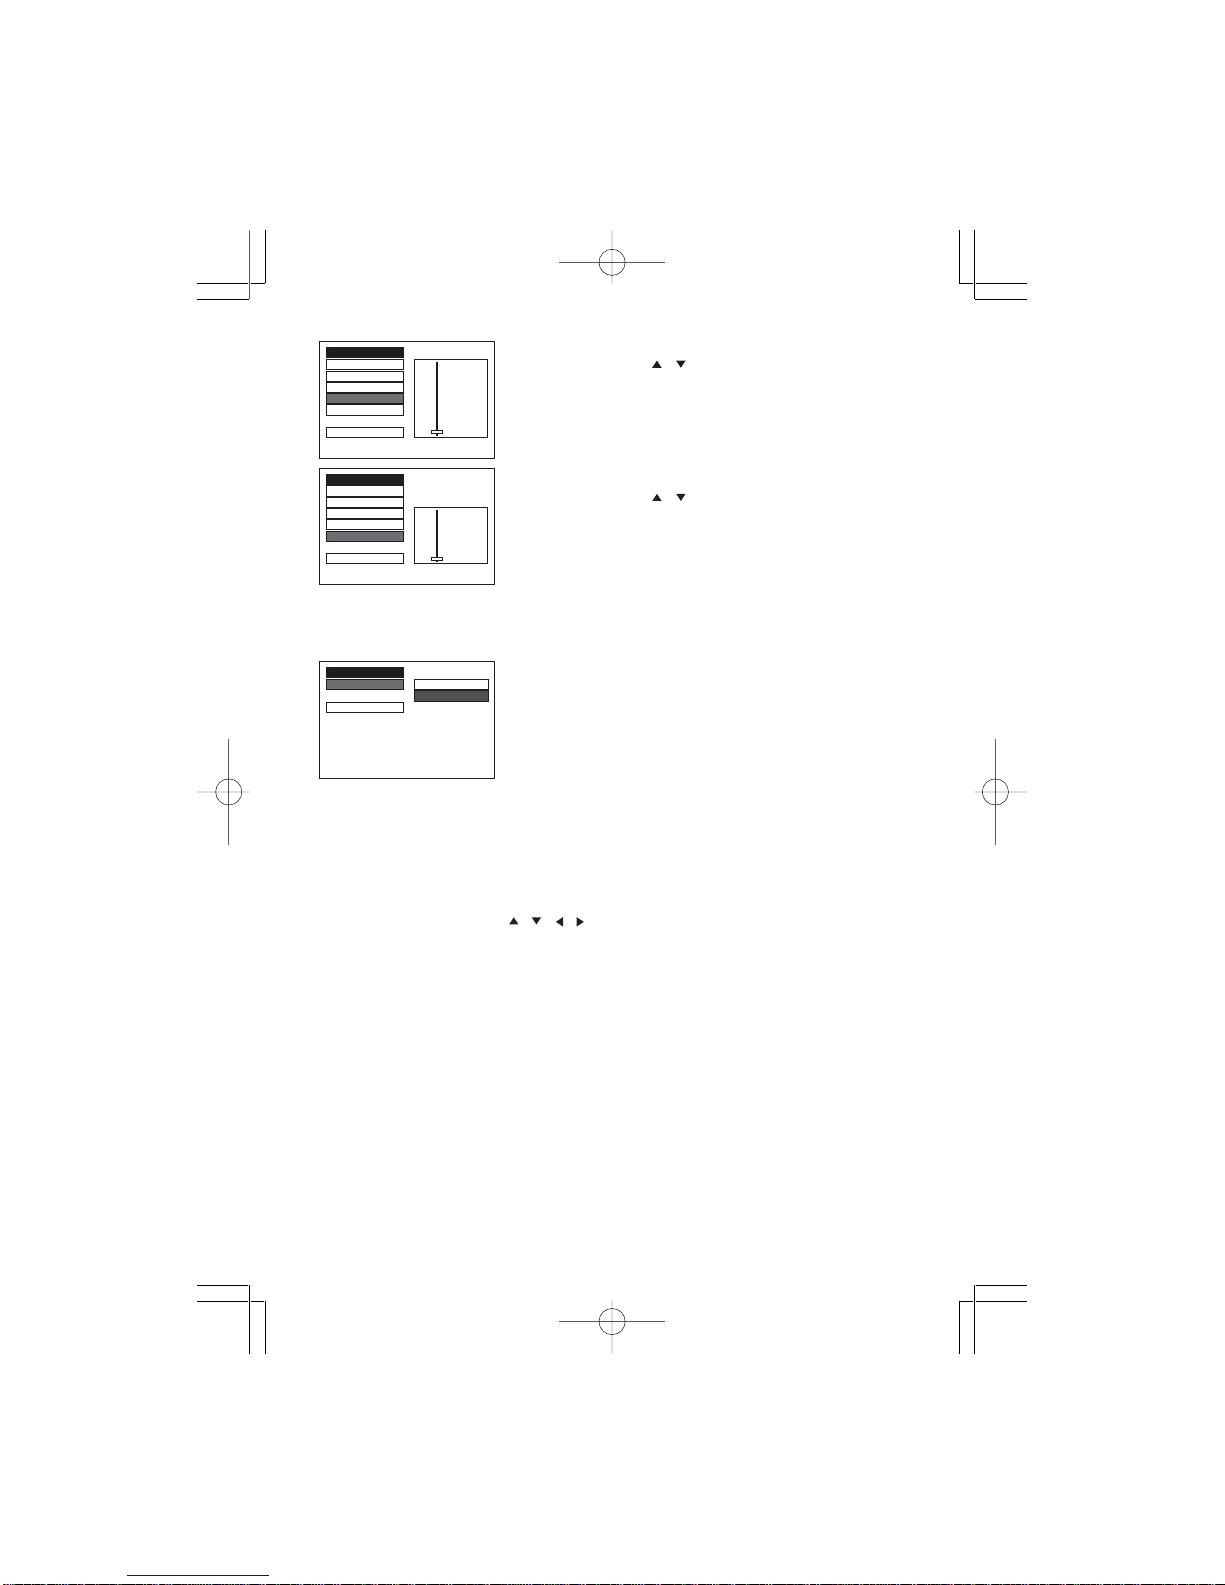
VIDEO SETUP
In STOP mode, press the SETUP button and press direction / buttons to highlight
VIDEO setup. Then press the button to confirm.
• BRIGHTNESS
Use the direction / button to move the scroll bar
and adjust the brightness.
• CONTRAST
Use the direction / button to move the scroll bar
and adjust the contrast.
• HUE
Use the direction / button to move the scroll bar and
adjust the hue.
LANGUAGE SETUP
OSD LANGUAGE
ENGLISH
AUDIO LANG GERMAN
SUBTITLE LANG SPANISH
MENU LANG FRENCH
ITALIAN
EXIT SETUP OFF
LANGUAGE SETUP
OSD LANGUAGE
ENGLISH
AUDIO LANG GERMAN
SUBTITLE LANG SPANISH
MENU LANG FRENCH
ITALIAN
EXIT SETUP
VIDEO SETUP
BRIGHTNESS
––12
CONTRAST – – 10
HUE – – 8
SATURATION – – 6
SHARPNESS – – 4
– – 2
EXIT SETUP – – 0
VIDEO SETUP
BRIGHTNESS – – 12
CONTRAST
––10
HUE – – 8
SATURATION – – 6
SHARPNESS – – 4
– – 2
EXIT SETUP – – 0
VIDEO SETUP
BRIGHTNESS – – + 6
CONTRAST – – + 4
HUE
––+2
SATURATION – – 0
SHARPNESS – – - 2
––-4
EXIT SETUP – – - 6
DVD263 Acoustic 00CA 14/6/07, 14:50Page 11 Adobe PageMaker 6.5C/PPC
12
• SATURATION
Use the direction / button to move the scroll bar and
adjust the saturation.
• SHARPNESS
Use the direction / button to move the scroll bar and
adjust the sharpness.
SPEAKER SETUP
In STOP mode, press the SETUP button and highlight SPEAKER setup. Then press the
ENTER button to confirm.
• DOWNMIX
- LT/RT
- STEREO (default)
Operation
DVD Menu Play
The DVD Menu Play function is only applicable for DVD movies. User can access the
Casting information, Production History, Movie Introduction etc. directly through this
function.
1. Press the DVD MENU key on the remote control to enter the Root Menu.
2. Use the direction button ( / / / ) or input the item index through the Number keys
(0-9) to make the selection.
3. Press ENTER to confirm the selection.
Audio
This function is applicable for DVD and CD audio but with different effects.
- Pressing the AUDIO key will change theAudio channel.
Note :
• When AV is ON, this key has no function.
Scan
This function is applicable for DVD and CD audio but with different effects. The FAST
FORWARD and FAST BACKWARD keys are used to achieve fast play function.
• For DVD, there are 4 different levels of speed (x2, x4, x8, x20) available. Press the
FAST button to cycle speed.
• For CD audio, the FORWARD / BACKWARD keys will play at high speed.
Note :
• Pressing the PLAY key at any stage will resume to normal speed.
• This function is not available when playing CD-G discs.
SPEAKER SETUP
DOWNMIX
LT/RT
STEREO
EXIT SETUP
VIDEO SETUP
BRIGHTNESS – – 12
CONTRAST – – 10
HUE – – 8
SATURATION
– – 6
SHARPNESS – – 4
– – 2
EXIT SETUP – – 0
VIDEO SETUP
BRIGHTNESS
CONTRAST
HUE – – 8
SATURATION – – 6
SHARPNESS
– – 4
– – 2
EXIT SETUP – – 0
DVD263 Acoustic 00CA 14/6/07, 14:50Page 12 Adobe PageMaker 6.5C/PPC

13
PREV. / Next
During playback, press PREV or NEXT key :
• When the PREV. key is pressed once, playback returns to the beginning of the
PREVIOUS playing chapter or track.
• When the NEXT key is pressed once, playback starts at the beginning of next chapter
or track.
Slow Play
The Slow Forward Backward function is only available for DVD. There are 6 steps of slow
motion speed: 1/2, 1/3, 1/4, 1/5, 1/6, 1/7. Press the SLOW key to cycle playback speeds.
Note :
• Press the PLAY key to resume normal playback speed.
• This function is not available for CD-G.
Repeat Mode
This function is applicable for DVD and CD audio but with different effects.
• For DVD disc playback, user can choose to repeat the current chapter, current title and
disc. Subsequent button presses of the REPEAT button can change between these three
options.
• For CD, user can choose to repeat the current track or the whole disc (Repeat All).
Subsequent button presses of the REPEAT button can change between these two
options.
Repeat A-B
User can specify the repeating interval by marking the starting point and the end point.
1. Press the REPEATA-B button to mark the starting point (Playback will continue).
2. Press the REPEAT A-B button to mark the end point (The marked part will be repeated
automatically.)
Note :
• Press the REPEAT A-B button during repetition will disable the Repeat mode.
• This function is not available for CD-G.
Subtitle
This function is only applicable for DVD disc. It can change the subtitle language shown on
the screen.
Note :
• Number of subtitle available depends on the DVD disc.
• This function is not available for CD-G.
Angle
Some discs may have multiple viewing angles during production. The ANGLE button is to
select the viewing angle shown on the screen.
Note : The number of Angles of View depends on the disc.
Search
The user can access a specific location or a specific track by keying in the targent time or the
track number.
1. Press the SEARCH button to enter to search mode.
2. Input the target time to the number button (0-9) and press the ENTER button. The player
will jump to the target location immediately.
DVD263 Acoustic 00CA 14/6/07, 14:50Page 13 Adobe PageMaker 6.5C/PPC
14
Display
This funciton is to show the time and status information on the screen.
Resume Play
This function is used in playback mode. When the STOP button is pressed once, the
player will enter the Resume Play mode. At this time, if the PLAY button is pressed, the
player will resume playback at the location when the STOP button is pressed. If the STOP
button is pressed a second time, resume mode cancels.
Zoom
This function will enlarge or reduce a still picture or a moving picture by pressing the
ZOOM button to select the levels of zooming (2, 3, 4, 1/2, 1/3, 1/4)
Note :
• Use the direction buttons ( / / / ) to navigate within the image.
• This function is not available for CD-G.
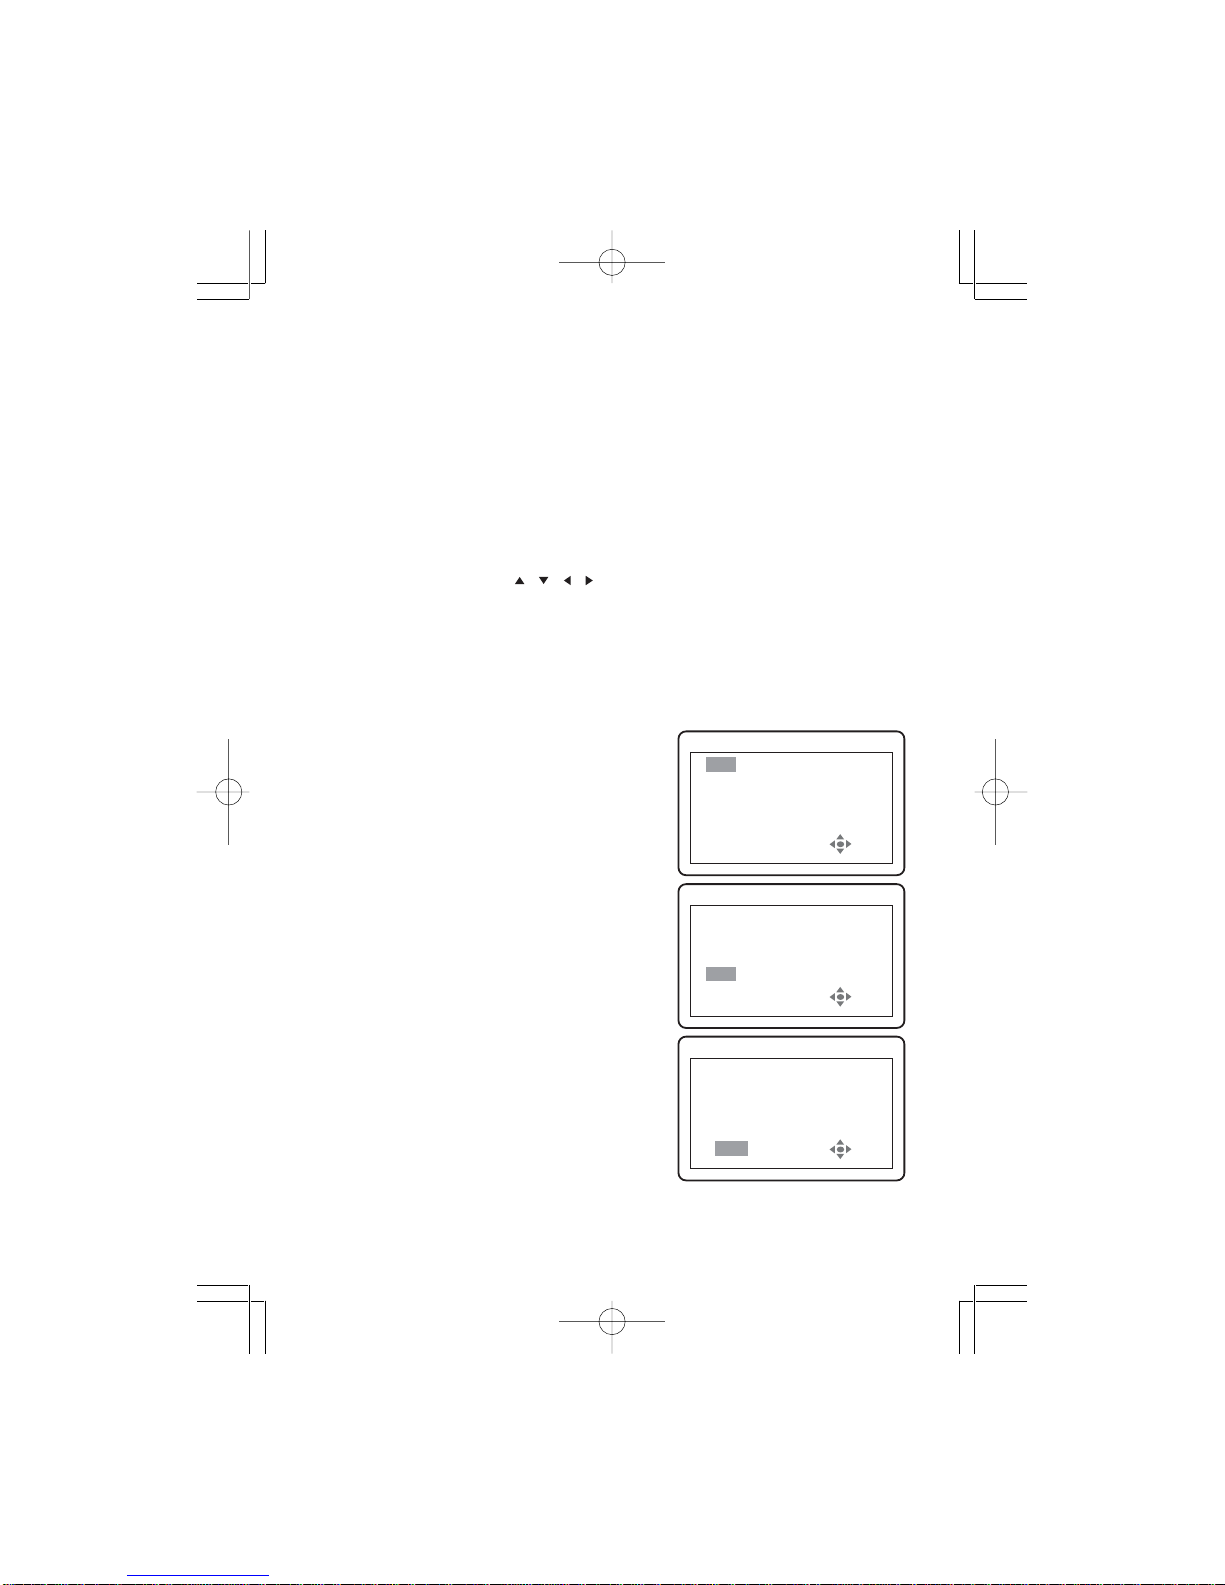
Program Mode
This function is applicable for DVD and CD audio. User can assign the playback
sequence according to his/her preference. For CD audio, user can assign the track
sequence. For DVD disc, user can assign both the Title and Chapter sequence.
• CD/CDG
1. Press the PROGRAM button. The Program
Sequence table will be shown on the screen.
2. Enter the track number according to the user
preference through the Number keys (0-9) on
the remote control.
3. After assigning the playback sequence, move
the highlight cursor to the PLAY option using the
Navigation Arrows. Press ENTER on the remote
control to confirm.
PROG
1 - - - - 5 - - - - 9 - - - - 13 ----
2 - - - - 6 - - - - 10 - - - - 14 --- -
3 - - - - 7 - - - - 11 - - - - 15 --- -
4 - - - - 8 - - - - 12 - - - - 16 --- -
PLAY CLEAR
PROG
1 0001 5 - - - - 9 - - - - 13 --- -
2 0003 6 - - - - 10 - - - - 14 ----
3 0005 7 - - - - 11 - - - - 15 ----
4 - - - - 8 - - - - 12 - - - - 16 --- -
PLAY CLEAR
PROG
1 0001 5 - - - - 9 - - - - 13 --- -
2 0003 6 - - - - 10 - - - - 14 ----
3 0005 7 - - - - 11 - - - - 15 ----
4 - - - - 8 - - - - 12 - - - - 16 --- -
PLAY CLEAR
DVD263 Acoustic 00CA 14/6/07, 14:50Page 14 Adobe PageMaker 6.5C/PPC
15
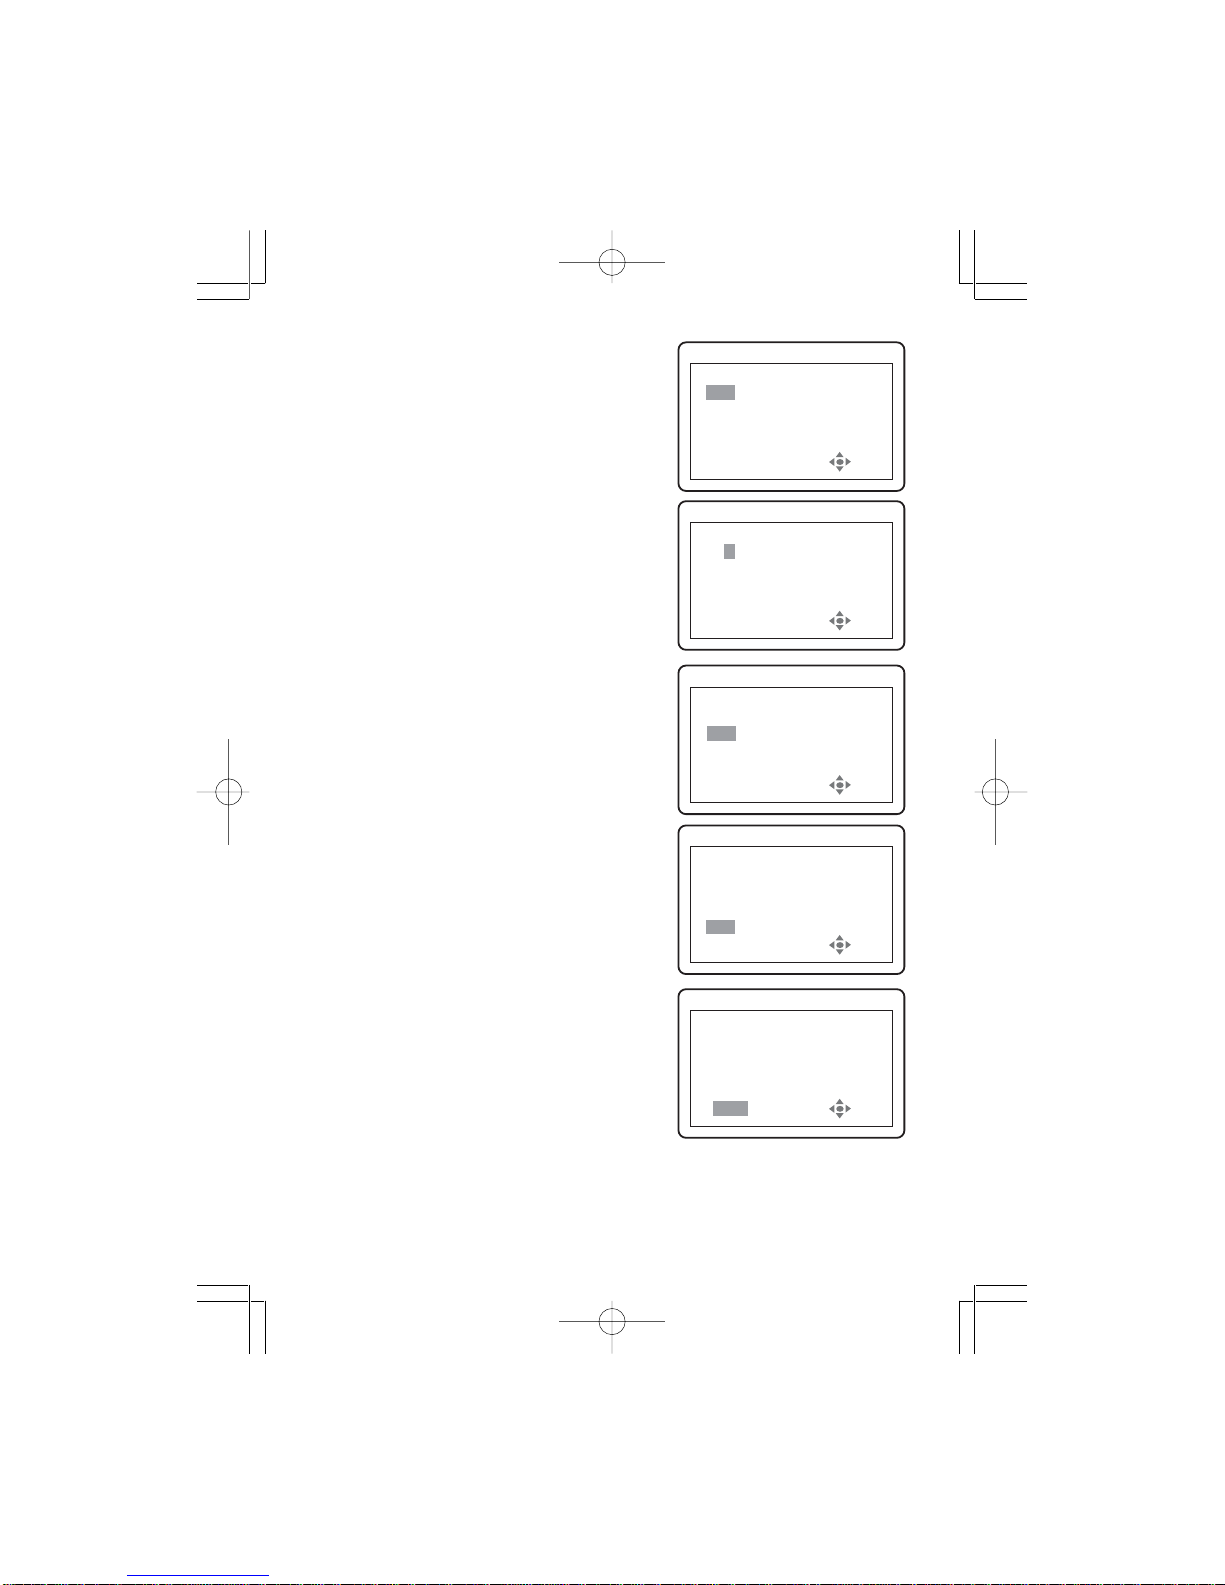
• DVD
1. Press the PROGRAM button. The Program
Sequence table will be shown on the screen.
2. Enter the Title number with the Number keys
(0-9) on the remote control.
3. Enter the Chapter number of the Title selected in
the last step.
4. Repeat steps 2 - 3 to input the sequence.
5. After assigning the playback sequence,move the
hightlight cursor to the PLAY option using the
Navigation Arrows. Press ENTER on the remote
control to confirm.
To cancel the program:
Move the highlight cursor to desired Program using
the Navigation arrows and press the CLEAR button
to delete the selected program.
PROG
T C T C T C T C
1
02
:
03
5 - -:- - 9 - -:- - 13 - -:- -
2 - -:- - 6 - -:- - 10 - -:- - 14 - -:- -
3 - -:- - 7 - -:- - 11 - -:- - 15 - -:- -
4 -- :- - 8 - -:- - 12 - -:- - 16 - -:- -
PLAY CLEAR
PROG
T C T C T C T C
1
02
:
03
5 - -:- - 9 - -:- - 13 - -:- -
2
01
:
01
6 - -:- - 10 - -:- - 14 - -:- -
3
03
:
04
7 - -:- - 11 - -:- - 15 - -:- -
4 -- :- - 8 - -:- - 12 - -:- - 16 - -:- -
PLAY CLEAR
PROG
T C T C T C T C
1
02
:
03
5 - -:- - 9 - -:- - 13 - -:- -
2
01
:
01
6 - -:- - 10 - -:- - 14 - -:- -
3
03
:
04
7 - -:- - 11 - -:- - 15 - -:- -
4 -- :- - 8 - -:- - 12 - -:- - 16 - -:- -
PLAY CLEAR
PROG
T C T C T C T C
1 - -:- - 5 - -:- - 9 - -:- - 13 - -:- -
2 - -:- - 6 - -:- - 10 - -:- - 14 - -:- -
3 - -:- - 7 - -:- - 11 - -:- - 15 - -:- -
4 -- :- - 8 - -:- - 12 - -:- - 16 - -:- -
PLAY CLEAR
PROG
T C T C T C T C
1
02
:- - 5 - -:- - 9 - -:- - 13 - -:- -
2 - -:- - 6 - -:- - 10 - -:- - 14 - -:- -
3 - -:- - 7 - -:- - 11 - -:- - 15 - -:- -
4 -- :- - 8 - -:- - 12 - -:- - 16 - -:- -
PLAY CLEAR
DVD263 Acoustic 00CA 14/6/07, 14:50Page 15 Adobe PageMaker 6.5C/PPC

16
Picture CD
Load a picture CD into the tray and the disc will be automatically identified. The playlist
table will shown on the screen.
Operation
During Slide Show Mode:
• Press the STOP button, it will shift to the playlist table will be shown on he screen.
• Press the PAUSE button, it will freeze the screen so that the current picture can be held
for a long time. To resume slide show mode, press the PLAY button.
• Press the NEXT button on the remote control to skip to the next picture.
• Press the PREVIOUS button on the remote control to repeat the previous picture.
• Pressing the PROGRAM button will change the picture effect as below:
WIPE TOP > WIPE BOTTOM > WIPE LIFE > .... > WINDOW V > RANDOM > NONE.
DVD263 Acoustic 00CA 14/6/07, 14:50Page 16 Adobe PageMaker 6.5C/PPC

17
Cautionary Note
When Moving the Player
•Be sure to remove the disc from the player before packing for moving.
It is recommended that you also remove the disc from the player and turn off the power
when not using the player.
Saving Power
•It is recommended that you turn off the power to the DVD player when not in use.
If you are not going to use it for prolonged period of time, unplug the power cord
from the wall outlet.
Maintenance of LCD Screen
•To keep the screen clean, turn off the power and then wipe with a soft, dry cloth.
About LCD Screen
• Do not press on the LCD Screen
AC Adapter
The suppliedAC adatper is compatible with 50/60Hz electrical system (100V-240V~ range).
Use of the AC adapter depends on the specific voltage requirements and electrical outlet
design.
• Using the AC adapter near a radio may cause poor reception.
• Do not let any type of flammables, liquid, or metal objects in the adapter.
• The adapter is covered with an outer plastic sheath. Do not peel open the sheath.
• Do not drop, jar, or shake the adapter.
• Do not place in direct sunlight.
• Do not use in high temperature or cold and humid environments.
Cleaning and Maintenance
• Many plastic parts are used in this DVD player casing. Do not use volatile chemicals
such as benzene or thinner. This might damage the finish.
• Wipe the casing with a soft, dry cloth. For excessive dirt, use a cloth dampened in a
diluted neutral detergent and wipe again with soft, dry cloth.
• Wipe off fingerprints or dirt on the LCD screen using a soft, dry cloth.
DVD263 Acoustic 00CA 14/6/07, 14:50Page 17 Adobe PageMaker 6.5C/PPC
18
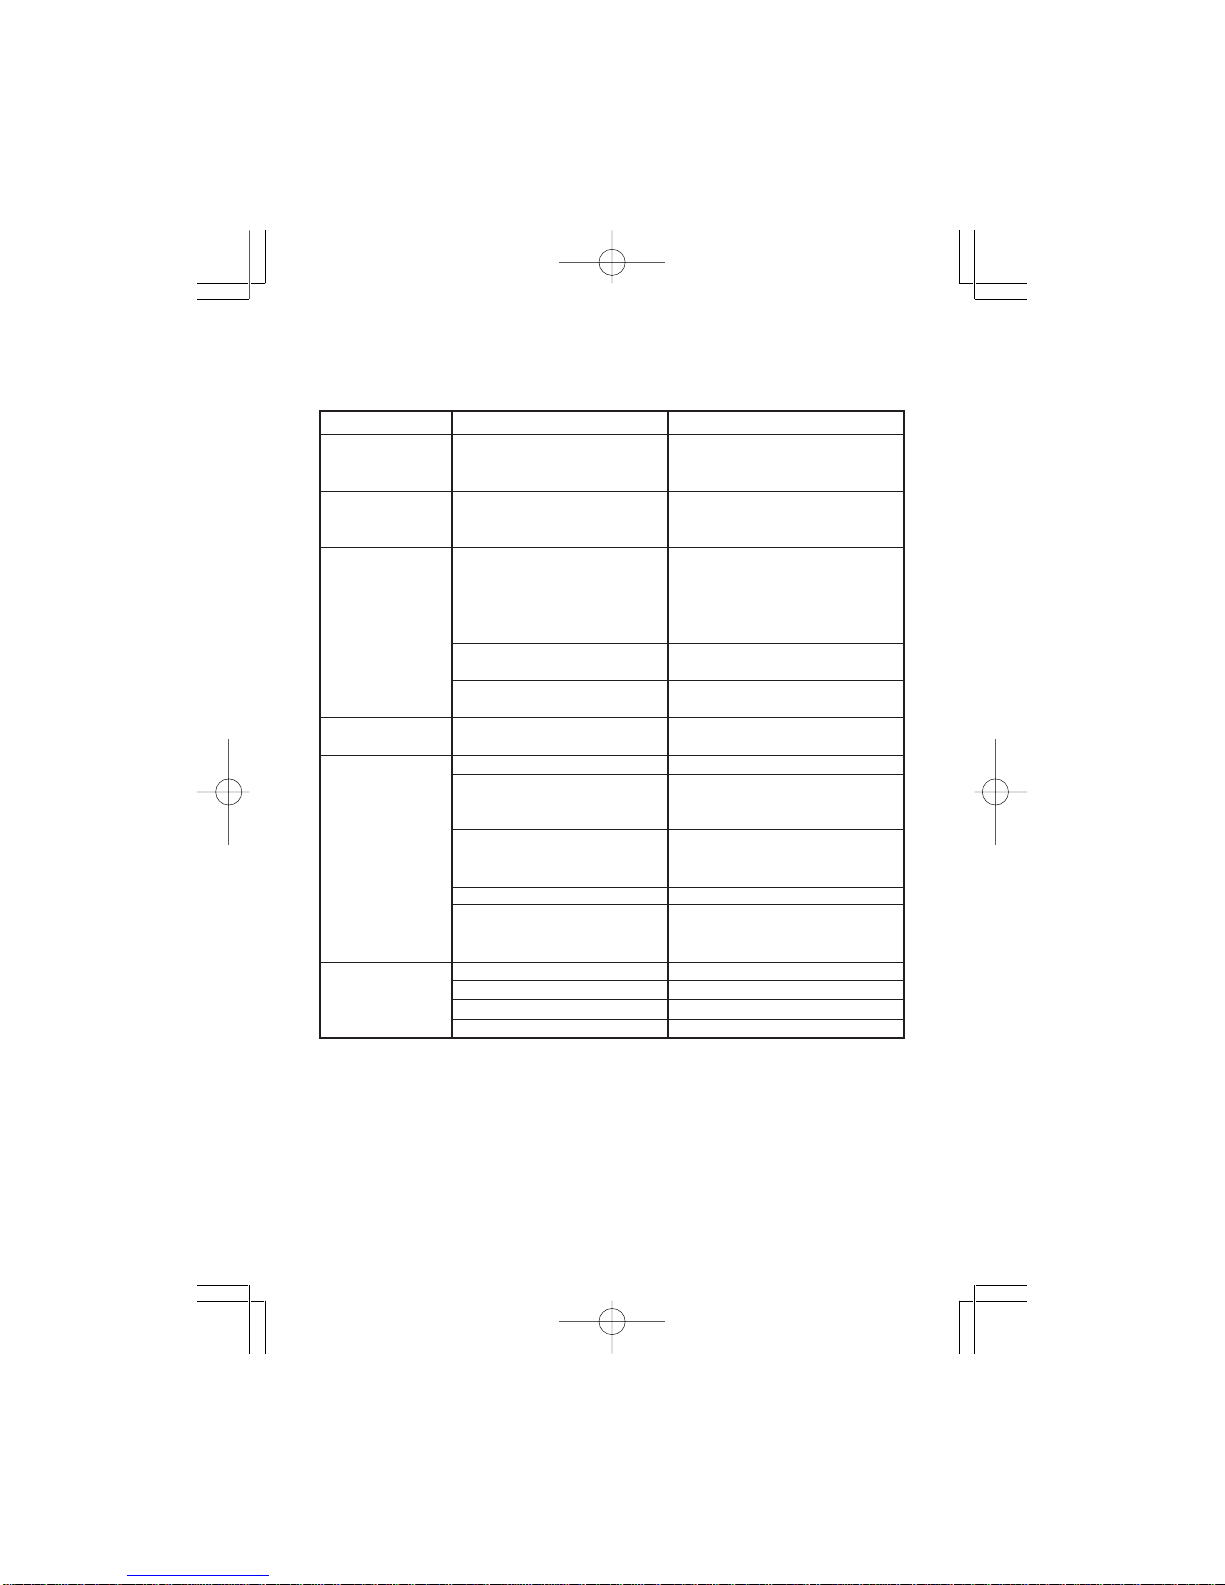
TROUBLE SHOOTING
Check the following guide for the possible cause of a problem before contacting service.
Symptom
The unit is receiving
no power
The power is ON,
but the unit does
not operate
There is no picture
(and/or sound), and
the Power LED is lit
in GREEN
Poor picture and/or
audio quality.
The DVD player
does not start
playback
The remote control
does not work
properly
Cause
• The AC adapter is disconnected
from the wall outlet or is not
connected to the unit.
• No disc is inserted.
• The “AV/DVD” switch is set to
AV, but there is no external
video input available
(see page 6).
• The external video/audio cable(s)
are not connected securely.
• The external video/audio
equipment is powered off.
• A dirty or scratched disc is being
played.
• No disc is inserted.
• An unplayable disc is inserted.
• The disc is placed in the unit
upside down or misaligned with
the guides.
• The disc is dirty.
• A menu is still on the screen
• Not pointed at the unit.
• Operated too far away.
• Obstacle in remote’s path.
• Batteries in remote are low.
Correction
• Plug theAC adapter securely into the
wall outlet and securely into the unit,
as well.
• Insert a disc.
• Set the “AV/DVD” switch
appropriately, for either an external
video source (IN) or for internal disc
usage (OUT). Refer to page 6 for
additional information on this switch.
• Check the unit for the proper
external connections.
• Turn on the externally connected
equipment.
• Clean the disc by following the
procedure on page 4.
• Insert a disc
• Insert a playable disc. (Check the
disc type, the TV System menu, and
the Regional Code).
• Place the disc on the disc tray with
the proper orientation.
• Clean the disc.
• Press the SETUP button on the unit
or remote control to close the menu
screen.
• Point remote at unit’s sensor.
• Operate with 23 feet (7m).
• Remove the obstacle.
• Replace the batteries.
If you experience any problems when using or setting up the DVD-263, please don’t hesitate to
call the Argos Customer Service helpline on 0870 600 3030.
DVD263 Acoustic 00CA 14/6/07, 14:50Page 18 Adobe PageMaker 6.5C/PPC

19
SPECIFICATION
GENERAL
Power source DC9V-12V ... 2A
Power consumption 18W
External dimensions (WxDxH)
Main Unit 240 X 162 x 33 mm
each Display 214 x 142 x 23 mm
Weight Main Unit Approx. 0.6 kg
each Display Approx. 0.4kg
Operating conditions Temperature: 5°C to 35°C
Operation status Horizontal
Operating humidity 5% to 90%
SYSTEM
Laser Semiconductor laser wave length 650nm
Signal system NTSC/PAL
S/N more than 90db
Dynamic Range more than 90db
INPUT
Composite video 1.0V P-P 75ohm negative sync.
Audio 0.5Vrms 47Kohm
OUTPUT
Composite video 1.0V P-P 75ohm negative sync.
Audio output (Digital) 0.5V P-P 75ohm
Audio output (Analog) 2Vrms 600 ohm
AC Input (Adaptor) AC 100V - 240V~ 50/60Hz
* Design and specification are subject to change without notice.
This product incorporates copyright protection technology that is protected by
method claims of certain U.S. patents and other intellectual property rights
owners. Use of this copyright protection technology must be authorized by
Marcrovision Corporation, and is intended for home and other limited viewing
uses only unless otherwise authorized by Macrovision Corporation. Reverse
engineering or disassembly is prohibited.
Manufactured under license from Dolby Laboratories. “Dolby”, “Pro Logic” and
the double-D symbol are trademarks of Dolby Laboratories. Confidential unpub-
lished works. ©1992-1997 Dolby Laboratories, Inc. All rights reserved.
DVD263 Acoustic 00CA 14/6/07, 14:50Page 19 Adobe PageMaker 6.5C/PPC

CONTACT DETAILS
We trust you are completely satisfied with this product fromArgos Ltd., however please feel free
to contact us if you experience any difficulties, or if you would like to express your views regard-
ing our products.
Please write to:
Customer Services
Argos Ltd
489-499 Avebury Boulevard
Saxon Gate West
Central Milton Keynes
MK9 2NW
Telephone: 0870 600 3030
Through the process of continuous improvement, Argos Ltd. reserves the right to change or
alter specifications without prior notice. E&OE
Product Guarantee
This product is guaranteed against manufacturing defects for a period of
1 Year
This does not cover the product where the fault is due to misuse, abuse, use in
contravention of the instructions, or where the product has been the subject of
unauthorised modifications or alterations, or has been the subject of commercial use
In the event of a problem with the product within the guarantee period please return it to
your nearestArgos store
If the item is shown to have had an inherent defect present at the time of sale, the store
will provide you with a replacement
Your statutory rights remain unaffected
Guarantor; Argos Ltd
489 – 499Avebury Boulevard
Central Milton Keynes
MK9 2NW
DVD263 Acoustic 00CA 14/6/07, 14:50Page 20 Adobe PageMaker 6.5C/PPC
Table of contents


