Active Intent Mini Quad 6V Ride On User manual
Instruction Manual
Mini Quad 6V Ride On
The product must be assembled by adults only.
Picture is for reference only
Barcode: 9401056937400

Name Specification
Please read the instruction manual carefully before using this product.
lncorrect assembly may cause harm.
Please keep this manual for future reference.
Product Details
Battery
Motor
Suitable age
Load capacity
Product size
Package size
Speed
Charging time
Charger
Circuit Breaker
625*355*285mm
6V 4.5AH
6V 20W
36-95 months
30kg Maximum
650*420*430mm
3-4km/h
8-12 hours
Playing time 1-2 hours
Output: DC6V
4A
Safe driving for your children, please read this carefully.
1. Assembly by Adults only. Please keep children away from small
parts and under adult supervision while assembling this product.
2. Adult supervision is required when using this product. Do not leave
children to operate this ride on toy unsupervised.
3. Do not stand on the pedal switch or on the top of the seat.
4. Battery charging to be done by adults only. Charge first before using.
5. Keep children away from plastic bags. Suffocation danger.
6. Only assemble using the parts provided.
7. The charger is not a toy.
8. Max capacity is 30kg, to avoid permanent damage,do not overload.
9. Suitable age: 36-95 months (> 3 years, < 8 years).
10. One ride on for one charger.
11. Do not play with the ride on when charging. The power switch
must be turned to the OFF position when charging.
M8
Screw
nut
M4X10
Charger
Driving
wheel
Wheel
Motor
Rear axle
Front fork
screw
Handlebar
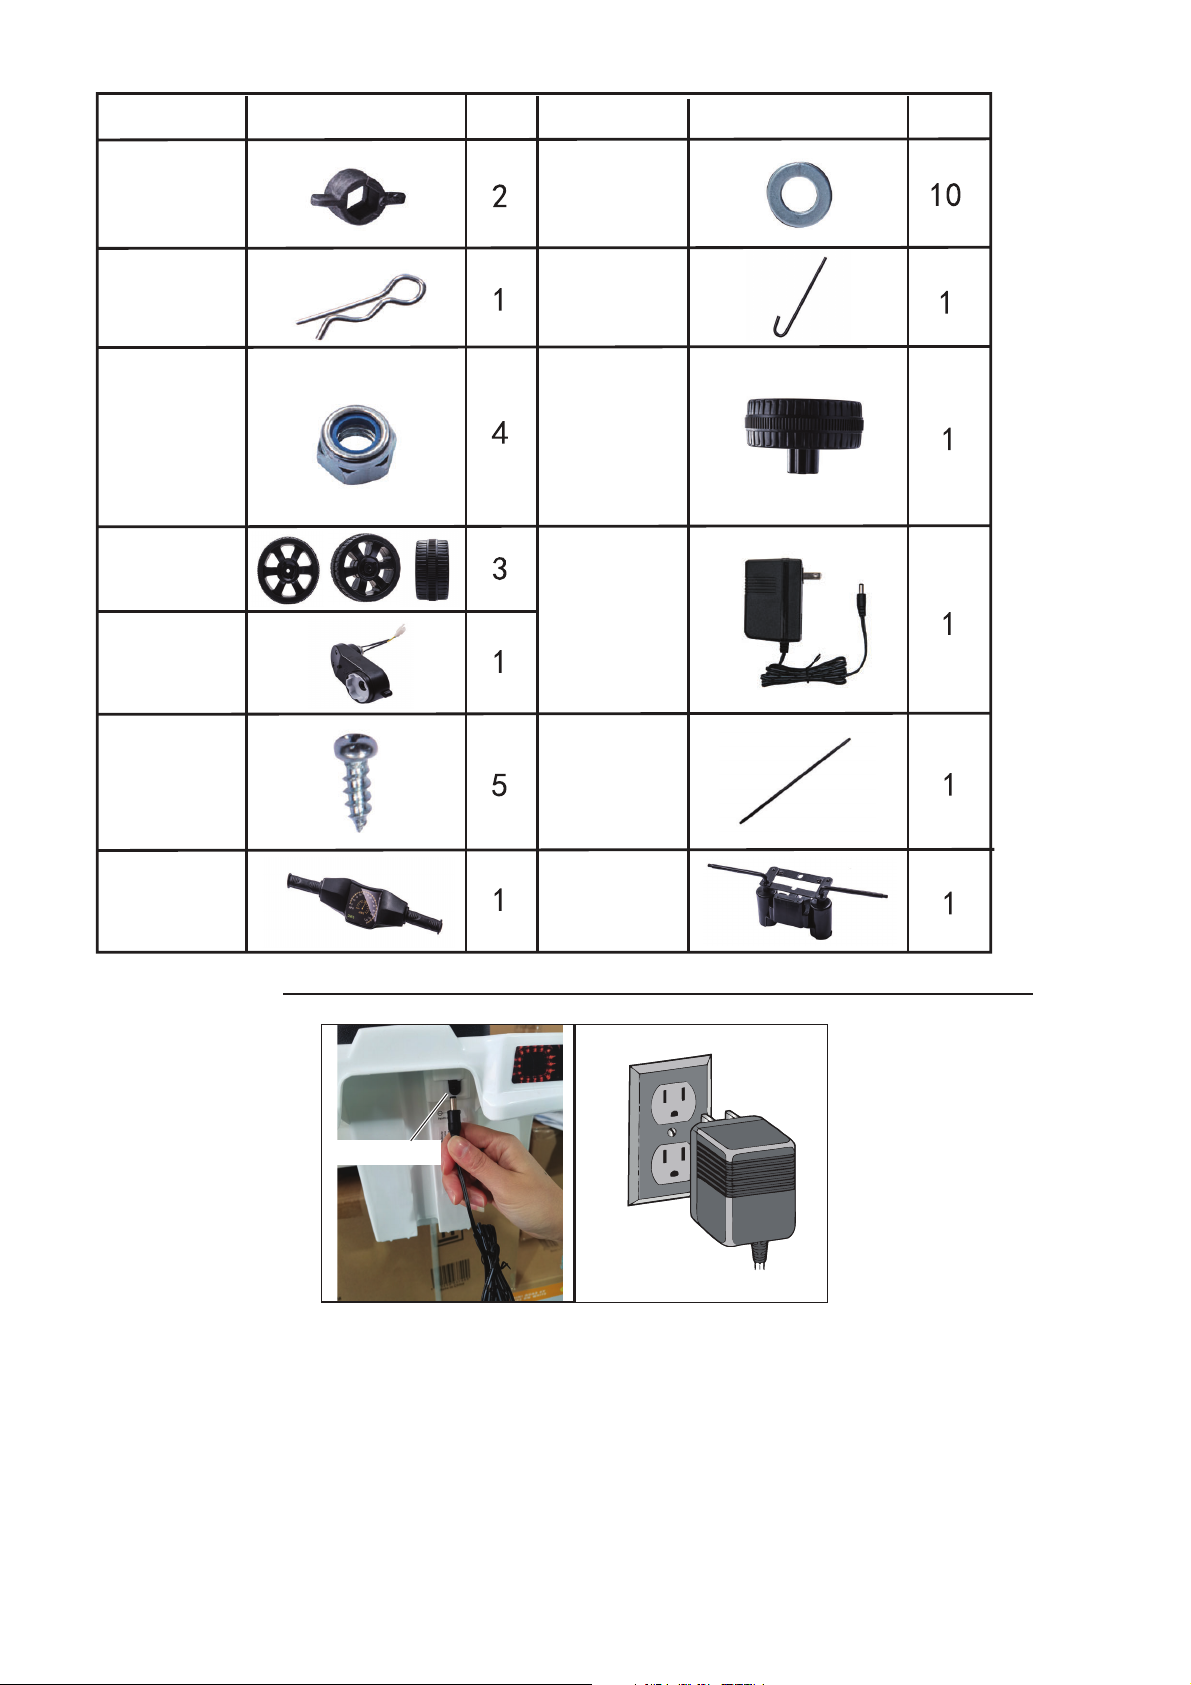
Parts: A screwdriver is required to assemble - not included)
Name Name
Picture PictureQty Qty
Wrench Washer
Snap-pin Steering
column
Charging
• The POWER SWITCH must be turned to OFF position when charging.
• Do not recharge the battery for more than 20 hours to avoid
overheating the charger.
• When the vehicle begins to run slowly, recharge the battery.
• After each use or once a month minimum recharge time is 8 to 12 hours.
1. Plug the charger port into the input socket. (it is located at the rear end
of the body below the seat).
2. Plug the charger plug into a wall outlet The battery will begin charging.
3. Carefully monitor the charge time as noted above.
Charging Input Socket

How to Assemble
1. Position the ride on, right side up, remove the seat (using a flat head
screw driver as shown to unlock the latch) and take the motor out.
2. Turn the ride on over, then insert the front fork according to the arrow.
3. Use 2pcs of M4X10 screw to tighten front guard and front fork
.
4. Use 2pcs M4x10 screw to tighten front fork and ride on body.
5. Insert washer (as indicated by the arrow) to the bottom of the steering
column as shown in the picture.

Screws
6. Insert the steering column into the hole as indicated by the arrow.
7. Move the washer up to the hole for snap-pin, then use snap-pin to secure.
8. Add one washer to each side of the front axle.
Washer
Snap-pin
Washer
Screw
How to Assemble

How to Assemble
Front wheel
Washer
Wrench
Screw nut
Washer
each side.
to each side of it, attach screw nuts and use wrench to tighten screw nut t
9.Add one front wheel to each side of the front axle, then add one washer
o
(see picture)
10. Add one washer to the long side of rear axle, then insert the rear axle
to the body from the right side.(see picture)
11. Add the motor to the left hand side, add one washer to the right hand
side.(see picture)
Wrench
Screw nut
Washer
12. Insert the driving wheel to the motor side and another rear wheel to
the washer side, add one washer to each rear wheel, then screw nut and
use wrench to tighten the wheel.

15. Straighten the wheel, then insert the handlebar to the steering column
(please align the shape), it is assembled correctly when you hear a “Click”.
.
How to Assemble and Function Overview
13. Connect motor’s white connector and vehicle’s white connector.
14. Insert the red wire to the red terminal on the battery, then close the seat.
Function overview
The internal circuit breaker
(fitted inline with the
battery) will cut off the
power if the ride on is
overloaded. Once the
overload has been
removed, the device will
automatically reset within
seconds.
16.
Power switch controls battery on/off status
Switch controls forward/backward
direction and stop (0).
Pedal switch controls car’s movement.
4 Push button for “BEEP” sound.

Problem Cause Solution
doesVehicle
not move
Cannot hold a
charge
Trouble Shooting
1. Battery Charge too low
2. Overload operated
3. Incorrect assembly
4. Battery wirings loose
5. Battery damage or
failure
6. Motor failure
Playing time too
short
1. Recharge
2. Allow to rest and reset
3. Reassemble
according to the manual
4. Reconnect the battery
5. Contact After Sales
6. Contact After Sales
1. Battery wirings loose
2.Charger not connected
properly while recharging
3. Charger failure
1. Reconnect the battery
2. Check the wall outlet
and plug in again
3. Contact After Sales
1. Battery not fully
charged
2. Battery Failure
1. Recharge the battery
2. Contact After Sales
Speed too low 1. Not enough power
2. Overloaded
3. Surface is too rough
1. Recharge the battery
2. Maximum load is 30kg
3. Always play on smooth
surface
Gearbox making
abnormal noise Motor or gears damaged Contact After Sales
Vehicle shaking
1. Motor connector loose
2. Battery is almost flat
1. Check and reconnect
the motor connections
2. Recharge the battery
Contact After Sales
Service
stops
running
Some components
damaged
Vehicle

2
1.
3.
.
Charging Recommendations
It is normal for the battery and charger to feel warm during charging.
2
1.
. Keep away from water when charging, or a short circuit will occur.
3. Only use charger and battery provided.
1.
2.
3.
4.
1.
2.
3.
4.
5.
6.
7.
8.
9.
When charging for the first time after purchase, charge for 10-12 hours only
and then use briefly to discharge before fully recharging. Failure to do this,
could result in damage to the battery.
Connect battery and charger first, then plug charger into the power outlet.
When the battery is flat, please recharge. Normal charging is for a duration
of 8-12 hours, never exceed 20 hours as this may cause permanent damage
to the battery or charger.
Charging Note
Safety Warnings During Use
Care and Maintenance lnstructions
For safe driving, please often inspect the charger, wiring and other parts for
signs of excessive wear or damage.
Before assembling, please make sure there are no missing or broken parts.
Please contact After Sales Service (0800 422 274) lf you have missing parts.
To clean the ride on use a damp (not wet) cloth.
When disassembling, please read instruction manual carefully , or damage
may occur to parts.
Ensure Children Are Supervised By An Adult While Using The Ride On.
Make sure the product is assembled correctly before use.
Do not play in the street, road, and slope or near drains.
Do not play on a slippery surface, like marble or floor tile.
Do not stand on the seat.
Do not use the product in the rain or water, keep product away from
water or fire, this may damage the wiring.
When battery power is low, light will not work, please recharge the
battery immediately.
Only one rider. Maximum capacity is 30kg. EXCEEDING THIS WEIGHT
CAN CAUSE PERMANENT DAMAGE.
Turn off the power when the product is not in use. Please disconnect the
battery connection (red wire) if you don't use the ride on for a long time.

i
STOP
BEFORE
RETURNING
TO STORE
Read the manual.
It will help you get the
best out of your product.
Still have questions?
Call After Sales Support
0800 422 274
AFTER SALES SUPPORT
0800 422 274
NZ
This manual suits for next models
1
Table of contents


