adapt ADPP-305 User manual

I
Adapt ADPP-
305 Projector
User Manual

2 www.adapt-mobile.com
IMPORTANT: Please read before use
•Before usin the product, please read the manual carefully.
•This product has 4GB memory, and can receive an additional TF/Micro SD
card of hi her capacity (8GB Max)
•You must leave 30 MB of free space in the memory of the player for the
Operatin System to work.
•Do NOT use the projector in damp, hot or dusty places.
•The ADPP-305 has a projection resolution of 800 x 600. For optimum
viewin please adjust your PC’s resolution to 800 x 600.
•When you turn off the MP4 module, please wait 3 seconds before turnin it
back on repeatedly.
•It is advised to compress all MP4 files that you store on the ADPP-305, as
this will increase the operatin speed of the device
•More information can be found on our website at www.adapt-mobile.com

3 www.adapt-mobile.com
Contents
Product List 4
Overview 4
General Specification of Pro ector 6
Basic Functions 7
Power Input 7
Battery 8
Connect to PC via VGA 8
(Standard 15 pin VGA) 8
Connect to digital (A/V in) Products 9
Audio 9
Micro SD Slot 9
Micro USB 9
Focusing the display 10
MP4 Player Instructions 11
MP4 Key Functions 11
MP4 features 12
Accessing the MP4 Menu 12
MP4 Function Descriptions 13
1. Music Mode 13
2. Video Mode 14
3. Photo Mode 14
4. Explorer Mode 15
5. Settings Mode 15
Desktop: 16
Language: 16
Remote Control User Guide 16
Appearance 16
Key Functions and Usage 17
Accessing Menus 17
Troubleshooting 19
Factory Reset 20

4 www.adapt-mobile.com
Product List
ADPP-305 Projector 1
AC Adapter 1
A/V Cable 1
Battery 1
Char er 1
Tripod 1
Remote Controller 1
Overview
Fi 1.1 Top View

5 www.adapt-mobile.com
Fi 1.2 Side View
Fi 1.3 Back View

6 www.adapt-mobile.com
General Specification of Pro ector
Parameters Normal Unit Remarks
Resolution 800x600 Pixel
Aspect ratio 4:3
Projection lens type Manual focus
Projection an le 33.4 De ree
Recommended projection size
30-40 Dia onal
Inch
Li ht source LED
Input RGB, A/V NTSC/PAL
Wei ht 290 Gram

7 www.adapt-mobile.com
Basic Functions
1. Power on the Projector
Attach the power cable or battery pack. Turn the power switch to ON
Hold down the Standby button for 3 seconds, a blue screen will be
displayed. The ADPP-305 is now in standby mode. To access the MP4
menu hold down PLAY button for 3 seconds.
Note: When the pro ector is in standby mode it is ready to playback
MP4 or receive external inputs
Power Input
Plu the DC char er directly into the ADPP-
305 and switch on. You can use this method
to save on battery consumption, but it will
not char e the battery.
8 www.adapt-mobile.com
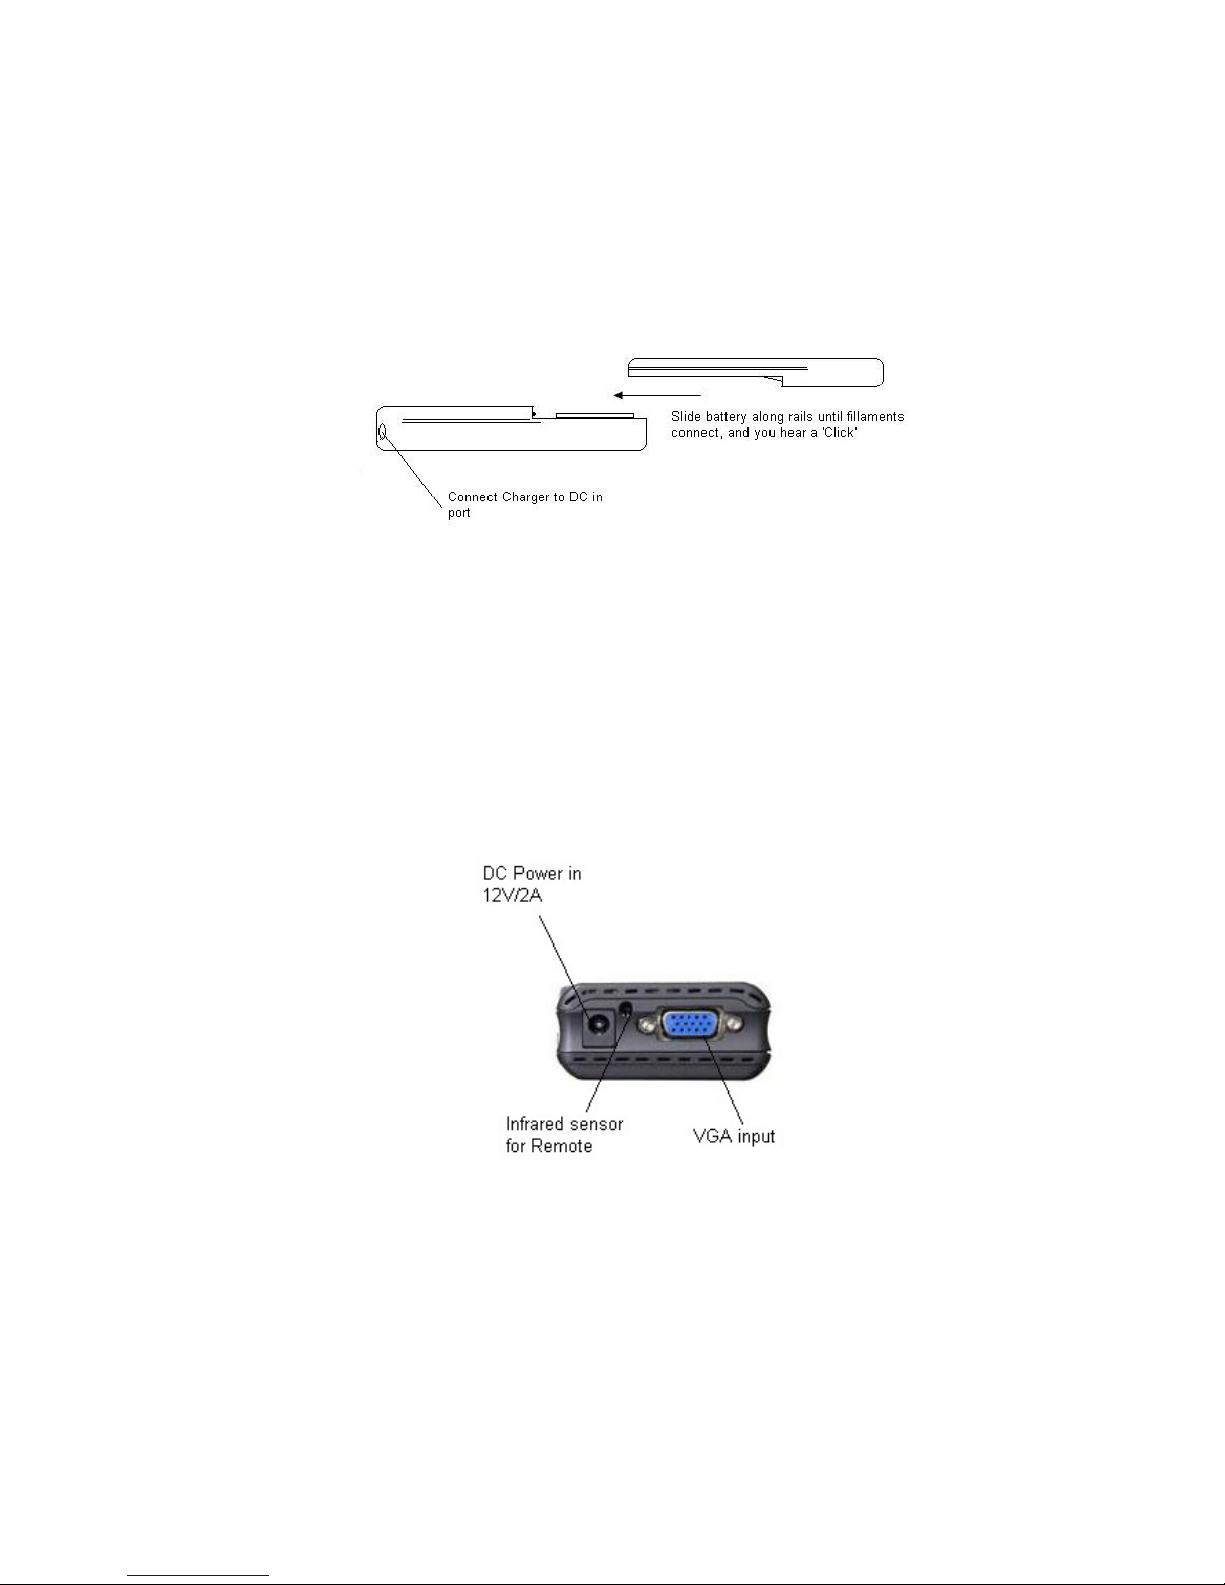
Battery
The ADPP-305 comes with a 2000mAH battery that should ive you up to
2 hours of playback when fully char ed.
To char e the battery, slide it onto the separate char in plate and plu the DC
char er into the wall.
You can connect the battery to the ADPP-305 in the same way.
Connect to PC via VGA
(Standard 15 pin VGA)
Usin the VGA cable provided in the box you must plu the male end
into the back of the projector, leadin from your Laptop/PC, as if connectin a
Monitor to your Laptop/PC.

9 www.adapt-mobile.com
Connect to digital (A/V in) Products
Usin the 3.5mm Data Jack provided in the box, connect your AV out device.
Note: You may need to use the female to female AV converter also provided.
You must also ensure that you are using the correct AV Out cable for your
device, as there is no generic AV cable for all devices they are each specific to
your device.
If using with an iPOD you may need to select ‘Video Out’ in order for the AV
Out function on the device to work.
Audio
You can also listen to audio either via the 2w internal speakers, or by plu in
in a set of standard earphones into the 3.5mm earphone jack.
Micro SD Slot
This can be used with up to 8GB (maximum capacity) Micro SD card. For either
extendin the stora e space on the ADPP 305, or transferrin data. The Micro
SD is accessed via the MP4 player (see MP4 Player uide for further
instructions).
Micro USB
The mini USB port is used only for connectin the ADPP 305 to your laptop for
data transfer. It is not intended for char in or playback. Simply plu a mini
USB cable (provided) into the mini USB slot, and then into your PC/Laptop to
access the internal 4GB memory.
Your PC/Laptop/Mac should automatically detect the internal memory. There
are however some exceptions, see troubleshoot pa e or visit www.adapt-
mobile.com or email Productsupport@adapt-mobile.com

10 www.adapt-mobile.com
Focusing the display
The Adapt ADPP 305 uses a manual focus on the front of the device. Move the
dial from left to write in order to et a clear picture. Optimal from 0.5 -1.8
metres.
Mounting the pro ector
You will need the projector mount clip and the tripod which both came in the box in order to
mount the ADPP-305 when using a battery instead of external power.
Mount Clip Projector on mount clip and tripod with battery
First you must insert the battery into the projector (followin instructions in
this manual), then simply clip the “mount clip” onto the base of the battery,
and then you can screw the Tripod into the underside of the battery.
Note: Ensure the tripod is placed on a well balanced area so that the ADPP-
305 does not fall over.
Table of contents
Other adapt Projector manuals


