Admiral A3875XRA Installation instructions

GVs C
Care
Instructions for your Electric Range with "T"Clock
CONTENTS
SAFETY INSTRUCTIONS ...................... 1-3 Preheating ................................... 9
Howte bake or roast ......................... 10
ELECTRONIC CONTROLLER ............. 4 and 15 Common baking problem chart ................ 10
Howto broil ................................. 11
FEATURES .................................. 5-6
Self-clean oven .............................. 5 MAINTENANCE............................... 12
Automatic oven cooking ....................... 6 Light replacement ............................ 12
Storage drawer .............................. 12
USINGYOUR COOKTOP...................... 7-8 Oven door .................................. 12
Surface elements ............................. 7 Leveling legs ................................ 12
Signal lights .................................. 7 Fuses (Canadian models only) ................. 12
Cooktop ..................................... 7
Drip bowls ................................... 7 CAREANDCLEANINGCHART ................. 13
Control knobs ................................ 7
Cooking tips .................................. 7 SERVICE .................................. 14-17
Cookware .................................... 8 Troubleshooting ............................. 14
Heat settings ................................. 8 Fault Code .................................. 14
Howto obtain service ......................... 17
USING YOUR OVEN ......................... 9-11
Oven characteristics ........................... 9 ELECTRONIC CONTROLLER GUIDE ............ 15
Fan ......................................... 9
Oven racks ................................... 9 WARRANTY.................................. 18
8113P007-60
(6/93)
SAFETY INSTRUCTIONS
STORAGE IN, ON OR NEAR APPLIANCE -Donot
store orusegasolineor otherflammablematerials,va-
porsandliquidsinthe oven,nearsurfaceunitsorinthe
vicinityofthisorany otherappliance.Thefumescan
createafirehazardorexplosion.Donotusecooktopor
ovenasastorageareafor foodorcookingutensils.
Thefollowinginstructionsarebasedonsafetyconsid-
erationsand mustbestrictlyfollowedtoeliminatethe DO NOT USE WATER //(I(1"--_
potentialrisksoffire,electricshock,or personalinjury.ON GREASE FIRES -
Smotherfireor flameor
PROPERINSTALLATlON- Besureyourapplianceisuse dry chemical or
properlyinstalledand grounded by a qualifiedtechni-foam-type extinguisher,if _'-r_
clan. available or sprinkle
heavily with baking soda.
USE ONLY DRY POTHOLDERS- Moist or damp
potholders on hot surfaces may result in burns from
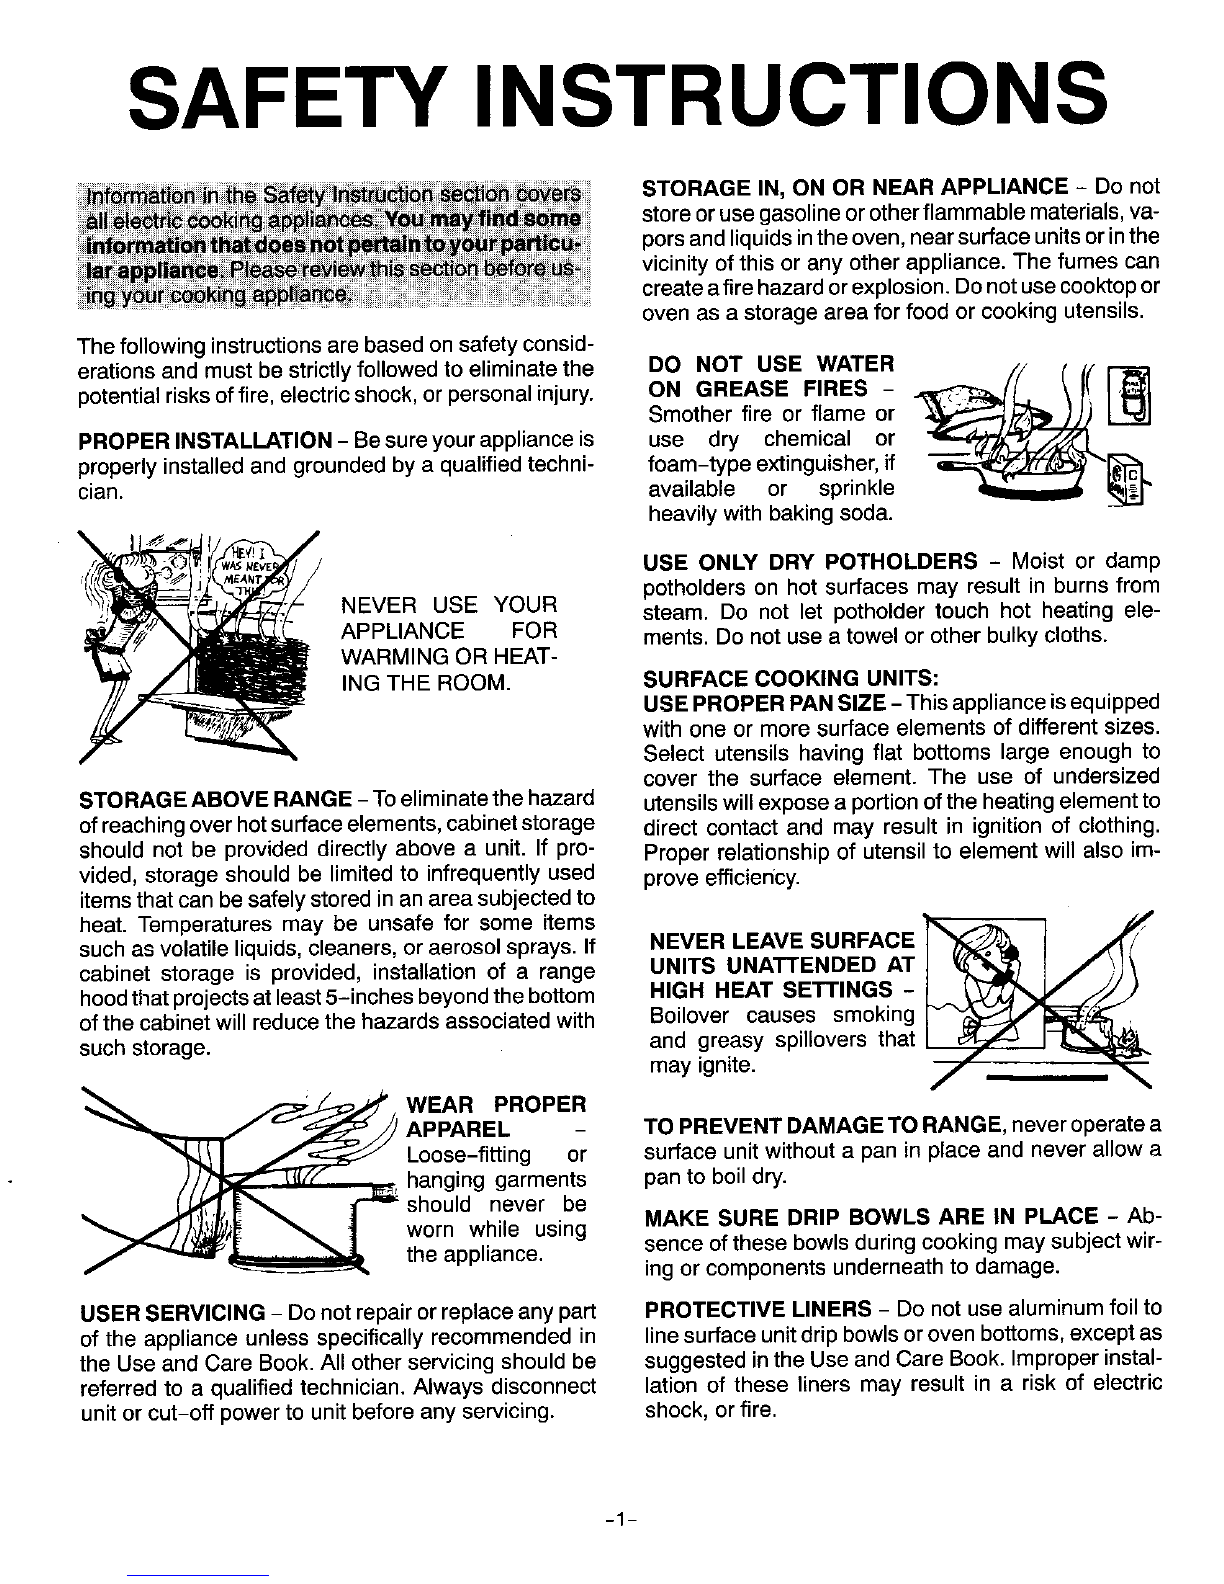
NEVER USE YOUR steam. Do not let potholder touch hot heating ele-
APPLIANCE FOR ments. Do not use a towel or other bulky cloths.
WARMING OR HEAT-
ING THE ROOM. SURFACECOOKING UNITS:
USEPROPERPANSIZE- This applianceisequipped
with one or more surface elements of different sizes.
Select utensils having flat bottoms large enough to
cover the surface element. The use of undersized
STORAGE ABOVE RANGE- Toeliminatethe hazard utensilswill expose a portionof the heatingelement to
of reachingover hotsurfaceelements, cabinetstorage direct contact and may result in ignition of clothing.
should not be provided directly above a unit. If pro- Proper relationship of utensil to element will also im-
vided, storage should be limited to infrequently used prove efficiency.
itemsthat canbe safelystored in an areasubjected to
heat. Temperatures may be unsafe for some items _ I .,,_
such as volatileliquids, cleaners, or aerosolsprays. IfNEVER LEAVE SURFACE
cabinet storage is provided, installation of a range UNITS UNATTENDED AT J _L'_ I /" _J\
hoodthatprojectsat least5-inchesbeyondthebottomHIGH HEAT SETTINGS - [ _ _ jJ_
ofthecabinetwillreducethe hazardsassociatedwithBoilover causes smokingF __ ._
suchstorage, and greasy spillovers that I _I_
mayignite 7
WEAR PROPER
APPAREL -TO PREVENTDAMAGETO RANGE, neveroperatea
Loose-fitting or surface unitwithouta pan in placeand neverallowa
hanginggarmentspanto boildry.
__should neverbe
worn while using MAKE SURE DRIP BOWLS ARE IN PLACE - Ab-
the appliance, senceofthesebowlsduringcookingmaysubjectwir-
ingorcomponentsunderneathtodamage.
USER SERVICING- Donotrepairorreplaceanypart PROTECTIVE LINERS - Do not usealuminumfoilto
oftheapplianceunlessspecificallyrecommendedin linesurfaceunitdripbowlsorovenbottoms,exceptas
theUse and Care Book.AllotherservicingshouldbesuggestedintheUse andCareBook.Improperinstal-
referredto a qualifiedtechnician.Alwaysdisconnect lationof theseliners may result in a riskof electric
unitorcut-offpowerto unitbeforeany servicing,shock,or fire.
-1-

SAFETY INSTRUCTIONS
GLAZED COOKING UTENSILS -Only certain types VENTILATING HOODS:
of glass, glass/ceramic, ceramic, earthenware, or CLEANVENTILATING HOODS FREQUENTLY -
other glazed utensils are suitable for range-top serv- Greaseshould not beallowed to accumulateon hood
icewithoutbreaking dueto thesudden changeintern- or filter. When flaming foods under the hood, turn the
perature, fan off.Thefan, ifoperating, may spread theflame.
UTENSIL HANDLES IMPORTANT SAFETY NOTICE ANDWARNING
_ _ SHOULD BE The California Safe Drinking Water and Toxic Enforce-
TURNED INWARD ment Act of 1986 (Proposition65)requires the Gover-
AND NOT EXTEND norofCaliforniato publish a list of substances known
OVER ADJACENT tothe State ofCaliforniato cause cancer or reproduc-
SURFACEUNITS - To tive harm,and requiresbusinesses to warncustomers
reduce the risk ofof potentialexposures tosuch substances.
burns, ignitionof flarn-
mable materials, and Users ofthis appliance are hereby warned that when
spillage due tounin-the appliance is engaged in the self-clean cycle there
tentional contactwiththe utensil, the handleof a utensil may be some low-levelexposure tosome of the listed
should be positioned sothat itis turned inward, and substances,including carbon monoxide. Exposure to
does not extend over adjacent surface elements,these substances can be minimized by properly vent-
ingthe appliance tothe outdoors during the self-clean
DO NOT SOAK REMOVABLEHEATING ELE-cycle.
MENTS - Heating elements should never be im-
mersed in water. Immersing element in water wouldDEEP FAT FRYERS:
damage insulating material inside element. Use extreme cautionwhen moving the grease kettleor
disposing of hot grease.
OVENS:
USE CAREWHEN OPENING DOOR - Let hot air orDONOT TOUCH SURFACE ELEMENTS OR OVEN
steam escape beforeremoving orreplacing food. ELEMENTS, AREAS NEAR ELEMENTS OR INTE-
RIOR SURFACES OF OVEN - Elements may be hot
DO NOT HEAT UNOPENEDFOOD CONTAINERS -even though they are dark incolor. Areas nearsurface
Build-up ofpressure may cause container toburst and elements and interior surfaces ofovertmay become
resultininjury, hot enough to cause burns. During and after use, do
PREPAREDFOOD WARNING: Followfood rnanufac- not touchorlet clothing orother flammable materials
turer's instructions. Ifaplastic frozen food container contactheating elements, areasnear elements orinte-
and/or its filmcover distorts, warps, or is otherwise riotsurfaces ofoven untilthey have had sufficienttime
damaged during cooking, immediately discard the to cool.Among these areas are the cooktop, surfaces
food and its container.The foodcould be contami- facing the cooktop,oven vent opening and surfaces
nearthisopening, oven door,and oven window. Also,
nated, donot allow aluminum foil, meat probes or any other
KEEP OVEN VENT DUCTS (located under rear ele-metalobject, other than a utensilon a surface element,
ment; rear corner ofcooktop; between oven doorandto contact heating elements.
control panel of wall oven or on backguard) UNOB-
STRUCTED. Blockage of vent preventsproper oven ANTI-TIP BRACKET:
air circulationand will affect oven performance. Avoid WARNING: To reduce the risk of tippingoftheappli-
touchingoven vent area whileoven ison and for sev- ancefrom unusual usageor by excessive loading of
eral minutes after oven is turned off. Some parts of the the oven door, the appliance mustbe secured by a
vent and surrounding area become hot enough to properly installed anti-tip device. To check if deviceis
installed properly: Use a flashlight and look under-
cause burns, neath range to see that one of the rear leveling legs is
PLACEMENT OF OVEN RACKS -Always place oven engaged in the bracket slot.When removing appliance
racks in desired locationwhileoven iscool. If rack must for cleaning, besureanti-tip deviceisengaged when
bemoved whilehot, usecareto avoid contact of rangeisreplaced.Theanti-tipdevicesecurestherear
potholder withovenelement, leveling leg to thefloor, when properly engaged.
-2-
SAFETY INSTRUCTIONS
ADDITIONAL INFORMATION:
After appliance isinstalled, be certain all packing mate- On some models, a fan should be heard during the self
rialsareremoved fromthe appliancebeforeoperating clean cycle.If not, cancel clean cycle and call a serv-
theunit.If applianceisinstallednear a window, takeiceman beforeself cleaning again. (Refer to CON-
stepsto prevent curtainsfrom blowing over surface TENTS onfront cover for locationofselfclean instruc-
elementscreating a fire hazard, tionsandfan information.)
Careshould begiven to locationof appliance. BesureSMOOTHTOP COOKTOP:
floor coveringunder appliance, walls adjacent to appli- Do not cook on broken cooktop. If cooktop should
ance, cabinetryadjacent to appliance, and other mate-break, cleaning solutionsand spilloversmay penetrate
rials adjacent to appliance can withstand prolonged the broken cooktop and create a risk of electric shock.
heat. This is a heavy appliance and can settle into soft Contact a qualified technician immediately. Clean
floor coverings such as cushioned vinyl. Use care cooktopwithcaution, lfawetspongeorclothisusedto
when moving range on this type of floor covering, wipe spills on a hot cooking area, be careful to avoid
steam burn. Some cleaners can produce noxious
fumes if applied to a hot surface.
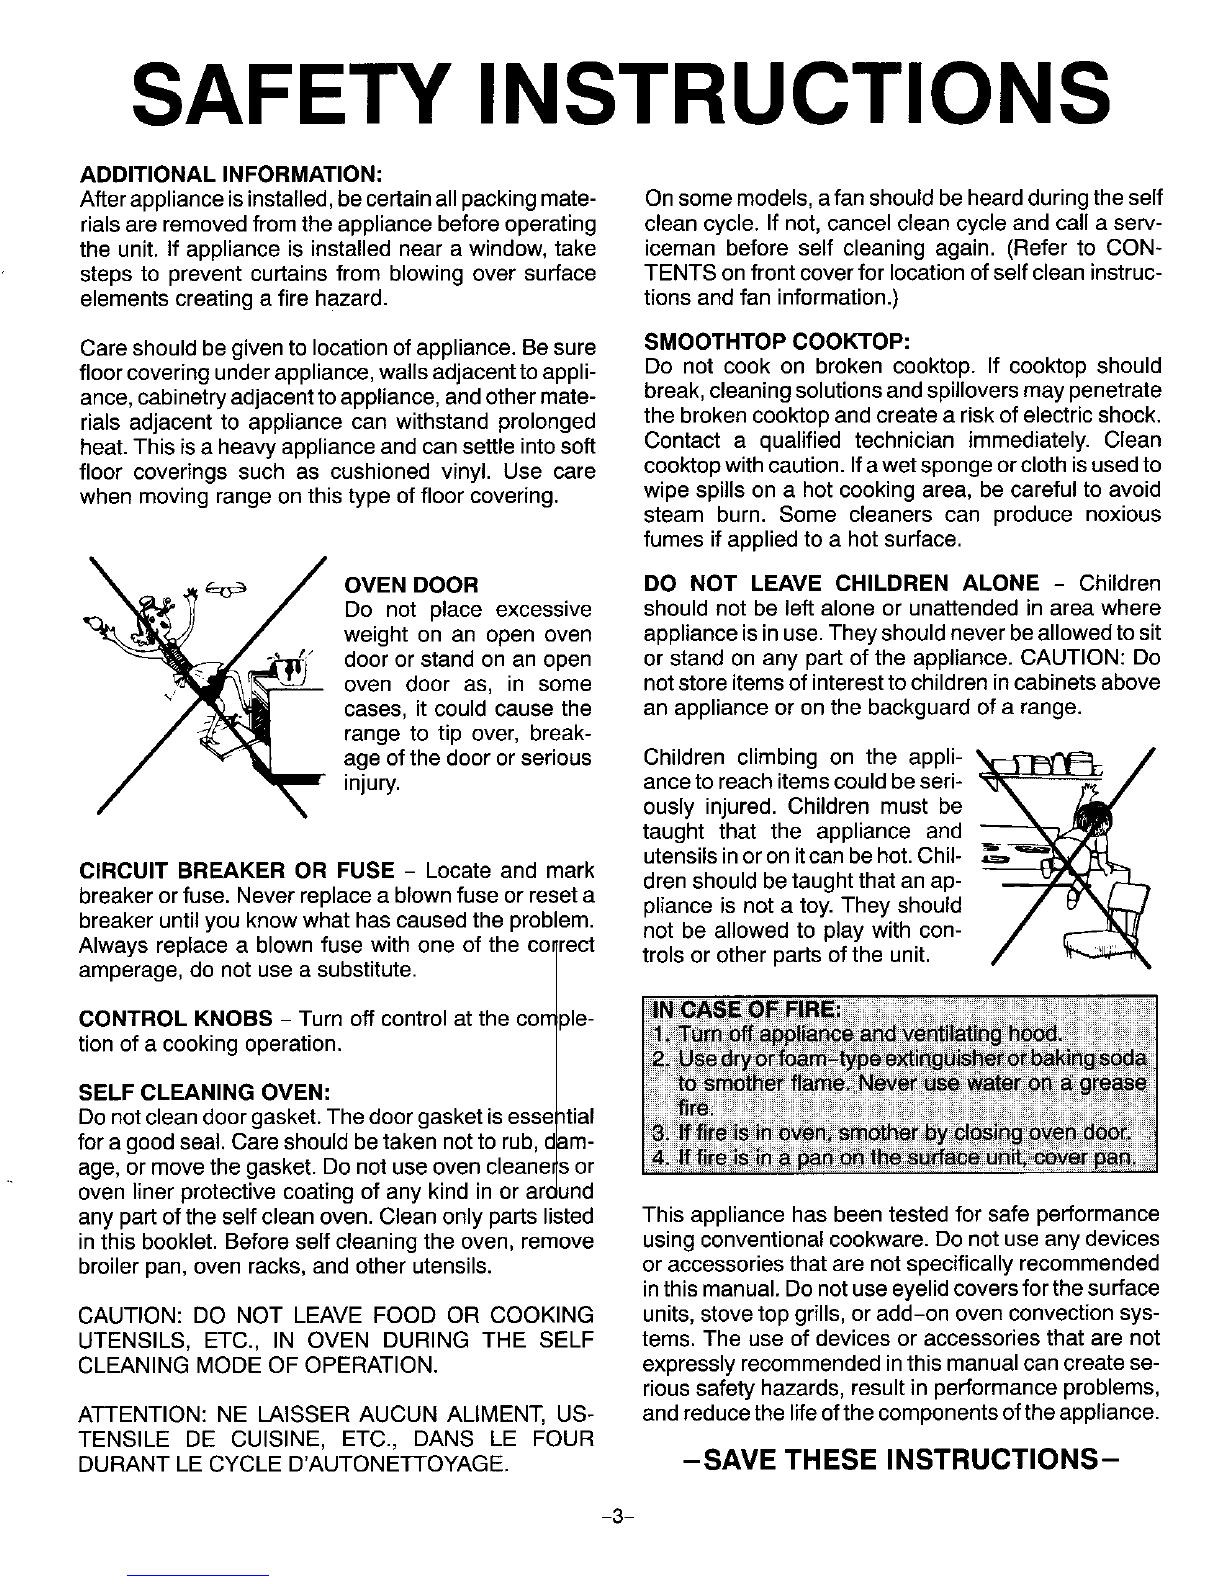
/OVEN DOOR DO NOT LEAVE CHILDREN ALONE -Children
Do not place excessiveshould not beleft alone or unattended in area where
weight on an openovenapplianceisinuse. Theyshould never beallowedtosit
dooror stand on an open or stand on any part of the appliance. CAUTION: Do
oven door as, in somenotstoreitems of interest tochildren in cabinetsabove
cases, it could causethean appliance or on thebackguard ofa range.
rangeto tip over, break-
age ofthe dooror serious Children climbing on the appli- _jl
injury, ance to reach items could be seri- _ /
ously injured.Children must be
taught that the appliance and
utensils in or on it can be hot. Chil-
CIRCUIT BREAKER OR FUSE -Locate and mark dren should be taught that an ap-
breaker or fuse. Neverreplace a blown fuseor reset a pliance isnot a toy. Theyshould
breaker until you know what hascaused theproblem,not beallowed to play withcon-
Alwaysreplacea blown fusewith oneof thecolrect trois or otherpartsof theunit.
amperage, do not useasubstitute.
CONTROL KNOBS - Turn off control at thecornole-
tion of a cooking operation.
SELF CLEANING OVEN:
Do notclean door gasket. The door gasketis esse _tial
for a good seal. Care should be taken not to rub, d am-
age, or move the gasket. Do not use oven cleaner sor
oven liner protective coating of any kind in or arc Jnd
any part of the self clean oven. Clean only parts listed This appliance has been tested for safe performance
in this booklet. Before self cleaning the oven, remove using conventional cookware. Do not use any devices
broiler pan, oven racks, and other utensils, or accessories that are not specifically recommended
in this manual.Do not use eyelid covers for the surface
CAUTION: DO NOT LEAVE FOOD OR COOKING units, stove top grills, or add-on oven convection sys-
UTENSILS, ETC., IN OVEN DURING THE SELF terns. The use of devices or accessories that are not
CLEANING MODE OF OPERATION. expressly recommended inthis manual can create se-
rious safety hazards, result in performance problems,
ATTENTION: NE LAISSER AUCUN ALIMENT, US- and reduce the life ofthe components ofthe appliance.
TENSILE DE CUISINE, ETC., DANS LE FOUR
DURANT LE CYCLE D'AUTONETTOYAGE.-SAVE THESE INSTRUCTIONS-
--3--
ELECTRONIC CONTROLLER
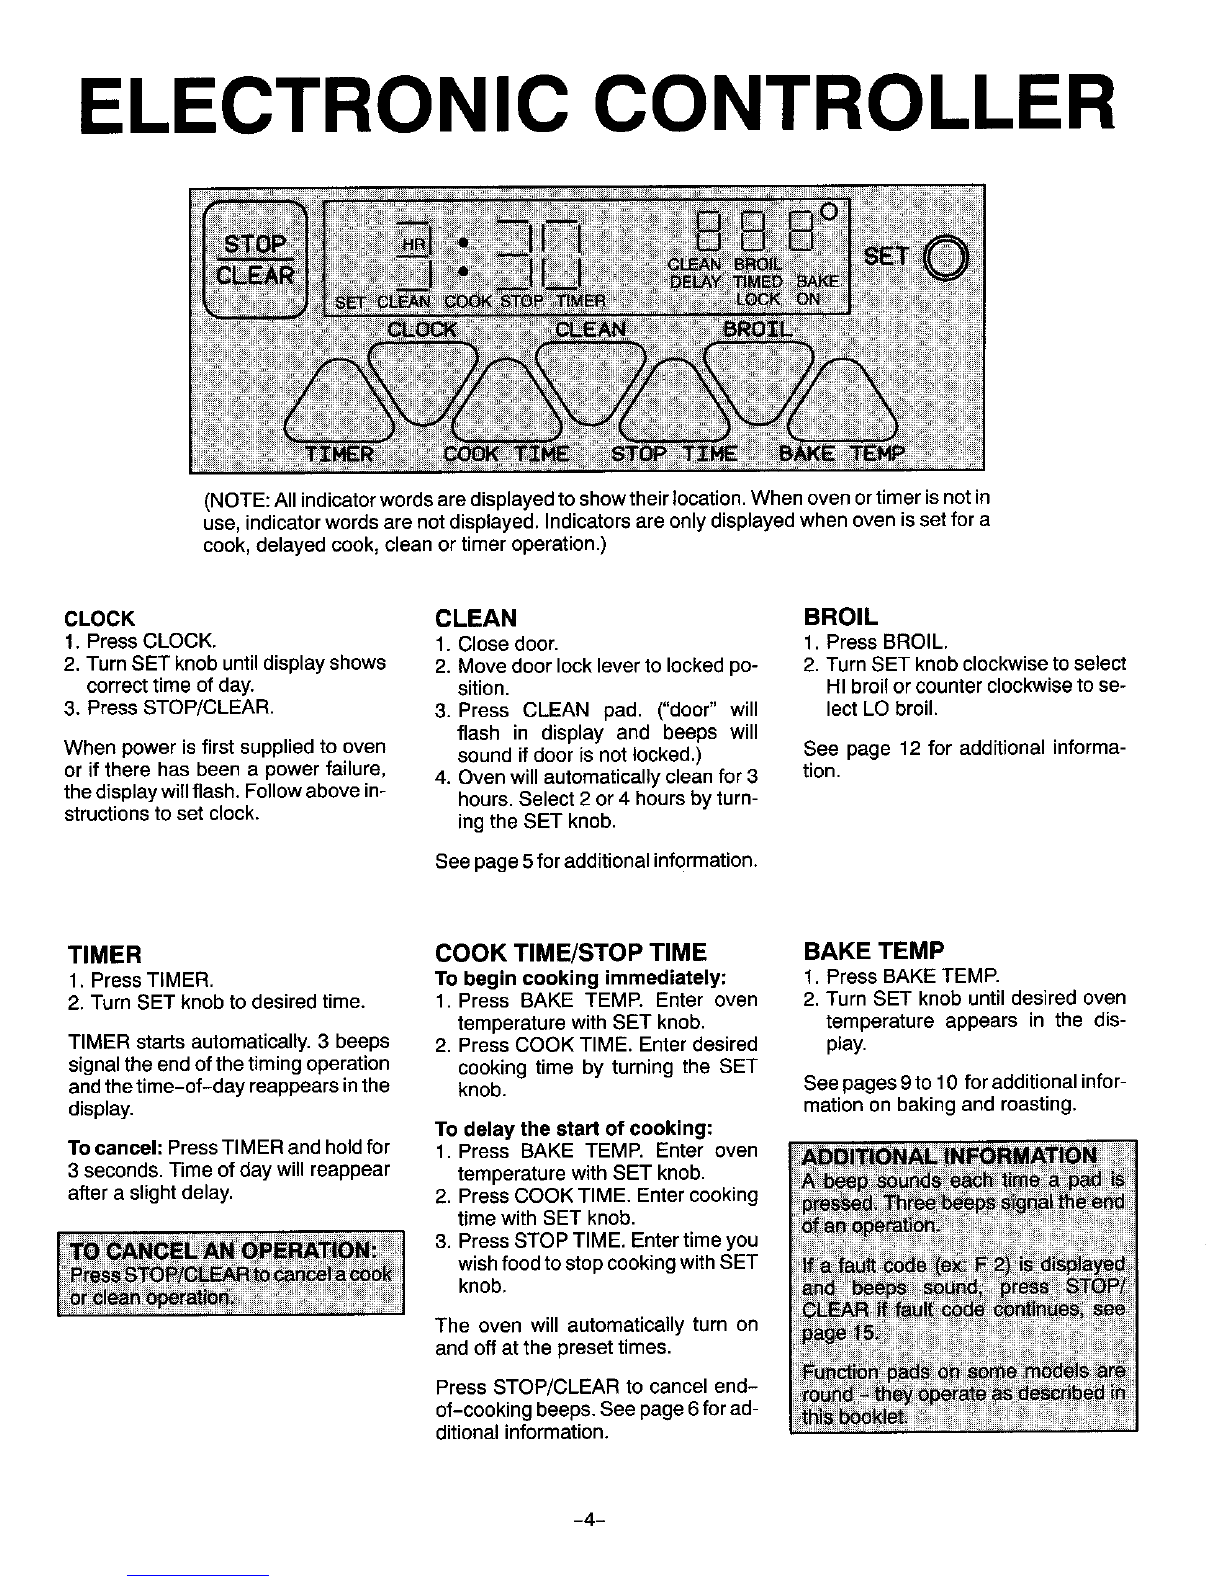
(NOTE:Allindicatorwordsare displayedtoshowtheirlocation.Whenoven or timerisnot in
use, indicatorwords are not displayed. Indicators areonly displayedwhen oven is setfor a
cook, delayedcook, clean or timer operation.)
CLOCK CLEAN BROIL
1.PressCLOCK.1.Closedoor.1.Press BROIL.
2. TurnSET knobuntildisplayshows 2. Movedoorlocklevertolockedpo- 2. TurnSET knobclockwiseto select
correcttime of day.sition. HI broilor counterclockwiseto se-
3. PressSTOP/CLEAR. 3.Press CLEANpad. ("door" will lectLO broil.
flash in display and beeps will
When powerisfirstsuppliedto oven soundifdoor isnot locked.) See page12for additional informa-
or if there has beenapowerfailure, 4.Ovenwillautomaticallycleanfor 3tion.
thedisplaywillflash.Followabovein-hours.Select2 or4 hoursbyturn-
structionstosetclock, ingthe SET knob.
See page5for additionalinformation.
TIMER COOK TIME/STOP TIME BAKE TEMP
1. PressTIMER.To begin cooking immediately: 1.PressBAKETEMP.
2. TurnSET knobtodesiredtime,1, Press BAKE TEMP. Enter oven 2,TurnSET knobuntildesiredoven
temperature with SET knob. temperature appears in the dis-
TIMER starts automatically. 3 beeps 2. Press COOK TIME.Enter desired play.
signalthe end ofthe timing operation cooking time by turning the SET
andthetime-of-day reappearsin the knob. Seepages9to 10 for additional infor-
display, mationon baking and roasting.
To delay the start of cooking:
Tocancel:PressTIMERandholdfor 1, Press BAKE TEMP. Enter oven
3 seconds,Timeofdaywillreappear temperaturewithSET knob,
aftera slightdelay.2.Press COOK TIME. Enter cooking
time with SET knob.
3. Press STOPTIME.Entertime you
wishfood tostop cooking withSET
knob.
The oven will automatically turn on
and offat the preset times.
Press STOP/CLEAR to cancel end-
of-cooking beeps. See page6forad-
ditional information.
-4-

FEATURES
BEFORE DURING It is normal forthecooktopofthe range
to becomehot duringa ctean cycle.
SELF-CLEANING SELF-CLEANING Thereforetouchingthecooktopduringa
WhenthedoorislockedandtheCLEAN self-clean cycleshouldbeavoided.
pad ispressed,theovenautomatically
begins to heat to cleaning tempera-As theovenheatsand cools,you may
tures,hear sounds of metal parts expanding
and contracting. This is normal and wilt
Turn off oven light before clean cycle. As the oven reaches cleaningtempera- not damage your appliance.
The life ofthe bulbmay be shortened if tures, the LOCK indicator will turn on to
lefton during the clean cycle, show that an internal lock mechanism
has engaged. At this point, the oven AFTER
Clean oven frame, door frame and door can not be unlocked and opened. SELF-CLEANING
aroundthe oven vent with a non-abra-
sive cleaning agent such as Bon Ami. Some soil may leave a light gray, pew-
These areas are not exposed to clean- Toprevent damagetothe doorand lock dery ash which can be removedwith a
ing temperatures and should be lever, do not force the lock lever to the damp cloth. If soil remains, it indicates
cleanedto prevent soil from baking on left when the LOCK indicator is dis- that the clean cycle was not long
during the clean cycle, played, enough.Thesoilwillberemoved during
the nextclean cycle.
Wipe up excess grease or spillovers About one hour after the completion of
fromthe oven bottomto preventexces- the clean cycle,the internallock will dis- Ifthe oven racks do not slide smoothly
sivesmoking during the clean cycle, engageand the LOCKindicator willturn after a clean cycle, wipe racks and em-
off. At this point, the lock lever can be bossed rack supports with a small
Do not useoven cleaners oroven liner moved to the left (unlocked position) amount ofvegetable oil to restoreease
protective coatings of anykind on theand the door opened, of movement.
self-clean oven finish or around any
part of the oven. The first few timesthe oven is cleaned, Fine, hair-like lines may appear in the
some smokeandodormay bedetected, oven interioror oven door.This is a nor-
To preventdamage, do notclean or rub This is normal and will reduce ordisap- malconditionresultingfrom heating and
the gasket around the oven door. The pear with use. If the oven is heavily cooling of the porcelain finish. These
gasketisdesignedto sealin heatduring soiled, or if the broiler pan is left in the lines do not affect the performance of
the clean cycle, oven, smoke and odor may occur, the oven.
-5-

FEATURES
AUTOMATIC OVEN COOKING
Automaticcookingfeatureisusedtoturntheovenon andoff at thepreset
time-of-day.Thisfeaturecanbeusedtodelaythestartofacookingoperation.
Theautomaticcookingfeaturewillnotoperateunlesstheclockisfunctioning
andissetat thecorrecttime-of-day.
TO BAKE BY TIME with immediate START: GENERAL
INFORMATION
1. Press BAKE TEMP pad. BAKE [ I1--1 _1--1•nurnun_°}uIMPORTANT:Highlyperishablefoodslightsin the display.ILl• _lU such as dairy products, pork,poultry,
seafoods or stuffing are not recom-
2. Enter oven temperature withthe ct.o= CLE_ _ROZL mended for delayed cooking.If cook-
SET knob. ing more than one food, select foods
that cook for the same length of time
TZMCRco="rZMCSTOPTZ_ _ _ and at the same oven temperature.
3. PressCOOKTIME pad.SETCOOK
TIME flashes in the display.._ .I--II--I 3 S D°
4. Enter cooking time (howlong you _ _L-II_.L
wish food to cook) with the SET ct.oc_ ct._ BROZL
knob. To resetor cancel the program: Press
TIMED BAKE ONlightsin the dis-TZMERCOO*TZMCs'roPTZ_ BAKET_ the STOP/CLEAR pad.
play. The oven automatically turns
on and the display begins to count After setting the Automatic Cooking
down. feature, pressthe CLOCK padand the
i_1_.. •_IFI _ _.,,S_D° time-of-day will reappear in the dis-
. II I o play.TIMED BAKE ON, DELAYBAKE
5. At the end of the preset cooking _-- _-"_
time,the oven automatically turns ct.ocKCLEAN BROILorDELAYTIMED BAKE and the oven
_(_)_(_(_)(_) temperature will remain in the display
off. as a reminderthat the oven issetfor a
6. Press STOP/CLEAR pad to cancel "rzM_ COO,(TIMe STOPTZMCB_ETB'_ cooking operation.
end-of-cooking beeps. At end of cooking, continuous beeps
will sound.PressSTOP/CLEAR padto
cancel beeps.
TO BAKE BY TIME with delayedSTART:
1.Followsteps 1,2, 3 and 4 above.
2. PressSTOPTIME pad. "SETSTOP
TIME" flashes inthe display. I_ " °oIj/_/oI--IF' _ _,,,_um_°
3. Enter thetime you wishthe ovento CLOCKI_EAN BROIL
turn offbyturning theSETknob. De-
pending on your model, either DE-
LAYTIMED BAKE or DELAYBAKETZ._ coOKT_M¢S_OPTZM¢S_¢_:_
willlightinthedisplayandthetimeof
daywillthenreappear.
Theovenwillautomaticallyturn on [I1--1• _--I,--I_,_2
intime tohave the food cooked by ILl•IIJ o o
the preselected STOP TIME. The {_..OCXCLEANIBROIL
oven will automaticallyturnoff atthepresetstop time. _)_)_(_
4. Press STOP/CLEAR pad to cancelTZMCR CO(TXTIMESTOP?ZMEBAKETEMP
end-of-cookingbeeps.
-6-

USING YOUR COOKTOP
SURFACE ELEMENTS COOKTOP
Ranges with a coil-type cooktop will To preventriskof electric shock or fire,
_gress_|iddls_e_e_ feature eitheran"upswept"cooktop ora donot linedrip bowlswith aluminumfoil.
"flat" oooktop.
TO raise "upswept"cooktop: When Drip bowlswill turn blue or gold over
d_ i_if_ _Y¢i_+_ cool, grasp front edge of cooktop and timeorifoverheated.Thistypeofdisool-
gentlyliftupuntilthetwosupportrodsat oration is permanent and will not affect
Surface elementsare self-cleaning.Do the front ofthe cooktop snap into place, cooking performance. To protect finish,
not immerse elements in water. When avoid using high settings for long peri-
an element isturned on, it will cycle on ods of time. Reduce to a lower setting
and off to maintainthe heatsetting.\..._once foodbegins cooking.Also, do not
use oversized utensils. Utensil should
not extend more than 2 inches from the
element.
CONTROL KNOBS
Toremove: Raise element WHEN Your cooktop is equipped with control
COOL and carefully pull out and away knobs that provide an infinitechoice of
settings from LOW to HIGH. The knob
from the receptacle.Tolower top: Holdfront edge of cook-
top and carefully push back on each can be set onany ofthe numberedset-
support rodto release the notched sup- tingsor betweenthe numberedsettings.
port. Then gently lower top into place. Tooperate push in and turnknobto the
Thesupportrodswill slideintothe range desired setting.
frame.
TO raise "flat"cooktop: Grasp front COOKING TIPS
edgeof cooktopand riftup. Food will not cook any faster when a
higherheatsettingisusedthanneeded
to maintaina gentleboil.Waterboilsat
thesame temperaturewhether boiling
To replace: Insert theterminalsontheDRIP BOWLS gentlyor vigorously.Ifa highsettingis
elementintothereceptacle.Gentlylift
upon outeredgeofelement (oppositeThedrip bowls,locatedundereachBur- used, excessivespattering willoccur
terminal-sideof element) whileinsert-faceelement, aredesigned to catch andfoodmaystickorburnontothebet-
ing terminals into receptacle. Gentry spills or boilovers, tom ofthe pan.
press down on outer edge of element
untilelement sits level on drip bowl. Be sure drip bowls are in place. Ab-
sence of these bowls during cooking Use a higher heat setting to bring liquid
may subjectwiring or component parts to a boil or to begin cooking, then re-
Besure drip bowland chrometrim ring, underneaththe cooktopto damage, duee to a lower setting. Never leave
if equipped, areproperlyinstalled, food unattended during a cooking
Notchontrim ringshould becenteredClean after eachusewith soapand operation.
overthescrew securingthereceptaclewater.Removestubborn stains with
tothemaintop.Iftrimringisnotinstalledbakingsodapasteand plasticscouring
properlyandrestsonthisscrew,thetrim pad.Topreventscratchingthefinish,do
ringanddripbowlwill"rock". not useabrasivecleaning agents.
Rinse,dryand replace.
SIGNAL LIGHTS
Ranges areequippedwithoneto four
signallightsto indicatewhena surfaceNeverlet a pan boildry as thiscould
element is on. The lightwillremainon damagetheutensilandtheappliance.
untiltheelement isturned off.After a
cookingoperation,besureelementand
signallightareoff.
--7--

USING YOUR COOKTOP
COOKWARE
Fitthesizeofthecookwaretothesizeof A pan witha badlycurvedbottomwillDo notusewoksequippedwith round
theelement.This conservesenergy, notmakegoodcontactwiththeelement metalrings.Thering,whichisdesigned
and may notget enough heatto bring to supportthewokabovethe element,
Cookingperformanceisgreatlyaffected waterto a boil.willtrap heatand maydamagethe ele-
by the typeof cookwareused. Cook- mentandthecooktop.
wareSHOULDHAVEA FLATBOTTOM
to provide uniform cooking results, CANNING
faster heating and more efficient use of
energy.When canning, use the HIGH setting
just until water comes to a boil orpres-
sure is reached in the pressure canner.
____ Then, reduceto the lowest heatsetting
that maintainsthe boilor pressure.
Prolongeduseof theHIGH setting,or
theuseof incorrectcanning utensils
Cookwarewith uneven, warped, or ._.p _ p- produceexcessiveheat. Excessive
groovedbottomsdo not makegood J_ heat can causepermanentdamageto
contact,will reduceheat conductivity the porcelaincooktop,surfaceelement
and resultinslower,less evenheating. -andthedripbowl.
SUGGESTED HEAT SE'I-FINGS
Usethefollowingchartasa GUIDELINEuntilyou become We suggest thatyou experiment tofind the heat setting
morefamiliarwithyourcooktop. Keepinmindthatdifferent that best suits your particular cooking needs.Chart is
types ofcookware materials require differentheatsettings based on heavy gauge aluminum cookware. Lower the
for the same cooking operation, heat setting if using other materials.
HI To bring liquidto a boil, blanch, preheatskillet, or bring pressureup inpressure cooker.(Note:
Always follow instructionsin pressurecookeruseand care book.)Always reduceto a lower heat
setting when liquids just beginto boil or food begins to cook.
Medium
6-5 To maintainmoderatetoslowboilfor large amounts of liquids.
LO To keepfoods warm beforeserving.
NOTE:Referto cookware manufacturer's recommendationsfor suggested heatsettings. Some manufacturersdo notrec-
ommendthe use of HIGH or the use of HIGH for extended cooking operations.
-8-
USING YOUR OVEN
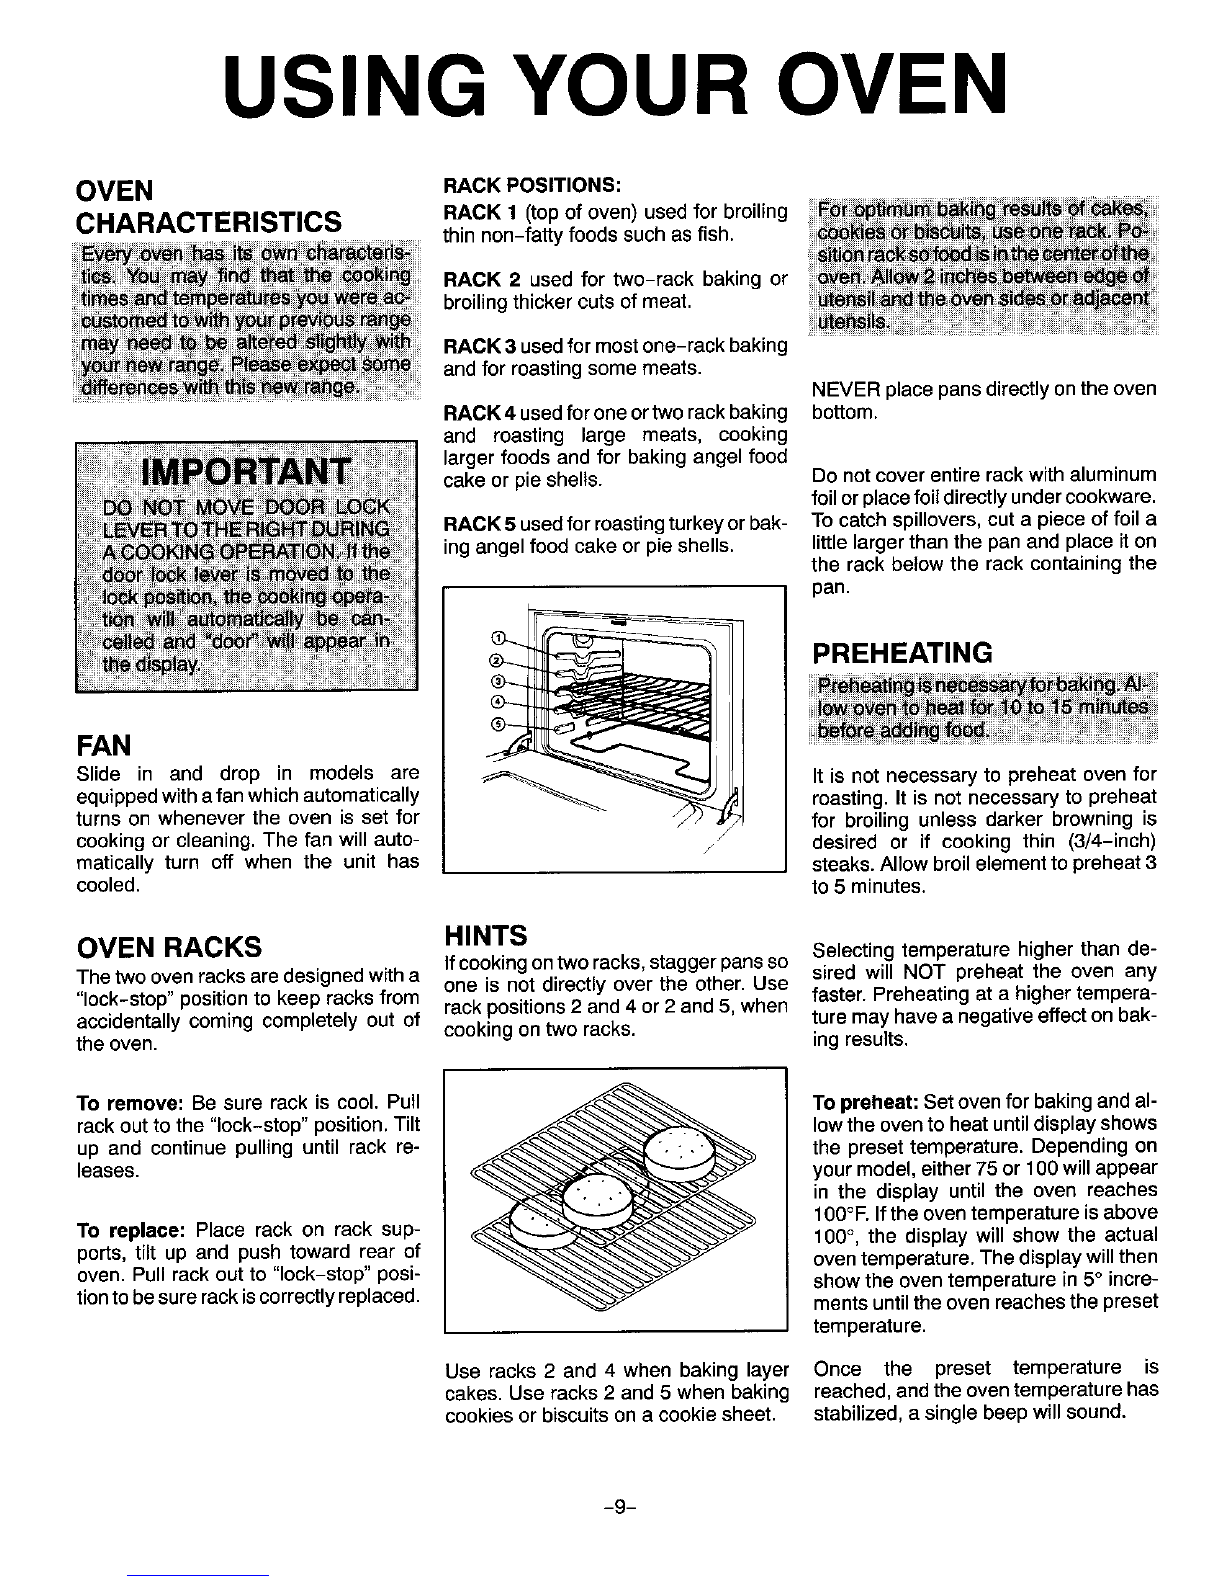
OVEN RACK POSITIONS:
CHARACTERISTICS RACK 1 (top of oven) usedforbroiling
thinnon-fattyfoodssuchasfish.
RACK 2 usedfor two-rack bakingor
broilingthickercutsofmeat.
RACK 3 usedformostone-rackbaking
andforroastingsomemeats. NEVERplacepansdirectlyontheoven
RACK4 usedforoneortwo rackbaking bottom.
and roasting largemeats, cooking
largerfoods andfor bakingangelfood
cakeorpieshells. Do notcoverentirerackwithaluminum
foilorplacefoildirectlyundercookware.
RACK5 usedforroastingturkeyorbak- To catchspillovers,cut a pieceof foil a
ingangelfoodcakeor pieshells, littlelargerthan the panand placeiton
therack belowtherackcontaining the
pan.
PREHEATING
FAN
Slidein and drop in models are_It is notnecessaryto preheatovenfor
equippedwithafan whichautomatically __. roasting.It is notnecessaryto preheat
turns onwheneverthe oven isset for for broiling unlessdarker browning is
cooking or cleaning. The fan will auto- _ desired or if cooking thin (3/4-inch)
matically turn off when the unit has /steaks. Allow broil element to preheat 3
cooled, to 5 minutes.
OVENRACKS HINTS
Ifcookingontworacks, staggerpans so Selecting temperature higher than de-
sired will NOT preheat the oven any
Thetwoovenracksare designedwitha oneis not directlyovertheother.Use
"lock-stop"positionto keep racksfrom rackpositions2 and4 or2 and5, whenfaster.Preheatingat a highertempera-
accidentallycomingcompletelyout of cookingontwo racks, ture mayhavea negativeeffectonbak-
theoven. ingresults.
To rem°ve: Be sure rackis c°°l' Putll _ 1T°praheat:Set°venf°rbakingandal"
rackouttothe"lock-stop"position.Tilt lowtheoventoheatuntildisplayshows
up and continuepulling until rack re-the presettemperature. Depending on
leases, your model,either 75or 100will appear
in the display until the oven reaches
To replace: Place rack on rack sup- 100°F.Ifthe oventemperature is above
ports, tilt up and push toward rear of 100°, the display will show the actual
oven. Pull rack out to "lock-stop" posi- oven temperature. The display willthen
tionto be surerack iscorrectly replaced, show the oven temperature in 5° incre-
mentsuntilthe ovenreachesthepreset
temperature.
Use racks 2 and 4 when baking layer Once the preset temperature is
cakes. Use racks 2and 5 when baking reached, and the oventemperature has
cookies or biscuits on a cookie sheet, stabilized, a single beepwill sound.
-9-

USING YOUR OVEN
TO SET OVEN: tions.Preheatoven for all baking opera- ZI •Jl--I _ _ _o/]
1. Press BAKE TEMP pad. BAKE indi- 4. Place food in oven when oven has J ° _llJ ,_,
oator turns on. preheated to set temperature. _ _E^,_OZL
2. Turn SET knob until desired tempera- 5. Check food at minimum time. Cook
ture is displayed, longer if necessary.
3. BAKE ON indicator and oven imme- 6. Press STOP/CLEAR pad to cancel _z,_cookTI_ sTc_TZ_ _'E"ra4P
diately turn on. the operation.
COMMON BAKING PROBLEMSAND WHY THEY HAPPEN
!;_!!iiiiii_iJi_iiiiiiiiiiiiiiiiiiiiii
Cakes are uneven.Panstouching each other or Cakes don't brown on top. Incorrect rack position.
oven walls. Temperatureset too low.
Batter uneven in pans, Overmixing.
Temperatureset too low or Toomuch liquid.
baking time too short.Pan size too large or too little
Oven not level, batter in pan.
Undermixing. Oven door opened too often.
Toomuch liquid.
Cakehigh in middle. Temperaturesettoohigh. Excessive shrinkage. Toolittle leavening.
Baking time too long. Overmixing.
Overmixing. Pan too large.
Toomuch flour. Temperatureset too high.
Pans touching each other or Baking time too long.
oven walls. Pans too close to eachother
Incorrect rack position,or oven walls.
Cake falls. Toomuch shortening or sugar.
Toomuch or too little liquid. Uneven texture. Toomuch liquid.
Temperatureset too low. Undermixing.
Old or too little baking powder. Temperatureset too low.
Pan too small. Baking time too short.
Oven door opened frequently.
Added incorrecttype of oil to Cakes have tunnels. Not enough shortening.
cake mix. Toomuch bakingpowder.
Added additional ingredients Overmixing or at too high a
to cake mix or recipe, speed.
Cakes, cookies, biscuits Incorrect rack position. Temperatureset too high.
don't brown evenly. Oven door notclosed properly.
Door gasket not sealing
properly. Cakes crackon top. Batter overmixed.
Incorrect useof aluminum foil. Temperatureset too high.
Oven not preheated. Toomuchleavening.
Pans darkened, dented or Incorrect rack position.
warped. Cake not donein middle.Temperatureset too high.
Pan too small.
Bakingtime too shorL
Cakes, cookies, biscuits Oven not preheated.
too brown on bottom.Pans touching each otheror
oven walls.
Incorrect rack position. Pie crust edges toobrown. Temperatureset too high.
Incorrect useof aluminum foil. Pans touching each other or
Placed 2 cookie sheets on one oven walls.
rack. Edges of crust too thin.
Used glass,darkened, stained,
warped or dull finish metal
pans. (Use a shiny cookie Piesdon't brown on bot- Used shiny metal pans.
sheet.) tom. Temperatureset too low.
Pies have soaked crust. Temperaturetoo low at start of
baking.
Filling too juicy.
Used shiny metal pans.
-10-
USING YOUR OVEN
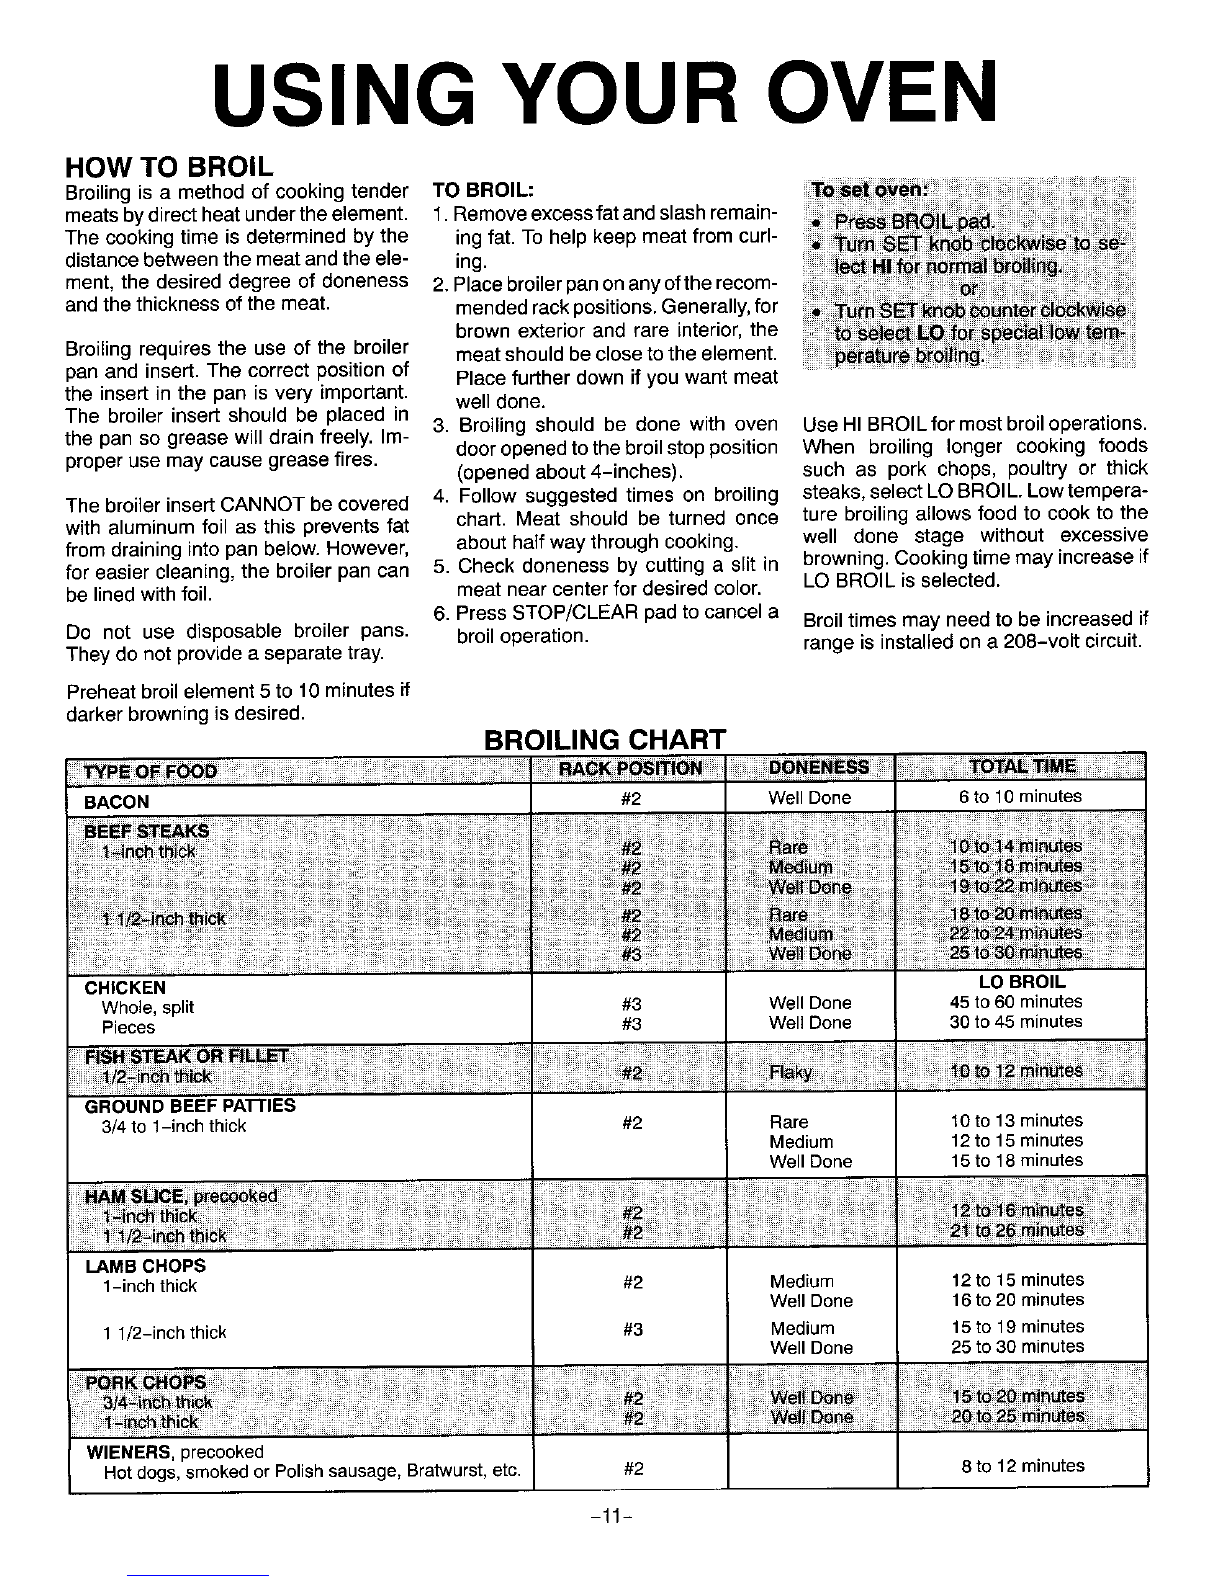
HOW TO BROIL
Broiling is a method ofcooking tender TO BROIL:
meats by direct heat under the element. 1. Remove excess fat and slash remain-
The cooking time is determined by the ing fat. To help keep meat from curl-
distance between the meat and the ele- ing.
ment, the desired degree of doneness 2.Place broiler pan on any ofthe recom-
and the thickness of the meat. mended rack positions. Generally, for
brown exterior and rare interior, the
Broiling requires the use of the broiler meat should be close to the element.
pan and insert. The correct position of Place further down if you want meat
the insert in the pan is very important, well done.
The broiler insert should be placed in
the pan so grease will drain freely. Im- 3. Broiling should be done with oven Use HI BROIL for most broiloperations.
door opened to the broil stop position When broiling longer cooking foods
proper use may cause grease fires. (opened about 4-inches). such as pork chops, poultry or thick
The broiler insert CANNOT be covered 4. Follow suggested times on broiling steaks, select LO BROIL.Lowtempera-
with aluminum foil as this prevents fat chad. Meat should be turned once ture broiling allows food to cook to the
from draining into pan below.However, about half way through cooking, well done stage without excessive
for easier cleaning,the broiler pan can 5. Check doneness by cutting a slit in browning.Cooking time may increase if
be lined with foil. meat near center for desired color. LO BROIL is selected.
6. Press STOP/CLEAR pad to cancel a Broil times may need to be increased if
Do not use disposable broiler pans. broil operation, range is installed on a 208-volt circuit.
They do not provide a separate tray.
Preheat broil element 5 to 10 minutes if
darker browning is desired. BROILING CHART
BACON #2 Well Done 6 to 10 minutes
CHICKEN LO BROIL
Whole,split #3 WellDone 45 to 60 minutes
Pieces #3 Well Done 30 to 45 minutes
GROUND BEEF PATrlES
3/4to 1-inch thick #2 Rare 10 to 13 minutes
Medium 12 to 15 minutes
Well Done 15 to 18 minutes
LAMB CHOPS
1-inchthick #2 Medium12to 15 minutes
Well Done16to 20 minutes
11/2-inchthick #3 Medium 15 to 19 minutes
WellDone25 to30 minutes
WIENERS, precooked
Hotdogs,smoked or Polishsausage, Bratwurst,etc.#2 8 to 12 minutes
-11-

MAINTENANC
LIGHT REPLACEMENT TOreplace: Fit ends ofdrawer glides To replace door: Grasp doorat each
Beforereplacinglightbulb, DISCON- ontorails.Liftupdrawerfrontandgently side, align slots in thedoor with the
NECT POWER TO RANGE. push in to first stop position.Lift uphingearms and slide door down onto
drawer again and continue to slidethehingearms untilcompletelyseated
To replacefluorescent surface light: drawertotheclosedposition, onhinges.
Grasp the top trim ofbackguardwith
thumbs under front edge and pull out-_,_
ward while lifting to release trim from
catches at each end.
LEVELING LEGS
Somefloorsarenot level. For proper
OVEN DOOR baking,your rangemustbelevel.Level-
Do not placeexcessiveweight on an inglegs arelocatedon each cornerof
Removebulbandreplace with an 18 open oven dooror stand on an open thebaseoftherange.Levelbyturning
watt fluorescenttube. Snap top trim oven dooras, in somecases, itcould thelegs.
cause the rangeto tipover,breakageof
clock.backintoplace,restorepowerandreset the door orserious injury. _'l
Toreplaceoven light: Be sure bulb is When opening oven door, allow steam
cool. Donot touch a hot bulb with a andhotairtoescapebeforereachingin I "
dampclothasthebulbmaybreak. Usea oven to check, add or removefood.
dry potholder,to preventpossible harm
to hands, and very carefully unscrew Toremovelift-off door: Open door to
bulbcover and bulb. the "stop" position (opened about 4
inches) and grasp doorwith both hands To prevent range from accidently tip-
at each side. Do not usedoor handleto ping, range should be secured to the
lift door. Lift up evenly until door clears floor by slidingrear leveling leginto the
the hinge arms. anti-tip bracket supplied with therange.
FUSES
(Canadian models only)
Your rangeisequippedwith seven(7)
type"P"fuses.Thefusesarelocatedon
Replacewitha40 watt appliancebulb. theback wall. Removethestorage
Replacebulb cover and reconnect drawerfor accesstothefuses.
powerto range.Resetclock.
STORAGE DRAWER _,. "_
The storagedrawerat thebottom ofthe
range issafe and convenient for storing LOCAT'_IONOF/metal and glass cookware. DO NOT
store plastic, paperware, food or flam- 7FUSES .-/ _'_'_"f S
mable material in this drawer. Remove
drawer to clean underrange.
To remove: Empty drawer then pull If part of your range does not operate,
drawer out to thefirst stop position. Lift checktoseeifafuse hasblown.A gapin
upfront ofdrawer andpulltothe second the fusestripor adarkened windowindi-
stopposition.Graspsidesandliftupand cates a blown fuse. Replace with the
out to remove drawer, same type and amperagetype "P" fuse.
-12-

CARE AND CLEANING
Broiler pan & in-Soap &water. Plastic Remove from oven after use. Cool then pour off grease. Place soapy
serf scouring pad. Soap cloth overinsert and pan; let soakto loosen soil. Wash in warm soapy
filled scouring pad. water. Use soap filled scouring pad to remove stubborn soil.Clean in
dishwasher if desired.
Control knobs Mild detergent &water. Toremoveknobs,gently pull forward.Washin milddetergentand water.
Do notuseabrasivecleaningagents.They willscratch finish and remove
markings.Rinse,dry and replace.Turn eachelement ON tosee if knobs
have been replaced correctly.
Metal finishes: Soap& water,Pasteof Wash with soap and water.Remove stubborn soil with paste of baking
Aluminum - back- baking soda & water, soda and water. Do not use oven cleaners, abrasive or caustic agents.
Iguard base. They will damage the finish.
tChrome & stainless
steel - trim parts
Oven racks Soap & water. Cleans- Cleanwithsoapywater. Removestubborn soilwithcleansingpowder or
ing powders & plastic soap filled scouring pad. Rinse and dry.
pads.Soapfilled scour-
ing pad.
Porcelain enamel: Mild liquidcleaners, Porcelain enamel isglassfused on metal. It may crackor chipwith mis-
Cooktop detergent or soap & use. Cleanwith soap andwaterwhen parts arecool.Allspillovers, espe-
See page 5 for water.Cleansing pow- ciallyacid orsugarspillovers, should bewiped upimmediatelywith a dry
self-clean oven.ders and non abrasive cloth. Surface may discoloror dull if soilisnot removed.When surface is
nylon or plastic pads. cool, clean with warm soapy water. NEVER WIPE OFF A WARM OR
HOTENAMEL SURFACE WITH A DAMP CLOTH. THIS MAYCAUSE
CRACKING AND CHIPPING. Never use oven cleaners, abrasive or
caustic cleaning agents onexterior finish of range. NOTE: The cooktop
on coil models only liftsup.
-13-
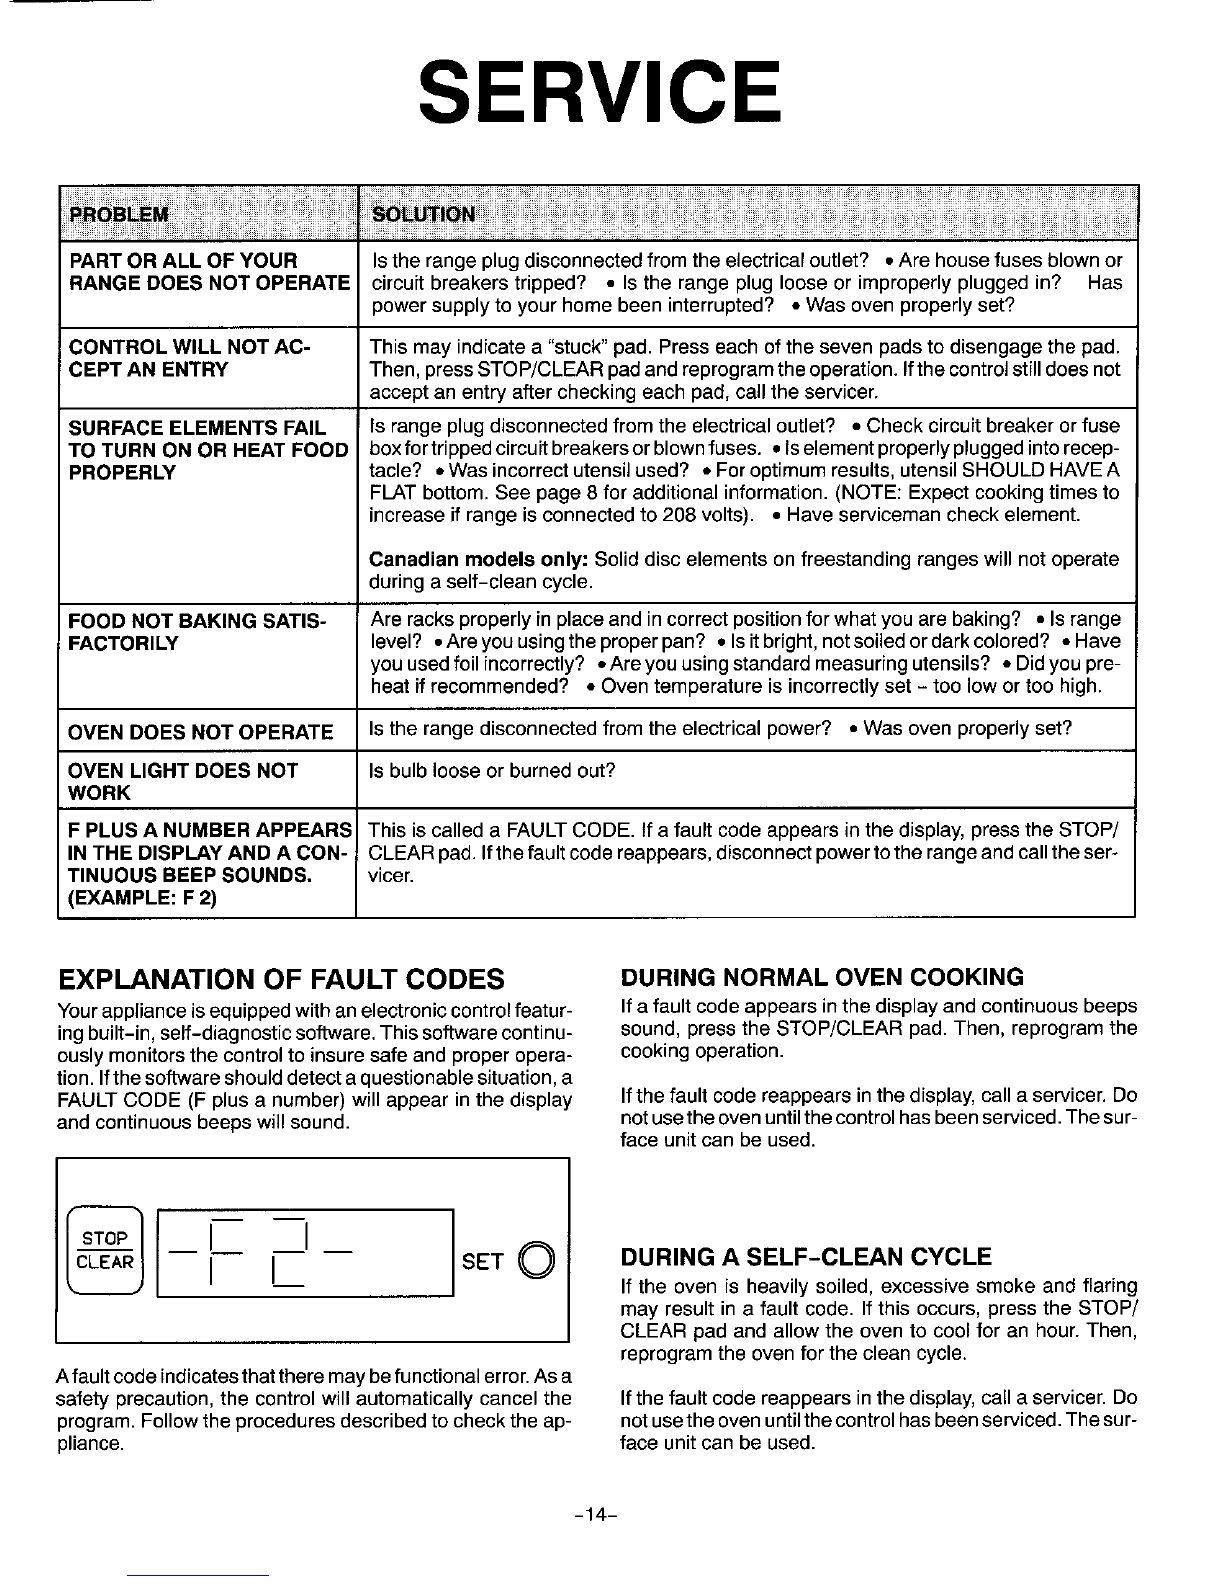
SERVIC
PARTOR ALL OF YOUR Is the range plug disconnectedfrom the electricaloutlet? • Are house fuses blownor
RANGE DOES NOT OPERATEcircuit breakers tripped? ° Is the range plug loose or improperly plugged in? Has
powersupply to your home been interrupted? * Wasoven properly set?
CONTROLWILL NOTAC- This may indicate a "stuck" pad. Press each of theseven pads to disengagethe pad.
CEPT AN ENTRY Then,pressSTOP/CLEAR padand reprogramthe operation.Ifthecontrolstilldoesnot
accept an entry after checking each pad, call the servicer.
SURFACEELEMENTS FAIL Is range plug disconnected from the electricaloutlet?°Check circuit breaker or fuse
TO TURN ON OR HEAT FOOD boxfortrippedcircuitbreakersorblewnfuses.•Iselementproperlypluggedintorecep-
PROPERLY tacle?•Wasincorrectutensilused?=Foroptimumresults,utensilSHOULD HAVEA
FLATbottom.See page8for additionalinformation.(NOTE: Expectcookingtimesto
increaseifrangeisconnectedto 208 volts).=Haveservicemancheckelement.
Canadian models only: Soliddiscelementsonfreestandingrangeswillnotoperate
duringa self-cleancycle.
FOOD NOT BAKING SATIS- Areracksproperlyinplaceandincorrectpositionforwhatyouarebaking? =Is range
FACTORILY level? °Areyouusingtheproperpan? •lsitbright, notsoiledordarkcolored? =Have
youusedfoilincorrectly?*Areyouusingstandardmeasuringutensils?*Didyoupre-
heat ifrecommended? =Oven temperatureisincorrectlyset- toolowortoo high.
OVEN DOES NOTOPERATE Istherangedisconnectedfromthe electricalpower? =Wasovenproperlyset?
OVEN LIGHT DOES NOT Is bulblooseor burnedout?
WORK
F PLUSA NUMBERAPPEARS This iscalleda FAULTCODE. ifa faultcodeappears in thedisplay,presstheSTOP/
IN THE DISPLAYAND A CON- CLEARpad. Ifthefault codereappears,disconnectpowertotherangeand calltheser-
TINUOUS BEEPSOUNDS. ricer.
(EXAMPLE: F 2)
EXPLANATION OF FAULT CODES DURINGNORMALOVENCOOKING
Yourapplianceisequippedwithanelectroniccontrolfeatur- Ifa faultcodeappearsinthedisplayand continuousbeeps
ingbuilt-in,self-diagnosticsoftware.Thissoftwarecontinu- sound, pressthe STOP/CLEAR pad.Then, reprogramthe
ouslymonitorsthecontrolto insuresafeand properopera- cookingoperation.
tion.Ifthesoftwareshoulddetecta questionablesituation,a
FAULTCODE (F plusa number)will appearinthedisplay If thefaultcodereappearsinthedisplay,calla servicer.Do
andcontinuousbeepswill sound,notusetheovenuntilthecontrolhasbeenserviced.Thesur-
faceunitcan beused.
fIsETO DURINGASELF-CLEANCYCLE
If the oven is heavily soiled, excessive smoke and flaring
may result in a fault code. If this occurs, press the STOP/
CLEAR pad and allow the oven to cool for an hour. Then,
reprogramthe oven for the clean cycle.
Afault code indicatesthat there maybe functional error.As a
safety precaution, the control will automatically cancel the If the fault code reappears in the display, call a servicer. Do
program.Follow the proceduresdescribedto check the ap- notusetheovenuntilthecontrolhasbeenserviced. Thesur-
pliance, face unitcan be used.
-14-

SERVIC
SERVICE
Do not attempt to service the appli-coverforlocationofyourmodeland se- Ifyou did notreceive satisfactoryserv-
ante yourself unless directed to do rialnumbers.) icethroughyourserviceror Maycoryou
so in this book.Contact the dealer may contactthe MajorApplianceCon-
sumerAction Panelby letterincluding
whOice,soldyou the appliance for serv-Ifyouareunabletoobtainservice,writeyour name, address,and telephone
tous.Ouraddressisfoundontherating number,aswellasthe modeland serial
plate.Seefrontcoverforlocationofrat- numbersoftheappliance.
ingplate.
HOW TO OBTAIN
SERVICE Ifyou are notsatisfied withthe local re- MajorApplianceConsumerActionPanel
When your appliancerequiresservicesponseto your servicerequirements,20 NorthWackerDrive
or replacement parts, contact your call orwriteMAYCORApplianceParts Chicago,IL 60606
DealerorAuthorizedServicer.Useonly and ServiceCompany, 240 Edwards
genuinefactory or Maycor parts if re-Street, S.E., Cleveland, TN 37311,
placementpartsarenecessary.Consult (615)472-3500. Includeor haveavail- MACAP (Major ApplianceConsumer
theYellowPagesin yourtelephonedi- ablethecomplete model and serial ActionPanel)isan independentagency
rectoryunder appliancefor the service numbersoftheappliance,the nameand sponsored by three tradeassociations
center nearest you. Be sure to include addressof the dealer from whom you asa courtofappeals onconsumer com-
your name, address, and phone num- purchased the appliance, the date of plaints which have not been resolved
bar, along with the modal and serialpurchase and details concerning your satisfactorilywithina reasonableperiod
numbers of the appliance. (See front problem, of time.
-17-
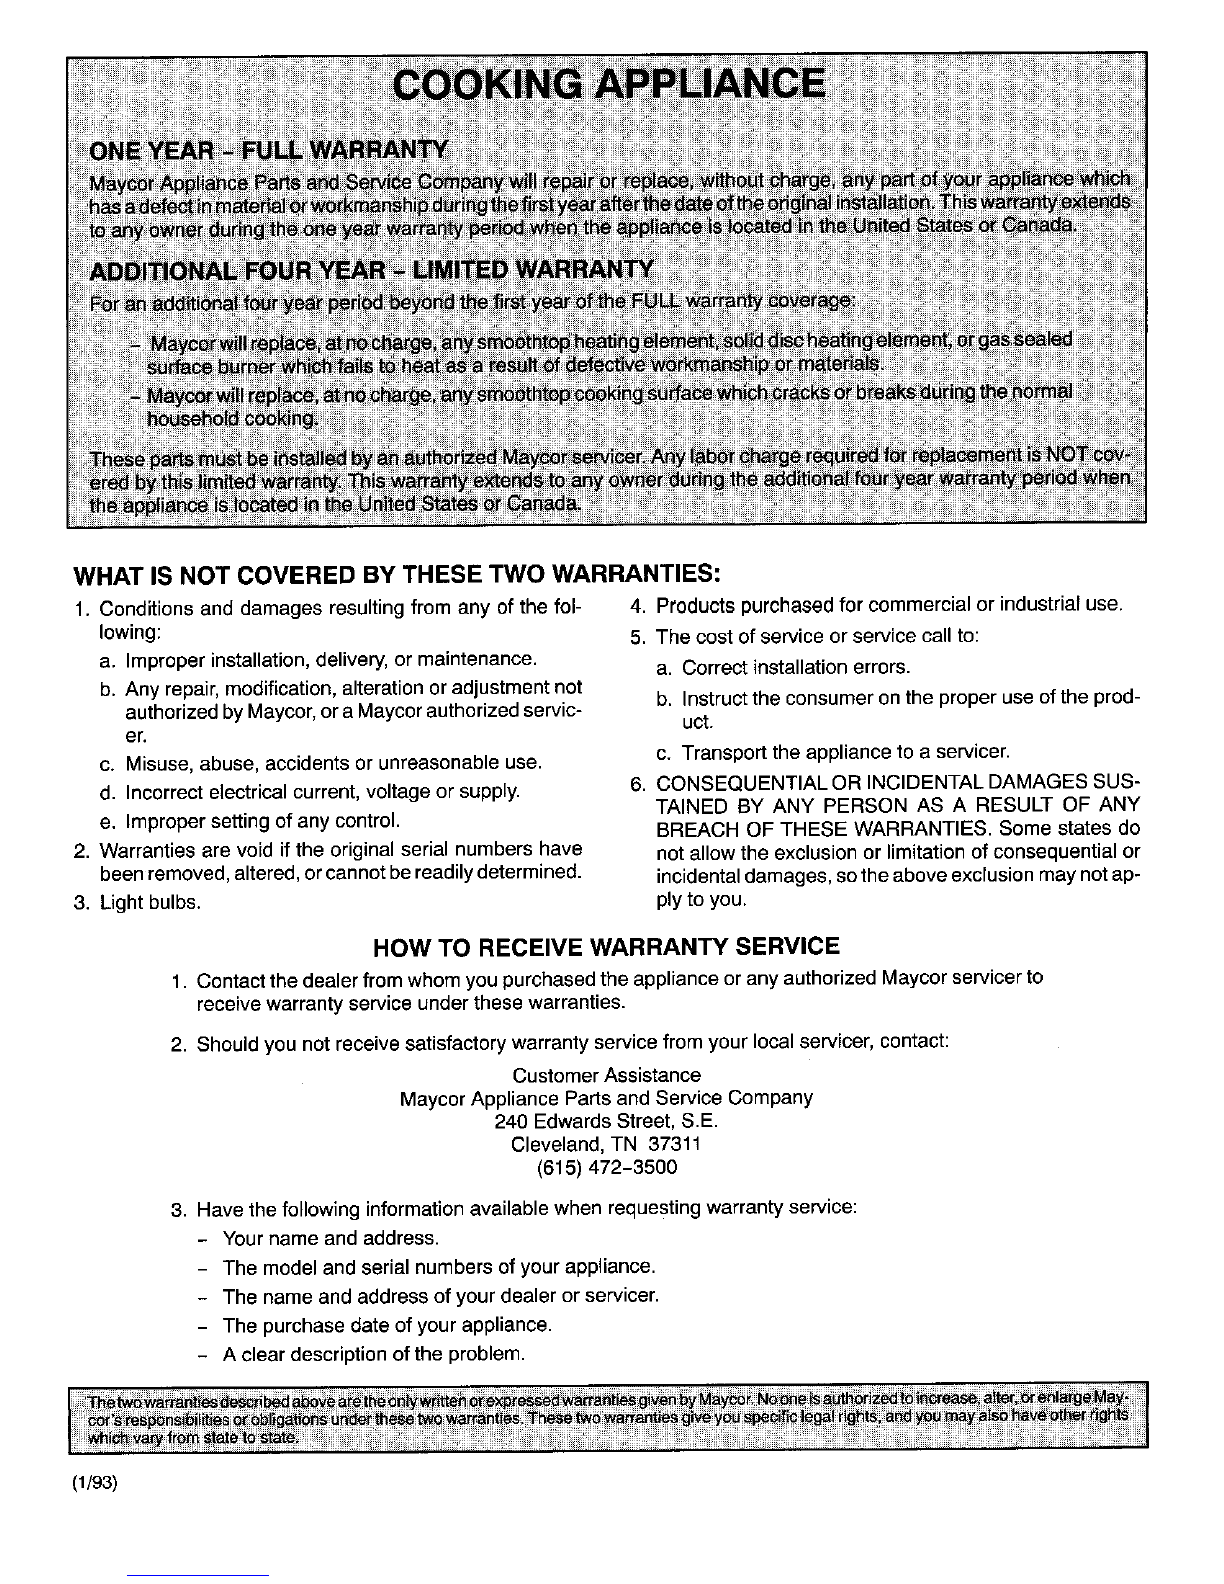
WHAT IS NOT COVERED BY THESE TWO WARRANTIES:
1. Conditions and damages resulting from any of thefol- 4. Productspurchasedfor commercial or industrial use.
lowing: 5. The cost of service or service call to:
a. Improperinstallation,delivery, or maintenance,a. Correct installation errors.
b. Any repair,modification,alterationor adjustmentnot b. Instructthe consumer onthe proper useof the prod-
authorized by Maycor,or a Maycorauthorized servic- uct.
er.c.Transport the appliance to a servicer.
c.Misuse, abuse,accidents or unreasonable use.
d. Incorrect electrical current,voltage or supply. 6. CONSEQUENTIAL ORINCIDENTALDAMAGES SUS-
TAINED BY ANY PERSON AS A RESULT OF ANY
e. Improper setting of any control. BREACH OF THESE WARRANTIES. Some states do
2. Warranties are void if the original serial numbers have not allow the exclusion or limitation of consequential or
beenremoved,altered,or cannotbereadilydetermined, incidentaldamages, sothe aboveexclusion may notap-
3. Light bulbs,plyto you.
HOW TORECEIVE WARRANTY SERVICE
1, Contactthe dealerfromwhomyoupurchasedtheapplianceoranyauthorizedMaycorservicerto
receive warranty service underthese warranties.
2. Should you not receivesatisfactory warranty service from your local servicer,contact:
CustomerAssistance
Maycor Appliance Parts and Service Company
240 Edwards Street, S.E.
Cleveland, TN 37311
(615) 472-3500
3. Have the following information available when requesting warranty service:
- Yourname and address.
- The model and serial numbers of your appliance.
-The name and address of yourdealer or servicer.
- The purchase date of your appliance.
- A clear description of the problem.
(1/93)
Table of contents
Popular Cooktop manuals by other brands


Lincat
Lincat Silverlink 600 Series Installation, operating, servicing and conversion instructions

NEFF
NEFF T66S66N0 Assembly instructions

Inalsa
Inalsa Etna instruction manual

KitchenAid
KitchenAid 30" Freestanding Range installation instructions

Teka
Teka TR 5300 Installation instructions and recommendations for using and maintaining

Indesit
Indesit IRD 2030 B instruction manual

Q90
Q90 Q2PCVI Instructions for installation, use and maintenance

GE
GE Radiant JP5030DJBB owner's manual

Electrolux
Electrolux EW30GC55G S installation instructions

Whirlpool
Whirlpool SCS3017RB00 parts list

Thermador
Thermador Professional P24WK installation instructions

KitchenAid
KitchenAid KFGS306VSS00 parts list