Admiral A9122VPV User manual
SAFETY INSTRUCTIONS
IWARNING: If theinformation in this manual is not
followed exactly, a fire or explosion may result
causing property damage, personal injury or death.
- Do not store or use gasoline or other flammable
vapors and liquids in the vicinity ofthis or any
other appliance.
- WHAT TO DO IF YOU SMELL GAS
• Do not try to light any appliance.
•Do not touch any electrical switch; do not
useany phonein your building.
•Immediately call your gas supplier from a
neighbor's phone. Follow the gassupplier's
instructions.
•If you cannot reach your gas supplier, call the
fire department.
- Installation and service must be performed by a
qualified installer, service agency or the gas
supplier.
GENERAL
Nocookingapplianceshouldbeusedas line,and otherflammablevaporsand Misuseof appliancedoors, such as
aspaceheater.Thisinstructionisbased materials, stepping,leaningorsittingonthedoor,
onsafetyconsiderationstopreventpc- mayresultin possibletippingoftheap-
tentialhazardtothe consumeraswell Havetheinstallershowyouthelocation plianceorbreakageofdoorandserious
asdamagetotheappliance, efthegasshufoffvalveandhowtoshut injuries.
it offin anemergency. +
i base of the backguard.Neverblock
ovenventorairintakes.Donotobstruct
theflowof combustionandventilation -'
air.Restrictionof airflowto theburner
preventsproperperformance.
Avoid touchingoven vent area while
ovenisonandforseveralminutesafter
ovenis turnedoff. Someparts of the
ventandsurroundingareabecomehot
If range is installed near a window, enoughtocauseburns.
properprecautionsshouldbetakento IN CASE OF FIRE:
prevent curtains from blowing over Donotusecooktoporovenasastorage 1.Turnoffrangecontrols.
burnerscreatingaFIREHAZARD.areafor foodor cookingutensils.This 2.Smother fire or flame with baking
instructionis basedon safetyconsid- soda,dry chemical,or a foam-type
Keepareaaroundapplianceclearand erationsto preventpotentialhazardto extinguisher.Do not use wateron
freefromcombustiblematerials,gaso- userandtotheappliance,greasefires.

SAFETY INSTRUCTIONS
CHILD SAFETY Touching a hot ovenlightbulb with a ___._ _ _
damp cloth could causethe bulb to
Donotleavechildrenaloneorunsuper- break. Shouldthebulbbreak, discon-
vised near the appliance when it is in nect powerto the range before tryingto, \
use or isstill hot.Children should never remove thebulb to avoid electrical
be allowedto sitor stand on anypart of shock.
the appliance. Children must betaught
that the appliance and utensils in it can Clean range with caution. If a wet
be hot.Children should be taught that sponge or cloth is usedto wipe spillson
an appliance is not a toy. They should a hot cooking area, be careful to avoid
not be allowed to play with controls or steam burns.Some cleaners can pro-
other parts of the unit. Let hot utensils duce noxious fumes if applied to a hot
coolin asafe place,out ofreachof small surface.
children. Be sure you know which knob controls
GREASE which surface burner. Always make
surethe correct burner isturned on and
Use extreme caution when moving the that the burner hasignited.When cook-
grease kettleordisposingof hotgrease, ing is completed, turn burneroff.
Hot grease is flammable. Avoid letting Use caution when wearing garments
grease deposits collect around appli- made of flammable material to avoid
ance, range hood, or vent fan. Do not clothingfires,Loosefittingor longhang-
leave container of grease around a ing-sleeved apparelshould not beworn
cookingappliance. AIwaysletquantities while cooking. Clothing may ignite or
ofhotfatusedfordeepfatfryingcoolbe- catch utensilhandles.
foreattemptingtomoveorhandle. Inthe
event of a greasefire, DO NOTattempt
CAUTION: Do not store items of inter-to move pan.Coverpan with a lidto ex. _l
estto children in cabinets above an ap- tinguish flame and turn surface burner
plianceoronthebackguard of a range, off. Do not douseflame with water. Use
Children climbing on the appliance to a dry chemical orfoam-type fire extin-
reach items could be seriously injured, guisher, if available, or sprinkle heavily
Do not use an appliance as astep stool with baking soda.
to cabinets above.
ANTI-TIP DEVICE ,Never heatan unopened container on
the surface burner or in the oven. Pres-
Toreducethe riskoftipping oftheappli- sure build-up may cause container to
ance from unusual usage or by exces- burstresulting inserious personal injury
sive loadingof the oven door, the appli- or damage to the range.
ance must be secured by a properly in-
stalled anti-tip device.To check if de- Slide oven rack out to add or remove
vice is installed properly: Use a flash- food, using dry, sturdy pot holders, AI-
light and look underneath range to see ways avoid reaching into oven to place
that oneofthe rear levelinglegsis en- Spillsorboiloverswhichcontain greaseor remove food.
gaged inthe bracket slot. When remov- should becleaned upas soon as possi-
ingappliancefor cleaning,besure anti- ble. If they are allowed to accumulate, Use dry, sturdy pot holders. Damp pot
tip device is engagedwhen range is re- they could create a FIRE HAZARD.
placed.The anti-tip device securesthe holders maycauseburnsfrom steam.
Dishtowels or other substitutes should
rearleveling legtothe floor, when prop- COOKING SAFETY never be used as pot holders because
erly engaged. Always adjustsurface burnersflame so they cantrailacross hot surface burners
that is does not extend beyond the bot- and ignite orget caughton range parts.
CLEANINGtom of utensil. This instruction isbased
Turn off all controls and wait for range on safety considerations.Use care when opening oven door, Let
partsto coolbeforetouching or cleaning hotair or steamescapebefore remov-
*,hem.Donottouchtheburnergratesor Never leave a surface cooking opera- ingorreplacingfood.Alwaysplaceoven
surrounding areas until they have had tion unattended especiallywhen using a racksinthe desired positionswhile oven
sufficient time to cool. high heat setting.Boilovers cause is cool, If a rack must be moved while
smoking and greasy spillovers mayig- hot, be careful to avoid contact of pot
nite. holders with oven burner flame.
I
SAFETY INSTRUCTIONS
STORAGE ABOVE Besure utensil is large enoughto prop- IMPORTANT SAFETY
erly contain food and avoid boilovers. NOTICEAND WARNING
RANGE Pan size is particularly important in
Toeliminatethe hazardofreachingover deepfat frying. Besure pan will accom- The California Safe DrinkingWater and
hot surface burners, cabinet storage modate the volume of food that is to be Toxic Enforcement Act of 1986 (Propo-
should notbe provided directlyabove a addedaswell asthebubbleactionoffat. sition 65) requiresthe Governor of Call-
unit. If such storage is provided, it Never leave adeep fat fryingoperation fornia to publish a list of substances
should be limited to items which are unattended, knowntotheStateofCaliforniatocause
used infrequently and which are safely cancer or reproductive harm, and re-
quiresbusinessesto warncustomersof
storedinanareasubjectedtoheatfrom Never let a pan boil dry as this could potential exposures to such sub-
an appliance.Temperatures in storage damagetheutensil and the appliance.
areas abovethe unitmay beunsafefor stances.
some items, such as volatile liquids,
cleanersor aerosolsprays.ALUMINUM FOILUsers of this appliance are hereby
Use aluminum foil ONLY as instructed warned that the burning of gas can re-
in this book.Improper useof aluminum sultinlow-levelexposuretosomeofthe
UTENSIL SAFETYfoil may cause damage to the oven,af- Jistedsubstances,including benzene,
Use only pans that have flat bottoms fect cooking results,and can also result formaldehyde andsoot, due primarily to
andhandlesthat are easilygraspedand in shock and/or fire hazards, the incomplete combustion of natural
stay cool. Avoid using unstable, gasor liquidpetroleum (LP)fuels. Prop-
warped, easily tipped or loose handled erly adjusted burners will minimize in-
pans. Do not use pans if their handles PLASTICS complete combustion. Exposure to
twist andcannotbetightened. Pansthat Many plastics are vulnerable to heat. these substances can also be mini-
are heavyto movewhenfilled with food Keepplastics awayfrompartsofthe ap- mizedbyproperlyventingthe burnersto
mayalso be hazardous, pliancethat maybecome warm or hot. the outdoors.
Always place a panoffood on asurface AEROSOL SPRAYS VENTILATING HOOD
burnerbeforeturningiton, andturnitoff Many aerosol-type spray cans are EX- To reduce thehazard of storage above
before removing the pan. PLOSIVE when exposed to heat and a range, install a ventilating hood that
may be highly flammable. Avoid their projects at least 5 inches beyond the
use orstorage nearan appliance, bottom edge of the cabinets.Clean
Always turn pan handles to the side or
backofappliance,not outintotheroom hoodfrequently topreventgrease from
where they are easily hit or reached by SELF-CLEAN OVEN accumulating on hood or its filter.
Shouldaboilover orspillover resultinan
smallchildren. To minimizeburns, igni- De notclean doorgasket.Thedoorgas- open flame, immediately turn off the
tionofflammable materialsand spillage ket is essential for a good seal. Care hood'sfan to avoid spreadingthe flame.
due tounintentionalcontactwith the should be taken not to rub,damage, or After thoroughly extinguishing flame,
utensil, do not extendhandles over ad- move the gasket. Do not use oven thefan may beturned on to remove un-
jacentsurface burners,cleaners of any kind in or around any pleasant odor or smoke.
part of the self-clean oven. Clean only
parts listedin thisbooklet. Before self-
X,,_,_, ,J , cleaning the oven, remove broiler pan,
./
ovenracks, andotherutensils,andwipe
"_f_.)-.') _,2 off excessivespillovers.
It is normal for the cooktop of the range
to becomehotduringa self-clean cycle.
Therefore, touching or lifting the cook-
top during a clean cycle should be
avoided.
-3-

FEATURES
ANALOG CLOCK AND DIGITAL CLOCK AND
TIMER, ifequipped TIMER, ifequipped
12
11 1
10_ O 0
CLOCKSET MINUTETIMER
8 _',,,,,,"1////1'113'0""\'_\\_"<488:88will flash inthe display when oven
•6 5 isfirst connectedto power orifpower is
interrupted.
TO SETOLOCK: Push in andturn Min- TO SET CLOCK:Press and hold
uteMinder knob to the correct time-of- CLOCK SET button while turning MIN-
day.Be sure Minute Minder hand ison UTE TIMER knob to the correct time-
OFF aftersetting clock, of-day. MINUTE TIMER knob can be
turned in either direction.
TO SETMINUTE MINDER:Turn knob
in either direction to the desired time. TO SETMINUTETIMER:Turn MIN-
Whenthe buzzer sounds, manuallyturn UTETIMER knobto the right, tothe de-
the Minder to OFF.sired time, up to 60:00 (1 hour). Timer
willbegin countingdownafterafewsec-
onds delay. When time has lapsed, a
continual beep will sound for up to 2
minutes. E
TOSTOP BEEPS: Press CLOCK SET
buttonto stopbeepsounds.The correct
time-of-day will reappear inthedisplay.
TO CANCELATIMINGOPERATION:
Turn MINUTE TIMER knob to the left,
until 00:00 appears in the display. The
correct time-of-day will reappear inthe
display after a few seconds delay.
TO CHECK TIME-OF-DAY DURING
A TIMING OPERATION: Press and
holdCLOCKSET button.Timewill re-
appearin thedisplay.
r
L
-4-
FEATURES
CONTINUOUS CLEANING
OVEN (if equipped)
WHAT IS THE CONTINUOUS MANUALLY CLEANING HINTS
CLEANING OVEN? HEAVYSPILLOVERS Brittlecrusts or stains can be loosened
Thefinish oftheContinuousCleaning Thespecialfinishwillclean mostspat- byGENTLY tapping stain with a
Ovenisidentifiedby itsdarkgraycolor, ters during normalovenuseunless woodenorplasticutensil. Brush away
and rough, poroustexture,The rough thereis aheavy buildupof soil. Heavy any loosesoil that flakesoff. Varnish
textureprevents grease spatters from spilloverssuchas pie orcasseroletypestains usuallyneed tobesoftened
forming beadswhich rundown thewalls boilovers wilt not clean effectively with-with a small amount of water or damp
leaving unsightly streaks. Rather, the out some manual help.The crusty or cloth. Remaining soil will gradually re-
rough texture absorbs spatters and al- varnish-like stains that formfrom these ducewith continued oven useat normal
lows them to spread, thus exposing a spillovers clog thepores and prevent bakingtemperatures.
largerarea tothehotoven air.Thecata- the special finishfrom being exposed to
lyst, when exposed to heat,speeds the the hot oven air. This greatly reduces
oxidation of soil.the cleaning effectiveness of the finish. DO NOT USE ANY TYPE OF OVEN
CLEANER, POWDERED CLEANS-
Cleaning action automatically begins Thesecrustyorvarnish-likestainsmust ERS,SOAP, DETERGENT OR PASTE
wheneverthe oven isturned onfor bak- either beremoved or brokenup beforeON ANY CONTINUOUS CLEANING
ingor roasting.Theoven MUST be"on"
for cleaning to take place. No cleaning cleaning can effectively take place.SURFACE. ALSO, DO NOT USE ANY
ABRASIVE MATERIALS, STEEL
will occurwhen theoven isoff. Thespe- WOOL, SHARP INSTRUMENTS OR
cialcatalyticfinishmust be exposed toTO MANUALLYCLEAN SCRAPERS FOR THEY WILL DAM-
hot oven air beforesoil will beginto HEAVY SPILLOVERS AGE THE FINISH.
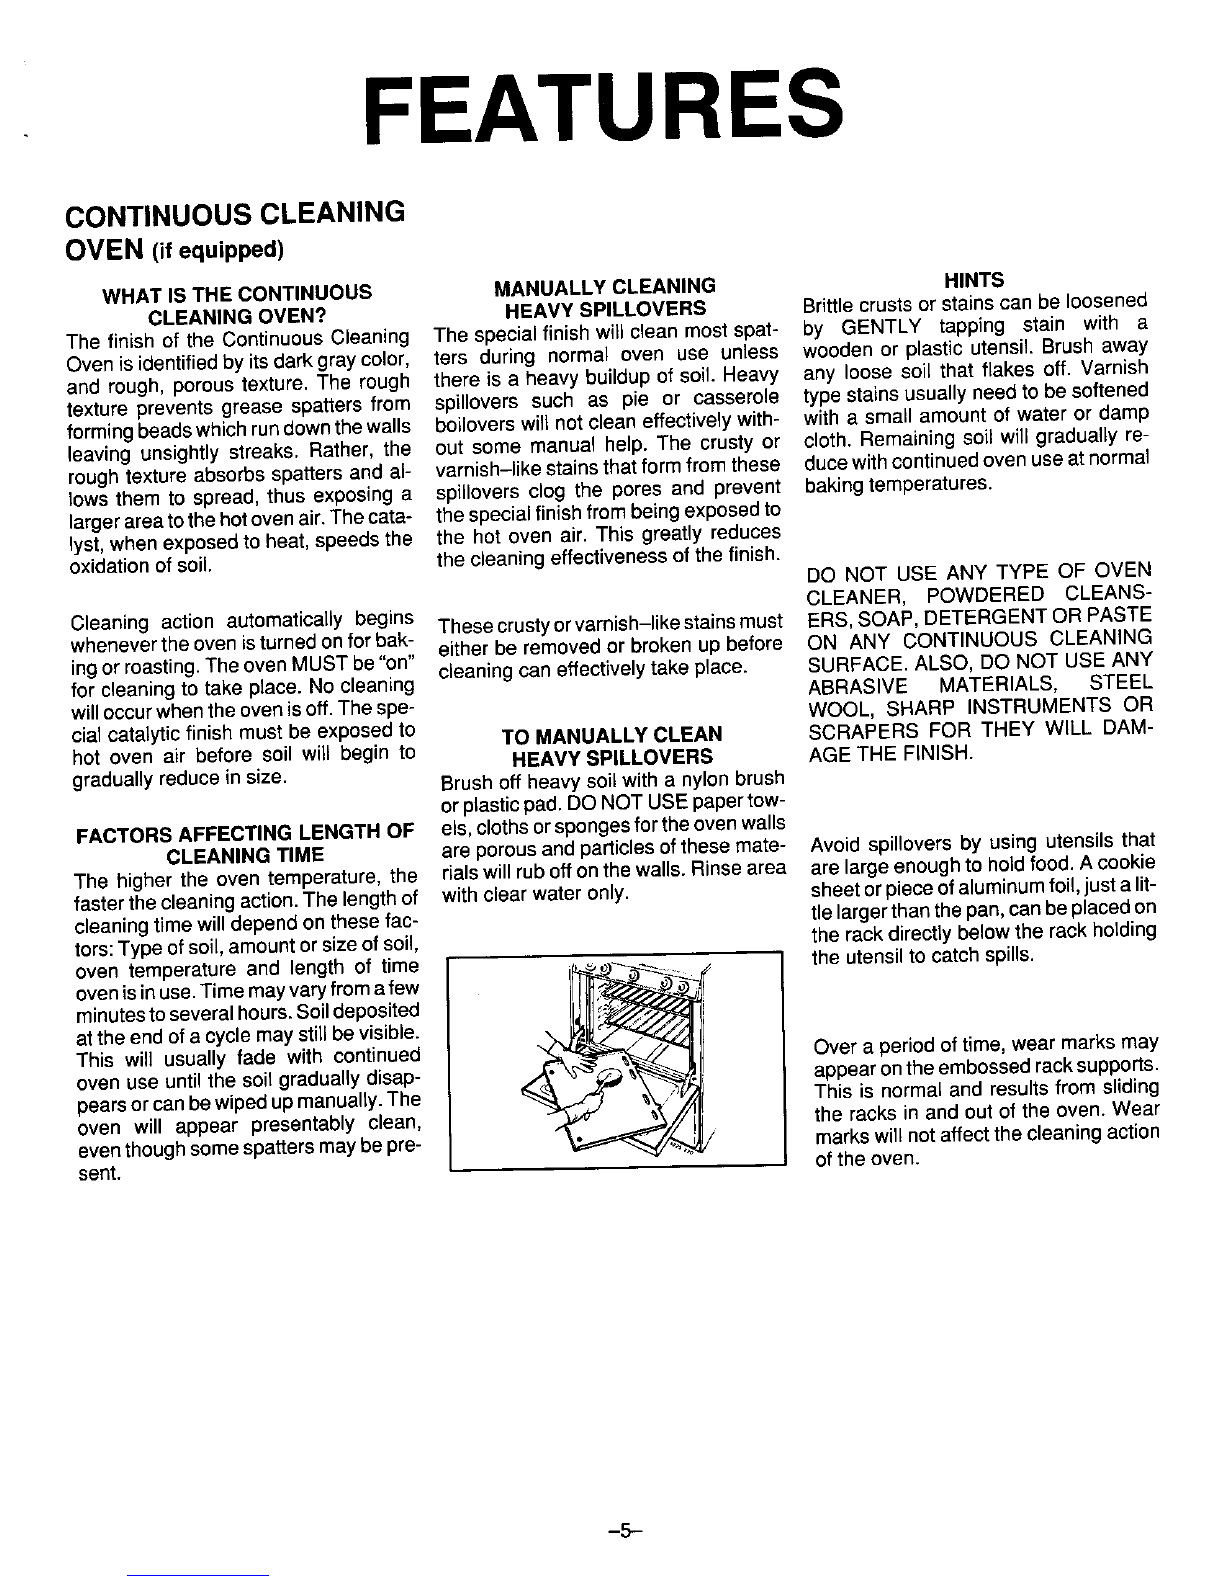
graduallyreducein size. Brush off heavy soilwitha nylon brush
orplasticpad. DO NOT USEpaper tow-
FACTORS AFFECTING LENGTHOF els, cloths orspongesfor theoven walls
CLEANINGTIME areporousandparticlesofthese mate-Avoidspillovers by using utensils that
The higher the oventemperature, therialswillruboffonthewalls.Rinseareaare largeenoughto holdfood.Acookie
fasterthecleaningaction.The lengthof withclear water only. sheetorpieceof aluminumfoil,justalit-
cleaningtime will depend onthese fac- tie largerthanthe pan,canbeplacedon
tors: Type ofsoft,amount or size of soil, the rackdirectly belowthe rack holding
oven temperature and length of time the utensilto catch spills.
ovenisinuse.Time mayvaryfromafew
minutestoseveral hours.Soildeposited
at theend of a cycle maystill be visible.
This will usually fade with continued Over a period oftime,wear marks may
oven use until the soil gradually disap- appearonthe embossed racksupports.
pearsor canbewipedupmanually.The This is normal and resultsfrom sliding
oven will appear presentably clean, the racksin and outoftheoven.Wear
eventhoughsomespattersmaybepre- markswillnotaffectthecleaningaction
sent.ofthe oven.
-5-

USING YOUR OVEN
PILOT IGNITION OVEN DOOR DESIGN2- SPECIALDOOR
Be sure oven control is set in the OFF When opening oven door, allow steam On some models, the oven door is
positionpriortosupplying gastothe ap- and hot airto escapebefore reaching in equippedwith a specialhingethat locks
pliance, oven to check, add or removefood. into placeas the door is removed.
Tolight ovenpilot:When cool,remove Do notattempt toopen orclose doorTo remove doorwith special hinges:
ovenracksand oven bottom.With theuntil door iscompletely seatedon 1.Opendoorto thebroilstopposition
oventhermostatknobintheOFF posi- hingearms.Neverturnonovenunless (openabout4 inches).
tion,holda lightedmatchtothepilotIo- doorisproperlyinplace,Whenbaking,
cated at theback end oftheoven besuredoorJscompletelyclosed.BaK-2. Grasp thesidesofthedoor at the
middleofthedoor.Slowly liftdoor
burner.Once pilot lights, replace oven ingresultswillbe affected if dooris not straight up.
bottomand racks,securelyclosed.3. As you liftthe door up, very slightly
l"_.Your wall oven will feature either the open door by pulling doortoward
standarddoor (Design 1)or a door with you. Check to be sure latches (A)
special hinges (Design 2). swing down into the notches on the
hinge arms.
DESIGN1-STANDARD DOOR
To remove door: Open door to the
"stop"position (opened about 4 inches)
and grasp door with both handsat each
side. Do not usedoor handleto lift door.
Liftupevenly until door clears the hinge
arms.
PILOTLESS IGNITION
GIo bar-type ignition ,.._ t_-_
With this type of ignitionsystem, the
ovenwillnotoperateduringapowerfail-
ure or if unit is disconnected from the
wall outlet. No attempt should be made
to operate oven during a powerfailure. To replace door:
OVEN BURNER 1. Graspsidesofdoorandalignslotsin
doorwith hinge arms.
The size and appearance of a properly
adjusted oven burner flame shouldbe 2.Very slightly pull door to a more
as shown: open position as you slide the door
CAUTION: downonto the hinge arms.The slid-
Hingearmsare spring mountedand ingactionofthedoorwilldisengage
_--_-i the latches onthe hingearrns.
will slam shut against theoven if acci-
dently hit. Neverplace hand orfin-3. Gentlypushthe doordownward until
gers between the hinges and the the door rests evenly on the hinges.
front oven frame. You could bein- Close door.
Coneincenterissmallerjuredifhingesnapsback.
To replace door: Grasp door at each [
side, align slots in thedoorwiththe
oneapprox.1/2-inchhingearms and slidedoordown onto
• thehingearms untilcompletelyseated
on hinges.
--6--
USING YOUR OVEN
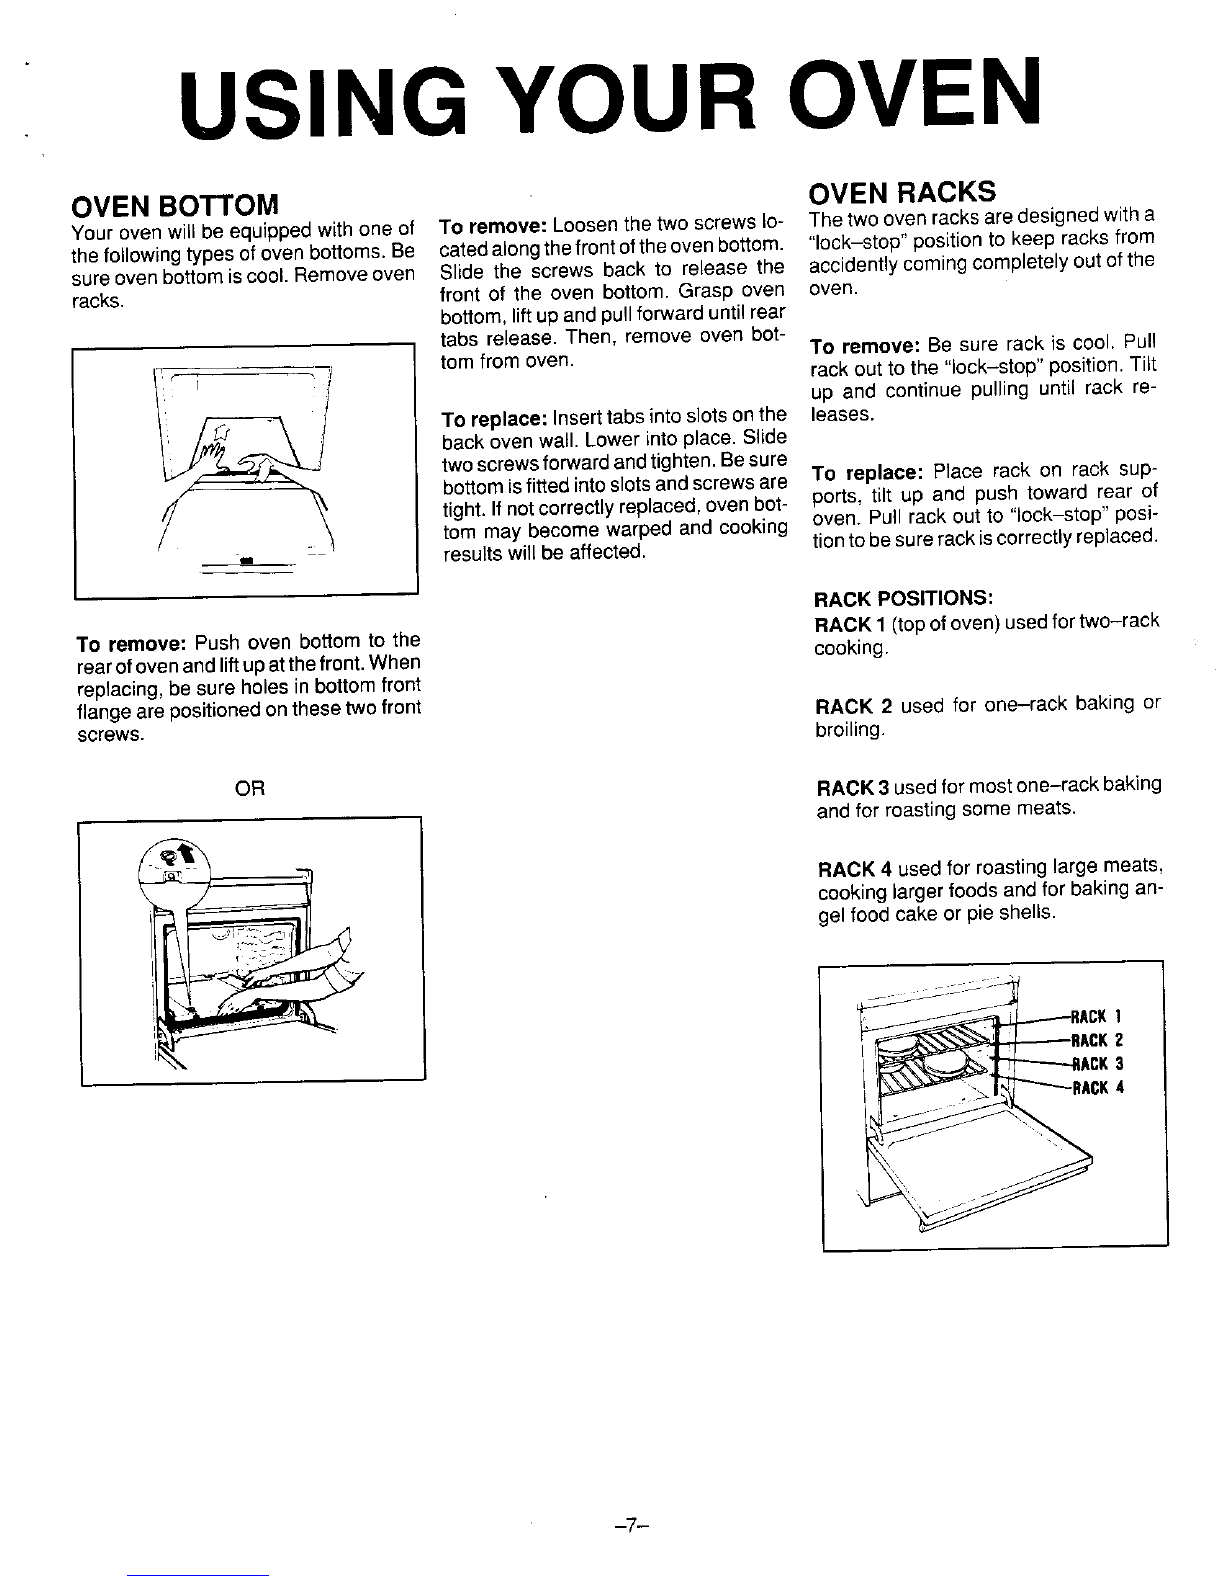
OVEN BOTTOM OVEN RACKS
Youroven will beequipped with one of To remove:Loosen thetwoscrewsIo- The two oven racks are designed with a
the following types of oven bottoms. Be catedalongthefront ofthe oven bottom. "lock-stop" position to keep racks from
sure oven bottom iscool. Removeoven Slidethescrews back to releasethe accidently coming completely out ofthe
racks, front of the oven bottom.Grasp oven oven.
bottom,liftupand pullforwarduntilrear
tabs release. Then, remove oven bot-
tom from oven. Toremove: Be sure rack is cool. Pull
rack out to the "lock-stop" position. Tilt
up and continue pulling until rack re-
Toreplace: Inserttabsinto slots onthe leases.
backoven wall. Lower into place. Slide
twoscrews forward andtighten. Besure
bottomisfitted intoslots andscrews are To replace: Place rack on rack sup-
tight. Ifnot correctly replaced,oven bot- ports, tilt up and push toward rearof
tom may become warped and cooking oven.Pull rack out to "lock-stop" posi-
-resultswillbe affected, tiontobesurerackiscorrectlyreplaced.
RACK POSITIONS:
To remove:Push evenbottom tothe RACK 1 (topofoven)used fortwo-rack
rearofoven and liftupatthefront. When cooking.
replacing, besure holes in bottom front
flangeare positionedonthese two front RACK 2 used for one-rack baking or
screws, broiling.
OR RACK 3 usedfor most one-rack baking
and for roasting some meats.
RACK4 used for roasting large meats,
cooking larger foods and for baking an-
gel food cake or pie shells.
i
_ACK4
-7-

USING YOUR OVEN
THERMOSTAT KNOB
TheTHERMOSTATknobisusedtose- cooking thin(3/4-inch) steaks. Allow Ifcookingontworacks,staggerpansso
lectandmaintaintheoventemperature, burnerto preheat3 to 5 minutes, one isnotdirectlyovertheother. Use
Always turn this knob justTO the de- rack positions 2 and 4,or 1 and 3,de-
sired temperature not to a higher tem-
peratureand then back. On some mod- Selecting temperature higher than de- pending on baking results,when cook-
sired will NOT preheat the oven any ing on two racks.
els, there is an indent at the 350°F set-
ting. Turn this knob to OFF whenever faster. Preheatingatahigher tempera-
ture may have a negative effect on bak-
the oven is not inuse. ing results.OVEN
CHARACTERISTICS
The oven temperatureis maintained Every oven has its own characteris-
_ _ t by cyclingthe burneron andoff.After tics. You may find that the cooking
theoventemperaturehas beenset, times and temperaturesyou were ac-
there will beabout a45 second delay customed to with your previous oven
before the burner ignites.This isnor- may need to be altered slightly with
maL and no gas escapes duringthis your new oven.Please expect some
delay, differences with this newoven,
THERMOSTAT HINTS: HOW TO SET OVEN:
Foroptimumbakingresultsofcokes. 1. Placerackincorrectposition.
cookies,or biscuits, or if using a
Pilotless Ignition Models: cookie sheet,use one rack.Position 2. Turnthermostat knob to desired
rack so food is in thecenter of the temperature settingfor baking or
Oven cannot be used during a power oven.Allow2inchesbetween edgeof roasting Turnto BROILfor a broil
failure.utensilandtheovensidesoradjacent operation.
utensils.3,Preheatovenfor baking operations
PREHEATING orifcalledforinthe recipe,
Preheatingis necessaryfor baking.AI- NEVER placepansdirectlyontheoven
Iowoventoheatfort0to15minutesbe- bottom Do not coverentirerack with 4. Check food for donenessat mini-
foreaddingfood. It isnot necessaryto aluminumfoil. Do notplacefoil directly mumtimemrecipe.Cook longerif
preheatovenforroasting, onovenbottomorplacefoildirectlyun- necessary.
oer utensil. To catchspillovers,cul a
piece offoilalittlelargerthan thepan 5.Turn thermostatknob to OFF and
removefoodfromthe oven.
Itisnot necessarytopreheat for broiling and place it on therack below therack
unlessdarker browning is desired or if containing the utensil.
i -
USING YOUR OVEN
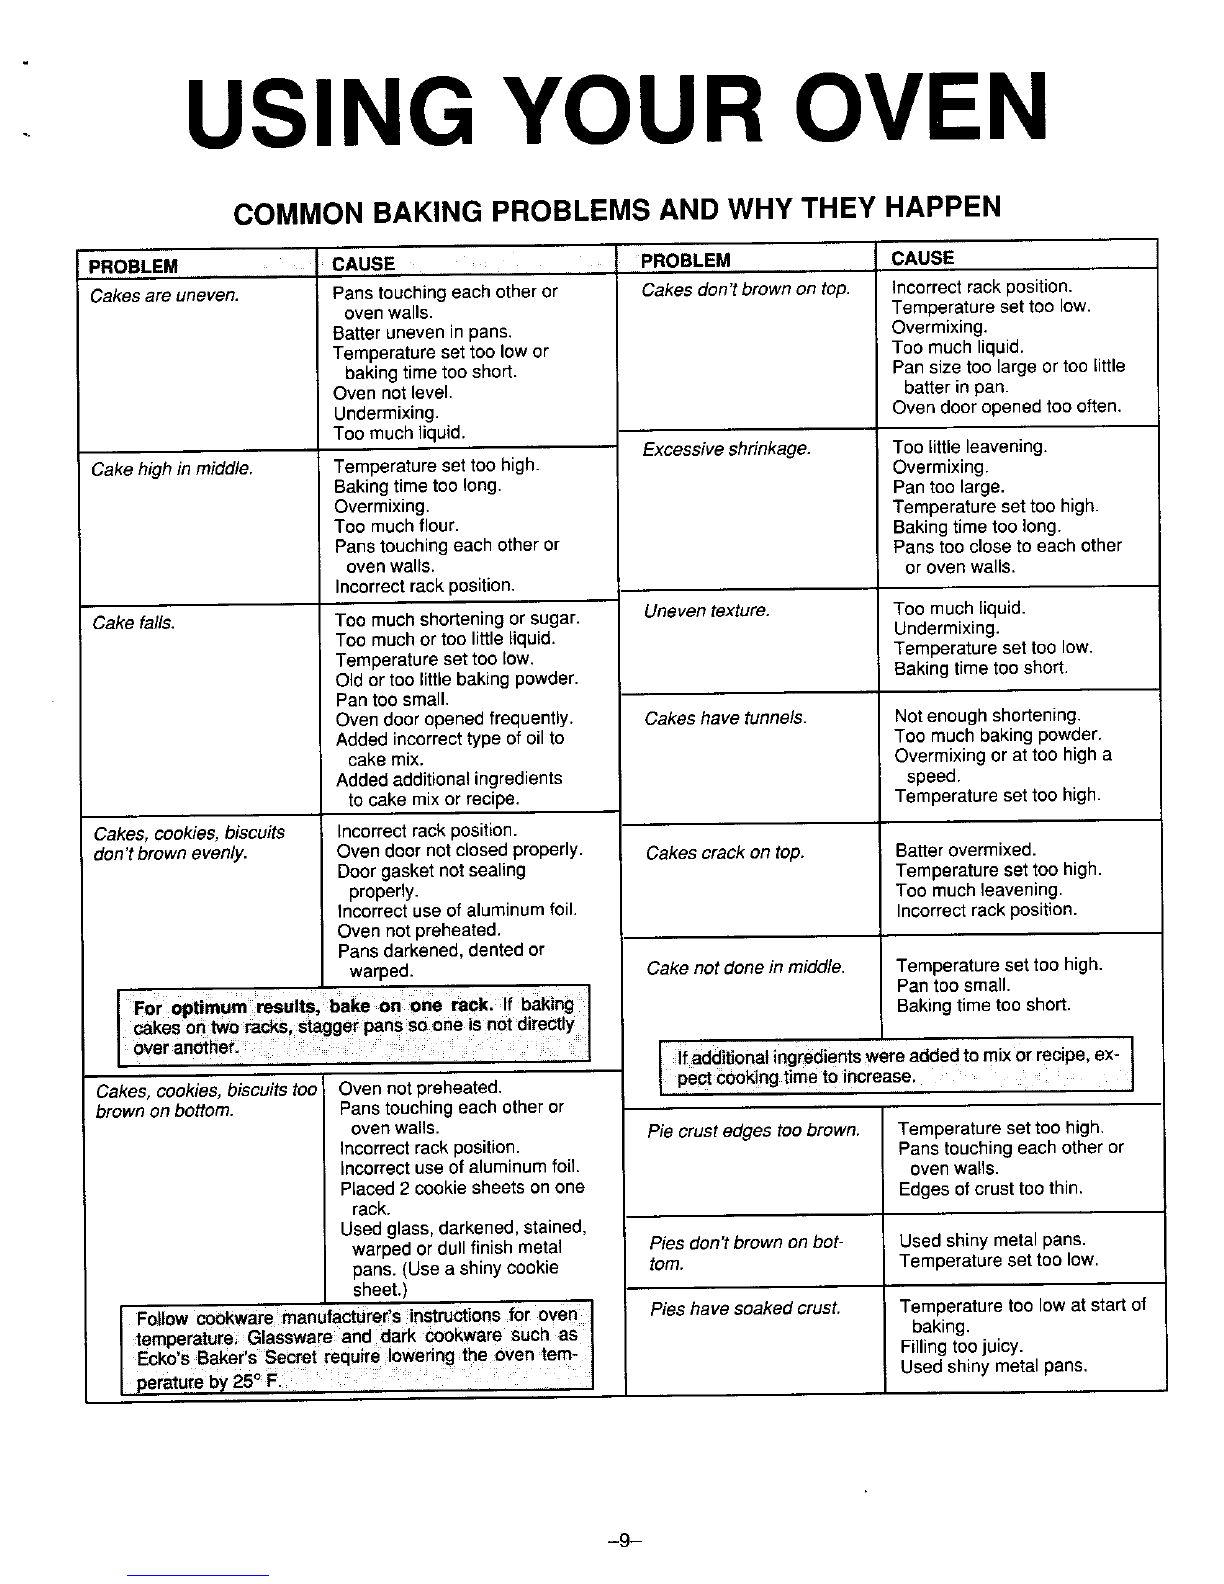
COMMON BAKING PROBLEMS AND WHY THEY HAPPEN
PROBLEM CAUSE PROBLEM CAUSE
Cakesare uneven. Pans touchingeach other or Cakesdon't brown on top. Incorrectrack position.
oven walls. Temperature set too low.
Batter uneven in pans. Overmixing.
Temperature settoo low or Too much liquid.
baking timetooshort.Pan size too large or too little
Oven not level, batter in pan.
Undermixing.Oven door opened too often.
Too much liquid, Excessive shrinkage. Too little leavening.
Cake high in middle. Temperature set too high. Overmixing.
Baking time too long. Pan too large.
Overmixing. Temperatureset too high.
Too much flour. Bakingtime too long.
Panstouching each other or Panstoo close to each other
oven walls, or oven walls.
Incorrectrack position.
Cake falls. Too much shortening or sugar. Uneven texture. Too much liquid.
Too much or toolittle liquid. Undermixing.
Temperatureset too low. Temperature set too low.
Old or too littlebaking powder. Baking timetoo short.
Pan toosmall.
Oven door opened frequently. Cakeshave tunnels. Notenough shortening.
Added incorrect type ofoilto Too muchbaking powder.
cake mix. Overmixing or at too high a
Added additional ingredients speed.
to cakemix or recipe. Temperature set too high.
Cakes, cookies, biscuits Incorrect rack position.
don't brown evenly, Oven door not closed properly. Cakes crack on top. Batter overmixed.
Door gasket not sealing Temperature set too high.
properly. Too much leavening.
Incorrect use of aluminum foil. Incorrect rack position.
Oven not preheated.
Pansdarkened,dented or
warped. Cake not done in middle. Temperature set too high.
Io"e rack:If baking] Pantoo small.
Icakeson tworacks,staggerpansso one,isn0tdirectlyI Bakingtimetoo short.
[ ifadd!tionalingredientswereaddedtomixorrecipe,ex- ]
Cakes, cookies, biscuits too'_---"_-_preheated.J
brown on bottom.Panstouchingeachotheror
ovenwails.Pie crust edgestoo brown. Temperaturesettoo high.
Incorrectrackposition.Panstouchingeachotheror
incorrect use of aluminum foil. evenwalls.
Placed2 cookie sheets on one Edges of crust too thin.
rack.
Used glass, darkened,stained,
warped or dull finishmetalPies don't brown on bet-Usedshinymetalpans.
pans. (Use a shiny cookie tom. Temperature set too low.
sheet,)
Followcookware manufacturer'sinstructionsfor oven]Pies have soaked crust, Temperature too lowatstart of
Iemperature; Glassware anddark cookware such as _ baking.
Ecko'sBaker's SeCretrequire loweringthe oVentern- ] Fillingtoojuicy.
Usedshinymetalpans.
-9-
USING YOUR OVEN
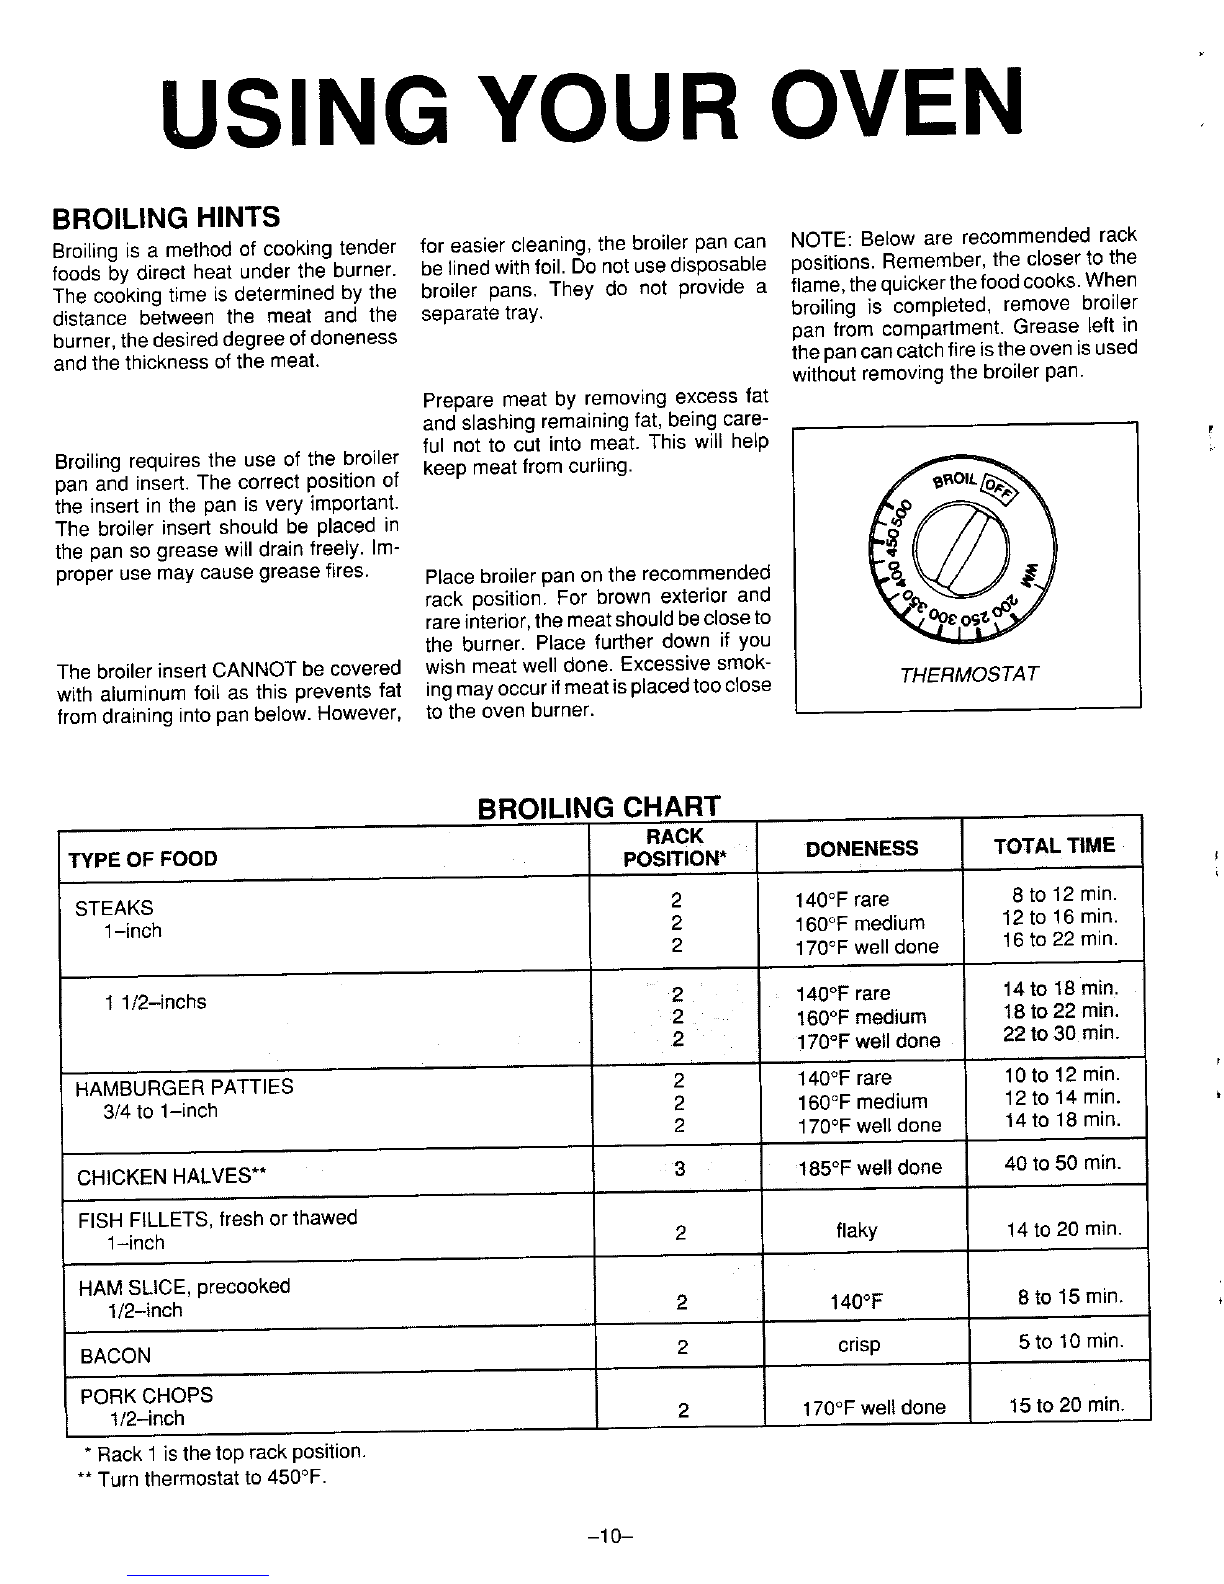
BROILING HINTS
8roiling is a method of cooking tender foreasier cleaning, the broiler pan can NOTE: Below are recommended rack
foods by direct heat under the burner, be linedwith foil. Do not usedisposable positions. Remember, the closer to the
The cooking time is determined by the broiler pans,They do not provide a flame, thequicker thefoodcooks. When
distance between the meat and the separate tray. broiling is completed, remove broiler
burner, the desired degreeof doneness pan fromcompartment. Greaseleft in
and the thickness ofthe meat. the pan cancatchfire isthe oven isused
without removing the broiler pan,
Prepare meat by removing excess fat
and slashing remainingfat, being care-
ful not to cut into meat, This will help
Broiling requires the use of the broiler keep meat from curling.
pan and insert. The correct position ofO
the insert in the pan is very important.
The broiler insert should be placed in
the pan so grease will drain freely. Im-
proper usemay cause grease fires. Placebroiler pan on the recommended
rack position. For brown exterior and
rare interior,the meatshould beclose to
the burner. Place further down if you
The broiler insert CANNOT be covered wish meat well done. Excessive smok-
with aluminum foil as this prevents fat ingmayoccurifmeatisplacedtoocfose THERMOSTAT
from draining intopan below. However, to the oven burner.
BROILING CHART
RACK
TYPE OF FOOD POSITION* DONENESS TOTAL TIME
STEAKS 2 140°F rare 8 to 12 rain.
1-inch 2 160°F medium 12to 16rain.
2 170°F well done 16to 22 rain.
1 1/2-inchs 2 140°F rare 14 to 18rain.
2 160°F medium 18to22 rain.
2 170°F well done 22to30 rain.
..... i
HAMBURGER PATTIES 2 140°F rare 10to 12 min.
3/4 to 1-inch 2 160°F medium 12to 14 rain.
2170°Pwell done 14to 18rain.
CHICKEN HALVES** 3 185°F welldone 40 to 50 rain.
,, ,, , ,
FISH FILLETS, fresh or thawed
1-inch 2 flaky 14to 20 rain.
HAM SLICE, precooked
1/2-inch 2 140°F 8 to15rain.
BACON 2 crisp 5 to 10rain.
PORK CHOPS
1/2-inch 2 170°F well done 15to20 min.
*Rack 1is the top rack position.
** Turn thermostat to 450°F.
-10-

CARE AND CLEANING
PARTS CLEANING AGENTS DIRECTIONS Besureall parts are cool before cleaning.
Be sure all parts are properly replaced a;tercleaning.
BakedEname/ Soap& water. PasteofUse adry towelorcloth to wipeupspills,especially acidspil;s,assoon asthey occur. (Thisisasps-
Oven door baking soda & water, cially important for white surfaces.) When surface is cool, wash with soap and water. Do not use
abrasiveorharshcleaning _iquidsand powdersor oven cleaners. These will scratchand perma-
nently damage the finish. Dry with a soft cloth.
Broilerpan &Soap& water.Plastic Removefrom ovenafter use. Coolthenpouroffgrease. Place soapycloth over insert andpan;let
Insert scouringpad. Soap filled soakto loosensoil. Washinwarmsoapywater. Usesoapfilledscouring padto removestubbornsoil.
scouring pad. Clean in dishwasher if desired.
Control knob Soap &water. To remove knobsfor cleaning,gently pull forward. Wash in mild detergent andwater. Do not use
abrasive cleaning agents.They will scratch finish and remove markings. Rinse, dry and replace.
Turn on to see if knob has been replaced correctly.
Glass Soap&water. Pasteof Wash with soapandwater.Removestubborncoil with paste of baking soda and water. Toavoid
Oven window baking soda&water, inside stainingofovendoor glass,do not oversaturate cloth. Do not useabrasive materialssuch as
Windowcleaningfluid, scouringpads,steelwoolor powderedcleaningagents.They willdamage glass. Rinse withclear
water anddry.
Metalfinishes Soap &water. Pasteof Washwith soap andwater.Remove stubbornsoilwith pasteof bakingsodaandwater. Donot use
Trim parts baking soda &water, oven cleaners,abrasive or caustic agents.They will damage the finish.
Control panel
Oven racka Soap & water. Cleansing Clean withsoapywater. Removestubborn soilwithcleansing powder or soapfilledscouringpad.
powders &plastic pads. Rinseanddry.
Soap filledscouring pad.
Plastie or vinyl Soap &water.Pasteof Neveruseovencleaners, abrasiveor causticliquidor powderedcleaning agentsonplasticfinishes.
finishes baking soda &water. These cleaning agents will scratch ormart finish,To preventstaining or discoloration,wipe upfat,
Doorhandles Non-abrasive plastic grease or acid (tomato, lemon, vinegar, milk, fruit juice,marinade) immediately with adry paper
Overlays pad or sponge, towel or cloth.When surface is cool, clean with soap and water; rinse, anddry.
Knobs
Porcelainfinish Soap & water.Cleansing Porcelaineeamef is glass fusedon metal,ft maycrackor chip with misuse.Cleanwithsoapand
interior powders & plastic pads.water when partsare cool. NEVERWIPE OFF A WARM OR HOT ENAMEL SURFACE WITH A
(See page 5for Commercia/oven DAMP CLOTH.THIS MAYCAUSECRACKING AND CHIPPING.
oonfinousclean cleaner.
oveninstructions) Cleanoveninteriorwithsoapand water.Usecleansingpowdersor a plasficscouringpadtoremove
stubbornsoil.Wipeacid orsugarstainsas soonas theoveniscooiasthesestainsmaydiscoloror
etchtheporceJaJe.DonotusemetalJicscouringpadsastheywiJiscratchtheporcelain. CornmercJal
ovencleaners canNOTbeusedontheContinuous Cleaningovenfinish.Ovencleaners canbeused
on the porcelain oven but follow manufacturer's directions.
Silicone rubber Soap &water.Washwithsoap andwater,bnse anddry.Do not remove door gasket,
Doorgasket
--1 1--
MAINTENANCE
ELECTRICAL HOW TO REMOVE OVEN LIGHT REPLACEMENT
CONNECTION FOR CLEANING AND Before replacingoven light bulb, DIS-
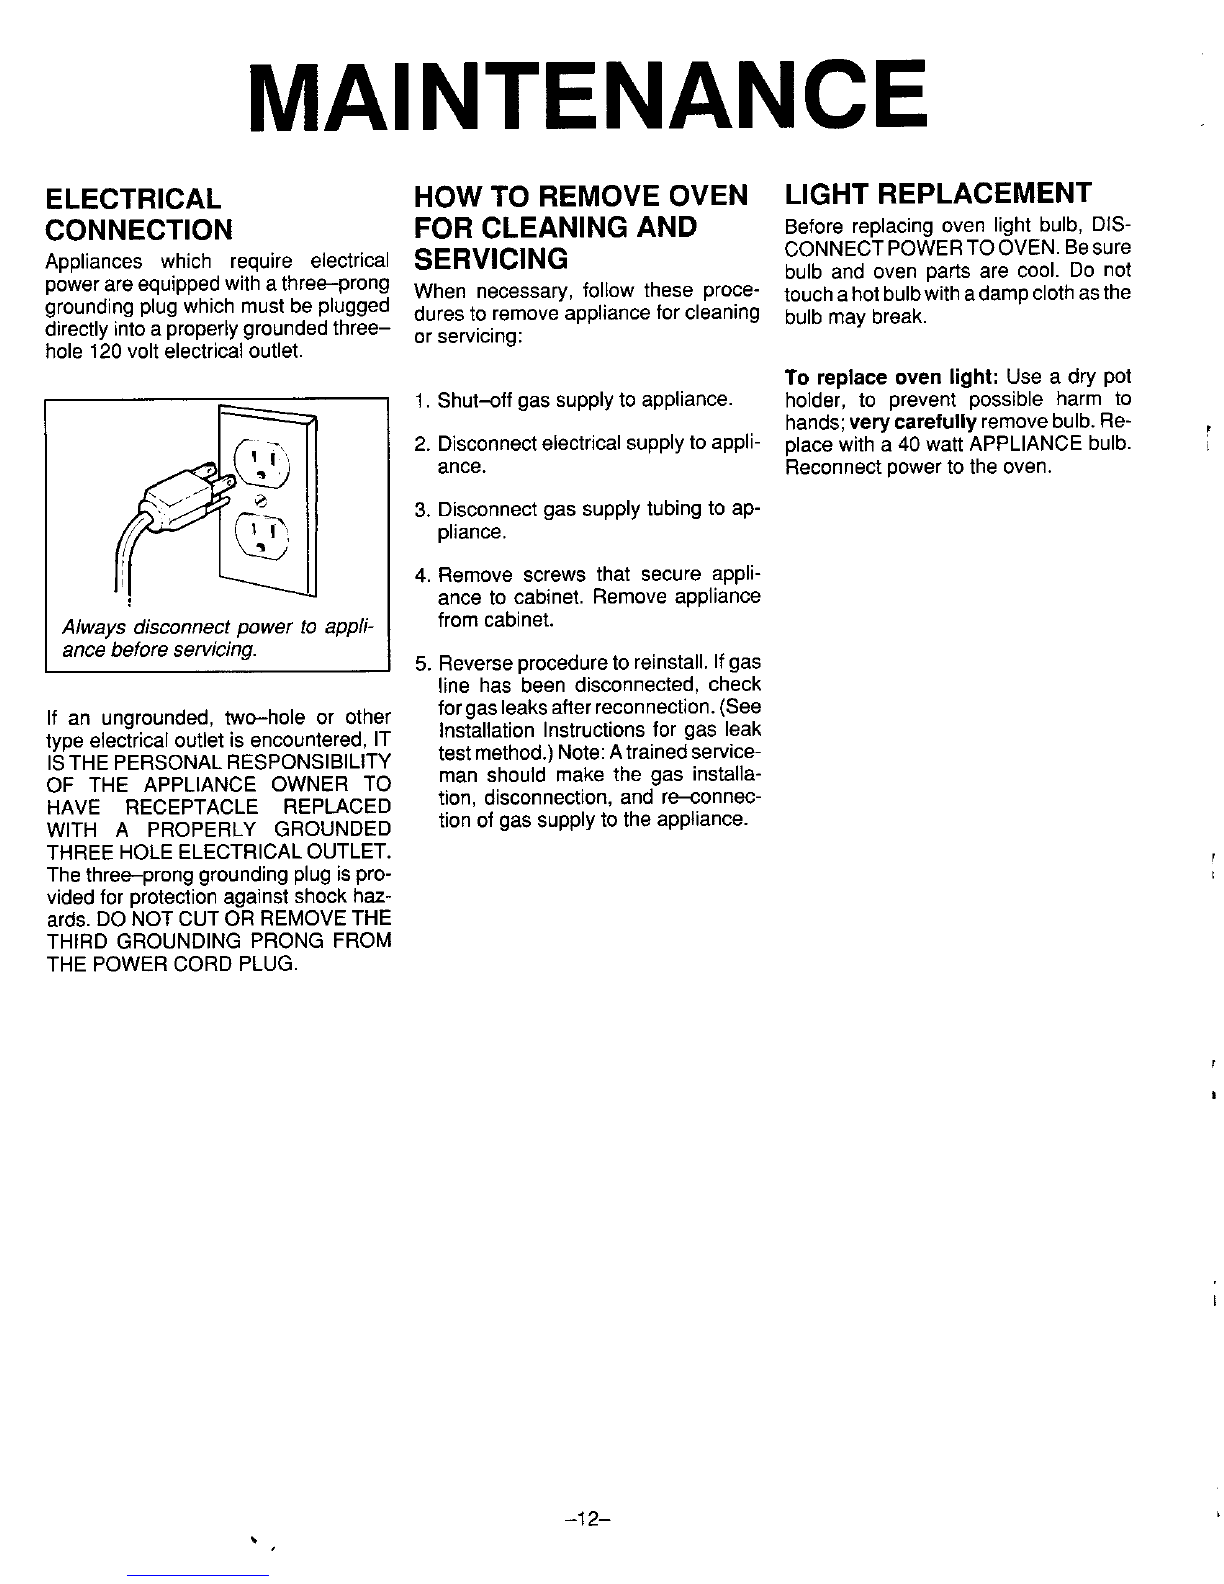
Appliances which require electrical SERVICING CONNECTPOWERTOOVEN. Besure
bulb and oven parts are cool. Do not
power are equippedwith athree-prong When necessary, follow these proce- touch a hot bulbwith adamp clothasthe
grounding plug which must be plugged dures to remove appliance for cleaning bulb may break.
directly intoa properlygrounded three- orservicing:
hole 120volt electrical outlet. Toreplaceoven light:Use a dry pot
1. Shut-off gas supplyto appliance, holder, to prevent possible harm to
hands;very carefully remove bulb. Re-
(_ I", 2. Disconnectelectricalsupply to appli- place witha 40watt APPLIANCE bulb.
_ __2.._ ance.Reconnect power to the oven.
/_q_r'__,, 3.Disconnectgas supply tubing to ap-
pliance.
4. Remove screws that secure appli-
•._ ance tocabinet. Remove appliance
Always disconnect power to appli- from cabinet.
ance before servicing.5. Reverse procedure to reinstall. Ifgas
line has been disconnected, check
If an ungrounded, two-hole or other forgasleaks afterreconnection.(See
type electrical outlet is encountered, IT Installation Instructions for gas leak
ISTHE PERSONALRESPONSIBILITY testmethod.) Note:A trainedservice-
OF THE APPLIANCE OWNER TO man should make the gas installa-
HAVE RECEPTACLE REPLACED tion, disconnection, and re-connec-
WITH A PROPERLY GROUNDED tion of gas supply to the appliance.
THREE HOLEELECTRICAL OUTLET.
The three-prong grounding plug is pro-
videdfor protectionagainst shock haz-
ards. DO NOT CUT OR REMOVETHE
THIRD GROUNDING PRONG FROM
THE POWER CORD PLUG.
-12-
SERVIC
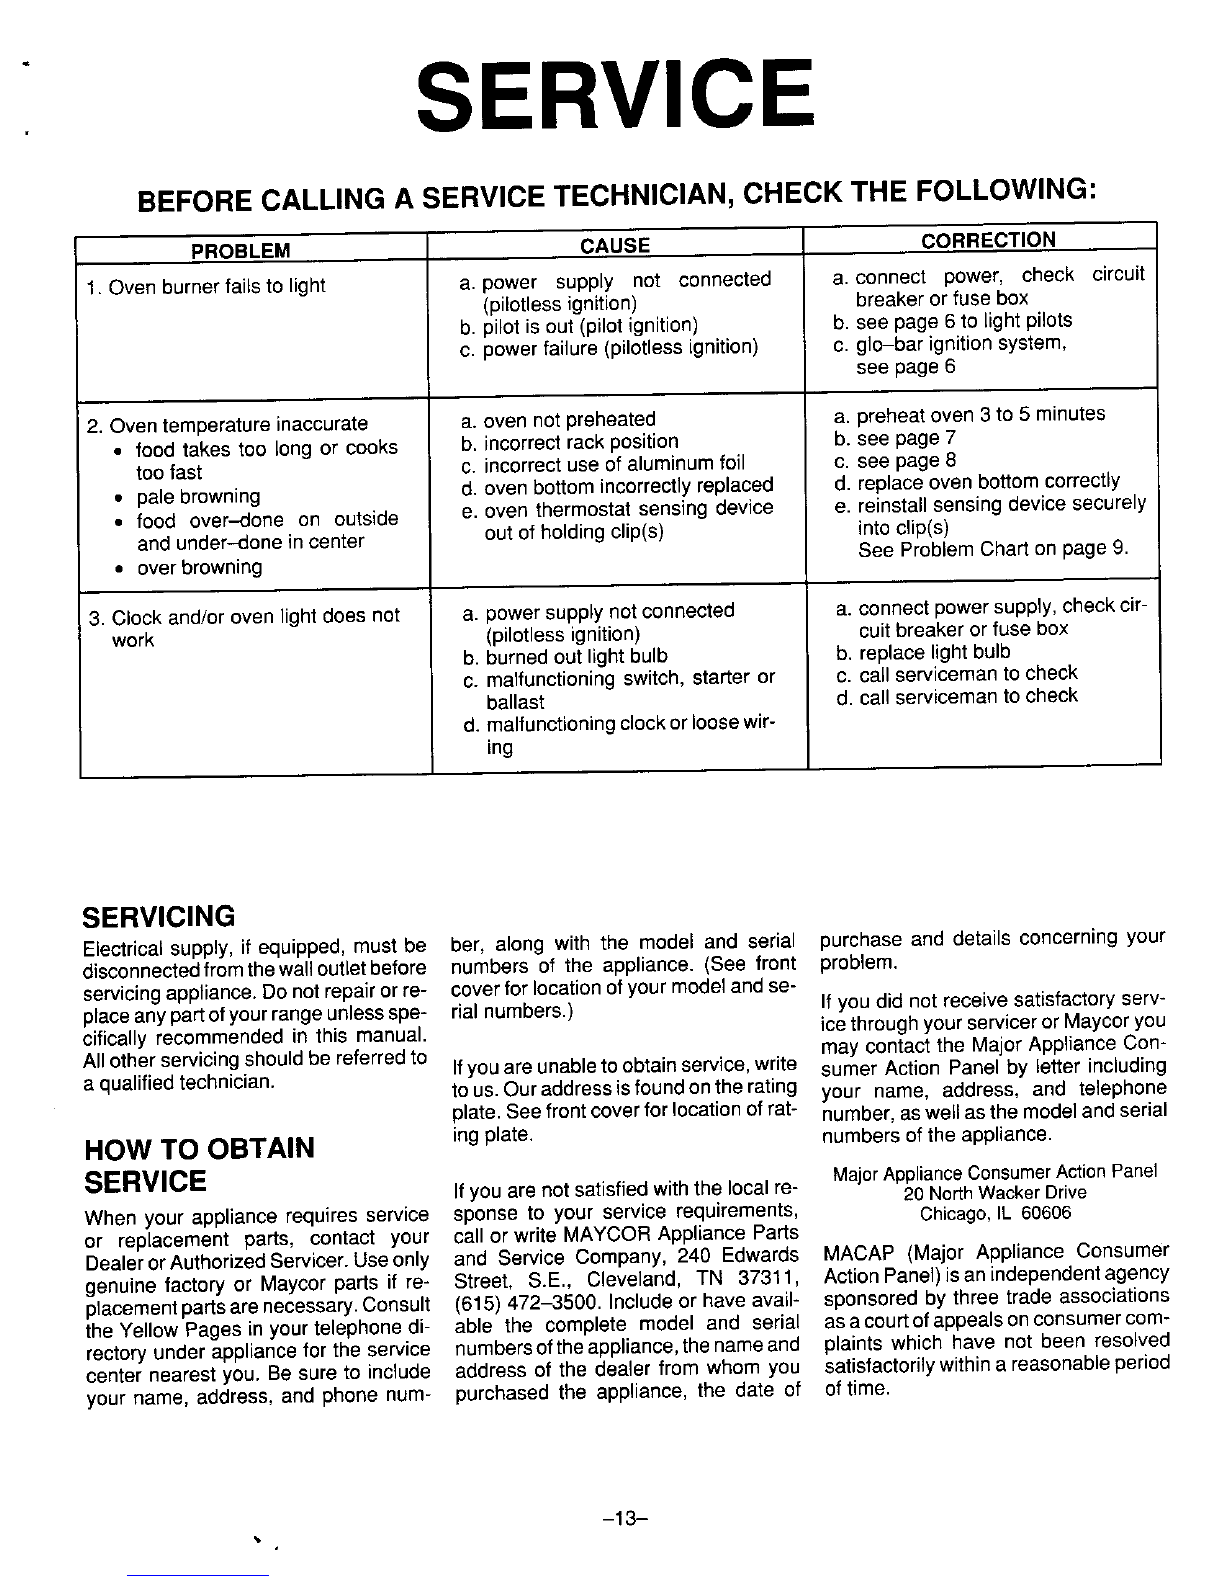
BEFORE CALLING A SERVICE TECHNICIAN,CHECK THE FOLLOWING:
PROBLEM CAUSE CORRECTION
1. Ovenburnerfailsto light a. power supply not connected a. connect power, check circuit
(pilotlessignition) breaker or fusebox
b. pilot is out (pilot ignition) b. see page 6to light pilots
c. power failure (pilotless ignition) c. glo-bar ignition system,
see page 6
2. Oven temperature inaccurate a. oven not preheated a. preheat oven 3 to 5 minutes
• food takes too long or cooks b. incorrect rack position b.see page 7
too fast c. incorrectuse ofaluminum foil c. see page8
• pale browning d. oven bottom incorrectly replaced d. replace oven bottom correctly
• food over-clone on outside e. oven thermostat sensing device e. reinstall sensingdevice securely
and under-done in center out of holding clip(s) into clip(s)
• over browning See Problem Chart on page 9.
3. Clock and/or oven light does not a. power supply not connected a.connect powersupply, check cir-
work (pilotless ignition) cult breaker or fuse box
b. burned out light bulb b. replace light bulb
c. malfunctioningswitch, starter orc.call servicemantocheck
ballast d. callserviceman to check
d. malfunctioning clock or loosewir-
ing
SERVICING
Electrical supply, ifequipped, must beber,along withthemodeland serial purchaseand detailsconcerning your
disconnectedfromthewalloutletbefore numbers of the appliance. (See front problem.
servicing appliance.Do not repair or re- cover for location ofyour modeland se-
placeanypartofyourrange unlessspe- rial numbers.) If you did not receive satisfactory serv-
cifically recommended in this manual, ice through your servicer or Maycor you
may contact the Major Appliance Con-
All other servicing should be referredto Ifyou are unableto obtain service,write sumer Action Panel by letter including
a qualified technician. tous. Our addressisfoundonthe rating your name, address, and telephone
plate. Seefront cover for location of rat- number, aswell asthe model and serial
HOW TO OBTAIN ing plate, numbers of the appliance.
MajorApplianceConsumerActionPanel
SERVICE Ifyou are notsatisfiedwiththe local re-20NorthWackerDrive
When your appliancerequiresservicesponse to your servicerequirements,Chicago,IL 60606
or replacement parts,contact your callorwriteMAYCOR ApplianceParts
DealerorAuthorizedServicer.Useonly and ServiceCompany,240 Edwards MACAP (MajorAppliance Consumer
genuine factory or Maycor parts if re- Street, S.E., Cleveland, TN 37311, Action Panel)isan independent agency
placementparts arenecessary.Consult (615) 472-3500. Include or have avail- sponsored by three trade associations
the Yellow Pages in your telephone di- able the complete model and serial asacourtofappealsonconsumercom-
rectory under appliance for the service numbersoftheappliance,the nameand plaints which have not been resolved
center nearest you. Be sure to include address of the dealer from whom you satisfactorilywithin a reasonableperiod
your name, address, and phone num- purchased the appliance, the date of oftime.
-13-
FULL ONE-YEAR WARRANTY
pplianceParts&S eDicOMcoEmsTalnycilIGeApaSroO raepIEcLe,Ewic hTouatIchOrgae,AaNnyGpaEof yourproductwhichhas_'a
defectin materialor workmanshipduring the first yearafter the date ofthe original installation. This warranty extends
to any owner during the one-year warranty period.
LIMITED5 YEAR WARRANTY
Onelectric rangesequippedwith soliddisc orsmoothtop heatingelements, andongasrangeswith sealedburners,for
an additional 4yearperiod beyondthe firstyearofthegeneral coverageof thiswarranty,Maycor will replaceany ofthe
solid disc or smoothtop heatingelements, or sealed burnerswhich fail to heatas a resultofdefective workmanshipor
material. Additionally, Maycor will replace any smoothtop cooking surface which cracks or breaks during normal
householdcooking.These partsmust beinstalledby a qualifiedperson.Any laborcharge required for replacementis
notcovered by this warranty.
HOW TO OBTAIN SERVICE
To obtain the repair or replacement of a defective part under these warranties, you should contact the dealer from
whom you purchased the appliance or a servicer hedesignates.
WHAT IS NOT COVEREDBYTHESE WARRANTIES
1. Conditions and damage resultingfrom improper in- 5. Any product used for other than normal household
stallation, delivery, unauthorized repair, modifica- use. It does not extend to products purchased for
tion, or damage notattributable to a defectin mate- commercial or industrial use.
rial or workmanship. 6. Anyexpense incurredfor service calls tocorrect in-
2. Conditions resulting from damage, such as: (1) im- stallationerrorsor to instructyou on howto usethe
proper maintenance, (b) misuse, abuse, accident, products.
or (c) incorrect electrical current or voltage. 7.CONSEQUENTIAL OR INCIDENTAL DAMAGES
3. Warranties arevoid ifthe originalserial number has SUSTAINED BYANY PERSONAS A RESULT OF
beenremoved, altered, or cannot be readily deter- ANY BREACHOFTHESE WARRANTIES OR ANY
mined. IMPLIED WARRANTY. Some states do not allow
the exclusion or limitation of consequential or inci-
dental damages, so the above exclusion may not
4. Light bulbs, apply to you.
ADDITIONAL HELP
If you are not satisfied with the local response to your service requirements and wish to contact Maycor, please ad-
dressyour lettertothe Customer RelationsDepartment, Maycor Parts& ServiceCompany, 240 EdwardsStreet,S.E.,
Cleveland,TN 37311 or call (615)472-3500.To save time, your lettershould includethe complete model and serial
numbers ofthe warrantedappliance, thenameandaddressofthedealerfrom whom youpurchasedthe appliance,the
date of purchaseand details concerning your problem.
These warranties are the only written or expressed warranties given by Maycor. No one is authorized to increase,
alter, or enlarge Maycor's responsibilities or obligations under these warranties.These warranties give you specific
legal rights, and you may also have other rights which vary from state to state.
8109P059-60/_'_
(6/91)
-14-
FULL ONE-YEAR WARRANTY
31lanceParts&ServiceCompanywillrepairor replace,withoutchar( ::
defect in materialorworkmanship during the first year afterthe dateof theoriginal installation. This warranty extends ;
to anyowner during the one-year warranty period.
LIMITED 5 YEAR WARRANTY
On electricrangesequippedwith soliddiscor smoothtop heatingelements,andongasrangeswith sealedburners,for
anadditi_na_4 yearperi_dbey_ndthefirstyear_fthegenera_c_verage_fthi_warranty_Mayc_rwi__rep_aceany_fthe
soliddiscorsmoothtopheatingelements,orsealedburnerswhichfail toheatasa resultofdefectiveworkmanshipor
material.Additionally,Maycorwilereplaceanysmoothtopcookingsurfacewhichcracksor breaks duringnormal
householdcooking.Thesepartsmustbe installedbyaqualifiedperson.Anylaborchargerequiredforreplacementis
notcoveredbythiswarranty.
HOW TO OBTAIN SERVICE
To obtain therepairor replacementofa defectivepart underthesewarranties,you shouldcontactthedealerfrom
whomyoupurchasedtheapplianceora servicerhedesignates.
WHAT IS NOT COVERED BY THESE WARRANTIES
1. Conditionsand damage resulting fromimproperin-5. Any product usedfor otherthan normal household
stallation, delivery, unauthorized repair, modifica- use.It does not extend to products purchased for : :
tion, or damage notattributable to a defect in mate- commercial or industrial use. :
rial orworkmanship.
6. Any expense incurredfor service calls tocorrect in- : :
2. Conditions resulting from damage, such as: (1) ira- stallation errors or to instruct youon howto use the ....:
proper maintenance, (b) misuse, abuse, accident, products.
........ or (c) incorrect electrical current or voltage. 7. CONSEQUENTIAL OR INCIDENTAL DAMAGES ................ :
3. Warranties arevoid ifthe original serial numberhas SUSTAINED BYANY PERSONASA RESULT OF
been removed, altered, or cannot be readily deter- ANY BREACHOF THESEWARRANTIES ORANY
mined. IMPLIED WARRANTY. Some states do not allow
the exclusion or limitation of consequential or inci-
dental damages, so the above exclusion may not :
4. Lightbulbs, apply to you.
ADDITIONAL HELP
If youare notsatisfiedwiththe local responsetoyour service requirements and wish to contact Maycor, please ad-
dress yourlettertotheCustomerRelationsDepartment,Maycor Parts& ServiceCompany,240 EdwardsStreet,S.E., :
Cleveland,TN 37311 or call (615)472-3500. To save time, your lettershould include the complete modeland serial
numbersofthewarrantedappliance,the nameandaddressofthedealerfromwhom youpurchasedthe appliance,the
date of purchase and details concerning your problem.
These warranties are the only written or expressed warranties given by Maycor. No one is authorized to increase,
alter, or enlarge Maycor's responsibilities or obligations under these warranties. These warranties give you specific
legalrights, and you may also have other rights which vary from state to state.
8109P059-60
(6/91)
-14-
This manual suits for next models
1
Table of contents
Popular Range manuals by other brands

Frigidaire
Frigidaire FFEF3043LS Product specifications

Metos
Metos 92/04 VTC user manual
 use and care manual")
White-Westinghouse
White-Westinghouse 316257134 (0809) use and care manual

Fulgor Milano
Fulgor Milano SOFIA 600 Series installation instructions

GE
GE JCGBS86 owner's manual

CombiSteel
CombiSteel 7178.0440 Instruction and maintenance manual


