Adventurer LP Truck Camper User manual

Truck Camper
Owner’s Manual

TABLE OF CONTENTS
© ALP (Adventurer Limited Partnership). All Rights Reserved
Truck Camper......................................................................................................................1
Introduction..........................................................................................................................1
Information in This Manual........................................................................................1
Dealer’s Responsibility...............................................................................................1
Prolonged Occupancy............................................................................................................2
Limited Warranty ..................................................................................................................2
Important Information about Your Warranty...............................................................2
ANNUAL INSPECTIONS AND ANY REQUIRED SERVICE................................................3
Exclusions ................................................................................................................3
Identification ........................................................................................................................4
Center Of Gravity ..................................................................................................................5
Weight Information...................................................................................................6
Propane Systems...................................................................................................................6
LP Gas Safety Precautions .........................................................................................7
Filling LP Gas Tanks ..................................................................................................7
Lighting LP Gas Appliances ........................................................................................8
If You Smell Gas .......................................................................................................8
Using LP Gas Systems at Low Temperatures...............................................................8
Fire And Safety......................................................................................................................9
LPG Leak Detector ....................................................................................................9
Combination Smoke & Carbon Monoxide Detector.......................................................9
Electrical System.................................................................................................................10
ELECTRICAL CONNECTION TO TRUCK .....................................................................10
Ground Fault Interrupter .........................................................................................10
Systems Monitor Panel ............................................................................................11
Water Pump Control Switch .....................................................................................11
Monitor Panel-Levels Indicators Switch.....................................................................11
Erroneous indications when checking water levels can be caused by:................................................ 11
Water System......................................................................................................................12
The dual water systems in our campers supply water from either the unit’s storage tank
(potable water) or directly from the city water hookup. .............................................12
Fresh Water Tank ...................................................................................................12
City Water Hookup..................................................................................................12
Hot Water Tank ......................................................................................................12
Waste Water System...........................................................................................................13
LOADING & Unloading Your Camper...................................................................................14

TABLE OF CONTENTS
© ALP (Adventurer Limited Partnership). All Rights Reserved
Dually Brackets .......................................................................................................14
Manual Jack Operating Instructions..........................................................................14
Operating Remote Control Electric Jacks...................................................................15
Electric Jack Operating Instructions........................................................................................................... 16
Continuation for all Jack Versions.............................................................................16
To Unload –Reverse above procedure.................................................................17
Towing and Hitch systems ..................................................................................................17
Loading Cargo .....................................................................................................................17
Carrying Capacity....................................................................................................17
Camper Features .................................................................................................................18
Vents .....................................................................................................................18
Lighting..................................................................................................................18
Bathroom ...............................................................................................................18
Dinette Bed ............................................................................................................18
Ladder and Roof Rack .............................................................................................18
Cab-Over................................................................................................................18
Storage ..................................................................................................................18
Appliances...........................................................................................................................19
Lighting LP Gas Appliances ......................................................................................19
Microwave Oven .....................................................................................................19
Refrigerator ............................................................................................................19
Operating Tips ........................................................................................................20
Water Heater..........................................................................................................20
Range / Oven .........................................................................................................20
Operating the ELECTRIC Slide Out ......................................................................................21
Slide-Out Manual Operation (Select Models) .............................................................21
Slide-Out Manual Operation (Schwintek slides) .........................................................22
Maintenance........................................................................................................................23
Maintaining Exterior and Interior Finishes .................................................................23
Exterior:.......................................................................................................................................................... 23
Interior: ........................................................................................................................................................... 23
Drapes and Upholstery:............................................................................................................................... 23
Floors and Carpeting:................................................................................................................................... 23
Power Range Hood:..................................................................................................................................... 23
Refrigerator:................................................................................................................................................... 24
Shower Care:................................................................................................................................................. 24
Drains:............................................................................................................................................................ 24
Winterization And Winter Storage ......................................................................................24
Winterizing Your Camper .........................................................................................24
Preparing Your Unit for Storage ...............................................................................26

TABLE OF CONTENTS
© ALP (Adventurer Limited Partnership). All Rights Reserved
Short-Term Storage above Freezing (Less Than 60 Days)..........................................26
Long-Term Storage above Freezing..........................................................................27
General Camper Winter Storage Checklist.................................................................27
Reactivating the Unit after Storage...........................................................................28
Drain, flush and sanitize the fresh water system..................................................................................... 28
Remaining systems check........................................................................................................................... 29
Travel Tips...........................................................................................................................29
Some Useful Equipment to Take Along .....................................................................30
Troubleshooting ..................................................................................................................31
FAQ .......................................................................................................................31
Notes...................................................................................................................................32
Notes...................................................................................................................................33
Notes...................................................................................................................................34

© ALP (Adventurer Limited Partnership). 1 All Rights Reserved
INTRODUCTION
ADVENTURER LIMITED PARTNERSHIP (ALP) as further noted in this manual, would like to take this
opportunity to thank you for choosing one of our truck campers. We have sought to anticipate your
needs and desires with respect to convenience, style, safety and engineering. Customer satisfaction
and goodwill are of primary importance, so we have provided this manual to assist you in
understanding the proper use, operation and maintenance of the various components and systems
that have been designed into your truck camper.
Study this manual carefully, as well as the manuals included from the manufacturers for the
appliances and equipment installed in your unit. Your Dealer should take you through the unit and
explain how each of the systems is operated, making sure you understand it fully before you set out
on the road.
Product improvement is a continuing process at ALP, thus we reserve the right to change materials,
components and specifications without prior notice.
In the interest of safety, your recreational vehicle has been designed and constructed to meet or
exceed the requirements of applicable Recreational Vehicle Industry Association & ANSI codes.
A warranty registration card is enclosed along with the manual. Please complete and fill out this
registration card with your Dealer, and return it to us within fifteen (15) days of purchase in order to
validate the warranty.
Should you have additional questions or problems regarding operation, maintenance, service or
warranty, please contact your Dealer for assistance.
This manual has been designed to cover our complete line of Truck Campers.
Information in This Manual
Products and components in ALP manufactured products may change without notice. This manual is
intended to be a guide only. Please refer to the individual component instructions and warranties in
your Info-Pak.
Dealer’s Responsibility
ALP delivers the best quality in our campers to the dealer. Before shipping, every camper has been
inspected to ensure it is complete and of the best quality. As with any owner, the dealer must also
inspect and reseal units annually as necessary as they await sale.
The dealer will perform a complete inspection of the unit to see that it is free from defects. Your
dealer at the time of purchase should walk you through the camper and explain the proper usage of
the following.
Appliances
Slide-out operation
RV Hookups

TRUCK CAMPER OWNER’S MANUAL
© ALP (Adventurer Limited Partnership). 2 All Rights Reserved
Electrical Systems
Plumbing Systems
Loading and Unloading
PROLONGED OCCUPANCY
Your truck camper has not been designed for permanent housing or lodging. Using your camper in
this manner may lead to deterioration of the structure, interior finishes, fabrics, carpeting and drapes.
Damage due to long term use may not be considered normal use and may under the terms of the
warranty constitute misuse, abuse or neglect, and may reduce your warranty protection.
LIMITED WARRANTY
ALP hereby warrants each truck camper manufactured to be free from defects in material and
workmanship under normal service and use. The manufacturer’s obligation under this warranty shall
be limited to repairing or replacing any part or parts therein deemed to be defective upon
manufacturer’s examination for one year from original retail purchase from an authorized Adventurer
Dealer. Also provided is a
three year transferable limited structural warranty
, which shall
become effective only if the warranty card is properly completed and returned to the manufacturer.
This warranty shall not apply where the product is being used for rental and/or leasing purposes or
has been subject to damage caused by misuse, accident, alternation or negligence. This warranty
does not cover refrigerators, stoves, water heaters, furnace or any other components, which are
protected by their respective manufacturer’s warranties. Also, there will be no reimbursement for
transportation, gas, food or lodging.
Important Information about Your Warranty
At ALP, we would like to ensure that you enjoy many years of trouble free relaxation in your new
truck camper. We ask that you read the terms and conditions of your warranty thoroughly, and
understand fully what must be met in order for the warranty to remain valid. In order for the
warranty to become effective, the warranty registration card must be properly completed and
returned to the manufacturer no later than 15 days from the date of the original purchase from the
dealer, this should be done by the dealer upon delivery but you need to confirm that this has been
completed to activate your warranty, if you find your warranty card in your owner’s manual please fill
it out and mail it in to activate your warranty.

TRUCK CAMPER OWNER’S MANUAL
© ALP (Adventurer Limited Partnership). 3 All Rights Reserved
Normal maintenance is the responsibility of the owner. To keep the structural warranty in force,
owners are required, at their own expense, to bring their truck camper to their authorized dealer for
repair. Failure to provide routine maintenance may void this warranty.
ANNUAL INSPECTIONS AND ANY REQUIRED SERVICE.
The following will be inspected:
Inspect under floor protection for damage, punctures and a moisture tight seal.
Inspect all entry doors, baggage and access doors, windows, tail lights, clearance and
marker lights, moldings and attachments for a moisture tight seal.
Inspect all fiberglass joint seams for proper adhesion,
Inspect all exterior and interior surfaces for proper care and maintenance (e.g. regular
wash and wax of exterior siding).
Inspect all roof moldings, trims, vents, antennas, roof racks and other attachments for
moisture- tight seal.
Owners must have all authorized factory repair depots OBTAIN FACTORY REPAIR
AUTHORIZATION PRIOR to executing any warranty repairs. Any costs associated with
transporting the vehicle to the factory or other authorized repair facility is the sole responsibility of
the owner.
Exclusions
The scope of this warranty is expressly limited to only items actually constructed by ALP. ALP
therefore makes no warranty with respect to component parts constructed or assembled by other
manufacturers, including, but not limited to the LPG and electrical appliances, heaters, refrigerators,
plumbing fixtures, light fixtures, lights, entrance door and windows. These component parts may be
warranted by their respective manufacturers, and copies of such warranties are included with the
camper.
This warranty shall not apply to damage caused by abuse, misuse, neglect, alteration, modification,
accidents or normal wear and tear. Nor does this warranty apply to parts made out of cloth, leather,
wood, paint, or chrome which has been affected by airborne fallout, such as chemicals and tree sap,
or by road salt, hail, windstorm or other environmental factors.
No payment or other compensation will be made for incidental expenses, including, but not limited
to, towing, telephone, transportation, lodging, travel, gasoline, loss of pay or indirect or
consequential damage including, but not limited to, loss of use of the vehicle, inconvenience, damage
or injury to person or property, or loss of revenue incurred or sustained by reason of a
manufacturer’s defect covered by this warranty. Adventurer is not responsible to any purchaser of
this recreational vehicle for any undertaking, representation or warranty made by dealers during the
course of selling this recreational vehicle, beyond those herein expressed.

TRUCK CAMPER OWNER’S MANUAL
© ALP (Adventurer Limited Partnership). 4 All Rights Reserved
As the manufacturer of the camper, which you have purchased, ALP cannot know the purpose you
have in mind for your truck and camper, nor can ALP know the GVWR of your truck. Therefore, ALP
makes no warranties or representations, express or implied, as to the performance of your truck if
the match up of your truck and camper exceeds the GVWR as specified by your truck’s manufacturer.
Specifically, there is no express or implied warranty of merchantability or of fitness for the particular
match of your truck to any particular camper.
IDENTIFICATION
ALP is a Canadian owned company with a reputation for quality and reliability. We build all of our
units with Canadian & US conditions in mind. Each unit is identified with the following labels or
plates:
A. RVIA and ANSI labels are affixed to the exterior of each unit, usually near the entrance door. ALP
meets or exceeds these specifications.
B. Camper label is attached to the exterior of all truck campers. This label is
near the entrance door, and shows the model and serial numbers, date of
manufacture and camper mass.
MFGD By
Adventurer LP
3303 W. Washington AVE Yakima, WA 98903
DATE OF MFG.______________________
THIS CAMPER CONFORMS TO ALL APPLICABLE
U.S. FEDERAL MOTOR VEHICLE SAFETY
STANDARDS IN EFFECT ON THE DATE OF
MANUFACTURE SHOWN ABOVE
Camper Weight is ________ Lbs. Maximum When
it Contains Standard Equipment, __________of
Water,_____ of Bottled Gas, and —Cubic Ft.
Refrigerator or Ice Box With ________ Lbs. of Ice.
Consult Owner’s Manual or Data Sheet for
Weights of Additional or Optional Equipment.
V.I.N. ___________________________________

TRUCK CAMPER OWNER’S MANUAL
© ALP (Adventurer Limited Partnership). 5 All Rights Reserved
CENTER OF GRAVITY
On each Adventurer camper (left and right) sidewall is the center of gravity label. The center of
gravity should be within the manufacturer’s COG load range of your truck (Usually found in your
vehicle owner’s manual).
When packing your camper: Store heavy gear first, keeping it on or near the camper floor. Place
heavy objects or items far enough forward to keep the loaded camper’s center of gravity within the
area recommended by the manufacturer. Store only light objects on high shelves. Distribute weight
to obtain even side-to-side balance of the loaded vehicle.
Center of Gravity Label close-up
COG Load range of this F-350 SRW pickup. COG load range will vary on every truck and is owner’s responsibility to make sure
their truck and camper are compliant with manufacturer’s recommendations.
COG
Loa
d
Ran
ge
of
this
F-
350
COG Label on Camper
(COG=Center of Gravity)
COG on this truck is 6” after the axle and
20” forward of the axle. Refer to your
owner’s manual; this figure will vary
on every truck.

TRUCK CAMPER OWNER’S MANUAL
© ALP (Adventurer Limited Partnership). 6 All Rights Reserved
CAUTION: Camper weights vary depending on
the dry and wet weight, plus options etc.
Weight Information
“NOTE: THIS IS A GUIDE ONLY”. Please ensure that your truck is the right size for the camper
you have purchased as this is solely the responsibility of the owner.
The weight of your truck camper is stated on the camper’s interior serial decal. This weight includes
only the STANDARD EQUIPMENT, as listed on the specification decal found inside the closet of
your unit. In addition, this label will also show the dry weight of your camper with all options as
completed at the manufacturing facility.
YOU MUST REMEMBER THAT THE ADDITION OF OPTIONAL EQUIPMENT WILL INCREASE
THE WEIGHT OF YOUR CAMPER.
This should be added to the maximum camper weight figure used to select the appropriate truck.
Review your option-listing guide for specific option weight. (Available online at amlrv.com)
When the truck camper is loaded, drive to a scale and weigh the front and the rear axles separately
to determine axle loads. The load on an axle should not exceed its gross axle weight rating (GAWR).
The total of the axle loads should not exceed the gross vehicle weight rating (GVWR). Weight ratings
are given on the vehicle certification label that is located in the glove box or on the left side of the
vehicle door post or door edge. If weight ratings are exceeded, move or remove items to bring the
weights below ratings.
It is very important that as the owner you properly match your truck and camper to the weights
specified by your vehicle manufacturer as said owners are solely responsible for proper fitting. Truck
bed sizes and bed to cab heights vary. Make certain that there is a minimum 1 ½ in. clearance
between truck cab and camper overhead. The camper should sit back in the bed 1 in. from the front
rail of the truck box to avoid damage to truck and camper.
PROPANE SYSTEMS
The stove, refrigerator, water heater and furnace are all operated with LP Gas, which is stored in
tanks in the propane compartment of your unit. The gas is fed through a regulator that has been pre-
set to the correct pressure. DO NOT CHANGE THIS SETTING. Gas lines must be checked periodically
for possible leakage. See your RV Dealer for an annual gas (propane) test. A manufacturer’s manual
has been provided for each of the gas appliances furnished with your Truck Camper info pack . Read
each of them carefully and operate the equipment in accordance with the instructions.
COG Load Range of this F-350 SRW
Truck
6” behind to 20” in front of axle
Refer to your owners manual for your COG Load
range

TRUCK CAMPER OWNER’S MANUAL
© ALP (Adventurer Limited Partnership). 7 All Rights Reserved
WARNING: SAFETY STANDARDS IN SOME AREAS PROHIBIT OPERATION OF AN LP GAS
REFRIGERATOR WHILE THE MOTOR VEHICLE IS IN MOTION. IF THIS IS THE CASE IN YOUR
AREA ENSURE THAT THE PROPANE TANK VALVE IS IN THE OFF POSITION.
WARNING: TURN OFF LP MAIN VALVE AND INDIVIDUALLY TURN OFF GAS APPLIANCES OR
ELECTRICALLY DISCONNECT AUTOMATIC IGNITION APPLIANCES BEFORE ENTERING AN LP GAS
BULK PLANT OR MOTOR FUEL SERVICE STATION.
WARNING: DO NOT FILL PROPANE CONTAINERS TO MORE THAN 80% CAPACITY.
OVERFILLING CAN RESULT IN UNCONTROLLED GAS FLOW WHICH CAN CAUSE FIRE AND
EXPLOSION. A PROPERLY FILLED CONTAINER HOLDS ABOUT 80% OF ITS VOLUME AS LIQUID.
CAUTION: LP gas is flammable and potentially
explosive. Use proper handling, lighting, and
ventilation procedures
LP Gas Safety Precautions
Historically, LP gas is a safe and reliable fuel. As with any other volatile and flammable material,
common sense dictates that LP gas be handled and used with respect and caution. Because LP gas
systems are so reliable, they are often taken for granted. Neglect can be very dangerous. If the
system is maintained regularly, you can expect almost trouble free operation.
Filling LP Gas Tanks

TRUCK CAMPER OWNER’S MANUAL
© ALP (Adventurer Limited Partnership). 8 All Rights Reserved
Lighting LP Gas Appliances
Detailed operating information for the LP appliances can be found in your Info-Pak. Please read and
follow these instructions.
NOTE: The distinctive odor of LP gas indicates a leak.
If You Smell Gas
Extinguish all open flames, pilot lights and all smoking materials.
Do not touch electrical switches.
Shut off the gas supply at the tank-valve(s) or gas supply connection.
Open all doors, windows and vents.
Leave the area until the odor clears.
Have the gas systems checked and the cause of the leak corrected before using the
system.
1. Inspect the entire LP system for leaks or damaged parts before each trip.
2. Do not restrict access to LP tanks (no locks on access doors). In an emergency the propane tank
service valve must be easily accessible.
3. Be sure the tanks are securely fastened in their storage compartment whenever they are mounted
in the Camper.
Using LP Gas Systems at Low Temperatures
Your gas system will function at low temperatures provided the system components are kept at a
temperature above the vapor point of the LP gas (-44F).
LP gas systems can freeze up in very cold weather. It is a common misconception that the regulator
or the gas itself freezes. Actually, it is moisture or water vapor that gets trapped in the system or is
absorbed by the gas that freezes and causes the problem. This ice can build up and partially or
totally block gas supply. There are a number of things you can do to prevent this freeze up:
Be sure the gas tank is totally moisture-free before it is filled.
Be sure the tank is not overfilled. This is also a safety consideration.
Keep the valves on empty tanks tightly closed.
Have the gas tanks purged by the LP gas service station if freeze up occurs.
TRUCK CAMPER OWNER’S MANUAL
© ALP (Adventurer Limited Partnership). 9 All Rights Reserved
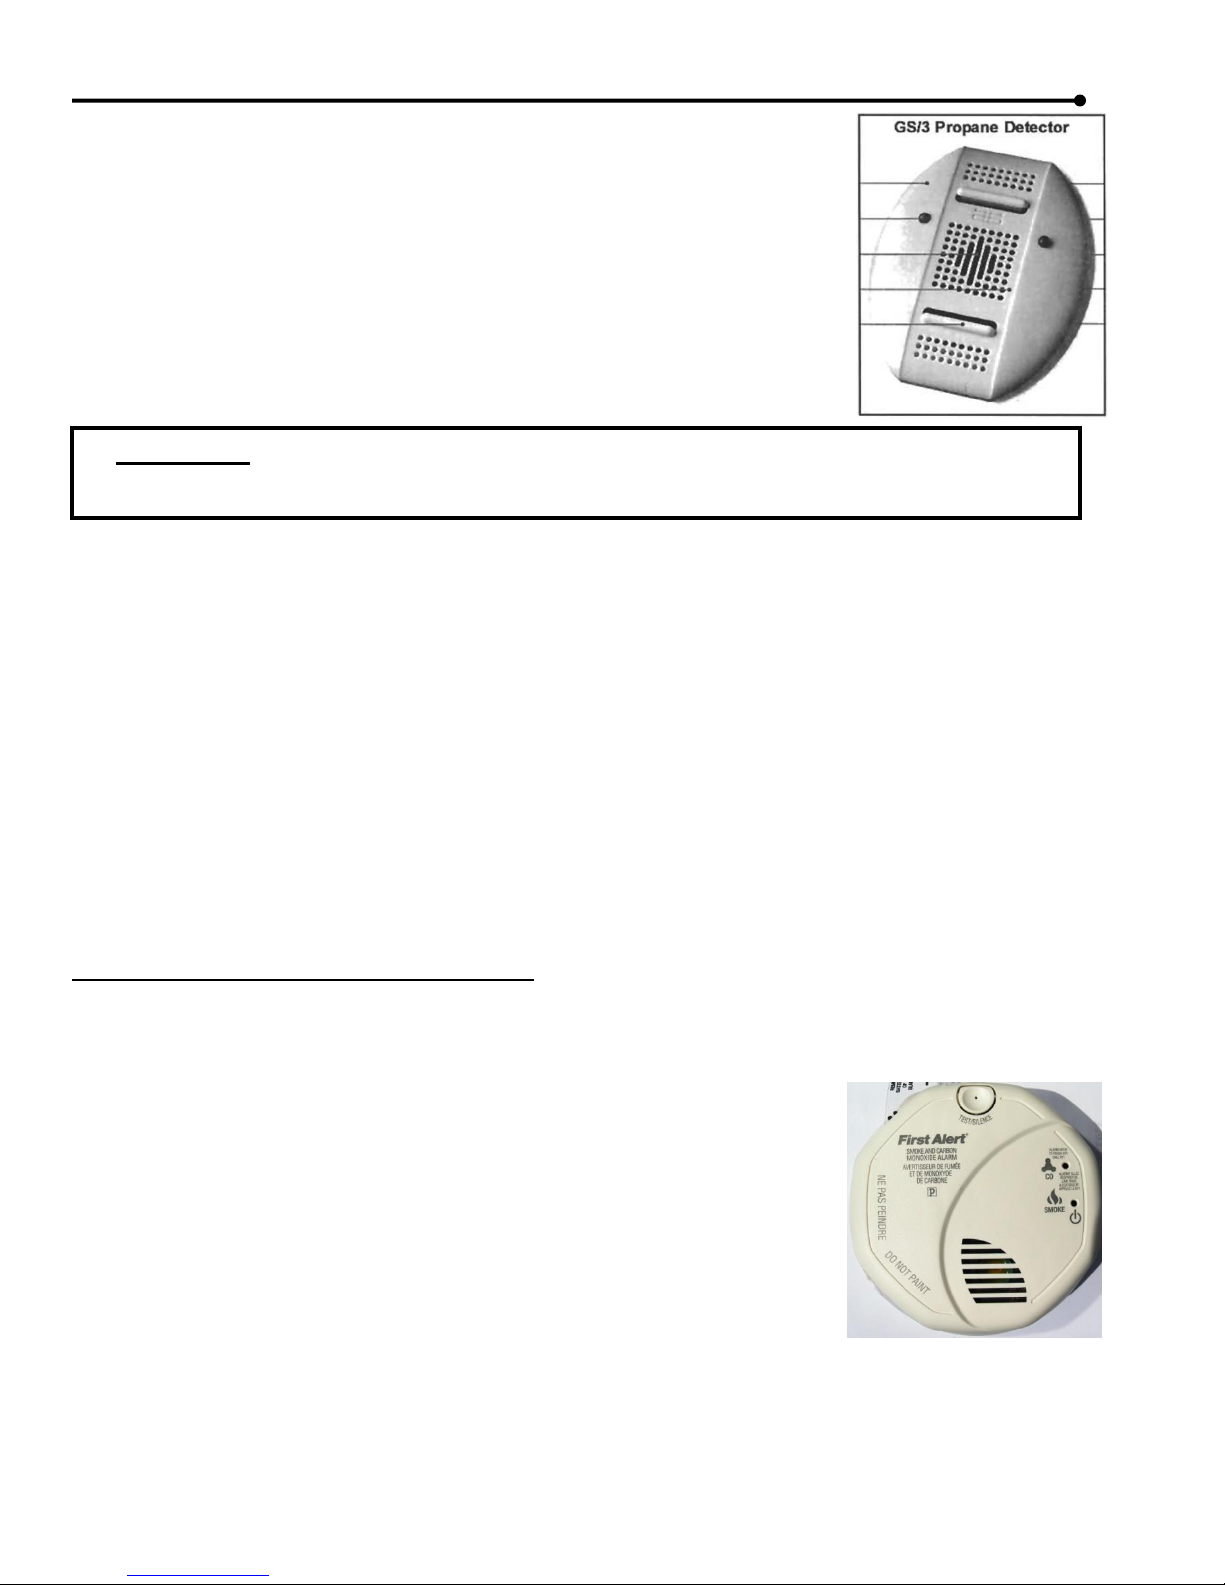
WARNING: THIS PROPANE DETECTOR DETECTS THE PRESENCE OF LP GAS. IT DOES NOT
DISCONNECT THE GAS SUPPLY.
FIRE AND SAFETY
LPG Leak Detector
An installed LP gas leak detector is located near the floor in the
camper. The unit contains an alarm that will sound alerting you to the
presence of low levels of potentially dangerous LP gas that may have
been released due to a range top or oven burner flame loss, a gas
piping leak, or an incorrectly adjusted appliance burner.
Combination Smoke & Carbon Monoxide Detector
Most fire casualties are caused by inhalation of toxic fumes (smoke) from a fire and not by flame.
The combination smoke & carbon monoxide detector has separate sensing chambers for smoke and
carbon monoxide that work independently of one another. It is battery powered and complies with
UL-217, ULC- S531, and CSA 6.19-01. It is located in the living/cooking area of your camper. Please
read the Owner’s Manual for details on testing and caring for this important safety device. Test the
device after the camper has been in storage, before each trip, and at least once a week during use.
Turn the device counterclockwise to remove it from the bracket. The detector should never be
disabled due to nuisance or false alarm from cooking smoke, a dusty furnace, etc. Ventilate your
camper with fresh air and the alarm will shut off.
DO NOT DISCONNECT THE BATTERIES
Replace the batteries once a year or immediately when the low battery “beep” signal sounds once a
minute. The detector uses two standard “AA” batteries, usually available at any retail store that sells
batteries.
Test the operation of the detector after replacing the batteries. If the
detector fails to operate with new batteries, replace it with a new unit.
The fire extinguisher in your camper is located near the main entrance
door. Read the operating instructions that are printed on the
extinguisher. You and your family should be familiar with fire
extinguisher operation. Your fire extinguisher should be replaced
immediately after use or discharge.

TRUCK CAMPER OWNER’S MANUAL
© ALP (Adventurer Limited Partnership). 10 All Rights Reserved
ELECTRICAL SYSTEM
Most electrical systems in your truck camper including the lighting,
operate on 12-volts. 12-volt power is supplied from the battery of
the truck through a charge line in your 7-pin plug (if so equipped),
or from an auxiliary battery (1 or 2 depending on model) which can
be installed in the camper through your dealer at delivery. In
addition, your unit is equipped with a 110-volt 30 amp power supply
cord, which can be plugged into any available outlet. This current
goes into the 45 amp converter, which changes it to 12-volt before
feeding it into the circuits. This system automatically switches to batteries when disconnected from
external 110-volt, or vice versa. Auxiliary batteries are charged through the alternator of the vehicle
when runnig and/or through a built-in charger in the 45 amp converter when connected to 110V
power. Your batteries can also receive a charge from a on board generator if you have this option.
WARNING:Do not install fuses with amperage ratings greater than that specified, as this may cause
a fire potential.
ELECTRICAL CONNECTION TO TRUCK
The trucks 7-Pin electrical connection can be installed by your dealer according to your trucks wiring
system, if it is not already equipped from the factory. With the wiring and connectors hooked-up,
your truck will supply 12-volt DC power to charge your camper battery and provide power for the 12-
volt power needs while the truck is operating. See the listing below for 12-volt connector wire colors,
wire gauge and function:
Note: Do not use less than 10 gauge wire size for charge lines. Also, do not attach them
to smaller gauge wires.
Your Dealer should ensure that the wiring between the
vehicle and your unit is adequate for the demand
system.
Ground Fault Interrupter
Bathroom and patio (where equipped) 120-volt electrical
outlets are protected by a Ground Fault Interrupter (GFI). This device is provided
in compliance with ANSI A119.2/NFPA 501C and CSA requirements and is intended
to protect you against the hazards of line to ground electric faults and electrical
leakage shocks possible when using electrical appliances in the bathroom or damp
areas.

TRUCK CAMPER OWNER’S MANUAL
© ALP (Adventurer Limited Partnership). 11 All Rights Reserved
Systems Monitor Panel
The systems monitor panel incorporates controls and instrumentation concerning the electrical and
fluid systems. Some models also have switches for optional automatic water heaters and generators.
Water Pump Control Switch
This rocker switch controls the on demand water pump. The water pump is pressure sensitive and
starts (with the switch ON) when a faucet is opened, causing pressure in the line to drop. When the
faucet is closed, pressure builds in the line and the pump stops. This switch should be in the off
position for safety when traveling.
Monitor Panel-Levels Indicators Switch
When depressing the monitor switch, indicator lights for the black (waste/toilet), gray (sink/shower),
fresh water tank and battery charging will illuminate, indicating the existing condition of each
component.
Erroneous indications when checking water levels can be caused by:
Water with a low mineral content level is measured by a very low electrical signal traveling through
the liquid. Some water which is low in mineral content, may not conduct the signal properly. Check
the panel reading when the fresh water tank is filled.
Material trapped on the sides of the holding tanks may give a full reading when the tank is actually
empty. Use of the optional “Black Tank Flush” or a spray wand inserted in to the toilet to wash out
the tank following dumping should help prevent this condition.
NOTE: If the sensor probes mounted in the tanks get coated with grease, the monitor panel may
indicate falsely or not at all. Avoid pouring grease, oils, or similar substances down drains or the
toilet. If this is unavoidable, the holding tank(s) should be washed out with a hot soapy water
solution and re-dump tank.
When testing approximate battery condition, first turn all lights, fans and other 12-volt equipment
OFF. If the battery is being charged the charge light will illuminate when the monitor switch is
depressed. If only a weak light is illuminated, discontinue use of all 12volt equipment until the
battery can be recharged.

TRUCK CAMPER OWNER’S MANUAL
© ALP (Adventurer Limited Partnership). 12 All Rights Reserved
WATER SYSTEM
The dual water systems in our campers supply water from either the unit’s storage tank (potable
water) or directly from the city water hookup.
Fresh Water Tank
Your unit has an on demand water system for the (potable) fresh
water tank. There is a separate connection for the city water
hookup on these units (read below). With the demand system, to
draw water from the unit’s storage tank, an electrically operated
on-demand pump has an ON/OFF switch for turning on while
camping or shutting down the system while traveling, while
hooked up to city water or when the unit is not in use. Filling the
potable water tank can be done by means of a hose or a bucket. Periodic draining of the tank and
flushing it with a tablespoon of baking soda will keep it fresh and clean.
City Water Hookup
To use the city water system, simply attach a clean fresh water hose
(not a garden hose) from a service faucet to the city water connection.
When the faucet is turned on, water will be supplied to the unit,
including the water heater and will pressurize your lines much the
same as at home. Because of varying system PSI you should always
use a pressure regulator to eliminate the possibility of damaging the
water lines in your unit, these are available a most any RV supply store
or dealer (40PSI is recommended and safe).
Hot Water Tank
If your unit is supplied with a hot water system, carefully read the manufacturer’s operating
instructions (included with your owner’s manual – in info packet). Following these directions will
ensure an adequate supply of hot water at all times, wherever you are. The correction of a failure,
though rare indeed, is not a job for the do-it-yourselfer. There are hundreds of authorized service
centers across North America. Your Dealer is probably one of them.

TRUCK CAMPER OWNER’S MANUAL
© ALP (Adventurer Limited Partnership). 13 All Rights Reserved
WASTE WATER SYSTEM
Your truck camper may be equipped with one or more waste
water holding tanks. One is known as the “grey water tank”,
where waste from the shower, kitchen and bath sinks are
stored; the second is the “black water tank” where your toilet
waste or sewage is stored. Both have their own drainage valves,
but empty through the same discharge outlet.
To drain, open the cap and connect the outlet to a dumping station with a
sewer hose (not supplied with the camper) and open the large valve
(4”) for the toilet tank (black tank) and let it drain and leave
open at this point. Then open the smaller valve to drain (1½”),
the grey water tank, by dumping in this order the “grey soapy
water” will help clean your dump line and sewer hose. If you have
the optional “black tank flush” on your camper, the next step is to
connect a fresh water hose to this connection, turn on the water and this
feature will spray fresh water inside of your black tank through a jet system
further rinsing your black tank for a cleaner, fresher tank. WARNING! Make certain your black
tank valve is open before turning on the water or you will damage your black tank, floor
and/or flood your unit! Turn off the water to your black tank flush (if equipped with this option),
close both of your dump valves, disconnect your sewer hose and store it away and be sure to
reinstall your dump line cap for travel.
Notes to remember: Add about a gallon of clean water and a good deodorant chemical through
your toilet to keep your black tank clean and fresh at all times. This is a good practice even when
storing your unit.
When connected to a sewer in a park or camp ground, the toilet holding tank valve should remain
closed until the tank is almost full. Then drain and recharge black water tank as above. This method
will avoid undesirable buildup in the tank, causing reduced capacity and/or costly repairs.
TRUCK CAMPER OWNER’S MANUAL
© ALP (Adventurer Limited Partnership). 14 All Rights Reserved
LOADING & UNLOADING YOUR CAMPER
There are presently two types of jacks used on our truck campers. They are New Generation Happi-
Jac (manual) and New Generation Happi-Jac (electric) with wireless remote control.
Load and Unload Your Camper on level ground, never on an obvious grade.
Dually Brackets
SWING-OUT BRACKETS (OPTIONAL)
To load or unload campers on dual rear wheel trucks, swing-out brackets will need to be installed on
the front jacks to clear the duallys/fender. To operate, follow the steps below:
1. Lift jack from the travel notch locked position and swing outward from the camper body.
2. Position jack so when camper jack is lowered, the notch and raised tab engage to prevent
rotation.
3. Repeat the process for the other front mounted jack.
4. Follow the standard camper loading and removal procedures below.
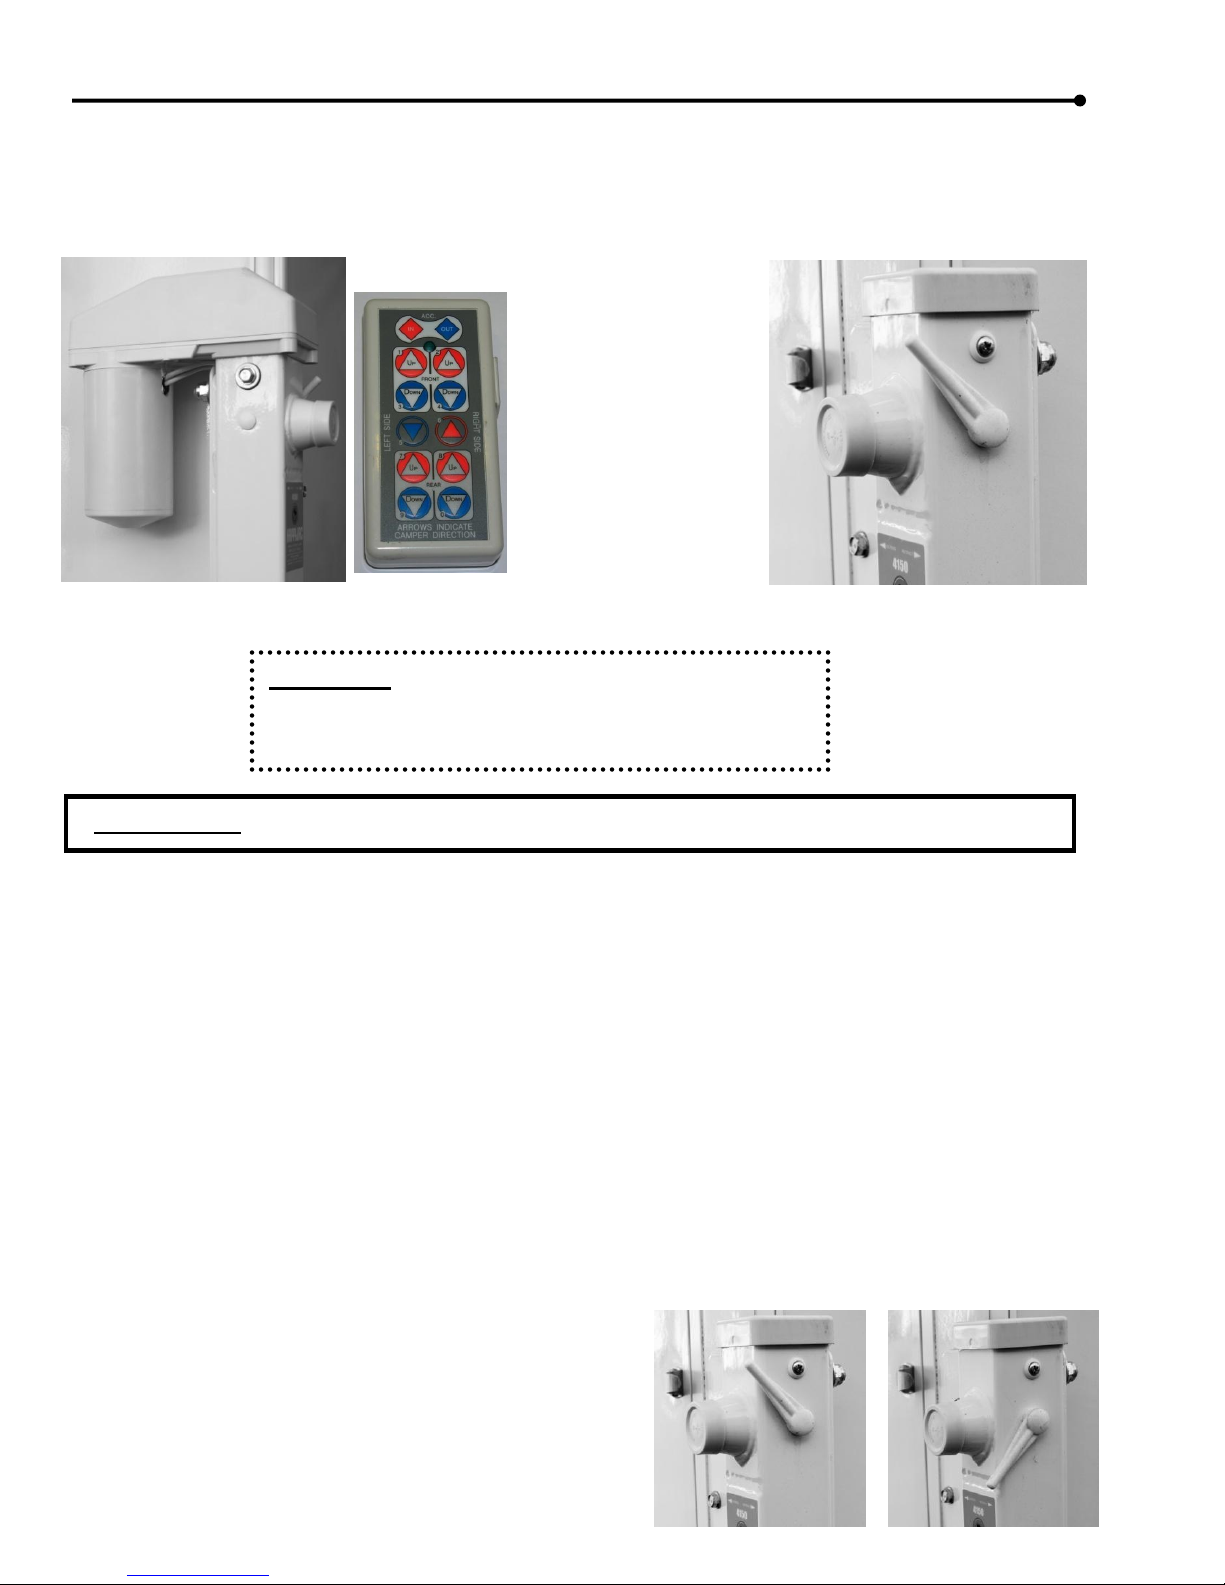
Manual Jack Operating Instructions
Remove dust cap and pull Release locking
lever to the “unlocked” (Down Position) at top
WARNING: USE EXTREME CAUTION WHEN UNLOADING YOUR CAMPER IN A STRONG WIND
CAUTION: When unloading your camper, be sure
all tie downs and electrical connections are
disconnected.
Manual Screw Jack
Electric Screw Jack & Wireless Remote
Locked
Unlocked

TRUCK CAMPER OWNER’S MANUAL
© ALP (Adventurer Limited Partnership). 15 All Rights Reserved
of jack before cranking. Be sure to reset locking lever to the “locked” (UP Position) when jacks
are not being cranked to avoid accidental extension/retraction.
Insert crank handle firmly into the crank socket of the jack. Starting at the front, begin
cranking.
Extend each jack no more than 4 - 6” at a time at all four corners starting with the front jacks,
keeping the camper level or the front slightly higher at all times. Repeat this process until the
camper is clear of the truck body bed by approximately 4 to 6“. (If there are two people
working the jacks, one on each side, it is a very easy task) the use of a cordless drill is a nice
accessory to speed up this process. WARNING: Never raise the back of your camper
higher than the front
See “Continuation for all Jack Versions” below to continue.
Operating Remote Control Electric Jacks
WARNING: Do not over-extend or over-retract jacks. Each jack has built in stops. If excessive force
is applied against the stops, damage to the jacks may occur, this is usually noted by a ratchting
sound. Electric jacks need 12-volt automotive battery power to operate. The camper battery must be
charged and in good condition. If the battery is too low to operate the jacks, charge the battery
before using jacks. If the camper is on the truck, starting the truck’s engine will supply power to the
jacks as long as the 12-volt electrical cord is connected. If no power is available, use the manual
override operation noted above.
WARNING: Do not use the electric jacks to raise or lower the camper using only 120-volt power.
The converter’s charger can be damaged if the jacks are operated with 120-volt power through the
12-volt converter without an automotive battery or with a low battery.
A well charged battery in good
condition is required.
NOTE: Before operating the remote control electric camper jacks, be sure to read and understand
the operating instructions that were provided with your camper pertaining to their safe operation.
The jacks are operated with a hand held remote control. To activate, locate and press the two center
“all jacks” buttons simultaneously and then press the two top “Accessory” buttons simultaneously to
activate the remote. A light on the face of the remote will illuminate when activated. The remote is
on a time delay, that will automatically shutoff after 10 minutes of inactivity, this feature helps save
CAUTION: Do NOT leave jacks in the unlocked
position for an extended period of time

TRUCK CAMPER OWNER’S MANUAL
© ALP (Adventurer Limited Partnership). 16 All Rights Reserved
your remote batteries and adds additional security for your camper. After use, store the remote unit
in a secure place away from access by children.
Electric Jack Operating Instructions
Locate your wireless remote control. Activate per manufacturer’s instructions.
Press the appropriate buttons on remote control to lift the camper until it is clear of the truck
body bed by approximately 4 to 6“. Note: One button can run all jacks at once and each
jack has its own button to run each jack individually. Make sure all jacks are
touching the ground before using the “all jacks” button to raise your camper.
Failure to do this can result in damage to your camper off of the truck.
See “Continuation for all Jack Versions” below to continue.
Continuation for all Jack Versions
Slowly back the truck under the camper making sure to clear the wheel wells and camper
jacks. Warning: If you have a dually truck make certain you have swing out jack
brackets on the front jacks to clear your dual wheels and fenders.
Continue backing up until the truck is within a foot of the fully loaded position. Stop and
connect the 12-volt power cord to the “7-pin” 12-volt receptacle on the truck (this may need
to be installed by your dealer if your truck doesn’t already have one). Before continuing check
to see that the distance between the trucks tail lights and the rear of the camper has at least
1” separation. If not, add an appropriate wood shim in the front of the truck bed as a spacer
before continuing. (This is rarely needed but a good practice for a new camper install).
Continue backing under the camper until the bumpers/camper guides, mounted on the front
corners of the camper, are approximately 1” from the front of the truck bed.
Slowly raise both rear jacks then front jacks (lower camper) evenly for manual jacks (you can
raise/lower all jacks at once with electric) until the camper is resting fully on the truck bed.
Raise the jack base pads to within 2” of full retraction for travel or to jack manufacturer’s
directions. Warning: Failure to fully retract jack legs as described can cause damage,
extended jacks can catch on curbs etc. while driving!
If equipped with swing out brackets (for dually trucks), disengage the swing out bracket on
the front jacks and move the brackets to the inward position for travel.
Secure the camper to the truck with a set of high quality tie downs. Hook one end to the
camper tie-down under the wing or jack bracket of the camper and the other end to your
camper tie-down bracket installed on your truck. It is RECOMMENDED that all tie downs
be spring loaded. (We recommend Torklift Tie-Downs and Fast Guns as our tie-
down of choice but there are many other acceptable options).
Install all four, 2-front and 2-rear, tie downs as per the manufacturer’s directions
Stow remote control or jack crank handle for future use.
This manual suits for next models
1
Table of contents
Other Adventurer LP Motorhome manuals


