Aerial WT 230 User manual
MADE IN GERMANY
Instruction Manual
Indoor Air Laundry Dryers
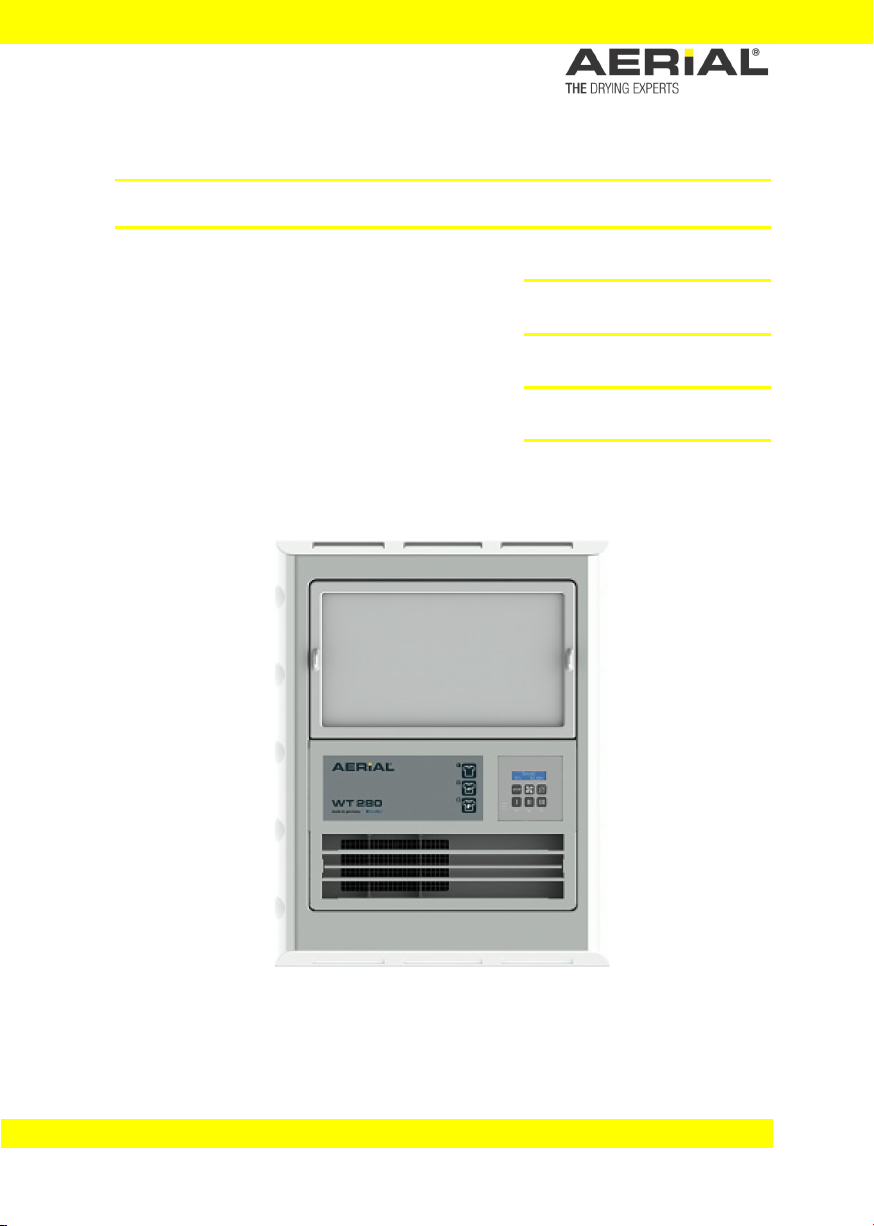
WT 230
WT 240
WT 250
WT 280

This instruction manual shall not be reproduced, copied and distributed, neither in parts
nor completely, without the manufacturer's written permit.
All rights reserved.
The instruction manual is based on the technical and product-specific parameters. The
manufacturer reserves the right to add supplementary information to the instruction
manual.
Using a device outside the specified conditions and contrary to its designated use will
lead to the forfeiture of all warranty claims.
As of: 11_2017

CONTENTS
Page 1 of 25
1Notes on this instruction manual____________________________________________ 2
Target groups ______________________________________________________________ 2
Conventions _______________________________________________________________ 2
Designated use ____________________________________________________________ 3
2Safety ____________________________________________________________________________ 3
Safety devices______________________________________________________________ 3
Hazards from accessories__________________________________________________ 3
Authorized operator _______________________________________________________ 4
User _______________________________________________________________________ 4
Safety instructions _________________________________________________________ 4
3Construction ____________________________________________________________________ 5
4Transport and installation ____________________________________________________ 6
Transport __________________________________________________________________ 6
Scope of delivery___________________________________________________________ 7
Operating conditions_______________________________________________________ 7
Erection and installation ___________________________________________________ 8
5Operation and operator control ____________________________________________12
Operating elements_______________________________________________________12
Operating modes _________________________________________________________12
Commissioning ___________________________________________________________13
Operator control __________________________________________________________14
Set language ______________________________________________________________15
Set room dehumidification________________________________________________15
Calibrate hygrostat________________________________________________________15
6Maintenance and service ____________________________________________________16
Maintenance work ________________________________________________________16
7Troubleshooting _______________________________________________________________18
Fault messages ___________________________________________________________19
Faults _____________________________________________________________________20
8Shutdown, storage and disposal____________________________________________21
Shutdown_________________________________________________________________21
Storage ___________________________________________________________________21
Disposal __________________________________________________________________21
9Specifications __________________________________________________________________22
10 EC Declaration of Conformity________________________________________________23
NOTES ON THIS INSTRUCTION MANUAL
Page 2 of 25
1Notes on this instruction manual
This instruction manual is part of the product. It contains all important information on
how to transport, install, operate, store and dispose of the device from AERIAL properly
and safely. Therefore keep this instruction manual in a safe place.
Target groups
This instruction manual addresses the users and operators of the devices manufactured
by AERIAL. They must have read and understood the instruction manual. The physical
and psychological preconditions for proper and safety-conscious handling of the devices
must always be guaranteed.
Conventions
Warnings
In this instruction manual you will find information intended to warn you of possible
hazards at the beginning of a specific action.
DANGER
Type and source of hazard
This symbol in connection with the signal word "DANGER" refers to a
life-threatening situation. Failure to observe this warning will result in
serious, fatal injury.
This arrow marks precise steps to avert danger which must
always be performed.
WARNING
Type and source of hazard
This symbol in connection with the signal word "WARNING" refers to a
dangerous situation. Failure to observe this warning can result in life-
threatening injury and death.
This arrow marks precise steps to avert danger which must be
performed.
CAUTION
Type and source of hazard
This symbol in connection with the word "CAUTION" warns of minor
or moderate injury and potential material damage.
Measures to prevent personal injury or material damage are
described here.

SAFETY
Page 3 of 25
In this box you find tips and information concerning the use of the
device.
Designated use
The indoor air laundry dryers WT 230/240/250/280 are intended for air dehumidification
and laundry drying in closed rooms.
The indoor air laundry dryers are designed exclusively for use at atmospheric pressure.
Operating the dehumidifiers within the limits of designated use also involves observing
the specified operating conditions (refer to page 7). Any use of the device going beyond
the designated use specified above is considered contrary to its designated use.
Misuse is concerned if the WT indoor air laundry dryer is used for purposes not included
in designated use. In these cases the manufacturer does not assume any liability for
personal and material damage.
2Safety
Safety devices
The WT series indoor air laundry dryers were subjected to thorough safety testing.
Improper operation or misuse will cause danger to
the operator,
the machine and other material property of the user,
efficient operation of the machine.
All persons involved in the installation, commissioning, operation, maintenance and
servicing of the devices must
be properly qualified,
closely observe the instructions set out in this manual.
Hazards from accessories
Waste water hoses, power cables and air filters must be properly installed and must not
disable the protection devices of the indoor air laundry dryers. The operating elements
must always be accessible.

SAFETY
Page 4 of 25
Authorized operator
Indoor air laundry dryers may only be operated by persons commissioned and
instructed by the user. In the working area the operator is responsible to third parties.
For all activities on the device the responsibilities must be clearly defined and observed.
Unclear competencies are a safety risk.
User
The user must
make the instruction manual accessible to the operator,
make sure that the operator has read and understood the instruction manual.
Safety instructions
The devices must not be used under the following conditions:
in rooms with potentially explosive atmospheres.
in rooms with aggressive atmospheres, e.g. ammonia, wood acids.
in rooms with water with a pH value outside the range from 7.0 to 7.4. In case of
low ph values there is risk of corrosion on all metals and risk of damage to mortar-
containing materials (joints). Higher pH values cause mucous membrane irritations
and increased lime deposits.
In rooms with salt or liquids with a salt content > 1%.
In moist areas of indoor swimming pools.
in rooms with ozone-treated air.
in rooms with high solvent concentration.
in rooms with extreme dust load.
The laundry dryer must always be stored in a dry environment.
Please note that excessive additional air movements in the room may
impair the function of the laundry dryer because they could disturb the
air flow of the laundry dryer.
In addition the following must be observed when using the indoor air laundry dryer:
Work on electrical equipment may only be carried out by skilled electricians.
The device must always be transported by two people, or suitable lifting gear must
be used.

CONSTRUCTION
Page 5 of 25
Original spare parts or spare parts approved by the manufacturer shall exclusively
be used.
3Construction
Fig. 1: AERIAL WT series - overview
1 Air intake area with air filter 5 Condensate drain pipe
2 Operating panel 6 On / Off switch
3 Air outlet with two baffle
plates 7 Power cable outlet
4 Rail for wall mounting
How long the indoor air laundry dryer must be used to dry a room or a certain amount
of laundry or to reach a certain humidity depends on the ambient conditions in the
room in which the device is installed.

TRANSPORT AND INSTALLATION
Page 6 of 25
4Transport and installation
Transport
DANGER
Danger to life due to electric shock
Touching live parts can lead to death.
Switch off the indoor air laundry dryer via the on/off switch and
disconnect the mains plug from the socket outlet before
moving the device.
WARNING
Cutting and crushing hazard
When the air filter has been removed cutting injuries from the sharp
edges of the heat exchanger may occur.
Two people are needed to carry the indoor air laundry dryer, or
suitable lifting gear must be used for transport.
Wear protective gloves when changing the air filter.
Do not reach into the inlet screen.
WARNING
Danger of injury
The indoor air laundry dryer is heavy. Loss of stability or uncontrolled
movements may cause serious injuries and material damage.
Lift the device with a colleague and use suitable lifting and
transport equipment.
In case of wall mounting use suitable holders and fastening
elements according to the weight.

TRANSPORT AND INSTALLATION
Page 7 of 25
CAUTION
Material damage
Pulling the power cable may damage the cable.
Always disconnect the mains plug from the socket outlet
before transport of the indoor air laundry dryer.
1. Transport the indoor air laundry dryer to the place of installation using suitable
lifting gear or have it carried by two persons.
2. Remove the packaging material completely and dispose of according to the local
regulations.
3. Check the delivery for completeness.
Scope of delivery
Indoor air laundry dryer
Wall mounting rail with mounting bolts and sound insulation anchors
One instruction manual
Operating conditions
Series WT 230/240/250/280 indoor air laundry dryers are suitable for use in residential
buildings, cellars, garages, water works and storage rooms. They work without
problems in the temperature range from +5 to +32 °C and at a relative humidity in the
range from 40% to 99%.
TRANSPORT AND INSTALLATION
Page 8 of 25
Erection and installation
The series WT 230/240/250/280 indoor air laundry dryers are designed for stationary
use and wall mounting.
The indoor air laundry dryer may only be used for the purpose of air
dehumidification and laundry drying..
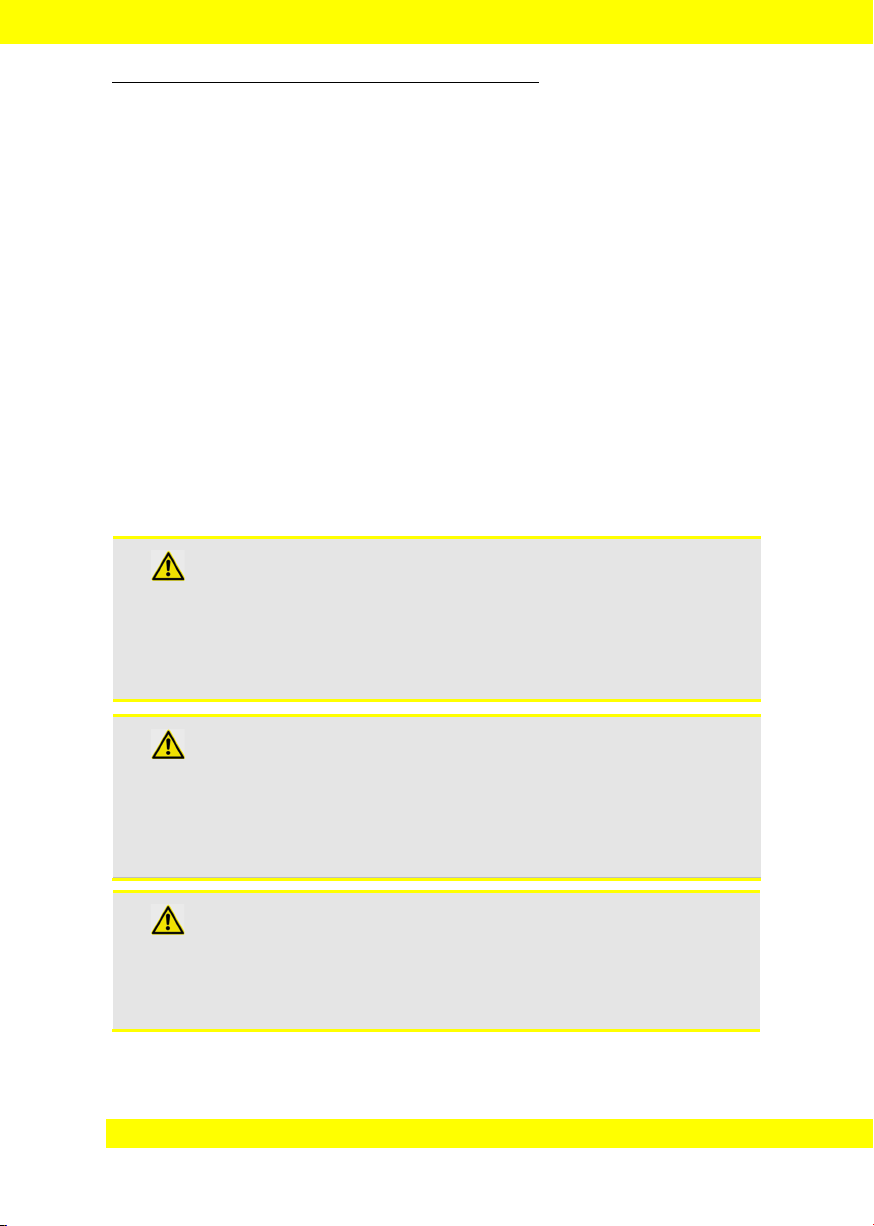
Fig. 2: Dimensional drawing
TRANSPORT AND INSTALLATION
Page 9 of 25
Select place of installation
When selecting the place of installation ensure
that an outlet for draining off the condensate is available (refer to section
"Installation of condensate drain hose“, from page 11onwards).
that a suitable plug socket is available (refer to section "Connection“, from page 11
onwards).
that optimum air circulation in the entire room is guaranteed.
that the drying racks are placed longitudinally or radially to the air outlet of the
indoor air laundry dryer.
CAUTION
Danger of damage to the device
Insufficient air circulation can result in damage to the device and
inefficient operation.
Install the indoor air laundry dryer in such a way that free air
circulation is ensured.
Ensure that air filter and air outlet are not covered.
The free space in front of the front panel must be at least 0.5
metres.
Wall mounting
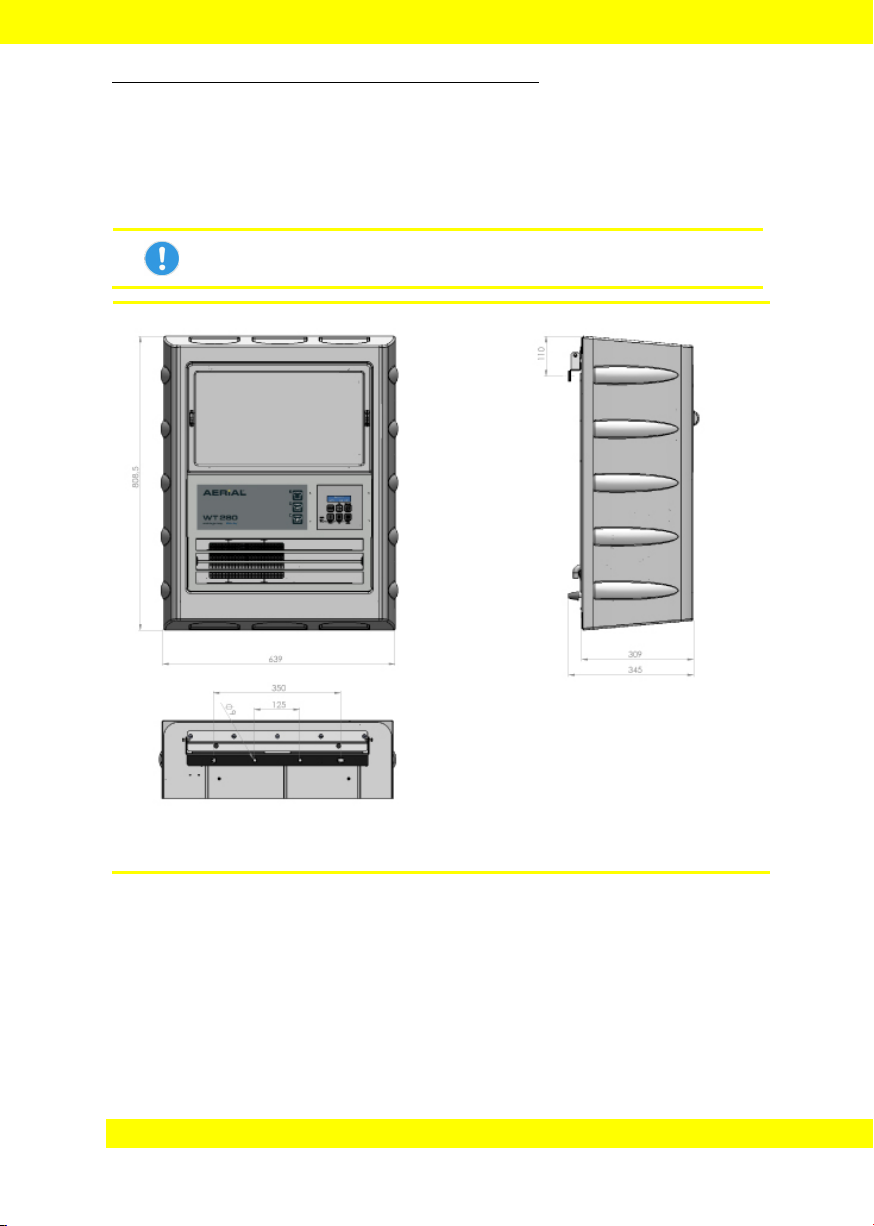
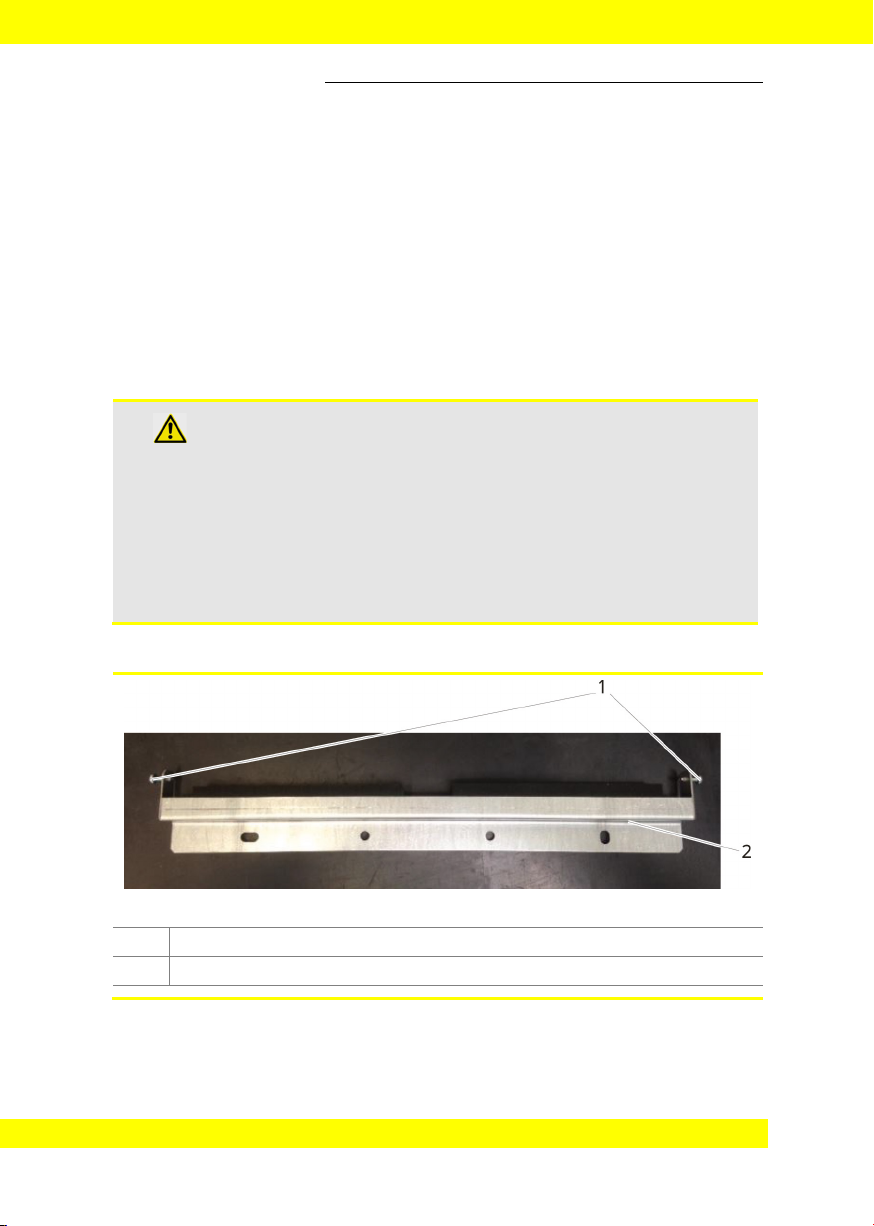
Fig. 3: Wall rail
1Fixing bolts
2 Wall rail
TRANSPORT AND INSTALLATION
Page 10 of 25
The scope of delivery includes one wall rail (Fig. 3) and suitable bolts and sound
insulation anchors.
WARNING
Danger of loss of stability or dropping from the wall
The indoor air laundry dryer is heavy. A fall or uncontrolled
movements may cause serious injuries and material damage.
In case of wall mounting use suitable mounting rail and
fastening elements suitable for the weight.
1. Attach the wall rail straightly aligned (use spirit level!) and securely to a suitable wall
using four bolts.
Above the rail, a clearance of about 30 cm to the ceiling is required to
enable mounting of the indoor air laundry dryer in the wall rail without
problems.
2. Lift the indoor air laundry dryer from the top into the wall rail in such a way that the
mounting bar on the rear side (page 5, Fig. 1, item 4) engages in the wall rail.
CAUTION
Damage to the device
The indoor air laundry dryer must be aligned along all axes.
Check the position of the indoor air laundry dryer using a
spirit level.
3. Fix the indoor air laundry dryer using the two lateral fixing screws on the wall rail.
TRANSPORT AND INSTALLATION
Page 11 of 25
Connection
DANGER
Danger to life due to electric shock
Prior to commissioning the technical data of the indoor air
laundry dryer must be compared with the conditions
prevailing in the room of installation!
Use exclusively the original power cable! In case of loss or
damage original power cables are available from your
supplier.
Work on electrical parts of the indoor air laundry dryer may
only be carried out by the manufacturer or by authorised
qualified electricians.
The following items must be checked prior to electrical connection of the indoor air
laundry dryer:
Is the mains voltage in conformity with the voltage of the device?
Are socket and supply system sufficiently fused?
Has an RCCB been installed?
Is the appliance coupler suitable for the building socket outlet?
Is the socket outlet used grounded properly?
4. Connect the power cable of the indoor air laundry dryer to a suitable power outlet.
Installation of condensate drain hose
CAUTION
Material damage
In case of incorrect installation of the condensate drain hose water
may flow into the room.
Ensure that the condensate can always be reliably collected
or discharged.
A slope of 5 cm minimum per metre of hose must be
guaranteed.
The series WT 230/240/250/280 indoor air laundry dryers are equipped with a drain
pipe for connecting a condensate drain hose 15 x 2 mm (page 5, Fig. 1, item 5).
1. Connect the drain hose to the drain pipe.

OPERATION AND OPERATOR CONTROL
Page 12 of 25
2. Attach the drain hose safely to an outlet.
3. Ensure that the hose is laid with a slope of at least 5 cm per metre of hose from the
device.
5Operation and operator control
CAUTION
Danger of injury and damage to appliance
Inadmissible ambient conditions and improper operation of the device
may constitute a risk.
Read the instruction manual before commissioning the indoor
air laundry dryer.
Operating elements
Fig. 4: Operating panel
1 Drying program symbols 4 Display
2 Stop button 5 ES button (room
dehumidification mode)
3 Fast drying button 6, 7, 8 Program selection buttons
Operating modes
Room dehumidification
The "Room dehumidification" mode is activated and set via the ES button, see section
Operator control, page 13.

OPERATION AND OPERATOR CONTROL
Page 13 of 25
Laundry dryer
All laundry dryer programs and the functions of the buttons on the operating panel are
described in the section Operator control, page 13.
Automatic defrosting
During dehumidification ice may build up on the evaporator. The series WT
230/240/250/280 indoor air laundry dryers are equipped with an automatic hot-gas
defrosting system.
Commissioning
To commission the indoor air laundry dryer proceed as follows:
1. Mount the indoor air laundry dryer, see page 9.
2. Connect the indoor air laundry dryer electrically, see page 11.
3. Make sure that the drain hose has been fitted correctly and is laid into a drain (see
section "Installation of condensate drain hose“, from page 11)..
For drying and keeping rooms with wood furnishing or paintings,
antiques etc. dry, a minimum moisture of 55 – 60% must be observed.
For living space, climate conditions of 20 – 25 °C and 50 – 60% relative
humidity are recommended.
In case of doubt please contact your technical advisor.
4. Switch on the indoor air laundry dryer via the On/Off switch (s. page 5, Fig. 1, item 6).
The following indication appears in the display:
5. Select a program or drying mode on the operating panel.
In addition you can steer the drying air manually to different directions
via the pivotable baffle plates.
For detailed information concerning operation of the indoor air laundry
dryer please refer to the chapter Operator control, page 13.
Ready
57%
OPERATION AND OPERATOR CONTROL
Page 14 of 25
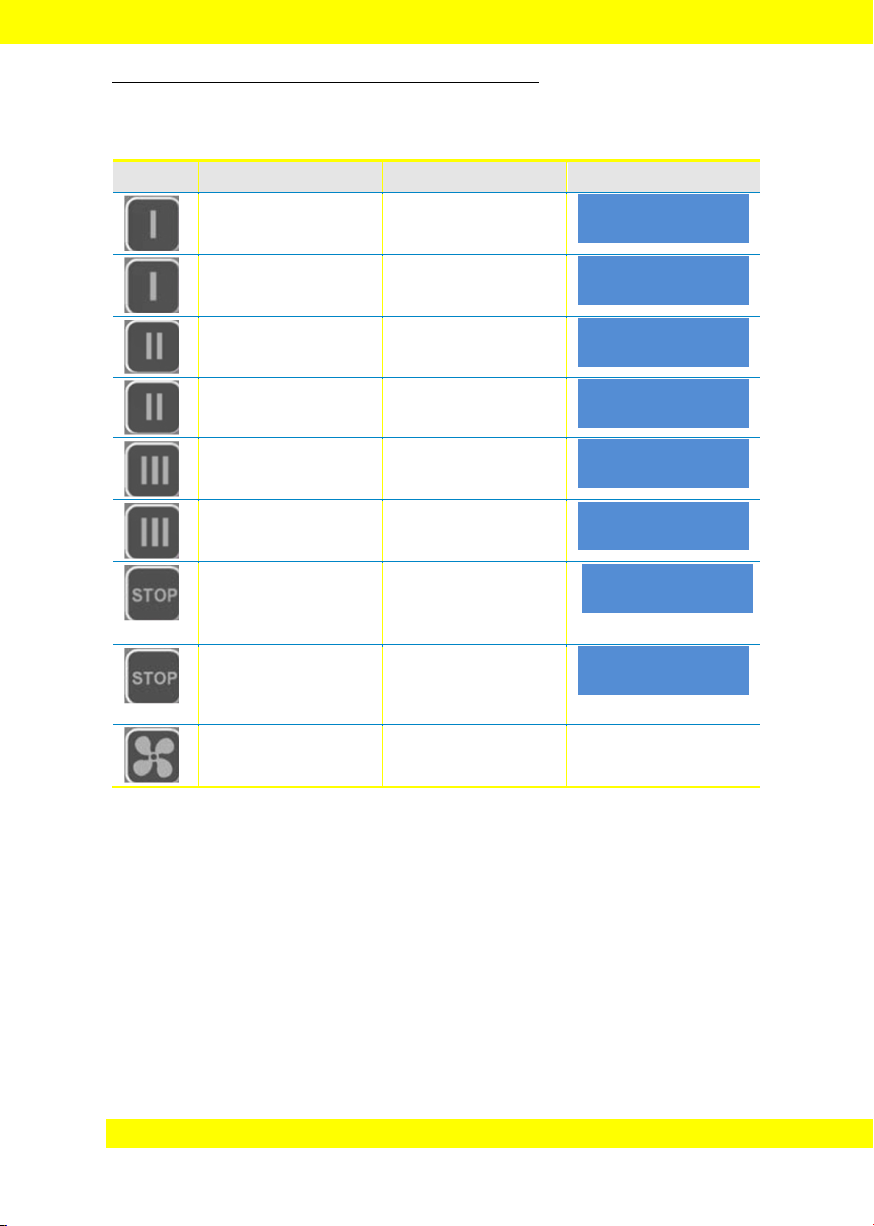
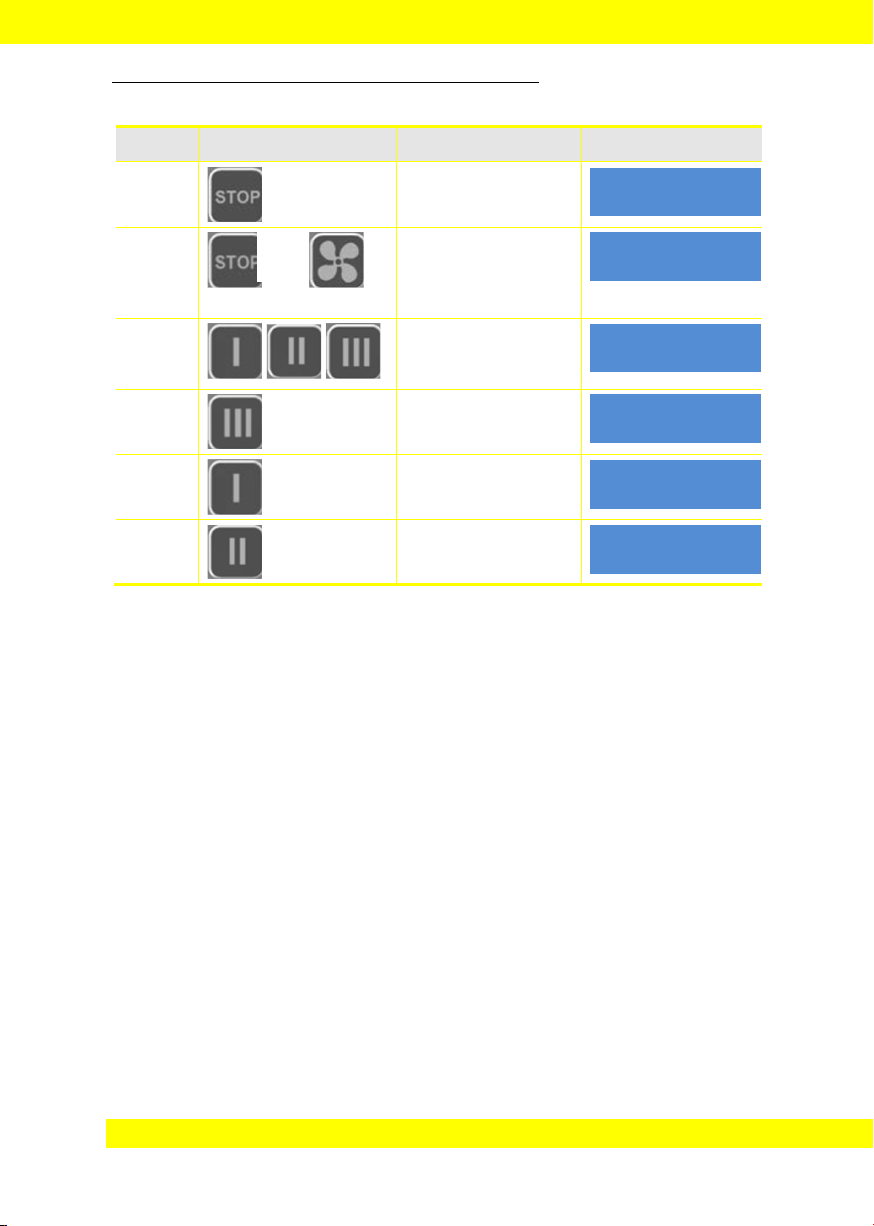
Operator control
Button Press briefly Press for 5 s Display
Program
"cupboard dry"
Time-limited drying:
30 min.
Program
"iron dry"
Time-limited drying:
60 min.
Program
"predried"
Time-limited drying:
90 min.
Switch unit off:
1. Compressor off
2. Fan off
indicator flashes
Operating hours,
serial number of
electronics system
Fast drying button green LED on, when
active
Unit
switches off
Drying
30 min
iron dry
37% P2=58%
Drying
60 min
predried
37% P3=65%
Drying
90 min
234 h
SN:12345678
cupboard dry
37% P1=46%
OPERATION AND OPERATOR CONTROL
Page 15 of 25
Set language
Button Press briefly Press for 5 s Display
Switch off unit
Open language
selection
Select language
(DE, FR, IT, EN)
Save language
selection
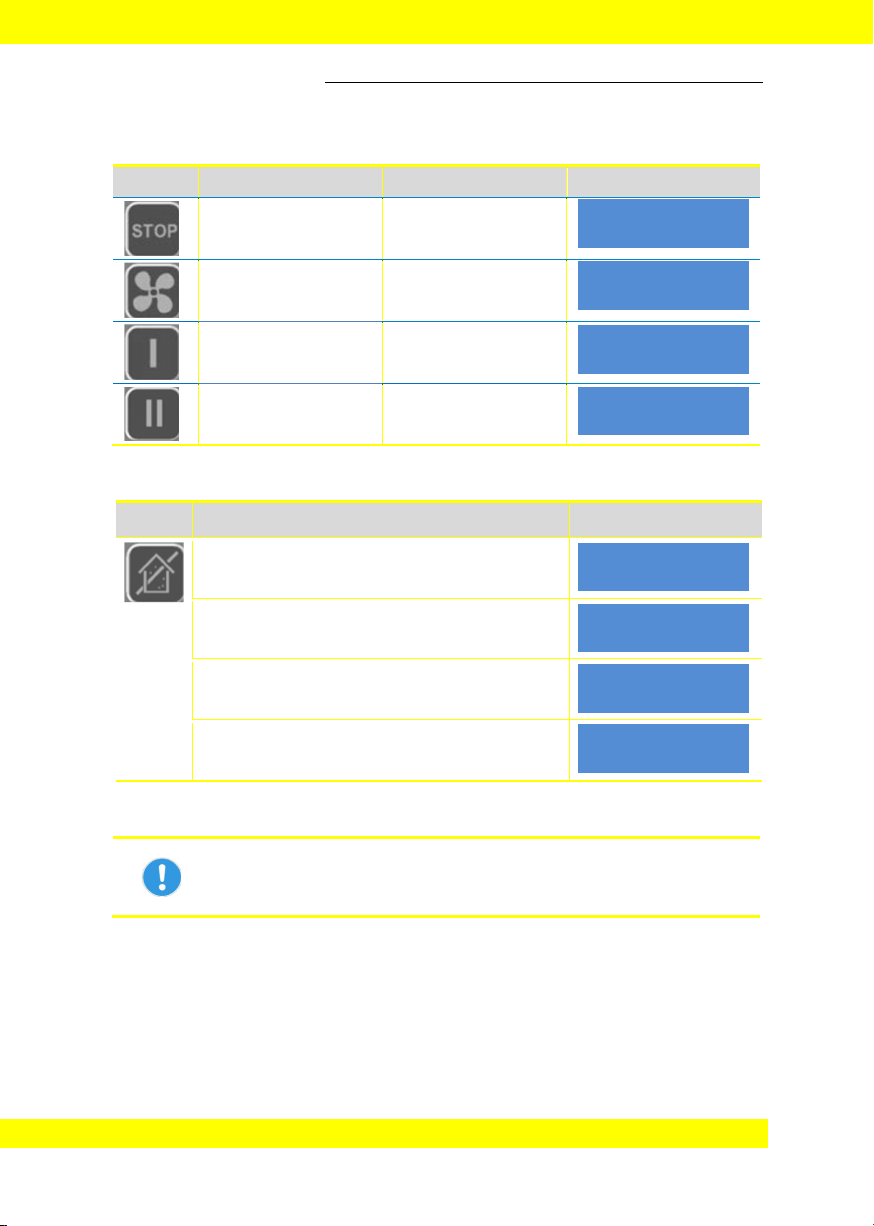
Set room dehumidification
Button Press briefly Display
ES button
Press 1 x
desired room humidity = 35%
Press 2 x
desired room humidity = 40%
Press 3 x
desired room humidity = 45%
etc. after pressing 7 x:
terminate ES mode
Calibrate hygrostat
Correct calibration of the hygrostat requires special knowledge. Please
ask the person commissioned and instructed by the user (e. g.
caretaker).
Ready
37%
Ready
37% ES 45%
Ready
37% ES 40%
Ready
37% ES 35%
Unit
switches off
Language
English
Language
English
Language
German
MAINTENANCE AND SERVICE
Page 16 of 25
Step Button Function Display
1
Switch off unit
2
(press for 5 sec.)
Open hygrostat
calibration
3 , ,
Select program to be
calibrated
4
Increase calibration
value step by step
5
Reduce calibration
value step by step
6
Save calibration value
6Maintenance and service
Maintenance work
Cleaning intervals depend largely on the operating conditions. Therefore check your
indoor air laundry dryer after every drying process.
In order to guarantee trouble-free functioning of the indoor air laundry dryer it must be
cleaned at regular intervals, and in particular the air filter must be checked. Proceed as
follows:
Remove and clean the air filter, replace it if necessary
(see page 5, Fig. 1, item 1).
Saved
Calibrating P2
54%
Unit
switches off
Calibrating P2
56%
Calibrating P2
58%
Calibrating HY
+
MAINTENANCE AND SERVICE
Page 17 of 25
WARNING
Danger of injury by electric shock and risk of material damage
The indoor air laundry dryer may only be repaired by trained
specialised staff. Within the warranty period, any work on the
dehumidifier shall only be carried out by the manufacturer
or persons commissioned by the manufacturer. Any work
carried out by unauthorized persons shall lead to the
forfeiture of all warranty claims!
WARNING
Cutting and crushing hazard
When the air filter has been removed cutting injuries from the sharp
edges of the heat exchanger may occur.
Two people are needed to carry the indoor air laundry dryer,
or suitable lifting gear must be used for transport.
Wear protective gloves when changing the air filter.
Do not reach into the inlet screen.
Visual inspection: drain pipe and connected hose.
Clean casing on the outside with a moist cloth.
Insert new or cleaned filter. drain pipe and connected hose.

TROUBLESHOOTING
Page 18 of 25
7Troubleshooting
If problems arise with the indoor air laundry dryer please check the following points.
Should the fault not be located please contact your technical advisor.
WARNING
Danger of injury by electric shock and risk of material damage
The indoor air laundry dryer may only be repaired by trained
specialised staff. Within the warranty period, any work on the
dehumidifier shall only be carried out by the manufacturer
or persons commissioned by the manufacturer. Any work
carried out by unauthorized persons shall lead to the
forfeiture of all warranty claims!
WARNING
Danger of injury due to contact with hot components of the
cooling circuit
Work on inside components may only be carried out by the
manufacturer or personnel authorised by the manufacturer.
WARNING
Danger of injury from flammable refrigerants and toxicity
Work on inside components may only be carried out by the
manufacturer or personnel authorised by the manufacturer.
Other manuals for WT 230
1
This manual suits for next models
3
Table of contents
Other Aerial Dryer manuals


Popular Dryer manuals by other brands


American Dryer Corp.
American Dryer Corp. AD-30x2 Installation & operator's manual

AEG Electrolux
AEG Electrolux LAVATHERM 58810 User information

Kenmore
Kenmore 41798076701 installation instructions

LG
LG DLGX4501 Series owner's manual

Bosch
Bosch WQG2410H0 User manual and installation instructions

LG
LG DLEX3370 series owner's manual


