Afresco AO001 User manual
Built-In Electric
Multifunction Oven
AO001
User Manual

2
CONTENTS
DESCRIPTION OF MULTIFUNCTION OVEN AO001 3
WARNING 4
CABINET INSTALLATION 5
ELLECTRICAL INSTALLATION AND POWER CONNECTION 8
PREPARING YOUR OVEN FOR THE FIRST TIME 9
COOKING AND TEMPERATURE GUIDE 9
CLEANING AND MAINTENANCE 11
TROUBLESHOOTING 12
3
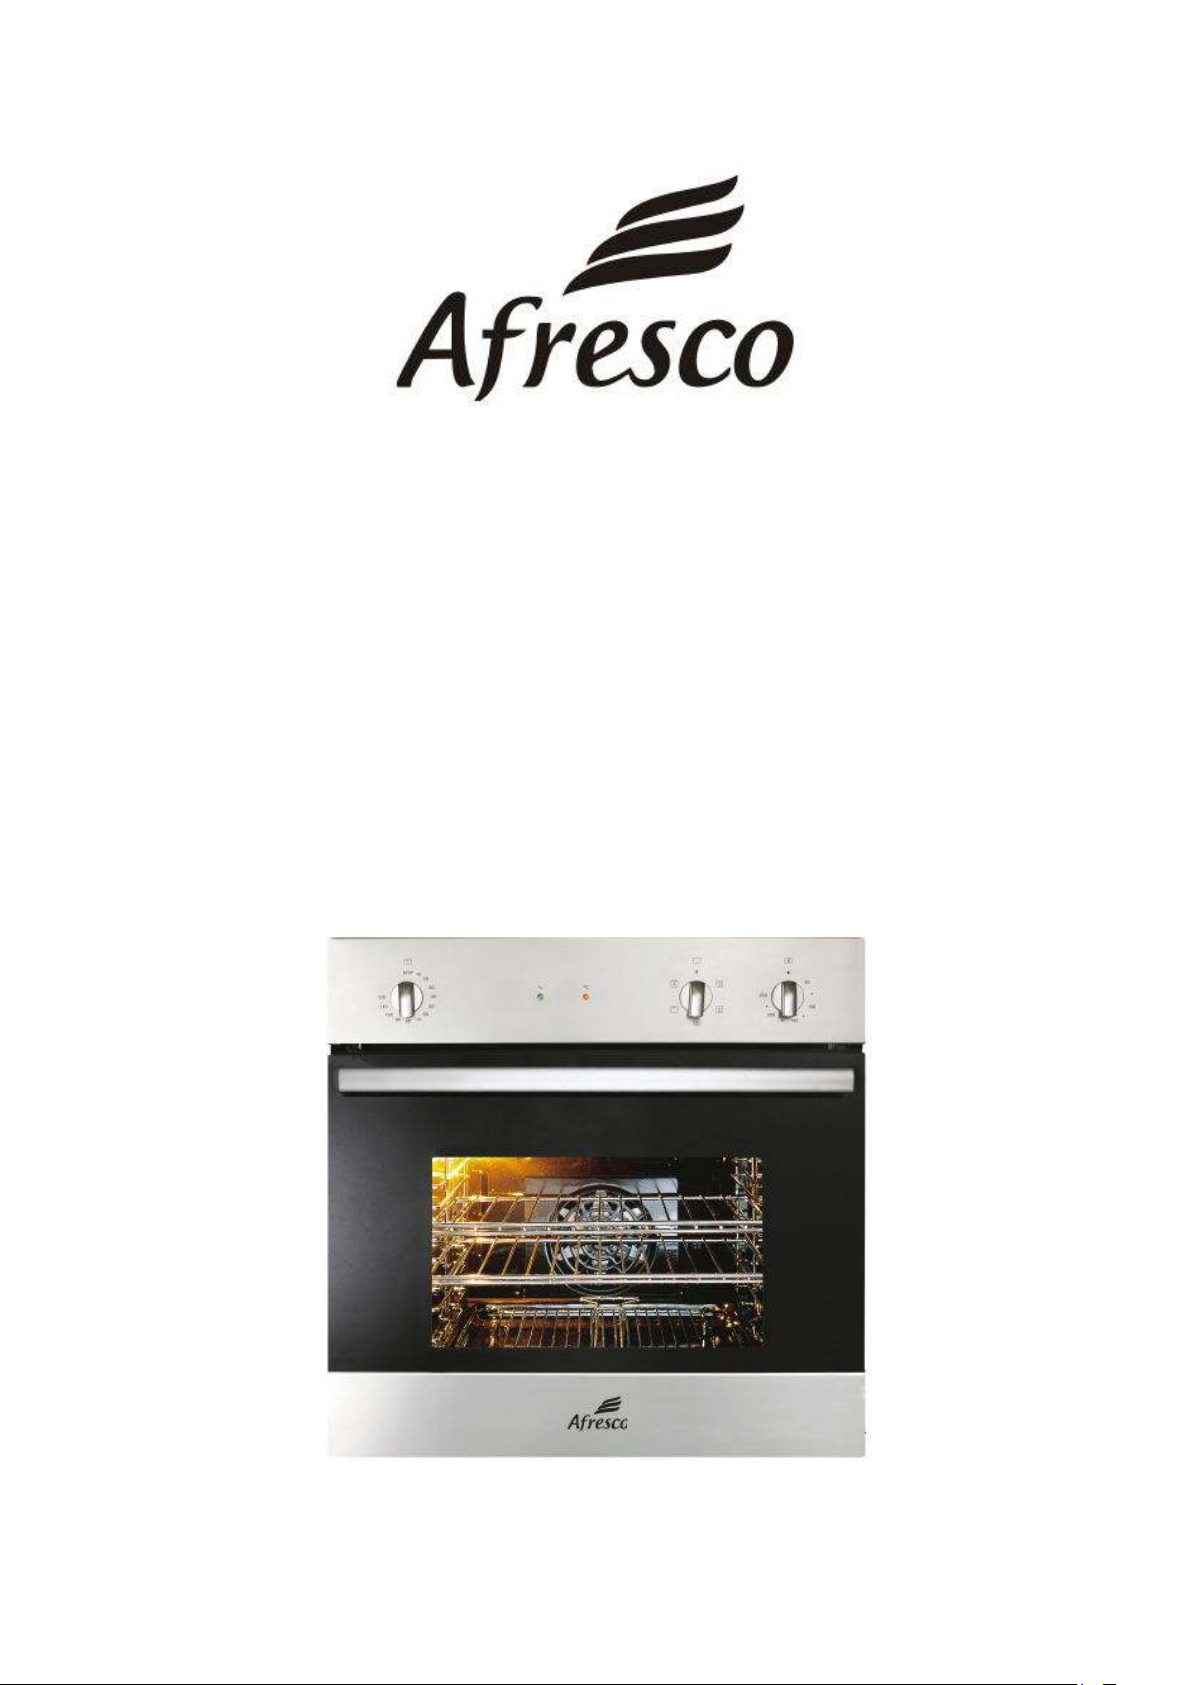
DESCRIPTION OF THE MULTIFUNCTION OVEN AO001
A B C D
A The 2-hour timer features an automatic oven “cut-off”, allowing a cooking
period of up to 120 minutes to be set. Turning this knob clockwise will switch
on the oven. The interior light will come on automaticall when the appliance
is in use. When timer completes, a bell will sound and the oven will
automaticall switch off.
B Power indicators.
The GREEN light indicates when the power is ON.
The RED light is ON during the oven operation indicating the heating
element/s are active.
C Multifunction oven operation controller to select the cooking mode.
D To set the temperature, turn the temperature selector in a clockwise
direction to the desired settings from 50, to 250,. A RED indicator light will
come on to indicate operation of the heating elements. When the temperature
is reached, the thermostat switches off the elements and the indicator light
goes out. When the oven temperature falls below the desired setting, the
heating source switches on automaticall and the indicator light is illuminated
again. Once the food is cooked, turn the temperature selector back in an anti-
clockwise direction.
L ght
Interior light ON/OFF.
Defrost
The powerful fan circulates air around the food. It’s a gentle wa
to speed up defrosting of delicate foods as well as fish and
poultr .
This operation also can be used to raise east dough and to dr
fruit, vegetables and herbs.
Fan Forced
The rear circular heating element is used in conjunction with the
fan to circulate air around the oven cavit and distribute heat
evenl throughout the oven. Food can be placed an where in
the oven and be cooked at the same temperature.
Max Gr ll-
This function directs radiant heat from 2 powerful upper
elements onto the food. Unlike man other grillers, keep the
oven door CLOSED when using this function. It features a large
4
area and faster cooking time. For best results it’s recommended
to preheat our grill for 3 minutes.
Max Gr ll w th Fan-
An addition of the fan to the grill offers ou the benefits of both
“bake” and traditional “grill” functions. The two grill element turns
on and off to maintain the set temperature while the fan
circulates the heated air. Again the oven door remains CLOSED
for “fan grill”. You can use “fan grill”for large cuts of meat. This
gives ou a result that is similar to “rotisserie” cooked meat.
When using “fan grill” it’s not necessaril to turn the food over
during cooking c cle.
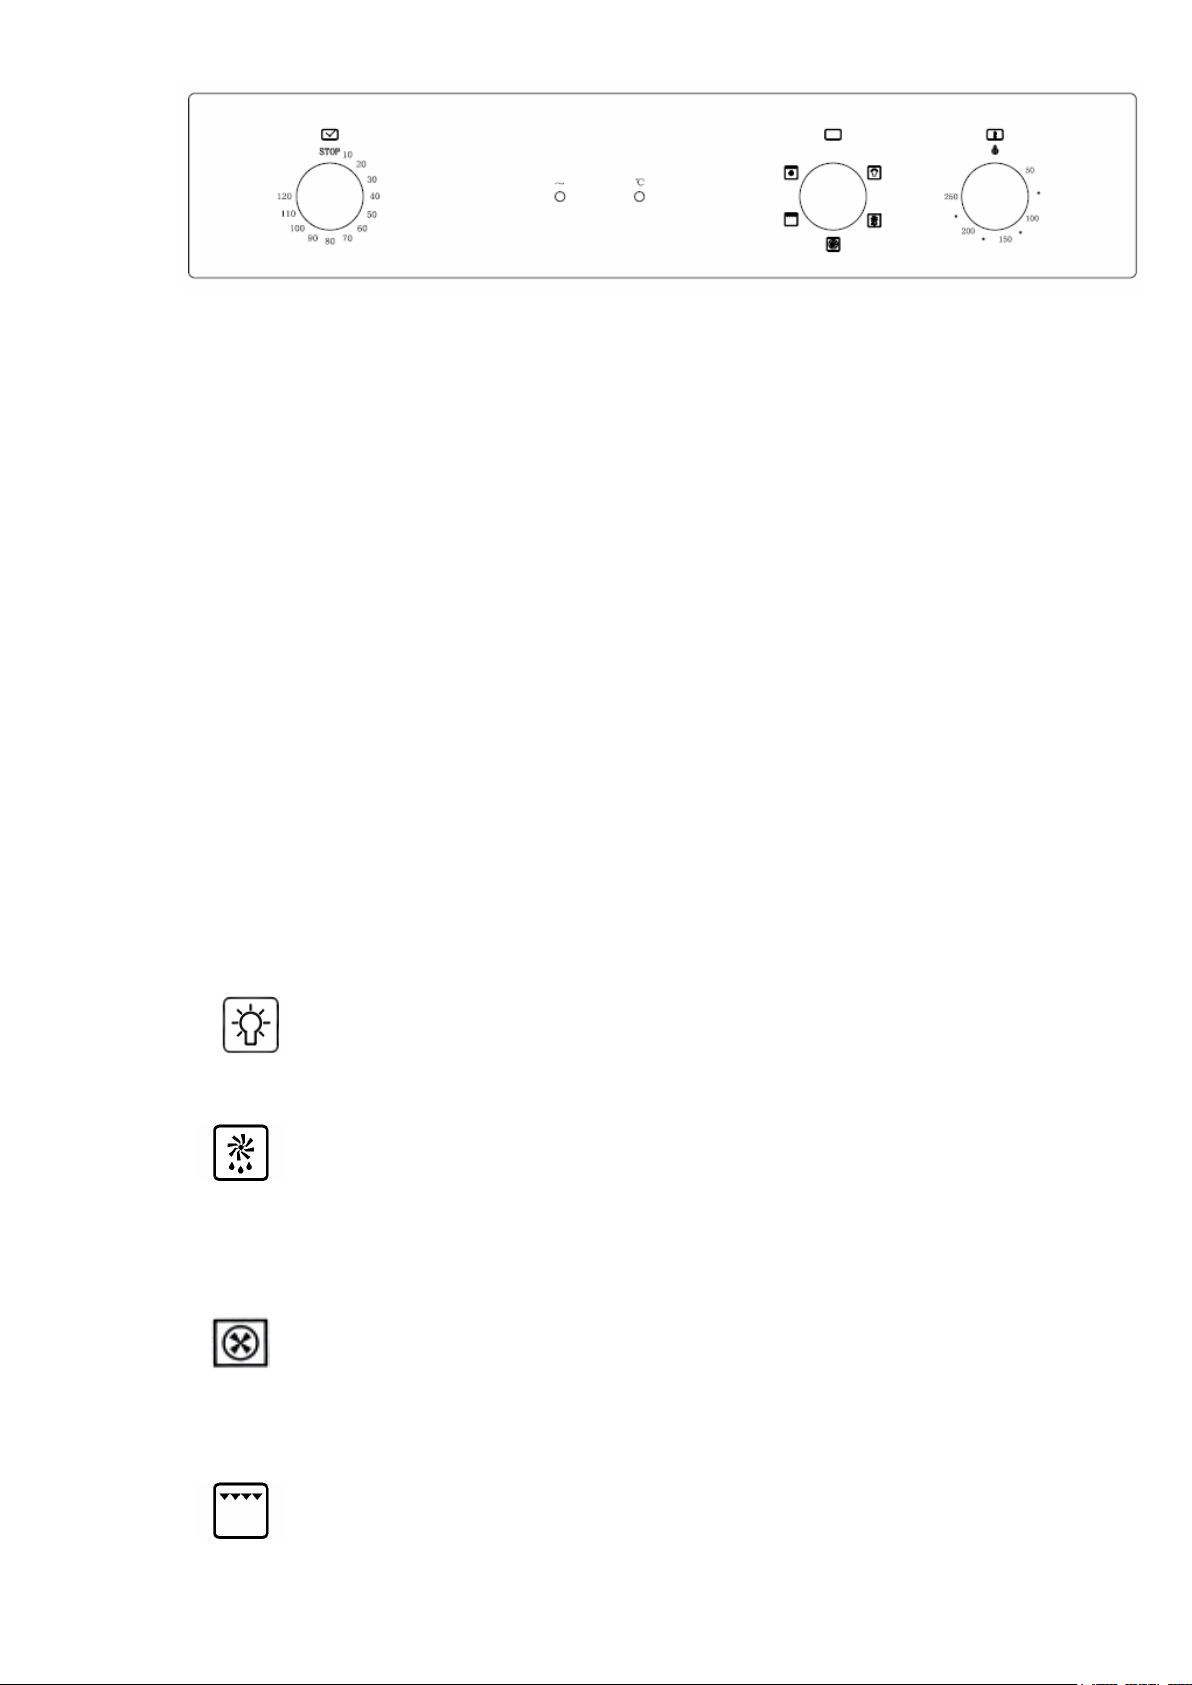
Accessor es
WARNING
This appliance is designed for non-professional use b private individuals at
home.
It must be used b adults. Children should be kept awa while it is in use.
The product installation and repair must be performed b competent and
qualified installers.
Alwa s turn the grill off immediatel after use and keep the grill tra clean as
an fat left ma catch fire

5
Do not leave the grill on unattended
To avoid an accident or fire, ensure that shelves, grill tra s and fittings are
alwa s inserted into the correct wa .
Do not put thick portions of the food under the grill. Foods ma catch the grill
and ignite.
Accessible parts ma become hot when oven or grill is in use. Care should be
taken to avoid touching the hot surfaces inside the oven.
Switch the appliance off and allow to cool down before cleaning or performing
an maintenance
Do not use the door as a shelf
Do not push down on the open door
Do not use harsh abrasive cleaners or sharp metal scrapers to clean the oven
door glass since the can scratch the surface, which ma result in shattering
of the glass
A steam cleaner is not to be used.
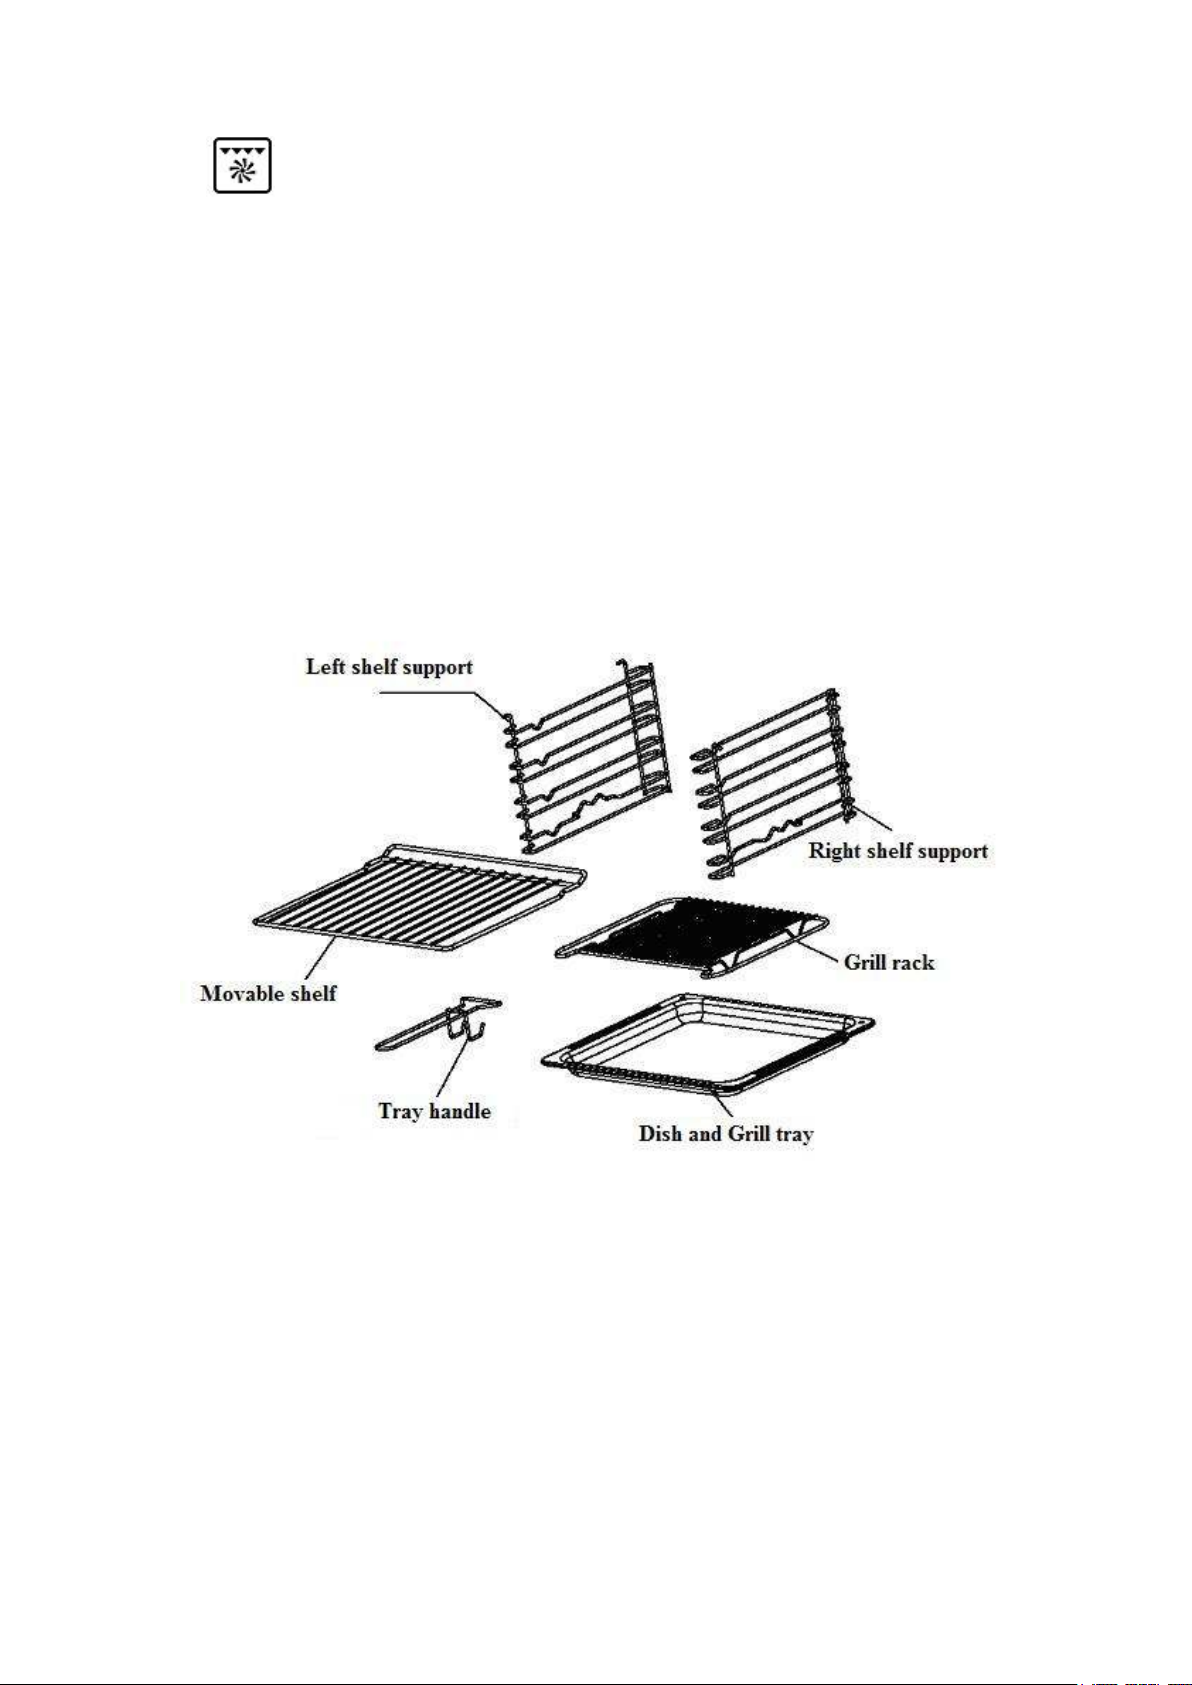
CABINET INSTALLATION
Do not lift the appliance b the door handle
Prepare the cupboard opening to match the oven measurements
Slide the oven into the cupboard, ensuring that the suppl cable does not
kink.
Secure oven to the cabinet through 4 mounting holes with screws supplied.
Centerline distance between the holes: width 572mm, height 333mm.
WARNING: Securel fasten oven to the cabinet using screws provided.
Failure to do so could cause the oven to move or tip during use and result in
personal injur .
Avoid damage of the power cord during installation. The plug must be
accessible after installation
Where the oven is build into the cabinet, the cabinet material must be capable
of withstanding 90,.
For the best integration with the kitchen, install this appliance in a standard
600mm wide cupboard that gives a flush f t with the surrounding cupboard
fronts ( draw ng and mages A,B,C ).
If it is not possible to flush-fit this appliance,
it can be installed as a proud f t /tr m exposed with the surrounding
cupboards ( draw ng and mage D ) .
6

7

8
Oven must be mounted on a flat horizontal surface.
In order to ensure adequate ventilation, the back panel of the cabinet must be
removed to ensure a gap at least 50mm at the rear.
ELLECTRICAL INSTALLATION AND POWER CONNECTION
Installation must compl with SAA Wiring Rules and with local electrical and
building regulations.
Not ce to Electr c an: Please ensure sufficient suppl cable is provided to
allow oven to be pulled clear of the cavit should an service work be
necessar . This will also allow eas connection of suppl .
The oven must be supplied with proper voltage and frequenc (AC220-240V,
50Hz), and connected to an individual, properl grounded branch circuit,
protected b a circuit breaker. Electrical load of the oven is 2145W.
Wiring diagram located at the back of the oven.

9
POWER
CABLE SIDE
AC220-240V 50Hz 3*1.5mm
2
Blue Brown
Yellow
& Green
EARTH
GROUND
NL
CUSTOMER
SIDE
APPLIANCE
WARNING: ELECTRICAL SHOCK HAZARD
Proper electrical ground is required on this appliance.
Do not connect to the electrical suppl until the oven is permanentl grounded.
Disconnect power to the junction box before making the electrical connection.
Power suppl line should not be in contact with metal case of the electric oven.
Do not use a gas suppl line for grounding the appliance.
Never use reductions, shunts, adaptors that can cause overheating or burning.
The manufacturer s not l able for any d rect or nd rect damage caused
by faulty nstallat on or operat on
PREPARING YOUR OVEN FOR THE FIRST TIME
Please remove all internal boxes, bags, plastic film from the oven before
operation and dispose of to avoid safet issues with children.
Please wipe out the oven interior prior to operation with warm soap water
and polish dr with a soft clean cloth. Do not close the oven door until the
oven is completel dr .
A new appliance can have an odour during the initial operation. It is normal
and recommended to “run in” the oven before ou cook for the first time at
180 , for approximatel one hour.
COOKING AND TEMPERATURE GUIDE
Preheat ng and Pan Placement
Preheat the oven if the recipe calls for it. To preheat, set the oven at the
correct temperature. Preheating is necessar for good results when baking
cakes, cookies, pastr and bread. Preheating time is usuall 10 minutes.
Baking results will be better if baking pans are centered in the oven and not
touching each other or the oven’s walls. If ou need to use two shelves,
stagger the pans, so that one is not directl above the other.

10
Energy sav ng h nt
The oven can be switched off shortl before the cooking time ends, the
residual temperature is enough to complete cooking. Open the oven door onl
when it is necessar . To check on progress, look through the glass, the oven
light is automaticall on during cooking.
Below Cook ng Charts are ntended as a gu de only.
Temperatures and cook ng t mes may be var ed to su t nd v dual tastes
APROXIMATE BAKING TIMES
APROXIMATE ROASTING TIMES FOR MEAT, POULTRY & FISH
TEMPERATURE , GENERAL TERMS FOOD SUITABLE
100-120 Ver Slow Small meringues, pavlova, baked
custard dishes
135-140 Slow Rich fruit cake(20cm)
Light fruit cake
165-170 Moderatel Slow Casseroles
Deep buttercakes
170-180 Moderate Shallow buttercakes, sponges
biscuits, meat loaf, baked fish
200-210 Moderatel Hot Swiss roll, patt cakes, rock cakes,
shortcrust pastr
230 Hot Scones, puff pastr
TYPE OF MEAT,
POULTRY,FISH
CUTS OF MEAT TIME/KG ,
BEEF Standing Rib, Rolled Sirloin
Bolar Blade, Corned Topside
Fillet, Scotch Fillet
60mins/kg
40mins/kg
190
190
VEAL Shoulder or leg (with bone or rolled)
40-50mins/kg 190
LAMB Leg, Shoulder,Loin or Rolled 40-50mins/kg 190
PORK
Leg Loin
Cook at highest temperature for first
30mins and reset to low until
cooked
90mins/kg 190-230
CHICKEN Whole or Pieces 30mins/0.5kg 190
DUCK 1.4-1.6kg
1.7-1.9kg
35mins/0.5kg
+35mins extra
190
190
TURKEY
2.5-4.0kg
4.0-6.0kg
6.0-8.0kg
8.0-10.0kg
30mins/0.5kg
+30mins extra
190
190
190
190
FISH
Whole or Fillets
Covering fish for ¾ of the cooking
time will assist in retaining the
moisture
10mins/0.5kg 180

11
APROXIMATE GRILLING TIMES
Fan gr ll cook ng h nts:
Turn meat once if needed
Sausages to be pierced
CLEANING AND MAINTENANCE
Be sure electrical power is off and all surfaces are cool before cleaning an
part of the oven.
Onl use soap water to clean the appliance.
An food spillage should be wiped up immediatel to avoid discoloration.
When surface is cool, clean and rinse.
Do not use oven cleaners, cleaning powders, stainless steel cleaners or harsh
abrasives on the outside of the door.
Control panel
It is a good idea to wipe the control panel after each use. Clean it with dr soft
cloth. Do not use abrasive cleansers, strong liquid cleansers, plastic scouring
pads or oven cleansers on the control panel-the will damage the finish.
Glass Surfaces
To clean the outside glass finish, use a glass cleaner. Rinse and polish with a
dr cloth.
TYPE OF MEAT, POULTRY,FISH TEMPERATURE , APROXIMATETIME
Ch cken Whole
Pieces
180
190
30mins per 0.5kg
15-20mins
Lamb Loin/Rack
Chops, med/rare
Chops, medium
180
180
180
25mins per 0.5kg
10-12mins
15mins
Beef Steak, rare
Steak, medium
Steak, well-done
180
180
180
6-8mins
12mins
12-15 mins
Pork Chops, med/rare
Chops, medium
Chops, well done
200
180
180
6-8mins
10-12mins
15mins
Bacon 200 5-6mins
Sausages Thin
Thick
180
180
10mins
12-14mins
F sh Fillets,rolled
Fillets,thick
Whole
180
180
200
12mins
12mins
15-30mins
Sliced vegetables
Tomato Halves
Sauce-based recipes with breadcrumb
toppings
Pasta Dishes
180-190
200
180
180
20-30mins
6mins
20-30mins
20-30mins

12
Replac ng the oven bulb
1.Bulb holder
2.Bulb
3.Glass cover
NOTE: The glass cover should be removed onl when cold. Let
the bulb cool completel before removing it. Wearing rubber
gloves ma offer a better grip.
Before replacing the bulb, disconnect electrical power to the oven
For our safet , do not touch a hot bulb with a damp cloth.
Replace with a new 25-watt oven high temperature suitable bulb.
Reassemble the glass cap and reconnect the oven.
TROUBLESHOOTING
PROBLEM POSSIBLE CAUSE
Oven or gr ll not work ng
Oven controls improperl set.
Power not turned on. Controls are
incorrectl set. Household fuse has blown
or power suppl is off
Oven l ght not work ng. Lamp blown or loose in socket.
Household fuse has blown
Condensat on bu ld ng up Reduce amount of water used in cooking
(some condensation is normal)
Un t smok ng when f rst used Protective oils being removed.
Fan no se
A cooling fan ma automaticall turn on.
This is normal. The cooling fan will turn on
to cool internal parts.
Door cannot be replaced after
removal Door hinges not engaged properl
Table of contents
Popular Oven manuals by other brands


/HA S operating instructions")


Gaggenau
Gaggenau BO 470/471 2 Series instruction manual

VALERA
VALERA LD4 datasheet

Electrolux
Electrolux DDO61GAWN manual

NEFF
NEFF B64VS71 0B Series User manual and installation instructions

Kopa
Kopa 400 Installation and operating manual

Kleenmaid
Kleenmaid OMF6012K Instructions for use and warranty details