Albrecht DR 403 User manual

DR 403 USB Receiver for DAB, DAB +, DMB
User Manual
1 Introduction
1.1 About This Document
1.1.1. Foreword
Thank you for buying Albrecht DR 403. The manual will introduce Albrecht DR 403
installation and operations. It contains the software framework, the relevant
information, and quickly guides system's basic function.
The present software description is issued for the preliminary working title KOGAN,
produced by DabMate. The description is valid for the Albrecht DR 403
accordingly, until the software issue will be modified to show Albrecht DR 403
instead of Kogan.
1.1.2. Topics
Following is a general introduction to the chapters.
Chapter 1: Introduction - Provide chapters outline and the content of the software
provided on Albrecht DR 403.
Chapter 2: Getting started - Guiding how to install, uninstall and utilize DR 403.
Chapter 3: Albrecht DR 403 basics - Basic operations for listening to DAB/Internet
Radio and relevant system information.
Chapter 4: DAB guide - Introduce DAB functions and operational steps on KOGAN.
Chapter 5: Internet Radio guide - Introduce Internet Radio functions and
operational steps on KOGAN.
Chapter 6: More functions - Introduce other advanced functions, including “Screen
Mode”, “Favorites”, “My Multimedia Files”, and “Recall Last Program”
Functions.

1.1.3. Reference
N/A.
1.2. Preface
Albrecht DR 403, a multimedia digital platform which follows the DAB specification of
Eureka-147, supports digital broadcasting DAB and DMB with AAC + audio codec as
well as Internet Radio services to enrich your digital multimedia entertainment
experience. AAC + coded audio services, which are transmitted as MPEG 4 video (for
example the radio station BigFM2See with AAC + audio + video slide show can also be
received. For DAB + a later software update will be possible.
1.2.1. Accessories
The package provides the following accessories:
1. USB Digital Receiver (DR 403)
2. Installation CD (user manual is included)
3. External magnetic telescopic antenna for Band III and L Band
4. User’s quick guide
5. USB cable
1.2.2. Functions
This section provides a summary of KOGAN. The operation of follow-up steps will
be introduced in the following chapters.
1. Supports playback for audio, video, and slide show programs.
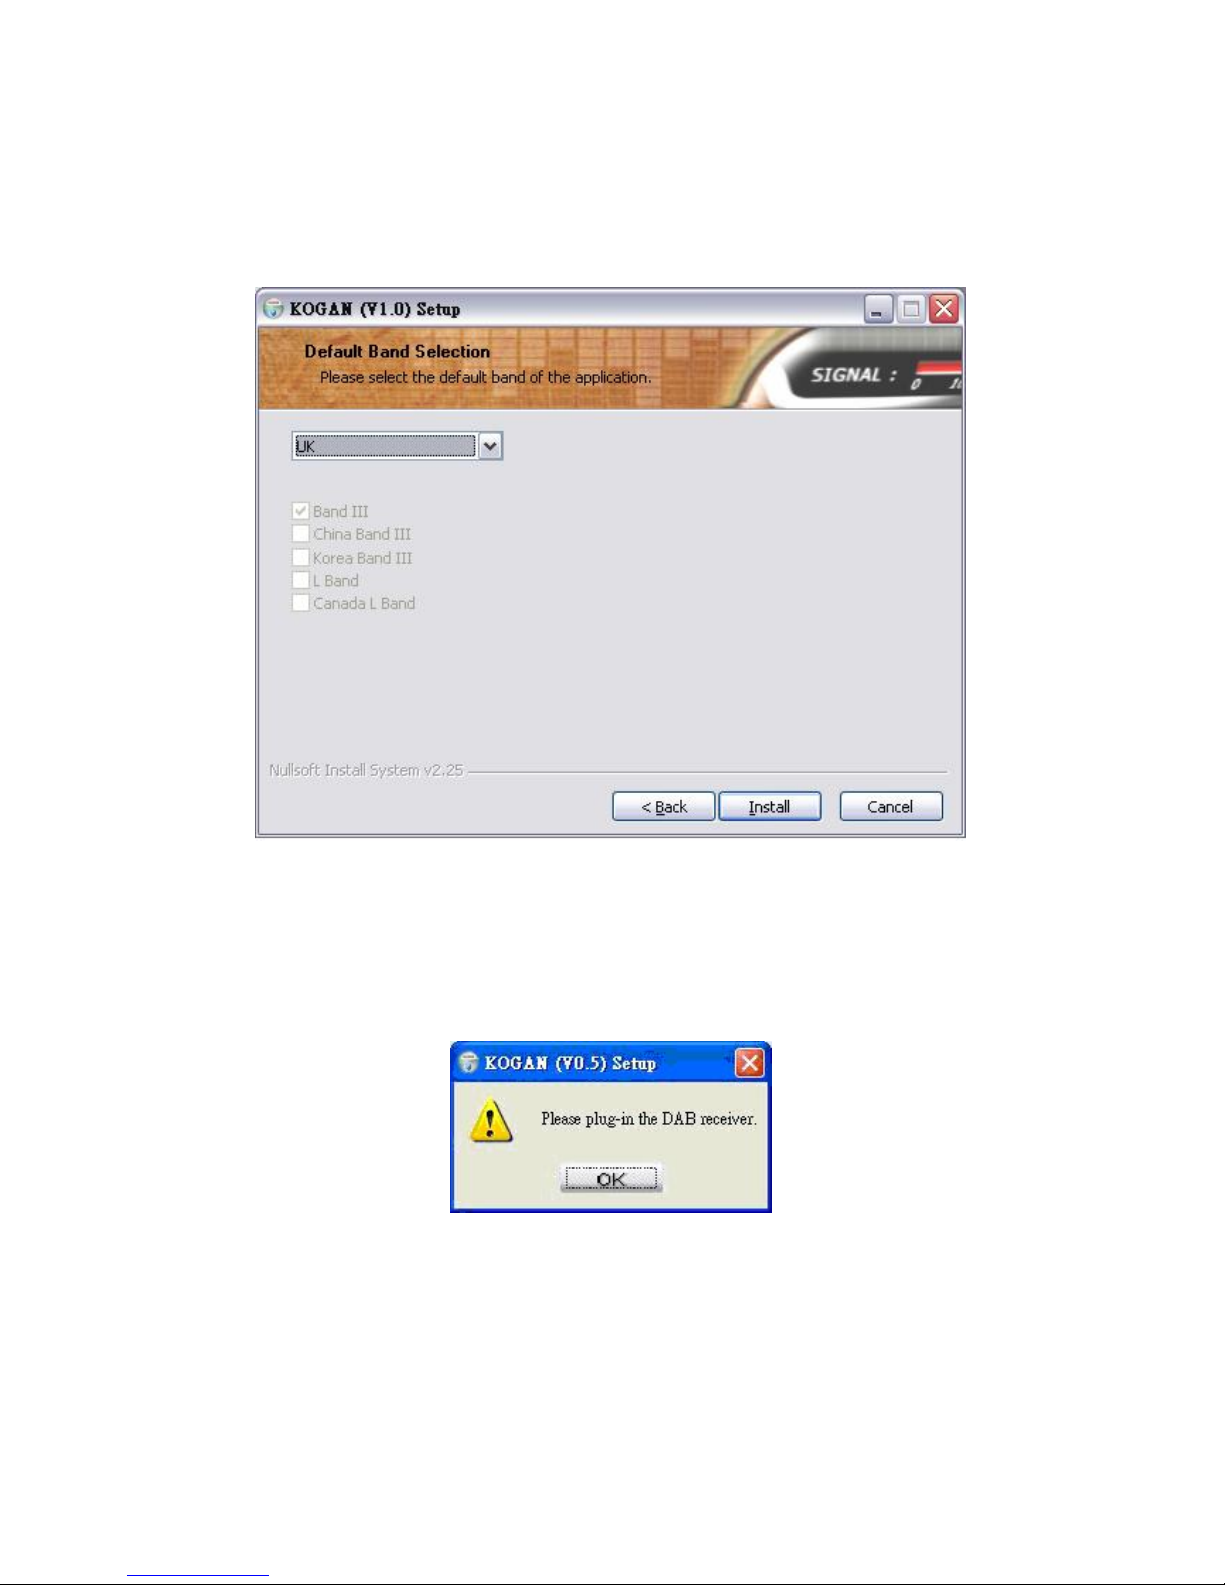
2. Supports the following bands of frequencies which can be easily adjusted on
screen and no need to re-install.
Eureka147 Band III
Eureka 147 China Band III
Eureka 147 Korea Band III
Eureka 147 L Band
Eureka 147 Canada L Band
3. Contains over 5,000 Internet Radio stations.
4. Supports full channel scan/single channel scan in DAB Mode.
5. Supports my favorite station management.

6. Simultaneously records an audio or video program in DAB mode.
7. Easily adjusts the screen size, compact mode or full-screen playing.
8. On screen volume control.
9. Previous/Next tuning buttons to quickly switch stations.
10. Easily switches languages on screen, no need to re-install.
11. Automatically or manually checks the most up-to-update version and free
download.
1.2.3. Supported Bands for Each Country
Country Band
Australia Band III
Canada Canada L Band
China China Band III + L Band
China-Beijing China Band III
China-Shanhai L Band
Denmark Band III
France Band III + L Band
German Band III + L Band
Korea Korea Band III
New Zealand Band III
Singapore Band III
Taiwan Band III
UK Band III
1.3. System Requirement
Before installing KOGAN software, please make sure your computer fits the system
requirements of the software and hardware.
1.3.1. Hardware Requirements
CPU : Intel Pentium IV 750MHz or above
Intel Celeron 750MHz or above
AMD Sempron K8 or above
Memory : 256MB or above
H.D.D. : 32MB free disk space
USB : USB 1.1 or above
1.3.2. Software Requirements
OS: Windows® XP SP 2 ( recommended ), Windows Vista

1.4. Technical Support
Under http://www.dabmate.com You will find much interesting technical background
information to DAB radio, while You will find Albrecht Related technical information on our
technical website http://service.alan-germany.de.
1.5. Version
The manual is applicable to any version released after dabMate KOGAN V1.0.

2. Getting Started
2.1Introduction
This chapter will guide you how to install, uninstall and utilize dabMate-KOGAN functions.
2.2Installation
To Install KOGAN:
1. Please insert the installation CD to the CD ROM drive.
2. Installer Language
Please select the language to be used during the installation process. The language
of application will be selected at Step 7.
(Figure 2.1)
3. Auto-run windows will pop up. Follow the installation steps to install KOGAN or double
click the <KOGAN_Setup.exe> file on the CD to execute the setup program. (Figure
2.1)

(Figure 2.2)
4. KOGAN License Agreement will pop up. After carefully reading the agreement,
please click “Yes, I Accept “check box to accept the terms within. Click Next to
continue the installation. (Figure2.2)
(Figure 2.3)

5. Take the default folder C: \programme\dabMate\KOGAN, or select the destination
folder by Browse button.Click Next to continue. Please note the available storage
space. (Figure2.3)
(Figure2.4)
6. Follow the wizard to select the default shortcut and click Next to continue the
installation. (Figure2.4)

(Figure2.5)
7. Select the language used in the application and click Next to continue the
installation.(Figure 2.5)
(Figure2.6)

8. Select the band frequency by region in band selection window for the application to
receive the digital signal. Or select “others” to manually set up the band frequency.
(Figure 2.6) After this step, you need to plug-in DAB Receiver to configure the
hardware.
(Figure 2.7)
9. Please plug-in the DAB receiver. If the correct DAB receiver is not properly plugged
in, the installer will popup the following message to remind you. If the same problem
occurs again after you plug in the correct DAB receiver, please go to the store where
the receiver is purchased for help.
(Figure2.8)
10.The Device Driver Installation Wizard will show up to help you install the driver. Click
Next to continue.

(Figure 2.9)
11.The wizard will search for the driver and install it. After finished, it will show the
successfully installed message. Click Next to let installer continue the remaining
tasks.
(Figure2.10)

12.Click Close to finish the installation of KOGAN.(Figure 2.7) KOGAN has been
installed successfully and ready to launch from the start menu on the windows task
bar: [Start] →[Programme] →[dabMate] →[KOGAN] →KOGAN
(Figure2.11)
2.3Uninstall
Please follow the steps to uninstall the software: (For complete uninstallation, please
close the KOGAN application first.)
1. Click [Start] →[Programme] →[dabMate] →[KOGAN] →Uninstall
Uninstall wizard will guide you to uninstall this software.
2. Click “Next” to start uninstall.
3. The installation path of KOGAN will be brought out automatically. Click “Uninstall” to
start.(Figure 2.8)

(Figure2.12)
2.4Execution of KOGAN
Before executing KOGAN, make sure to:
1. Plug the DAB Receiver into USB port when playing DAB services.
2. Connect to the internet successfully when listening to the Internet Radio services.
3. Click the program [Start] →[Programme] →[dabMate] →[KOGAN] →KOGAN to
execute the program.
4. The details will be introduced in the following chapters.

(Figure2.13)
2.5KOGAN Folder Structure
After installing KOGAN, the “KOGAN” folder will be automatically created in the destination
folder specified during installation process. To keep system working, please do not move or
delete any file.
The folder structure of KOGAN is as following:
1. Program Home($Home) [C:/Programme/ dabMate/ KOGAN]
– including the execution files of KOGAN and its libraries
2. Driver [$Home/driver]
– including all the relevant drivers
3. My Multimedia [$Home/My multimedia files]
– accessing the list of recorded files
Please note: in German language Windows ® systems the directory will show “Programme”
as folder, while English language computers will show “programs” or “program files”
accordingly.

3. KOGAN-Basics
3.1Introduction
Noting basic operations for listening to DAB/Internet Radio and relevant system information.
3.2On Screen Functions
3.2.1 The Information Panel
(Figure3.1)
1. Indicates the received signal strength in DAB mode.
2. Displays the channel ID in DAB mode.
3. Displays the ensemble name in DAB mode.
4. Displays the ensemble frequency in DAB mode.
5. Displays the channel bit rate in DAB mode.
6. Displays the current playing/recording status.
7. Displays the service name in DAB mode.
8. Recording: (for audio and video services in DAB mode only)
Click the Record button to start recording and click again to stop recording. After
that, a file-saving dialog will pop up to request a file name and the folder for saving the
recorded file. You can see the recorded file in the category of My Multimedia File.
9. Stop:

Click the Stop button to stop playing.
10.Play:
Highlight the service name and click the Play button to start playing.
11.Previous Station:
Click to switch to the previous service on the service list.
12.Next Station:
Click to switch to the next service on the service list.
13.Snapshot: (for Slide Show programs in DAB mode only)
Click the button to capture the current playing slide. A file-saving dialog will pop up to
request a file name and the folder for saving the picture. You can see the snapshot in the
category of My Multimedia File.
14.Mute:
Click once to turn off the sound and click again to turn the sound back on.
15.Volume Bar:
Indicate the volume status. Adjust the volume by mouse dragging
16.DLS
DLS, means “Dynamic Labeling Service”, the public message will be shown on the
screen simultaneously. When you move cursor to the DLS area, the running message
will be frozen for reading until cursor moves away.
(Figure 3.2)
17.Indicates the received signal strength in Internet Radio mode.
18.Displays the channel name in Internet Radio mode.
19.Displays the channel bit rate and playing status in Internet Radio mode.

3.2.2 Tool Bar
(Figure 3.3)
20.Open:
Click the Open button to open a recorded file, and click the file name to start playing.
21.Full Scan:
Click the Scan button to start full scanning.
22.Delete Item:
After selecting a channel or service, click to delete the item. If the service is in use,
the window will pop up to ask whether you want to delete the item and stop playing the
service at the same time.
23.Compact Mode:
Click , it shows only the information pane. Other parts will disappear.
24.Full-Screen Mode:
To show video into full screen. (Only used in playing video)
25.Display Window:
In Audio DAB or Internet Radio mode, click to toggle switch displaying or hiding
the KOGAN logo.
In Video or Slide Show DAB mode, click to toggle switch displaying or hiding the
present video or picture.

3.2.3 Display Window
(Figure 3.4)
26.Original window size, depending on the received video size.
27.Window size 1.5 times:
You may click on menu [View] [Window Size] [150%] for this viewing effect.
28.Window size 2 times:
You may click on menu [View] [Window Size] [200%] for this viewing effect.
29.Always on top (only for video mode)
You may click on menu [View] [Always On Top] for this effect.
30.Next Slide:
When playing slide show, click on to go to the next slide.
31.Previous Slide:
When playing slide show, click on back to the previous slide.

3.2.4 Tuner
(Figure 3.5)
32.All Programs:
Displays all DAB audio, video, slide show services and Internet Radio channels.
33.Audio:
Displays all available digital broadcasting audio services.
34.Video:
Displays all available digital broadcasting video services.
35.Slide Show:
Displays all available digital broadcasting slide show services.
36.Internet Radio:
Displays all the Internet Radio stations categorized by region or genre.
37.Ensemble:
Displays available DAB service list categorized by ensemble.
38.Favorites:
You may bookmark services/stations to Favorites page to easily tune to the channels
you like.
39.My Multimedia Files:
Displays all files that you recorded from KOGAN.

40.Frequency Table:
Displays the channel frequency and channel ID of DAB service.
41.Adjust Displaying Types:
You may adjust the displaying items on screen to easily access to your frequently
used stations.
(Figure 3.6)
42.Full Scan / Single Channel Scan:
Full Scan: Scan for all frequencies listed in the selected Band.
Single Channel Scan:Scan for the specified Channel ID only.
43.Switch to Boundary Mode:
Tuner window will be stuck on left boundary of screen, and disappear when cursor
moves away. It will come back when you move cursor to left boundary of screen.
44.Switch to Stick Mode:
Tuner window and main window are tight closed.
3.3Items Description
3.3.1 Digital Broadcasting
You may select a service type like [All], [Audio], [Video] or [Slide Show] in
Tuner to see the available services for playing.

(Figure3.7)
45.Digital Audio Broadcast
46. DAB Station name
47.Band of DAB (at present: Band III).
48.Bit Rate:
Indicates the data bit transmitting rate.
49.Channel ID used by this service
50.Channel Name
Indicates the name of the channel provider.
51.Frequency used by this service
52.Program Type:
The genre of this program, not always provided.
53.Service Type:
There are some types: Audio, Video, and Slide Show. At present: Audio.
54.Internet Radio
55.Classifies internet radio by region, genre
56. Slide Show
57.Video ( Digital Multimedia Broadcasting )
Other manuals for DR 403
1
Table of contents