ALDI Easy Home MS-201 User manual

LAUNDRY
ID: #05007
m
y
h
a
n
s
e
c
o
n
t
r
o
l
.
c
o
m
M
A
N
U
A
L
D
E
V
E
L
O
P
E
D
I
N
G
E
R
M
A
N
Y
User-friendly
Manual
User manual
MINI-SEWING MACHINE

7
6
2
3 4
5
1
Dok./Rev.-Nr. 199072_20210519

Contents
3
Contents
1Sewing machine
2Needle, 4×
3Bobbin, 6×
4LR6 battery (AA, 1.5V), 4×
5Threader
6Foot pedal
7Mains adapter
The package contents includes four 1.5V batteries,
type LR6 (AA).

Table of contents
4
Table of contents
Contents .......................................................................................................... 3
Table of contents............................................................................................. 4
General information ....................................................................................... 5
Reading and storing the user manual ..................................................................5
Proper use..................................................................................................................5
Explanation of symbols .................................................................................. 5
Safety............................................................................................................... 6
Explanation of notes ................................................................................................6
General safety notes.................................................................................................6
Battery notes ........................................................................................................... 10
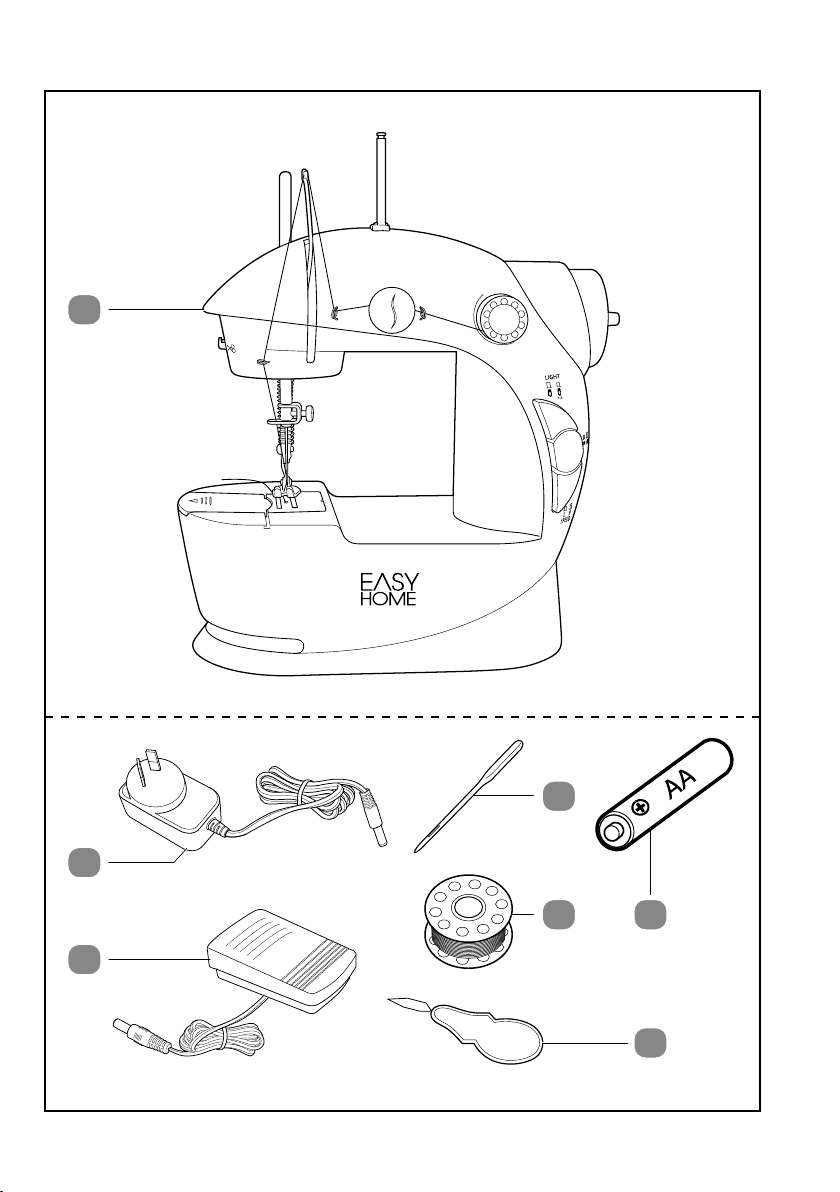
Product description ....................................................................................... 12
First use ..........................................................................................................14
Checking the product and package contents.................................................... 14
Preparing for battery operation........................................................................... 14
Preparing for mains operation............................................................................. 16
Connecting the foot pedal..................................................................................... 16
Threading the upper thread ..................................................................................17
Using the threader..................................................................................................20
Threading the bobbin thread...............................................................................20
Adjusting the thread tension................................................................................24
Operation ...................................................................................................... 24
Sewing......................................................................................................................26
Changing the sewing direction............................................................................28
Ending the sewing process...................................................................................29
Spooling ................................................................................................................... 31
Changing the needle .............................................................................................33
Troubleshooting ........................................................................................... 35
Cleaning..........................................................................................................37
Storage .......................................................................................................... 38
Technical data ............................................................................................... 38
Disposal ......................................................................................................... 39
Disposing of the packaging ..................................................................................39
Disposing of the sewing machine........................................................................39
Warranty Details............................................................................................ 40
Repair and Refurbished Goods or Parts Notice............................................41

General information
5
General information
Reading and storing the user manual
This user manual is part of this mini-sewing machine (referred to below
only as the “sewing machine”). It contains important information about
start-up and handling.
Before using the sewing machine, please read through the user manual
carefully. This applies in particular to the safety instructions. Failure to follow this user
manual may result in serious injury or damage to the product.
Store the user manual for future use. If you pass the sewing machine on to third par-
ties, please be absolutely sure to include this user manual.
Proper use
The sewing machine is designed solely for sewing fabrics. It is intended for private
use only and is not suitable for commercial purposes.
Use the sewing machine only as described in this user manual. Any other use is
deemed improper and may result in damage to property or even personal injury. The
sewing machine is not a toy.
The manufacturer or vendor accepts no liability for damage caused by improper or
incorrect use.
Explanation of symbols
The following symbols are used in this user manual, on the product or on the
packaging.
This symbol provides you with useful additional information
about start-up or operation.
This symbol identifies electrical devices that belong to the protec-
tion class 2.
Positive polarity: the sewing machine's mains adapter connection
has a positive inner conductor.
The RCM Mark (Regulatory Compliance mark) indicates that the
product complies with the relevant guidelines of eh ACMA as well
as corresponding government requirements for the safety of elec-
trical devices.

Safety
6
Safety
Explanation of notes
The following symbols and signal words are used in this user manual.
WARNING!
This symbol/signal word designates a hazard
with moderate degree of risk which may lead to
death or severe injury if not avoided.
CAUTION!
This signal symbol/word designates a hazard
with low risk that, if not avoided, may result in
minor or moderate injury.
NOTICE! This signal word warns against potential damag-
es to property.
General safety notes
WARNING!
Risk of electric shock!
A faulty electrical installation or excessive mains voltage may result
in an electric shock.
− Only connect the sewing machine if the mains voltage of the
socket corresponds to the specification on the rating plate.
− Connect the sewing machine only to an easily accessible sock-
et so that you can quickly disconnect the sewing machine from
the power supply in the event of a fault.
− Do not operate the sewing machine if it exhibits visible dam-
age or if the mains cord or mains plug is defective.
− If the mains cord of the mains adapter and the foot pedal is
damaged, to avoid hazard it must be replaced with an equiv-
alent connector cable that can be obtained from the manufac-
turer or their after-sales support.

Safety
7
− Do not open the housing; instead, have a qualified professional
carry out repairs. Contact a qualified workshop for this. Liability
and warranty claims are waived in the event of repairs per-
formed by the user, improper connection or incorrect operation.
− Only parts that comply with the original device data may be
used for repairs. There are electrical and mechanical parts in
this sewing machine that are essential for providing protection
against potential dangers.
− Do not operate the sewing machine with an external timer or
separate remote control system.
− Do not immerse the sewing machine, mains cord, foot pedal or
mains plug in water or other liquids.
− Never touch the mains plug with wet hands.
− Never pull the mains plug out of the socket by the mains cord.
Instead, always hold on to the mains plug while doing so.
− Never use the mains cord as a carrying handle.
− Keep the sewing machine, mains plug and mains cord away
from open flames and hot surfaces.
− Arrange the mains cord so that it does not pose a tripping hazard.
− Do not kink the mains cord and do not lay it over sharp edges.
− Only use the sewing machine indoors. Never use it in wet
rooms or in the rain.
− Never store the sewing machine in such a way that it could fall
into a bath or wash basin.
− Never reach to retrieve an electrical device if it has fallen in
water. In such a case, immediately disconnect the mains plug
from the socket.
− Make sure that children do not insert any objects into the sew-
ing machine.
− Always switch the sewing machine off, pull the mains plug out
of the socket and remove the batteries from the battery com-
partment when you are not using the sewing machine, when
you are cleaning or servicing it, or in the event of a fault.
− Only use the sewing machine with the enclosed mains adapter.

Safety
8
WARNING!
Danger for children and persons with impaired physical, sen-
sory or mental capacities (e.g. partially disabled persons, older
persons with reduced physical and mental capacities) or lack of
experience and knowledge (e.g. older children).
− This sewing machine may be used by children aged eight and
over and by persons with impaired physical, sensory or mental
capacities or those lacking experience and knowledge if they
are supervised or have been instructed in how to use the sew-
ing machine safely and have understood the risks associated
with it. Do not allow children to play with the sewing machine.
Cleaning and user maintenance must not be performed by
unsupervised children.
− Keep children under eight years of age away from the sewing
machine and the connection cable.
− Do not leave the sewing machine unattended while in operation.
− Do not let children play with the packaging film. Children may
get caught in it when playing and suffocate.
CAUTION!
Risk of injury!
Careless and improper handling of the sewing machine may result
in injury.
− Keep fingers away from all moving parts. Take particular care
with the needle.
− Do not attempt to sew clothing that you are (or another person
is) currently wearing. Remove clothing before sewing.
− Turn the sewing machine off and pull the mains plug out of
the socket if you leave the sewing machine unattended.
− Unplug the appliance before carrying out maintenance.

Safety
9
NOTICE!
Risk of damage!
Improper handling of the sewing machine may damage it.
− Place the sewing machine on an easily accessible, level, dry,
heat-resistant and sufficiently stable work surface. Do not place
the sewing machine on the edge or corner of the work surface.
− Never place the sewing machine on or near hot surfaces (e.g.
stove tops etc.).
− Ensure that the mains cord does not come into contact with
hot parts.
− Never expose the sewing machine to high temperatures
(heaters etc.) or to the effects of the weather (rain etc.).
− Never fill the sewing machine with liquid.
− Never attempt to clean the sewing machine by submerging it
in water and do not use a steam cleaner to clean it. Otherwise,
the sewing machine could be damaged.
− Do not place any heavy objects on the sewing machine.
− Do not let the sewing machine fall and do not subject it to
harsh impacts.
− Never put the sewing machine in a dishwasher. It would be
destroyed as a result.
− Stop using the sewing machine if its plastic parts exhibit cracks
or breaks or are deformed. Only replace damaged parts with
corresponding original spare parts.
− Always use the same denier for upper threads and bobbin
threads.
− Only use the bobbins supplied.
− Do not move the sewing machine during operation.
− Do not insert objects into the sewing machine openings.

Safety
10
Battery notes
WARNING!
Risk of injury!
Mishandling of the supplied batteries may cause gas leakage, elec-
trolyte (battery fluid) leakage, fire or explosion.
− Do not short-circuit the batteries.
− To avoid short circuits, store unpacked batteries so that the
battery contacts do not touch one another. Ideally store the
batteries in their original packaging.
− Keep unpacked batteries away from metal objects to avoid
short circuits.
− Do not take the batteries apart.
− Do not modify the batteries in any way.
− Do not crush, deform or drill the batteries.
− Do not throw the batteries into an open fire.
− Do not heat the batteries or carry out welding or soldering
directly next to them.
− Stop using the batteries if they are damaged.
− Do not attempt to charge the batteries.
− Avoid over-discharging the batteries.
− Always change the entire set of batteries. Never mix old and
new batteries or batteries with different charges.
− Only replace the batteries with the same ore an equivalent
− battery type.
− When inserting batteries, ensure that the battery polarity is
correct (positive (+) and negative (-)).
− Remove empty batteries from the sewing machine.
− Rechargable batteries must be removed from the sewing ma-
chine before charging.

Safety
11
WARNING!
Risk to health and suffocation hazard!
Swallowing batteries can cause suffocation. It may also cause poi-
soning or internal burns if a battery which has been swallowed
then leaks.
− Do not allow children to play with the batteries.
− Only allow children to change the batteries under supervision.
− Keep batteries out of reach of children.
− Immediately consult a doctor if a battery has been swallowed.
CAUTION!
Risk of injury!
In case of malfunction or damage, electrolyte (battery fluid) may
leak from the batteries, which can cause burns if touched.
− Do not touch leaky batteries.
− Avoid all contact with leaked electrolyte.
− Should contact with leaked electrolyte occur, wipe the area
with clean water immediately.
− Immediately consult a doctor if leaked electrolyte comes into
contact with eyes.
NOTICE!
Risk of damage!
If discharged batteries remain in an appliance for too long, electro-
lyte may leak out, causing damage to the appliance.
− Remove depleted batteries from the sewing machine and dis-
pose of them according to the applicable legal requirements.

Product description
12
NOTICE!
Risk of damage!
Improper storage can damage the batteries.
− Remove batteries from the sewing machine if it is not going to
be used for an extended period of time.
− Store the batteries in a cool, dry place.
Product description
A
15
14
16
17
18
8
26
27
25
24
23
22
19
109 11 12 13
20
21

13
Product description
B
29
30
28
8Take-up lever 18 Speed switch (L=slow/H=fast)
9Thread guide 2 19 Battery compartment
10 Spool holder 20 Needle thumbscrew
11 Upper thread tensioner 21 Presser foot
12 Thread guide 1 22 Bobbin compartment
13 Bobbin holder 23 Needle plate
14 Handwheel 24 Thread eyelet
15 Bobbin winder 25 Needle clamp
16 Light switch 26 Thread guide 3
17 On/off switch 27 Thread cutter
28 Presser foot lever 30 Foot pedal connection
29 Mains adapter connection

First use
14
First use
Checking the product and package contents
NOTICE!
Risk of damage!
If you are not cautious when opening the packaging with a sharp
knife or other pointed objects, you may quickly damage the sewing
machine.
− Be very careful when opening it.
1. Remove the sewing machine from the packaging.
2. Check to make sure that the delivery is complete (see Fig.A on page 2).
3. Check the sewing machine and the individual parts for signs of damage. If any
damage is evident, do not use the sewing machine. Contact the warrantor by fol-
lowing the instructions on the warranty card.
You can connect the sewing machine to the mains supply or operate it
with batteries.
Preparing for battery operation
WARNING!
Risk of explosion or fire!
If batteries are inserted upside down, they may be short-circuited
or charged. This may result in overheating, explosion or fire.
− Make sure that the polarity is correct when inserting the bat-
tery.

First use
15
1
31
1. Remove the battery cover 31 to open the battery compartment 19 on the un-
derside of the sewing machine.
31 Battery compartment cover
2
419
2. Insert the supplied LR6 batteries 4into the corresponding slots in the battery
compartment 19 . Make sure the polarity is correct (+/–).
31
3
3. Replace the battery compartment cover 31 and snap shut. It must click audibly
into place.

First use
16
Preparing for mains operation
1
7
1. Connect the mains adapter 7to the mains adapter connector 29 on the sew-
ing machine (see Fig. 1).
2. Insert the mains plug into a properly installed and easily accessible socket.
3. To disconnect the appliance from the mains, first pull the mains plug out of the
mains socket and then pull the other end out of the mains adapter connector on
the sewing machine.
Connecting the foot pedal
CAUTION!
Risk of injury!
Careless and improper handling of the sewing machine may result
in injury.
− Please ensure that the on/off switch is not actuated when you
connect and operate the foot pedal!
− Ensure that nothing rests on the foot pedal while the sewing
machine is not in use!

First use
17
1
30 6
The sewing machine can be started/stopped using either the on/off switch 17 or the
foot pedal 6.
− Connect the foot pedal plug to the foot pedal connection 30 on the sewing ma-
chine and place the foot pedal on the floor (see Fig. 1).
The sewing machine starts when you press the foot pedal. The sewing machine stops
when you release the foot pedal.
Threading the upper thread
• When selecting thread, ensure it is suitable for sewing machines.
Unsuitable thread can quickly break while sewing.
• If the sewing machine has been supplied pre-threaded, carefully
study the thread guide before re-threading.
1. Place the sewing machine on a table or another level and dry surface.
1
LIGHT
13
2. Pull the bobbin holder out and remove the spring (see Fig. 1).

First use
18
2
LIGHT
13
3
3. Insert one of the bobbins 3supplied and then the spring onto the bobbin hold-
er 13 . Firmly press the bobbin holder (with the spring) back into the opening
(see Fig. 2).
3
14
4
8
2
4. Turn the handwheel 14 clockwise until the needle 2and the take-up lever 8
are up (see Fig. 3 and 4).
5
311 12926
2
8

First use
19
5. Pass the end of the thread through thread guide 1 12 (from right to left) (see Fig. 5).
6. From above, pass the thread between both discs of the upper thread tensioner 11
and pass it through thread guide 2 9.
7. Pull the thread through the thread guide on the take-up lever (from right to left),
then through thread guide 3 26 (from top to bottom) and then through the
thread eyelet 24 (from top to bottom) above the needle.
6
221
28
8. Thread the needle from left to right. You can also use the threader 5if necessary
(see chapter “Using the threader”) (see Fig. 6).
9. Lift the presser foot lever 28 until it snaps into place and position the thread in
the gap of the presser foot 21 .
10. Pull the thread through by approx. 10cm and position it to the rear so the end of
the thread points away from you.
• As well as a bobbin holder, the sewing machine has a spool
holder 10 for using standard spools for the upper thread.
Thread spools are used in a similar way to thread bobbins. Pull
the spool holder all the way out and place a spool of thread on
it. The threading process works exactly the same way as with
the bobbin.
• Use both holders simultaneously for 3-thread sewing (sewing
with two upper threads and one bobbin thread). Thread from
the spool holder is threaded along with thread from the bobbin
holder.

First use
20
Using the threader
1
2 5
1. Pass the wire loop of the threader 5through the eye of the needle 2from
right to left (see Fig. 1).
2. Insert the thread through the wire loop.
3. Pull the wire loop (with the thread) out through the eye of the needle.
4. Remove the thread from the wire loop.
Threading the bobbin thread
• Only use the bobbins supplied!
• The upper thread must be threaded before you thread the bobbin
thread.
1
22
1. Remove the cover of the bobbin compartment 22 by sliding it to the left (see Fig. 1).
Table of contents
Other ALDI Sewing Machine manuals