Alien ALH-9010 User manual

ALIEN TECHNOLOGY®
ALH-9010/9011
Handheld
User’s Guide
Windows Mobile
September 2012
ALH-9010
ALH-9011
ALH-9010 EMA
ALH-9011 EMA

Legal Notices
Copyright ©2012 Alien Technology Corporation. All rights reserved.
Alien Technology Corporation has intellectual property rights relating to technology embodied in the products described in this
document, including without limitation certain patents or patent pending applications in the U.S. or other countries.
This document and the products to which it pertains are distributed under licenses restricting their use, copying, distribution and
decompilation. No part of this product documentation may be reproduced in any form or byany means without the prior written consent
of Alien Technology Corporation and its licensors, if any. Third party software is copyrighted and licensed from Licensors. Alien, Alien
Technology, the Alien logo, Nanoblock, FSA, Gen2Ready, Squiggle, the Squiggle logo, Nanoscanner and other graphics, logos, and
service names used in this document are trademarks of Alien Technology Corporation in the U.S. and other countries. All other
trademarks are the property of their respective owners. U.S. Government approval required when exporting the product described in
this documentation.
Federal Acquisitions: Commercial Software -- Government Users Subject to Standard License Terms and Conditions. U.S.
Government: If this Software is being acquired by or on behalf of the U.S. Government or by a U.S. Government prime contractor or
subcontractor (at any tier), then the Government's rights in the Software and accompanying documentation shall be only as set forth in
this license; this is in accordance with 48 C.F.R. 227.7201 through 227.7202-4 (for Department of Defense (DoD) acquisitions) and
with 48 C.F.R. 2.101 and 12.212 (for non-DoD acquisitions).
DOCUMENTATION IS PROVIDED “AS IS” AND ALL EXPRESS OR IMPLIED CONDITIONS, REPRESENTATIONS AND
WARANTEES, INCLUDING ANY IMPLIED WARRANTY OF MERCHANTABILITY, FITNESS FOR A PARTICULAR PURPOSE OR
NON-INFRINGMENT ARE HEREBY DISCLAIMED, EXCEPT TO THE EXTENT THAT SUCH DISCLAIMERS ARE HELD TO BE
LEGALLY INVALID.
FCC Compliance
This equipment has been tested and found to comply with the limits for Class A digital device, pursuant to Part 15 of the FCC Rules.
These limits are designed to provide reasonable protection against harmful interference when the equipment is operated in a
commercial environment. This equipment generates, uses, and can radiate radio frequency energy and, if not installed and used in
accordance with instruction manual, may cause harmful interference with radio communications. Operation of this equipment in a
residential area is likely to cause harmful interference in which case the user will be required to correct the interference at his own
expense.
Any change or modification to this product voids the user’s authority to operate per FCC Part 15 Subpart A. Section 15.21 regulations.
Industry Canada Compliance
Operation is subject to the following two conditions: (1) this device may not cause interference and (2) this device must accept any
interference, including interference that may cause undesired operation of the device.
This device has been designed to operate with an antenna having a maximum gain of 6dBi. Antenna having a higher gain is strictly
prohibited per regulations of Industry Canada. The required antenna impedance is 50 ohms.
To reduce potential radio interference to other users, the antenna type and its gain should be so chosen that the equivalent
isotropically radiated power (EIRP) is not more than that required for successful communication.
Caution
Reader antennas should be positioned so that personnel in the area for prolonged periods may safelyremain at least 23 cm (9 in) in an
uncontrolled environment from the antenna’s surface. See FCC OET Bulletin 56 “Hazards of radio frequency and electromagnetic
fields” and Bulletin 65 “Human exposure to radio frequency electromagnetic fields.”
European Radio Compliance
This Equipment has been tested and found compliant with the following Mandatory Specifications:
EN 302 208
Electromagnetic Compatibility and Radio spectrum Matters (ERM)
Radio Frequency Identification Equipment operating in the band
865 MHz to 868 MHz with Power levels of 2w ERP.
Part 1: Technical requirements and methods of measurements.
Part 2: Harmonized EN under article 3.2 of R&TTE Directive.
EN 301 489
Electromagnetic compatibility and Radio spectrum Matters (ERM)
Electromagnetic Compatibility (EMC) standards for Radio
equipment and services:
Part 1: Common technical requirements
Part 3: Specific conditions for short-Range Devices (SRD)
operating on frequencies between 9 kHz and 40 GHz.
EN60950
Safety of information technology equipment.
This radio must be used with the external mains to DC power
adaptor, supplied with the product.
1177

TABLE OF CONTENTS
ALH-901X USER’S GUIDE
DOC. CONTROL #8102117-000 REV A
i
Alien Technology®
User’s Guide
ALH-9010, ALH-9011
September, 2012
Table of Contents
CHAPTER 1INTRODUCTION...........................................................................................................1
About this Manual..................................................................................................................................1
Who should read this manual?.......................................................................................................................1
How to use the battery correctly.....................................................................................................................1
Caution when using........................................................................................................................................1
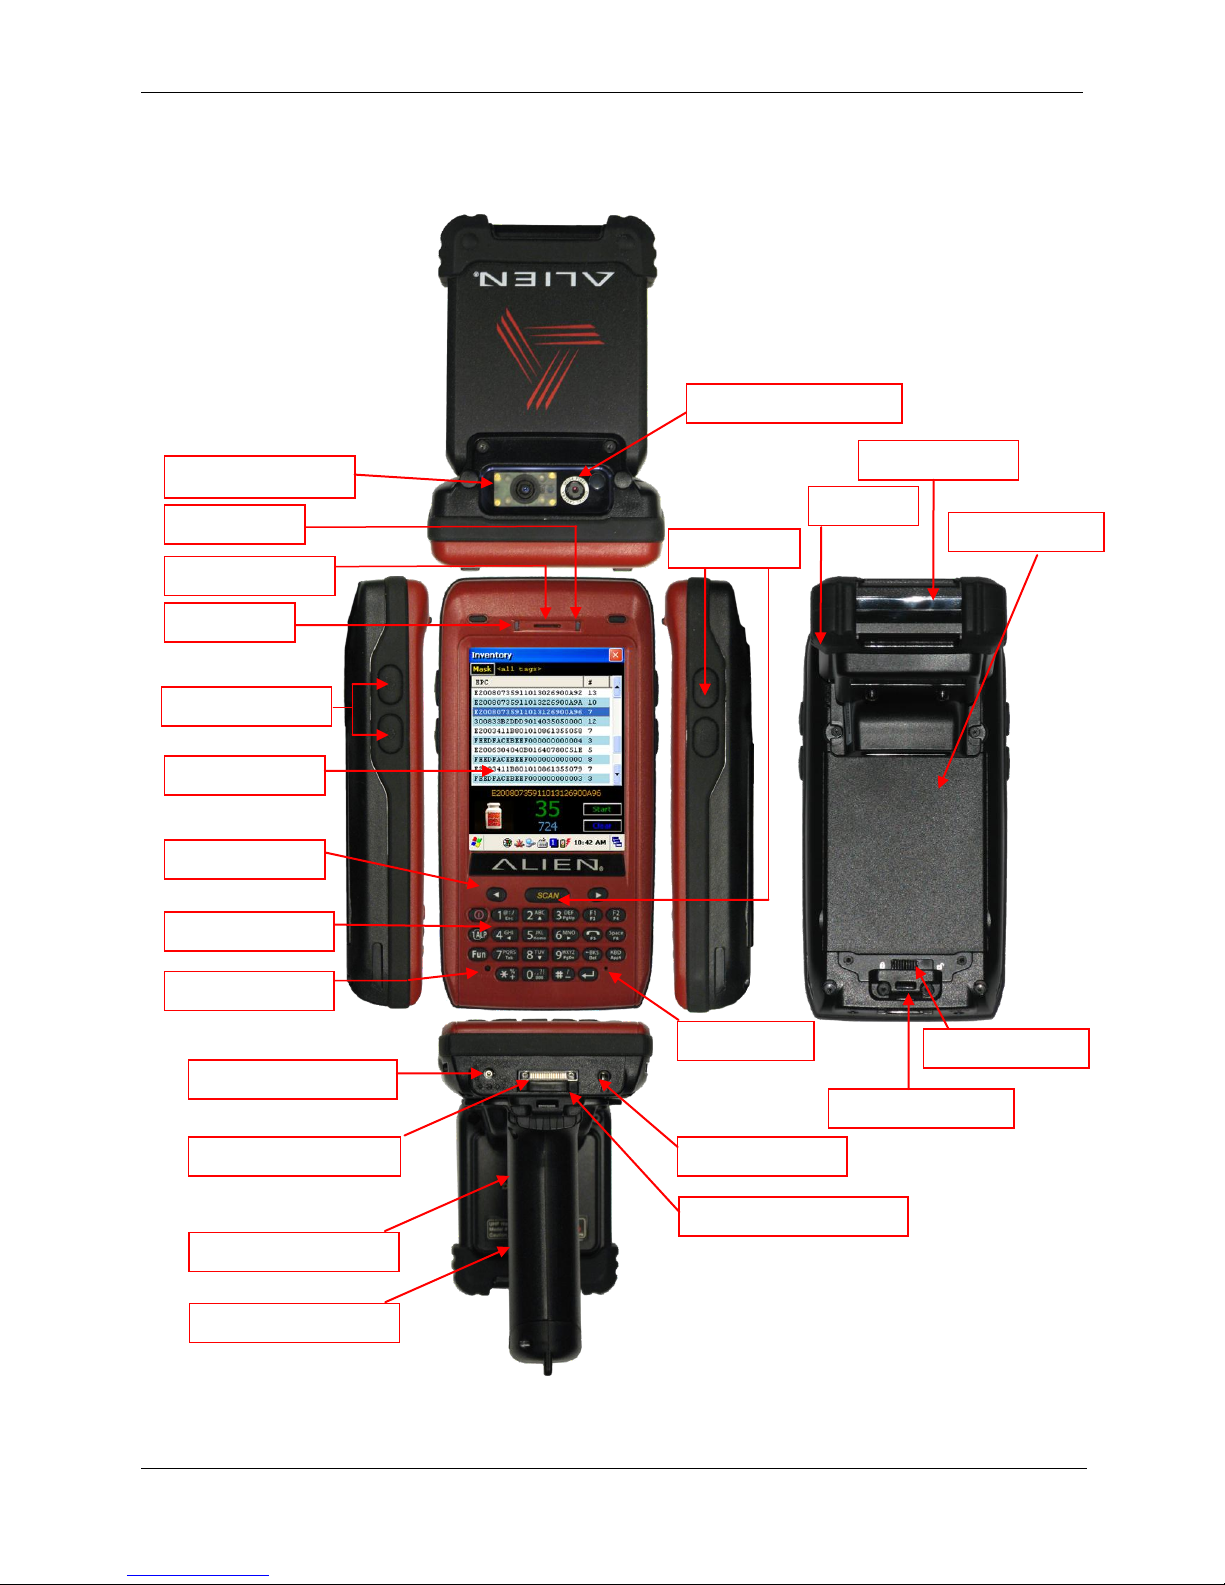
Components and Features ....................................................................................................................1
Package components.....................................................................................................................................2
Handheld Components...................................................................................................................................3
Description of Each Component.....................................................................................................................4
CHAPTER 2BASIC FUNCTIONS......................................................................................................5
Power and Battery .................................................................................................................................5
Switch On Backup Battery..............................................................................................................................5
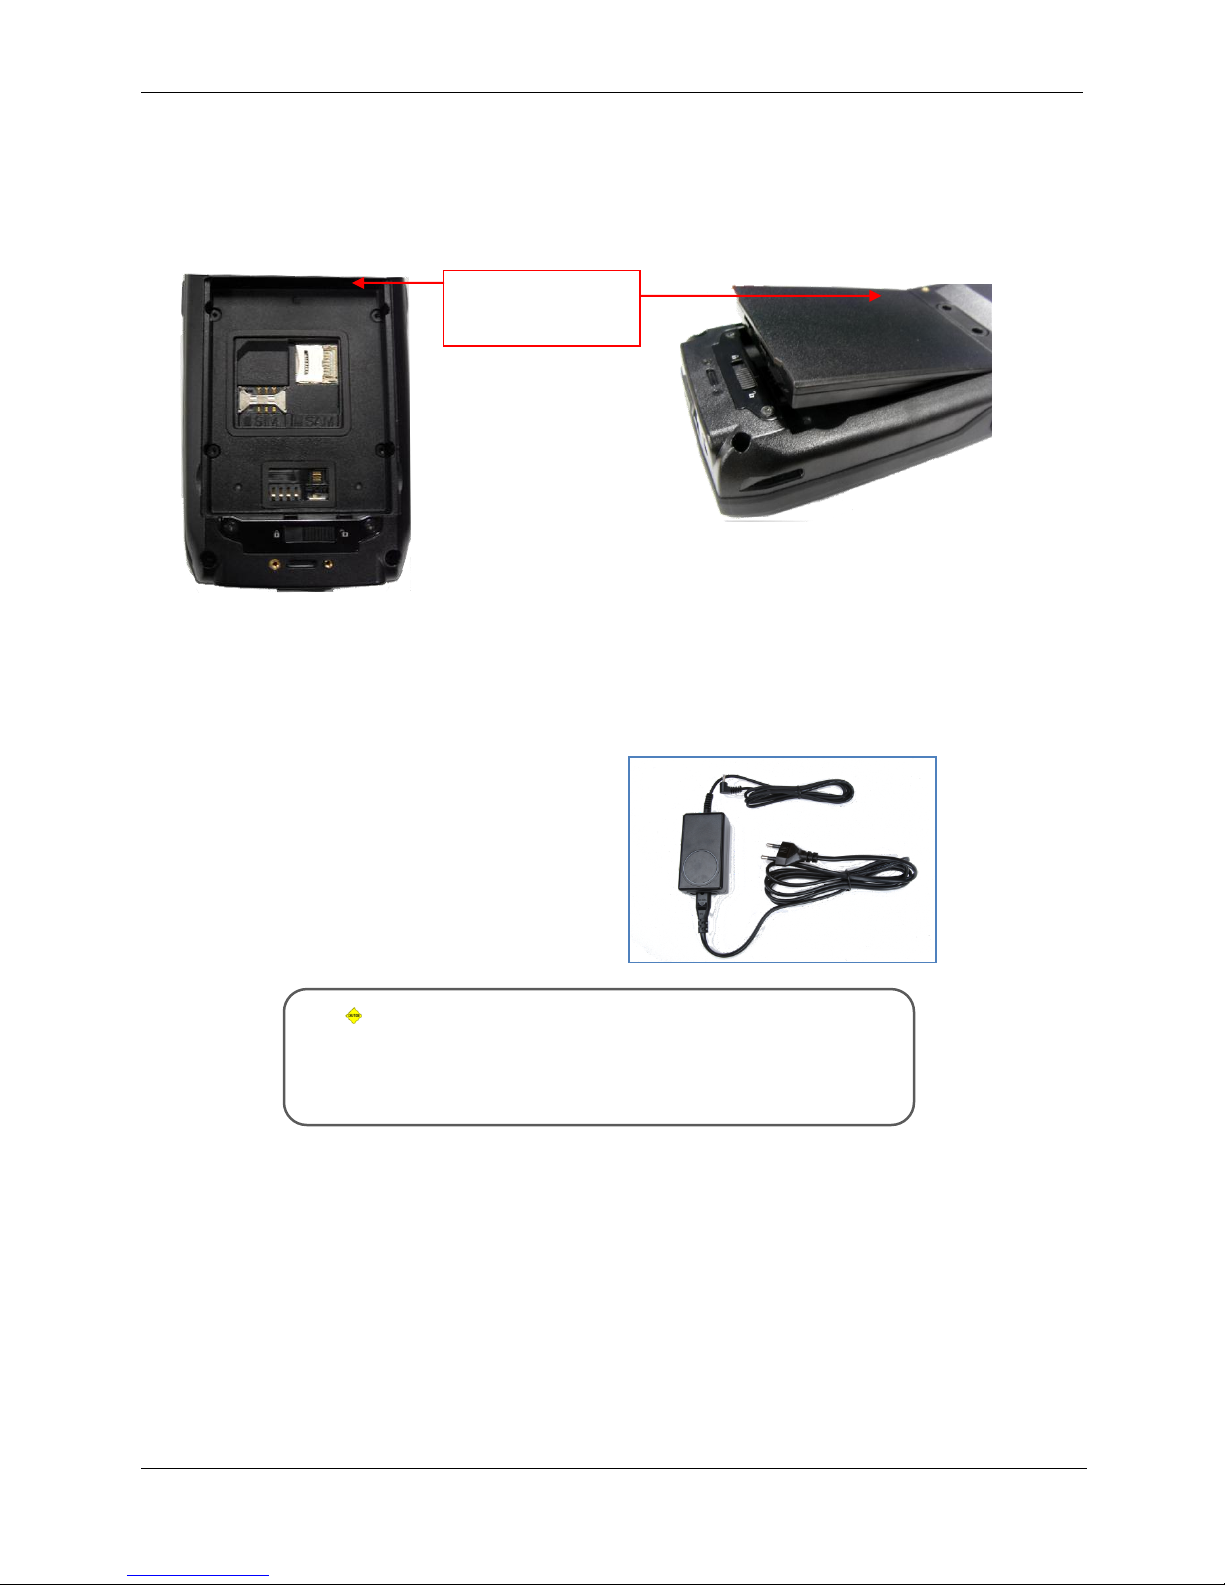
Detaching the Main Battery............................................................................................................................5
Attaching the Main Battery.............................................................................................................................6
Charging.........................................................................................................................................................6
Connecting Adapter............................................................................................................................6
Power On and Off...........................................................................................................................................7
Power On and Off With <Power> Button ...........................................................................................7
Locking the Screen.............................................................................................................................7
Power Off Automatically.....................................................................................................................8
Battery Discharging............................................................................................................................8
Checking the Battery Gauge..........................................................................................................................9
Checking Battery Gauge....................................................................................................................9
Low Power Warning...........................................................................................................................9
Backup Battery...............................................................................................................................................9
Disposal of Battery.........................................................................................................................................9
System Reset.......................................................................................................................................10
Soft (Warm) Reset........................................................................................................................................10
Soft Reset.........................................................................................................................................10
Hard (Cold) Reset ........................................................................................................................................10
Hard Reset.......................................................................................................................................10
Using a MicroSD Card.........................................................................................................................10
Installing a MicroSD Card.............................................................................................................................11
System Settings...................................................................................................................................12
Setting Screen Contrast...............................................................................................................................12
Screen Calibration........................................................................................................................................13
Setting System Sounds................................................................................................................................13
Setting the Date and Time............................................................................................................................14
Using the Keypad.................................................................................................................................14
Entering Data ...............................................................................................................................................15
Using the <Fun> Button ...............................................................................................................................15
Using the Soft Input Panel...................................................................................................................15
Using the Stylus...................................................................................................................................16
Using ActiveSync.................................................................................................................................16
Installing Microsoft ActiveSync Program ......................................................................................................16
Handheld Firmware..............................................................................................................................17

TABLE OF CONTENTS
ALH-901X USER’S GUIDE
DOC. CONTROL #8102117-000 REV A
ii
Boot Menu............................................................................................................................................18
CHAPTER 3RFID TAG READER ..................................................................................................20
Starting theALH-901x RFID Demo Software.......................................................................................20
Inventory Utility ....................................................................................................................................21
Geiger Tag Utility..................................................................................................................................22
Tag Access Utility.................................................................................................................................23
Basic Access Tab .........................................................................................................................................23
Advanced Access Tab..................................................................................................................................25
Tag Mask..............................................................................................................................................27
Tag Mask –Scan..........................................................................................................................................28
Tag Mask –Specify ......................................................................................................................................28
Tag Mask –Presets......................................................................................................................................30
Tag Mask –Assets .......................................................................................................................................30
Reader Settings...................................................................................................................................33
CHAPTER 4BARCODE SCANNER (1D &2D)................................................................................34
Barcode Demo.....................................................................................................................................34
Setting Barcode Symbology ................................................................................................................35
Barcode Scanning Beam Position.......................................................................................................35
Correct Scanning Beam Position .................................................................................................................35
Incorrect Scanning Beam Position ...............................................................................................................35
CHAPTER 5WIRELESS LAN .......................................................................................................36
Powering Up the WLAN Radio ............................................................................................................36
Configuring the WLAN Connection......................................................................................................36
CHAPTER 6BLUETOOTH.............................................................................................................38
Turning on Bluetooth............................................................................................................................38
Connecting Bluetooth Printers (SPP) ..................................................................................................39
CHAPTER 7USING GPS .............................................................................................................41
Running the GPS Demo Program .......................................................................................................41
CHAPTER 8USING THE CAMERA.................................................................................................42
Using the Camera................................................................................................................................42
CHAPTER 9USING A SIM CARD ..................................................................................................44
Installing SIM Card.......................................................................................................................................44
Turning on the 3G Phone.............................................................................................................................44
Creating the 3G Network Connection...........................................................................................................45
Making the 3G Network Connection.............................................................................................................46
APPENDIX ....................................................................................................................................47
Configuration........................................................................................................................................47

CHAPTER 1 INTRODUCTION
ALH-901X USER’S GUIDE
DOC. CONTROL #8102117-000 REV A
1
Chapter 1
Introduction
About this Manual
This manual provides you with safety information, technical support information, and sources for
additional product information.
Who should read this manual?
This manual is written for the person who is responsible for installing, configuring, and maintaining
the ALH-9010/9011 (“ALH-901x”) handheld. This manual provides you with information about the
features of the ALH-901x, and how to install, configure, operate, and maintain it. Before you work
with the ALH-901x, you should be familiar with your network and general networking terms, such as
IP address.
Before you handle and operate your ALH-901x, please read through and become familiar with the
contents of this manual.
How to use the battery correctly
Do not touch the terminals of the battery with any metal objects.
If you do not use the battery for a long time after charging, keep it at room temperature.
Depending on the age of the battery and the operating time while using it, the charge
capacity can be reduced.
You must charge the device with only the provided adaptor.
Caution when using
Careless use or repair attempts may damage the unit or stored data. Alien is not
responsible for this damage, so important data should be kept separately.
If you have a problem, do not try to repair or disassemble the product yourself; please
contact Alien customer service.
Do not use where devices sensitive to electromagnetic radiation are operating, such as a
hospital, airplane, etc., or risk of interference may occur.
The unit may malfunction at very high or low temperatures, or in a very humid
environment.
Please do not use sharp objects to touch the screen, or damage may result. Use only soft
objects, like your finger or the included stylus, on the touchscreen.
Components and Features
The ALH-901x mobile computer is a small, ergonomically designed PDA, built on the Microsoft
Windows Mobile 6.5 operating system. The PDA is equipped with an RFID tag reader, MicroSD
card reader, 1D or 2D barcode scanner, and optional 3G wireless modem, GPS and camera
modules.

INTRODUCTION CHAPTER 1
ALH-901X USER’S GUIDE
DOC. CONTROL #8102117-000 REV A
2
Package components
After opening the product packaging box, check the items listed as below. If there are missing or
defective items, please contact the Alien customer support, or your place of purchase.
Protective Film
Adaptor and AC Cable
USB Sync Cable
Stylus
Main Battery
Hand Strap
Cradle
ALH-901x Body
Pistol Grip

CHAPTER 1 INTRODUCTION
ALH-901X USER’S GUIDE
DOC. CONTROL #8102117-000 REV A
3
Handheld Components
Barcode Scanner
Camera (ALH-9011)
RFID Reader
Handstrap Hole
Speaker
Main Battery
Battery Latch
F7/F8 F9
Volume
Buttons
Microphone
DC Power Jack
Earphone Jack
Cradle Connector
USB Sync Connector
WLAN LED
Phone Speaker
Power
LED
Touch Screen
Keypad
L/R Arrow Key
Reset Button
Pistol Grip
Trigger Button (F19)

INTRODUCTION CHAPTER 1
ALH-901X USER’S GUIDE
DOC. CONTROL #8102117-000 REV A
4
Description of Each Component
Part
Descriptions
UHF Reader
The 900MHz UHF RFID tag reader module.
1D/2D Barcode Scanner
The laser beam is emitted through this window. Do not look directly at the
laser!
Reset Button
Enables you to perform a Soft Reset. Press along with the <Power> button
to perform a Hard Reset.
Microphone
Records audio from the surrounding environment.
WLAN LED
Indicates WLAN power on-off status.
Battery Latch
Allows you to detach the main battery.
Main Battery
Provides primary power to the unit.
Volume Buttons
Adjusts the volume, when you also press the <Fun> button.
Function Buttons (F7, F8)
Allows you to perform common actions.
Function Button (F9)
Allows you to perform common actions, like scan for an RFID tag.
Speaker
Built-in speaker emits various sound effects.
USB Sync Connector
Allows you to connect and send data to a PC via a USB sync cable.
Earphone Jack
Allows you to connect earphones.
L/R Arrow Key
Moves the cursor left and right. When also pressing the <Fun> button,
moves the cursor up and down.
Power LED
Illuminates red when the battery is charging and green when it is fully
charged.
Cradle Connector
Interfaces with the cradle, when docked.
Camera (ALR-9011)
Allows you to capture and store photographic images.
Cradle Connector
Enables you to sync with a PC, while charging the batteries.
Keypad
Allows you to input key presses (numbers, letters, and symbols).
Touchscreen
Displays running programs, and allows you to control them directly, using
the stylus and touchscreen.
Hand Strap Hole
Enables you to attach the hand strap and/or stylus in a convenient location,
while using the device for a long period of time.

CHAPTER 2 BASIC FUNCTIONS
ALH-901X USER’S GUIDE
DOC. CONTROL #8102117-000 REV A
5
Chapter 2
Basic Functions
Power and Battery
The ALH-901x battery system is composed of main battery, an optional pistol grip battery, and a
backup battery. The main battery supplies the power to the system and RAM which retains saved
data. A backup battery saves the data in RAM in the situation where the main battery is
discharged completely.
Main Battery: 3,000mAh, 3.7v Lithium–Polymer
Pistol-Grip Battery (optional): 4,400mAh, 3.7v Lithium-Ion
Backup Battery: 100mAh, 3.7v Lithium–Polymer
Switch on the backup battery when first setting up the ALH-901x, and then install the main battery
and charge it completely.
Switch On Backup Battery
The image below shows the battery compartment, after the main battery has already been
removed. Slide the lever to the right to switch on the backup battery.
Re-attach the main battery to the back battery compartment of the PDA. Confirm that the battery
latch locked firmly (see below).
Connect the adaptor to the PDA adaptor connecting jack, and check to make sure the Power LED
is illuminated red, and then allow it to charge completely until it the Power LED turns green.
Detaching the Main Battery
The images below show the back-bottom of the handheld unit. Slide the battery latch to the right
(UNLOCK side), and then lift the main battery out of the compartment along both sides of groove.
Backup Battery Switch
Both sides of groove
Battery Latch

BASIC FUNCTIONS CHAPTER 2
ALH-901X USER’S GUIDE
DOC. CONTROL #8102117-000 REV A
6
Attaching the Main Battery
Put the top part of battery into the upward groove, and then press down on the bottom part of the
battery into the battery compartment. Slide the battery latch to the left (LOCK side) to attach the
battery firmly.
Charging
You must charge the battery only with the provided adapter or cradle. The Power LED illuminates
red while charging and green when charging is complete.
Connecting Adapter
1. Plug the adapter cable to 110V socket.
2. Connect adapter DC cable to the power
connecting jack of the main body.
3. “Power LED”is red while charging.
Caution:
You must charge the battery by using only the dedicated adapter
provided by Alien, or your device may be damaged.
R/L Battery
Attaching Groove

CHAPTER 2 BASIC FUNCTIONS
ALH-901X USER’S GUIDE
DOC. CONTROL #8102117-000 REV A
7
Power On and Off
Pressing the <Power> button once causes the device to enter low-power (sleep) mode. Pressing
<Power> button once again activates the system.
Power On and Off With <Power> Button
Even though the unit’s power is off, the data stored in RAM will be saved, and those programs
which have been running before the power was turned off will resume where they left off. If the
main battery and backup battery are both discharged, the RAM data will disappear and the system
will be start up as if from a cold reboot.
Locking the Screen
You can lock the screen on the unit, but still be able to see the clock and status bar at the top.
Click the Start button, and then the Lock icon next to it to lock the screen.
Power Off:
1. When the system is on, press the <Power>
button for a couple of seconds and the
backlight will be turned off and it will enter
the low-power sleep mode.
Power On:
1. When the system is off, press the <Power>
button quickly, and the backlight will turn on
and wake up the system.
2. The power will be turned on automatically
when you connect to the ActiveSync USB
cable.
Power Button
Start button
Taskbar
Lock

BASIC FUNCTIONS CHAPTER 2
ALH-901X USER’S GUIDE
DOC. CONTROL #8102117-000 REV A
8
To unlock the locked screen, you swipe across the slider at the top of the screen.
Power Off Automatically
If the device has not been used for a period of time, the system will enter low-power (sleep) mode
automatically. Carefully setting the sleep mode time in the Power Management control panel can
save power and prolong the life of the battery.
[Start] > [Settings] > [Power] > [Advanced]
Battery Discharging
If the main battery discharges completely while the system is turned on, the device will go into
low-power (sleep) mode automatically, and even pressing the <Power> button will not cause the
system to turn on. In this case, you should fully charge the main battery and then press the
<Power> button to turn on the handheld.
You can also click the status bar at the top,
and then the <Power> icon to enter this
screen.
To reactivate the device after it has
gone to sleep automatically, press
the <Power> button.
Status Bar
Slide to Unlock
Clock Display
Power Icon

CHAPTER 2 BASIC FUNCTIONS
ALH-901X USER’S GUIDE
DOC. CONTROL #8102117-000 REV A
9
Checking the Battery Gauge
Battery life is largely affected by the user’s usage habits. The battery may need up to twelve hours
to charge completely.
Checking Battery Gauge
[Start] > [Settings] > [Power] > [Battery]
Low Power Warning
If the remaining battery charge cannot support the running system any more, a low power warning
message window will appear on the screen. You will need to press the <Power> button to turn off
the power, and charge the battery as soon as possible.
Backup Battery
The backup battery can safely maintain the RAM data, even when the main battery is discharged
completely.
Disposal of Battery
If the battery becomes damaged or reaches its end-of-life, you need to purchase a new one.
Please dispose the used batteries in an approved location.
Caution:
If the main battery and the backup battery are both discharged, the RAM data will be
lost. Any unsaved data in the running programs will be lost. After charging and
rebooting, the system will not be restored to its previous state.

BASIC FUNCTIONS CHAPTER 2
ALH-901X USER’S GUIDE
DOC. CONTROL #8102117-000 REV A
10
System Reset
If there is no response from the handheld, or an application is locked up and stops responding,
then a reset of the handheld may be necessary. Resetting the system is also required when you
want to upgrade firmware,
Soft (Warm) Reset
If there is no response from the system, you should first perform a soft reset. A soft reset will halt
running programs and the user memory will be deleted. Installed programs and saved data are not
affected. Use the stylus pen to press <Reset> button briefly. The screen will go black momentarily
before the system reboots again.
Soft Reset
Press Reset button.
System will reboot.
Desktop appears in about ten seconds.
Your registry information, copied files,
and installed programs are all retained.
Hard (Cold) Reset
A Hard Reset (which is sometimes called a Cold Reset) initializes the hardware completely. The
user’s installed programs, files, and registry values will be retained, but the real-time data and
date/time will be reset. You need to reset the time and date after performed Hard Reset. You
should only perform a Hard Reset when the Soft Reset fails to restore the system. Hold the
<Power> button while using the stylus pen to press the <Reset> button, then release both of them
simultaneously. The screen will go black momentarily before the system restarts again.
Hard Reset
Press Power and Reset buttons together.
System will reboot.
Desktop reappears in about ten seconds.
Time & date window will pop up and need
to be reconfigured.
Using a MicroSD Card
The image below is with the battery compartment off. There is one MicroSD card slot, and one
SIM card slot. Instructions for inserting and configuring a SIM card, for 3G network
communications, are given in the chapter, “Using a SIM Card”.
Reset Button
Reset Button
Power Button
MicroSD Card Slot
SIM Card Slot
SAM Card Slot
(unused; may not be present)

CHAPTER 2 BASIC FUNCTIONS
ALH-901X USER’S GUIDE
DOC. CONTROL #8102117-000 REV A
11
Installing a MicroSD Card
You can find the MicroSD memory card icon in the File Explorer, after inserting the MicroSD card.
Carefully slide the metal cover to the
right, along the direction of the arrow,
to open it.
Lift the cover up along arrow direction.
Set the MicroSD card into the slot and
lower the cover again.
Slide the cover to the left to lock it, and
reattach the main battery.

BASIC FUNCTIONS CHAPTER 2
ALH-901X USER’S GUIDE
DOC. CONTROL #8102117-000 REV A
12
System Settings
Most of the system settings can be changed through the Settings control panel, which is accessed
via the Start button.
Setting Screen Contrast
The screen brightness/contrast is one of the biggest parts of your power consumption, so you may
need to adjust it to suit your actual needs.
[Start] > [Settings] > [System] > [Contrast]
A lighter contrast makes a brighter screen, and will consume battery power faster than a darker
contrast. You can also control how long before the screen automatically dims, in the Backlight
control panel.
Start button
Settings
control panel

CHAPTER 2 BASIC FUNCTIONS
ALH-901X USER’S GUIDE
DOC. CONTROL #8102117-000 REV A
13
Screen Calibration
The first time the device is used, or if you haven’t used the device for a long time, you may find that
you cannot accurately select the place where you touch with the stylus. In this case, you need to
perform the screen calibration.
[Start] > [Settings] > [System] > [Screen] > [Align Screen]
Press and hold the stylus pen briefly on the center of the cross symbol, and repeat five times as it
moves around the screen.
Setting System Sounds
You can set which system sounds are enabled (including vibrations) in the Sounds & Notifications
control panel.
[Start] > [Settings] > [Sounds & Notifications]
You can adjust the volume quickly by folding the Fun button while pressing the Up and Down
button along the left side of the unit.

BASIC FUNCTIONS CHAPTER 2
ALH-901X USER’S GUIDE
DOC. CONTROL #8102117-000 REV A
14
Setting the Date and Time
[Start] > [Settings] > [Clocks & Alarms]
Using the Keypad
The physical keypad enables you to input numbers, letters and special symbols. You can also
execute other preset functions with the <Fun> button.
If you’d like to change the current input mode, press the <1 ALP> button on the keypad as it steps
through the following sequence:
“1” (Numeric) -> “a” (lowercase letters) -> “A”(uppercase letters) -> “1”
You can also change input modes by using the Status Bar icon:
Clicking the Status Bar, and then the
Input Mode icon also allows you to
change the input mode.

CHAPTER 2 BASIC FUNCTIONS
ALH-901X USER’S GUIDE
DOC. CONTROL #8102117-000 REV A
15
Entering Data
Numeric Keypad Mode, “1”: Press the <1 ALP> button or keypad icon on the taskbar to change
to the numeric mode. Pressing a keypad button will directly enter the number printed on that key.
Alphabet Keypad Mode, “A,a”:Press the <1 ALP> button or keypad icon on the taskbar to
change to the lowercase (a) or uppercase (A) mode. Each keypad button has 2-4 letters or
symbols. Pressing the button once causes the first letter or symbol to be entered; quickly pressing
twice causes the second letter or symbol to be entered, and the third letter or symbol requires the
button to be pressed three times quickly.
Using the <Fun> Button
Pressing <Fun> button and other buttons simultaneously can activate various functions, as below:
Fun + Button
Descriptions
<Esc>
Cancels the selected command or the program’s current task.
Volume button
<Up>, <Down>
Increases or decreases the sound volume.
<3>,<9>
Performs page-Up or page-Down operations.
<2>,<4>,<5>,<6>,<8>
Moves the cursor Left, Right, Up, Down, and Home.
<Del>
Deletes a letter located to the right of the cursor.
<7>
Works like a Tab key.
<*>,<0>,<#>
Enables you to input +, 000, and –symbols.
<F3>,<F4>
Enables you to use as two additional function buttons.
Using the Soft Input Panel
Sometimes, when entering data on-screen, it is easier to use the stylus and the soft input panel to
enter text. You can configure the layout of the soft input panel in the Input Panel control panel.
Clicking the software input panel
(keyboard) icon on the taskbar
brings up the on-screen keypad.
Tap on the on-screen keys and the
characters are entered wherever the
insertion cursor is.

BASIC FUNCTIONS CHAPTER 2
ALH-901X USER’S GUIDE
DOC. CONTROL #8102117-000 REV A
16
Using the Stylus
You can tie the stylus to the hole in the hand strap connector, to allow you to use the stylus like a
mouse on a PC. The hand strap has a small integrated holster for storing the stylus safely.
Using ActiveSync
The ActiveSync interface synchronizes data between the PC and handheld device, so that you
can install programs, copy, transition, and delete data, etc.
Installing Microsoft ActiveSync Program
Download the latest version of the ActiveSync program from the Microsoft website, and install it to
your PC. http://www.microsoft.com/downloads/
Caution:
You must use ActiveSync v3.7 version or later.
Caution:
Please do not use sharp objects on the touch screen. Use only the supplied
stylus; otherwise you could seriously damage the touch screen.
Use the stylus to:
Select a letter on the onscreen soft keypad.
Select a program on the desktop or taskbar.
Select a button, tab bar, or other control in an
application window.
Click the [Next] button.
Designate the installation folder, and then click
the <Next> button.
This manual suits for next models
2
Table of contents
Other Alien Handheld manuals