Allied LEISTER VULCAN SYSTEM User manual

VULCAN
SYSTEM
®

Wiring Diagram
Alarm
ON
F1
max 3A
NO
OFF
COM
K1 K1 K1
PE
L1
Power
L1
F2
L2
L3
L2 L3
S1
S2
N
P
L2
L3
L1
Display
COM
NO
Power
Alarm

Operating Instructions
Hot air blower
VULCAN SYSTEM
Application
The hot air blower VULCAN SYSTEM is suitable for building into machines, installations or appliances and is
designed for continuous operation.
Its most important applications include; drying and heating, thawing, accelerating and removal, sterilising,
smoothing, polishing, activation and dissolving, separating and fusing, shrinking, removal.
GB
Please read operating instructions carefully before use
and keep for future reference.
Danger of death when opening the device, as live parts and connections are
exposed. The device must be fully disconnected from the mains before opening it.
Incorrect use of the hot air blower can present a fire and explosion hazard
especially near combustable materials and explosive gases.
Warning
Danger – can cause burns! Do not touch the heating element tube and nozzle
while they are hot. Allow the device to cool. Do not direct hot-air stream towards
people or animals.
Devices of protection class I must be earthed with a protective earth conductor.
Keep away from wet and damp areas.
The device must not be left unattended when in use.
Heat can reach combustible materials which are out of sight. The device may only
be used by trained personnel or under their supervision. Children may not use
the device under any circumstances.
The nominal voltage indicated on the device must correspond to the mains
voltage. EN 61000-3-11; Zmax = 0.033 Ω+ j 0.021 Ω.
If necessary, consult your
electricity supply utility.
230
400
Caution
Congratulations on purchasing a
VULCAN SYSTEM!
You have chosen a top-class hot air blower by Leister, made from high-quality materials. Every VULCAN
SYSTEM undergoes stringent quality checks before leaving the factory in Switzerland.

Disposal
Electrical equipment, accessories and packaging should be recycled in an environmentally friendly
way. For EU countries only: Do not dispose of electrical equipment with household refuse!

Technical Data
• Heat output steplessly adjustable with potentiometer
• Integrated power electronics
• Protection against heating element or device overheating
• Brushless blower motor with FC control
• Alarm output
• Integrated temperature control
• Integrated temperature probe
• Display for showing the setpoint and actual values (°C or °F)
Voltage V~ 3×230 3 ×400 3×480
Power consumption kW 610 611 6 11
Frequency Hz 50/ 60 50 / 60 50 / 60
Max. air outlet
temperature °C 650 650 650
Max. air inlet
temperature °C 65 65 65
Air volume (20°C) l/min. 850/1500 950 / 1700 950 / 1700
Max. static pressure Pa 3100/4000 3100 / 4000 3100 / 4000
Emission level LpA (dB) 65 65 65
Weight kg
without power supply cord 9.3 9.3 9.3
Dimensions Page 3 (Size) Page 3 (Size) Page 3 (Size)
Mark of conformity
Approval mark
Protection class I
Technical data and specifications are subject to change without prior notice
Mains voltage cannot be switched over

Relay output
Max. voltages AC 250V, DC 30V
Max. currents AC 3A, DC 3A
Max. contact resistance 100mOhm at DC 6V / 1A
Relay contact SPST-NO
Insulation IEC/EN 60065 AC 2000V (50-60Hz) 1min
Technical data for interface
Technical data internal dip switch
Signal inputs
with reverse polarity protection
and zero point correction
Insulation IEC/EN 60747-5-2 AC 1414VPeak
Voltage input Uc in relation to
GND iso
DC 0-10V
(Rippel < 0.05V at
5°C resolution)
(Rippel < 0.1V at
1% resolution)
Max. input voltage DC 12V
Nominal input resistance 280kOhm
Current input Ic (2 - conductor
technology)
DC 4…20mA
(Rippel < 0.1mA at
5°C resolution)
(Rippel < 0.15mA at
1% resolution)
Max. input current DC 22mA
Nominal input resistance 160Ohm
Supply
with reverse polarity protection
without separation of the
signal inputs
Operating voltage Us in relation to
GND iso DC 15…24V
Max. operating voltage DC 25V
Power consumption 12mA at DC 24V
CAUTION : When fixing the tool into an installation, the mains connection must have a suitable de-
vice for disconnect all poles from the mains with a 3 mm distance between contacts.
Alarm contact: SPST–NO 250VAC / 30VDC, 3A cos
ϕ
= 1
Open Loop or Closed Loop
Power setting function Setting level OFF…100%;
1% steps
Temperature control function Setpoint value specification
50°C…650°C, 5°C steps
Setpoint setting
Potentiometer or
interface
Internal potentiometer Setpoint value OFF…100% or
50°C …650°C
Interface Setpoint value OFF…100% or
50°C …650°C

Device description
1Cable gland for mains connection
(mounted ex works)
2 Locking screw for frequency converter
(mounted ex works)
3Locking screw for alarm relay
(mounted ex works)
4 Locking screw for interface
(mounted ex works)
5 Cable gland for frequency converter
(enclosed in the connection housing)
6Cable gland for alarm relay
(enclosed in the connection housing)
7 Cable gland for interface
(enclosed in the connection housing)
8 Flange ø 60 mm
9 Air slide
10 Potentiometer for temperature setting
11 Display
12 Connection and housing cover
13 Screws for connection housing
14 Heating element tube
15 Mounting base
16 Blower motor
Preparation
• Remove VULCAN SYSTEM from the packaging.
• Remove the connection housing cover (12) by loosening the screws (13).
• Remove warning slip, read carefully and keep at hand for consultation.
•
Remove locking screws (mounted ex works) for the frequency converter (2), alarm relay (3) and interface (4).
• Mount the enclosed cable glands for the frequency converter (5), alarm relay (6) and interface (7), if
required.
• If no interface or FU/FC (frequency converter) is used, the cable glands (5/7) must be removed and the locking
screws (2/4) mounted.
1
2
3
4
8
9
10
11 12
14
15
16
13
5
6
7

Nozzles / Reflector - change
Danger – can cause burns! Do not touch the heating element tube and nozzle while they are hot.
Allow the tool to cool down before replacing the nozzle or reflector.
Installation
• The installation must ensure that
– only cold air is supplied.
– no excess (heat) residue builds up.
– the device is not subject to jets of hot air from another device.
• Protect the VULCYAN SYSTEM from mechanical vibrations and shocks.
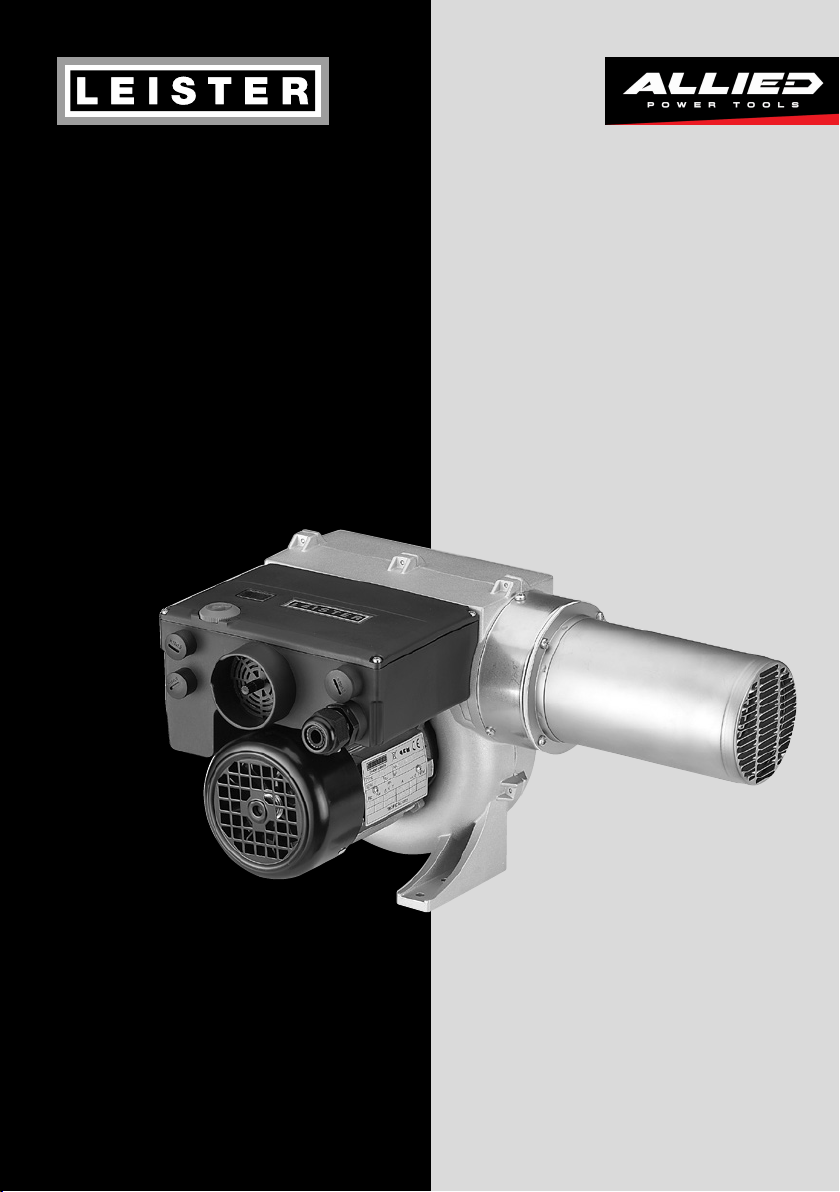
• Fasten the tool on the mounting base (15) using four screws Ø M6.
• For installation dimensions, see page 3 (Size).
Air supply
• The integrated blower serves as an air supply (note direction of rotation and compression heating).
• In order to protect the device and heating element, the specified minimum air volume must never be fallen below
and the maximum temperature (hottest point measured 3 mm in front of the heating element tube) must never
be exceeded (see technical specifications). If the minimum air volume is fallen below, the heat output must
be interrupted immediately.
• Reduce air flow as required by use of the air slide (9).
• Observe direction of air flow.
• Use Leister stainless steel filters if the air is dusty. Slides onto flange (8). In the case of particularly critical dusts
(e.g. metal, electrically conductive or damp dusts), special filters must be used to avoid short-circuits in the tool.
Attention: always operate device with air supply!
Connection
• The VULCAN SYSTEM must be connected by qualified personnel.
• A suitable device for full disconnection from the mains must be provided in the mains connection!
• It must be ensured that the connection lines do not come into contact with the heating element tube and are not
exposed to the hot air jet.
• The device must be connected in accordance with the connection diagram and the termi-
nal arrangement on page 4 (Wiring Diagram) and page 5 (Interface) of the operating instructions:
– Carry out wiring in the connection housing (12).
•ATTENTION: check dip switch settings (see chapter Configuration internal dip switch).
• Mount connection housing cover (12) with the screws (13).
• Connect VULCAN SYSTEM to the electrical mains.
• Slide corresponding nozzle or reflector onto heating element tube (14), if required.
• It must be ensured that the hot air can flow out freely, as otherwise the device can
be damaged by the excess heat building up (risk of fire!).
• Attention: comply with minimum air volume as per technical data.
• Switch on mains.
• Allow device to cool down after heating mode.
14

°C
Actual temp
Setpoint %
Open Loop mode (OPL)
Display shows power
setpoint in % and actual
temperature
Configuration internal dip switch
• Optionally dierent operating modes which are set with an integrated dip switch
Only operate the dip switch when switched o!
– Steplessly adjustable heat output via red potentiometer (10) on the device 1 2
– Steplessly adjustable heat output via interface 3 4
– Steplessly adjustable temperature via red potentiometer (10) on the device 5 6
– Steplessly adjustable temperature via interface 7 8
– Integrated temperature display in °C or °F
• The device is fitted with an integral heating element and device protection
(see chapter Function of heating element - device protection).
• Settings for selecting the various operating modes:
Mode
CLL = Closed Loop
OPL = Open Loop
Open Loop
(power set point)
OPL
Closed Loop
(temperature set point)
CLL
Display
Potentiometer mode (Pot)
°C
°F
Interface mode (Interf)
°C
°F
Function of heating element – device protection
• If the heating element or device overheats (too hot inlet air or excess heat residue), the power supply to the
heating element will be interrupted and the working contact of the alarm relay opened. After the heating element
or device protection is activated, it will be necessary to reset the VULCAN SYSTEM for reasons of safety!
• IMPORTANT: measures to take when the heating element or device protection is activated
– Disconnect device from the mains for 10 seconds
– Check air supply
– Check air volume
– Check air flow
– Reconnect device to the mains
1
2
3
4
5
6
7
8
°C
Actual temp
Setpoint
Closed Loop mode (CLL)
Display shows setpoint
temperature and actual
temperature
ON
123
ON
123
ON
123
ON
123
ON
123
ON
123
ON
123
ON
123
OPL
Pot
°C
CLL
Interf
°F
24 VDC
4–20mA-
4–20mA+
0–10 VDC
GND
3
ON
2
1
Interface
Mode

FU/ FC Frequency converter operation
Configuration frequency converter FC550
• Wiring diagram page 6
Parameters No. Default value
Min. frequency 01 20 Hz
Max. frequency 02 60 Hz
Acceleration time 03 5 s
Deceleration time 04 10 s
FC configuration 05 Pr
Parameters No. Default value
Nominal current 06 0.65 A
Nominal speed 07 2790 rpm
Nominal voltage 08 230
Motor power factor 09 0.70
Preset speed 1 18 20 – 60 Hz
Clock frequency 37 18 kHz
FU/ FC frequency converter wiring diagram
• The VULCAN SYSTEM is available in three voltage versions and the blower can be activated via the FU/FC
(frequency converter) in 3× 230V and 3× 400V.
• The following steps have to be followed to connect the frequency converter to the internal circuit:
– Remove white and brown wires from terminals 8 and 9 of the electric circuit.
– Remove capacitor (C).
– Insulate connections of the white wires from the temperature switch (T) with insulating tape and push
protruding ends back into the motor box.
3×230V 3×400V 3×480V
1 3 x 230V
2 3 x 400V
3 3 x 480V
4
5
U1
V1
W1 V2
U2
W2
12μF
9
8
T
U1
V1
W1 V2
U2
W2
4μF
9
8
T
U1
V1
W1 V2
U2
W2
2μF
9
8
T
U1
V1
W1 V2
U2
W2
U
V
W
PE
U1
V1
W1 V2
U2
W2
U
V
W
PE
C
C
C
1 3 x 230V
2 3 x 400V
3 3 x 480V
4
5
U1
V1
W1 V2
U2
W2
12μF
9
8
T
U1
V1
W1 V2
U2
W2
4μF
9
8
T
U1
V1
W1 V2
U2
W2
2μF
9
8
T
U1
V1
W1 V2
U2
W2
U
V
W
PE
U1
V1
W1 V2
U2
W2
U
V
W
PE
C
C
C
1 3 x 230V
2 3 x 400V
3 3 x 480V
4
5
U1
V1
W1 V2
U2
W2
12μF
9
8
T
U1
V1
W1 V2
U2
W2
4μF
9
8
T
U1
V1
W1 V2
U2
W2
2μF
9
8
T
U1
V1
W1 V2
U2
W2
U
V
W
PE
U1
V1
W1 V2
U2
W2
U
V
W
PE
C
C
C
Electrical
circuit Electrical
circuit Electrical
circuit
FU/FC (FC550) 3×230V FU/FC 3 ×400 – 480V
1 3 x 230V
2 3 x 400V
3 3 x 480V
4
5
U1
V1
W1 V2
U2
W2
12μF
9
8
T
U1
V1
W1 V2
U2
W2
4μF
9
8
T
U1
V1
W1 V2
U2
W2
2μF
9
8
T
U1
V1
W1 V2
U2
W2
U
V
W
PE
U1
V1
W1 V2
U2
W2
U
V
W
PE
C
C
C
1 3 x 230V
2 3 x 400V
3 3 x 480V
4
5
U1
V1
W1 V2
U2
W2
12μF
9
8
T
U1
V1
W1 V2
U2
W2
4μF
9
8
T
U1
V1
W1 V2
U2
W2
2μF
9
8
T
U1
V1
W1 V2
U2
W2
U
V
W
PE
U1
V1
W1 V2
U2
W2
U
V
W
PE
C
C
C
FU/FC external FU/FC external
Motor connection status as supplied

Training
Leister Technologies AG and its authorised service points provide free courses in the area of applications.
3D drawings
3D drawings are available from your Service Centre or at www.leister.com
Accessories
•Only Leister accessories may be used.
•Leister offers a wide range of accessories, e.g.
– Frequency converter FC 550, Art. Nr. 117.359
– Temperature controls
– Nozzles
– Reflectors
• Accessories at www.leister.com
Service and Repairs
• Repairs should only be carried out by authorised Leister Service Centres. They guarantee a correct and reliable
repair service within reasonable period, using original spare parts in accordance with the circuit diagrams and
spare parts lists.
Warranty
• For this tool, the guarantee or warranty rights granted by the relevant distributor/seller shall apply. In case of
guarantee or warranty claims any manufacturing or workmanship defects will either be repaired or replaced by the
distributor at its discretion. Warranty or guarantee rights have to be verified by an invoice or a delivery document.
Heating elements shall be excluded from warranty or guarantee.
• Additional guarantee or warranty claims shall be excluded, subject to mandatory provisions of law.
• Warranty or guarantee shall not apply to defects caused by normal wear and tear, overload or improper handling.
• Warranty or guarantee claims will be rejected for tools that have been altered or changed by the purchaser.
Display Description Fault correction
Err 01 Device temperature too high Check environment temperature
Check air intake temperature
Err 02 Heating element temperature too high Check air supply volume
Err 03 Temperature probe Check probe connection
Err 04
Err 05
Err 06
Err 07
Contact your Leister Service Centres
Error

Your authorised Service Centre is:
© Copyright by Leister
®
Allied Power Tools
12/ 76 Rushdale St, Knoxfield VIC 3180 Australia
T: + 61 3 9764 2911
W: www.alliedpowertools.com.au
Table of contents