manuals.online logo
Brands
  1. Home
  2. •
  3. Brands
  4. •
  5. Alyseum
  6. •
  7. Music Mixer
  8. •
  9. Alyseum Q-MIX User manual

Alyseum Q-MIX User manual

Q-MIXI, Q-MIX & Q-MIXO – User’s manual © - Revision 2.0 - Page 1
Q-MIX, Q-MIXI & Q-MIXO - User manual
1 Introduction
Once upon a time, needed a small audio mixer for my own case, including 4 inputs with LEVEL & PAN controls and an
adjustable stereo audio level output, all in 6HP maximum!
The challenge of this new module was multiple:
● Strong focus on ergonomics in maximum 6HP.
● Pro audio components for excellent performance.
● LINE IN & OUT connectors on the rear panel, which allows to add future extension modules.
● Large MASTER stereo output potentiometer.
● Stereo PEAK LED with memory.
● Single electronic board and a boxed power connector.
● Quality capacitors on the audio path.
I made it and, following the positive comments from my entourage, I said to myself "what about marketting it"?
I have since added a sub-mixer (Q-MIXI) and a balanced output module (Q-MIXO) with two independent headphone
outputs.
Q-MIX, Q-MIXI and Q-MIXO use quality capacitors in the audio signal path.
No DC signal can pass through the modules.
Depending on your use and needs, The Q-MIXI, Q-MIX and Q-MIXO modules can be used in 7 combinations:
● Individually
or or
Q-MIXI, Q-MIX & Q-MIXO – User’s manual © - Revision 2.0 - Page 2
● In pairs
and or and or and
● And all three together
and and
Q-MIXI, Q-MIX & Q-MIXO – User’s manual © - Revision 2.0 - Page 3
2 Table of Contents
1 Introduction ....................................................................................................................... 1
2 Table of Contents............................................................................................................... 3
3 Hardware ........................................................................................................................... 3
3.1 Package Content. ........................................................................................................... 3
3.2 Installation. .................................................................................................................... 3
3.3 Features & specifications............................................................................................... 4
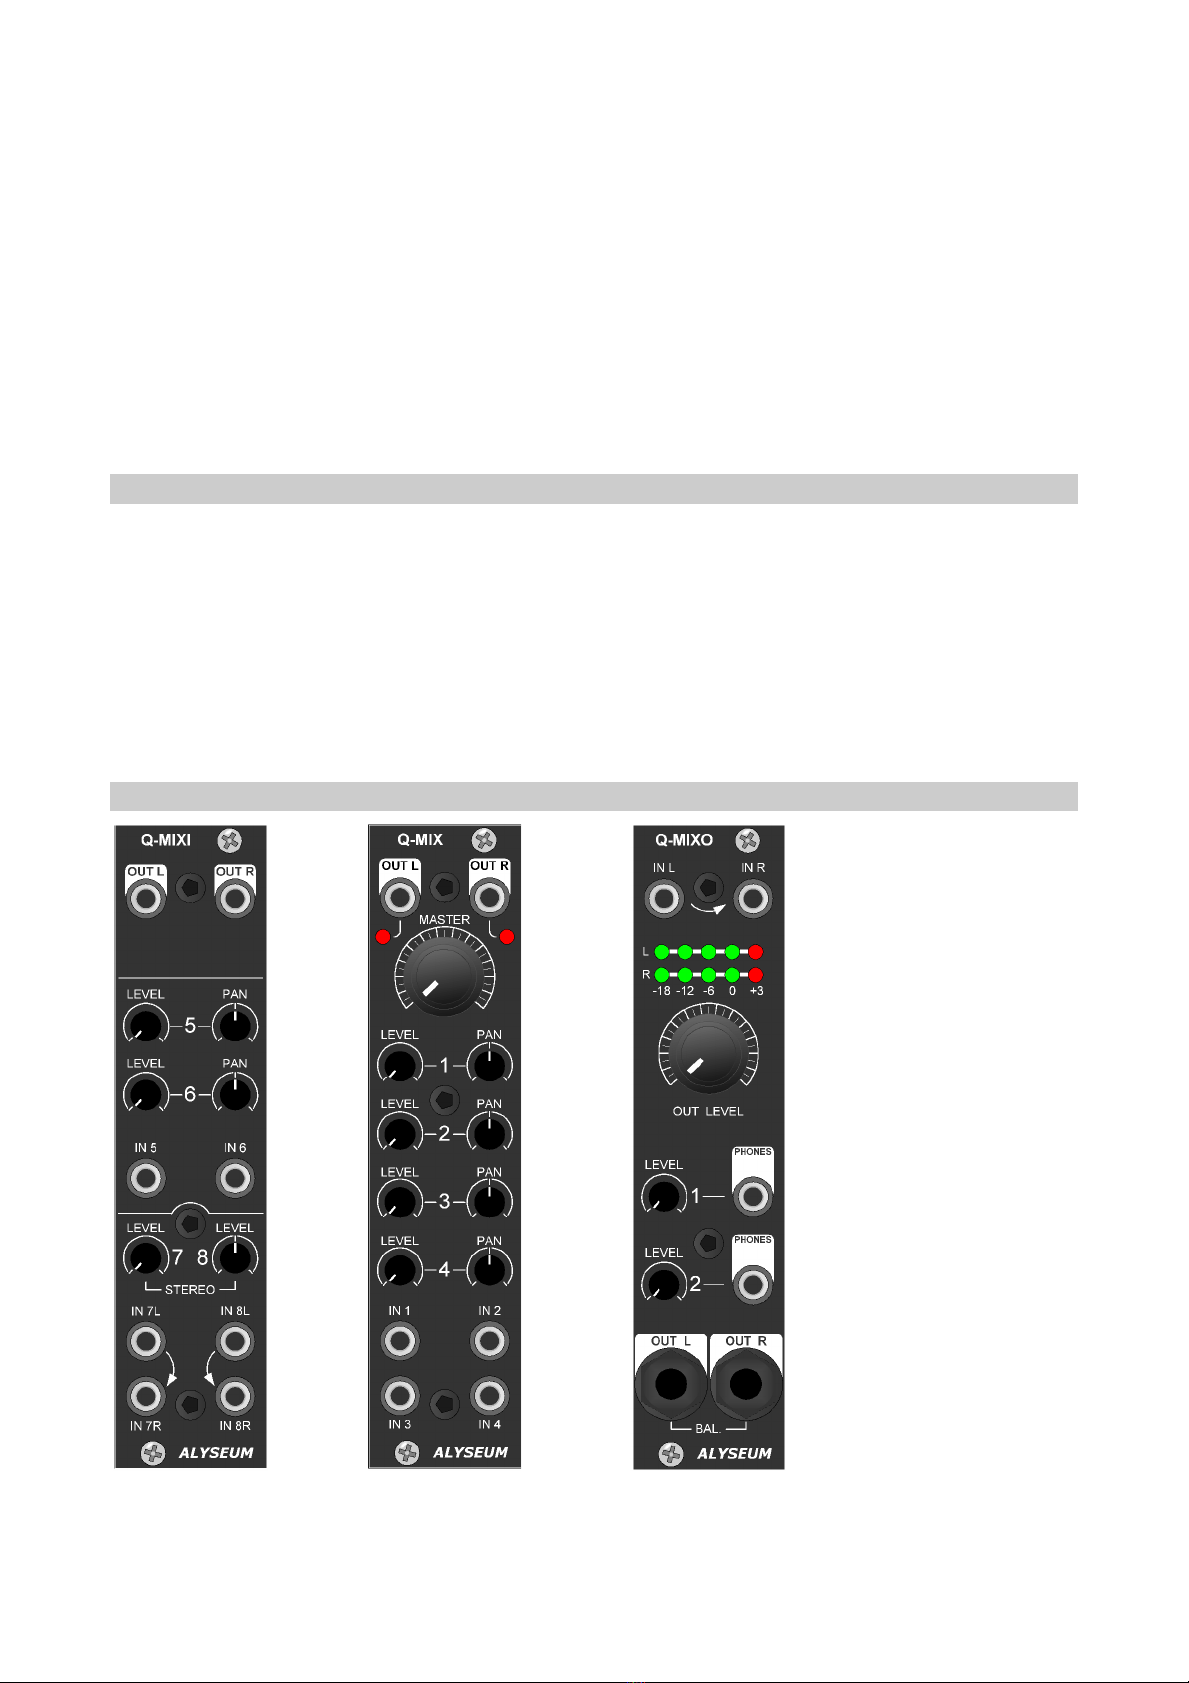
3.4 Fronts panels.................................................................................................................. 4
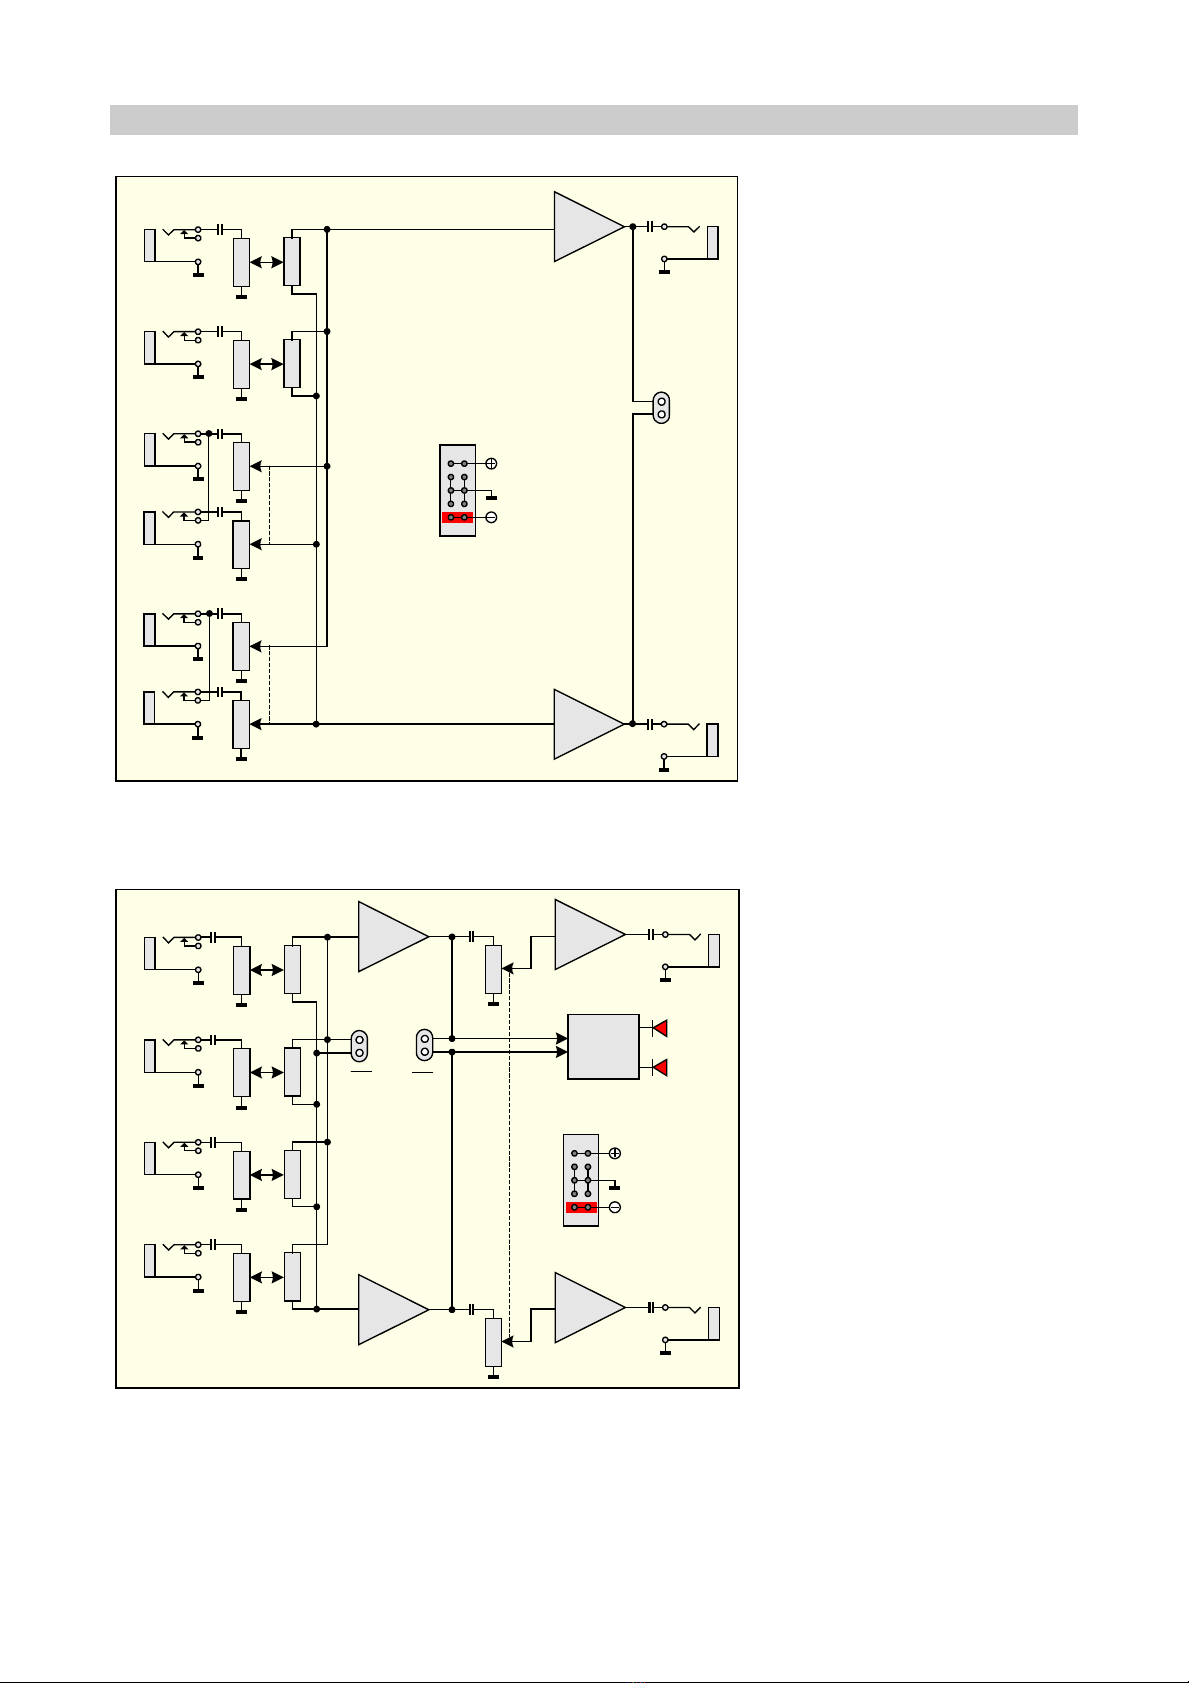
3.5 Bloc diagram. ................................................................................................................. 5
3.6 Backdoor Wiring............................................................................................................. 6
4 Use. .................................................................................................................................... 6
5 Miscellaneous .................................................................................................................... 7
5.1 Disclaimer....................................................................................................................... 7
5.2 Warranty and repair ...................................................................................................... 7
3 Hardware
3.1 Package Content.
● One Q-MIX or Q-MIXI or Q-MIXO module with Eurorack compliant front panel.
● One plastic bag containing:
o Two M3 screws + M3 nylon washers.
o One 10/16 pins power ribbon cable.
● Warranty & user manual access card.
3.2 Installation.
If you use only one of the modules, place it where you want according to your personal ergonomics.
If you use 2 or 3 of these modules, it is important to place jointly the Q-MIXI on the left, the Q-MIX in the middle and
the Q-MIXO on the right.
This is important for the rear wiring (see the chapter 3.6)
Choose the installation location of your unit carefully:
● Avoid placing it in direct sunlight or close to a source of heat.
● Avoid locations subject to vibrations, excessive dust, heat, cold, moisture or rain.
Procedure:
1. Only connect the module to a Eurorack bus board powered by a specified A-100 power supply.
Q-MIXI, Q-MIX & Q-MIXO – User’s manual © - Revision 2.0 - Page 4
2. Switch OFF and disconnect the Eurorack case from the main power supply by unplugging it from the wall
socket!
3. Make absolutely certain that the ribbon cable has the right orientation by connecting the indicated red stripe
on the negative 12 Volt side of your Eurorack case bus board.
4. Carefully place the module on an appropriately spaced spot on your Eurorack and fasten it firmly in place with
the supplied screws and nylon washers. Replace any covers or blanking plates that you removed to install the
module and screw them in firmly.
5. Reconnect the Eurorack case power cable back into the main power supply and switch the case power on.
6. If it doesn’t seem to be working as expected, immediately disconnect the system from the main power supply
again. In this case, double-check the connections, making completely sure that the ribbon cable is the right
way round where it connects to the module and the bus.
3.3 Features & specifications.
● High quality OP-AMP type LM49720
o Low distortion: less 0.0001%
o Low noise: typ. –110dB
● Power supply is fully protected against reverse ribbon cable insertion.
● Front panel width: 30 mm (6HP)
● Modules maximum depth: 26 mm
3.4 Fronts panels.
Q-MIXI, Q-MIX & Q-MIXO – User’s manual © - Revision 2.0 - Page 5
3.5 Bloc diagram.
Q-MIXI
IN 5 LEVEL PAN
IN 6 LEVEL PAN
OUT L
O.A.
OUT R
O.A.
12V
12V
LINE OUT
LEVEL
IN 7
LEVEL
IN 8
(L)
(R)
(L)
(R)
NB: if you only have a mono signal for stereo inputs 7 and 8, use the left input, it will automatically be connected to
the right input.
Q-MIX
IN 1 LEVEL PAN
IN 2 LEVEL PAN
IN 3 LEVEL PAN
IN 4 LEVEL PAN
LINE
O.A. OUT L
O.A.
O.A. OUT R
O.A.
12V
12V
PEAK
OUT L
R
MASTER OUT
IN
Q-MIXI, Q-MIX & Q-MIXO – User’s manual © - Revision 2.0 - Page 6
Q-MIXO
IN L
IN R
OUT R
12V
12V
LINE IN
LEVEL
LEVEL
LEVEL
PHONES 1
P.A.
P.A.
PHONES 2
P.A.
P.A.
B.A.
B.A.
OUT L
V.U.
V.U.
BALANCED
NB: The rear wiring from the Q-MIX is automatically cut if you insert a source into the input jacks.
3.6 Back Wiring.
Q-MIXI is equipped on its back side with a cable in a white sheath. You can connect it directly to the LINE IN socket of
the Q-MIX.
Q-MIXO is equipped on its back side with a cable in a black sheath. You can connect it directly to the LINE OUT socket
of the Q-MIX.
If you use Q-MIXI and/or Q-MIXO without the Q-MIX, please leave the cables unconnected.
NB: It is not possible to connect the Q-MIXI directly to the Q-MIXO
4 Use.
Well, is it necessary to explain how to use the LEVEL, PAN and Master Out adjustements of these modules?
There is abundant literature on the subject, and if you really have a question, do not hesitate to contact me personally
at [email protected]
I would be pleased to answer you because you made the effort to read this user manual up to here.
Q-MIXI, Q-MIX & Q-MIXO – User’s manual © - Revision 2.0 - Page 7
5 Miscellaneous
5.1 Disclaimer
All rights reserved. Reproduction in whole or part of this document is prohibited without the express permission of
ALYSEUM.
© 2011-2021 ALYSEUM.
The information and specifications described in this manual are subject to change without prior notice.
Throughout this manual, trademarked names might be used. We state herein that we are using the name to the
benefit of the trademark owner, with no intention of infringement.
5.2 Warranty and repair
ALYSEUM warrants to you, the original purchaser, that each of its products will be free from defects in materials and
workmanship for a period of two years following the date of purchase.
This warranty does not apply to any products which have been repaired or altered by other than ALYSEUM, or which
have been subject to ESD, moisture, abuse, accident, improper installation or use.
ALYSEUM assumes no liability as a consequence of such events under the terms of this Warranty.
Please, consult your dealer for more details or visit our support page on alyseum.com/support before any action.

This manual suits for next models

2

Popular Music Mixer manuals by other brands

Xenyx 1204 user manual

Xenyx

Xenyx 1204 user manual

Audio Gear Obsession SUMMINGFACILITY user manual

Audio Gear Obsession

Audio Gear Obsession SUMMINGFACILITY user manual

OBH Nordica Power Mix 200 Instructions for use

OBH Nordica

OBH Nordica Power Mix 200 Instructions for use

Studiomaster MIXDOWN owner's manual

Studiomaster

Studiomaster MIXDOWN owner's manual

Scott DJX 480 PK user manual

Scott

Scott DJX 480 PK user manual

Omnitronic EM-280 user manual

Omnitronic

Omnitronic EM-280 user manual

Toa D-2008SP operating instructions

Toa

Toa D-2008SP operating instructions

Mackie 406M HOOK-UP GUIDE

Mackie

Mackie 406M HOOK-UP GUIDE

Phonic POWERPOD1860 Service manual

Phonic

Phonic POWERPOD1860 Service manual

Whirlwind MIX-5 Operation manual

Whirlwind

Whirlwind MIX-5 Operation manual

Pioneer DJM-850-K operating instructions

Pioneer

Pioneer DJM-850-K operating instructions

Realistic 32-1200C owner's manual

Realistic

Realistic 32-1200C owner's manual

Total Recall VR TRVR Audio Mixer quick start guide

Total Recall VR

Total Recall VR TRVR Audio Mixer quick start guide

Comica CVM-AX1 user manual

Comica

Comica CVM-AX1 user manual

Behringer PRO MIXER VMX1000USB quick start guide

Behringer

Behringer PRO MIXER VMX1000USB quick start guide

Life Fitness M051-00K99-0004 Operation manual

Life Fitness

Life Fitness M051-00K99-0004 Operation manual

Pioneer DJM-900NXS2 operating instructions

Pioneer

Pioneer DJM-900NXS2 operating instructions

Yamaha DM 2000 Version 2 owner's manual

Yamaha

Yamaha DM 2000 Version 2 owner's manual

manuals.online logo
manuals.online logoBrands
  • About & Mission
  • Contact us
  • Privacy Policy
  • Terms and Conditions

Copyright 2025 Manuals.Online. All Rights Reserved.