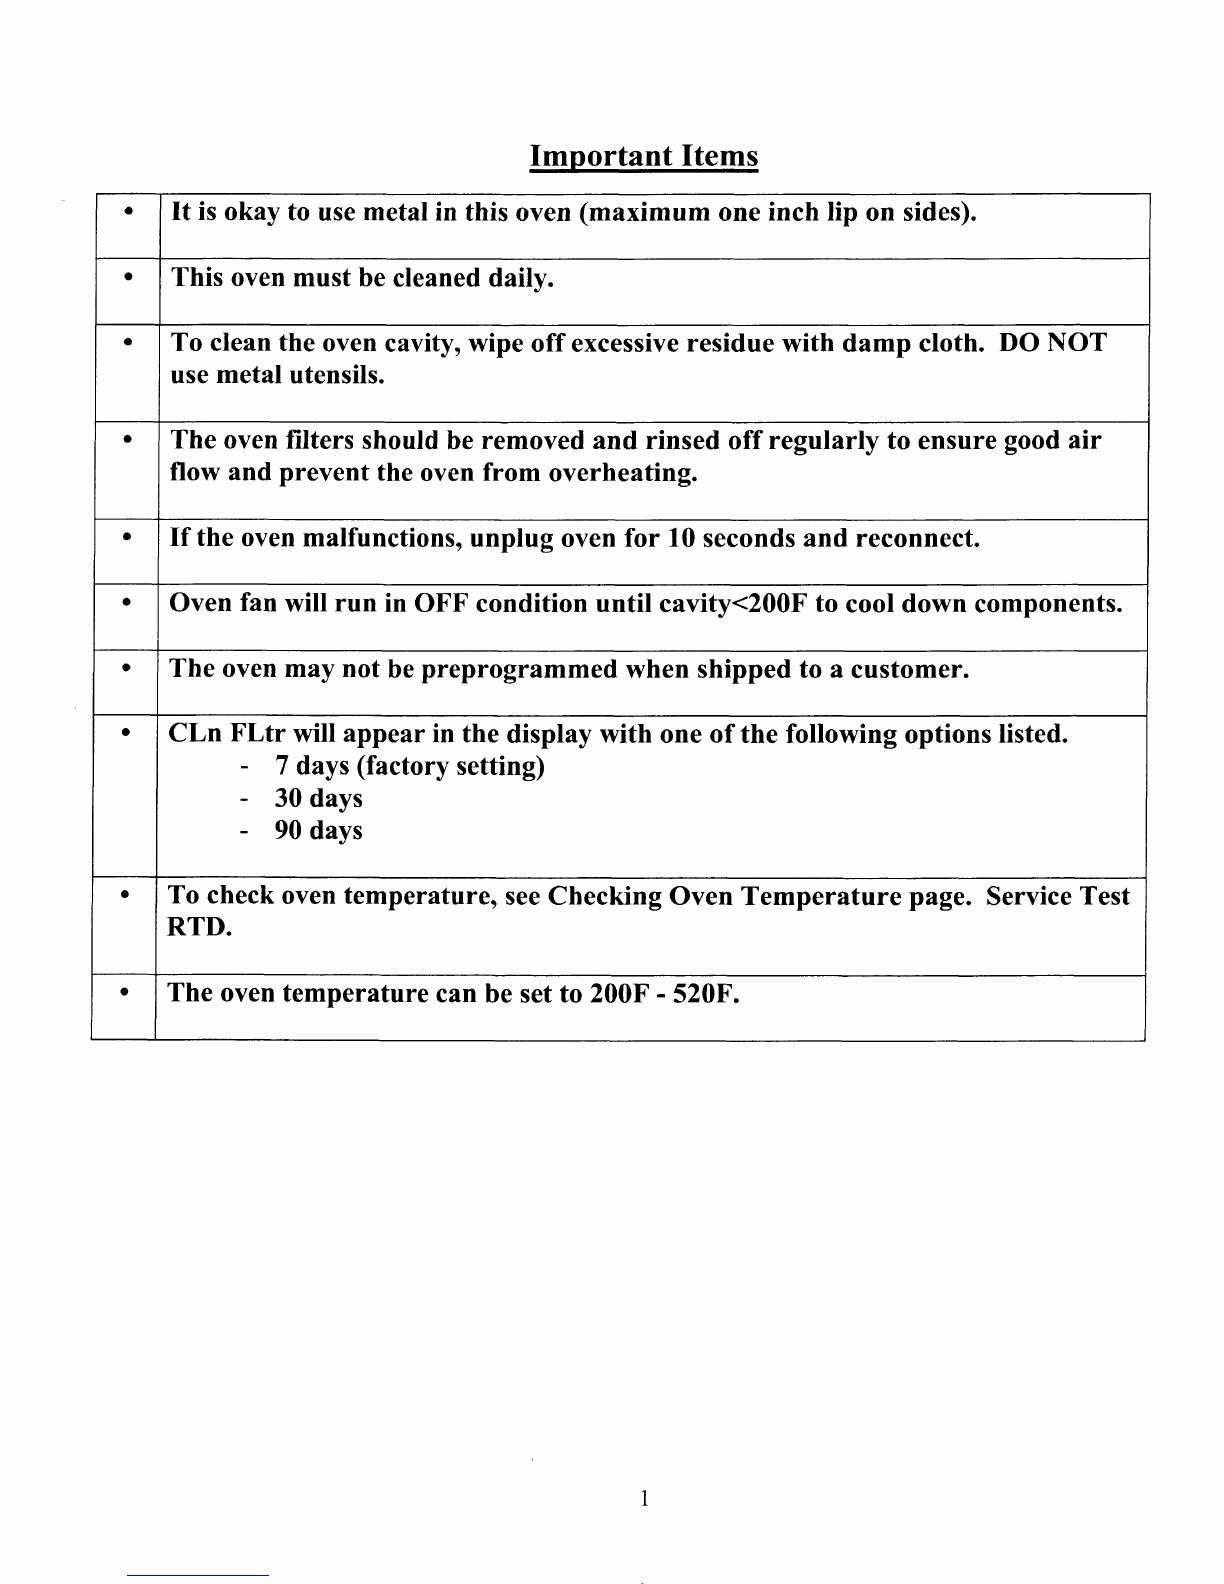
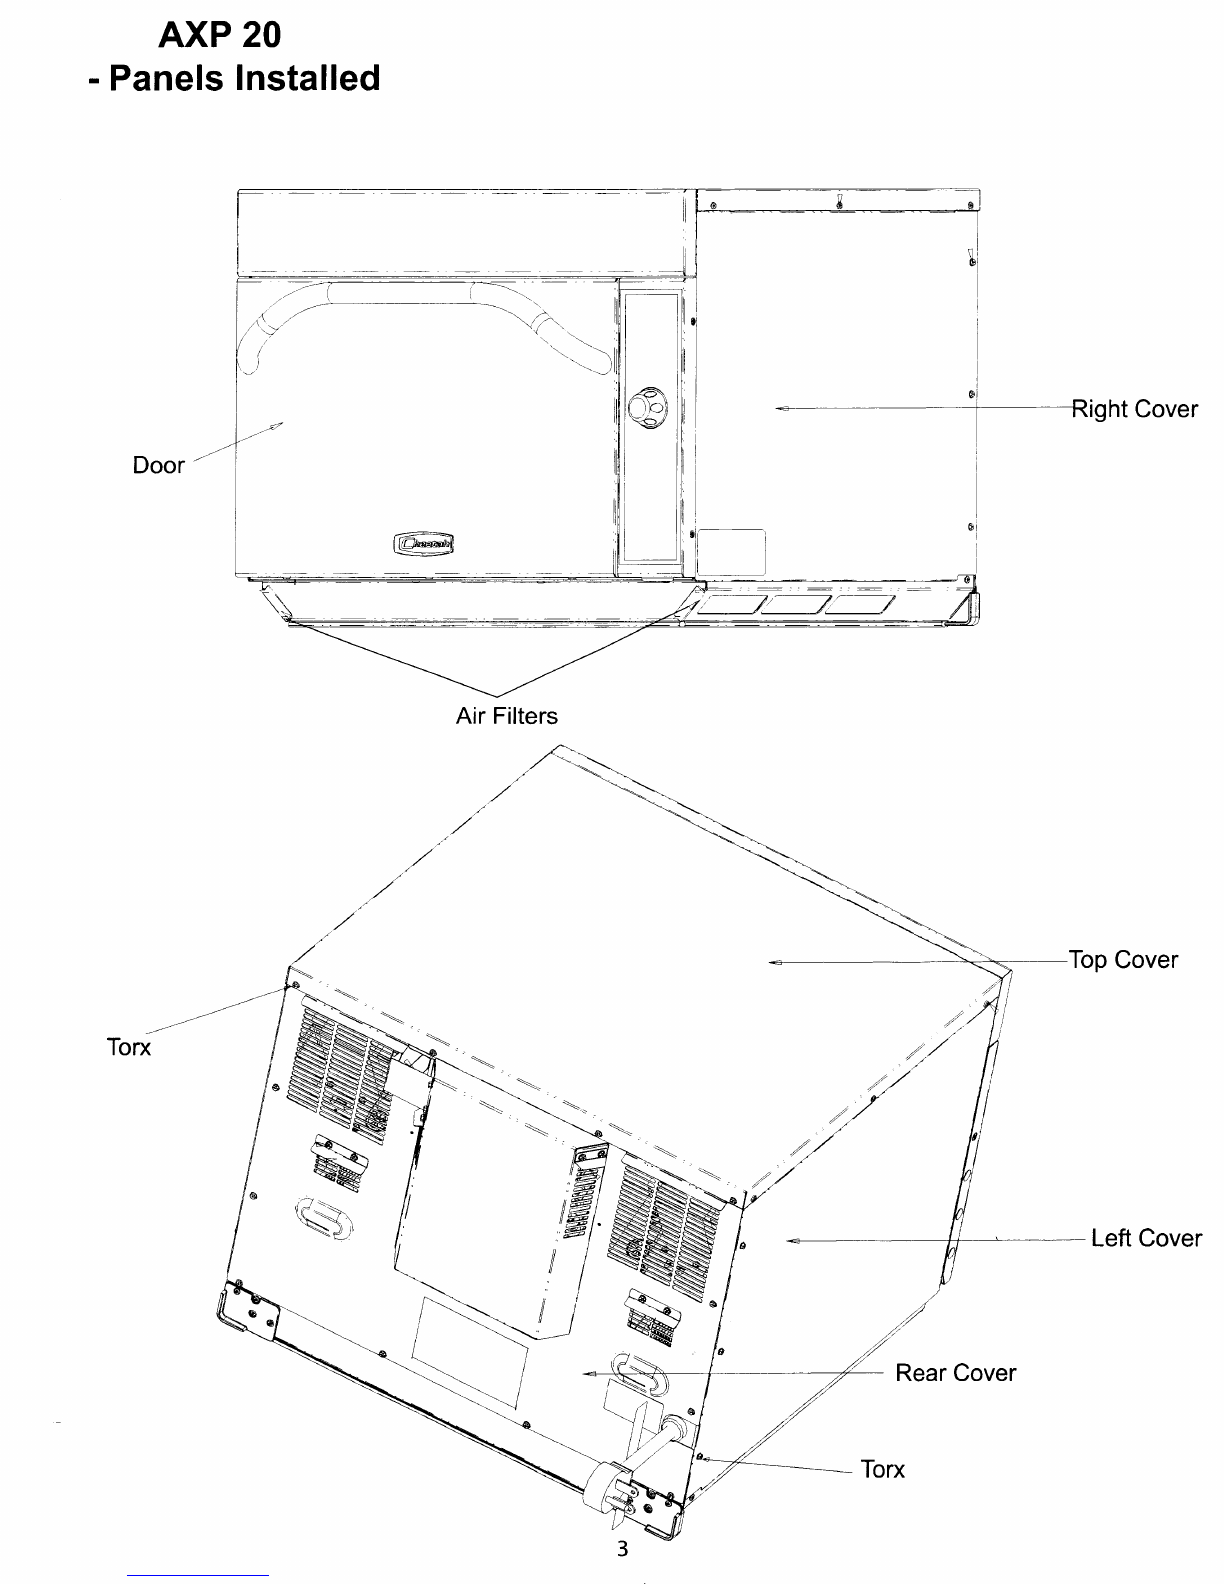
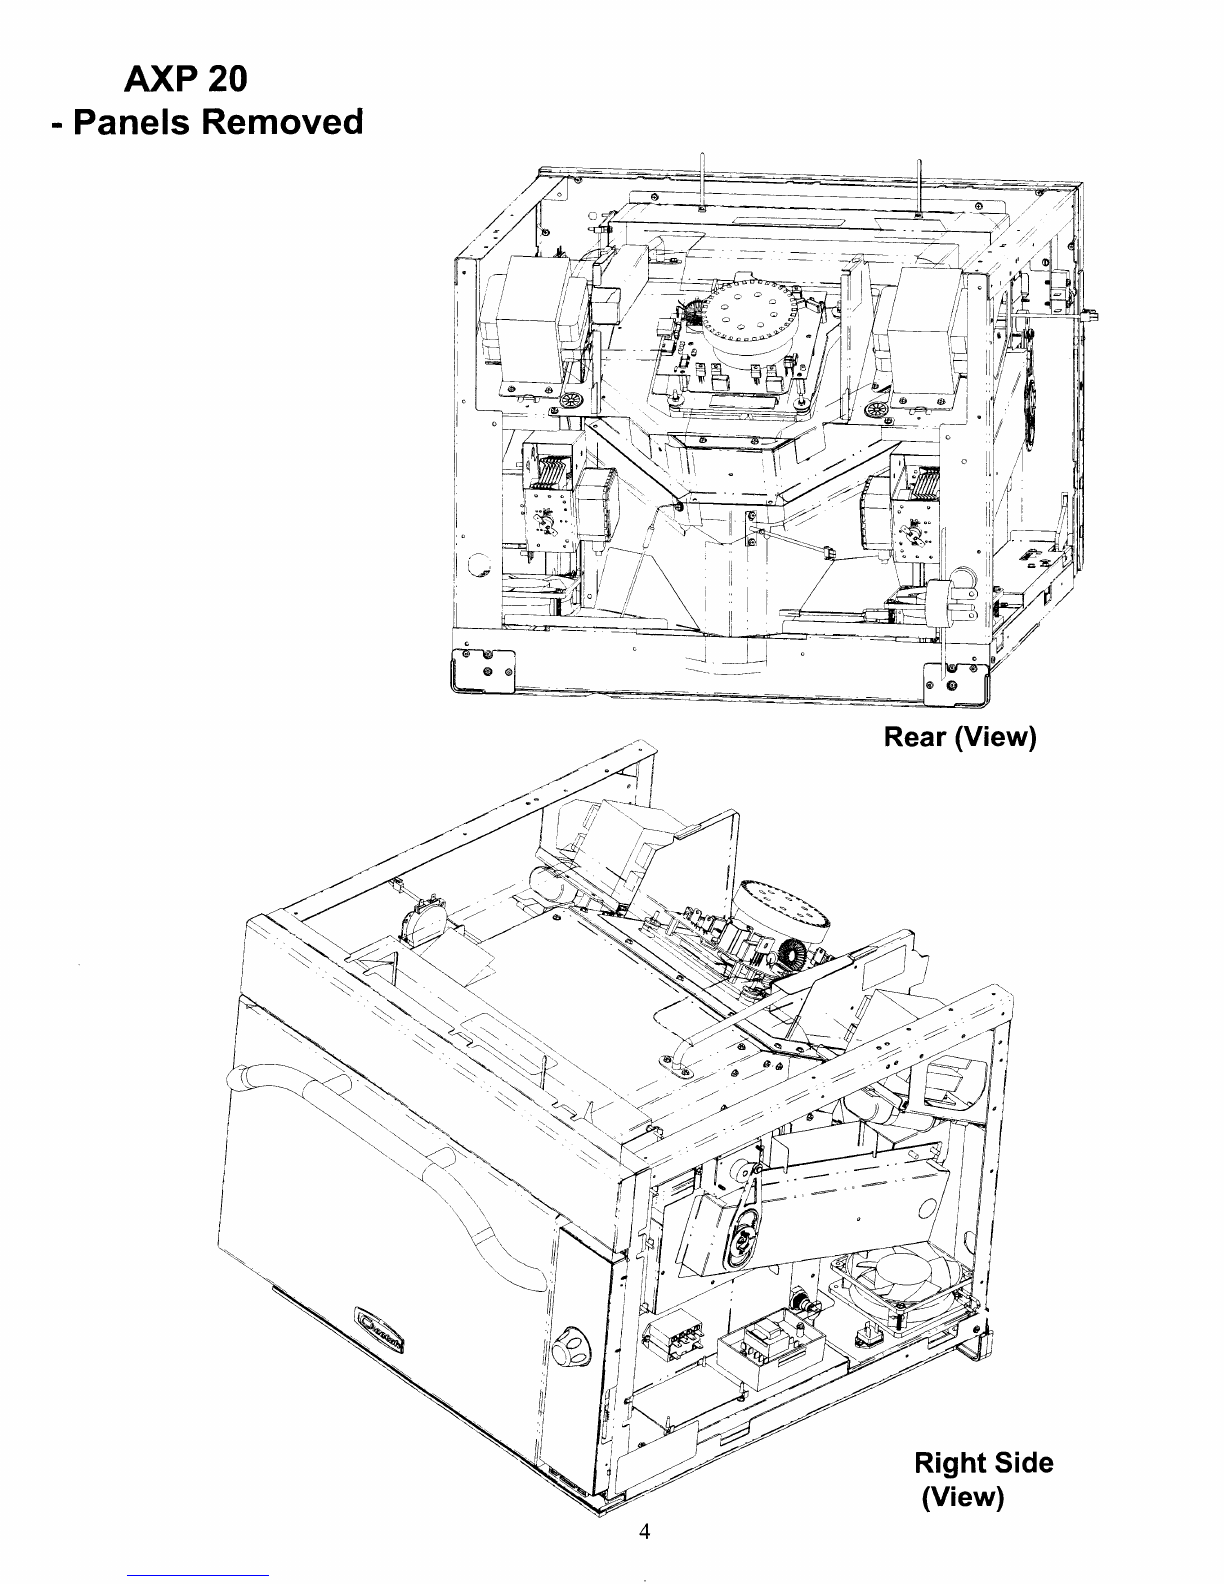
Amana AXP20 Installation guide

Trarning
Manual
High
Speed
Combination
Oven
AXP
20
Pl333601
M
60
Hz
August,2007 /lmsna'

Important Items
aIt isokayto use
metalin thisoven
(maximum oneinch lip on sides).
aThisoven
mustbe
cleaneddaily.
oTo cleantheoven
cavity,wipeoff excessive
residue
with damp cloth. DO NOT
use
metal
utensils.
aTheovenfiltersshould
be
removedand rinsed
off regularlyto ensure
good
air
flow and
prevent
the
oven
from overheating.
aIf theovenmalfunctions,
unplugovenfor 10
seconds
andreconnect.
oOven
fanwill run in OFFconditionuntil cavity<200F
to cooldowncomponents.
aTheovenmaynotbe
preprogrammed
whenshippedto acustomer.
OCLn FLtr will appear
in the displaywith oneof the following options
listed.
- 7days
(factorysetting)
- 30days
- 90
davs
oTo check
oven
temperature,
seeCheckingOvenTemperature
page. Service
Test
RTD.
aTheoventemperature
can
besetto 200F
- 520F.

AXP20
2081230Y, 60H2
Models AXP2O
PowerSource
VoltaseAC 208t230
VAC
Amperape
(Sinele
Unit) 30A
Frequency 60Hz
Single
Phase,
3wire grounded X
Receptacle 6-30R
PIug 6-30P
Power
Output - Microwave
Nominalmicrowaveenergy
GEC705) 2000
Watts
Operating
Frequency 2450
MHz
Power
Consumption
Microwaveonlv 4200
Watts
Convectionfan 425
WattsI 6200
RPM
Radiantheater 3000Watts
Convection
heater 2000
Waffs
Combination 5300Watts
Dimensions
Cabinet
(in / cm) 25" 63.5cm
width 20.25" 51cm
Heieht 25.625" 65cm
Depth
Oven
Interior (in / cm) 16" 41cm
width 7.75" 20
cm
Height 15" 38cm
Depth(includes
cordbracket on back)
Weight (Ibs.
/ ke)
Uncrated 150lbs. 68
ke

AXP
20
-Panels
Installed
Door'
-"-/
Tox
ight
Cover
Top
Cover
LeftCover
\
,Q'-t- -
w
s
T
ii
-.\
t
'''t ---
tt'
,(. ..t .."4.
,, -..j' *.. .\.
(' "''.- -\
_) ''-..-l
r::=:\
llr[fuffi||
\:_, 0l
\
Air
Filters
RearCover

AXP
20
rPanels
Removed
Rear
(View)
I
l
I
/
Right
Side
(View)

-
contro,ffi"'lorsembty
Touch
ScreenDisplay
DataKeyPlug
DisplayBoard
Holder
DisplayBoard
Caution: Do
not
touchscreendisplay
bythesides.
Thismay
damagethe
display
circuitry.
Handleusing
thecorners.
ata
Key
Board
Board
Holder
m
br
Touch
Panel
Assembly

AXP20
-Gircuit
Boards
-Oven
Relay
-Limiter
-Triac
-
Thermocouple
-Cooling
Fans
-Gonvection
Motor
-TempSensor
Convection
Motor
Main
Board
Relay
Board
Oven
Relay
PowerSupply
Board
(24VDC)
Snubber
Thermocouple
Limiter
Triac Cooling
Fans

A)(P20
- HV
Transformers
-Magnetrons
-Fuses
-Sensor
-Triac's
-Magnetron
TCO's
-Gapacitor
/ Diodes
Capacitor
Diode
(Right
Side
Legend
TRI-Magnetron1
TR2
-Magnetron
2
TR3
-ConvectionHeater
TR4
-Radiant
Heater
HighVoltageTransformers
Magnetrons
Fl-
Main
Fuse
F2
-ConvectionMotor
F3
-Magnetron
1
F4
-Magnetron
2
F5
-ConvectionHeater
F6
-Radiant
Heater
Temp
Sensor
(RTDConvection) Small
Fuses
F2,F3,F4
(12
amp)
Triac
(TR1)
riac
gRz;
riac
gne;
Large
Fuses
F1,F5,F6
(25
amp)
Capacitor
Diode
(Left
Side)
Magnetron
TCO's

AXP
20
-Interlock
Switch
Adjustment
WireHarness
Connectors
Whenthedoorisopenedor closed,
theleft ioor hinge activatesthe
secondawI monitor
switches.
1.
2.
3.
4.
Removeair channelcover.
Connectanohm-metertowire harness
(asshown
in Figure 11
Loosenmounting
screws.
Slide
adjustmentleverfor properswitchactivation.
NOTE: To
ensure
proper
switch
adjustment,
theswitchmounting
screws
MUST
betightenedafter
eachadjustment
prior
totestingthedooralignment.
NOTE: The
switchassembly
shouldactivatewhen
thedoor
gap
is approximatelv
r/o
inch 8
SwitchAdjustmentLevqr
Mounting
Screws
Figure
1

AXP20
-Stirrer
Motor
-Gam
-Rack
Gear
-Str?p,Rack
Gear
-
Ant.
GearClip
StirrerMotor
Cam
Rivet
(Plastic)
Rack
Gear
Snap,Rack
Gear
Ant.Gear
Clip
See
Detail
Below

AXP20 Quick Start Refercnce
Guide
High Speed Commercial
Combination Oven
So...howdo I use
it?
Rrt, tu Produtt
S&0^
ALanual
_fo,
S$tryStateruents
CompleteOwner's
Manual
availableonline
Theovencontrolcanbeusedthree
ways
Touch
Screen:
Press
the
displayed
pad
to
perform
thatoperation
Keypad:Pressnumbersfor
preprogrammed
menuitemsortoentertimeortemperature
Dial:Rotate
dial
tomove
through
items
onthescreenand
press
toselect.
Gooking with Pre-programmed Pads
To cookfood usingpre-programmed
menuitems
1. PreheatOvenbypressing
ON PREHEATorrotatedial
untilON PREHEATishighlighted,Pressknobto select.
2. Statusbarshowsovenpreheating
andtemperature.
Whenovenreachestemperature
"READY"
displays. ,.:'..
.1rf
,,,.....
F,RE}lEiB:f
ffiffi
t t.i*N
{:JL-
CHANGETEMP
-
Change
Preheattemp
MANUAL
COOK
- If
allowed,enter
manualcookcycles
l,'
:
,ri:lr::i.,
:if,Xm$:,'.|li:l:i:i],
.'..'.:..ffffi,',,,i'
.1...1fftr!*l'..'
,.'':.l;.ffi.i::ll:'
ffi,
intc,Riol9$ll t. G lolrtf,Y
Programming or
Ghanging Preheat
Setting
Thisovencanbeset
to a
preheat
temperature
between
21A
"F and 500'F.
To program the preheat
setting:
Oven
mustbe
plugged
in.
Press
CHANGE
TEMPPad
Rotateknobuntil
CHANGE
TEMP
iS
highlightedand
press
knobtoselect.
Enterdesired
temperature
byusing
the
numeric
key
pads.
Rotate
knobuntil
desired
temperature
is
displayed
and
press
knobtoselect.
PressSAVE.
3.
4.
5.
6.
Press
"MENU"
orrotateknob
until
"MENU"
is
highlighted
and press
knob.
Rotate
knobuntil
menuitem
or menu
group
is
highlightedor entermenuitemnumberusingkeypad
andpress
knob.
(Repeat
stepif another
menu
group
selection
is displayed.)
Open
oven
door,
place
foodinovenandclosedoor.
Cookingcyclebegins.
At endof cookingcycle,
ovenbeepsandanddisplays
.DONE.
REMOVEFOOD
FROMOVEN"
Ready Screen
Thesearethe optionsdisplayed
after
preheating
theovenfor
HighSpeedCooking.
1.
2.
MENU
- Programmed
menu
items
PROGRAM
- lnput
itemsinputto save
toyourmenu
Instullution 4.
ffffill:f, 1
Oven Glearances
A-For NorthAmerican
(UL/CSA)
models,
allowat least2" (5.1
cm)of clearancearoundtopofoven.
Forlnternational
(50Hz)
models,allow
atleast12"
(30
cm)of clearance
around
top of
oven.Proper
air
flow
aroundovencoolselectrical
components.
Withrestricted
air
flow,
oven
maynotoperate
properly
andlifeofelectrical
parts
is reducec.
B-Allow at least
2"(5.1
cm)between
airdischargeon back
of
oven
andback
wall.
C-Allow at least
5"(12.7
cm)of clearance
aroundsides
of oven.
l0

tufr,
Using MANUAL GOOK
Tocookfoodusing
a specificentered
timeandpower
level.
lltlft,i,ilOGK
::iri,l;tf:l::::i!;i:::i,ti3r:!::i!;
:i,!:
:
:::iPgluEn ll' i:::::::
: :FAtl ilelgl: ::'..:,lR . t0lk ..
ffi
,:
:r:Ftft' :,:,r
:r!*j,a':i::::::r:ii:il:i:*B.rffi tlf$6::,it:irj
',..q4L,:.:, ila'9il:.:..:,
::'
:l|1,, . tf t?..:;:i:'
': liltAdt, :'i
:
::ri,t:ii:r:iii::i!;l::'tlLi lt:tl'|, :i,!i,:
t:ttl,,' .'t?r, : Fcryltttr*
.'l*r} : ' iiorii. ..1R.
.
-. rf0t
i::i:-i,f4,,etlr:lt:ii:i!::'r.4,.
:: Ilitll :al;tt :r:'
:
:::t*tiF,!::i:::i:r:a?tt
: ::!
: :i*glvlt:tllit. r:
tttf tlt% lh, flrsn
0,':,0o:og
1.
2.
3.
4.
5.
6.
7.
8.
9.
10.
IHJ..:.l;::J
Select
MANUAL
COOKoption
onthe
READY
screen.
ForStage1,inputdesired
cooking
time
usingthe
key
pad
orrotateknob.Pressknobto
select.
Inputdesiredtemperatureusing
thekey
pad
orrotateknob.
Pressknob
toselect.
Rotateknob
untildesired
microwave
cooking
power
is
displayedand
press
knobto
select.
Rotateknob
untildesired
cooking
fan
speed
isdisplayed
andpress
knobtoselect.
Rotateknob
untildesired
heating
setting
is
diplayedand
press
knob
toselect.
Repeatsteps2-6for
each
cookingstage,ifmorethanone
stageis necessary.
Place
food
in
oven
asindicated
on
theoven
display.
Pressstart
pad
ortouchscreen
to start.
Atend
ofcookingcycle,oven
beepsanddisplays
"DONE.
REMOVEFOODFROM
OVEN".
Note:
Tomoveto next
function
press
dialonly.
Quick Start Refercnce
Guide
NEW
-Add a new
men
item
BACK
- Gotoprevious
screen
lo Produrt
.fqft\, l'Ianaa/
.fu, .frfrry .ftutenents
Setting Up Programmed Menu ltems
Select
PROGRAMfrom
theREADYscreen
byrotatingknobuntil
PROGRAMis
highlightedor bytouchingthe
pad
onthescreen
andthen
pressing
knobto select.
TheAXP20
oven
givesyou
flexible
control
to program
themenuitems.Programmed
menu
items
canbeentered
inthree
levels.
Eachlevel
allows
youto enter
the
descriptions
thatwill
appear
onthe
screen.
TheTopLevelmightincludeuptosixmenucatagories
(for
example,
Sandwiches,Entrees,Omlets,etc,)orit
mightbeorganized
by
quantity
(1,2,3,
4,etc.)orinotherwaysthat
support
your
business.
The Mid-Level
provides
anotheropportunity
to divide
theoptionsentered
atthe
Top
Level.
The BottomLevel
canbe programmed
for up to nine
menuitems.
lf
you
donotuseallthreelevels,the
unusedlevelswillnotbedisplayedonthe
screen.Setnumber
oflevelsinUserOptions
(MENU
SETTINGS).
PROGRAMMEN
t
Adding or Ghanging Top Level or Mid-Level Menu ltem
1. FromPROGRAM
MENUrotateknob
ortouchscreento select
NEW
to add
anitemorEDIT
orEDIT
MENU
to
changean item
(border
willflash).
2. Press
pad
to program.
3. Enternameformenuusingkeypad
digits
for letters,
numbersand
symbols.
[Forexample:PressKeypad
"2" threetimes for letter"c"l When
thecorrect
letter
isdisplayed,waituntil
cursormovestothenextspace.lfa
correction
is necessary,
press
CLEAR
toeraseonecharacterata time.
4. Press
SAVE
whenitem
iscomplete.
5.
PressEXITMENU
toreturn
to
READYdisplay.
EDIT
- Changean
existingmenu
item
DELETE
- Deletean
existingmenuitem
Keypad Character
I-#1
2a.b,
c,A,B,C,2
Jd,e,
I D,E,F,3
4g,
h,i,
G,H,
I,4
5j,k,
l,J,K,L,5
6mrnrorMrNrOr6
7p,g,r,
s,
P,
Q,
R,S,7
8t, u, v, T, lJ, V, 8
9w,
X,
y, zrWrX,YrZ,9
0&, o/o,
$,0
11

Quick Start Reference
Guide
fuft, to Product5'afe4Manua/
_fu,
S.oftry
S
tutuments
Adding Bottom Level Menu ltem
SelectNEW
from
the
PROGRAMMENU.
Select
desiredTopand
Mid-Level
menus.AtBottom
LevelMenutouchCREATEorrotateknobtoCREATE
and
press
knob.Rotateknob
untiiunused
menuitemis highlightedor until
item
to be
changed
is highlighted
and press
knob.
SelectMenultemfromdisplaybytouching
thescreenorrotatingtheknobto
highlightthe item
andthen
pressing
to select.
1. For
Stage
1rotate
theknobuntilthedesiredtimeisdisplayed
orenterthe
timeusing
thekeypadnumbers
andthen
press
theknob.
2. Thedisplay
will
advancetothetemperature.Rotatethe knobuntil
thedesired
temperatureisdisplayedorenterthetemperature
using
thekeypad
andthen
press
the knob.
3. Continue
toenterthemicrowave
cooking
power.
Keys0 t0I will
enter
a
power
level
of 0%to 90olo.Pressknob.
4. Rotatethe knob
untilthedesiredcookingfanspeedisdisplayed
or use
keypadtoenterdesired
speed.
Keys
0 to 9 willenter
a speed
of0o/oto 90%.
Pressknob.
5. Rotateknob
until
desiredcook
heater
levelisdisplayedor used
keypad
to
enter
desired
level.
Keys
0 to 9 will
entercookheaterslevels0'/o
to 90%.
Pressknob.
6. Touch
SAVE
lf necessary,repeat
steps1through
5for
stages2, 3,and4.
TouchCREATEorpress
knob
toCONFIRMOVERWRITE.
EnterltemNames
usingletters
on keypad andtouchSAVE.
Menu Examples
MidLevel
BottomLevel(Buttons) BottomLevel(Numeric)
t2
MIGROWAVE ONLY
Thisoptionisonly
available
ifthe
oven cavity temperatureislessthan
200"F.
lfthis
option isavailable,
itdisplays
attheON PREHEATmenu.
To
cooka pre-programmed
microwave
onlyitemfollowthesesteps:
1. Select
MICROWAVEONLY
by
touchingtheoptiononthescreen
or rotatethe knob
until
theoption
is highlightedandthen press
knob.
2. Selectdesired
item
byrotating
knobuntil
theitemis highlightedor
by entering
theitem
numberusing
the keypadandpress
knob.
3. Placefoodinoven.
4. Ovenwillbeep
whenfood
isready.
Adding MICROWAVEONLY
menu
item
SelectPROGRAMat
the
ON
PREHEAT
display.
1. SelectNEWfrom
thePROGRAM
MENU.
2. For
Stage
1,inputdesired
cooking
timeusingthe key
pador rotate
knob.Pressknobto select.
3. Input
desired
timeusing
thekey
pad or rotateknobto display
desiredtime.
Pressknobto select.
4. Rotateknobuntildesired
microwave
cooking
poweris
displayedor use
kyepad
to enter
desired
power
level.Keys0 to 9
willentera power
levelof 0%to
9O%.Pressknobto select.
Repeatsteps2-5
foreachcooking
stage,if more
thanone stage
is
necessary.
Press
SAVE.
Using
letters
onkeypad,enter
ltem
NameandtouchSAVE.
5.
6.
7.

"'i-
*
fufer toProdact
,lafe4,
Manaal
for Safe4,
Sunnents
Changing
UserOptions
Thereareseveraloption
you
can
changetocustomizetheoperation
oftheoven
for
your
business.Thetable
belowshows
theseoptions;thefactorysetting
isshown
inboldtype.
1. Oven
mustbeinStandby[rode.
2. Pressandhold
"2"
keypadforthreeseconds.
3. Chooseoptionbyturning
knob
tohighlightdesiredoption.Pressknoband
thenextoptionwillbehighlighted.Ormoveto
thenextoptionby
pressing
NEXT
OPTION.
Scrollbackwardsthrough
the
option
bypressing
PREVIOUSOPTION
pad.
4. PressSAVE
whentinished.
Quick Start RefercnceGuide
Settine Ontions
DoubleDigitEntry Sinsle
Dieit Entrv
Double
Dieit Entrv
Menu Setting 1Level
2 Levels
3 Levels
Manual Lock Manual Cookingallowed
ManualCookinsnotallowed
ProgramLock Chanees
to Programs
allowed
Password
needed
Door Open Opening Door resetstimer
OoeninsDoor Pausescookcvcle
Keybeep off
On
KeybeepVolume Low
Medium
Hieh
End of Cycle Beep Continuousuntil door
isopened
Threebeeps
once
Threebeeos
reneatins
KeyboardWindow otr
30seconds
60seconds
120seconds
PreheatWarninss otr
Warn if ovennot at temperature
TemperatureScale DesreesF
Degrees C
Clean
Filter otr
Displayseverv7 days
Displaysevery
30days
Displaysevery90davs
Auto Menu Fromoreheat.soto Readv
From preheat,goto Menu
Magnetron Control No Individual TirbeProsrammins
Individual TubeProsrammins
DataTransfer Besin transfer from Card to Oven
Benn transferfrom Ovento Card
Microwave Only Mode No Microwave Onlv Mode
Nlow MicrowaveOnlv Mode
Manual ProgramSave Do not saveafterManualCook
Save
after Manual Cook
No Load DetectWarnine Disable
Enable
GLEAN
FILTER
GLTRH FILTER
RE]!ilOVE
THE AIR
,F:|LTERS
AIdD,GLEAil
:m.
:.,ffii:
[I[I:E
Ct:Cltr
FEit1
''''':rHt$'mE:ssiG*''{$tt.
::
:::::
,GOFlTlhluETlt 8E $llofltfN ,
,1,:
',.,',,'.
,.1i.On,,l{iCt}U'RS
.i'. ' ' . 'r.
Whenthis messagedisplays,
Amana
Commercial
Products
recommends
cleaning
theair
filter
thoroughly.
Gleaning
theair
filter
will notshutoff
the message.
The message
will
automatically
stop displaying
after
24
hours.
Dependingon microwave
useand
environmental
conditions,
thefiltermay
needto be cleaned
moreor less
frequently.
Once
thefrequency
is
determined,
setthe option
for the
appropriate
timeframe.
Air
filter
and
ventsmustbecleaned
regularlyto prevent
overheating
ofthe
oven.
Referto Owner's
Manual
for
completecleaning
instructions.
13

AXP20Error
Codes
ErrorsarelistedintheformofXY,
whereX isthetypeoferrorandY isthe parameters
ordetails
ortheerror.
FatalErrors
ErrorType Parameters/Descri
ption
A- Control 0- Invalid
program
checksum
B- Keypad 0- Partiallyshorted
keypad
1
- Fully
shorted
keypad
C- CavityRTD 0
- Open
1
- Shorted
2- OutofRanqe
D
- HeaterRTD 0
- Open
1
- Shorted
2
- Outof
Ranse
E
- Mag#1TIC 0
- Open
1
- Shorted
2- OutofRange
F
- Mag
#2TlC 0
- Open
1
- Shorted
2- OutofRanqe
G- Overheaded 0- Cavitytoohot
1
- Heaterstoohot
2- Maqnetronstoohot
Non-FatalErrors
ErrorType Parameters/Descri
ption
M- CurrentSensor 0 - Insufficient
amperage
DataTransferErrors
These
errorsoccurduringtheuseofthedatatransfercard. lfanerroroccurs,thedatatransfer
will
becancelled,andtheerrormessageshallbeshownuntilSTOP/RESET
ispressed.
ErrorType Paramete
rs/Descri
ption
S- DoubleDigit 0- DoubleDigitCalledfor,butnotset
T- Memory
full 0- Themenumemory
space
isfull
U
- Memory
switch 0- Thememoryswitchsettingisinvalid
14

Gheetah
Service
Mode
Accessto Service
Mode
Screen
:,t:..:....,,. Whileatthe
MainScreen,
press
the
iiiti'i.iiiilii..,i,;i.iii::i'i,iiiiil...:.::.;i.,'i:'..'i;i:i1l'i.'ll.i'.fi.
lfOllOWing SeqUenCe On the keypad.
PREHEITTEIYIF
={If" F,
ffi,H
PREHEIT
Hidden
Pad
- 1
- 3
- 5
-7 -9
Theoven
will
gointoService
Mode.
LocationofHidden
Pad:
IilISROW*VEONLY
7 ,,1
,'fi -,
$,l,o
,,:,lFffiffil
'
',
i'f
'
P$0,
,,1
p,ltcE ll GfIilNGE
....,::
:.If'E
fff
t ::.
:,
::
nformation Thefirstscreen
willbeOvenInformation
showing
the
versionsofsoftware
inthe
control
boardsandinformation
about
door
cycles
andtubehours.
NEXTTEST: Pressthis
pad
togo
tothe
next
Service
ModeTest
PREVTEST: Press
this
pad
togo
tothe
previous
ServiceMode
Test
CLEAR
INFO: Pressthis
pad
to
resetthe
DoorCyclesand
TubeHours
backtozero.
EXIT: Pressthis
pad
to return
totheovens
Main
Menu
t5

CheetahService
Mode
netron
#1
Thenextscreen
willallowoperationof
Magnetron#1
andshow
thenumberof
amps
beingdrawn.
NEXT
TEST: Pressthis
pad
togotothe
next
Service
Mode
Test
PREV
TEST: Pressthis
pad
togotothe
previous
Service
ModeTest
TURNON: This
pad
will
togglebetween
turning
the
magnetrononandoff.
CANCEL:Pressthis
pad
toreturnto
the
Main
Menu
...,
'..H
E#tr''i'.i.1.l.'
,,..i'iilf.Eillf::li:.i...i:;i:'.::ii.i:F.,Eflfi.'
,tE*t,,,
Hil.N.G.f.'[, ifiU,ft
ltll.',,1,,1;.;.''1..
..
.....|B.'hl
'..,i.....;.1,1i
....r,i
T6

Gheetah
Service
Mode
ConvectionHeater
Screen
,, "
.
'.
*=**lGE,
hloo=
,
' ' ttrNilEGTto,*i"=f,TEE
t..*o****u,*r ffil lttlPn
,.i,.,.,'..
ilififsE.HT#HfiEiffi
o.Ei....'.lu.'r,l'',
Thenextscreen
will
allowoperation
of
the
convection
heater
and
showthe
numberof
amps
beingdrawn.
NEXT
TEST: Pressthis
pad
togo
tothe
nextServiceModeTest
PREV
TEST: Press
this
pad
togotothe
previous
Service
ModeTest
TURNON: This
pad
willtoggle
between
turning
theheateronandoff.
GANCEL:
Press
this
pad
toreturntothe
Main
Menu
HEIff
TE.ST.
GTHGEI
FRtil..'.
T.f$[......'.
rilIRflt
t,,,,,t:6N:,.i
RadiantHeater
Screen I
Thenext
screen
will
allowoperation
ofthe
ii;iiili
l GANGEL:
Press
this
pad
toreturntothe
,,,:.,r"I rr-:- lt--
;,,,,'
IMainMenu
t7

CheetahService
Mode
ConvectionFan
- LowS
Screen
..'I
.
.
.l'
..lli',']'ts*Efivl:GE.I
f!il
nue
.''.'....',.l'li.....
l.li.
.l.:li.i.
i.l.GsltI.TE'GTtuftl,.rfi
N.
.fit
HRE}
T..n$ffi,.1riif|$:il:['lFE
; ,t t . , ,','., . t ..
fi0$rpm.ffi.:'.lE
lfs.E|.''
.
..1.,.
.:',
..li.i
Thenext
screen
will
allow
operation
ofthe
convection
fanata lowspeed
andshow
the
numberofamps
beingdrawn.
NEXT
TEST: Press
this
pad
togotothe
next
Service
ModeTest
PREVTEST: Pressthis
pad
to
gotothe
previous
Service
Mode
Test
TURNON: This
pad
willtogglebetween
turning
theconvection
fanonandoffata
low
speed.
GANGEL:Pressthis
pad
toreturntothe
MainMenu
i:,rufffr:
,.,.'ilH,ST,.,
Gil.H'G.;Et'
FiFES
T'f.SF
Trf:ffltf
.';.,,'ll,N,...,.,
Thenextscreenwillallowoperationofthe
,,,,',:,,r
Iconvection
fan
ata highspeedandshow
the
,'."' Inumberofamps
beingdrawn.
,,,,:
INEXTTEST:
Press
this
pad
to
go
tothe
,,,,
.,,,,''
I next
Service
ModeTest
PREVTEST: Press
this
pad
togotothe
previous
Service
ModeTest
TURNON: This
pad
will
togglebetween
turning
theconvection
fanonandoffata
highspeed.
CANCEL: Press
this
pad
to return
tothe
MainMenu
;..r.tiil1fl
Erffiiitirrt.tlil;
,i':i:i:iiriii:i:,it$ffi#tiri.Il
;:i:l
18

CheetahService
Mode
Goolinq
Fan
Screen
, ', $Eil ISEfilODE
,
i.'...#tr$tI*o.ffi
, *u**El{T
DRAI{*it.O
U*t*
.i'
.o**=FffiBffi:Wu,=t.,.
,.
.'1
Thenextscreen
willallowoperation
of
the
cooling
fanshow
the
numberofamps
being
drawn.
NEXTTEST: Pressthis
pad
togoto the
nextService
Mode
Test
PREV
TEST: Press
this
pad
togotothe
previous
Service
Mode
Test
TURNON: This
pad
willtogglebetween
turningthe
cooling
fanonandoff.
CANCEL: Pressthis
pad
toreturntothe
MainMenu
rurfiT
. E$T.
fi$iNG.Eit.
f,nt,S........,.i...
fif, Sf ,,::,,;.l
',.....,
fU.ftlrl
,':..fif::.r..l
AntennaMotor
-"**
il.'il
i:lil;,
I';*H.ilffi$
F
iffifi$$i
:i
.,.
'l.i
.
.
i...
I
','.'
. ' *NTGHNR.MOT(lfi,,,
.,,,-,,,.,.,,,,.,..,,,,
The
next
screen
willallow
operationof
the
antenna
motorshowthe
numberofamps
beingdrawn.
NEXTTEST: Pressthis
pad
togotothe
next
Service
ModeTest
PREVTEST: Pressthis
pad
togotothe
previous
Service
Mode
Test
TURN
ON: This
pad
willtogglebetween
turningtheantenna
motor
onandoff.
CANGEL: Pressthis
pad
to return
tothe
MainMenu
r9
Other manuals for AXP20
1
Table of contents
Other Amana Microwave Oven manuals

Amana
Amana MVH220E User manual

Amana
Amana AMV2307PFW User manual

Amana
Amana LD10D2 User manual

Amana
Amana AMV4204AAB User manual

Amana
Amana AMC6158BCB User manual

Amana
Amana AMC5101 User manual

Amana
Amana RMC800E User manual

Amana
Amana AMV1160VA User instructions

Amana
Amana AMC2165AB User manual

Amana
Amana 12392746 User manual

Amana
Amana RCS10TS User manual

Amana
Amana MV-194S User manual

Amana
Amana AMV5206BAW User manual

Amana
Amana Radarange AMC5108AAB User manual

Amana
Amana AMC5101AA User manual

Amana
Amana AMC5143BCS User manual

Amana
Amana ACM0720A Owner's User manual

Amana
Amana RCS10PBDA User manual

Amana
Amana AMV5164BA User manual

Amana
Amana AMC4080AA User manual