manuals.online logo
Brands
  1. Home
  2. •
  3. Brands
  4. •
  5. Antenna Pros
  6. •
  7. Antenna
  8. •
  9. Antenna Pros AX-912 User manual

Antenna Pros AX-912 User manual

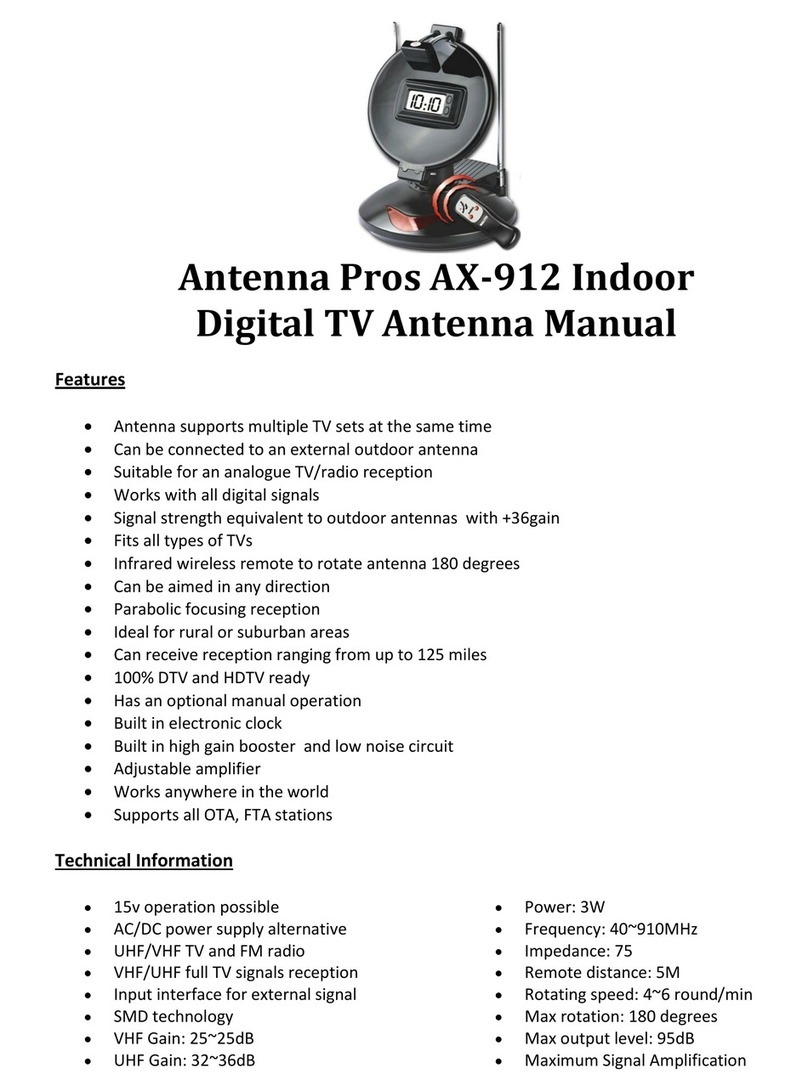
Antenna Pros AX-912 Indoor
Digital TV Antenna Manual
Features
•Antenna supports multiple TV sets at the same time
•Can be connected to an external outdoor antenna
•Suitable for an analogue TV/radio reception
•Works with all digital signals
•Signal strength equivalent to outdoor antennas with +36gain
•Fits all types of TVs
•Infrared wireless remote to rotate antenna 180 degrees
•Can be aimed in any direction
•Parabolic focusing reception
•Ideal for rural or suburban areas
•Can receive reception ranging from up to 125 miles
•100% DTV and HDTV ready
•Has an optional manual operation
•Built in electronic clock
•Built in high gain booster and low noise circuit
•Adjustable amplifier
•Works anywhere in the world
•Supports all OTA, FTA stations
TechnicalInformation
•15v operation possible
•AC/DC power supply alternative
•UHF/VHF TV and FM radio
•VHF/UHF full TV signals reception
•Input interface for external signal
•SMD technology
•VHF Gain: 25~25dB
•UHF Gain: 32~36dB
•Power: 3W
•Frequency: 40~910MHz
•Impedance: 75
•Remote distance: 5M
•Rotating speed: 4~6 round/min
•Max rotation: 180 degrees
•Max output level: 95dB
•Maximum Signal Amplification
What’sinthebox
•Pre-assembled AX-912 antenna
•Infrared Remote Control
•AC adapter (pre-connected)
•Co-axial cable (pre-connected)
•Instruction booklet
Connections
•DC 12V Input
•
: Optional
alternative power supply
Antenna Ext
•
: To connect to
outdoor antennas
TV
•
: Coaxial cable that sends
signal from antenna to TV
Power Input
: Provides power to
the antenna
SettingUpYourAntennain3EasySteps
1. Place your antenna on a sturdy, flat surface away from large metallic objects
2. Plug the Power Input in to a wall socket or outlet
3. Run the cable labeled “TV” to the back of your TV where it says “Antenna/Cable In” and be sure
to push it in fully before securing. To secure it, turn the nut clockwise (to the right)
•If you have an Analogue TV
4. Optional: If you’d like to connect the AX-912 to an outdoor antenna for amplified strength,
connect the coaxial cable from the outdoor antenna into “Antenna Ext” instead of your TV.
: Connect the cable labeled “TV” to the back of
your converter box, and then connect your converter box to your TV.
Now it’s time to turn on your TV and prepare it to accept your antenna. Each TV brand will vary, so for
this example we will use an LG LCD TV as reference.
1. Go to the TV’s Menu screen. Usually you can get there by pressing “Menu” on your controller
2. From Menu, go to Channel Settings
3. Be sure that you have selected “Antenna” for your TV. You may find that it has been set to
“Satellite” or “Cable” by default
4. Select “Auto Tuning” or “Scan.” This will update your channel information and at the end your
TV will tell you how many channels you are receiving and whether your signal is strong or weak.
5. Your antenna is now ready for watching! If you received “Weak Signal” you may want to adjust
the rabbit ears and make sure your dish is pointed in the correct direction for optimal signal.
HowtoSettheDateandTime
There will be two oval buttons to the right of your
antenna’s display screen. The bottom button we will call
the “Mode” button and the top button is for adjusting the
number.
1. First make sure the colon is blinking. Press the
Mode button once quickly. You’ll now see a single
digit on the left. This digit represents the Month. Set
it to the respective month by using the top button.
You cannot use the Mode button to make the
numbers decrease, you can only use the top
button to increase the numbers until they reset.
(Example: If the number were 3 and it was February, you would need to keep pressing the top button
until it becomes 10, 11, 12, 1, and then finally 2)
2. Press the Mode button once more, and you will see a two-digit number to the right of the screen.
This is the day of month. Set it with the top button, and then press the Mode button once more.
3. We now see a single digit to the left, a blinking colon, and then either the letter A or P. This stands
for either AM or PM. In order to change the hour you must press the top button until it reaches your
desired number.
4. Press the Mode button once more to set the minutes. Once you have finished setting the minutes with
the top button, press the Mode button one last time to complete the setup. You should see the
complete time, and the colons should be blinking. If you hold down on the Mode button, you will
see the date you have set.
AdditionalInformation
•This antenna is a directional antenna, so it is important that you make sure to have the dish facing
whichever direction most of your broadcast towers are in
•Tilting the dish upwards does not necessarily help you improve the signal of your antenna. If
anything, you may receive fewer channels that way.
•If the dish on your unit is not rotating, it could be because you have it tilted too upwards. Try
resuming its original position, and then rotating it.
•The rabbit ears on the unit work like your traditional rabbit ears, so you can extend, point, and
adjust them at will. However when turning the rabbit ears toward or away from you, we
recommend bending the ear downwards before swiveling. This will allow you to adjust the angle
at which you want it facing much easier. Only a light pressure is needed to adjust the ear. Be
careful. If you have to exert force, you are bending it against its swivel point and may result
in damaging your antenna. If you feel the absolute need to, you may also grease the swivel
point so that it will rotate easier.
•If your antenna is mysteriously rotating, it could be that the remote for your television is
interfering with its signal, since they are both infrared. When adjusting your TV volume, try
pointing away from the antenna
•Alternatively, if you somehow lose the antenna remote and wish to rotate your antenna you can
do so either manually or by pointing your TV remote at the red screen on the AX-912. On your
TV remote hold down either the volume or channel up/down button, and you should see the green
light come on, and the antenna rotate.
FrequentlyAskedQuestions
Q: Do we need a converter box?
A: Yes you would need a converter box if you do not have a digital TV. This is the general rule for all
antennas, not just the AX-912 alone.
Q: How do I know if my TV is digital?
A: There are tell-tale signs.
•If the TV was sold as "HDTV" or "DTV," it's supposed to have an ATSC tuner built in to it, so it
is a digital TV. If it was sold as "HD ready TV," then it does not have a digital tuner.
•You can always check the specs in the owner's manual for your TV. Or if you no longer have
your TV's manual, you can go to www.google.com and search the make and model of your TV to
check.
•If your TV's menu has an option for "Scanning" (also sometimes called "Auto-Tune") for digital
channels, then it has an ATSC tuner. If it doesn't have a way to scan for digital channels, then it
doesn't have a digital tuner.
•If you purchased your TV before 2009, it may be an analogue TV so it’s best to always double-
check
Q: I have more than one TV in my house. Can this antenna be used for all of them?
A: Yes. You may split the coaxial cable, but do keep in mind that each time you split the cable there will
be a decrease in reception strength as it travels through the various cables before reaching each TV.
Another option would be to purchase a Distribution Amplifier, which will keep your signal strength
strong and has multiple other ports for you to run various cables. Antenna Hub has a Distribution
Amplifier
category that you can browse through to purchase one.
Q: I did not receive my DC Adapter, where is it?
A: The AX-912 is not supposed to come with a DC (Direct Current) Adapter, because you are already
provided with an AC (Alternating Current) adapter. They serve the same purpose – powering the antenna.
DC adapters are for people who want to plug it into generators, car outlets, etc. AC adapters are useful for
transmitting electricity over long distances and controlling the surge of electricity passed, so naturally it is
the ideal option for your home installation.

Other Antenna Pros Antenna manuals

Antenna Pros AX-912 User manual

Antenna Pros

Antenna Pros AX-912 User manual

Antenna Pros AX-969 User manual

Antenna Pros

Antenna Pros AX-969 User manual

Popular Antenna manuals by other brands

ASC Signal ES40K-1 Installation, operation and maintenance

ASC Signal

ASC Signal ES40K-1 Installation, operation and maintenance

Antennas Direct ClearStream 4 Assembly

Antennas Direct

Antennas Direct ClearStream 4 Assembly

Tarheel Antennas Stubby 75A instruction manual

Tarheel Antennas

Tarheel Antennas Stubby 75A instruction manual

Emos J0681 user guide

Emos

Emos J0681 user guide

KING Jack OA8400 owner's manual

KING Jack

KING Jack OA8400 owner's manual

Palomar PAL-OCF1606 product manual

Palomar

Palomar PAL-OCF1606 product manual

Audiovox TERK TV5 owner's manual

Audiovox

Audiovox TERK TV5 owner's manual

Winegard Rayzar instruction manual

Winegard

Winegard Rayzar instruction manual

THOMSON ANT1703BK operating instructions

THOMSON

THOMSON ANT1703BK operating instructions

Winegard RM-DM00 instructions

Winegard

Winegard RM-DM00 instructions

Telex ALP-600 instruction manual

Telex

Telex ALP-600 instruction manual

Ubiquiti RocketDish RD-2G24 installation guide

Ubiquiti

Ubiquiti RocketDish RD-2G24 installation guide

COBHAM HGA-7001 installation manual

COBHAM

COBHAM HGA-7001 installation manual

Novatel ANT-533 user guide

Novatel

Novatel ANT-533 user guide

Scout CRUISER Installation and user instructions

Scout

Scout CRUISER Installation and user instructions

JTS UDA-49A manual

JTS

JTS UDA-49A manual

Radio Shack Universal Attic Mount owner's manual

Radio Shack

Radio Shack Universal Attic Mount owner's manual

Naxa NAA-304 instruction manual

Naxa

Naxa NAA-304 instruction manual

manuals.online logo
manuals.online logoBrands
  • About & Mission
  • Contact us
  • Privacy Policy
  • Terms and Conditions

Copyright 2025 Manuals.Online. All Rights Reserved.